1
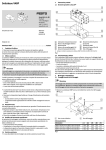
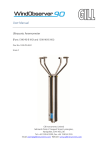
User Manual Data Solutions Platform (Parts 1955-105-0X-XX) Doc No: 1955-PS-0003 Issue 1 Gill Instruments Limited Saltmarsh Park, 67 Gosport Street, Lymington, Hampshire, SO41 9EG, UK Tel: +44 1590 613500, Fax: +44 1590 613555 Email: [email protected] Website: www.gillinstruments.com Gill Instruments Limited _____________________________________________________________________________________________________________ Contents 1. 2. 3. 4. FOREWORD ............................................................................................3 INTRODUCTION......................................................................................3 SPECIFICATION .....................................................................................4 PRE-INSTALLATION ..............................................................................6 4.1 4.2 4.3 4.4 Equipment supplied .......................................................................................... 6 MetStream 105 Part Numbers. ......................................................................... 6 Packaging ......................................................................................................... 7 Installation requirements ................................................................................... 7 4.4.1 4.4.2 4.4.3 4.4.4 4.5 Host system............................................................................................. 7 Software .................................................................................................. 7 Cables ..................................................................................................... 7 Mounting ................................................................................................. 8 MetStream Connections. .................................................................................. 8 4.5.1 4.5.2 4.5.3 4.5.4 4.5.5 4.5.6 4.5.7 4.5.8 MetStream Front Panel Connectors ......................................................... 8 Front Panel Status LED’s......................................................................... 8 Front Panel USB 2.0 Port ........................................................................ 8 MetStream Rear Panel Connectors.......................................................... 9 Rear Panel Power Socket ........................................................................ 9 Rear Panel Ethernet Socket..................................................................... 9 RS232/422/485 Connector..................................................................... 10 Power enable function ........................................................................... 10 5. INSTALLATION .....................................................................................10 5.1 Installation Guidelines ..................................................................................... 10 5.1.1 5.1.2 5.1.3 5.1.4 5.1.5 5.1.6 5.2 MetPak to MetStream Data Input Connection......................................... 11 Ethernet to Ethernet Connection ............................................................ 12 Cable length .......................................................................................... 13 Ethernet Socket Cable Wiring ................................................................ 13 Power supplies ...................................................................................... 14 Power over Ethernet Connection. .......................................................... 14 Connections.................................................................................................... 14 5.2.1 5.2.2 5.2.3 MetStream RS232 Digital Input Connections.......................................... 15 MetStream RS422 Digital Input Connections.......................................... 15 Mechanical installation........................................................................... 16 5.3 MetStream External Protection Box - Part 1955-PK-052 ................................. 17 6. METSTREAM GRAPHICAL USER INTERFACE ..................................19 6.1 Accessing the MetStream GUI using a PC and Ethernet Crossover Cable. .... 19 6.1.1 6.1.2 6.2 6.3 PC/Laptop Set Up using Gill MScan Software. ....................................... 19 PC/Laptop Set Up if Gill MScan Software is not available. ...................... 21 Accessing the MetStream GUI using a PC and a LAN Port Connection.......... 23 Accessing the MetStream GUI with a PC and a Wi-Fi Router ......................... 25 6.3.1 Using and Ethernet cable connection between MetStream 105 and a Wi-Fi Router............................................................................................................ 25 6.3.2 Using a Wi-Fi connection between MetStream 105 and a Wi-Fi Router. . 28 6.4 6.5 MetStream Front Page GUI Features. ............................................................ 33 MetStream Configuration (Administrator Use)................................................. 37 6.5.1 6.5.2 6.5.3 6.5.4 6.5.5 6.5.6 6.5.7 Login ..................................................................................................... 37 Exit/Reboot/Shutdown/Thru Mode/Logout .............................................. 38 Username and Password ....................................................................... 39 Date and Time ....................................................................................... 40 Dashboard Settings (Administrator Use) ................................................ 41 Data Logging ......................................................................................... 42 Input Device Settings ............................................................................. 45 ________________________________________________________________________________________________ MetStream 105 Page 1 Issue 1 Doc. No. 1955-PS-001 April 2014 Gill Instruments Limited _____________________________________________________________________________________________________________ 6.5.8 6.5.9 6.5.10 6.5.11 Network Settings ................................................................................... 48 Weather Observation Website (WOW) ................................................... 50 About..................................................................................................... 51 Thru Mode (Diagnostic Connection) ....................................................... 52 7. MAINTENANCE & FAULT-FINDING ....................................................57 7.1 7.2 7.3 Maintenance ................................................................................................... 57 Fault-finding .................................................................................................... 58 Returning Units ............................................................................................... 58 8. APPENDICES ........................................................................................59 8.1 8.2 8.3 Glossary & Abbreviations................................................................................ 59 Guarantee....................................................................................................... 60 Electrical Conformity ....................................................................................... 61 ________________________________________________________________________________________________ MetStream 105 Page 2 Issue 1 Doc. No. 1955-PS-001 April 2014 Gill Instruments Limited _____________________________________________________________________________________________________________ 1. FOREWORD Thank you for purchasing the MetStream 105 manufactured by Gill Instruments Limited. To achieve optimum performance we recommend that you read the whole of this manual before proceeding with use. Gill products are in continuous development and therefore specifications may be subject to change and design improvements without prior notice. The information contained in this manual remains the property of Gill Instruments and should not be copied or reproduced for commercial gain. 2. INTRODUCTION The Gill MetStream 105 is a robust unit which allows connection of a Gill Instruments MetPak Range Weather Station to its Digital input and with the use of its Ethernet Output or Wi-Fi output to a Router allow Weather Data to be viewed and logged over a PC network. The MetStream 105 can be used in conjunction with a Wireless Router, LAN or PC. After you have successfully set up the MetStream 105, we strongly advise that you then go back and read the rest of the manual to ensure that you get the best results from the MetStream 105. ________________________________________________________________________________________________ MetStream 105 Page 3 Issue 1 Doc. No. 1955-PS-001 April 2014 Gill Instruments Limited _____________________________________________________________________________________________________________ 3. SPECIFICATION MetStream 105 - Parts 1955-105-0X-XX Input Power Requirement (MetStream only) Voltage 9-30V DC Current 250mA max@12V DC (3W) MetStream 105 600mA max @ 12V DC, (7.2W max) including external sensor Power over Ethernet Wi Fi Transmit Power Baseband Modulation – WiFi Receiver Sensitivity – WiFI Built-in receiver (IEEE 802.3af-2003) - +15dBm typical for both 802.11 b and g - 802.11g: OFDM - 802.11b: DSSS/CCK - 54 Mb/s @ -74 dBm OFDM - 6Mb/s @ -90 dBm OFDM - 11Mb/s @ -88 dBm CCK - 1Mb/s @ -90 dBm DSSS Output Power Voltage Current Regulated 12V DC ± 10% Up to 300mA @ 12V DC Digital Input Communication Baud rates Formats Data Input Rate ASCII, RS232, RS422/485 4 wire, full duplex 1200, 2400, 4800, 9600, 19200, 38400, 57600 8 data, odd, even or no parity Up to 20Hz Digital Output Format Communication 8P8C Ethernet 10/100 BASE-T speeds/format Internal Storage Micro SD Card External Data Storage USB 2.0 Port Start Up Time Data Ready Dimensions Size Weight Materials External Construction 4GB with operating system and enough storage to log 1Hz data for 1 month. Expansion port supplied for external USB Data Storage, max of 32GB supported. Less than 90 seconds (MetStream box) from power up. 125mm long, 111mm wide, 34mm deep, antenna folded 205mm long with antenna extended. 0.28kg. Aluminium and Plastic ________________________________________________________________________________________________ MetStream 105 Page 4 Issue 1 Doc. No. 1955-PS-001 April 2014 Gill Instruments Limited _____________________________________________________________________________________________________________ Environmental Moisture protection Operating temperature Storage temperature Humidity EMC FCC Standards IP40 IP65 with optional Gill outdoor enclosure -20°C to +70°C -40°C to +80°C <5% to 95% RH BS EN 55024:2010 BS EN 55022:2010 CFR47 Part 15B Traceable to UK national standards MetStream Power Supply Unit - Part 026-04969 (Supplied with all MetStream Parts 1955-105-0X-XX) Input Voltage Range 100v to 240V AC @ 300mA max (50/60Hz) Mains Adaptors UK, Euro, US and AUS types supplied. Output Power Voltage Current DC Cord Regulated 12V DC ± 2% Up to 1 Amp (over current and short circuit current protected). 1.5 metres long with right angled 2.1 C +ve plug. Dimensions Size Weight 79mm long x 55.4mm wide x 37mm deep. 150 grams. Materials External Construction Plastic, PB free ROHS compliant. Environmental Operating temperature Storage temperature Humidity EMC FCC EMI SAFETY 0°C to +40°C -20°C to +60°C 5% to 95% RH BS EN 55024:2010 BS EN 55022:2010 CFR47 Part 15B BS EN55022 FCC (Part 15 Class B) UL60950-1 MetStream External Protection Box - Part 1955-PK-052 (Supplied with MetStream Part 1955-105-02-XX) Dimensions Size Weight Maximum Cable size Materials External Construction Environmental Moisture protection Install Temperature Operating temperature 335mm long x 220mm wide x 107mm deep. 1.5kg 5 x 2.5 mm sq. Thermoplastic. IP65 0°C to +40°C -20°C to +70°C ________________________________________________________________________________________________ MetStream 105 Page 5 Issue 1 Doc. No. 1955-PS-001 April 2014 Gill Instruments Limited _____________________________________________________________________________________________________________ 4. PRE-INSTALLATION 4.1 Equipment supplied MetStream 105. Universal Ac supply input, 12v dc 1A output supply. 2 Metre one to one Ethernet lead. 1 Metre crossover Ethernet lead. MetStream IP address MScan Software, on the CD. MetStream 105 User Manual on the CD (this manual). MetPak terminal block 8-way connector. 2.1mm, 12v dc Power Plug. 4.2 MetStream 105 Part Numbers. Available spare parts and optional extras are as detailed below:Item MetStream 105 (Supplied unit). Mains powered 12v dc Power Supply (Supplied with MetStream). Ethernet Cable (one to one) 2 Metres long (Supplied with MetStream). Ethernet Crossover cable 1 Metre long (Supplied with MetStream). 8 way Spring terminal block (Supplied with MetStream). External Protection Box (Supplied with part 1955-105-02-XX). Part Number 1955-105-0X-XX 026-04969 026-04970 026-05073 020-04277 1955-PK-052 ________________________________________________________________________________________________ MetStream 105 Page 6 Issue 1 Doc. No. 1955-PS-001 April 2014 Gill Instruments Limited _____________________________________________________________________________________________________________ 4.3 Packaging Whilst the MetStream 105 is being moved to its installation site, the unit should be kept in its packaging. Retain the packaging for use if the unit has to be moved or returned to Gill Instruments. 4.4 Installation requirements 4.4.1 Host system Select from the following: Router with Ethernet input. Or Wi Fi Modem with Ethernet input. Or LAN Ethernet input. Plus PC with Wi Fi or Ethernet input to view MetStream Data. Internet Browser (we recommend Firefox, Chrome or IE9.0 or later) Optional USB 2.0/3.0 data stick to export store logged data. Gill Instruments MetPak Range Unit set for ASCII, RS232, RS 422 output (see http://www.gillinstruments.com/products/anemometer/weather-station-range.htm for the range of MetPak units). 4.4.2 Software Gill MScan Software to detect the MetStream IP address. o Note MScan app works on Windows devices. 4.4.3 Cables To connect MetStream to the host unit (e.g. MetStream 105 to a MetPak unit). Use a suitable RS232 or RS422/485 cable, there are restrictions on cable type and length for suitable operation, refer to the connecting equipment Manual. To connect the MetStream 105 to an Ethernet port. Use a CAT 5 CAT5e or CAT 6 cable to connect between the MetStream 105 and the user interface equipment. Ethernet cables of up to 100 metres can be supported. A 2 Metre Ethernet test cable is supplied (non-crossover type). To connect the MetStream 105 directly to a PC. Use a CAT 5 CAT5e or CAT 6 crossover cable to connect between the MetStream 105 and the PC Ethernet port. Ethernet cables of up to 100 metres can be supported. A 1 Metre Ethernet crossover test cable is supplied. To connect DC power to the MetStream unit A 12v dc power supply and lead with wired connector are supplied otherwise use a cable suitable for connecting a dc supply of nominally 12v dc (1 amp recommended). If requiring full current then take into account volt drops if a long cable run is needed. Alternatively a 2.1mm, 12v dc plug is provided if it is required to connect to a user 12v dc power supply to MetStream. ________________________________________________________________________________________________ MetStream 105 Page 7 Issue 1 Doc. No. 1955-PS-001 April 2014 Gill Instruments Limited _____________________________________________________________________________________________________________ 4.4.4 Mounting The MetStream 105 is designed for indoor use. The MetStream 105 can be positioned laid flat down or on its side. For outdoor use the unit should be enclosed in a box that provides the necessary sealing that will meet the outdoor climatic conditions. Gill instruments can provide an outdoor box if required part number 1955-PK-052. 4.5 MetStream Connections. 4.5.1 MetStream Front Panel Connectors DC Power LED Connection Status LED USB Port to copy data 4.5.2 Front Panel Status LED’s The Yellow LED illuminated indicates DC Power is applied to the MetStream Box. The Green LED illuminated indicates unit connecting/connected to a user unit. A flashing Green LED means that MetStream is communicating with the connected instrument. When power is applied to the MetStream with valid equipment wired to the RS232/422/485 connector the Green LED will be: Off initially for approximately 10 seconds. On for approximately 20 seconds. Flash whilst correct communication (Comms Mode and Baud Rate) with the connected device is being established. On continuously when the connected instrument is recognised and data is ready to be read. However allow up to 90 seconds for a valid connection to be established depending on equipment connected. 4.5.3 Front Panel USB 2.0 Port Suitable for a USB data stick to copy files from MetStream only. Maximum 32GB device supported. Hot Pluggable. ________________________________________________________________________________________________ MetStream 105 Page 8 Issue 1 Doc. No. 1955-PS-001 April 2014 Gill Instruments Limited _____________________________________________________________________________________________________________ 4.5.4 MetStream Rear Panel Connectors Wi-Fi Antenna Ethernet Link LED Ethernet Link Activity LED Earthing Stud Power Supply Ethernet Data Comms 4.5.5 Rear Panel Power Socket Two contact power socket Use with 2.1mm x 5.5mm plug (see below). Voltage Range 9v to 30v dc. Input Current Up to 250mA @12V from MetStream. Up to 0.6A @12V, MetStream and external device. Supply +ve Supply -ve 2.1 4.5.6 Rear Panel Ethernet Socket A standard Ethernet socket is provided for connecting:The supplied 2 metre Ethernet cable for a Local Area Network (LAN) connection Or The 1 Metre Ethernet crossover cable for direct connection to a PC. Other length Ethernet cables can be used:If there is a successful connection between the MetStream Ethernet socket and LAN then the Yellow Ethernet Socket LED’s will be illuminated and the Green LED will indicate Data traffic activity. Ethernet Link Connection LED Pin 8 Ethernet Link Activity LED Pin 1 ________________________________________________________________________________________________ MetStream 105 Page 9 Issue 1 Doc. No. 1955-PS-001 April 2014 Gill Instruments Limited _____________________________________________________________________________________________________________ 4.5.7 RS232/422/485 Connector Contact 8 Contact 1 A removable 8 way plug is supplied for the RS232/422/485 data input connections. The part number for the plug is Phoenix Contact 8 way spring terminal Part 1881383. Connections to the RS232/422/485 connector are CONTACT/ COMMS MODE RS232 1 2 3 4 5 6 7 8 Rx+- - - Tx- 0v Rx+ Tx+ Rx- Tx- Power Enable Power Enable 0v RS422/485 +12v dc Output +12V dc Output 0v 0v Recommended range of wire gauges that can be used with the connector is 20 AWG to 28 AWG. Wires connected to this plug should be stripped back 8 mm for insertion into the push/lock connector. 4.5.8 Power Enable Function The +12v dc output is only enabled on Terminal 5 when the Power Enable connection on Terminal 6 is connected to Terminal 7 (0v) or Terminal 8 (0v). If Terminal 6 Power Enable is left open circuit then the 12V supply output from Terminal 5, and any connected instrument using this supply, will be disabled. In this case, the external instrument should be powered separately from the MetStream by a customer-provided supply. 5. INSTALLATION NOTE: Warranty is void if the MetStream case is opened. 5.1 Installation Guidelines The MetStream 105 is designed for indoor use. For outdoor use a suitable sealed enclosure that meets the required environmental conditions can be used. ________________________________________________________________________________________________ MetStream 105 Page 10 Issue 1 Doc. No. 1955-PS-001 April 2014 Gill Instruments Limited _____________________________________________________________________________________________________________ Gill instruments can supply an outdoor IP65 enclosure; refer to the technical specification in the front of this manual to ensure it meets the required conditions of use. Ensure the product is correctly earthed in accordance with this manual. Use cables recommended by Gill, keeping the length below the maximum allowed. Where the cables are cut and re-connected (junction boxes, plugs and sockets) the cable screen integrity where applicable must be maintained, to prevent the EMC performance being compromised. Earth loops should not be created – earth the system in accordance with the installation guidelines. Ensure the power supply operates to the MetStream 105 specification at all times. The MetStream 105 product uses Wi-Fi in the 2.4GHz region. When the Wi-Fi connection is used, the unit should be placed away from objects that could interfere with the signal. o Do place the unit In open spaces Above floor/ground level where possible Within line of sight of the Wi-Fi base station or router o Do not place the unit On or near metal surfaces Next to thick walls or structures Next to sources of electronic interference such as PCs. o Bench system test Note: Prior to physically mounting the MetStream 105 in its final location, we strongly recommend that a bench system test be carried out to confirm the system is configured correctly, is fully functional and electrically compatible with the selected host system and cabling (preferably utilising the final cable length). The required data format, units and other options should also all be configured at this stage. 5.1.1 MetPak to MetStream Data Input Connection The following table shows an example manufacturers’ reference; other manufacturers’ equivalents can be used. Recommended Belden cable types Application No. of Pairs Belden Ref. Digital RS232 3 9503 Digital RS422 4 9504 For RS422 operation the cable should contain twisted pairs screened to match the application. ________________________________________________________________________________________________ MetStream 105 Page 11 Issue 1 Doc. No. 1955-PS-001 April 2014 Gill Instruments Limited _____________________________________________________________________________________________________________ Cable length The maximum cable length is dependent on the chosen communication method. The following table shows the maximum cable lengths for the supported communication protocols at the given baud rates, using the recommended cable. If any problems of data corruption etc. are experienced, then a slower baud rate should be used. Alternatively, a higher specification cable can be tried. Maximum cable lengths for supported communication networks Communication format RS232 RS422 Baud rate Max. cable length 19200 6.5M 19200 1000M Cabling (unused wires) Any unused wires in the connecting cables should be connected to ground preferably at the user equipment end. Cabling protection Cables should be secured:With cable clamps or equivalent at regular intervals such that the hub box cable gland does not support the cable weight. Away from any mounting bolts to prevent chaffing of the cable. NOTE: Install appropriate strain relief support to the cable if required. Earthing To ensure correct operation and for maximum protection from lightning, a separate lightning rod system is recommended to protect the system. You can also earth the MetPak through its mountings or by connecting a grounding cable to the MetPak Earth Terminal Post. Clean off any paint etc. that might prevent a good connection to the Earth structure. When you connect the screened communications cable ensure that the screen has a connection to the MetStream Case. 5.1.2 Ethernet to Ethernet Connection An Ethernet compatible cable should be used. Generic description:– 2 Twisted pairs for Data only application. 4 twisted pairs for Data and Power over Ethernet (POE) applications. CAT5 or higher RJ45. 8 pin 8 contact type (8P8C). Max Cable Length 100 metres (Cat 5, Cat 5e, Cat 6). Types - straight or crossover depending on system connection. Shielded Twisted Pair (STP) recommended or Unshielded Twisted Pair (UTP). ________________________________________________________________________________________________ MetStream 105 Page 12 Issue 1 Doc. No. 1955-PS-001 April 2014 Gill Instruments Limited _____________________________________________________________________________________________________________ The table below shows some set up cable options. Cable type required for setup MetStream to:- PC Crossover Wi Fi Router Straight LAN Straight 5.1.3 Cable length The typical maximum length at Ethernet 10Mbps data rate is 100 Metres, using the recommended cable. If any problems of data corruption are experienced (due to, for example, a high local electrical ‘noise’ level), then check that a shielded Ethernet twisted pair cable is being used. Alternatively, a thicker or higher specification cable can be tried. 5.1.4 Ethernet Socket Cable Wiring The rear Ethernet RJ45 socket on the MetStream unit has the following connections:- 10Base T Port Pin outs. Pin 8 Pin 1 IEEE 802.3af connections using spare pairs for POE. 8 Pin 8 Description 1 2 3 4 5 6 7 8 Transmit+ Transmit Receive+ DC+ DC+ Receive DCDC- TIA/EIA TIA/EIA 568A 568B White/Green White/Orange Green Orange White/Orange White/Green Blue Blue White/Blue White/Blue Orange Green White/Brown White/Brown Brown Brown Pins 4, 5, 7 and 8 are not used unless a Power over Ethernet connection is used. Ensure that a fully 8 wire populated cable is used for POE applications. ________________________________________________________________________________________________ MetStream 105 Page 13 Issue 1 Doc. No. 1955-PS-001 April 2014 Gill Instruments Limited _____________________________________________________________________________________________________________ 5.1.5 Power supplies MetStream 105 units Input Supply: Voltage Current Current 9v to 30v DC. 250mA max@12v DC (excludes external USB flash drive and MetPak unit. 600mA max@12v DC including external Sensor. 5.1.6 Power over Ethernet Connection. It is possible to Supply Power to a MetStream 105 and connected MetPak unit for instance through the use of a Single Port MidSpan PoE Injector. Typically the Power over Ethernet device will inject 48v dc on the Ethernet cable to connect to the MetStream 105 unit. Maximum cable length between The POE injector and MetStream should be 100 Metres Connect MetStream Ethernet lead to the Power and Data connection socket. Typical MetStream System Connection using Power over Ethernet. 5.2 Connections Important:- Any cable wires not used should be isolated and grounded at the terminating equipment/user end. Digital OV should be used in conjunction with RS422 TX RX lines in order to improve noise immunity. Earthing or grounding It is recommended that MetStream metal case is grounded via its Knurled Screw Earth Terminal. ________________________________________________________________________________________________ MetStream 105 Page 14 Issue 1 Doc. No. 1955-PS-001 April 2014 Gill Instruments Limited _____________________________________________________________________________________________________________ 5.2.1 MetStream RS232 Digital Input Connections The following example shows a MetPak with its COMMS set for RS232 connected to MetStream. This is the MetPak default communication configuration setting. NOTE: The 8 way connectors fitted to MetStream and Metpak are identical, take care when connecting the lead to the equipment to ensure that cable wiring matches that required of the connecting equipment. MetPak J5 Hub Box 8 way Connector Signal Terminal Names Nos. RS232 Tx 3 RS232 Rx 4 2 Signal Ground Chassis Terminal Ground Post Supply –ve Supply +ve MetStream 8 Way Connector Terminal Signal Nos. Names 1 Rx+ 4 Tx8 0v Screen Wires Terminal Post 6 7 8 7 5 Chassis Power Enable 0v +12v dc 5.2.2 MetStream RS422 Digital Input Connections The following example shows a MetPak with its COMMS set for RS422 connected to MetStream. This is not the default MetPak communications setting; ensure the MetPak has been configured for this output requirement before wiring to MetStream. MetPak J5 Hub Box 8 way Connector Signal Terminal Names Nos. RS422 Tx+ 6 3 RS422 Tx5 RS422 Rx+ RS422 Rx4 2 Signal Ground Chassis Terminal Ground Post Supply –ve Supply +ve 7 8 MetStream 8 Way Connector Terminal Signal Nos. Names 1 Rx+ 3 Rx2 Tx+ 4 Tx8 0v Screen Wires Terminal Post 6 7 5 Chassis Power Enable 0v +12v dc ________________________________________________________________________________________________ MetStream 105 Page 15 Issue 1 Doc. No. 1955-PS-001 April 2014 Gill Instruments Limited _____________________________________________________________________________________________________________ 5.2.3 Mechanical installation Before installing, a bench system test is recommended. All the time the MetStream 105 is not in its final location, it should be protected from damage by keeping it in the original packaging as long as possible. Location It is advised to not site the MetStream 105 in close proximity of electrical noise, Radar or RF transmitters. A site survey may be required if there is any doubt about the strength of external electrical noise. Orientation The unit may be mounted in any orientation. Dimensions are in mm ________________________________________________________________________________________________ MetStream 105 Page 16 Issue 1 Doc. No. 1955-PS-001 April 2014 Gill Instruments Limited _____________________________________________________________________________________________________________ 5.3 MetStream External Protection Box - Part 1955-PK-052 (Supplied with MetStream Part 1955-105-02-XX). Note the environmental temperature conditions etc. under which the Protection Box and MetStream will be used to ensure there is no conflict (see manual Specification pages 4 and 5). Outer Case Dimensions (with cover in place) 335mm long x 220mm wide x 107mm deep. Case Preparation and Mounting The case should be mounted on a vertical surface with cable entries at the bottom. The case should be mounted onto a flat surface to prevent twisting that could affect sealing. Do not drill any holes in the enclosure apart for those for waterproof glands as this could impair on the IP65 weather proof rating. A template (not to scale) is shown to aid mounting hole positioning (units in mm). ________________________________________________________________________________________________ MetStream 105 Page 17 Issue 1 Doc. No. 1955-PS-001 April 2014 Gill Instruments Limited _____________________________________________________________________________________________________________ To install the MetStream unit remove the case lid, loosen the 2 Philips screws identified below, slide the clamp plate to the right. Slide in the MetStream unit as shown and clamp in MetStream and tighten the 2 screws. Connect the supplied pre-wired Earth Tag, Power and 8 Way MetStream plugs to MetStream. Installed cable connections are as follows:- Connect external Power and Communications to the MetStream via the sealing strip or gland entry points and terminate in the 12 way screw fitting connector block. Protection Box Case Loosen these 2 screws to slide the clamp plate to the right Gland entry for cables 8mm to 13mm in diameter. Rubber Sealing Strip entry points for clamping and sealing cables up to 2.5 sq. mm. ________________________________________________________________________________________________ MetStream 105 Doc. No. 1955-PS-001 Page 18 Issue 1 April 2014 Gill Instruments Limited _____________________________________________________________________________________________________________ 6. METSTREAM GRAPHICAL USER INTERFACE The MetStream 105 output can be viewed in a Graphical User Interface (GUI) by connecting directly to a PC/Laptop or via a Wi Fi or Ethernet LAN connection and opening a Web Page (Internet Explorer 9 or Mozilla Firefox 19.0.2 are recommended, earlier versions may not be suitable). This then allows the user to view data and those with password access to retrieve logged data and change GUI settings. Parts required:MetStream 105 and Power Supply (supplied). Ethernet 1 metre crossover cable (supplied). Ethernet 2 Metre non crossover cable (supplied). Gill MScan Software (supplied on the CD). Computer preferably running Internet Explorer version IE9 (Chrome) or Mozilla Firefox 19.0.2. MetPak Range Unit or suitable connecting device. 6.1 Accessing the MetStream GUI using a PC and Ethernet Crossover Cable. First connect equipment as per the following system diagram. Now apply power to the MetStream 105, wait for 90 seconds before attempting to access it for data. 6.1.1 PC/Laptop Set Up using Gill MScan Software. If the PC/laptop has a Wi Fi connection then temporarily disable this function to connect to MetStream via a direct Ethernet crossover cable connection. Note: - It is recommended to connect the MetPak or connected device to MetStream to ensure correct configuration, however it is possible to set up MetStream parameters without the connected device. ________________________________________________________________________________________________ MetStream 105 Page 19 Issue 1 Doc. No. 1955-PS-001 April 2014 Gill Instruments Limited _____________________________________________________________________________________________________________ Load and Open Gill MScan Software on to the PC from the supplied CD. Select ‘Direct Connection between PC and MetStream’. Click on the ‘Find MetStream(s)’ button. A MetStream should be found at 192.168.67.67. Click on MetStream Found at 192.168.67.67 to highlight the MetStream IP Address. Click on ‘Connect to MetStream’. Your default browser will be launched and connect to the MetStream homepage If the opening MetPak screen does not appear to reflect the currently connected equipment then clear the Browser Cache and refresh the display. In Chrome the cache can be cleared by selecting ‘Customise and control Google Chrome/History/Clear browsing history’. Then select only ‘Empty the cache’. Now Configure or retrieve MetStream data as per Para 6.5. ________________________________________________________________________________________________ MetStream 105 Page 20 Issue 1 Doc. No. 1955-PS-001 April 2014 Gill Instruments Limited _____________________________________________________________________________________________________________ 6.1.2 PC/Laptop Set Up if Gill MScan Software is not available. If the PC/laptop has a Wi Fi connection then temporarily disable this function to connect to MetStream via a direct Ethernet crossover cable connection. Apply power to MetStream 105 (wait for 90 seconds before attempting to access it for data). On the PC select Start/ Select/ Control Panel/ Network and Sharing Center/ Local Area Connection/ Properties. Double click on:Now click on:Internet Protocol Version 4 (TCP/IPv4). ‘Use the following IP address’. Type in the PC IP address 192.168.67.1 (cannot be the same as the MetStream default IP address 192.168.67.67). Type in Subnet Mask 255.255.255.0. Type in Default gateway 192.168.67.255. Click on OK. ________________________________________________________________________________________________ MetStream 105 Page 21 Issue 1 Doc. No. 1955-PS-001 April 2014 Gill Instruments Limited _____________________________________________________________________________________________________________ On the PC open Internet Explorer (or equivalent) browser window. Type in a default MetStream IP address 192.168.67.67. This IP address can be used irrespective of any fixed IP address that may have been previously set. If the opening MetPak screen does not appear to reflect the currently connected equipment then clear the Browser Cache and refresh the display. In Chrome the cache can be cleared by selecting ‘Customise and control Google Chrome/History/Clear browsing history’. Then select only ‘Empty the cache’. Now Configure or retrieve MetStream data as per Para 6.5. Upon completion of configuration to return the PC/Laptop to its previous state then:- On the PC select Start/Select/Control Panel/Network and Sharing Center/Local Area Connection/Properties. Double click on Internet Protocol Version 4 (TCP/IPv4). Click on Obtain an IP address automatically and then click OK etc. Re-enable the PC/Laptop wireless function as appropriate. ________________________________________________________________________________________________ MetStream 105 Page 22 Issue 1 Doc. No. 1955-PS-001 April 2014 Gill Instruments Limited _____________________________________________________________________________________________________________ 6.2 Accessing the MetStream GUI using a PC and a LAN Port Connection. First connect MetStream to a LAN connection using the 2 metre Ethernet Cable supplied or any standard non crossover Ethernet cable. Now apply power to the MetStream 105, wait for 90 seconds before attempting to access it for data. Open Gill MScan Software load and Open Gill MScan Software on to the PC from the supplied CD. Select ‘MetStream Connected to Network’. Click on the ‘Find MetStream’ button. ________________________________________________________________________________________________ MetStream 105 Page 23 Issue 1 Doc. No. 1955-PS-001 April 2014 Gill Instruments Limited _____________________________________________________________________________________________________________ A list of available MetStreams will be listed with their IP addresses. Click on and highlight the MetStream found at IP address that you want to connect to. Click on ‘Connect to MetStream’. Your default browser will be launched and will connect to the MetStream homepage If the opening MetPak screen does not appear to reflect the currently connected equipment then clear the Browser Cache and refresh the display. In Chrome the cache can be cleared by selecting ‘Customise and control Google Chrome/History/Clear browsing history’. Then select only ‘Empty the cache’. Now Configure or retrieve MetStream data as per Para 6.5. ________________________________________________________________________________________________ MetStream 105 Page 24 Issue 1 Doc. No. 1955-PS-001 April 2014 Gill Instruments Limited _____________________________________________________________________________________________________________ 6.3 Accessing the MetStream GUI with a PC and a Wi-Fi Router 6.3.1 Using and Ethernet cable connection between MetStream 105 and a Wi-Fi Router. Note:- Alternative Wi-Fi connected devices may be used to connect to the MetStream unit to view the GUI if required e.g. Tablet or Smart Phone however the Gill MScan Software will only run on a PC to determine the IP address. Alternative IP Scan app software can be used. Connect MetStream to a Wi-Fi Router using the 2 metre Ethernet Cable supplied or any standard non crossover Ethernet cable. Now apply power to the MetStream 105, wait for 90 seconds before attempting to access it for data. If not already connected to the Wi Fi Router on the PC select:Start/ Select/ Control Panel/ Network and Sharing Center/ Select the appropriate Wi Fi Network and log on to the Wi Fi Network (the Wi Fi password may be needed). ________________________________________________________________________________________________ MetStream 105 Page 25 Issue 1 Doc. No. 1955-PS-001 April 2014 Gill Instruments Limited _____________________________________________________________________________________________________________ Once connected to the Wi Fi network load and open Gill MScan Software on to the PC (MScan Software is on the supplied CD). Select ‘MetStream Connected to Network’. Click on the ‘Find MetStream’ button. A list of available MetStreams will be listed with their IP addresses. Click on the appropriate ‘MetStream found at xxxxx’ IP address to highlight the one to connect to. Click on ‘Connect to MetStream’. Your default browser will be launched and will connect to the MetStream homepage. ________________________________________________________________________________________________ MetStream 105 Page 26 Issue 1 Doc. No. 1955-PS-001 April 2014 Gill Instruments Limited _____________________________________________________________________________________________________________ NOTE the MetStream IP address is allocated by the Wi Fi Router and can change each time MetStream is powered up if the MetStream unit is set for DHCP. Use Configure to fix the IP Address of MetStream if required. If the opening MetPak screen does not appear to reflect the currently connected equipment then clear the Browser Cache and refresh the display. In Chrome the cache can be cleared by selecting ‘Customise and control Google Chrome/History/Clear browsing history’. Then select only ‘Empty the cache’. Now Configure or retrieve MetStream data as per Para 6.5. ________________________________________________________________________________________________ MetStream 105 Page 27 Issue 1 Doc. No. 1955-PS-001 April 2014 Gill Instruments Limited _____________________________________________________________________________________________________________ 6.3.2 Using a Wi-Fi connection between MetStream 105 and a Wi-Fi Router. Before the Wi-Fi on a MetStream can be used, it needs to be set up. This means that the MetStream needs to be connected to either the PC or the router via a wired connection as per Para 6.1.1, 6.2, or 6.3.1. Once the MetStreams' IP address has been obtained, open Firefox or Chrome and type the IP address into the browsers address bar (A): The MetStream GUI will load and be displayed in the browser. Now click configure (B). ________________________________________________________________________________________________ MetStream 105 Page 28 Issue 1 Doc. No. 1955-PS-001 April 2014 Gill Instruments Limited _____________________________________________________________________________________________________________ The following window will now appear: Enter username (admin) and password (password) and click login. The configuration screen will now be displayed: Clicking network settings (A) will bring up the above options window. Clicking refresh will ensure that all Wi-Fi networks in range will be selectable. Choose the network that you wish to log onto from the drop-down menu (this will auto-populate the SSID box. Choose the encryption type (C) to match that of the detected Router (WPA/WEP/NONE) and enter the passphrase (D). It is possible to set the MetStream so that it obtains it's IP address automatically from the router (DHCP) or the IP address can be determined and set by the user (static IP). ________________________________________________________________________________________________ MetStream 105 Page 29 Issue 1 Doc. No. 1955-PS-001 April 2014 Gill Instruments Limited _____________________________________________________________________________________________________________ To automatically assign an IP address, check option A. To set a static IP address, check option B. Option B requires the user to know what the routers subnet identity is and assign an IP address accordingly (e.g. if the routers address is 192.168.1.1, then you may use address 192.168.1.105 in box (C), as long as this does not conflict with another client connected to the router). The subnet mask (D) value will again depend upon the router but this value is more often than not able to be left at 255.255.255.0. The default gateway (E) should be set to the routers IP address. Once the MetStream has been set-up according to the user’s wishes, click save settings (F). The following screen will now be displayed: Click 'OK' and the following screen will be displayed whilst the MetStream reboots: ________________________________________________________________________________________________ MetStream 105 Page 30 Issue 1 Doc. No. 1955-PS-001 April 2014 Gill Instruments Limited _____________________________________________________________________________________________________________ Once the MetStream has rebooted, it will still be observable on the same browser window as it will still be connected to the PC via LAN, crossover cable or router. If a static IP address has been set, the user can check that the Wi-Fi IP address is valid by entering that address into the address bar of a new browser window. If the MetStream is configured for DHCP the IP address can be found under “About” in the configure window. ________________________________________________________________________________________________ MetStream 105 Page 31 Issue 1 Doc. No. 1955-PS-001 April 2014 Gill Instruments Limited _____________________________________________________________________________________________________________ Alternatively the IP address can be found using the MScan Software (MScan Software is on the supplied CD). Select ‘MetStream Connected to Network’. Click on the ‘Find MetStream’ button. A list of available MetStreams will be listed with their IP addresses. Click on the appropriate ‘MetStream found at xxxxx’ IP address to highlight the one to connect to. Click on ‘Connect to MetStream’. Your default browser will be launched and will connect to the MetStream homepage. The MetStream can now be unplugged from the LAN connection to the router (there may be a 'glitch' in the Wi-Fi connection as the LAN connection is unplugged but the MetStream will recover). ________________________________________________________________________________________________ MetStream 105 Page 32 Issue 1 Doc. No. 1955-PS-001 April 2014 Gill Instruments Limited _____________________________________________________________________________________________________________ 6.4 MetStream Front Page GUI Features. Once a Web Browser connection has been established then it is possible to view the MetPak/connected instrument data. Open Browser Window Type in the IP address e.g. 192.168.1.67 and Enter MetStream will communicate with the attached RS232/422/485 connected device, read settings, log data automatically and display data in a graphical format. In this case a Gill MetPak Pro is connected to the MetStream device and the Graphical User Interface (GUI) opens with the following display. Dashboards MetPak Pro parameters open on Dashboard 1, to display further MetPak Pro instruments click on Dashboards 2 and 3. ________________________________________________________________________________________________ MetStream 105 Page 33 Issue 1 Doc. No. 1955-PS-001 April 2014 Gill Instruments Limited _____________________________________________________________________________________________________________ Dashboard 2 instrument display shown as follows:- Dashboard 3 instrument display shown as follows:- ________________________________________________________________________________________________ MetStream 105 Page 34 Issue 1 Doc. No. 1955-PS-001 April 2014 Gill Instruments Limited _____________________________________________________________________________________________________________ Where applicable at the bottom of the MetStream parameter display there are 2 tool signs. Trend Graphs Click on the Trend Graph interest. icon to open a trend graph of the parameter of E.g. Wind Direction. Select a trend period value as required. Trend Graph Period Sampling. One Minute screen - a reading is taken every second. One Hour Screen - a reading is taken once every minute. 24 hours screen - a reading is taken once every 30 minutes. 7 days - a reading is taken once every 3 hours (00:00, 03:00, 06:00 etc.). 28 days - a reading is taken once every 3 hours (00:00, 03:00, 06:00 etc.). Trend plots are built from the logged data stored in the MetStream. On power up, it may take several minutes for all of the plots to be populated from the stored data. ________________________________________________________________________________________________ MetStream 105 Page 35 Issue 1 Doc. No. 1955-PS-001 April 2014 Gill Instruments Limited _____________________________________________________________________________________________________________ Change Reading Type and Reset Max/Min. Click on the icon. Select Wind Direction Dial style or reset max or min or any as required, click on Save Settings. NOTES: ‘Save settings’ only saves settings for the period that the browser window is open. If the browser window is refreshed or PC re-started then the display will revert to the default screen settings on first opening MetStream. Browser Window saved settings are only applicable to the PC on which MetStream is viewed. Saved Settings do not change the MetStream unit configuration. If Global use PC browser settings need to be changed then use MetStream Configure (password protected) to make changes to MetStream. ________________________________________________________________________________________________ MetStream 105 Page 36 Issue 1 Doc. No. 1955-PS-001 April 2014 Gill Instruments Limited _____________________________________________________________________________________________________________ 6.5 MetStream Configuration (Administrator Use) Access to the Configure pages is dependent on having username and password access. Click on the Configure icon at the top of the main screen. 6.5.1 Login Enter Username and Password. (MetStream units are shipped with a default username and password as follows). Username: admin (default, note all lowercase letters). Password: password (default, note all lower case letters). Click on Login. This will bring you to the opening MetStream Configuration screen. ________________________________________________________________________________________________ MetStream 105 Page 37 Issue 1 Doc. No. 1955-PS-001 April 2014 Gill Instruments Limited _____________________________________________________________________________________________________________ 6.5.2 Exit/Reboot/Shutdown/Thru Mode/Logout On the left hand side of the Configuration screen there are five buttons:- Exit without saving (and ) – Go back to GUI front screen without changing settings but will still logged into configure screen. If you then click on Configure you will be taken to the Configure tabs without having to login again. Reboot MetStream – An electrical power down of MetStream that will need a refresh of the Web browser screen. Shutdown MetStream – Turns off power inside the MetStream box. This will require MetStream to be powered up to view the web GUI again. WARNING: This command will require the physical removal of the power from the MetStream and the reapplication of power. MetStream cannot be restarted remotely once this command has been issued. Enable Thru Mode – A mode to allow other software (e.g. a Terminal Programme) to access the connected instrument to view or change its settings (see Para 6.5.11). Logout – Go back to the GUI screen this time if accessing Configure then a new login will be required. ________________________________________________________________________________________________ MetStream 105 Page 38 Issue 1 Doc. No. 1955-PS-001 April 2014 Gill Instruments Limited _____________________________________________________________________________________________________________ 6.5.3 Username and Password If it is required to change the default Username and Password then select this page as follows:To change the Password complete the fields identified below and click on Submit. Click on OK as below and this takes you back to the Main Dashboard screen to log in with the new Password. To change the Username select this option from the Username or Password dropdown menu. Complete the New Username fields identified below and click on Submit. Note you cannot change password and user name at the same time. They must be done separately. ________________________________________________________________________________________________ MetStream 105 Page 39 Issue 1 Doc. No. 1955-PS-001 April 2014 Gill Instruments Limited _____________________________________________________________________________________________________________ 6.5.4 Date and Time When MetStream is first powered up it opens with a default Time Zone, default 01/01/2000 date and zero hour time. Select the required Time Zone from the drop down menu and click on ‘Save Time Zone’. Type in the required Time and Date into the relevant boxes and click on ‘Save Time & Date’. Default ‘Change Time Source’ setting is NTP (see Notes below). If PTP enabled (see Notes below) the screen will show:- Notes: Manual Time, for non-networked units, relies on MetStream internal clock. Network Time Protocol (NTP) recommended setting for network connected PC’s which can obtain time synchronisation over the internet. Precision Time Protocol (PTP) looks for the network provider master clock for specific closed networks. PTP options data will show the IP address of the PTP source. ________________________________________________________________________________________________ MetStream 105 Page 40 Issue 1 Doc. No. 1955-PS-001 April 2014 Gill Instruments Limited _____________________________________________________________________________________________________________ 6.5.5 Dashboard Settings (Administrator Use) Note: Changing Dashboard Settings affects the MetStream data view seen by all PC’s using the same MetStream Web browser IP address. Choose appropriate front GUI dashboard settings as required (MetPak connected equipment settings illustrated). Default Measurement Ranges units relate to all instrument measurements that are shown with a gauge and digital reading rather than just a digital reading on the front GUI screen. Click on Save Settings when changes have been made and a warning screen will be shown. Click on OK. After approximately 1 minute close the GUI and re-open the GUI to view new changes (this is not an automatic process). ________________________________________________________________________________________________ MetStream 105 Page 41 Issue 1 Doc. No. 1955-PS-001 April 2014 Gill Instruments Limited _____________________________________________________________________________________________________________ 6.5.6 Data Logging Logging Notes: MetStream logs data to an internal SD card (not user removable). Data logging occurs continuously once MetStream is connected to a recognised/configured external instrument; in this case data logging cannot be disabled. If no unit (e.g. MetPak) is connected to the MetStream then no data is logged. MetStream logs data at the output rate of the connected instrument (up to 20Hz). MetStream creates daily log files up to a maximum of 29 after which the oldest dated folder is deleted. Logged data can be downloaded to a PC or to a USB flash drive connected to MetStream. Saving Logged Data to a PC Download Location Select the Measurement Log Tab. If for instance you had selected the box of Log: 28/11/2013 and Clicked on Save this would save an MSLOG_20131118.csv file to the PC Downloads Folder. (E.g. Start/Documents/Downloads (MSLOG_Year/Month/Day.csv file). This file can automatically open in a spreadsheet format if for instance Microsoft Excel or Libre Office Calc are installed on the PC as per the following example. Otherwise the data can be opened as a Comma Separated text file. ________________________________________________________________________________________________ MetStream 105 Page 42 Issue 1 Doc. No. 1955-PS-001 April 2014 Gill Instruments Limited _____________________________________________________________________________________________________________ Saving Data to a USB Flash Drive Data logged and saved to the internal SD card can be manually copied to an external USB flash drive. Data is not automatically or directly sent to the USB flash drive. MetStream will support USB flash drives up to 32GB. If no external flash drive has been connected to MetStream then this will be reported (No Drives Found). If a USB flash drive has been inserted then when the MetStream Measurement Log screen is reached an external drive will be recognised e.g. Kingston. When connecting a USB drive to MetStream after power up then open the Measurement Log screen and click on ‘Refresh external drives’. Note: When MetStream is first switched on the day/month/year defaults to 01/01/2000 until Date and Time are configured. The log file created for this date can be deleted if required. Click on the external drive tick box (e.g. KINGSTON) to enable copying of files (highlights selected files options). Click on Log or Logs to be saved (e.g. Log 01/11/2013). ________________________________________________________________________________________________ MetStream 105 Page 43 Issue 1 Doc. No. 1955-PS-001 April 2014 Gill Instruments Limited _____________________________________________________________________________________________________________ Click on Ok After 5-10 seconds MetStream will report. Data is saved on the USB flash drive as a .CSV file identified as for example by MSLOG_20131101 (Year 2013/Month11/Day01). This file can automatically open in a spreadsheet format if for instance Microsoft Excel or Libre Office Calc are installed on the PC as per the following example. ________________________________________________________________________________________________ MetStream 105 Page 44 Issue 1 Doc. No. 1955-PS-001 April 2014 Gill Instruments Limited _____________________________________________________________________________________________________________ 6.5.7 Input Device Settings When Input Device Settings is selected Connection Type will show Auto as the default setting. Auto The Auto selection (default setting) allows MetStream to automatically detect any of the instruments detailed in the Supported Devices list and log the data string data that they are outputting. ________________________________________________________________________________________________ MetStream 105 Page 45 Issue 1 Doc. No. 1955-PS-001 April 2014 Gill Instruments Limited _____________________________________________________________________________________________________________ Manual Mode MetPak Equipment If Manual setting is selected then if the connected device settings can be read they will be shown as per the following example with a connected MetPak Pro. If a device needs to be connected that is not on the supported list please contact Gill Instruments for advice. ________________________________________________________________________________________________ MetStream 105 Page 46 Issue 1 Doc. No. 1955-PS-001 April 2014 Gill Instruments Limited _____________________________________________________________________________________________________________ ________________________________________________________________________________________________ MetStream 105 Page 47 Issue 1 Doc. No. 1955-PS-001 April 2014 Gill Instruments Limited _____________________________________________________________________________________________________________ 6.5.8 Network Settings Automatic IP address (DHCP) The default Network setting is to obtain an IP address automatically using a Dynamic Host Configuration Protocol (DHCP). Thus the MetStream IP address will be allocated to it when connected to a Wi Fi Router or LAN Server. Static IP Address If a Static IP address is required for the MetStream connection then click on Use a Static IP address and complete the form. When connecting MetStream in a system that has no DNS or DHCP server, it may be necessary to set up a static IP address (see Para 6.1.2 to determine the IP address). ________________________________________________________________________________________________ MetStream 105 Page 48 Issue 1 Doc. No. 1955-PS-001 April 2014 Gill Instruments Limited _____________________________________________________________________________________________________________ WLAN Interface The Wireless LAN Interface Configuration connection is only applicable to MetStream 105. Ensure selected to ON for Wi-Fi Operation (default setting is OFF). Refer to section 6.3.2 for Wi-Fi configuration instructions. ________________________________________________________________________________________________ MetStream 105 Page 49 Issue 1 Doc. No. 1955-PS-001 April 2014 Gill Instruments Limited _____________________________________________________________________________________________________________ 6.5.9 Weather Observation Website (WOW) Applies to MetStream units that are connected to a device that has internet access. The UK Meteorological Office have created a platform for collecting weather observation readings primarily from across the United Kingdom see http://wow.metoffice.gov.uk/ (other countries have contributed data). This can include data from instruments that are connected to MetStream that provide weather type data (e.g. the MetPak range). General details on WOW can be read at:http://wow.metoffice.gov.uk/support/general To register for sending data to the UK Met Office WOW site see the attached link:https://register.metoffice.gov.uk/WaveRegistrationClient/public/register.do?service=weath erobservations To send data to the Met Office site when an account has been set up, select the MetStream Weather Observation page. Under Weather Observation Website: Click on Enabled. Complete Site ID, Pin and Site Update Rate information. Click on Save Settings. Data collected by MetStream will be sent automatically providing an internet link is established with the MetStream unit. The time interval for sending this data can be selected by the user ________________________________________________________________________________________________ MetStream 105 Page 50 Issue 1 Doc. No. 1955-PS-001 April 2014 Gill Instruments Limited _____________________________________________________________________________________________________________ 6.5.10 About Reports various MetStream attributes that can be useful for record of unit build and fault finding. ________________________________________________________________________________________________ MetStream 105 Page 51 Issue 1 Doc. No. 1955-PS-001 April 2014 Gill Instruments Limited _____________________________________________________________________________________________________________ 6.5.11 Thru Mode (Diagnostic Connection) It is possible to communicate directly with a sensor attached to a MetStream using a terminal program, allowing you to view/log the raw sensor data in real time and if necessary re-configure the sensor. NOTE: Data logging into the MetStream internal memory is DISABLED while Thru Mode is active. Enable Thru Mode Connect the sensor to MetStream and open the MetStream IP address GUI on a PC web browser as per examples in Paras 6.1 to 6.3. Log in to Configuration screen and on the "Input Device Settings" check that is set to match the attached sensor (Auto for a MetPak). It is not necessary to setup the number of parameters or the fields. (If settings are changed it may be necessary to reload the page and log back into the configuration screen). Click on the Network Settings Page which shows Thru Mode TCP Port Number e.g. 8023. Click on the Enable Thru Mode button on the left hand side of the screen. The following warning screen appears, Click on OK. MetStream will now re-boot to enable Thru mode. Note: The following warning screen does not warn when 1 minute is up; hence close the MetStream Web browser window after clicking on ok. ________________________________________________________________________________________________ MetStream 105 Page 52 Issue 1 Doc. No. 1955-PS-001 April 2014 Gill Instruments Limited _____________________________________________________________________________________________________________ If required re-open the MetStream Web page e.g. 10.10.10.153 to confirm that Thru Mode has been enabled (see screen shot). Close the Web Browser page connection. Open a Telnet terminal programme e.g. HyperTerminal. Type in a Name, e.g. MetStream Thru Mode. Click on OK. Type in the Host Address (MetStream IP address) for example 10.10.10.153 Type in the Port Number which for MetStream will be 8023. Select Connect Using from the drop down list to be TCP/IP. Click on OK. ________________________________________________________________________________________________ MetStream 105 Page 53 Issue 1 Doc. No. 1955-PS-001 April 2014 Gill Instruments Limited _____________________________________________________________________________________________________________ Data should now be scrolling on the Hyperterminal screen updated at the connected instrument output rate (MetPak Pro data illustrated). Should it be necessary to place the connected instrument into a Set Up mode/Configuration mode then send the necessary command (for Gill sensors this is the * command). To interrogate the connected instrument:Type * to place the unit into Set up Mode (Enter key not needed). The connected MetPak Pro unit has responded with SETUP MODE. Refer to the connected Sensor Manual to determine which Configuration or Test commands are applicable for a terminal mode connection. In this MetPak example the ‘Report’ command has been typed, the Enter key pressed and the unit has responded with the fields that it is reporting to MetStream. Type Q and press Enter key to return to normal measurement mode. ________________________________________________________________________________________________ MetStream 105 Page 54 Issue 1 Doc. No. 1955-PS-001 April 2014 Gill Instruments Limited _____________________________________________________________________________________________________________ Logging Data Hyperterminal can be used to log MetStream data (but note it will not add a Date/Time stamp to the data). Start Logging Select Transfer /Capture Text. Then select Browse to choose a location/file on the PC to log the data. Click on Start to commence data logging. Stop Logging Select Transfer/Capture Text/Stop. Viewing Logged Data. Open the saved data file location and view the text data e.g. using Notepad or similar. ________________________________________________________________________________________________ MetStream 105 Page 55 Issue 1 Doc. No. 1955-PS-001 April 2014 Gill Instruments Limited _____________________________________________________________________________________________________________ Disable Thru Mode With any terminal connection to MetStream closed, open the Web Browser page and LogIn to the Configure pages. Click on Disable Thru Mode. Click on OK. MetStream will now Re-Boot. After 1 minute Refresh the Web Browser IP address page to view normal connected instrument data. ________________________________________________________________________________________________ MetStream 105 Page 56 Issue 1 Doc. No. 1955-PS-001 April 2014 Gill Instruments Limited _____________________________________________________________________________________________________________ 7. MAINTENANCE & FAULT-FINDING 7.1 Maintenance There are no MetStream user-serviceable parts requiring routine maintenance. Opening the unit will void the warranty. In the event of failure, prior to returning the unit to your authorised Gill distributor, it is recommended that: All cables and connectors are checked for continuity, bad contacts, corrosion etc. Fault-finding checks are carried out as Para 7.2. Contact your supplier for advice if failure persists. ________________________________________________________________________________________________ MetStream 105 Page 57 Issue 1 Doc. No. 1955-PS-001 April 2014 Gill Instruments Limited _____________________________________________________________________________________________________________ 7.2 Fault-finding To Support fault finding Gill Instruments Manuals can be downloaded from:http://www.gillinstruments.com/data/manuals/manuals.htm Gill Instruments Software can be downloaded from:http://www.gillinstruments.com/main/software.html Symptom Action Not able to open the GUI Display Corrupted output MetStream GUI opens but does not display the connected instrument Incorrect GUI. Check DC power is applied to the MetStream, the front panel Yellow LED should be constantly illuminated. If the MetStream front panel Green LED is flashing then check the cabling between the connecting instrument and MetStream. Check that there is a link between the MetStream 8 way connector terminals 6 (Power Enable) and 7 (0v). This supplies power to the connected instrument. Check the MetStream Ethernet cable socket connection between MetStream the PC/Router/LAN. The Green LED should be constantly illuminated and the Yellow LED will flash showing data traffic. Check that correct Ethernet cable type has been used (straight or crossover as appropriate). Check that the correct IP address has been used. Connect MetStream directly to a PC as detailed in Paras 6.1.1.or 6.1.2 and use IP address 192.168.67.67 to check MetStream operation and configuration. Check cable lengths and type of cable. Check connected instrument is installed as per its installation guidelines to avoid sources of interference. If the MetStream front panel Green LED is flashing then check the cabling between the connecting instrument and MetStream. Check that there is a link between the MetStream 8 way connector terminals 6 (power Enable) and 7 (0v). Is the unit set for Thru Mode? Disable Thru Mode. Use Thru Mode to check communication with the connected sensor. Clear the Web Browser cache. 7.3 Returning Units If the unit has to be returned, it should be carefully packed in the original packaging and returned to your authorised Gill distributor, with a full description of the fault condition. Gill Instruments Distributors can be found at:http://www.gillinstruments.com/main/an_distributors.htm The Return Maintenance Authorisation (RMA) procedure can be found at:http://www.gillinstruments.com/products/anemometer/support.htm ________________________________________________________________________________________________ MetStream 105 Page 58 Issue 1 Doc. No. 1955-PS-001 April 2014 Gill Instruments Limited _____________________________________________________________________________________________________________ 8. APPENDICES 8.1 Glossary & Abbreviations Item BS CAT CD CFR CSV DC DHCP DNS EC EMC EN FCC GND GUI IEEE IP LAN LED MAC MAX MIN No. O/P NTP PC POE PTP RJ RMA RS232 RS422 RS485 RX RXD SD STP TCP Meaning British Standard Category Compact Disc Code of Federal Regulations Comma Separated Variable Direct Current Dynamic Name Host Protocol Domain Name System European Community Electro Magnetic Compatibility European Standard Federal Communications Commission Ground Graphical User Interface Institute of Electrical and Electronic Engineers Internet Protocol or Ingress Protection Local Area Network Light Emitting Diode Media Access Control Maximum Minimum Number Output Network Time Protocol Personal Computer Power over Ethernet Precision Time Protocol Registered Jack Return Material Authorisation Communications standard Communications standard Communications standard Receive Received Data Secure Digital Shielded Twisted Pair Transmission Control Protocol ________________________________________________________________________________________________ MetStream 105 Page 59 Issue 1 Doc. No. 1955-PS-001 April 2014 Gill Instruments Limited _____________________________________________________________________________________________________________ Item TX TXD TXT UL USB UTP WLAN WOW +VE -VE Meaning Transmit Transmitted Data Text Underwriters Laboratory Universal Serial Bus Unshielded Twisted Pair Wireless Local Area Network Weather Observation Website Positive Negative 8.2 Guarantee For terms of guarantee contact your supplier. Warranty is void if the black security seal covering MetStream box screws are damaged or broken. ________________________________________________________________________________________________ MetStream 105 Page 60 Issue 1 Doc. No. 1955-PS-001 April 2014 Gill Instruments Limited _____________________________________________________________________________________________________________ 8.3 Electrical Conformity EC DECLARATION OF CONFORMITY ACCORDING TO COUNCIL DIRECTIVE 2004/108/EC We, Gill Instruments Limited, declare our sole responsibility that the products: MetStream 105 Manufactured by: Gill Instruments Limited Saltmarsh Park 67 Gosport Street Lymington, SO41 9EG to which this declaration relates, are in conformity with the protection requirements of Council Directive 2004/108/EC on the approximation of the laws relating to electromagnetic compatibility. This Declaration of Conformity is based upon compliance of the product with the following harmonized standards: BS EN 55022:2010 BS EN 55024:2010 Emissions Immunity Using Using BS EN 61000 BS EN 61000 Signed by A.C.R. Stickland – Director Date of issue: 29/11/2013 Place of issue: Gill Instruments Limited Saltmarsh Park 67 Gosport Street Lymington, SO41 9EG ________________________________________________________________________________________________ MetStream 105 Page 61 Issue 1 Doc. No. 1955-PS-001 April 2014