1
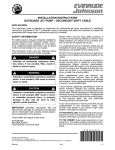
Evinrude E-tec
INSTALLATION GUIDE
Revision 2.6 - English version
(Not included the ICON model)
INSTALLATION
GUIDE
Evinrude
Evinrude E-tec
E-tec installasjonsguide
CoastKey harness
CoastKey harness
connector
Checklist before installation:
• Read the installation guide and user manual before installing the CoastKey system.
• Check that the engine(s) functions and operates normally before installation.
• The CoastKey system shall not be installed in an explosive environment.
• The CoastKey system and design may not be changed or tampered with.
• The system should only be used for its original purpose and only installed as per the directions in
this Installation Guide.
• Familiarise yourself with the national safety rules and regulations in your region to avoid a breach of
these rules and help prevent accidents.
• The installation of the lock unit is permitted only in areas that are protected against water intrusion.
• The lock unit shall be installed on a fiberglass, wood, plastic, glass or other non-conductive surface.
The lock unit must not be attached to carbon, cables, wire or other metal surfaces as this leads to
loss of signal strength, which will affect radio communication between the key and lock unit. Strong
electromagnetic fields may also affect the system. Locating the lock unit in the immediate vicinity of
conductive cables and any radio devices such as VHF, radar, etc. should also be avoided.
• To achieve optimal radio and signal conditions, it is recommended to install the lock unit as high as
possible in the boat (at least 70 cm above the waterline).
• Ensure that the lock unit is secure and stable, so it is easy to operate the push button. Clean the
attachment point with acetone or a similar cleaning fluid before the supplied Velcro strip is
attached.
• Other wireless systems that use the same frequency (In Europe: 433 MHz), such as a remote
controlled anchor winch or bow thruster, can affect the operational stability of the CoastKey system.
• The distance between the installation point of the lock unit and the pilot’s usual position should be
as short as possible and not exceed a radius of 1.5 meters.
• In a dual installation the lock units should be placed at least 30 cm apart.
• For security reasons, the power supply to the lock unit(s) is to be connected through a main power
switch.
• Maximum system load is 10 amps. (Check current draw when connecting to external systems like
anchor winch etc.)
• Remember to complete the Test and Safety Form in this guide.
Revision 2.6 - English version
INSTALLATION GUIDE
Installation procedure:
1. General
Make sure the battery terminals, the main power switch and all common connection points are free of corrosion and that there are no loose connections. Check
that the engine(s), tilt and any other devices that CoastKey will be connected to,
are functioning normally before starting the installation. The main switch must be
switched off during the installation.
2. Key switch and connections
Modify the key switch and it’s connections according to the description below:
Disconnect the yellow wire with red stripe from the post on the rear side of the
ignition lock. (you might need to pull back the rubber boot to be able to loosen the
connector.) Connect the female plug on the black T-split harness provided with the
kit to the same post. The male connector on the T-split is then connected to the
yellow and red wire that was removed from the ignition lock.
This ensures that your start-in-gear protection isn’t compromised (see Figure 1).
Figure 1:
INSTALLATION GUIDE
Evinrude E-tec
A side-mounted remote control must be opened to access the ignition switch
to perform the installation. The black T-split harness used to connect the start
signal is routed out of the remote control along the control cables for gear and
throttle. The black T-split harness’ single end is connected to the brown wire in
CoastKey’s main harness.
Remove the black wire with yellow stripe from the ignition switch (see Figure 2).
Figure 2:
(You might need to pull back the rubber boot to be able to loosen the connector.)
This wire will stay disconnected. Pull the rubber boot back on to the connector to
avoid any possibility of a short circuit. On a top-mounted or panel mounted
remote control application the ignition switch is installed in the console. In this
case there is no need to open the remote control to perform the installation.
A gray 6-pin connector is located
Figure 3:
20-30 cm (8-12”) down the main
harness from the ignition switch /
remote control. This is the main connector between the ignition switch
and the main harness from the engine. This connector is disconnected
and the corresponding connectors
on CoastKey’s harness are inserted
between the original connectors so
that they form a T-connection.
(See figure 3.)
Revision 2.6 - English version
INSTALLATION GUIDE
The same procedure is done with the triangular gray 3-pin connector for the tilt
signals. On a side-mounted remote control you’ll find this connector in the same
area as the main connector.
On a top-mounted remote control you’ll find this connector on the signal cables
from the control handle.
Note: Exercise care when opening the side-mounted remote control.
The throttle and shift cables might be in tension and accidentally pop out
making it difficult to re-assemble the remote control.
3. Lanyard Switch
Figure 4:
Drill a 16mm (5/8”) hole for the
engine kill switch provided with
the kit. Install it in a suitable place
in the console. (See Figure 4)
Connect the kill-switch’s wires to
the black and blue wire on CoastKey’s harness. (See Figure 5)
The kill-switch is provided with the
kit because the original manual
lanyard cord attached to the key
switch will stop operating when
the black wire with yellow stripe is
disconnected from the key switch.
Figure 5:
INSTALLATION GUIDE
Evinrude E-tec
Note:
Be careful when drilling holes to not damage other equipment.
Check the inside of the console for objects that might get hit by the drill-bit.
The engine can be started from the original key switch if the lock unit is
disconnected. In this case the engine must be stopped with the manual
lanyard cord provided with the kit as long as the black wire with yellow stripe
is disconnected from the ignition key switch.
4. The lock unit
Clean the surface where the lock unit is to be placed with acetone or similar, and
place it according to the guideline in “Installation checklist” located on page 2.
Plug the lock unit into CoastKey’s harness.
5. Test and Safety
Secure CoastKey’s harness and other loose wires with cable ties. Turn on the main
switch and complete the “Test and Safety Form” on the next page before you use
the boat for the first time.
Note:
If the boat is equipped with two engines, repeat the above installation
procedure for engine No. 2
Checklist for Installation
INSTALLATION GUIDE
Test and Safety Form
Revision 2.6 - English version
Checklist for Installation
Please refer to user manual for proper procedure for carrying out the points
below.
OK
Error
Turn on the ignition and start the engine(s) with the key fob.
Check that the start sequence works correctly and as specified.
Check the radio range by moving the key device more than 20 meters away
from the boat to make sure that the wireless lanyard cord is functioning properly and stops the engine(s).
(The distance needed to stop the engine(s) on land can vary based on the
radio reflection where the boat is located)
Check that the key device vibrates and the signal beacon is activated when a
“Man overboard” situation is simulated.
The ignition is switched back on automatically 12 seconds after a man overboard situation has occurred. Check that the engine(s) can be started directly
from the lock unit’s push button after a simulated man overboard situation.
Reset the system by taking control via the key fob by turning it off and then
back on by switching the main switch off and back on before the next test.
Enter the 4-digit PIN code provided with your CoastKey system by pressing
the lock unit’s button to unlock the system and check that the engine(s) starts
after the confirmation tone.
(Optional) Check that the aux. functions work from the key unit.
If connected to trim in a dual installation, check that both engines tilt in
parallel.
If connected to an anchor winch, the anchor must be secured with a strap.
Make sure the winch pulls in when you unlock the key-lock on the key fob.
Check that the manual ignition switch works normally when the lock unit is
disconnected. (The lock unit is disconnected by disconnecting the gray 8-pin
connector located 15 cm down the lock unit’s harness.)
When the system is disconnected, there are some types of engines that can
only be stopped using the manual lanyard switch.
The User Manual must be read before the CoastKey system is used.
Drivers and passengers must be informed of the lock units position and how to restart the
engine (s) in an emergency.
Take care of your owner’s manual as a future reference.
Disclaimer:
CoastKey AS will not be held responsible for any damage to personnel or property arising
from the incorrect use or installation of any CoastKey product.
It is mandatory to read the installation manual, user manual and complete the test and
security form before attempting any CoastKey installation.
CoastKey AS, Vestre Strandvei 77, N-3482 Tofte, Norway
www.coastkey.com - [email protected]