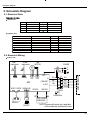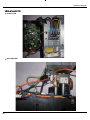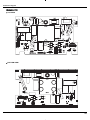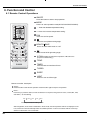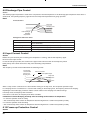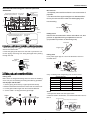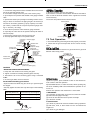
1
Service Manual
MODEL: GWC09KF-K3DNA5A
GWH09KF-K3DNA5A
GWH09KF-K3DNA6A
GWC09KF-K3DNA9A
GWH09KF-K3DNB1A
(Refrigerant R410A)
GWC12KF-K3DNA5A
GWH12KF-K3DNA5A
GWH12KF-K3DNA6A
GWC12KF-K3DNA9A
GWH12KF-K3DNB1A
GREE ELECTRIC APPLIANCES,INC.OF ZHUHAI
Table of Contents
Summary and Features.................................................................................1
Part 1 Safety Precautions..........................................................................................2
Part 2 Specifications.....................................................................................................3
2.1 Unit Specifications..................................................................................................3
2.2 Operation Characteristic Curve............................................................................13
2.3 Capacity Variation Ratio According to Temperature............................................13
2.4 Operation Data.....................................................................................................14
2.5 Noise Criteria Curve Tables for both Models.......................................................14
Part 3 Construction Views......................................................................................15
3.1 Indoor Unit ...........................................................................................................15
3.2 Outdoor Unit ........................................................................................................15
Part 4 Refrigerant System Diagram...................................................................16
Part 5 Schematic Diagram......................................................................................17
5.1 Electrical Data......................................................................................................17
5.2 Electrical Wiring....................................................................................................17
5.3 Printed Circuit Board............................................................................................19
Part 6 Function and Control...................................................................................24
6.1 Remote Control Operations..................................................................................24
6.2 Changing Batteries and Notices ..........................................................................26
6.3 Description of Each Control Operation.................................................................27
6.4 Troubleshooting of Temp Sensor Malfunction ....................................................29
6.5 Frequency Control................................................................................................29
6.6 3-minutes Standby...............................................................................................29
6.7 Compressor Protection Function..........................................................................29
6.8 Discharge Pipe Control........................................................................................30
6.9 Input Current Control............................................................................................30
6.10 Freeze-up Protection Control.............................................................................30
6.11 Heating Peak-cut Control...................................................................................30
6.12 Defrost Control...................................................................................................31
6.13 Fan Control........................................................................................................32
Table of Contents
Part 7 Installation Manual........................................................................................33
7.1 Tools Required for Installation.............................................................................33
7.2 Installation Position Selection..............................................................................33
7.3 Install Indoor Unit.................................................................................................33
7.4 Install Outdoor Unit ..............................................................................................37
7.5 Test Operation......................................................................................................38
Part 8 Exploded Views and Parts List..............................................................39
8.1 Indoor Unit.............................................................................................................39
8.2 Outdoor Unit..........................................................................................................48
Part 9 Troubleshooting...............................................................................................60
9.1 Precautions Before Performing Inspection or Repair...........................................60
9.2 Confirmation.........................................................................................................60
9.3 Judgement by Flashing LED of Indoor/Outdoor Unit...........................................60
9.4 How to Check Simply the Main Part.....................................................................62
9.5 2-way, 3-way Valve Appearance..........................................................................66
Part10 Removal Procedure.......................................................................................73
10.1 Removal Procedure of Indoor Unit.....................................................................73
10.2 Removal Procedure of Outdoor Unit...................................................................87
Part11 Care and Cleaning .........................................................................................92
11.1 Cleaning of Refrigeration System.......................................................................92
11.2 Cleaning of Heat Exchanger............................................................................... 92
Summary and Features
Summary and Features
Indoor Unit
GWC09KF-K3DNA5A/I
GWH09KF-K3DNA5A/I
GWC12KF-K3DNA5A/I
GWH12KF-K3DNA5A/I
GWH09KF-K3DNA6A/I
GWH12KF-K3DNA6A/I
GWH09KF-K3DNB1A/I
GWC09KF-K3DNA9A/I
GWC12KF-K3DNA9A/I
Outdoor Unit
GWC09KF-K3DNA5A/O(CB146W0050)
GWC12KF-K3DNA5A/O(CB146W0070)
GWH09KF-K3DNA5A/O(CB146W0060/CB146W0069)
GWH12KF-K3DNA5A/O(CB146W0080/CB146W0089)
GWH12KF-K3DNB1A/I
GWC09KF-K3DNA5A/O(CB146W0051)
GWC12KF-K3DNA5A/O(CB146W0072)
GWH09KF-K3DNA5A/O(CB146W0063/CB146W0068)
GWH12KF-K3DNA5A/O(CB146W0083/CB146W0088)
Remote Control
FAN AUTO
OPER
AIR HEALTH X-FAN
HUMIDITY
FILTER
TURBO
HOUR
YB1F2
ON/OFF
ON/OFF
MODE
FAN
X-FAN
TEMP
TIMER
TURBO
SLEEP
LIGHT
1
Safety Precautions
1.Safety Precautions
Installing, starting up, and servicing air conditioner can be
Make sure the outdoor unit is installed on a stable, level
hazardous due to system pressure, electrical components, and
surface with no accumulation of snow, leaves, or trash
equipment location, etc.
beside.
Only trained, qualified installers and service personnel are
Make sure the ceiling/wall is strong enough to bear the
allowed to install, start-up, and service this equipment.
weight of the unit.
Untrained personnel can perform basic maintenance functions
Make sure the noise of the outdoor unit does not disturb
such as cleaning coils. All other operations should be
neighbors.
performed by trained service personnel.
Follow all the installation instructions to minimize the risk
When handling the equipment, observe precautions in the
of damage from earthquakes, typhoons or strong winds.
manual and on tags, stickers, and labels attached to the
equipment. Follow all safety codes. Wear safety glasses and
Avoid contact between refrigerant and fire as it generates
work gloves. Keep quenching cloth and fire extinguisher nearby
poisonous gas.
when brazing.
Apply specified refrigerant only. Never have it mixed with
Read the instructions thoroughly and follow all warnings or
any other refrigerant. Never have air remain in the
cautions in literature and attached to the unit. Consult local
refrigerant line as it may lead to rupture and other hazards.
building codes and current editions of national as well as local
Make sure no refrigerant gas is leaking out when
electrical codes.
installation is completed.
Should there be refrigerant leakage, the density of
Recognize the following safety information:
refrigerant in the air shall in no way exceed its limited
value, or it may lead to explosion.
Warning Incorrect handling could result in
personal injury or death.
Caution
Incorrect handling may result in
minor injury, or damage to product
Keep your fingers and clothing away from any moving
parts.
Clear the site after installation. Make sure no foreign
objects are left in the unit.
Always ensure effective grounding for the unit.
or property.
Warning
Caution
All electric work must be performed by a licensed technician
Never install the unit in a place where a combustible gas
according to local regulations and the instructions given in this
might leak, or it may lead to fire or explosion.
manual.
Make a proper provision against noise when the unit is
installed at a telecommunication center or hospital.
Before installing, modifying, or servicing system, main
Provide an electric leak breaker when it is installed in a
electrical disconnect switch must be in the OFF position.
watery place.
There may be more than 1 disconnect switch. Lock out and
Never wash the unit with water.
tag switch with a suitable warning label.
Handle unit transportation with care. The unit should not be
Never supply power to the unit unless all wiring and tubing
carried by only one person if it is more than 20kg.
are completed, reconnected and checked.
Never touch the heat exchanger fins with bare hands.
This system adopts highly dangerous electrical voltage.
Never touch the compressor or refrigerant piping without
Incorrect connection or inadequate grounding can cause
wearing glove.
personal injury or death. Stick to the wiring diagram and all
Do not have the unit operate without air filter.
the instructions when wiring.
Should any emergency occur, stop the unit and disconnect
Have the unit adequately grounded in accordance with
the power immediately.
local electrical codes.
Have all wiring connected tightly. Loose connection may
lead to overheating and a possible fire hazard.
All installation or repair work shall be performed by your dealer
or a specialized subcontractor as there is the risk of fire, electric
shock, explosion or injury.
2
Properly insulate any tubing running inside the room to
prevent the water from damaging the wall.
Specifications
2.Specifications
2.1 Unit Specifications
Models GWC09KF-K3DNA5A, GWH09KF-K3DNA5A
GWC09KF-K3DNA5A
Model
Product Code
CB14600050 CB14600051
Function
Rated Voltage
Frequency
High
(Inverter different Com pres s or Standard
speed)
Low
Total Capacity
High
(Inverter different Com pres s or Standard
speed)
Low
Power Input
High
(Inverter different Com pres s or Standard
Low
speed)
Rated Input
Rated Current
Air Flow Volume
H
Dehum idifying Volum e
EER / C.O.P
Energy Clas s
Indoor unit
Fan Motor
Speed
Hz
Hz
Hz
W / Btu/h
W / Btu/h
W / Btu/h
W
W
W
W
A
m 3/h
COOLING
220-240V̚
78
53
15
3230 / 11000
2650 / 9000
450 / 1500
1350
800
200
1420
6.3
600
COOLING
HEATING
220-240V̚
78
98
53
72
15
24
3230 / 11000
4100 / 14000
2650 / 9000
3520 / 12000
450 / 1500
450 / 1500
1350
1450
800
950
200
200
1420
1550
6.3
6.8
600
M
m 3/h
370
370
L
3
m /h
l/h
W/W
H
M
L
r/m in
r/m in
r/m in
W
ȝF
A
mm
mm
280
0.8
3.3
A/A
GWC09KF-K3DNA5A/I
1100
900
700
10
1.2
0.16
Cross flow fan
ĭ92X594
Alum inum fin-copper tube
7
2-1.4
280
0.8
3.3/3.7
A/A
GWH09KF-K3DNA5A/I
1100
900
700
10
1.2
0.16
Cross flow fan
ĭ92X594
Aluminum fin-copper tube
7
2-1.4
mm
610X294X24
610X294X24
W
A
dB (A)
dB (A)
dB (A)
dB (A)
dB (A)
dB (A)
mm
mm
kg
MP24BA
1.5
PCB 3.15A
38
30
24
48
40
34
770X283X201
844X342X261
8/11
MP24BA
1.5
PCB 3.15A
38
30
24
48
40
34
770X283X201
844X342X261
8/11
Output
Capacitor
RLA
Type
Diameter-Length
Fan
mm
Evaporator
Pipe Diameter
Row-Fin Gap
Coil length (l)Xheight
(H)Xcoil width (L)
Model
Output
Swing
Motor
Fus e (A)
Sound Press ure Level
Sound Power Level
Dimension (WXHXD) ( m m)
Dimension of Package (LXWXH)
Net Weight /Gross Weight
GWH09KF-K3DNA5A
CB14600060 CB14600063
CB14600068 CB14600069
H
M
L
H
M
L
Remarks:
Rating conditions are:
Cooling: Indoor air temperature 27°C D.B. / 19°C W.B.
Outdoor air temperature 35°C D.B. / 24°C W.B.
Heating: Indoor air temperature 20°C D.B.
Outdoor air temperature 7°C D.B. / 6°C W.B.
3
Specifications
Outdoor Unit
Manufacturer/trademark
Model
Type
Compressor L.R.A. (A)
A
DIT/daikin
1YC23AEXD
1YC23AEXD
5RWDU\
5RWDU\
4
4
A
4
4
W
600
600
CS-7SA
CS-7SA
Capillary
Transducer starting
Capillary
Transducer starting
10~48
-15~48
Starting Method
Working Temp Range
ć
Aluminum fin-copper tube
Aluminum fin-copper tube
Pipe Diameter
mm
7
7
Rows-Fin Gap
mm
1-1.4
1-1.4
Coil
Coil length (l) X height (H) X coil width (L)
Speed
Output of Fan Motor
RLA
Capacitor
Air Flow Volume of Outdoor Unit
Fan
DIT/daikin
Power Input(W)
Throttling Method
Fan Motor
GWH09KF-K3DNA5A/O
RLA(A)
Overload Protector
Heat
Exchanger
Coil
GWC09KF-K3DNA5A/O
mm
647X528X19.05
647X528X19.05
rpm
930
930
W
30
30
A
0.236
0.236
ȝF
2
2
3
1600
1600
Axial fan
Axial fan
370
370
/
Auto defrosting
T1
T1
I
I
IP24
IP24
Mpa
3.8
3.8
m /h
Type
Diameter
mm
Defrosting Method
Climate Type
Isolation
Moisture Protection
Permissible Excessive Operating
Pressure for the Discharge Side
Permissible Excessive Operating
Pressure for the Suction Side
Sound Pressure Level
Mpa
1.2
1.2
dB (A)
51
51
Sound Power Level
dB (A)
61
61
Dimension (WXHXD)
mm
710X550X275
710X550X275
Dimension of Package (LXWXH)
mm
771X348X592
771X348X592
kg
27/31
28/32
R410A
R410A
0.74
0.74
5
5
Net Weight /Gross Weight
Refrigerant
Name of refrigerant
Weight
Length (m)
Connection Gas additional charge
Pipe
Liquid Pipe Diameter
kg
m
g/m
15
20
mm
ĭ6
ĭ6
mm
ĭ9.52
ĭ9.52
Max. Interunit Height Difference
m
10
10
Max. Interunit Piping Length
m
15
15
Gas Pipe Diameter
The above data is subject to change without notice. Please refer to the nameplate of the unit.
4
Specifications
Models GWC12KF-K3DNA5A, GWH12KF-K3DNA5A
GWC12KF-K3DNA5A
Model
Product Code
CB14600070
Function
Rated Voltage
High
Frequency
(Inverter different Com pres sor Standard
Low
s peed)
High
Total Capacity
(Inverter different Com pres sor Standard
Low
s peed)
High
Power Input
(Inverter different Com pres sor Standard
Low
s peed)
Rated Input
Rated Current
Air Flow Volum e
H
M
L
Dehum idifying Volum e
EER / C.O.P
Energy Class
Indoor unit
Fan Motor
Speed
H
M
L
Output
Capacitor
RLA
Type
Diam eter-Length
Fan
Swing
Motor
Fus e (A)
Sound Press ure Level
COOLING
HEATING
220-240V̚
92
108
72
78
15
24
3960 / 13500
5130 / 17500
3530 / 12000
4100 / 13990
600 / 2000
600 / 2000
1450
1550
1100
1135
220
220
1550
1650
6.5
7.8
680
410
mm
mm
300
1.5
3.21
A/A
GWC12KF-K3DNA5A/I
1150
950
750
10
1.2
0.16
Cros s flow fan
ĭ92X594
Alum inum fin-copper tube
7
2-1.4
300
1.5
3.21/3.61
A/A
GWH12KF-K3DNA5A/I
1150
950
750
10
1.2
0.16
Cross flow fan
ĭ92X594
Alum inum fin-copper tube
7
2-1.4
mm
610X294X24
610X294X24
W
A
dB (A)
dB (A)
dB (A)
dB (A)
dB (A)
dB (A)
mm
mm
kg
MP24BA
1.5
PCB 3.15A
39
31
25
49
41
35
770X283X201
844X342X261
9/12
MP24BA
1.5
PCB 3.15A
39
31
25
49
41
35
770X283X201
844X342X261
9/12
Hz
Hz
Hz
W / Btu/h
W / Btu/h
W / Btu/h
W
W
W
W
A
m 3/h
m 3/h
m 3/h
l/h
W/W
r/m in
r/m in
r/m in
W
ȝF
A
mm
Sound Power Level
Dim ens ion (WXHXD) ( m m )
Dim ens ion of Package (LXWXH)
Net Weight /Gros s Weight
H
M
L
H
M
L
CB14600080 CB14600083
CB14600088 CB14600089
COOLING
220-240V̚
92
72
15
3960 / 13500
3530 / 12000
600 / 2000
1450
1100
220
1550
6.5
680
410
Evaporator
Pipe Diam eter
Row-Fin Gap
Coil length (l)Xheight
(H)Xcoil width (L)
Model
Output
CB14600072
GWH12KF-K3DNA5A
Remarks:
Rating conditions are:
Cooling: Indoor air temperature 27°C D.B. / 19°C W.B.
Outdoor air temperature 35°C D.B. / 24°C W.B.
Heating: Indoor air temperature 20°C D.B.
Outdoor air temperature 7°C D.B. / 6°C W.B.
5
Specifications
GWC12KF-K3DNA5A/O
GWH12KF-K3DNA5A/O
DIT/daikin
DIT/daikin
Model
1YC23AEXD
1YC23AEXD
Type
5RWDU\
4
4
Outdoor Unit
Manufacturer/trademark
A
5RWDU\
4
RLA(A)
A
4
Power Input(W)
W
Compressor L.R.A. (A)
Overload Protector
Throttling Method
Starting Method
Working Temp Range
Heat
Exchanger
Coil
Coil
Capillary
Capillary
Transducer starting
Transducer starting
10~48
-15~48
Aluminum fin-copper tube
Aluminum fin-copper tube
7
7
mm
Rows-Fin Gap
mm
2-1.4
2-1.4
mm
647X528X38.1
647X528X38.1
rpm
930
930
W
30
30
Speed
Output of Fan Motor
RLA
Capacitor
Air Flow Volume of Outdoor Unit
Fan
600
CS-7SA
Pipe Diameter
Coil length (l) x height (H) x coil width (L)
Fan Motor
ć
600
CS-7SA
A
0.236
0.236
ȝF
2
2
3
1600
1600
Axial fan
Axial fan
370
370
T1
Auto defrosting
m /h
Type-Piece
Diameter
mm
Defrosting Method
Climate Type
T1
I
I
IP24
IP24
Mpa
3.8
3.8
Mpa
1.2
1.2
dB (A)
53
53
dB (A)
63
63
Dimension (WXHXD)
mm
710X550X275
710X550X275
Dimension of Package (LXWXH)
mm
771X348X592
771X348X592
kg
29/33
30/34
Isolation
Moisture Protection
Permissible Excessive Operating
Pressure for the Discharge Side
Permissible Excessive Operating
Pressure for the Suction Side
Sound Pressure Level
Sound Power Level
Net Weight /Gross Weight
Refrigerant
R410A
R410A
kg
m
1.0
1.0
5
5
g/m
15
20
Name of refrigerant
Weight
Length (m)
Connection Gas additional charge
Pipe
Liquid Pipe Diameter
mm
ĭ6
ĭ6
mm
ĭ9.52
ĭ9.52
Max. Interunit Height Difference
m
10
10
Max. Interunit Piping Length
m
20
20
Gas Pipe Diameter
The above data is subject to change without notice. Please refer to the nameplate of the unit.
6
Specifications
Models GWH09KF-K3DNA6A, GWH12KF-K3DNA6A
Model
GWH09KF-K3DNA6A
GWH12KF-K3DNA6A
CB14600110
CB14600120
V̚
220-240
220-240
Hz
50
50
1
1
Indoor
Indoor
Product Code
Rated Voltage
Power Supply Rated Frequency
Phases
Power Supply Mode
Cooling Capacity (Min̚Max)
W
2650(450~3230)
3530(600~3960)
Heating Capacity (Min̚Max)
W
3520(450~4100)
4100(600~5130)
Cooling Power Input (Min̚Max)
W
800(200~1350)
1100(220~1450)
Heating Power Input (Min̚Max)
W
950(200~1450)
1135(220~1550)
Cooling Power Current
A
3.55
4.88
Heating Power Current
A
4.21
5.04
Rated Input
W
1550
1650
Rated Current
A
6.88
7.32
Air Flow Volume(SH/H/M/L/SL)
3
600/520/370/280/-
680/560/410/300/-
Dehumidifying Volume
m /h
L/h
1
1.2
EER
W/W
3.3
3.21
COP
W/W
3.7
3.61
SEER
W/W
/
/
HSPF
W/W
/
/
12-18
16-24
GWH09KF-K3DNA6A/I
GWH12KF-K3DNA6B/I
Application Area
m
2
Model of indoor unit
Fan Type
Cross-flow
Cross-flow
Diameter Length(DXL)
mm
ĭ92X594
ĭ92X594
Fan Motor Cooling Speed
(SH/H/M/L/SL)
r/min
1300/1100/900/700/-
1350/1150/950/750/-
Fan Motor Heating Speed
(SH/H/M/L/SL)
r/min
1300/1140/980/820/-
1350/1190/1020/850/-
Output of Fan Motor
W
10
10
Fan Motor RLA
A
0.16
0.16
Fan Motor Capacitor
ȝF
1.2
1.2
Input of Heater
W
0
0
Aluminum Fin-copper Tube
Aluminum Fin-copper Tube
Evaporator Form
Indoor Unit
Pipe Diameter
mm
ĭ7
ĭ7
Row-fin Gap
mm
2-1.4
2-1.4
Coil Length (LXDXW)
mm
610X24X294
610X24X294
MP24BA
Swing Motor Model
Output of Swing Motor
W
1.5
MP24BA
1.5
Fuse
A
PCB 3.15A
PCB 3.15A
Sound Pressure Level
(SH/H/M/L/SL)
dB (A)
41/36/30/24/-
42/37/31/25/-
Sound Power Level (SH/H/M/L/SL)
dB (A)
51/46/40/34/-
52/47/41/35/-
Dimension (WXHXD)
mm
770X283X201
Dimension of Carton Box (L/W/H)
mm
841X339X246
770X283X201
841X339X246
Dimension of Package (L/W/H)
mm
844X342X261
844X342X261
Net Weight
kg
8
9
Gross Weight
kg
11
12
7
Specifications
Model of Outdoor Unit
Compressor
Manufacturer/Trademark
Compressor Model
Compressor Oil
Compressor Type
Daikin Compressor
Industries/daikin
1YC23AEXD
1YC23AEXD
DAPHEN FVC50K
DAPHEN FVC50K
Rotary
Rotary
A
4
4
Compressor RLA
A
4
4
Compressor Power Input
W
600
600
Overload Protector
CS-7SA
CS-7SA
Throttling Method
Capillary
Capillary
Operation temp
ć
16̚30
16̚30
Ambient temp (cooling)
ć
10̚48
10̚48
Ambient temp (heating)
ć
Pipe Diameter
mm
-15̚24
-15̚24
Aluminum Fin-copper Tube
Aluminum Fin-copper Tube
ĭ7
ĭ7
Rows-fin Gap
mm
1-1.4
2-1.4
Coil Length (LXDXW)
mm
647X19.05X528
647X38.1X528
Fan Motor Speed
rpm
930
930
Output of Fan Motor
W
30
30
Fan Motor RLA
A
0.236
0.236
Fan Motor Capacitor
ȝF
2
2
Air Flow Volume of Outdoor Unit
3
m /h
Fan Type
Fan Diameter
mm
Defrosting Method
Climate Type
Isolation
Moisture Protection
1600
1600
Axial-flow
Axial-flow
370
370
Automatic Defrosting
Automatic Defrosting
T1
T1
I
I
IP24
IP24
Permissible Excessive Operating
Pressure for the Discharge Side
MPa
3.8
3.8
Permissible Excessive Operating
Pressure for the Suction Side
MPa
1.2
1.2
Sound Pressure Level (H/M/L)
dB (A)
51/-/-
53/-/-
Sound Power Level (H/M/L)
dB (A)
61/-/-
63/-/-
Dimension (WXHXD)
mm
710X318X550
710X318X550
Dimension of Carton Box (L/W/H)
mm
768X345X577
768X345X577
Dimension of Package (L/W/H)
mm
771X348X592
771X348X592
Net Weight
kg
28
30
Gross Weight
kg
Refrigerant
Refrigerant Charge
Length
Connection
Pipe
GWH12KF-K3DNA5A/O
L.R.A.
Condenser Form
Outdoor Unit
GWH09KF-K3DNA5A/O
Daikin Compressor Industries
/daikin
kg
32
34
R410A
R410A
0.74
1
m
5
5
Gas Additional Charge
g/m
30
20
Outer Diameter Liquid Pipe
mm
ĭ6
ĭ6
Outer Diameter Gas Pipe
mm
ĭ9.52
ĭ9.52
Max Distance Height
m
10
10
Max Distance Length
m
15
20
The above data is subject to change without notice. Please refer to the nameplate of the unit.
8
Specifications
Models GWC09KF-K3DNA9A, GWC12KF-K3DNA9A
Model
Product Code
Rated Voltage
V̚
Phases
Power Supply Mode
GWC09KF-K3DNA9A
GWC12KF-K3DNA9A
CB146009300 CB146009301
CB146009400 CB146009402
220-240
220-240
1
1
Indoor
Indoor
Cooling Capacity (Min̚Max)
W
2650(450~3230)
3530(600~3960)
Heating Capacity (Min̚Max)
W
/
/
Cooling Power Input (Min̚Max)
W
800(200~1350)
1100(220~1450)
Heating Power Input (Min̚Max)
W
/
/
Cooling Power Current
A
3.55
4.88
Heating Power Current
A
/
/
Rated Input
W
1420
1550
Rated Current
A
6.30
6.50
Air Flow Volume(SH/H/M/L/SL)
3
(600/520/370/280/-)
(680/560/410/300/-)
Dehumidifying Volume
m /h
L/h
1
1.2
EER
W/W
3.30
3.21
COP
W/W
/
/
SEER
Btu/w.h
/
/
HSPF
Btu/w.h
/
/
12-18
16-24
GWC09KF-K3DNA9A/I
GWC12KF-K3DNA9A/I
Cross-flow
Cross-flow
Application Area
m
2
Model of indoor unit
Fan Type
Diameter Length(DXL)
mm
ĭ92X594
ĭ92X594
Fan Motor Cooling Speed
(SH/H/M/L/SL)
r/min
1300/1100/900/700/-
1350/1150/950/750/-
Fan Motor Heating Speed
(SH/H/M/L/SL)
r/min
/
/
W
10
10
Fan Motor RLA
A
0.16
0.16
Fan Motor Capacitor
ȝF
1.2
1.2
Input of Heater
W
0
0
Output of Fan Motor
Evaporator Form
Indoor Unit
Aluminum Fin-copper Tube
Aluminum Fin-copper Tube
Pipe Diameter
mm
ĭ7
ĭ7
Row-fin Gap
mm
2-1.4
2-1.4
Coil Length (LXDXW)
mm
610X24X294
610X24X294
Swing Motor Model
MP24BA
MP24BA
Output of Swing Motor
W
1.5
1.5
Fuse
A
PCB 3.15A
PCB 3.15A
Sound Pressure Level
(SH/H/M/L/SL)
dB (A)
41/38/30/24/-
42/39/31/25/-
Sound Power Level (SH/H/M/L/SL)
dB (A)
51/48/40/34/-
52/49/41/35/-
Dimension (WXHXD)
mm
770X283X201
770X283X201
Dimension of Carton Box (L/W/H)
mm
841X339X246
841X339X246
Dimension of Package (L/W/H)
mm
844X342X261
844X342X261
Net Weight
kg
9
9
Gross Weight
kg
12
12
9
Specifications
Model of Outdoor Unit
Compressor
Manufacturer/Trademark
Compressor Model
Compressor Oil
Compressor Type
L.R.A.
A
GWC12KF-K3DNA5A/O
DIT/daikin
1YC23AEXD
1YC23AEXD
DAPHEN FVC50K
DAPHEN FVC50K
Rotary
Rotary
4
4
Compressor RLA
A
4
4
Compressor Power Input
W
600W
600W
CS-7SA
CS-7SA
Overload Protector
Throttling Method
Capillary
Capillary
Operation temp
ć
16~30
16~30
Ambient temp (cooling)
ć
10~48
10~48
Ambient temp (heating)
ć
Condenser Form
Pipe Diameter
Outdoor Unit
GWC09KF-K3DNA5A/O
DIT/daikin
mm
/
/
Aluminum Fin-copper Tube
Aluminum Fin-copper Tube
ĭ7
ĭ7
Rows-fin Gap
mm
1-1.4
2-1.4
Coil Length (LXDXW)
mm
647X19.05X528
647X38.1X528
Fan Motor Speed
rpm
930
930
Output of Fan Motor
W
30
30
Fan Motor RLA
A
0.236
0.236
Fan Motor Capacitor
ȝF
2
2
Air Flow Volume of Outdoor Unit
3
m /h
Fan Type
Fan Diameter
mm
Defrosting Method
Climate Type
Isolation
Moisture Protection
1600
1600
Axial-flow
Axial-flow
370
370
/
/
T1
T1
I
I
IP24
IP24
Permissible Excessive Operating
Pressure for the Discharge Side
MPa
3.8
3.8
Permissible Excessive Operating
Pressure for the Suction Side
MPa
1.2
1.2
Sound Pressure Level (H/M/L)
dB (A)
51/-/-
53/-/-
Sound Power Level (H/M/L)
dB (A)
61/-/-
63/-/-
Dimension (WXHXD)
mm
710X318X550
710X318X550
Dimension of Carton Box (L/W/H)
mm
768X345X577
768X345X577
Dimension of Package (L/W/H)
mm
771X348X592
771X348X592
Net Weight
kg
27
29
Gross Weight
kg
31
33
Refrigerant
R410A
R410A
Refrigerant Charge
kg
0.74
1
Length
m
5
5
Gas Additional Charge
g/m
20
20
mm
ĭ6
ĭ6
mm
ĭ9.52
ĭ9.52
Max Distance Height
m
10
10
Max Distance Length
m
15
20
Connection Outer Diameter Liquid Pipe
Pipe
Outer Diameter Gas Pipe
The above data is subject to change without notice. Please refer to the nameplate of the unit.
10
Specifications
Models GWH09KF-K3DNB1A,GWH12KF-K3DNB1A
Model
GWH09KF-K3DNB1A
GWH12KF-K3DNB1A
CB14600760
CB14600770
V̚
220-240
220-240
Hz
50
50
1
1
Indoor
Indoor
Product Code
Rated Voltage
Power Supply Rated Frequency
Phases
Power Supply Mode
Cooling Capacity (Min̚Max)
W
2650(450~3230)
3530(600~3960)
Heating Capacity (Min̚Max)
W
3520(450~4100)
4100(600~5130)
Cooling Power Input (Min̚Max)
W
800(200~1350)
1100(220~1450)
Heating Power Input (Min̚Max)
W
950(200~1450)
1135(220~1550)
Cooling Power Current
A
3.55
4.88
Heating Power Current
A
4.21
5.04
Rated Input
W
1550
1650
Rated Current
A
6.88
7.32
Air Flow Volume(SH/H/M/L/SL)
3
600/520/370/280/-
680/560/410/300/-
Dehumidifying Volume
m /h
L/h
1
1.2
EER
W/W
3.3
3.21
COP
W/W
3.7
3.61
SEER
W/W
/
/
HSPF
W/W
/
/
12-18
16-24
GWH09KF-K3DNB1A/I
GWH12KF-K3DNB1A/I
Cross-flow
Cross-flow
Application Area
m
2
Model of indoor unit
Fan Type
Diameter Length(DXL)
mm
ĭ92X594
ĭ92X594
Fan Motor Cooling Speed
(SH/H/M/L/SL)
r/min
1300/1100/900/700/-
1350/1150/950/750/-
Fan Motor Heating Speed
(SH/H/M/L/SL)
r/min
1300/1140/980/820/-
1350/1190/1020/850/-
W
10
10
Fan Motor RLA
A
0.16
0.16
Fan Motor Capacitor
ȝF
1.2
1.2
Input of Heater
W
0
0
Output of Fan Motor
Evaporator Form
Indoor Unit
Aluminum Fin-copper Tube
Aluminum Fin-copper Tube
Pipe Diameter
mm
ĭ7
ĭ7
Row-fin Gap
mm
2-1.4
2-1.4
Coil Length (LXDXW)
mm
610X24X294
610X24X294
MP24BA
Swing Motor Model
Output of Swing Motor
W
1.5
MP24BA
1.5
Fuse
A
PCB 3.15A
PCB 3.15A
Sound Pressure Level
(SH/H/M/L/SL)
dB (A)
41/38/30/24/-
42/39/31/25/-
Sound Power Level (SH/H/M/L/SL)
dB (A)
51/48/40/34/-
52/49/41/35/-
Dimension (WXHXD)
mm
770X283X201
Dimension of Carton Box (L/W/H)
mm
844X342X261
770X283X201
844X342X261
Dimension of Package (L/W/H)
mm
847X345X276
847X345X276
Net Weight
kg
8
9
Gross Weight
kg
11
12
11
Specifications
Model of Outdoor Unit
Compressor
Manufacturer/Trademark
Compressor Model
Compressor Oil
Compressor Type
L.R.A.
A
Daikin Compressor Industries
/daikin
Daikin Compressor
Industries/daikin
1YC23AEXD
1YC23AEXD
DAPHEN FVC50K
DAPHEN FVC50K
Rotary
Rotary
4
4
A
4
4
Compressor Power Input
W
600W
600W
CS-7SA
CS-7SA
Capillary
Capillary
Throttling Method
Operation temp
ć
16̚30
16̚30
Ambient temp (cooling)
ć
18̚43
18̚43
Ambient temp (heating)
ć
-15̚24
-15̚24
Condenser Form
Aluminum Fin-copper Tube
Aluminum Fin-copper Tube
Pipe Diameter
mm
ĭ7
ĭ7
Rows-fin Gap
mm
1-1.4
2-1.4
Coil Length (LXDXW)
mm
647X19.05X528
647X38.1X528
Fan Motor Speed
rpm
930
930
W
30
30
Fan Motor RLA
A
0.236
0.236
Fan Motor Capacitor
ȝF
2
2
3
1600
1600
Axial-flow
Axial-flow
370
370
Automatic Defrosting
Automatic Defrosting
T1
T1
I
I
IP24
IP24
Output of Fan Motor
Air Flow Volume of Outdoor Unit
m /h
Fan Type
Fan Diameter
mm
Defrosting Method
Climate Type
Isolation
Moisture Protection
Permissible Excessive Operating
Pressure for the Discharge Side
MPa
3.8
3.8
Permissible Excessive Operating
Pressure for the Suction Side
MPa
1.2
1.2
Sound Pressure Level (H/M/L)
dB (A)
51/-/-
53/-/-
Sound Power Level (H/M/L)
dB (A)
61/-/-
63/-/-
Dimension (WXHXD)
mm
710X318X550
710X318X550
Dimension of Carton Box (L/W/H)
mm
771X348X592
771X348X592
Dimension of Package (L/W/H)
mm
774X351X607
774X351X607
Net Weight
kg
28
30
Gross Weight
kg
32
34
Refrigerant
Connection
Pipe
GWH12KF-K3DNA5A/O
Compressor RLA
Overload Protector
Outdoor Unit
GWH09KF-K3DNA5A/O
R410A
R410A
Refrigerant Charge
kg
0.74
1
Length
m
5
5
Gas Additional Charge
g/m
30
20
Outer Diameter Liquid Pipe
mm
ĭ6
ĭ6
Outer Diameter Gas Pipe
mm
ĭ9.52
ĭ9.52
Max Distance Height
m
10
10
Max Distance Length
m
15
20
The above data is subject to change without notice. Please refer to the nameplate of the unit.
12
Specifications
2.2 Operation Characteristic Curve
Cooling
Heating
8
10
9
7
8
6
7
5
Current(A)
Current(A)
6
5
4
3
Condition
Indoor:DB 27ć WB19ć
Indoor air flow: Super High
Pipe length:5m
Voltage:230V
2
4
3
Condition
Indoor:DB 20ć
Indoor air flow: Super High
Pipe length:5m
Voltage:230V
2
1
1
0
0
0
20
40
60
80
100
0
120
20
Compressor Speed(rps)
40
60
80
100
120
Compressor Speed(rps)
2.3 Capacity Variation Ratio According to Temperature
Heating
110
120
100
100
90
80
Capacity ratio(%)
Capacity ratio(%)
Cooling
80
70
60
Condition
Indoor:DB27℃ WB19℃
Indoor air flow: Super High
Pipe length:5m
50
32 33 34 35 36 37 38 39 40 41 42 43 44 45 46
Outdoor temp. (°C)
60
40
Condition
Indoor:DB20℃
Indoor air flow: Super High
Pipe length:5m
20
0
-15
-10
-5
0
5
10
Outdoor temp. (°C)
13
Specifications
2.4 Operation Data
Cooling
Temp. Condition(ć)
Indoor
Outdoor
27/19
35/24
Model
Standard
Pressure(Mpa)
09K
0.9 to 1.1
12K
0.8 to 1.0
Model
Standard
Pressure(Mpa)
09K
2.3 to 2.5
12K
2.4 to 2.6
Indoor Fan
Mode
Outdoor
Fan Mode
Super High
930rpm
Indoor Fan
Mode
Outdoor
Fan Mode
Super High
930rpm
Compressor
Frequency(Hz)
53
72
Heating
Temp. Condition(ᲇ)
Indoor
20/-
Outdoor
7/6
Compressor
Frequency(Hz)
72
78
NOTES :
(1) Measure surface temperature of heat exchanger pipe around center of heat exchanger path U
bent. (Thermistor themometer)
(2) Connecting piping condition : 5 m
2.5 Noise Criteria Curve Tables for Both Models
Indoor side noise when blowing
54
40
52
12K
Heating
Noise dB(A)
Noise dB(A)
50
30
09K
48
46
Cooling
44
42
20
40
Low
Middle
Indoor fan motor rotating speed
14
High
20
30
40
50
60
Compressor frequency(Hz)
70
80
Constrction Views
3. Construction Views
3.1 Indoor Unit
770
283
201
770
548.5
258.5
283
126.5
Unit:mm
3.2 Outdoor Unit
275
550
658
318
299
710
470
15
Refrigerant System Diagram
4. Refrigerant System Diagram
(1)Cooling Only Models
INDOOR UNIT
OUTDOOR UNIT
GAS SIDE
3-WAY VALVE
4-Way valve
Muffler
Discharge
HEAT
EXCHANGE
(EVAPORATOR)
Suction
Accumlator
COMPRESSOR
HEAT
EXCHANGE
(CONDENSER)
LIQUID SIDE
2-WAY VALVE
Capillary
Strainer
COOLING
HEATING
(2)Cooling & Heating Models
INDOOR UNIT
OUTDOOR UNIT
GAS SIDE
3-WAY VALVE
Muffler
Discharge
HEAT
EXCHANGE
(EVAPORATOR)
Suction
Accumlator
COMPRESSOR
HEAT
EXCHANGE
(CONDENSER)
LIQUID SIDE
2-WAY VALVE
Capillary
Strainer
COOLING
Refrigerant pipe diameter
Liquid : 1/4" (6 mm)
Gas : 3/8" (9.52 mm)
16
Schematic Diagram
5. Schematic Diagram
5.1 Electrical Data
Indoor Unit
Symbol
Color symbol
Symbol
Color symbol
WH
WHITE
BN
BROWN
YE
YELLOW
BU
BLUE
RED
BK
BLACK
RD
YEGN
YELLOW GREEN
PROTECTIVE EARTH
Outdoor Unit
Symbol
L1
PCB1~PCB2
S10/S11S40/S70/S80/S90
SAT
COMP
Parts name
REACTOR
PRINTED CIRCUIT BOARD
CONNECTOR
OVERLOAD
COMPRESSOR
PROTECTIVE EARTH
Symbol
WH
YE
RD
BN
BU
BK
YEGN
OG
Color symbol
WHITE
YELLOW
RED
BROWN
BLUE
BLACK
YELLOW GREEN
ORANGE
5.2 Electrical Wiring
Indoor Unit
TUBE
TEM.SENSOR
ROOM
TEM.SENSOR
FAN
MOTOR
POWER
M1
0
RT2
BN
BU
YEGN
0
RT1
TUBE
ROOM
PG
PGF
AP2
N
COM-OUT
L-OUT
DISP1 DISP2 SWING-UD
HEALTH-L
HEALTH-N
XT
BU
N(1)
BK
2
3
BN
BU
BK
BN
YEGN
YEGN
OUTDOOR UNIT
AC-L
L
N
PE
M2
AP1
DISPLAY
SWING
MOTOR
RD
BU
EVAPORATOR
COOL PLASMA
GENERATOR
NOTE:The parts with broken line is applicable
to the models with cold-plasma function.
17
Schematic Diagram
Outdoor Unit
Models GWC09KF-K3DNA5A/O ,GWC12KF-K3DNA5A/O
L1
EXHAUST
OUTTUBE OUTROOM
TEM.SENSOR TEM.SENSOR TEM.SENSOR
RT3
0
OG
RT5
0
RT4
0
OG
HA1
S90
S10
PCB2
HA2
BU
S70
HN3
U V W
E1
PCB1
E2
BN
YEGN
YEGN
YEGN
YEGN
PE
YEGN
WH WH
PE
YEGN
V
HN2
BK
2
3
BN
AC1
BU
N(1)
BK
S
HL2
BU
RD YE BU
X1
RD YE BU
COMP.
BN
HL3
S40
YEGN U
S11
XT
BU
AC2
INDOOR UNIT
HR1
HR2
CLAPBOARD
SUB-ASSY
M
W
ELECTRICAL BOX
WARNING
FAN
PE MOTOR
SAT
PE
PE
Please don't touch any terminal when the voltage of
terminal DC+ and DC- at PCB2 is higher than 30V to
prevent the risk of electrical shock!
Models GWH09KF-K3DNA5A/O ,GWH12KF-K3DNA5A/O ,GWH09KF-K3DNA6A/O ,
GWH12KF-K3DNA6A/O , GWH09KF-K3DNB1A/O ,GWH12KF-K3DNB1A/O
EXHAUST
OUTTUBE OUTROOM
TEM.SENSOR TEM.SENSOR TEM.SENSOR
RT3
0
L1
4YV
OG
OG
RT5
0
RT4
0
HR1
S90
HA1
S80
S10
BU
S70
S40
U V W
PE
HN2
HN3
WH WH
PE
YEGN
V
HL2
BU
RD YE BU
X1
RD YE BU
COMP.
HL3
BN
W
SAT
M
FAN
PE MOTOR
CLAPBOARD
SUB-ASSY
E1
PCB1
YEGN
2
3
BN
AC1
E2
BK
BN
YEGN
YEGN
YEGN
BU
N(1)
BK
S
PCB2
HA2
YEGN U
S11
XT
BU
AC2
INDOOR UNIT
HR2
YEGN
PE
PE
ELECTRICAL BOX
WARNING
Please don't touch any terminal when the voltage of
terminal DC+ and DC- at PCB2 is higher than 30V to
prevent the risk of electrical shock!
These circuit diagrams are subject to change without notice, please refer to the one supplied with the unit.
18
Schematic Diagram
5.3 Printed Circuit Board
TOP VIEW
Interface of input null wire
Interface of null wire of cold-plasma
Interface of live wire
Interface for feedback
of cold-plasma
Interface of indoor fan of indoor fan
Interface of input live wire
Interface of pipe temp
sensor
Interface of
communication wire
Interface of
input live wire
Interface of ambient
temp sensor
Interface of display
device
Interface of motor
Interface of capacitor
of fan
BOTTOM VIEW
19
Schematic Diagram
null line
communication
wire
live wire
ground wire
dispaly
board
infrared
receiver
20
Schematic Diagram
TOP VIEW
Interface of mainboard
and wave filter
Interface of temp sensor
Interface of outdoor fan
Interface of compressor
Interface of overload
protector of compressor
Interface of live wire
Interface of null wire
Interface of 4-way valve
BOTTOM VIEW
21
Schematic Diagram
FRONT VIEW
BOTTOM VIEW
22
Schematic Diagram
TOP VIEW
BOTTOM VIEW
23
Function and Control
6. Function and Control
6.1 Remote Control Operations
1
ON/OFF
Press this button to start or stop operation.
2
MODE
Press it to select operation mode(AUTO/COOL/DRY/FAN/HEAT).
FAN
AUTO
OPER
AIR HEALTH X-FAN
HUMIDITY
FILTER
TURBO
HOUR
3
- : Press it to decrease temperature setting.
4
+ : Press it to increase temperature setting.
5
FAN
ON/OFF
Press it to set fan speed.
6
Press it to set up &down swing angle.
2
1
ON/OFF
MODE
7
3
4
Press it to select health mode on or off.
6
5
8
FAN
Press it to set left & right swing angle.
8
7
9
10
X-FAN
TEMP
12 TURBO13 SLEEP
TIMER
HEALTH SAVE
9
11
LIGHT
X-FAN(X-FAN is the alternative expression of BLOW for the
purpose of understanding.)
14
10
TEMP
11
TIMER
Press it set auto-on timer/auto-off timer.
12
TURBO
13
SLEEP
14
LIGHT
Press it to turn on/off the light.
Remote controller description
1 ON/OFF :
Press this button to start the unit operation .Press this button again to stop the unit operation.
2 MODE :
Each time you press this button,a mode is selected in a sequence that goes from AUTO, COOL,DRY, FAN,
and HEAT*, as the following
:
AUTO
COOL
DRY
FAN
HEAT
*
*Note:Only for models with heating function.
After energization, AUTO mode is defaulted. In AUTO mode, the set temperature will not be displayed on the
LCD, and the unit will automatically select the suitable operation mode in accordance with the room temp
erature to make indoor room comfortable.
24
Function and Control
3
Press this button to decrease set temperature.Holding
it down above 2 seconds rapidly decreases set temperature. In
.
AUTO mode, set temperature is not adjustable.
4
+:
Press this button to increase set temperature.Holding it down above 2 seconds rapidly increases set temperature. In
AUTO mode, set temperature is not adjustable.
5 FAN :
This button is used for setting fan speed in the sequence that goes from AUTO,
,
, to
, then back to Auto.
Auto
Low speed
6
●
Medium speed
High speed
:
Press
button to start or stop up & down swing function.The remote controller defaults to simple swing condition.
● Press + button and
button at the same time at unit OFF to switch between simple swing and static swing,
blinking 2 seconds.
● In static swing condition, press
●
button, the swing angle of up & down louver changes as below:
If the unit is turned off during swing operation,the louver will stop at present position.
7 HEALTH SAVE:
Press HEALTH part of this button to turn on or off HEALTH function. Pressing SAVE part of this button,
is displayed
and the unit goes into SAVE operation mode. Press SAVE part of the button again to cancel SAVE function .During
SAVE operation, the tmperature and fan speed is not adjustable.
8
:
● Press
button to start or stop left & right swing function.The remote controller defaults to simple swing condition.
● Press + button and
button at the same time at unit OFF to switch between simple swing and static swing,
blinking 2 seconds..
● In static swing condition, press
button, the swing angle of left & right louver changes as below:
● If the unit is turned off during swing operation,the louver will stop at present position.
9 X-FAN:
Pressing X-FAN button in COOL or DRY mode,the icon "X-FAN" is displayed and the indoor fan will continue operation
for 10 minutes in order to dry the indoor unit even though you have turned off the unit.
After energization, X-FAN OFF is defaulted. X-FAN is not available in AUTO,FAN or HEAT mode.
10 TEMP:
Press this button to select set temperature or indoor ambient temp to be displayed by indoor unit. When there is no mark
displayed on remote controller, the current display will not change after the signal is received by indoor unit ( set emperature will be shown when first energization of the unit); When “ ” is displayed on remote control, the set temp will be
displayed after the signal is received by indoor unit; When “ ” is displayed,the indoor ambient temp will be displayed
after the signal is received by indoor unit; When “
” is displayed on remote control, the current display will not change
after the signal is received by indoor unit.
25
Function and Control
Press this button to select displaying indoor set temp or indoor ambient temp. Set temp will be displayed after first
energization of indoor unit; When temp display changes to “ ” from other state, the ambient temp will be displayed
and then set temp will be displayed after receiving other remote signals. When turning off the unit, temp display setting
will be set temp. If the user has not set the state of temp display, the set temp will be displayed.
11 TIMER:
Press TIMER button at unit ON to set TIMER OFF, HOUR OFF blinking. Press TIMER button at unit OFF to set TIMER
ON, HOUR ON blinking. In this case, pressing + or - button changes time setting. Holding down either button rapidly
changes time setting (time setting range 0.5-24hours). Press TIMER button again to confirm setting, HOUR ON/OFF
stopping blink. If there is not any operation of button within 5 seconds during HOUR ON/OFF blinking, TIMER setting
will be canceled.
12 TURBO:
Press this button to activate / deactivate the Turbo function which enables the unit to reach the preset temperature in
shortest time. In COOL mode, the unit will blow strong cooling air at super high fan speed. In HEAT mode, the unit will
blow strong heating air at super high fan speed. (This function is not applicable for some models).
13 SLEEP :
Press this button to go into the SLEEP operation mode. Press it again to cancel. This function is available in COOL ,
HEAT (Only for models with heating function) or DRY mode to maintain the most comfortable temperature for you.
14 LIGHT:
Press LIGHT button to turn on the display's light and press this button again to turn off the display's light. If the light is
tunrned on,
is displayed. If the light is tunrned off
disappears.
43 and 33 About lock :
Press "+ " and "-" buttons simultaneously to lock or unlock the keypad. If the remote controller is locked,
blinks three times.
In this case, pressing any button,
3 and 22 About switch between fahrenheit and cenrigrade
At unit OFF, press "MODE " and "- " buttons simultaneously to switch between
and
.
6.2 Changing batteries and notices
1.Remove the battery cover plate from the rear of the remote controller. (As shown in the figure).
2.Take out the old batteries.
3.Insert two new AAA1.5V dry batteries, and pay attention to the polarity.
4. Replace the battery cover plate.
Notes:
When replacing the batteries, do not use old or different batteries,
otherwise, it may cause malfunction.
If the wireless remote controller will not be used for a long time,
please remove batteries to prevent damage from leaking batteries.
The operation should be performed in its receiving range.
It should be kept 1m away from the TV set or stereo sound sets.
If the wireless remote controller does not operate normally, please
take the batteries out and replace them after 30 seconds. If still not
operating properly, replace the batteries.
26
Sketch map for
replacing batteries
is displayed.
Function and Control
6.3 Description of Each Control Operation
* Cold air prevention function
(1)Cooling Mode
1. When room temp-set temp ≤-2℃,cooling will stop;
Outdoor fan will stop later and indoor fan will operate at set
speed;
2. When room temp –set temp > -2℃, if such situation
continues for a period of time, cooling operation will be
started. In that case, indoor fan, outdoor fan and
compressor will operate and the indoor fan will operate at
set speed.
* In this mode, fan and swing motor will operate at set status
and the temp range setting is 16~30℃(61~86℉).
* If there is malfunction of outdoor unit or the unit stops for
protection, the indoor unit will keep its operation status but the
error will be displayed.
The rotational speed of indoor motor is decided based on the
indoor pipe temperature. The indoor fan can run at low speed or stop
running. This function will terminate after the unit runs for 3min or the
pipe temperature reached certain value.
During heating, if the indoor pipe temperature is lower than certain value.
The running speed of indoor fan will decrease automatically based on the
pipe temperature to
* X-Fan function
During heating, when conditions for stop of the compressor is reached,
the compressor and the outdoor fa
n stop running while the horizontal
louver rotates to level L. the indoor fan will stop after running for
60s at setting speed.
C
(5)Auto Changeover Mode
B
A
Indoor temperature- set temperature
(2)Dry Mode
1. In this mode, the fan motor runs at low fan speed while swing works
according to setting state. The range of setting temperature is 16~30 o C
In this mode, the system selects the operation mode (cooling, heating, and fan)
automatically according to the ambient temperature. The display shows the
actual operation mode and setting temperature. There will be 30s delay for
mode conversion. The protection function is the same as that of other modes.
1. When T amb =25 ć , the cooling mode is selected.
2. for heat pump unit: when Tamb =22 ć , the unit runs in heating mode
3. for cooling only unit: when Tamb < 22 ć , the unit runs in fan mode. .
4. When 22 ć <T indoor amb< 25 ć , upon initial startup, the unit will
enter auto mode and run in automatic fan mode. If the other mode
changes to auto mode, the previous operation mode will remain.
2. When outdoor unit has malfunction or stopped for protection,
the indoor fan will keep the original running state and the error will be displayed
(3)Fan Mode
1. In this mode, the indoor fan may run at high, medium, low and automatic
2. In this mode, the range of setting temperature is 16~30
o
(4)Heating Mode
Cooling
operation
When setting temperature-indoor temperature<= -1.5O C,
When setting temperature-indoor temperature>-1.5 oC and it lasts for a
certain period, the unit will start heating. In that case, indoor fan, outdoor fan
and compressor will start running. The indoor fan works according to the
operation of cold air prevention.
* In this mode, the range of setting temperature is 16~30 o C
Heating
operation
Cooling
operation
With compressor capacity supplied
With no compressor capacity supplied
(6)Auto fan speed Mode
In auto fan mode, the rotational speed of the fan for indoor unit is
decided by the differential temperature between ambient temperature and
setting temperature. In dry mode, the automatic fan speed is
forced to be low.
A
Set temperature- indoor temperature
No. of
jumper
cap
B
unit
t ype
1
09K
2
12K
model
Rotational speed
during cooling
Rotational speed
during heating
Rotational speed
during cooling
Rotational speed
during heating
Super-high
High fan
Medium
Low fan
fan speed
speed
fan speed
speed
1300
1300
1350
1350
1100
1140
1150
1190
900
980
950
1020
700
820
750
850
C
2. Protection function: in heating mode, when the compressor stops as
3. Defrosting control: when the defrosting signal is received, the
27
Function and Control
(7)Lo uver Control
Timer off: the timer off function can be set when the unit is on. When the
After energization, the swing motor will open the horizontal
louver to be open and then be close completely. And the air outlet is close.
In heating mode, if the swing function is not set, the horizontal
louver will rotate to maximum in clockwise direction. Then it will rotate
to place D. Under other state, the horizontal louver will rotate to
level L. If the swing function is set when starting the unit, the horizontal louver
will swing between place L and D. there are 7 states for the louver: in
Place L, Place A, Place B, Place C, Place D, and swing between Place L and
place D, stop in any place between Place L and place D. When the unit is
turned off, the louver will stay in place 0. The swing is available only
when the swing function is set and the indoor fan is running.
Note: When place L to B, place A to C, and place B and D is set, the horizontal
louver will swing between place L to D.
set time for timer off is reached, the unit will stop. The timing interval is
0.5hour, and the set range is 0.5~24hours.
Clock Timer (timer-on and timer-off of the unit can be set. The accuracy
is minute. E.g.: timer on at 8:00a.m.; timer off at 17:30p.m.)
Timer on: if the timer on function is set when the system is on, the unit
will keep running. If the timer on function is set when the unit is off, the
unit will start running at the previously set mode when the set time is
reached.
Timer off: if the timer off function is set when the unit is off, the unit
will keep off state even though the setting time is reached. If t he timer off
function is set when the unit is on, the unit will stop running when the
set time is reached.
Timer modification: when the unit is under timer state, start or stop of the
unit can be set via remote ON/OFF button and the timer can be reset. The
unit runs according to the latest set state.
When both the timer on and timer off are set: the system runs according to
the current set state. When the set time is reached, the unit will start
and stop running. In that case, the unit will run according to the previously
set mode when the set time for timer on is reached. The unit will stop
O(0°)
running while the set time for timer off is reached.
If the setting time for timer on and timer off is the same, the unit will stop
running no matter what the current state is.
(10)Auto-Restart Function
L
A
B
C
D
Memory: mode, vertical swing, light, set temperature, set fan speed,
general timer (not clock), Fahrenheit / Celsius. After de-energized, the unit
can operate according to the memory if it is energized again. If the timer
function is not set in the last remote control, the unit will operate according to
the last remote control. If the timer function is set in the last control before it
is de-energized, the unit will memorize the last timer setting. The set time is
(8)Sleep Function
recalculated since the energization of the unit. If the timer function is set in
1. It is applicable to cooling mode, dry mode and heating mode.
2. In cooling mode or dry mode, 1 hour after the sleep curve is
set, the setting temperature will rise by 1 . 2 hours later, the setting
temperature will rise by 2 . After that, the setting temperature will not
change any more
Set temp. Tset
set
the last control and the setting time is reached before the unit is deenergized, the unit will operate according to the previous running mode after
it is energized again. But the timer function will terminate. The clock will
not be memorized.
(11) Turbo Function
In cooling and heating mode (not available in auto, dry, fan mode),
press the Turbo button, the super high speed will be displayed in the
remote controller and the indoor fan changes to super high speed as well.
set
(12) Health Functi o n
set
When the indoor fan is running, the Health function is set by pressing
1h
2h
About 2h
3. In heating mode, 1 hour after the sleep curve is set, the set temperature
will decrease by 1 . 2 hours later, the set temperature will decrease by
2 . After that, the set temperature will not change any more.
1h
2h
About 2h
remote controller (If there is no Health button on the remote controller, the
start of Health function is defaulted).
(13) I Feel Function
If the remote controller receives the I Feel order, the controller will work
according to the ambient temp which is sent by remote controller (Except the
set
defrosting and cool air prevention, which still adopt the sampling value from
set
Set temp. Tset
set
(9)Timer Function
The main board has general timer function and clock timer function. The timer
function can be selected by remote controller.
(1) General timer (timer-on and timer-off of the unit can be set.
The accuracy is minute.E.g.: timer on for 1 hour; timer off for 1.5 hours.)
Timer on: after setting timer on, the unit will run at set time according to
the original set mode. The timing interval is 0.5hour, and the set
range is 0.5~24hours.
28
AC itself ambient temp sensor), the remote controller will send ambient
temperature value to controller at intervals. If the controller hasn’t received
the ambient temperature value from the remote controller for long time, then
it will run accroding to the current ambient temperature of AC. If the
function has not been set, the ambient temperature will adopt the sensor
sampling value of AC itself. If power off happens, this function will not be
memorized.
Function and Control
6.4 Troubleshooting of Temperature Sensor
Detect malfunctions of temperature sensor at
(2) Indoor pipe temperature sensor
In defrosting period, the temperature sensor malfunction will not be detected. 5 min after finishing defrosting, the system begins to detect the temperature
The temperature sensor overheats. In this case, the complete unit will stop for protection. At the same time, the temperature protection and temperature
6.5 Frequency Control
Frequency Initial Setting
<Outline>
When starting the compressor, or when conditions are varied due to the change of the room, the frequency must be initialized according
to the D value of the indoor unit and the Q value of the indoor unit.
Q value: Indoor unit output determined from indoor unit volume, air flow rate and other factors.
PI Control (Determine Frequency Up / Down by
D Signal)
1. P control
Calculate
D value in each sampling time (20 seconds), and adjust the frequency according to its difference from the frequen cy
previously calculated.
2. I control
If the operating frequency is not change more than a certain fixed time, adjust the frequency up and down according to the
D value,
obtaining the fixed D value.
When the D value is small...lower the frequency.
When the
D value is large...increase the frequency.
3. Frequency management when other controls are functioning
When frequency is drooping;
Frequency management is carried out only when the frequency droops.
For limiting lower limit
Frequency management is carried out only when the frequency rises.
4. Upper and lower limit of frequency by PI control
The frequency upper and lower limits are set depending on indoor unit.
When low noise commands come from the indoor unit or when outdoor unit low noise or quiet commands come from indoor unit, the
upper limit frequency must be lowered than the usual setting.
6.6 3-minutes Standby
Prohibit to turn ON the compressor for 3 minutes after turning it off.(except when defrosting)
6.7 Compressor Protection Function
When turning the compressor from OFF to ON, the upper limit of frequency must be set as follows. (The function must not be used when
defrosting.)
Frequency
FCG 3
FCG 2
FCG 1
TCG1
TCG2
TCG3
88
64
48
240
360
180
FCG3
FCG2
FCG1
TCG 1sec
TCG 2sec
TCG 3sec
Time
29
Function and Control
6.8 Discharge Pipe Control
Outline
The discharge pipe temperature is used as the compressor’s internal temperature. If the discharge pipe temperature rises above a
certain level, the operating frequency upper limit is set to keep this temperature from going up further.
Detail
Divide the Zone
Stop zone
Drooping zone
Keep zone
Up zone
Heat exchanger
thermistor
temperature
Reset zone
Management within the Zones
Zone
Stop zone
Drooping zone
Keep zone
Return / Reset zone
Control contents
When the temperature reaches the stop zone, stop the compressor and
correct abnormality.
Start the timer, and the frequency will be drooping.
Keep the upper limit of frequency.
Cancel the upper limit of frequency.
6.9 Input Current Control
Outline
Detect an input current by the CT during the compressor is running, and set the frequency upper
limit from such input current.
In case of heat pump model, this control is the upper limit control function of the frequency which
takes priority of the lower limit of four way valve activating compensation.
Detail
The frequency control will be made within the following zones.
2 Hz drooping
1.0second after
rushing in the
drooping zone
After 2.5 seconds
Compressor stops
1
Stop zone
2
Drooping zone
Keep zone
3
Reset zone
When a “stop current” continues for 2.5 seconds after rushing on the stop zone, the compressor operation stops.
If a “drooping current” is continues for 1.0 second after rushing on the drooping zone, the frequency will be 2 Hz drooping.
Repeating the above drooping continues until the current rushes on the drooping zone without change.
In the keep zone, the frequency limit will remain.
In the return / reset zone, the frequency limit will be cancelled.
Limitation of current drooping and stop value according to the outdoor air temperature
1. In case the operation mode is cooling
* The current droops when outdoor air temperature becomes higher than a certain level (model by model).
2. In case the operation mode is heating
* The current droops when outdoor air temperature becomes higher than a certain level (model by model).
6.10 Freeze-up Protection Control
Outline
30
Function and Control
During cooling operation, the signals being sent from the indoor unit allow the operating frequency limitation and then prevent
freezing of the indoor heat exchanger. (The signal from the indoor unit must be divided into the zones as the followings.)
Detail
Conditions for Start Controlling
Judge the controlling start with the indoor heat exchanger temperature after 2 sec from operation start.
Control in Each Zone
Heat exchanger
thermistor temperature
A
Return/Reset zone
Up zone
B
Keep zone
C
Drooping zone
D
Stop zone
E
6.11 Heating Peak-cut Control
Outline
Heat Pump Only
During heating operation, the signals being sent from the indoor unit allow the operating frequency limitation and prevent
abnormal high pressure. (The signal from the indoor unit must be divided as follows.)
Detail
Conditions for Start Controlling
Judge the controlling start with the indoor heat exchanger temperature after 2 sec. from operation start.
Control in Each Zone
The heat exchange intermediate temperature of indoor unit controls the following.
Stop zone
Drooping zone
Keep zone
Up zone
Heat exchanger
thermistor temperature
Reset zone
6.12 Defrost Control
Outline
Heat Pump Only
Defrosting is carried out by the cooling cycle (reverse cycle). The defrosting time or outdoor heat exchanger temperature must be more
than its fixed value when finishing.
Detail
Conditions for Starting Defrost
The starting conditions must be made with the outdoor air temperature and heat exchanger temperature. Under the conditions that the
system is in heating operation, 6 minutes after the compressor is started and more than 44 minutes of accumulated time pass since
the start of the operation or ending the defrosting.
Conditions for Canceling Defrost
The judgment must be made with heat exchanger temperature. (39°F~72°F)
31
Function and Control
Frequency
PI control
0Hz
60sec.
50sec.
Compressor
600sec.
50sec.
ON
OFF
Four way valve
ON
OFF
5sec.
Fan
5sec.
ON
OFF
Electronic expansion
valve opening
450pps
350pps
450pps
Initial opening
6.13 Fan Control
Outline
Fan control is carried out according to the following priority.
1. Fan ON control for electric component cooling fan
2. Fan control when defrosting
3. Fan OFF delay when stopped
4. ON/OFF control in cooling operation
5. Tap control when drooping function is working
6. Fan control in forced operation
7. Fan control in indoor/outdoor unit silent operation
8. Fan control in powerful mode
9. Fan control in normal operation
Detail
Fan OFF Control when Stopped
* Fan OFF delay for 60 seconds must be made when the compressor is stopped.
Tap Control in indoor/outdoor unit silent operation
1. When Cooling Operation
When the outdoor air temperature is lower than 99°F, the fan tap must be set to L.
2. When Heating Operation
When the outdoor air temperature is higher than 39°F, the fan tap must be turned to L (only for heat pump model).
32
Installation Manual
7. Installation Manual
Important Notices
1. The unit installation work must be done by qualified
personnel according to the local rules and this
manual.
2. Before installating, please contact with local
authorized maintenance center, if unit is not installed
7.2 Installation Position Selection
(1)The air inlet and outlet vent should be far from the obstruction,
make sure that the air can be blown through the whole room.
(2)Select a position where the condensing water can be easily
drained out, and the place is easily connected for outdoor unit.
(3)Select a location where the children can not reach.
(4)Can select the place where is strong enough to withstand the
full weight and vibration of the unit. And will not increase the noise.
(5)Be sure to leave enough space to allow access for routine
by the authorized maintenance center, the malfunction
may not solved, due to discommodious contacts.
maintenance. The height of the installed location should be
250cm or more from the floor.
3. When removing the unit to the o.ther place, please
firstly contact with the authorized Maintenance
Center in the local area.
(6)Select a place about 1m or more away from TVset or any other
electric appliances.
Basic Requirements For Installation
Position
(7)Select a place where the filter can be easily taken out.
(8)Make sure that the indoor unit installation should accord with
installation dimension diagram requirements.
(9)Do not use the unit in the immediate surroundings of a laundry a bath a shower or a swimming pool.
Install in the following place may cause malfunction. If it is
unavoidable contact with service center please:
(1)Select a location from which noise and outflow air emitted by
* Place where strong heat sources, vapors, flammable gas or
volatile object are emitted.
unit will not inconvenience neighbors, animals, plants.
(2)Select a location where there should be sufficient ventilation.
* Place where high-frequency waves are generated by radio
equipment, welders and medical equipment.
(3)Select a location where there should be no obstructions cover
the inlet and outlet vent.
* Place where a lot of salinities such as coast exists.
* Place where the oil (machine oil) is contained in the air.
(4)The location should be able to withstand the full weight and
vibration of the outdoor unit and permit safe installation.
* Place where a sulfured gas such as the hot spring zones is
generated.
(5)Select a dry place, but do not expose under the direct sunlight
or strong wind.
* Other place with special circumstance.
(6)Make sure that the outdoor unit installation dimension should
accord with installation dimension diagram, convenient for
7.1 Tools Required for Installation
(not supplied)
1. Gauge manifold
2.Electronic balance for refrigerant charging
3. Phillips head screwdriver
4. Knife or wire stripper
5. Carpenter’s level
9. Hammer
10. Drill
11. Tube cutter
12. Tube flaring tool
13. Torque wrench
14. Adjustable wrench
15. Reamer (for deburring)
maintenance, repair.
(7)The height difference of connecting the tubing within 5m, the
length of connecting the tubing within 10m.
(8)Select a place where it is out of reach for the children.
(9)Select a place where will not block the passage and do not
influence the city appearance.
7.3 Installation of Indoor Unit
The mounting plate should be installed on a wall which can support the weight of the indoor unit.
1) Temporarily secure the mounting plate to the wall, make sure
that the panel is completely level, and mark the boring points on
the wall.
2) Secure the mounting plate to the wall with screws.
16. Vacuum pump (For R410A)
17. Gas leakage detector
33
Installation Manual
Recommended mounting plate retention spots and
dimensions
Use tape measure
as shown.
Position the end of
a tape measure at.
Recommended mounting plate Place a leveler
retention spots (5 spots in all) on raised tab.
120.5
101
247
241.7
241.7
203
Burr removal
1.Completely remove all burrs from the cut cross section of
pipe/tube.
2. Put the end of the copper tube/pipe in a downward direction as you remove burrs in order to avoid dropping burrs
into the tubing.
Pipe
41.3
Reamer
41.3
54.5
160
50
330.5
160
Gas pipe end
331
Liquid pipe end
770
54
Keep here the piece cut out
from the unit for piping
* The removed pipe port cover can be
kept in the mounting plate pocket.
Point down
Throughthe-wall
hole Φ65mm
Drain hose
position
Unit: mm
Putting nut on
Removed pipe
port cover
A
Mounting plate
Remove flare nuts attached to indoor and outdoor unit, then
put them on pipe/tube having completed burr removal.
(not possible to put them on after flaring work)
Flare nut
1.Make the piping hole (
Copper tube
65) in the wall at a slight downward
slant to the outdoor side.
2.Insert the piping-hole sleeve into the hole to prevent the con-
Indoor
Wall pipe
Outdoor
Seal pad
Flaring work
Firmly hold copper pipe in a die in the dimension shown in
the table above.
Handle
"A"
nection piping and wiring from being damaged when passing
through the hole.
Bar
Bar
Yoke
Cone
Ø65
Copper pipe
Clamp handle
Red arrow mark
Carry out flaring work using flaring tool as shown below.
3.1 Flaring work
Flaring work
Main cause for refrigerant leakage is due to defect in theflaring
Outside diameter
mm
inch
A
mm
work. Carry out correct flaring work using the follow-ing procedure.
Cut the pipes and the cable
Ø6.35
1/4
0~0.5
Ø9.52
3/8
0~0.5
1. Use the piping kit accessory or pipes purchased locally.
2. Measure the distance between the indoor and the outdoor unit.
Ø12.7
1/2
0~0.5
Ø15.88
5/8
0~1.0
3. Cut the pipes a little longer than the measured distance.
4. Cut the cable 1.5m longer than the pipe length.
Ø19.05
3/4
1.0~1.3
Copper
pipe
90e
Slanted Uneven Rough
Check
1.Compare the flared work with figure below.
2.If flare is noted to be defective, cut off the flared section and reflare it.
Smooth all round
Inside is shiny without scratches
= Improper flaring =
Even length
all round
34
Inclined Surface Cracked Uneven
damaged
thickness
Installation Manual
3.2 Connection of piping
1.Align the center of the pipes and sufficiently tighten the flare nut
5. Insert the connecting cable fully into the terminal block and
secure it tightly with screws.
by hand.
6. Tightening torque: 1.2 N•m (0.12 kgf•m).
7. Secure the connecting cable with the cord clamp.
8. Attach the terminal cover, rear plate bushing and air inlet grille
on the indoor unit.
Indoor unit tubing
Flare nut
Pipes
CAUTION
2.Tighten the flare nut with a wrench.
• Be sure to refer to the wiring system diagram
Open-end wrench (fixed)
specific wiring instructions or limitations.
Flare nut
Wrench
labeled inside the front panel.
• Check local electrical regulations for any
Connection pipe
Terminal cover
Indoor unit tubing
Outside diameter
mm
inch
Ø6.35
1/4
Ø9.52
3/8
Ø12.7
1/2
Ø15.88
5/8
Ø19.05
3/4
Screw
Torque
kg.m
1.8
4.2
5.5
6.6
6.6
Screw
Cord clamp
Terminal block
Earth wire
If drain hose extension or embedded drain piping is required,
use appropriate parts that match the hose front end.
Connecting cable
Insert drain hose into the handle of drain pan, and join
drain hose and connecting hose according to the figure by.
Shield pipe
Terminal block
Drain hose Inside the room
Extension drain hose
BU
YEGN
CAUTION
CAUTION
BK
Insert the drain hose and drain cap into the drain port, making sure that it comes in contact with the back of the drain
port, and then mount it. If the drain hose is not connected
properly, leaking will occur.
• Attach the Insulation (Drain hose) to the drain hose.
Insulation (Drain hose)
BN
Connecting cable
About 15 cm
Drain hose
70 mm
10 mm
Earth line
Wiring the connecting cable can be carried out without removing the front panel.
1. Remove the air inlet grille. Open the air inlet grille upward and
pull it toward you.
2. Remove the terminal cover and cord clamp.
3. Insert the connecting cable (or as according to local regula-
10 mm
50 mm
tions/codes) into the pipe hole on the wall.
4. Pull the connecting cable through the cable slot on the rear
panel so that it protrudes about 15 cm out of the front.
35
Installation Manual
How to replace the drain plug and drain hose
In the case of bending or curing refrigerant pipes, keep the following precautions in mind.
Abnormal sound may be generated if improper work is conducted.
1) Do not strongly press the refrigerant pipes onto the bottom
frame.
2) Do not strongly press the refrigerant pipes on the front grille,
either.
• How to remove the drain cap
Clamp drain cap with needle-nose pliers, and pull out.
• How to remove the drain hose
The drain hose is secured in place by a screw.
Remove the screw securing the drain hose, then
pull out the drain hose.
Insulation
fixing screw
Drain hose
• How to attach the drain cap
1. Insert hexagonal wrench (4 mm).
1)
No gap
Do not apply lubricating oil
(refrigerant machine oil) when
inserting the drain cap. If applied,
deterioration and leakage of the
drain plug may occur.
2. Firmly insert drain cap.
2)
• How to attach the drain hose
The piping can be lead out from right, right rear, left left rear.
Right-side, right-back, or right-bottom piping
1)After making slits on the front panel with a knife or similar tool,
cut them out with a pair of nippers or an equivalent tool.
Attach the drain hose to the underside of the refrigerant pipes
Insert a hexagon wrench
(4 mm)
Insert the drain hose firmly until the connector contacts the insulation, then
secure it in place using the original screw.
1.After making slits on the front panel with a knife or similar tool,
cut them out with a pair of nippers or an equivalent tool.
with an adhesive vinyl tape.
2) Wrap the refrigerant pipes and drain hose together with an
insulation tape.
Slit
2.Overlap the connection pipe insulation material and the indoor
Bind with vinyl tape
unit pipe insulation material. Bind them together with vinyl tape
so that there is no gap.
Plastic bands Insulation material
Right piping
Bottom
piping
Pipe (top)
Rear piping
Indoor unit drain hose
(bottom)
Left-side, left-back, or left-bottom piping
• Interchange the drain cap and the drain hose.
(1)
(2)
(3)
(4)
CAUTION
In order to align the drain hose and drain cap, be
sure to insert securely and vertically. Incline insertion will cause water leakage.
When inserting, be sure not to attach any material
besides water. If any other material is attached, it
will cause deterioration and water leakage.
After removing drain hose, be sure not to forget
mounting drain cap.
Be sure to fix the drain hose with tape to the bottom
of piping.
3.Wrap the area which accommodates the rear piping housing
section with vinyl tape.
Vinyl tape
(wide)
For left outlet piping, cut off the
piping outlet cutting groove
with a hacksaw.
Indoor unit
drain hose
36
Drain cap
Remove the drain cap by pulling
at the projection at the end of
the cap with pliers, etc.
Wrap with vinyl tape
Wrap with vinyl tape
Pipe
Vinyl tape(wide)
Drain hose
(5) Prevent drain water frozen under low temperature environment.
When installing indoor unit's drain hose outdoors, necessary
measure for frost protection should be taken to prevent drain
water frozen.
• Under low temperature environment (when outdoor temperature under 32 °F), after cooling operation is executed,
water in the drain hose could be frozen.
Once drain water is frozen, the drain hose will be blocked
and water leakage may be resulted for indoor unit.
Indoor
unit pipe
Connection
pipe
Indoor unit
Auxiliary pipes
Connecting
cable
Installation
plate
4.Bundle the piping and drain hose together by wrapping them
with vinyl tape for enough to cover where they fit into the rear
piping housing section.
Indoor unit installation
1) Pass the drain hose and refrigerant pipes through the wall
hole, then set the indoor unit on the mounting plate hooks by
using the markings at the top of the indoor unit as a guide.
Installation Manual
A Mounting plate
Drain-water hole
Marking
Bottom frame
Drain plug
Hose (available commercially,
inner dia. 16mm)
2) Swing the indoor unit to right and left to confirm that it is firmly
hooked on the installation plate.
3)While pressing the indoor unit onto the wall, hook it at the lower
part on the installation plate.
Remove the Valve cover from the unit by loosening the screw.
Align the center of the pipings and sufficiently tighten the flare
nut by hand.
Pull the indoor unit toward you to confirm that it is firmly
hooked on the installation plate.
For detaching the indoor unit from the installation plate pull the
indoor unit toward you while pushing the bottom up at the
specified places.
Finally, tighten the flare nut with torque wrench until the wrench
clicks.
Outdoor unit
Push
Liquid side piping
(Smaller diameter)
Push
4)Run the drain hose at a downward sloped angle.
Do not rise the drain hose.
Do not form the drain hose
into the waved shape.
50 mm
or more
Torque wrench
Gas side piping
(Bigger diameter)
Do not put the
drain hose end
into water.
Do not put the drain
hose end in the
drainage ditch.
5)Put water in the drain pan and make sure that the water is
being drained outside.
Caution:
Install the drain pipe for proper drainage. Improper drainage can
After the piping has been connected to the indoor unit, perform
result in water dripping inside the room.
the air purge.
7.4 Installation of Outdoor Unit
AIR PURGE
Evacuate the air in the connecting pipes and in the indoor
* Holes are provided on the base plate of the outdoor unit to
ensure that the defrost water produced during heating opera-
unit using a vacuum pump.
Do not use the refrigerant in the outdoor unit.
tions is drained off efficiently.
* If a centralized drain is required when installing the unit on a
For details, see the vacuum pump manual.
balcony or wall.
* If the drain port is covered by a mounting base or floor surface,
place additional foot bases of at least 30mm in height under the
outdoor unit’s feet.
* In cold areas, do not use a drain hose with the outdoor unit.
(Otherwise, drain water may freeze, impairing heating
Air purging with vacuum pump
Be sure to use a vacuum pump with counter-flow prevention
function so that oil inside the pump does not flow back into the
air conditioner pipes when the pump stops. (If oil inside the
vacuum pump enters into the air conditioner circuit which uses
R410A, trouble with the refrigeration system may develop.)
performance.)
37
Installation Manual
1. Connect the charge hose from the manifold valve to the service
port of the gas side packed valve.
2. Connect the charge hose to the port of the vacuum pump.
1) Strip the insulation from the wire (20mm).
2) Connect the connection wires between the indoor and outdoor
3. Open fully the low pressure side handle of the gauge manifold
valve.
units so that the terminal numbers match. Tighten the terminal
screws securely.
4. Operate the vacuum pump to begin evacuating. Perform evacuating for about 15 minutes if the piping length is 20 meters (15
The screws are packed with the terminal board.
Terminal block
minutes for 20 meters) (assuming a pump capacity of 27 liters
per minute). Confirm that the compound pressure gauge read-
N(1)
ing is –101 kPa (–76 cmHg).
5. Close the low pressure valve handle of gauge manifold.
7. Remove the charging hose from the service port.
8. Securely tighten the caps on the packed valves.
Pressure gauge
Manifold valve
Handle Hi
(Keep full closed)
Handle Lo
Charge hose
(For R410A only)
Charge hose
(For R410A only)
Connecting
pipe
Vacuum pump
adapter for
counter-flow
prevention
(For R410A only)
Packed valve
at liquid side
3
BU
BK
6. Open fully the valve stem of the packed valves (both sides of
Gas and Liquid).
Compound
pressure
gauge
-101kPa
(-76cmHg)
2
YEGN
BN
Connecting cable
7.5 Test Operation
1. Check that all tubing and wiring have been properly connected.
2. Check that the gas and liquid side service valves are fully
open.
Check the flare nut connections for gas leaks with a gas leak
detector and/or soapy water.
Check places for
flare nut connections
(indoor unit)
Valve cover
Vacuum
pump
Packed valve at gas side
Service port
(Valve core (Setting pin))
Electric parts
CAUTION
Check places
for outdoor unit
• IMPORTANT POINTS FOR PIPING WORK
1. Keep dust and moisture from entering the pipes.
2. Tighten connections carefully (between pipes and unit).
3. Evacuate the air in the connecting pipes using a VACUUM
PUMP.
4. Check for gas leaks at all connections.
Packed Valve handling precautions
• Open the valve stem all the way; but do not try to open it beyond
the stopper.
• Securely tighten the valve stem cap with torque in the following
table:
Gas side (Ø9.52 mm)
33 to 42 N• m (3.3 to 4.2 kgf •m)
Liquid side (Ø6.35 mm)
14 to 18 N• m (1.4 to 1.8 kgf •m)
Service port
14 to 18 N• m (1.4 to 1.8 kgf • m)
1)Switch on power, press “ON/OFF” button on the wireless remote control to start the operation.
2)Press MODE button, to select the COOL, HEAT (Cooling only
unit is not available), FAN to check whether the operation is normal or not.
Perform test operation and check items 1 and 2 below.
1. INDOOR UNIT
(1) Is operation of each button on the remote control unit normal?
(2) Does each lamp light normally?
(3) Do the air flow-direction louver operate normally?
(4) Is the drain normal?
2. OUTDOOR UNIT
(1) Is there any abnormal noise and vibration during operation?
(2) Will noise, wind, or drain water from the unit disturb the
Cap
Hexagon wrench(4mm)
38
neighbors?
(3) Is there any gas leakage?
Exploded Views and Parts List
8. Exploded Views and Parts List
8.1 Indoor Unit
Models GWC09KF-K3DNA5A/I,GWH09KF-K3DNA5A/I,GWC12KF-K3DNA5A/I,GWH12KF-K3DNA5A/I
15
14
23
13
26
12
17
11
24
33
34
35
36
10
37
38
39
9
40
7
16
19
6
5
20
4
21
18
3
22
8
25
2
1
27
28
FAN AUTO
OPER
AIR HEALTH X-FAN
HUMIDITY
FILTER
TURBO
HOUR
ON/OFF
ON/OFF
MODE
30
31
32
FAN
X-FAN
TEMP
TIMER
TURBO
SLEEP
LIGHT
29
39
Exploded Views and Parts List
No.
1
2
3
4
5
6
7
8
9
10
11
12
13
14
15
16
17
18
19
20
21
22
23
24
25
26
27
28
29
30
31
32
33
34
35
36
37
38
39
40
Description
Product Code
Decorative Strip
Front Panel
Filter Sub-Assy
Front Case
Guide Louver
Air Louver
Shaft of guide louver
Front Panel Assy
Drainage Pipe Sub-assy
Evaporator Support
Cross Flow Fan
Evaporator Assy
Helicoid tongue
Rear Case assy
Wall Mounting Frame
Electric Box Cover
Electric Box Assy
Motor Press Plate
Electric Box Cover Sub-Assy
Terminal Board
Crank
Step Motor
Pipe plug (outlet)
Electric Box
Motor Sub-Assy
Baffle Plate
Fan Motor
Front Case Assy
Remote Controller
Power Cord
Connecting Cable
Screw Cover
Main Board
XY Capacitor
Ambient Temperature Sensor
Relay
Fan Bearing
Damping washer sub-assy
Axile Bush sub-assy
Electric Box Sub-Assy
Part Code
GWC09KF-K3DNA5A/I
CB146N0050
20192292
2001232501T
1112208201
20012324
10512119
10512160
1054202001
2001237601
0523204101
24212108
10352423
01002270
26112486
2220211901
0125201801
20122106
2020225303
26112191
20122109
42011233
73012005
1521210701
76712020
20112086
15002002
26112218
15012093
2001237501
30510061
400204643
400205236
24252019
30138124
33030013
390000453
44020386
76512210
76512011
10542024
2020225703
The above data are subject to change without notice.
40
GWH09KF-K3DNA5A/I
CB146N0060
20192292
2001232501T
1112208201
20012324
10512119
10512160
1054202001
2001237601
0523204101
24212108
10352423
01002270
26112486
2220211901
0125201801
20122106
2020225302
26112191
20122109
42011233
73012005
1521210701
76712020
20112086
15002002
26112218
15012093
2001237501
30510061
400204643
400205236
24252019
30138120
33030013
390000453
44020386
76512210
76512011
10542024
2020225702
Qty
1
1
2
1
1
2
2
1
1
1
1
1
1
1
1
1
1
1
1
1
1
1
1
1
1
1
1
1
1
1
1
1
1
1
1
1
1
1
1
1
Exploded Views and Parts List
No.
1
2
3
4
5
6
7
8
9
10
11
12
13
14
15
16
17
18
19
20
21
22
23
24
25
26
27
28
29
30
31
32
33
34
35
36
37
38
39
40
Description
Product Code
Decorative Strip
Front Panel
Filter Sub-Assy
Front Case
Guide Louver
Air Louver
Shaft of guide louver
Front Panel Assy
Drainage Pipe Sub-assy
Evaporator Support
Cross Flow Fan
Evaporator Assy
Helicoid tongue
Rear Case assy
Wall Mounting Frame
Electric Box Cover
Electric Box Assy
Motor Press Plate
Electric Box Cover Sub-Assy
Terminal Board
Crank
Step Motor
Pipe plug (outlet)
Electric Box
Motor Sub-Assy
Baffle Plate
Fan Motor
Front Case Assy
Remote Controller
Power Cord
Connecting Cable
Screw Cover
Main Board
XY Capacitor
Relay
Ambient Temperature Sensor
Fan Bearing
Damping washer sub-assy
Axile Bush sub-assy
Electric Box Sub-Assy
Part Code
GWC12KF-K3DNA5A/I
CB146N0070
20192292
2001232501T
1112208201
20012324
10512119
10512160
1054202001
2001237601
0523204101
24212108
10352423
01002745
26112486
2220211901
0125201801
20122106
2020225301
26112191
20122109
42011233
73012005
1521210701
76712020
20112086
15002002
26112218
15012093
2001237501
30510061
400204643
400205236
24252019
30138125
33030013
44020386
390000453
76512210
76512011
10542024
2020225701
GWH12KF-K3DNA5A/I
CB146N0080
20192292
2001232501T
1112208201
20012324
10512119
10512160
1054202001
2001237601
0523204101
24212108
10352423
01002745
26112486
2220211901
0125201801
20122106
20202253
26112191
20122109
42011233
73012005
1521210701
76712020
20112086
15002002
26112218
15012093
2001237501
30510061
400204643
400205236
24252019
30138121
33030013
44020386
390000453
76512210
76512011
10542024
20202257
Qty
1
1
2
1
1
2
2
1
1
1
1
1
1
1
1
1
1
1
1
1
1
1
1
1
1
1
1
1
1
1
1
1
1
1
1
1
1
1
1
1
The above data are subject to change without notice.
41
Exploded Views and Parts List
Models GWH09KF-K3DNA6A/I,GWH12KF-K3DNA6A/I
25
23
24
21
22
19
20
18
26
17
27
16
28
29
15
14
30
13
12
FAN AUTO
OPER
AIR HEALTH X-FAN
HUMIDITY
FILTER
TURBO
HOUR
ON/OFF
ON/OFF
MODE
FAN
X-FAN
TEMP
TIMER
TURBO
SLEEP
LIGHT
11
10
9
1
42
2
3
4
5
6
7
8
Exploded Views and Parts List
Description
No.
Part Code
GWH09KF-K3DNA6A/I
GWH12KF-K3DNA6A/I
CB146N0110
CB146N0120
Product Code
Qty
1
Front panel 2
20012443S
20012443S
1
2
Front Case Assy
2001237501
2001237501
1
3
Remote Controller
30510061
30510061
1
4
Main Board
30138120
30138121
1
5
Ambient Temperature Sensor
390000453
390000453
1
6
Temperature Sensor
39000305
39000305
1
7
Indicator Light Cover
22242084
22242084
1
8
Terminal Board
42011233
42011233
1
9
Indicator shield cover
22242083
22242083
1
10
Electric Box Sub-Assy
2020225702
20202257
1
11
Electric Box Cover Sub-Assy
20122109
20122109
1
12
Electric Box Assy
2020225302
20202253
1
13
Drainage Pipe Sub-assy
0523204101
0523204101
1
14
Crank
73012005
73012005
1
15
Step Motor
1521210701
1521210701
1
16
Motor Press Plate
26112191
26112191
1
17
Fan Motor
15012093
15012093
1
18
Wall Mounting Frame
0125201801
0125201801
1
19
Rear Case assy
2220211901
2220211901
1
20
Pipe plug (outlet)
76712020
76712020
1
21
Cross Flow Fan
10352423
10352423
1
22
Helicoid tongue
26112486
26112486
1
23
Air Louver
10512160
10512160
2
24
Shaft of guide louver
1054202001
1054202001
2
25
Guide Louver
10512119
10512119
1
26
Evaporator Assy
01002270
01002745
1
27
Evaporator Support
24212108
24212108
1
28
Filter Sub-Assy
1112208201
1112208201
2
29
Connecting Cable
400205236
400205236
1
30
Power Cord
400204643
400204643
1
The above data are subject to change without notice.
43
Exploded Views and Parts List
Models GWC09KF-K3DNA6A/I,GWC12KF-K3DNA6A/I
25
22
23
24
21
19
20
18
26
27
17
16
28
29
15
30
14
13
FAN AUTO
OPER
AIR HEALTH X-FAN
HUMIDITY
12
FILTER
TURBO
HOUR
ON/OFF
ON/OFF
MODE
FAN
X-FAN
TEMP
TIMER
TURBO
SLEEP
LIGHT
11
10
9
1
44
2
3
4
5
6
7
8
Exploded Views and Parts List
No.
1
2
3
4
5
6
7
8
9
10
11
12
13
14
15
16
17
18
19
20
21
22
23
24
25
26
27
28
29
30
Description
Product Code
Front Panel Sub-Assy
Front Case Assy
Remote Controller
Main Board
Ambient Temperature Sensor
Temperature Sensor
Indicator Light Cover
Terminal Board
Indicator shield cover
Electric Box Sub-Assy
Electric Box Cover Sub-Assy
Electric Box Assy
Drainage Pipe Sub-assy
Crank
Step Motor
Motor Press Plate
Fan Motor
Wall Mounting Frame
Rear Case assy
Pipe plug (outlet)
Cross Flow Fan
Helicoid tongue
Air Louver
Shaft of guide louver
Guide Louver
Evaporator Assy
Evaporator Support
Filter Sub-Assy
Connecting Cable
Power Cord
Part Code
GWC09KF-K3DNA9A/I
CB146N09300
2001251001
2001237501
30510061
30138120
390000453
39000305
22242084
42011233
22242083
2020225703
20122109
2020225303
0523204101
73012005
1521210701
26112191
15012093
0125201801
2220211901
76712020
10352423
26112486
10512160
1054202001
10512119
01002270
24212108
1112208201
400205236
400204643
GWC12KF-K3DNA9A/I
CB146N09400
2001251001
2001237501
30510061
30138121
390000453
39000305
22242084
42011233
22242083
2020225701
20122109
2020225301
0523204101
73012005
1521210701
26112191
15012093
0125201801
2220211901
76712020
10352423
26112486
10512160
1054202001
10512119
01002745
24212108
1112208201
400205236
400204643
Qty
1
1
1
1
1
1
1
1
1
1
1
1
1
1
1
1
1
1
1
1
1
1
2
2
1
1
1
2
1
1
The above data are subject to change without notice.
45
Exploded Views and Parts List
Models GWH09KF-K3DNB1A/I,GWH12KF-K3DNB1A/I
25
23
24
21
22
19
20
18
26
17
27
16
28
15
14
13
FAN AUTO
OPER
AIR HEALTH X-FAN
HUMIDITY
FILTER
TURBO
HOUR
ON/OFF
ON/OFF
12
MODE
FAN
X-FAN
TEMP
TIMER
TURBO
SLEEP
LIGHT
11
10
9
1
46
2
3
4
5
6
7
8
Exploded Views and Parts List
Description
No.
Part Code
Qty
GWH09KF-K3DNB1A/I
GWH12KF-K3DNB1A/I
CB146N0760
CB146N0770
20012688S
20012688S
1
Product Code
1
Front panel
2
Front Case Assy
2001237501
2001237501
1
3
Remote Controller
30510061
30510061
1
4
Main Board
30138120
30138121
1
5
Ambient Temperature Sensor
390000453
390000453
1
6
Temperature Sensor
39000305
39000305
1
7
Indicator Light Cover
22242084
22242084
1
8
Terminal Board
42011233
42011233
1
9
Indicator shield cover
22242083
22242083
1
10
Electric Box Sub-Assy
2020225702
20202257
1
11
Electric Box Cover Sub-Assy
20122109
20122109
1
12
Electric Box Assy
2020225302
20202253
1
13
Drainage Pipe Sub-assy
0523204101
0523204101
1
14
Crank
15
Step Motor
73012005
73012005
1
1521210701
1521210701
1
16
Motor Press Plate
26112191
26112191
1
17
Fan Motor
18
Wall Mounting Frame
15012093
15012093
1
0125201801
0125201801
1
19
Rear Case assy
2220211901
2220211901
1
20
Pipe plug (outlet)
76712020
76712020
1
21
Cross Flow Fan
10352423
10352423
1
22
Helicoid tongue
26112486
26112486
1
23
Air Louver
24
Shaft of guide louver
25
Guide Louver
26
Evaporator Assy
01002270
01002745
1
27
Evaporator Support
24212108
24212108
1
28
Filter Sub-Assy
1112208201
1112208201
2
10512160
10512160
2
1054202001
1054202001
2
10512119
10512119
1
The above data are subject to change without notice.
47