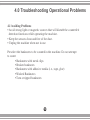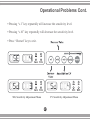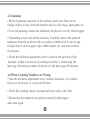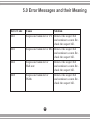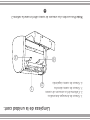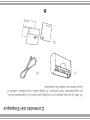
1
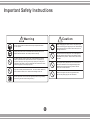
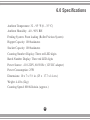
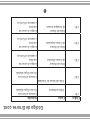
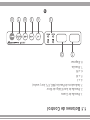
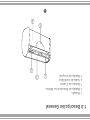
User Guide
Portable banknote counter
AB300
Thank you for purchasing this AccuBANKER product.
We recommend reading all information in the user guide to
become familiar with this product.
AccuBANKER and its logo are registered trademarks of Hilton Trading Corp. All Rights Reserved.
Table of Contents
Getting Started:
Introduction. . . . . . . . . . . . . . . . . . . . . . . . . . . . . . . . . . . . . . . . . . 5
Important Safety Instructions . . . . . . . . . . . . . . . . . . . . . . . . . . . 6
Other Safety Considerations. . . . . . . . . . . . . . . . . . . . . . . . . . . 7-8
Box Contents. . . . . . . . . . . . . . . . . . . . . . . . . . . . . . . . . . . . . . . . . 9
Cleaning of the Machine . . . . . . . . . . . . . . . . . . . . . . . . . . . . 10-11
1.0 General Controls and Parts. . . . . . . . . . . . . . . . . . . . . . . 12-13
1.1 Specific Controls. . . . . . . . . . . . . . . . . . . . . . . . . . . . . 14
2.0 Features
2.1 Automatic Start . . . . . . . . . . . . . . . . . . . . . . . . . . . . . . 15
2.2 Counting Mode. . . . . . . . . . . . . . . . . . . . . . . . . . . . . . . 15
2.3 Preset Batching. . . . . . . . . . . . . . . . . . . . . . . . . . . . . . 15
2.4 Counterfeit Detection. . . . . . . . . . . . . . . . . . . . . . . . . . 15
Table of Contents Cont.
3.0 Operations
3.1 Power Up . . . . . . . . . . . . . . . . . . . . . . . . . . . . . . . . . . 16
3.2 Counting Function . . . . . . . . . . . . . . . . . . . . . . . . . . . . 16
3.3 Batch Function . . . . . . . . . . . . . . . . . . . . . . . . . . . . . . 16
3.4 Counterfeit Detection Functions . . . . . . . . . . . . . . . . . . 18
4.0 Troubleshooting Operational Problems
4.1 Avoiding Problems . . . . . . . . . . . . . . . . . . . . . . . . . . . 19
4.2 Adjust MG or UV sensitivity when genuine
banknotes are detected as suspicious. . . . . . . . . . 20-21
4.3 Jamming . . . . . . . . . . . . . . . . . . . . . . . . . . . . . . . . . . . . 22
4.4 When Counting Numbers Are Wrong . . . . . . . . . . . . . 22
5.0 Error Messages and Their Meaning . . . . . . . . . . . . . . . 23-24
6.0 Specifications . . . . . . . . . . . . . . . . . . . . . . . . . . . . . . . . . . . 25
Introduction
The AB 300 portable banknote counter with counterfeit detection is the
next generation in micro-technology. This patent-pending product adopts
advanced circuitry for enhanced performance and counterfeit protection.
The simple, yet powerful design makes the AB300 perfect for personal
and professional use.
5
Important Safety Instructions
!
!
Warn in g
Caution
When unplugging the power cord, do not pull it by the
cord, but rather grip the plug to pull it out. Not following
these instructions may result in electric shock, fire or
damage to the unit.
Do not use this product in areas where it may be exposed to water
or other liquids.
Unplug this product from the wall outlet before cleaning. Do not use
liquid or aerosol cleaners. Use a damp cloth for cleaning.
To reduce the risk of electric shock, do not disassemble this product.
Take it to qualified service personnel when service or repair work is
required. Opening or removing covers may expose you to dangerous
voltages or other risks. Incorrect re-assembly can cause electric shock
when the appliance is subsequently used.
Only use the cable provided with the unit. The use of other cables may
result in electric shock, fire or cause serious damage to the unit.
Do not operate the unit in areas with high temperature or high humidity
since it may prevent it from working correct ly.
6
Do not use the unit if the power cord is damaged or if
the plug socket contact is loose. Not following these
instructions may result in electric shock, fire or other
hazards.
Do not place heavy objects over the cord and do not
bend it excessivel since it could get damaged. Not
follwoing these instructions may result in electric
shock, fire or other hazards.
When not using the unit for a long period of time,
remove the power plug from the wall outlet.
Other Safety Considerations
• Read and understand all of the safety instructions.
• Follow all warnings and instructions marked on the unit.
• This product should never be placed near or over a radiator or heater
register. This product should not be placed in a built-in installation unless
proper ventilation is provided.
• This product should be operated only from the type of power source indicated in this user’s guide. If you are not sure of the type of power supply
in you location, consult your dealer or local power company.
• Never push objects of any kind into the unit through the case slots or
openings, since they may touch dangerous voltage points or shortcut parts,
resulting in a risk of fire or electric shock.
• Never spill liquids of any kind on the product.
7
• Unplug this product from the wall outlet and refer to servicing
by qualified service personnel under the following conditions:
- When the power supply cord or plug is damaged or frayed.
- If liquid has been spilled into the unit.
- If the unit has been exposed to rain or water.
- If the unit does not operate normally while following the
operating instructions, adjust only those controls that are covered
by the operating instructions. Improper adjustment of other
controls may result in damage and will often require extensive
work by a qualified technician to restore the product to
normal operation.
- If the product has been dropped or the case has been damaged.
- If the product shows a noticeable change in performance.
8
Box Contents
When opening the box, verify that all of the items described below are
included. If any item is damaged or missing, contact the place where the
unit was purchased.
1)
2)
3)
9
Cleaning of the Machine
A) Cleaning the Optical Sensors
It is important to clean all of the sensors in the unit to avoid any paper particles or dust from sticking to the sensors. This should be done everyday, if
possible. The glass surfaces of the sensors may be wiped with a soft cloth
soaked with alcohol.
B) Cleaning the Inside of the Machine Periodically
It is necessary to clean the inside of the machine once a month or when
needed. Unplug the machine and open the stacker. Use compressed air,
such as AccuClean to lightly blow out dust from the interior.
C) Additional Recommendations
Avoid operating the machine in a dusty or dirty room.
10
Cleaning of the Machine Cont.
1. Auto-Start Sensor
2. Counting Sensor Cover
3. Right Counting Sensor
4. Left Counting Sensor
2
1
4
3
lift open metal
ledgfore beopreating
Note: To reach counting sensors, pull up counting sensors cover.
11
1.0 General Controls and Parts
1. Display Screen
2. Hopper
3. Control Buttons
4. Stacker Tray
5. Banknote Removal Lever
2
1
3
5
12
4
General Controls and Parts
6. Thickness Adjustment Screw
7. DC Input Jack
8. Power Switch
6
10
1
2
DC/12V
8
13
7
1.1 Specific Controls
1. Counting Number Display
2. Batch/Error Code Display
3. Function Indicators (MG, UV, batch, width)
4. +1
5. +10
6. +50
7. Function
8. Restart
1
2
3
4
14
5
6
7
8
2.0 Features
2.1 Automatic start
The AB300 is equipped with an auto-start sensor. The machine starts
counting when banknotes are placed in the hopper.
2.2 Counting Mode
Once turned on, the machine defaults to this mode, counting the bills
placed in the hopper.
2.3 Preset Batching
Counts banknotes per batch up to the numbers preset with the batch
buttons. The machine will count all inserted banknotes in the preset batch
amount.
2.4 Counterfeit Detection
Counterfeit detection can be done by 3 different methods - Magnetic
(MG), Ultraviolet (UV), and Width. MG sensors check the magnetic
properties of the banknote. The UV sensors check the banknote for UV
light reflection. While, the Width sensor checks the height of the banknote.
15
3.0 Operations
3.1 Power Up
Open the front panel (banknote stacker). Connect the 12V adapter to a
power outlet and to the jack at the rear of the machine; the unit will conduct
a self-check by spinning the rollers several times. The counting number and
batch number displays will both show “0” when the unit is ready.
Note: Refer to section 5.0 for any self-test codes. Be sure to unplug the
machine when not in use.
3.2 Counting mode
The default mode of the machine is counting mode. All banknotes placed in
the hopper will be counted automatically. If banknotes begin to fly out of the
machine during the counting, press the “restart” button to stop the counting.
Then, press the “restart” button to begin counting again.
3.3 Batch Function
Batches can be set by pressing the “+50,” “+10” and “+1” keys. Any combination can be used to set the required batch. The preset batch is displayed on
the right side. The actual count will be displayed on the left side. In order to
remove and clear the preset batch, press, “restart” key.
16
Operations Cont.
3.4 Counterfeit Detection Functions
The AB300 uses counterfeit detection as default during normal counting
operations. To change the type of counterfeit detection(s), press the
“function” key. The default settings are Magnetic (MG) and Ultraviolet
(UV) counterfeit detection.
3.4.1 MG and UV detection
This is the default detection setting when the machine is turned on. It will
check banknotes for magnetic ink properties and UV light reflectivity.
3.4.2 UV and Width detection
Press the “function” key once to change to UV and Width detection
methods on together. The corresponding indicators will light up.
3.4.3 UV detection only
The UV detection function is on as a default setting with MG detection. To
use UV detection only, press the “function” button two times. The indicator lights will show UV is on.
17
Operations Cont.
3.4.4 Width detection only: To use the Width detection setting only, press
the “function” key three times.
Note: It is not possible to disable all counterfeit detection functions at one
time.
18
4.0 Troubleshooting Operational Problems
4.1 Avoiding Problems
• Avoid strong light or magnetic sources that will disturb the counterfeit
detection functions while operating the machine.
• Keep the sensors clean and free of the dust.
• Unplug the machine when not in use.
Preselect the banknotes to be counted in the machine. Do not attempt
to count:
• Banknotes with metal clips
• Broken banknotes
• Banknotes with adhesive media (i.e., tape, glue)
• Washed Banknotes
• Torn or ripped banknotes
19
Operational Problems Cont.
4.2 Adjust MG or UV sensitivity when genuine banknotes are detected
as suspicious
• Press the “FUNCTION” and “RESTART” keys at the same time to get
in SETUP MENU.
• The Counting display shows “ ” indicating you are into the Ultraviolet
Adjustment Level menu, and the Batching display shows a value between
1- 8. This value belongs to the UV current setting.
• Press “+50” key once for changing to Magnetic Adjustment Level.
• The Counting display shows “ ” indicating you are into Magnetic
Adjustment Level menu, and the batching display shows a value between
1-F, which belongs to the MG current setting value.
20
Operational Problems Cont.
• Pressing “+1” key repeatedly will increase the sensitivity level.
• Pressing “+10” key repeatedly will decrease the sensitivity level.
• Press “ Restart” key to exit.
MG Sensitivity Adjustment Menu
UV Sensitivity Adjustment Menu
21
4.3 Jamming
• Before beginning operation of the machine, make sure there are no
foreign objects in any of the mechanisms such as silica bags, spare parts, etc.
• To avoid jamming, ensure that banknotes are placed correctly in the hopper.
• If jamming occurs, turn off the machine. Carefully remove the jammed
banknotes from the machine with a wooden or rubber stick. Look for any
foreign objects such as paper clips, rubber bands, etc. and remove them
if necessary.
• Check the thickness adjustment screw located in the top back of the
machine. Adjust if necessary by turning clockwise (-) narrowing the
inner gap. By turning counter-clockwise (+) the inner gap will increase.
4.4 When Counting Numbers are Wrong
• Turn the thickness adjustment screw counter-clockwise (+) to reduce friction or clockwise (-) to increase friction.
• Check the counting sensors for dust and clean with a soft cloth.
• Ensure that the banknotes are placed correctly in the hopper and count again.
22
5.0 Error Messages and their Meaning
Error Code
EE1
EE2
EE4
EE8
Cause
Solution
Suspicious banknote for UV Remove the suspect bill
and continue to count. Recheck the suspect bill.
Suspicious banknote for MG Remove the suspect bill
and continue to count. Recheck the suspect bill.
Suspicious banknote for
Remove the suspect bill
Half note
and continue to count. Recheck the suspect bill.
Suspicious banknote for
Remove the suspect bill
Width
and continue to count. Recheck the suspect bill.
23
5.0 Error Messages and their Meaning Cont.
Error Code
Cause
Solution
CE1
UV Battery error
CE2
Speed Sensor error
CE3
Right counting sensor
CE4
Left counting sensor
CE5
Auto-start sensor
24
Contact your technical
support or your authorized
service center
Contact your technical
support or your authorized
service center
Clear the sensor of dust
or obstructions or contact
technical support
Clean dust and obstructions
from sensor or contact
technical support
Clean dust and obstructions
from sensor or contact
technical support
6.0 Specifications
Ambient Temperature: 32 – 95 °F (0 – 35 °C)
Ambient Humidity: ~40 - 90% RH
Feeding System: Front loading (Roller Friction System)
Hopper Capacity: 100 banknotes
Stacker Capacity: 100 banknotes
Counting Number Display: Three red LED digits
Batch Number Display: Three red LED digits
Power Source: ~110-220V, 60-50 Hz (12V DC adaptor)
Power Consumption: 25W
Dimensions: 10 x 7 x 5 ½ in. (25 x 17.7 x 14 cm.)
Weight: 4.4 lbs (2kg)
Counting Speed: 800 bills/min. (approx.)
25
Notes
6.0 Especificaciones
- Temperatura Ambiente: 32 - 95 F (0-35 C)
- Humedad Ambiente: 40 - 90 % HR
- Modo de Conteo: Fricción por Rodillos
- Capacidad a la Entrada: 100 billetes
- Capacidad a la Salida: 100 billetes
- Pantalla de Conteo: Tres lámparas LED
- Pantalla de Lote: Tres lámparas LED
- Voltaje de Alimentación: 110-220 VAC, 50-60 Hz (adaptador 12V AC/DC)
- Consumo Energía: 25 W
- Dimensiones: 10 x 7 x 5,5 in.
- Peso: 4.4 lbs
- Velocidad de Conteo: 800 billetes/ min
26
Código
CE1
CE2
Causa
Fallo de Batería
Código de Errores cont.
Solución
Contacte al Servicio
Técnico Especializado
Fallo del Sensor de Velocidad
Fallo del Sensor
de Arranque Autom.
CE5
Error del Sensor
de Conteo Izquierdo
CE4
Error del Sensor
de Conteo Derecho
CE3
Contacte al Servicio
Técnico Especializado
Limpie el sensor en
cuestión
o contacte al Servicio
Limpie el sensor en
cuestión
o contacte al Servicio
Limpie el sensor en
cuestión
o contacte al Servicio
25
5.0 Código de Errores
Retire el billete sospechoso
verifique otra vez dicho
billete y continúe contando
Billete sospechoso
por tamaño del ancho
EE8
Retire el billete sospechoso
verifique otra vez dicho
billete y continúe contando
Medio Billete o Billete
partido
EE4
Retire el billete sospechoso
verifique otra vez dicho
billete y continúe contando
Billete sospechoso
por MG
EE2
Solución
Retire el billete sospechoso
verifique otra vez dicho
billete y continúe contando
Causa
Billete sospechoso
por UV
Código
EE1
24
Solución de Problemas Operacionales cont.
• Presionando la tecla “+1” repetidamente hará incrementar el valor de
sensibilidad.
• Presionando la tecla “+10” repetidamente hará disminuir el valor de
sensibilidad.
• Una vez ajustado el valor deseado presione “Restart” para salir.
Reducir Valor
Incrementar valor
Sensibilidad MG menú de ajuste
Selecciona MG o UV
Sensibilidad UV menú de ajuste
23
Solución de Problemas Operacionales
4.4 Procedimiento de Ajuste de la Sensibilidad Magnética y Ultravioleta
• Presione las teclas “FUNCTION” y “RESTART” al mismo tiempo para
entrar en el Menú Principal.
• Una vez dentro del Menú, en el display de conteo aparecerá “SE “ indicando que se encuentra listo para el ajuste del Sensor Ultravioleta.
En el display de agrupamiento aparecerá un valor del 1- 8.
Este valor es el valor actual del ajuste Ultravioleta.
• Pulsando la tecla “+50 la unidad conmuta para el ajuste de la Sensibilidad Magnetica.
• Cuando el display de conteo muestra “Sd” quiere decir que se la unidad
esta lista para ajustar el ajuste Magnético. En el display de agrupamiento
aparecerá un valor del 1-F. Este es el valor actual del ajuste Magnético.
22
Solución de Problemas Operacionales
4.3 Errores en el Conteo
- Ajuste la manilla de espesor del billete y asegúrese de que tiene el ajuste
adecuado para la moneda que esta contando.
- Verifique que los sensores de conteo están limpios de polvo u otra
suciedad y límpielos con un paño o brocha en caso necesario.
- Asegúrese de ubicar los billetes de forma ordenada al ser contados.
21
Solución de Problemas Operacionales
4.2 Atascamiento
Antes de comenzar a operar la máquina por primera vez asegúrese
de que no existen objetos en el interior de la misma como bolsas de
silica o alguna pieza de repuesto.
- Para evitar atascamiento asegúrese de que los billetes están puestos
ordenados y correctamente en el compartimento de entrada.
- Si algún billete se atasca, apague la unidad inmediatamente y con
cuidado encuentre y retire el billete. También verifique que no existe
algún otro cuerpo extraño como presillas, monedas, bandas de papel etc.
- Si los atascamientos son muy repetidos y no existe causa aparente veri
fique y asegúrese que este usando el ajuste de espesor del billete
adecuado para dicha moneda.
Girando la manilla de ajuste hacia la izquierda (+) permitirá que los billetes
pasen más libremente.
Girando hacia la derecha (-) permitirá que los billetes pasen mas ajustados.
20
4.0 Solución de Problemas Operacionales
4.1 Consejos Útiles
1- Evite la incidencia directa de fuentes de luz sobre la máquina
así como de fuertes campos magnéticos externos.
2- Mantenga los sensores ópticos limpios de polvo u otra suciedad
3- Desconecte la unidad cuando no la use.
4- Examine visualmente los billetes antes de introducirlos en la máquina
Evite contar aquellos billetes que:
- Estén muy deteriorados y rotos
- Que contengan material adhesivo como papel o goma
- Que contengan clips o presillas
- Que estén críticamente dañados o rasgados
19
Funciones Operacionales cont.
3.4.4 Detección por ancho del billete
En esta combinación solo se deja activo la evaluación del ancho
del billete. Se alcanza pulsando tres veces “Function”.
Nota: En las cuatro combinaciones anteriores se iluminan las lámparas de
las funciones activas en dicha combinación.
- Por medidas de seguridad no es posible deshabilitar todas las funciones de
seguridad a la vez para trabajar.
18
Funciones Operacionales cont.
3.4 Funciones de Detección de Falsificaciones
La unidad AB300 puede trabajar con diferentes combinaciones para la
detección de billetes falsos. Para cambiar el tipo de método de verificación
se hace pulsando “Function” repetidamente y se activarán alternadamente
las combinaciones disponibles.
3.4.1 Detección usando MG y UV
Es la combinación disponible al encender la unidad. Esta combinación
evaluará las propiedades magnéticas y UV de los billetes.
3.4.2 Detección usando UV y Width
Pulsando “Function” una vez se conmutará a esta combinación.
Aquí se estarán evaluando las propiedades UV y el ancho de los billetes.
3.4.3 Detección UV
Es la tercera combinación usada y se logra pulsando dos veces “Function”
17
3.0 Funciones Operacionales
3.1 Encendido y puesta en marcha
Abra el panel frontal (cubierta inferior delantera). Conecte el Adaptador
AC/DC 12V a la toma de energía y a la unidad. Al activar el interruptor la
unidad comenzara una rutina de auto-chequeo hasta que se detenga.
La unidad estará lista para contar con ambas pantallas con “000”.
3.2 Modo de Conteo
Es el modo de trabajo prioritario de la unidad. En este modo los billetes
una vez ubicados en el compartimiento de entrada serán contados y separados en lotes si es que se seleccionó esta opción.
Pulsando “restart” podrá detener dicho conteo.
3.3 Separación por grupos o lotes
Los Grupos o Lotes podrán ser definidos pulsando “+50” “ +10” y “+1”
hasta lograr el lote deseado.
El valor seleccionado aparecerá reflejado en la pantalla derecha.
El conteo aparecerá en la sección izquierda del display.
Para borrar el valor del agrupamiento se deberá pulsar “ restart”.
16
2.0 Funciones Generales
2.1 Arranque Automático
Un sensor óptico ubicado en el compartimiento de entrada de los billetes
permite que la máquina detecte la presencia de estos y automáticamente
comienza a contar.
2.2 Modo de Conteo
Una vez encendida, la máquina adopta este modo de trabajo.
Los billetes presentes en el compartimiento de entrada serán contados.
2.3 Agrupamiento
Los billetes serán contados formando grupos predefinidos anteriormente.
La máquina se detendrá en este número, el usuario retirara el lote recién
contado y presionara “restart” para seguir la operación.
2.4 Detección de Billetes Falsos
Son tres los procedimientos usados para este fin.
- MG: un sensor MG evalúa las propiedades magnéticas del billete.
- UV: un sensor UV evalúa la reflexión del billete a rayos UV.
- Width: mecanismo que inspecciona las dimensiones del billete.
15
1.1 Botones de Control
1. Pantalla de Conteo
2. Pantalla de Lote/Código de Error
3. Indicadores de Función (MG, UV, lote y ancho)
4. +1
5. +10
6. +50
7. Función
8. Empezar
1
2
3
4
5
6
7
8
14
Descripción General cont.
6. Manilla de Ajuste de Espesor
7. Entrada de Corriente
8. Interruptor de Encendido
6
10
1
2
DC/12V
8
7
13
1.0 Descripción General
1. Pantalla
2. Bandeja de Entrada de los Billetes
3. Botones de Control
4. Salida de los Billetes
5. Bandeja de recogida
1
2
3
5
4
12
Limpieza de la unidad cont.
1- Sensor de Arranque Automático
2- Cubierta de los sensores de conteo
3- Sensor de conteo derecho
4- Sensor de conteo izquierdo
2
1
4
3
lift open metal
ledgfore beopreating
Nota: Para acceder a los sensores de conteo debe levantar la cubierta 2.
11
Limpieza de la unidad
A) Limpieza de los sensores ópticos
Es importante limpiar periódicamente los sensores ópticos para evitar que
partículas de papel o polvo se adhieran a los mismos. La superficie
de estos puede ser limpiada con un paño húmedo en alcohol.
La mejor opción es hacerlo cada día al terminar la jornada de uso.
B) Limpieza interior de la unidad
Es necesario limpiar el interior de la unidad una vez al mes o cuando
sea necesario.
Apague y desconecte la máquina y abra la tapa del stacker.
Use aire comprimido como AccuClean para retirar el polvo del interior.
C) Recomendaciones adicionales
Evite operar la máquina en habitaciones polvorientas y sin las
condiciones adecuadas.
10
Contenido del Empaque
Al abrir la caja por primera vez verifique que todos los componentes descritos seguidamente están incluidos. Si alguno falta o esta dañado contacte el
lugar donde esta unidad fue adquirida.
1)
2)
3)
9
• Desconecte y/o apague la unidad y llame al servicio técnico en cualquiera
de los siguientes casos.
1.Cuando el cable de conexión este dañado o gastado.
2. En el caso de que se haya derramado liquido sobre la unidad.
3. Si la unidad fue expuesta al agua o a la lluvia accidentalmente.
4. Si la unidad no opera normalmente a pesar de que se hayan
seguido todas las instrucciones de ajuste recomendadas por el
manual. Un ajuste inadecuado de otros controles pudiera producir
otros daños mas complejos que tomarán mas tiempo resolver por el
servicio técnico.
5. Si el equipo sufrió alguna caída o alguna de sus cubiertas esta
dañada.
6. Si la unidad muestra evidentes cambios en su funcionamiento.
8
Medidas de Seguridad adicionales
• Lea cuidadosamente todas las instrucciones de seguridad.
• Siga todos los consejos e instrucciones descritos en este manual
• Esta unidad no debe ser ubicada en las cercanías de radiadores
térmicos ni en lugares cerrados con escasa ventilación.
• Asegurarse que la unidad será conectada a la línea de voltaje especificada
en este manual. Si usted no esta seguro de la red de su local deberá consultar
su dealer o su compañía local de energía.
• No introduzca objetos de ningún tipo por las aberturas de la unidad, ya
que pudieran hacer contacto con alguna parte del circuito electrónico provocando algún tipo de daño al mismo.
• Tener cuidado de no derramar ningún tipo de líquido sobre la unidad
7
Importantes Medidas de Seguridad
Precaución
6
Introducción
La AB300 es una máquina portátil contadora de billetes, la cual incorpora
técnicas para la evaluación y detección de billetes falsificados.
Combinando su atractivo, compacto y ligero diseño, junto a su amplia gama
de funciones operacionales, hacen de esta unidad una herramienta
imprescindible cuando EFICIENCIA y CONFIABILIDAD sean los objetivos a alcanzar tanto en el sector personal como profesional.
5
Indice cont.
3.0 Funciones Operacionales
3.1 Encendido y puesta en marcha. . . . . . . . . . . . . . . . . . 16
3.2 Modo de Conteo . . . . . . . . . . . . . . . . . . . . . . . . . . . . . 16
3.3 Separación por grupos. . . . . . . . . . . . . . . . . . . . . . . . . 16
3.4 Funciones de detección de falsificaciónes. . . . . . . . . . 17
4.0 Solución de Problemas Operacionales
4.1 Consejos Utiles . . . . . . . . . . . . . . . . . . . . . . . . . . . . . 19
4.2 Atascamiento. . . . . . . . . . . . . . . . . . . . . . . . . . . . . . . 20
4.3 Errores en el Conteo . . . . . . . . . . . . . . . . . . . . . . . . . . 21
4.4 Procedimiento de ajuste de la Sensibilidad
Magnética y Ultravioleta. . . . . . . . . . . . . . . . . . . . . . . 22
5.0 Código de Errores . . . . . . . . . . . . . . . . . . . . . . . . . . . . . 24-25
6.0 Especificaciones . . . . . . . . . . . . . . . . . . . . . . . . . . . . . . . . . 26
Indice
Introducción . . . . . . . . . . . . . . . . . . . . . . . . . . . . . . . . . . . . . . . . . 5
Importantes Medidas de Seguridad . . . . . . . . . . . . . . . . . . . . . . 6
Medidas de Seguridad adicionales . . . . . . . . . . . . . . . . . . . . . 7-8
Contenido del Empaque . . . . . . . . . . . . . . . . . . . . . . . . . . . . . . . . 9
Limpieza de la unidad . . . . . . . . . . . . . . . . . . . . . . . . . . . . . . 10-11
1.0 Descripción General . . . . . . . . . . . . . . . . . . . . . . . . . . . . 12-13
1.1 Botones de Control . . . . . . . . . . . . . . . . . . . . . . . . . . . 14
2.0 Funciones Generales
2.1 Arranque Automático. . . . . . . . . . . . . . . . . . . . . . . . . . 15
2.2 Modo de Conteo . . . . . . . . . . . . . . . . . . . . . . . . . . . . . 15
2.3 Agrupamiento . . . . . . . . . . . . . . . . . . . . . . . . . . . . . . . 15
2.4 Detección de Billetes falsos. . . . . . . . . . . . . . . . . . . . . 15
Gracias por adquirir este producto AccuBANKER
Recomendamos leer cuidadosamente esta Guía de Usuario
con el objetivo de que se familiarice con todas las
prestaciones que le brinda este producto.
AccuBANKER and its logo are registered trademarks of Hilton Trading Corp. All Rights Reserved.
Guia de Usuario
Contadora de Billetes Port!til
AB300