1
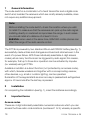
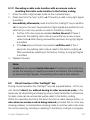
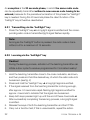
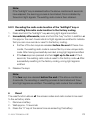
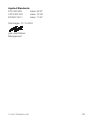
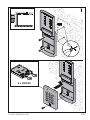
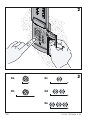
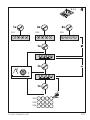
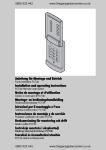
Anleitung für Montage und Betrieb Funkcodetaster FCT3b Installation and operating instructions FCT3b Remote code switch Notice de montage et d'utilisation Clavier à code sans fil FCT3b Montage- en bedieningshandleiding Radiocodeschakelaar FCT3b Istruzioni per il montaggio e l’uso Tastiera a radiocodice FCT3b Instrucciones de montaje y de servicio Pulsador codificado de radio FCT3b Bruksanvisning för montering och drift Radio kodlås FCT3b Instrukcja monta†u i eksploatacji Radiowy sterownik kodowy FCT3b Szerelési és üzemeltetési utasítás FCT3b rádiós kódkapcsoló Urheberrechtlich geschützt. Nachdruck, auch auszugsweise, nur mit unserer Genehmigung. Änderungen vorbehalten. Upphovsrätten skyddad. Eftertryck, även delvis, endast med vårt medgivande. Med förbehåll för ändringar. Copyright. No reproduction even in part is allowed without our permission. All details subject to change. Wszelkie prawa zastrze†one. Powielanie, równie† cz™∂ciowe, wy∆åcznie po uzyskaniu naszej zgody. Zastrzegamy sobie prawo do zmian konstrukcyjnych. Droits d'auteur réservés. Reproduction même partielle uniquement avec notre autorisation. Changements de construction réservés. Szerzo´´i jogi védelem alatt. Részleges utánnyomás is csak kizárólagos engedélyünkkel lehetséges. A változtatások jogát fenntartjuk. Door de auteurswet beschermd. Gehele of gedeeltelijke nadruk is zonder onze toestemming niet toegestaan. Wijzigingen voorbehouden. Diritti d'autore riservati. Riproduzione, anche solo parziale, previa nostra approvazione. La Ditta si riserva di apportare modifiche al prodotto. Copyright. Prohibida toda reproducción integra o parcial sin autorización previa. Reservado el derecho a modificaciones. 2 11.2004 TR20A004-A RE Deutsch ..................................................................................................... 4 English ..................................................................................................... 15 Français ................................................................................................... 26 Nederlands.............................................................................................. 38 Italiano ..................................................................................................... 49 Español.................................................................................................... 60 Svenska ................................................................................................... 72 Polski ....................................................................................................... 82 Magyar................................................................................................... 94 EN 50081 EN 50082 I-ETS 300220 11.2004 TR20A004-A RE 3 ENGLISH 1 2 3 4 5 5.1 5.1.1 5.1.2 5.2 5.2.1 5.2.2 5.2.3 6 7 General information Installation Important terms Light/flashing signals Changing the access codes Transmitting after entering an access code Learning after entering an access code Recoding a radio code location with an access code or resetting this radio code location to the factory coding Direct function of the “bell/light” key Transmitting via the “bell/light” key Learning via the “bell/light” key Recoding the radio code location of the “bell/light” key or resetting this radio code location to the factory coding Reset Manufacturer's declaration 11.2004 TR20A004-A RE 15 1 General information The code switch is a combination of a hand transmitter and a digital code switch and, besides the receivers which are mostly already available, does not require any additional equipment. Note: Before installing the code switch, check the location where you wish to install it to make sure that the receivers can pick up the radio signal. Installing directly on metal will compromises the range, in such cases you should install at a distance of at least 2-3 cm. 868 MHz: when used at the same time, GSM 900 mobile phones can affect the range of the radio remote control. The FCT3b is powered by two standard lithium cell CR2032 battery (see fig. 1); successfully made entries and changes are stored and retained even in the event of a power failure. With three individually selectable 4-digit access codes just as many functions can be triggered by radio signal; this means, for example, that up to three door operators can be actuated by impulse (i.e. wireless) using a FCT3b. Available in addition is a direct function (not protected by an access code), with which, likewise wireless and together with a corresponding receiver, other devices, e.g. a bell or outdoor lighting, can be operated. Illumination of the keypad starts as soon as a key is pressed and extinguishes approx. 20 seconds after the last key is pressed. 2 Installation On completing the installation (see fig. 1), insert the batteries accordingly. 3 Important terms Access codes These are 4-digit individually selectable numerical codes via which you can access the three radio code locations (numbered 1 to 3), whereby a specific 16 11.2004 TR20A004-A RE radio code location is always assigned to an access code. In the ex factory state or after a reset, the access codes are preassigned as follows: access code 1 for radio code location 1: “1234” access code 2 for radio code location 2: “2345” access code 3 for radio code location 3: “3456” Radio code location This is a location for a radio code, which as with the hand transmitters can be transmitted, learned or recoded and reset to the factory coding. Since in addition to the three radio code locations, which can be accessed via the access codes, there is a further radio code location which can be directly accessed without having to enter any access code, a total of 4 radio code locations are available in the unit. Radio code The 1 billion security code, which in the ex factory state or after a reset is uniquely preassigned to all the radio code locations. 4 Light/flashing signals How the LED glows varies, depending on the operating state: - short light signal (fig. 3a) - long light signal (fig. 3b) - slow-flashing (fig. 3c) - rapid-flashing (fig. 3d) - extremely rapid-flashing (fig. 3e) 5 Changing the access codes Here it is assumed that the normal transmission times (chapter 5.1) have elapsed. This is always indicated by a long light signal. If in any doubt about this, before making an entry wait more than 20 seconds without pressing any key. 11.2004 TR20A004-A RE 17 Note: Each time it is permitted to press a key, this is acknowledged by a short light signal; this also enables you to monitor whether the key was actually pressed. Furthermore, when two keys are pressed in succession, the time between pressing the first key and the second may not exceed 15 seconds; otherwise a long light signal is emitted and you can/must then start afresh. In this way (simply wait for a long light signal) any action initiated incorrectly or by mistake can be terminated and you can then start again. An invalid or incorrect entry is always indicated by three short light signals - after which the unit completely deactivates itself for 10 seconds and you then have to wait for a long light signal before starting the action again. In the ex factory state or after a reset, the factory access code is assigned to all three memory locations (numbered 1 to 3). These access codes should be changed as follows (fig. 4): 1. Depending on the radio code location, press the “key” button 1x, 2x or 3x. 2. Enter the valid access code (for access code following ex factory delivery or a reset see chapter 4/fig. 4), otherwise your own respectively valid access code. 3. Press the “key” button ➜ if the entry is valid, a long light signal is emitted. If the entry is invalid, 3 short light signals are emitted. 4. Enter the new 4-digit access code via the numerical keys. 5. Press the “key” button ➜ if the entry is valid, a long light signal is emitted. 6. Enter the new 4-digit access code again. 7. Press the “key” button ➜ if your entry is valid, a long light signal is emitted and the entered or changed access code comes into force with immediate effect. Note: A radio code which has been assigned a memory location number is retained even after the corresponding access code has been changed! 18 11.2004 TR20A004-A RE 5.1 Transmitting after entering an access code Instructions on entering the access codes for operating functions: Before entering a valid or suitable access code, any number of numerical keys can be pressed, so that on entering the access code in the company of another person, there is no risk of that person being able to take note of your code. Only the last 4 numerical keys pressed before the “key” button is pressed, are used to compare the entered code with the memorized access code. Each time it is permitted to press a key, this is acknowledged by a short light signal; this also enables you to monitor whether the key was actually pressed. Furthermore, when two keys are pressed in succession, the time between pressing the first key and the second may not exceed 15 seconds; otherwise a long light signal is emitted and you then have to start afresh. In this way (simply wait for a long light signal) any action initiated incorrectly or by mistake can be terminated and then started again. An invalid or incorrect entry is always indicated by three short light signals - after which the unit completely deactivates itself for 10 seconds and you then have to wait for a long light signal before starting the action again. 1. Enter the valid 4-digit access code via the numerical keys. 2. Press the “key” button ➜ if the entry is valid, a long light signal is emitted and the corresponding radio code is transmitted (light signal flashes rapidly). Note: As long as the “key” button is pressed, the radio code is transmitted, but for a maximum of 15 seconds. After the first transmission a 20 second phase starts, during which the same radio code can be repeatedly transmitted via any key except the 11.2004 TR20A004-A RE 19 “bell/light” key (light signal flashes rapidly). The end of this phase is indicated by a long light signal. This 20 second phase can be prematurely terminated via the “bell/light” key (a long light signal is emitted in the process). As a result, it is possible to enter another access code without waiting for the 20 seconds to elapse and to therefore transmit a further radio code in order, for example, to open or close another door. 5.1.1 Learning after entering an access code Caution! During the learning process, activation of the teaching transmitter can initiate a door cycle if a receiver programmed for it is located nearby! 1. Enter the valid 4-digit access code via the numerical keys. 2. Hold the teaching transmitter close to the code modulator, as shown, and then press and hold the desired key, of which the radio code is to be learned. (see fig. 2) 3. Press and hold the “key” button ➜ if the entry is valid, a long light signal is emitted. 4. If the signal received from the teaching transmitter is strong enough, after approx. 0.5 seconds a rapid-flashing light signal is emitted for approx. 4 seconds to indicate that the signal can be learned. 5. Keep both keys pressed right up until the end of these 4 seconds ➜ after successfully entering the access code, a long light signal is emitted. 6. Release the keys of both the teaching transmitter and the code switch. 7. Carry out a function test; if this is unsuccessful, repeat the action. Note: If the “key” button is released before the above-mentioned 4 seconds have elapsed, the learning process is terminated, indicated by three short light signals. The existing radio code is then retained. 20 11.2004 TR20A004-A RE 5.1.2 Recoding a radio code location with an access code or resetting this radio code location to the factory coding 1. Enter the valid 4-digit access code via the numerical keys. 2. Press and hold the “key” button ➜ if the entry is valid, a long light signal is emitted. 3. Immediately afterwards press and hold the “bell/light” key in addition ➜ For approx. the next 4 seconds short light signals are emitted to indicate that you can now recode or reset to the factory coding. • If either of the two keys are released before the end of these 4 seconds, the existing radio code is overwritten by a new unique radio code ➜ After having successfully recoded, a long light signal is emitted. • If the two keys continue to be pressed until the end of the 4 seconds, the existing radio code is reset to the factory coding ➜ After successfully resetting to the factory coding, a long light signal is emitted. 4. Release the keys Note: If both keys are released before the end of the above-mentioned 4 seconds, the recoding or resetting process is terminated; this is indicated by three short light signals. The existing radio code is then retained. 5.2 Direct function of the “bell/light” key During normal operation the “bell/light” key has a special status - with it you can transmit direct, i.e. without having to enter an access code, in the same way as transmitting and learning using a hand transmitter. Furthermore, its radio code can be recoded as well as reset to the factory coding. Within the operating functions this direct function is nearly always active, i.e. also when an access code is being entered, provided that no other key is being pressed, no transmission is being made to another radio code location and no learning, recoding or resetting to the factory coding is in progress. 11.2004 TR20A004-A RE 21 An exception is the 20 seconds phase, in which the same radio code can be repeatedly transmitted without a new access code having to be entered, because for the premature termination of this phase the “bell/light” key is needed. During this 20 seconds phase the direct function of the “bell/light” key is therefore deactivated. 5.2.1 Transmitting via the “bell/light” key 1. Press the “bell/light” key ➜ a long light signal is emitted and the corresponding radio code is transmitted (light signal flashes rapidly). Note: As long as the “bell/light” button is pressed, the radio code is transmitted, but for a maximum of 15 seconds. 5.2.2 Learning via the “bell/light” key Caution! During the learning process, activation of the teaching transmitter can initiate a door cycle if a receiver programmed for it is located nearby! 1. Hold the teaching transmitter close to the code modulator, as shown, and then press and hold the desired key, of which the radio code is to be learned. (see fig. 2) 2. Press and hold the “bell/light” key ➜ a long light signal is emitted. 3. If the signal received from the teaching transmitter is strong enough, after approx. 0.5 seconds a rapid-flashing light signal is emitted for approx. 4 seconds to indicate that the signal can be learned. 4. Keep both keys pressed right up until the end of these 4 seconds ➜ After successfully completing the learning process, a long light signal is emitted. 5. Release the keys of both the teaching transmitter and the FCT3b. 6. Carry out a function test; if this is unsuccessful, repeat the action. 22 11.2004 TR20A004-A RE Note: If the “bell/light” key is released before the above-mentioned 4 seconds have elapsed, the learning process is terminated; this is indicated by three short light signals. The existing radio code is then retained. 5.2.3 Recoding the radio code location of the “bell/light” key or resetting this radio code location to the factory coding 1. Press and hold the “bell/light” key ➜ a long light signal is emitted. 2. Immediately afterwards press and hold the “key” button in addition ➜ For approx. the next 4 seconds short light signals are emitted to indicate that you can now recode or reset to the factory coding. • If either of the two keys are released before the end of these 4 seconds, the existing radio code is overwritten by a new unique radio code. After having successfully recoded, a long light signal is emitted. • If the two keys are pressed and held right up to the end of the 4 seconds, the existing radio code is reset to the factory code ➜ After successfully resetting to the factory coding, a long light signal is emitted. 3. Release the keys Note: If the two keys are released before the end of the above-mentioned 4 seconds, the recoding or resetting process is terminated and three short light signals are emitted. The existing radio code is then retained. 6 Reset The reset function allows all the access codes and radio codes to be reset to the ex factory state. 1. Remove a battery. 2. Wait approx. 10 seconds 3. Press the “0” key at the same time as reinserting this battery. 11.2004 TR20A004-A RE 23 4. 5. 6. 7. 8. The “0” key must be pressed and held for at least 5 seconds. A slow-flashing light signal is emitted for approx. 1 second. A rapid-flashing light signal is emitted for approx. 4 seconds. An extremely rapid-flashing light signal is emitted for approx. 2 seconds. Release the “0” key. The device is now in the normal operating mode again. Note: If the “0” key is released before the above-mentioned 5 seconds have elapsed, the reset procedure is terminated and three short light signals are emitted. The device is now in the normal operating mode again. The existing access codes and radio codes are then retained. 7 EU Manufacturer's Declaration Manufacturer: Verkaufsgesellschaft KG Upheider Weg 94 – 98 D-33803 Steinhagen Product: Unit type: Code switch FCT3b On the basis of its design and type in the version marketed by us the product described above meets the relevant basic requirements of the directives listed below. In the event that the product is changed or modified without our approval, this declaration loses its validity. Relevant Directives that the product complies with: Conformity of the above mentioned products with the requirements of the Directives according to Section 3 of the R & TTE Directives 1995/5/EC has been proven by observance of the following Standards: 24 11.2004 TR20A004-A RE Applied Standards: ETS 300 683 issue: 06/97 I-ETS 300 220 issue: 10/93 EN 300 220-1 issue: 11/97 Steinhagen, 01.10.2004 ppa. Axel Becker Management 11.2004 TR20A004-A RE 25 6 . 2 x CR2032 11.2004 TR20A004-A RE 105 2 3a 3c 3b 3d 3 3e 106 11.2004 TR20A004-A RE 5.1.1 1x 2x ZC1 4 3x ZC2 ZC3 5 5 6 1x 4x 1x t 4x 1x ZC1 ZC2 ZC3 11.2004 TR20A004-A RE 107 11.2004 TR20A004-A RE