1
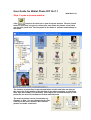
User Guide for Wallet Photo DIY Ver1.1
2006 March 25
Step 1: open a browse window
Click
button in the tool bar to open a browse window. The last visited
folder is open first and you can select your own folder. All photos in the folder
are shown in small size. The first photo in the folder is selected automatically in
the folder.
The number of photo files in the selected folder and the total size are show at
the status bar at the bottom of the window (In the above example, it is 36 Photo
files, total size 3.6Mb). The resolution, color depth, file size and filename of each
photo file are shown at the bottom of each reduced photo.
The reduced photos can be sorted either by
filename or date. You can change that by right
clicking on the space between the reduced
photos and make a selection.
When you click any photo in the browse window, the location of the photo in the
folder is displayed in the status bar (In the above example, it is Current photo
position is 1). A bigger and clear photo image of the selected photo is shown at
the leftmost bottom. You can use your mouse to enlarge or reduce the photo
image by moving the junction at the top and at the right hand side.
moving
the
junction at
the top
moving
the
junction at
the right
hand side
To view the most updated
information of the folder, right
clicking on the space between the
reduced photos and select
“Refresh”
Step 2: Select photos
Use Window normal selection method (mouse, Shift key and Control key) to
select one or two photos. Then click “OK” to jump into the “crop window”.
Step 3: Select print out area
In the “crop window”, first selected photo is displayed.
You can either
Draw a rectangular selection box on the photo to select the portion you
want to print out. Then you can drag and resize the box with your mouse
pointer.
And/Or
z Press “PgDn”/“PgUp”to enlarge/reduce the selection box.
z Press “↑” “→” “↓” “←” to move the selection box.
z Press “Shift ↑”, “Shift →”, “Shift ↓”, “Shift ←” to move the selection
box by one pixel.
Click
button to rotate the photo 90
degree clockwise/anticlockwise, if needed.
Then click the left right arrow
at the bottom to display another
photo, if exists. Repeat the selection procedure on the new photo.
Step 4: Check
button in the tool bar to add white border to the
wallet photos.
Step 5: Click
button in the tool bar to generate the 4R photo file
(.jpg). A preview window appears. Each 4R photo file (.jpg) has four
wallet (2.5” x 3.5”) photos.
Step 6: Final touch
The selected cropped photos are shown on the left hand
side of the preview window.
Under the photo you can find the position number
Click either number button to put the photo into the
corresponding location.
Click
button to put the photo into all locations.
Click
button to clear the resultant 4R photo.
Click
button make you go back to “crop window”.
Click
more photo files.
button make you jump back to browse window to select
Click
filename.
to save the 4R photo. You will be asked to enter your own
Click
button to close the preview window.
Note:
1. Click
button in the tool bar to view this help menu.
2. Click
through E-mail
button in the tool bar to send us comment and suggestion
3. Print the wallet photo file (.jpg) in 4R size.
End