1
SAS 9.1.3 ETL Studio
®
User’s Guide
The correct bibliographic citation for this manual is as follows: SAS Institute Inc. 2004.
SAS ® 9.1.3 ETL Studio: User’s Guide. Cary, NC: SAS Institute Inc.
SAS® 9.1.3 ETL Studio: User’s Guide
Copyright © 2004, SAS Institute Inc., Cary, NC, USA
ISBN 1-59047-635-2 (hard-copy book)
ISBN 1-59047-636-0 (Web download)
All rights reserved. Produced in the United States of America. No part of this publication
may be reproduced, stored in a retrieval system, or transmitted, in any form or by any
means, electronic, mechanical, photocopying, or otherwise, without the prior written
permission of the publisher, SAS Institute Inc.
U.S. Government Restricted Rights Notice. Use, duplication, or disclosure of this
software and related documentation by the U.S. government is subject to the Agreement
with SAS Institute and the restrictions set forth in FAR 52.227–19 Commercial Computer
Software-Restricted Rights (June 1987).
SAS Institute Inc., SAS Campus Drive, Cary, North Carolina 27513.
1st printing, August 2004
SAS Publishing provides a complete selection of books and electronic products to help
customers use SAS software to its fullest potential. For more information about our
e-books, e-learning products, CDs, and hard-copy books, visit the SAS Publishing Web site
at support.sas.com/pubs or call 1-800-727-3228.
SAS® and all other SAS Institute Inc. product or service names are registered trademarks
or trademarks of SAS Institute Inc. in the USA and other countries. ® indicates USA
registration.
Other brand and product names are registered trademarks or trademarks of their
respective companies.
Contents
What’s New
vii
Overview
vii
Details
vii
PART
1
Introduction
Chapter 1
1
4 Using This Manual
3
Purpose 3
Intended Audience
3
Quick Start with SAS ETL Studio
SAS ETL Studio Online Help
4
Chapter 2
4
4 Introduction to SAS ETL Studio
What Is SAS ETL Studio? 5
The SAS Intelligence Value Chain
The SAS Intelligence Platform 8
Features
10
Windows
13
Wizards
18
Usage Notes
PART
2
5
6
20
Planning, Installation, and Setup
21
Chapter 3
23
4 Designing a Data Warehouse
Overview of Warehouse Design
23
Data Warehousing with SAS ETL Studio
Planning a Data Warehouse 25
Planning Security for a Data Warehouse
Chapter 4
4 Example Data Warehouse
24
26
27
Overview of Orion Star Sports & Outdoors
27
Asking the Right Questions
28
Which Sales Person Is Making the Most Sales?
29
What Are the Time and Place Dependencies of Product Sales?
The Next Step 35
Chapter 5
4 Setup Tasks for Administrators
37
Overview of Installation and Setup 38
Review Project Plans
38
Install SAS ETL Studio and Related Software
39
Start SAS Management Console 40
Create a Metadata Profile and a Foundation Repository
40
32
iv
Enter Metadata for Users, Administrators, and Groups 41
Create a Project Repository for Each User
41
Enter Metadata for Servers 42
Enter Metadata for Libraries 44
Supporting Case and Special Characters in Table and Column Names
Prerequisites for SAS Data Quality 51
Prerequisites for Metadata Import and Export
52
Additional Information about Administrative Tasks
52
PART
3
Using SAS ETL Studio
Chapter 6
53
4 Task Overview for Users
55
Preliminary Tasks for Users
56
Main Task Flow for Users
59
Specifying Metadata for Sources and Targets
Using Source Designers 61
Using Target Designers 63
Working with Change Management 64
60
Specifying Metadata for DBMS Tables with Keys
Viewing the Data in a Table
67
Viewing the Metadata for a Table
67
Updating the Metadata for a Table
67
Setting Name Options for Individual Tables 68
Additional Information about User Tasks
69
Chapter 7
66
4 Specifying the Inputs to Warehouse Data Stores
71
Sources: Inputs to Warehouse Data Stores
71
Example: Using a Source Designer to Enter Metadata for SAS Tables
Example: Extracting Information from a Flat File
78
Next Tasks
87
Chapter 8
49
4 Specifying Warehouse Data Stores
72
89
Targets: Warehouse Data Stores
89
Example: Using the Target Table Designer to Enter Metadata for a SAS Table
Next Tasks
97
Chapter 9
4 Introduction to SAS ETL Studio Jobs
Overview of Jobs 100
Main Windows for Jobs
General Tasks for Jobs
99
102
113
Example: Creating a SAS Code Transformation Template
120
General Tasks for SAS Code Transformation Templates 128
Additional Information about Jobs 130
Chapter 10
4 Loading Warehouse Data Stores
131
Jobs: Process Flows That Load Warehouse Data Stores
131
89
v
Example: Creating a Job That Joins Two Tables and Generates a Report
Example: Using Slowly Changing Dimensions 145
Example: Using a SAS Code Transformation Template in a Job 155
Chapter 11
4 Creating Cubes
Overview of Cubes 161
General Tasks for Cubes
161
162
Example: Building a Cube from a Star Schema
164
Example: Using the Source Editor to Submit User-Written Code for a Cube
Additional Information about Cubes
175
PART
4
Appendixes
Appendix 1
177
4 Usage Notes
179
General Usage Notes
180
Usage Notes for Source Designers and Target Table Designers
Appendix 2
4 Building Java Plug-ins for SAS ETL Studio
Overview
189
Shortcut Plug-ins 190
Installing a Shortcut Plug-in
190
Example: Building a Source Designer Plug-in
Appendix 3
4 Recommended Reading
Recommended Reading
Glossary
Index
209
215
132
207
207
191
189
183
172
vi
vii
What’s New
Overview
Here is an overview of the latest features in SAS ETL Studio. For details about
upgrading metadata for this release, as well as for information about installing and
configuring servers, libraries, users, and other resources that are required by SAS ETL
Studio, administrators should see the SAS Intelligence Platform: Planning and
Administration Guide.
Details
SAS ETL Studio 9.1.3
Features that are new in SAS ETL Studio 9.1.3 include the following:
3 Support for the SAS Scalable Performance Data Server (SPD Server). The SAS
SPD Server is a high performance, multi-user, parallel-processing data server with
a comprehensive security infrastructure, backup and restore utilities, and
sophisticated administrative and tuning options. The SAS SPD Server can be
faster and more flexible than other storage options, including the SAS SPD Engine.
3 Two new transformation templates provide additional support for slowly changing
dimensions (SCD):
3 Unlike the SCD Type 2 transformation, which tracks changes to a table’s
descriptive attributes, the Key Effective Date transformation tracks changes in
a table’s keys. The Key Effective Date transformation can be used to track
changes in a table that does not have descriptive attributes, such as an
intersection table, which is a table that describes the relationships between two
or more tables.
For example, suppose that you have a table of users, called USERS, and a
table of groups, called GROUPS. An intersection table called
USERS_X_GROUPS could describe the many-to-many relationships between
USERS and GROUPS. The Key Effective Date transformation would use date
viii
What’s New
ranges (beginning and end dates) to detect when a new key combination has
been entered in USERS_X_GROUPS.
3 The Surrogate Key Generator transformation enables you to create a unique
identifier for records, a surrogate key. The surrogate key can be used to perform
operations that would be difficult or impossible to perform on the original key.
For example, a numeric surrogate key could be generated for an alphanumeric
original key, to make sorting easier.
3 The "Redeploy Jobs to Stored Process" feature rebuilds all stored processes that
are associated with SAS ETL Studio jobs. Use this feature when you update a job
for which a stored process has been generated. You can also use this feature when
the computing environment changes, such as when a metadata repository is
promoted from a test environment to a production environment, for example.
3 The property window for the Mining Results transformation was updated to make
it easier to select inputs and outputs.
Additional Information
For more details about the features that are new in SAS ETL Studio 9.1.3, perform
the following steps:
1 Start SAS ETL Studio 9.1.3. as described in “Start SAS ETL Studio” on page 56.
I Contents. The main Help window displays.
The default Help topic is Introduction to SAS ETL Studio.
2 From the menu bar, select Help
3 In the default Help topic, select What’s New for SAS ETL Studio. The features
that are new in SAS ETL Studio 9.1.3 are described in this topic.
SAS ETL Studio 9.1.2
Features that were new in SAS ETL Studio 9.1.2 include the following:
3 Support for slowly changing dimensions. SAS ETL Studio enables you to track
changes to data that occur over time. You can then analyze those changes and
forecast the impact on future business decisions. For example, a company that
provides long-distance telephone service could determine the group of customers
that was most likely to move to a different company. Those customers could be
targeted in a marketing campaign and offered an incentive to retain their current
provider.
SAS ETL Studio provides two new transformations, SCD Type 2 Loader and
Fact Table Lookup, that enable you to track changes and retain historical records.
With the SCD Type 2 Loader, you can load dimension tables and detect changes in
source data, add change tracking information, and generate primary key values.
(See “Example: Using Slowly Changing Dimensions” on page 145.) With Fact
Table Lookup, you can map source columns into fact tables, make use of
translation tables, and specify responses to the detection of missing values.
3 Better status handling for ETL process flows. The status of a SAS ETL Studio job
or a transformation within a job can be automatically sent in an e-mail, written to
a file, or sent to an event broker that will pass the status code to another
application. You can also use status code handling to capture job statistics, such as
the number of records before and after the append of the last table loaded in a job.
3 Easier data validation for ETL process flows. The new Data Validation
transformation enables you to identify and act on duplicate values, invalid values,
What’s New ix
and missing values. You can also develop your own validation process that
translates source values using expressions or translation tables.
3 Export and import of SAS ETL Studio jobs. You can export jobs from SAS ETL
Studio and then use SAS ETL Studio to import these jobs into the same metadata
repository or into a different repository. The jobs are exported to a file in XML
format.
3 Support for stored processes. You can save SAS ETL Studio jobs to a file for the
SAS Stored Process Server to execute later.
3 Impact analysis and reverse impact analysis (data lineage). SAS ETL Studio
enables you to identify the tables, columns, and transformations that would be
affected by, or which have an impact on, a selected table or column. You can view
a diagram and a report that show the affected jobs, transformations, tables, and
columns.
3 Support for SAS Enterprise Miner scoring models. The new Mining Results
transformation enables you to read the metadata from a SAS Enterprise Miner
scoring model and create an output table that applies the model to the source data.
3 Support for table concatenation and N-to-one column mapping. The new Append
transformation enables you to create a single target by appending (concatenating)
two or more sources. The Append transformation supports N-to-one column
mapping.
3 Support for using a physical table to update that metadata for the table. If a
change is made directly to a physical table, you can use the Update Table
Metadata feature to update table metadata so that it matches the physical table.
3 Support for optional macro variables in the code that SAS ETL Studio generates
for a job. The variables enable SAS ETL Studio jobs to access the metadata server
and retrieve relevant metadata. For example, the code that is generated for a job
might access the metadata server to retrieve an event code that is defined in a
repository.
3 Source designer wizards enable you to specify the Custom tree group to which the
new table metadata should belong.
3 In the SAS ETL Studio tree view, if you select the metadata for a library, you can
display its LIBNAME. If metadata has been defined for any tables in a library, you
can expand the library and view its table metadata.
Additional Information
For more details about the features that were new in SAS ETL Studio 9.1.2, perform
the following steps:
1 Start SAS ETL Studio as described in “Start SAS ETL Studio” on page 56.
I Contents. The main Help window displays.
The default Help topic is Introduction to SAS ETL Studio.
2 From the menu bar, select Help
3 In the default Help topic, select Understanding SAS ETL Studio. The features
that were new in SAS ETL Studio 9.1.2 are described in this topic.
x
What’s New
1
1
P A R T
Introduction
Chapter
1. . . . . . . . . . Using This Manual
Chapter
2 . . . . . . . . . . Introduction to SAS ETL Studio
3
5
2
3
CHAPTER
1
Using This Manual
Purpose 3
Intended Audience 3
Quick Start with SAS ETL Studio
SAS ETL Studio Online Help 4
4
Purpose
This manual explains how to use SAS ETL Studio to do the following tasks:
3 specify metadata for data sources, such as tables in an operational system
3 specify metadata for data targets, such as tables in a data warehouse
3 create jobs that specify how data is extracted, transformed, and loaded from
sources to targets.
This manual also summarizes how to set up servers, libraries, and other resources
that SAS ETL Studio requires. A data warehouse for a fictional company, Orion Star
Sports & Outdoors, is used to illustrate these tasks.
Intended Audience
This manual is intended for people who assume the following roles:
3 SAS ETL Studio user—a person who uses SAS ETL Studio software to extract,
transform, and load information into a data warehouse or data mart.
3 SAS ETL Studio metadata administrator—a person who uses SAS Management
Console software to maintain the metadata for servers, users, and other global
resources that are required by SAS ETL Studio.
This manual is not intended for server administrators—people who install and
maintain server hardware or software. However, some SAS ETL Studio tasks depend
on tasks that the server administrator performs.
A common scenario for SAS ETL Studio projects is as follows:
3 A server administrator installs and starts servers. For details about maintaining
these servers, administrators should see the documentation that came with the
servers. See also the SAS Intelligence Platform: Planning and Administration
Guide.
3 A metadata administrator uses SAS Management Console to define metadata for
servers, users, libraries, and other global resources, as described in Chapter 5,
“Setup Tasks for Administrators,” on page 37. For details about maintaining
4
Quick Start with SAS ETL Studio
4
Chapter 1
global metadata, see the online Help for in SAS Management Console. See also
the SAS Management Console: User’s Guide and the SAS Intelligence Platform:
Planning and Administration Guide.
3 SAS ETL Studio users create jobs that extract, transform, and load information
into a data warehouse or data mart, as described in “Main Task Flow for Users” on
page 59. Users are simply told which servers, user identities, libraries, and other
global resources to use.
Quick Start with SAS ETL Studio
Administrators who want to begin work immediately should read Chapter 5, “Setup
Tasks for Administrators,” on page 37. Users who want to begin work immediately
should read Chapter 6, “Task Overview for Users,” on page 55.
SAS ETL Studio Online Help
This manual is a companion to the online Help for SAS ETL Studio. The online Help
describes all of the windows in SAS ETL Studio, and it summarizes the main tasks that
you can perform with the software. The help includes examples for all Source Designer
wizards, all target designer wizards, and all transformation templates in the Process
Library tree.
Perform the following steps to display the main Help window for SAS ETL Studio.
1 Start SAS ETL Studio as described in “Start SAS ETL Studio” on page 56.
2 From the menu bar, select Help
I Contents. The main Help window displays.
To display the help for an active window or tab, click its Help button. If the window
or tab does not have a Help button, press the F1 key.
5
CHAPTER
2
Introduction to SAS ETL Studio
What Is SAS ETL Studio? 5
The SAS Intelligence Value Chain 6
The SAS Intelligence Platform 8
SAS Foundation 8
SAS Business Intelligence Infrastructure 8
SAS Foundation Servers 8
SAS Foundation Services 9
SAS Application Services 9
SAS Client Services 10
Features 10
Metadata Import and Export 11
Change Management Facility 11
Multi-Tier Support 11
Integrated SAS Data Quality Software 12
User-Written Components 12
Job Scheduling 12
Windows 13
Online Help for Windows 13
Open a Metadata Profile Window 13
Desktop 14
Menu Bar 15
Toolbar 15
Shortcut Bar 15
Tree View 15
Trees 15
Status Line 15
Message Window 15
Process Designer Window 16
Source Editor Window 16
Options Window 17
Wizards 18
Usage Notes 20
What Is SAS ETL Studio?
SAS ETL Studio is an application that enables you to manage ETL process
flows—sequences of steps for the extraction, transformation, and loading of data. The
data is loaded into a set of target data stores that are typically part of a data warehouse
or a data mart. As you probably know, a data warehouse can support a business
6
The SAS Intelligence Value Chain
4
Chapter 2
intelligence system, such as a customer relationship management (CRM) system. A data
mart can support a specialized set of users who have a finite set of queries and reports.
SAS ETL Studio is not a stand-alone application. It is only one product in a SAS
intelligence solution.
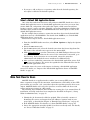
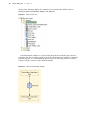
The SAS Intelligence Value Chain
The following figure illustrates the SAS Intelligence Value Chain, a model for
building an intelligence solution.
Figure 2.1
SAS Intelligence Value Chain
Plan
ETLQ
Intelligent
Storage
Business
Intelligence
Analytic
Intelligence
Most links in the chain are associated with a set of SAS software. SAS ETL Studio is
Q
associated with the ETL link and the Intelligent Storage link of the chain, as described
in the following table.
Table 2.1 Links in the SAS Intelligence Value Chain
Link
Description
Associated Software
Plan
Work with a SAS representative to select
platforms and SAS software products that are
required for your solution. Identify how data will
be stored; how you will query the data; and how
information consumers will access data. Build
data models for data warehouses and data marts.
Includes third-party data
modeling software.
ETLQ
Extract data from sources such as SAS data sets,
DBMS tables, and enterprise applications.
Includes SAS ETL Studio,
SAS/ACCESS interfaces to
relational databases, SAS
Data Surveyors for
enterprise applications,
SAS Data Quality Server,
dfPower Studio.
Transform the data before writing it to the target
data stores. For example, you might change the
structure of your data by joining the contents of
several tables into one table.
Load the transformed data into the target data
stores.
Ensure the Quality of the data to be loaded into
the target data stores by reviewing and cleansing
the data so that it is accurate, up-to-date, and
consistently represented.
Introduction to SAS ETL Studio
4
The SAS Intelligence Value Chain
Link
Description
Associated Software
Intelligent
Storage
Store data to achieve the best performance.
Storage options include SAS, third-party
relational databases, parallel storage,
multidimensional databases. or a combination of
these storage structures.
Includes Base SAS, SAS
ETL Studio, SAS OLAP
Server (for
multi-dimensional
storage), SAS SPD Server
(for parallel storage), SAS/
ACCESS software for
third-party relational
databases and for
enterprise applications.
Business
Intelligence
Explore the data in a data warehouse or data
mart and control the presentation of the results in
business reports.
Includes SAS Information
Map Studio, SAS Web
Report Studio, SAS Web
Report Viewer, SAS
Information Delivery
Portal, SAS Enterprise
Guide, and SAS Add-In for
Microsoft Office.
Analytic
Intelligence
Predictive and descriptive modeling, forecasting,
optimization, simulation, experimental design,
and more.
Includes SAS Enterprise
Miner and many other
analytic-intelligence
products for areas such as
Enterprise Intelligence,
Supplier Intelligence,
Organizational
Intelligence, Customer
Intelligence, and Supply
Chain Intelligence.
7
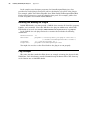
Note: Not all solutions require products from each link of the SAS Intelligence
Value Chain . 4
Q
SAS ETL Studio enables you to perform all of the tasks in the ETL link of the SAS
Intelligence Value Chain: the extraction of data from operational data stores, the
transformation of this data, and the loading of the extracted data into your data
warehouse or data mart. SAS ETL Studio extends into the Intelligent Storage link
because it enables you to design the flow of data into SAS data sets, OLAP cubes,
and/or third-party relational database tables.
A number of products augment the capabilities of SAS ETL Studio. For example, the
SAS/ACCESS interfaces to relational databases enable you to read, write, and update
data regardless of its native database and platform. The SAS Data Surveyors enable
you to build SAS ETL Studio jobs that help you read and write data from enterprise
applications from SAP, Siebel, Oracle, and other vendors.
There are also several components that enable you to improve the quality of your
data. For instance, the SAS Data Quality Server allows you to analyze, cleanse, and
standardize your data. This product is often used in conjunction with products such as
dfPower Studio from DataFlux Corporation, which enables you to customize the quality
knowledge base that the SAS Data Quality Server uses to store its data-cleansing
guidelines.
8
The SAS Intelligence Platform
4
Chapter 2
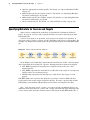
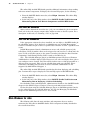
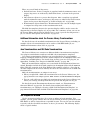
The SAS Intelligence Platform
The following figure illustrates the SAS Intelligence Platform, a software
architecture for end-to-end intelligence solutions.
Figure 2.2
Software Architecture for the SAS Intelligence Platform
SAS®
Client
Services
Development
Environment
SAS
Information
Delivery
Portal
Desktop Client
Interfaces
Web-based Interfaces
SAS® Java Components
SAS®
Application
Services
SAS® COM Components
SAS® Query and Reporting Sevices
®
SAS BI
Infrastructure
SAS®
Foundation
Services
SAS® Foundation Services
SAS®
Foundation
Servers
SAS® Foundation Servers
SAS®
Foundation
SAS/CONNECT®
SAS/ACCESS®
SAS/STAT®
SAS/GRAPH®
SAS/SHARE®
SAS/ETS®
SAS/QC®
Base SAS®
SAS ETL Studio is in the SAS Client Services tier of the platform. It interacts with
software in the other tiers.
SAS Foundation
The SAS Foundation layer consists of SAS products such as Base SAS, SAS/
CONNECT, SAS/GRAPH, SAS/ACCESS, SAS/STAT, SAS/ETS, SAS/OR, SAS/QC, and
others in the SAS product line. These products provide a broad range of core data
manipulation functions, such as distributed data management, data access across
multiple database sources, data visualization, data mining, and advanced analytical
modeling.
SAS ETL Studio generates SAS code and submits that code to Base SAS for
execution. It also uses Base SAS to access data. SAS ETL Studio often uses SAS/
ACCESS to access data in formats other than SAS.
SAS ETL Studio uses SAS/CONNECT to submit generated SAS code to remote
machines and to interact with remote libraries.
SAS Business Intelligence Infrastructure
The SAS Business Intelligence Infrastructure (BI Infrastructure) layer provides a
suite of servers and services. With the BI Infrastructure, SAS can be deployed in
multi-tier environments where Web servers and application servers operate.
SAS Foundation Servers
The servers in the BI Infrastructure include the following:
Introduction to SAS ETL Studio
4
SAS Business Intelligence Infrastructure
9
3 SAS Metadata Server
The SAS Metadata Server enables centralized, enterprise-wide metadata delivery
and management: one metadata server provides metadata to SAS applications
across the enterprise.
3 SAS OLAP Server
The SAS OLAP Server delivers pre-summarized cubes of data to OLAP clients
such as SAS Enterprise Guide using OLE DB for OLAP. The SAS OLAP Server is
a multidimensional database server that is designed to reduce the load on
traditional back-end storage systems by delivering different summarized views of
data to business intelligence applications, irrespective of the amount of data
underlying these summaries.
3 SAS Stored Process Server
The SAS Stored Process Server executes and delivers results from SAS Stored
Processes in a multi-client environment. A SAS Stored Process is a SAS program
that can be called through the SAS Stored Process Server. Using the SAS Stored
Process Server, clients can execute parameterized SAS programs without having to
know the SAS language.
3 SAS Workspace Server
The SAS Workspace Server surfaces the SAS programming environment through
an API to calling clients.
The example data warehouse that is described in this manual uses a SAS Metadata
Server, a SAS Workspace Server, and a SAS OLAP Server. See “Enter Metadata for
Servers” on page 42.
A SAS ETL Studio job can be saved as a stored process. The stored process can then
be executed on a SAS Stored Process Server. In this way, people other than ETL
specialists can execute SAS ETL Studio jobs, if they have the appropriate authorization.
See the online Help for details. To display the relevant Help topics, perform the
following steps:
1 From the SAS ETL Studio menu bar, select Help
window displays.
I Contents. The online Help
2 In the left pane of the Help window, select Stored Processes
Stored Processes.
I Maintaining
SAS Foundation Services
SAS ETL Studio and other applications depend on SAS Foundation Services to
provide user authentication, profile management, session management, activity logging,
metadata and content repository access, and connection management. Extension
services for information publishing, event management, and SAS Stored Process
execution are also provided.
SAS Application Services
SAS Application Services provide business-oriented query and reporting services to
calling clients. By using a business metadata layer and a universal report definition,
SAS Query and Reporting Services provide a solid foundation for enterprise reporting
and application development. Java and COM-based interfaces to SAS Application
Services surface to clients the functionality provided by SAS Query and Reporting
Services. SAS Application Services can also be used by application developers to
provide custom business intelligence capabilities within their solutions.
10
SAS Client Services
4
Chapter 2
SAS Client Services
SAS ETL Studio is the SAS Client Services layer. This layer provides a suite of
Web-based and desktop front-end interfaces to the content and applications generated
from the SAS BI Infrastructure and the SAS Foundation.
Features
SAS ETL Studio supports a number of features that enable you to manage large data
warehousing projects. The following table lists the basic features. For an overview of
the latest features, see the following table.
Table 2.2 SAS ETL Studio Features
Feature
Related Documentation
A metadata architecture that complies with the Common
Warehouse Metamodel (CWM). Enables SAS ETL Studio
to share metadata with other applications.
See the SAS Open Metadata
Architecture documentation on the
SAS OnlineDoc CD or on the
support.sas.com Web site.
Import and export of metadata in Common Warehouse
Metamodel (CWM) format. Optional bridges are available
for other formats. Enables SAS ETL Studio to import and
export metadata about sources and targets.
See “Metadata Import and Export” on
page 11.
Optional Data Surveyor wizards that provide access to the
metadata in enterprise applications from SAP, Siebel,
Oracle, and other vendors.
See the online Help for the Data
Surveyor wizards in SAS ETL Studio,
if installed.
Source control for metadata. Supports team-based
development of ETL process flows.
See “Working with Change
Management” on page 64.
Metadata access control by user and group.
See the SAS Intelligence Platform:
Planning and Administration Guide.
Metadata backup.
See the SAS Metadata Server: Setup
Guide.
Multi-tier support for processes that flow across multiple
servers.
See “Multi-Tier Support” on page 11.
Optional, integrated SAS data quality software for data
cleansing and data analysis.
See “Integrated SAS Data Quality
Software” on page 12.
Support for OLAP data stores.
See Chapter 11, “Creating Cubes,” on
page 161.
Support for user-written components.
See “User-Written Components” on
page 12.
Introduction to SAS ETL Studio
4
Multi-Tier Support
Feature
Related Documentation
Job scheduling.
See “Job Scheduling” on page 12.
Multiple work environments—separate environments for
development, testing, and production, for example.
See metadata promotion and metadata
replication in the SAS Management
Console: User’s Guide.
11
Metadata Import and Export
SAS ETL Studio is a SAS Open Metadata Architecture application. It can easily
share metadata repositories with other SAS Open Metadata Architecture applications,
such as SAS Management Console, SAS Enterprise Miner, SAS Information Delivery
Portal, SAS OLAP Administrator, and the metadata LIBNAME engine.
SAS ETL Studio also provides metadata import and export wizards from its Shortcut
Bar and the Tools menu. These wizards enable you to perform the following tasks:
3 exchange metadata with applications that support the Common Warehouse
Metamodel (CWM)
3 import or export metadata using one of the optional Meta Integration Model
Bridges (MIMB) from Meta Integration Technology, Inc.
For example, you can use the metadata importer wizard to import a data model in
CWM format or in a format for which you have the appropriate Meta Integration Model
Bridge. In SAS ETL Studio, you could view the properties of each table in the model
and verify that the appropriate metadata was imported. The tables could then be used
in SAS ETL Studio jobs.
For details about the metadata import and export wizards, see the SAS Management
Console: User’s Guide.
To import or export metadata in formats other than CWM, additional software from
Meta Integration Technology must be installed. Meta Integration Technology is a SAS
software partner. For information about obtaining and installing their software, see
www.metaintegration.net/Products/MIMB/Description.html. You can also request
an evaluation license key from this location.
Change Management Facility
SAS ETL Studio enables you to create metadata objects that define sources, targets,
and the transformations that connect them. These objects are saved to one or more
metadata repositories. In SAS ETL Studio, the change management facility enables
multiple SAS ETL Studio users to work with the same metadata repository at the same
time—without overwriting each other’s changes. For details, see “Working with Change
Management” on page 64.
Multi-Tier Support
SAS ETL Studio provides N-tier support for processes that flow across multiple
servers, as described in “The SAS Intelligence Platform” on page 8. SAS ETL Studio
uses a combination of SAS Integration Technologies software and SAS/CONNECT
software to access SAS servers.
SAS servers provide two critical services:
3 Data services—access to data using SAS software, including the SAS/ACCESS
products for access to DBMS data.
12
Integrated SAS Data Quality Software
4
Chapter 2
3 Compute services—submission of SAS code to other machines running SAS and
retrieval of the results.
SAS ETL Studio’s multi-tier support includes support for implicit data transfers
using the UPLOAD/DOWNLOAD procedures, explicit data transfers using a Data
Transfer transformation template, or both. (A Data Transfer transformation template is
one of the templates that is provided in the Process Library. For an overview of the
Process Library, see “Process Library Tree” on page 107.)
Support is included for scripted signon for SAS/CONNECT. SAS ETL Studio will
generate script assignments in its generated code.
Integrated SAS Data Quality Software
The Process Library in SAS ETL Studio contains two data quality transformation
templates: Create Match Code and Apply Lookup Standardization. These templates
enable you to increase the value of your data through data analysis and data cleansing.
The prerequisites for these templates are described in “Prerequisites for SAS Data
Quality” on page 51. After the prerequisites have been met, you can drag and drop the
templates into process flow diagrams.
User-Written Components
SAS ETL Studio enables you to do the following:
3 Specify user-written code for an entire job or a transformation within a job. For a
summary of this task, see “Creating Jobs That Retrieve User-Written Code” on
page 116.
3 Drag a User-Written transformation template from the Process Library and drop it
into the process flow diagram for a job. You can then update the default metadata
for the transformation so that it specifies the location of user-written program.
3 Use the Transformation Generator wizard to create your own SAS code
transformation templates and add them to the Process Library. After a
transformation template has been added to the Process Library, you can drag and
drop it into any job. For a description of this wizard, see “Transformation
Generator Wizard” on page 112.
The online Help for SAS ETL Studio provides additional information about working
with user-written components. To display the relevant Help topics, do the following:
1 From the SAS ETL Studio menu bar, select Help I Contents. The online Help
window displays.
2 In the left pane of the Help window, select Task Overviews I SAS ETL Studio
Task Reference I User-Written Components and SAS ETL Studio.
You can also do the following:
3 Use the Java programming language to create your own plug-ins for SAS ETL
Studio. You can create Java-based transformation templates, source designer
wizards, target designer wizards, and new object wizards. For details about
creating your own Java plug-ins, see Appendix 2, “Building Java Plug-ins for SAS
ETL Studio,” on page 189.
Job Scheduling
After users define one or more jobs in SAS ETL Studio, they can submit the jobs for
immediate execution. Administrators can also make jobs available for scheduling in
Introduction to SAS ETL Studio
4
Open a Metadata Profile Window
13
another application. For example, after a job has been deployed, an administrator can
use the Schedule Manager plug-in to SAS Management Console to schedule the deployed
job to run at specified date and time or when a specified event occurs. For details about
deploying jobs and scheduling jobs, see “Jobs Can Be Scheduled” on page 102.
Windows
The following table lists the main windows and components in SAS ETL Studio.
Each component is briefly described in the sections that follow.
Table 2.3 SAS ETL Studio Interface
Component
Description
“Open a Metadata Profile Window” on page 13
Displays in front of the SAS ETL Studio
desktop. Use to open or maintain metadata
profiles. You use metadata profiles to connect to
various metadata servers.
“Desktop” on page 14
Use to begin working with the metadata in the
current repositories.
“Process Designer Window” on page 16
Use to create process flow diagrams, to generate
and submit code for jobs, and to perform related
tasks.
“Source Editor Window” on page 16
A general-purpose SAS code editor.
“Options Window” on page 17
Use to specify options for SAS ETL Studio.
Online Help for Windows
To display the help for an active window or tab in SAS ETL Studio, click its Help
button. If the window or tab does not have a Help button, press the F1 key.
You can also use the table of contents to access Help topics for the main windows. To
display the relevant Help topics, do the following:
1 From the SAS ETL Studio desktop, select Help
The online Help window displays.
I Contents from the menu bar.
2 In the left pane of the Help window, select the SAS ETL Studio Desktop folder,
the Other Main Windows folder, or the SAS ETL Studio Wizards folder.
3 In the folder, select the desired topic.
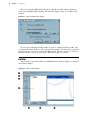
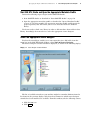
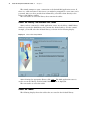
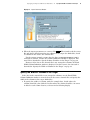
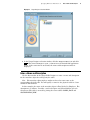
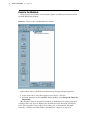
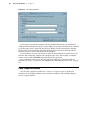
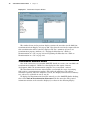
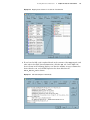
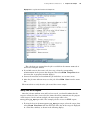
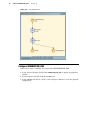
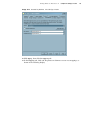
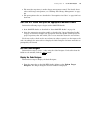
Open a Metadata Profile Window
A metadata profile is a client-side definition of where a metadata server is located.
The definition includes a host name, a port number, and a list of one or more metadata
repositories. In addition, the metadata profile can contain a user’s login information and
instructions for connecting to the metadata server either automatically or manually.
14
Desktop
4
Chapter 2
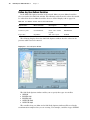
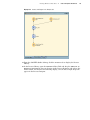
When you start SAS ETL Studio, the Open a Metadata Profile window displays in
front of the SAS ETL Studio desktop. The following display shows an example of this
window.
Display 2.1 Open a Metadata Profile Window
Use the Open a Metadata Profile window to open an existing metadata profile, edit
an existing metadata profile, or add a new metadata profile. You must open a metadata
profile before you can do any work in SAS ETL Studio. For more details, see “Create a
Metadata Profile” on page 57 and “Open a Metadata Profile” on page 58.
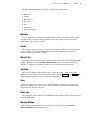
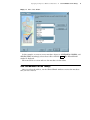
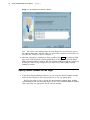
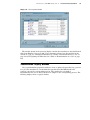
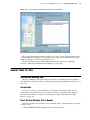
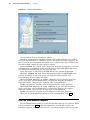
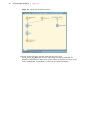
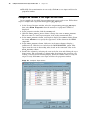
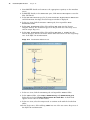
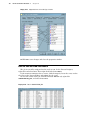
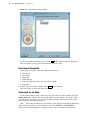
Desktop
After you open a metadata profile, the SAS ETL Studio desktop displays, as shown in
the following display.
Display 2.2 SAS ETL Studio Desktop
Introduction to SAS ETL Studio
4
Desktop
15
The SAS ETL Studio desktop consists of the following components:
1 Menu bar
2 Toolbar
3 Shortcut bar
4 Tree view
5 Trees
6 Status line
7 Message window
Menu Bar
Use the menu bar to access the drop-down menus. The list of active options varies
according to the current work area and the kind of object that is selected. Inactive
menu options are disabled or hidden.
Toolbar
The toolbar contains shortcuts for items on the menu bar. The list of active options
varies according to the current work area and the kind of object that is selected.
Inactive options are disabled or hidden.
Shortcut Bar
The shortcut bar displays a pane of task icons on the left side of the SAS ETL Studio
desktop. To display it, select View I Shortcut Bar from the menu bar. Each icon
displays a commonly used window, wizard, or a selection window for wizards.
Tree View
The tree view displays the metadata that is associated with a current metadata
repository. Use the tabs at the bottom of this pane, such as Inventory and Custom , to
display different views or “trees” of a current repository.
Trees
Most trees display the contents of a current metadata repository in various ways.
The Process Library tree can be used to drag and drop transformation templates into
the process flow diagram for a job.
Status Line
The status line at the bottom of the SAS ETL Studio desktop displays error messages
or other information.
Message Window
The message window display various messages. To display it, select View
Message Window from the menu bar.
I
16
Process Designer Window
4
Chapter 2
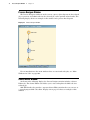
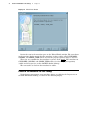
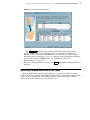
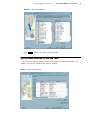
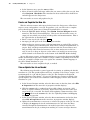
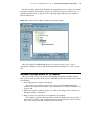
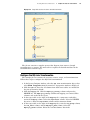
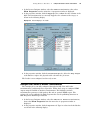
Process Designer Window
The Process Designer window is used to create a process flow diagram for the selected
job, to generate and submit code for the selected job, and to perform related tasks. The
following display shows an example of this window and a process flow diagram.
Display 2.3 Process Designer Window
For an introduction to the main windows that are associated with jobs, see “Main
Windows for Jobs” on page 102.
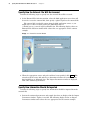
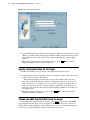
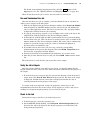
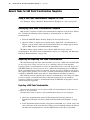
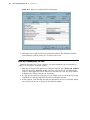
Source Editor Window
As shown in the following display, the Process Designer window includes a Source
Editor tab. The Source Editor tab enables you to view and update the SAS code for a
selected job.
SAS ETL Studio also provides a separate Source Editor window that you can use as
a general-purpose SAS code editor. Display 2.4 on page 17 shows an example of this
window.
Introduction to SAS ETL Studio
4
Options Window
17
Display 2.4 Source Editor Window
To display the Source Editor window, from the SAS ETL Studio desktop, select Tools
I Source Editor.
To submit code from the Source Editor, from the SAS ETL Studio desktop, select
Editor I Submit.
To display Help for this window, press the F1 key.
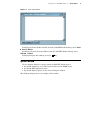
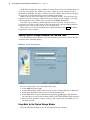
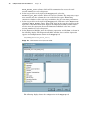
Options Window
Use the Options window to specify options for SAS ETL Studio such as
3 the default support for case and/or special characters in DBMS names
3 the default SAS application server
3 the default display options for the Process Designer window.
The following display shows an example of this window.
18
Wizards
4
Chapter 2
Display 2.5 Options Window
The following steps describe one way to view or update the options on the Options
window:
I Options to display the
Options window.
2 Select the tab that contains the options that you want to view or update.
1 From the SAS ETL Studio desktop, select Tools
Wizards
The following wizards are available from the Shortcut Bar or the Tools item on the
menu bar on the SAS ETL Studio desktop.
Table 2.4 SAS ETL Studio Wizards
Wizard
Description
Cube Designer
Enables you to create a cube, which is a data
store that supports online analytical processing.
See Chapter 11, “Creating Cubes,” on page 161.
Data Surveyors (optional)
If installed, enable you to access the metadata in
enterprise applications from vendors such as
PeopleSoft, SAP R/3, Siebel, and Oracle.
Introduction to SAS ETL Studio
4
Wizards
Wizard
Description
Export Job to File
Enables you to export a SAS ETL Studio job to
an XML file.
Job Import and Merge
Enables you to import jobs that have been
exported from SAS ETL Studio.
Metadata Exporter
Enables you to export metadata to other
applications that support CWM format.
Optional bridges are available for other formats.
See “Metadata Import and Export” on page 11.
Metadata Importer
Enables you to import metadata from other
applications that support CWM format.
Optional bridges are available for other formats.
See “Metadata Import and Export” on page 11.
New Job
Enables you to select one or more tables as the
target(s) (outputs) for a new job. Generates
metadata for the new job. See “New Job Wizard”
on page 103.
Source designers
Enable you to generate metadata for tables or
external files that exist in physical storage. See
“Using Source Designers” on page 61.
Target designers
Enable you to create metadata for an object that
will be created in the future, but does not
currently exist in physical storage. An example
of such an object would be a table that will be
created when a SAS ETL Studio job is executed.
See “Using Target Designers” on page 63.
Transformation Generator
Enables you to create a user-written, SAS code
transformation and make it available in the
Process Library tree. One of the easiest ways to
customize SAS ETL Studio. See
“Transformation Generator Wizard” on page 112.
19
In addition the wizards that were described in the previous table, the following
wizards are available from the New Object wizard selection window. This window is
displayed by selecting File I New Object from the SAS ETL Studio desktop. Some of
these wizards are also available from the properties windows for some objects, as
described in the following table.
Table 2.5 Wizards That Are Accessible from New Object Wizard Selection Window
Wizard
Description
New Document
Enables you to define a document that you can
associate with one or more objects in a metadata
repository.
New Group
Enables you to add a user-defined group to the
Custom tree on the SAS ETL Studio desktop.
20
Usage Notes
4
Chapter 2
Wizard
Description
New Library
Enables you to define a SAS library for SAS
data or for other data. See “Enter Metadata for
Libraries” on page 44.
New Note
Enables you to define a note that you can
associate with one or more objects in a metadata
repository.
Usage Notes
See Appendix 1, “Usage Notes,” on page 179 for notes that apply to the current
release of SAS ETL Studio.
21
2
P A R T
Planning, Installation, and Setup
Chapter
3. . . . . . . . . . Designing a Data Warehouse
Chapter
4 . . . . . . . . . . Example Data Warehouse
Chapter
5 . . . . . . . . . . Setup Tasks for Administrators
23
27
37
22
23
CHAPTER
3
Designing a Data Warehouse
Overview of Warehouse Design 23
Data Warehousing with SAS ETL Studio 24
Step 1: Extract and Denormalize Source Data 24
Step 2: Cleanse, Validate, and Load 24
Step 3: Create Data Marts or Dimensional Data 25
Planning a Data Warehouse 25
Planning Security for a Data Warehouse 26
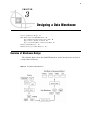
Overview of Warehouse Design
The following figure shows how SAS ETL Studio is used to flow data into and out of
a central data warehouse.
Figure 3.1 Best Practice Data Warehouse
24
Data Warehousing with SAS ETL Studio
4
Chapter 3
In this model, SAS ETL Studio jobs are used to perform the following tasks:
1 Extract enterprise data into a staging area.
2 Cleanse and validate data and load a central data warehouse.
3 Populate a data mart or dimensional model that provides collections of data from
across the enterprise.
Each step of the enterprise data model is implemented by multiple jobs in SAS ETL
Studio. Each job in each step can be scheduled to run at the time or event that best fits
your business needs and network performance requirements.
Data Warehousing with SAS ETL Studio
SAS ETL Studio helps you build dimensional data from across your enterprise in
three steps:
3 Extract source data into a staging area (see “Step 1: Extract and Denormalize
Source Data” on page 24).
3 Cleanse extracted data and populate a central data warehouse (see “Step 2:
Cleanse, Validate, and Load” on page 24).
3 Create dimensional data that reflects important business needs (see “Step 3:
Create Data Marts or Dimensional Data” on page 25).
The three-step enterprise model represents best practices for large enterprises.
Smaller models can be developed from the enterprise model. For example, you can
easily create one job in SAS ETL Studio that extracts, transforms, and loads data for a
specific purpose.
Step 1: Extract and Denormalize Source Data
The extraction step consists of a series of SAS ETL Studio jobs that capture data
from across your enterprise for storage in a staging area. SAS data access capabilities
in the jobs enable you to extract data without changing your existing systems.
The extraction jobs denormalize enterprise data for central storage. Normalized data
(many tables, few connections) is efficient for data collection. Denormalized data (few
tables, more connections) is more efficient for a central data warehouse, where
efficiency is needed for the population of data marts.
Step 2: Cleanse, Validate, and Load
After loading the staging area, a second set of SAS ETL Studio jobs cleanse the data
in the staging area, validate the data prior to loading, and load the data into the data
warehouse.
Data quality jobs remove redundancies, deal with missing data, and standardize
inconsistent data. They transform data as needed so that the data fits the data model.
For more information on available data cleansing capabilities, see the SAS Data
Quality Server: Reference.
Data validation ensures that the data meets established standards of integrity. Tests
show that the data is fully denormalized and cleansed, and that primary, user, and
foreign keys are correctly assigned.
When the data in the staging area is valid, SAS ETL Studio jobs load that data into
the central data warehouse.
Designing a Data Warehouse
4
Planning a Data Warehouse
25
Step 3: Create Data Marts or Dimensional Data
After the data has been loaded into the data warehouse, SAS ETL Studio jobs extract
data from the warehouse into smaller data marts, OLAP structures, or star schemas
that are dedicated to specific business dimensions, such as products, customers,
suppliers, financials, and employees. From these smaller structures, additional SAS
ETL Studio jobs generate, format, and publish reports throughout the enterprise.
Planning a Data Warehouse
The following steps outline one way of implementing a data warehouse.
1 Determine your initial needs:
a Generate a list of business questions that you would like to answer.
b Specify data collections (data marts or dimensional data) that will provide
answers to your business questions.
c Determine how and when you would like to receive information. Information
can be delivered based on events, such as supply shortages, on time, such as
monthly reports, or simply on demand.
2 Map the data in your enterprise:
3 Locate existing storage locations for data that can be used to populate your
data collections.
3 Determine storage format, data columns, and operating environments.
3 Create a data model for your central data warehouse:
3 Combine selected enterprise data sources into a denormalized database that
is optimized for efficient data extraction and ad hoc queries. SAS ETL Studio
resolves issues surrounding the extraction and combination of source data.
3 Consider a generalized collection of data that might extend beyond your
initial scope, to account for unanticipated business requirements.
4 Estimate and order hardware and software:
3 Include storage, servers, backup systems, and disaster recovery.
3 Include the staging area, the central data warehouse, and the data marts or
dimensional data model.
5 Based on the data model, develop a plan for extracting data from enterprise
sources into a staging area. Then specify a series of SAS ETL Studio jobs that put
the extraction plan into action:
3 Consider the frequency of data collection based on business needs.
3 Consider the times of data extraction based on system performance
requirements and data entry times.
3 Note that all data needs to be cleansed and validated in the staging area to
avoid corruption of the data warehouse.
3 Consider validation steps in the extraction jobs to ensure accuracy.
6 Plan and specify SAS ETL Studio jobs for data cleansing in the staging area:
3 SAS ETL Studio contains all of the data cleansing capabilities of the SAS
Data Quality Server software.
3 Column combination and creation are readily available through the data
quality functions that are available in the SAS ETL Studio’s Expression
Builder.
26
Planning Security for a Data Warehouse
4
Chapter 3
7 Plan and specify SAS ETL Studio jobs for data validation and load:
3 Ensure that the extracted data meets the data mode of the data warehouse
before the data is loaded into the data warehouse.
3 Load data into the data warehouse at a time that is compatible with the
extraction jobs that populate the data marts.
8 Plan and specify SAS ETL Studio jobs that populate data marts or a dimensional
model out of the central data warehouse.
9 Plan and specify SAS ETL Studio jobs that generate reports out of the data marts
or dimensional model. These jobs and all SAS ETL Studio jobs can be scheduled to
run at specified times.
10 Install and test the hardware and software that was ordered previously.
11 Develop and test the backup and disaster recovery procedures.
12 Develop and individually test the SAS ETL Studio jobs that were previously
specified.
13 Perform an initial load and examine the contents of the data warehouse to test the
extract, cleanse, verify, and load jobs.
14 Perform an initial extraction from the data warehouse to the data marts or
dimensional model, then examine the smaller data stores to test that set of jobs.
15 Generate and publish an initial set of reports to test that set of SAS ETL Studio
jobs.
Planning Security for a Data Warehouse
You should develop a security plan for controlling access to libraries, tables, and
other resources that are associated with a data warehouse. The phases in the security
planning process are as follows:
3 Define your security goals.
3 Make some preliminary decisions about your security architecture.
3 Determine which user accounts you must create with your authentication
providers and which user identities and logins you must establish in the metadata.
3 Determine how you will organize your users into groups.
3 Determine which users need which permissions to which resources, and develop a
strategy for establishing those access controls.
For details about developing a security plan, see the security chapters in the SAS
Intelligence Platform: Planning and Administration Guide.
27
CHAPTER
4
Example Data Warehouse
Overview of Orion Star Sports & Outdoors 27
Asking the Right Questions 28
Initial Questions to Be Answered 28
Which Sales Person Is Making the Most Sales? 29
Identifying Relevant Information 29
Identifying Sources 29
Source for Staff Information 29
Source for Organization Information 30
Source for Order Information 30
Source for Order Item Information 30
Source for Customer Information 31
Identifying Targets 32
Target That Combines Order Information 32
Target That Combines Organization Information 32
Target That Lists Total Sales by Employee 32
What Are the Time and Place Dependencies of Product Sales? 32
Identifying Relevant Information 32
Identifying Sources 33
Sources Related to Customers 33
Sources Related to Geography 33
Sources Related to Organization 34
Sources Related to Time 34
Identifying Targets 34
Target to Support OLAP 34
Target to Provide Input for the Cube 34
Target That Combines Customer Information 34
Target That Combines Geographic Information 35
Target That Combines Organization Information 35
Target That Combines Time Information 35
The Next Step 35
Overview of Orion Star Sports & Outdoors
Orion Star Sports & Outdoors is a fictitious international retail company that sells
sports and outdoor products. The headquarters is based in the United States, and retail
stores are situated in a number of other countries including Belgium, Holland, Germany,
the United Kingdom, Denmark, France, Italy, Spain, and Australia. Products are sold
through physical retail stores, as well as through mail-order catalogs and on the
Internet. Customers who sign up as members of the Orion Star Club organization can
receive favorable special offers; therefore, most customers enroll in the Orion Star Club.
28
Asking the Right Questions
4
Chapter 4
Note: The sample data for Orion Star Sports & Outdoors is for illustration only. The
reader is not expected to use sample data to create the data warehouse that is
described in the manual. 4
Asking the Right Questions
Suppose that the executives at Orion Star Sports & Outdoors want to be proactive in
regard to their products, customers, delivery, staff, suppliers, and overall profitability.
They might begin by developing a list of questions that needed to be answered, such as
the following:
Product Sales Trends
3 What products are available in the company inventory?
3 What products are selling?
3 What are the time and place dependencies of product sales?
3 Who is making the sales?
Slow-Moving Products
3 Which products are not selling?
3 Are these slow sales time or place dependent?
3 Which products do not contribute at least 0.05% to the revenue for a given
country/year?
3 Can any of these products be discontinued?
Profitability
3 What is the profitability of products, product groups, product categories, and
product line?
3 How is the profitability related to the amount of product sold?
Discounting
3 Do discounts increase sales?
3 Does discounting yield greater profitability?
Initial Questions to Be Answered
After reviewing their list of questions, Orion Star executives might select a few
questions for a pilot project. The executives might choose the following two questions,
for example:
3 Which sales person is making the most sales?
3 What are the time and place dependencies of product sales?
The executives would then direct the data warehousing team to answer the selected
questions. The examples used in this manual are derived from the selected questions.
Example Data Warehouse
4
Identifying Sources
29
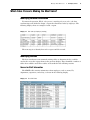
Which Sales Person Is Making the Most Sales?
Identifying Relevant Information
To answer the question, Which sales person is marking the most sales?, the data
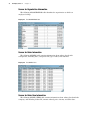
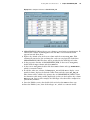
warehousing team decided to design a report that listed total sales by employee. The
following display shows an example of such a report.
Display 4.1 Total Sales by Employee (mockup)
The next step is to identify how such a report could be created.
Identifying Sources
The data warehouse team examined existing tables to determine if they could be
used to the create the report shown in the previous display. They identified a number of
tables that could be used. These tables are described in the following sections.
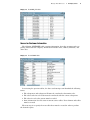
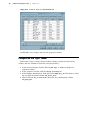
Source for Staff Information
The STAFF table contains information about employees, such as name, ID,
department, supervisor, and salary, as shown in the following display.
Display 4.2 The STAFF Table
30
Identifying Sources
4
Chapter 4
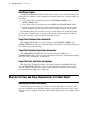
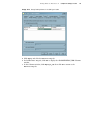
Source for Organization Information
The following ORGANIZATION table identifies the organization to which an
employee belongs.
Display 4.3 The ORGANIZATION Table
Source for Order Information
The following ORDERS table contains information about orders placed with
salespersons, including date, salesperson ID, type of order, and customer.
Display 4.4 The ORDERS Table
Source for Order Item Information
The following ORDER_ITEM table contains information about orders placed with the
company, and includes product ID, amount ordered, price of items, and other data.
Example Data Warehouse
4
Identifying Sources
31
Display 4.5 The ORDER_ITEM Table
Source for Customer Information
The following CUSTOMER table contains information about the customers who are
placing orders with the company. Information includes name, address, birthdate, and
other data.
Display 4.6 The CUSTOMER Table
In reviewing the previous tables, the data warehousing team identified the following
issues:
3
3
3
3
The salesperson and salesperson ID must be correlated to determine sales.
The sales totals for each order must be correlated with the correct salesperson.
The sales for each sales person must be totaled.
Some information does not exist in current source tables. New columns and tables
must be created.
The next step is to specify the new tables that must be created in order to produce
the desired reports.
32
Identifying Targets
4
Chapter 4
Identifying Targets
To simplify the SAS ETL Studio job that will be used to create the desired report, the
team decided to combine certain columns from existing tables into a smaller number of
new tables:
3 A new table will be created that joins the CUSTOMER, ORDERS, and
ORDER_ITEMS tables.
3 A new table will be created that joins the STAFF and ORGANIZATION tables.
3 In order to answer the question of who made the most sales, the two new tables
will be combined to create a third new table on which the report will be based.
By combining tables, the warehouse team can easily answer the specified question,
as well create a diverse range of reports to answer other business questions. Details
about each new table are provided in the following sections.
Target That Combines Order Information
The ORDER_FACT table is created by joining the CUSTOMER, ORDERS, and
ORDER_ITEMS tables. The new table will include all order data, including salesperson
ID, customer, price, and quantity.
Target That Combines Organization Information
The ORGANIZATION_DIM table is created by joining the STAFF and
ORGANIZATION tables. The new table will include all employee information including
name, ID, salary, department, and managers.
Target That Lists Total Sales by Employee
The Total_Sales_by_Employee table is created by joining the ORDER_FACT table
and ORGANIZATION_DIM table. The new table will include employee name, total
revenue, employee ID, job title, company, and department. It will be used to produce
the report shown in Display 4.1 on page 29.
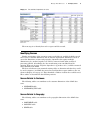
What Are the Time and Place Dependencies of Product Sales?
Identifying Relevant Information
To answer the question, What are the time and place dependencies of product sales?,
the data warehousing team decided to design a report that reports sales across a time
dimension and a geographic dimension. The following display shows an example of such
a report.
Example Data Warehouse
4
Identifying Sources
33
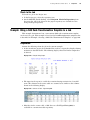
Display 4.7 Time and Place Dependencies for Sales
The next step is to identify how such a report could be created.
Identifying Sources
Further questioning of the executive team revealed that it would be helpful to track
sales across a customer dimension and an internal organization dimension as well as
across the dimensions of time and geography. Questions that require multiple
dimensions to be analyzed together can often be answered with online analytical
processing (OLAP). Accordingly, the data warehousing team concluded that the
question, What are the time and place dependencies of product sales?, could be answered
most efficiently with OLAP.
The data warehouse team examined existing tables to determine whether they could
be used as inputs to an OLAP data store that would produce reports similar to the one
shown in Display 4.7 on page 33. They identified a number of tables that could be used.
These tables are described in the following sections.
Sources Related to Customers
The following tables can contribute to the customer dimension of the OLAP data
store:
3 CUSTOMER table
3 CUSTOMER_TYPE table
Sources Related to Geography
The following tables can contribute to the geographic dimension of the OLAP data
store:
3 CONTINENT table
3 COUNTRY table
3 STATE table
34
Identifying Targets
4
Chapter 4
3 COUNTY table
3 CITY table
3 STREET_CODE table
Sources Related to Organization
The following tables can contribute to the organization dimension of the OLAP data
store:
3 STAFF table
3 ORGANIZATION table
Sources Related to Time
The following tables can contribute to the time dimension of the OLAP data store:
3 CONTINENT table
3 COUNTRY table
3 STATE table
3 COUNTY table
3 CITY table
3 STREET_CODE table
While the previous tables contain the appropriate information, it is not in the correct
format for OLAP. To support OLAP, a number of new data stores most be created, as
described in the following section.
Identifying Targets
In order to support the OLAP reports such as the one shown in Display 4.7 on page
33, the data warehousing team specified the following new data stores.
3 A SAS cube that will support OLAP reporting.
3 A set of new tables that will form the central fact table and dimension tables for a
star schema. Each new table will be created by joining two or more source tables
that are related to a particular dimension, such as customers, geography,
organization, and time.
The target tables are described in the following sections.
Target to Support OLAP
A SAS cube named Star will be created to support OLAP. This cube will support
reports similar to Display 4.7 on page 33.
Target to Provide Input for the Cube
In this example, the ORDER_FACT table that is described in “Target That Combines
Order Information” on page 32 is the central fact table in a star schema. Its dimension
tables are described in the following sections.
Target That Combines Customer Information
The CUSTOMER_DIM table will be created by joining the tables described in
“Sources Related to Customers” on page 33. In this example, CUSTOMER_DIM is one
dimension of a star schema.
Example Data Warehouse
4
The Next Step
35
Target That Combines Geographic Information
The GEOGRAPHY _DIM table will be created by joining the tables described in
“Sources Related to Geography” on page 33. In this example, GEOGRAPHY_DIM is one
dimension in a star schema.
Target That Combines Organization Information
This dimension table is the same as “Target That Combines Organization
Information” on page 32. In this example, ORGANIZATION_DIM is one dimension in a
star schema.
Target That Combines Time Information
The TIME _DIM table will be created by joining the tables that are described in
“Sources Related to Time” on page 34. In this example, TIME_DIM is one dimension in
a star schema.
The Next Step
After the questions, desired outputs, sources, and targets have been specified,
administrators can begin setting up the servers, libraries, and other resources that SAS
ETL Studio requires.
36
37
CHAPTER
5
Setup Tasks for Administrators
Overview of Installation and Setup 38
Review Project Plans 38
Plan Your Change-Managed Metadata Repositories 38
Install SAS ETL Studio and Related Software 39
Required Servers 39
SAS/CONNECT Server 39
Start SAS Management Console 40
Create a Metadata Profile and a Foundation Repository 40
Enter Metadata for Users, Administrators, and Groups 41
Create a Project Repository for Each User 41
Enter Metadata for Servers 42
Default SAS Application Server 42
Impact of the Default SAS Application Server in SAS ETL Studio 43
Code Generation 43
Interactive Access to Data 43
Enter Metadata for Libraries 44
Which Libraries Are Needed? 44
Libraries for the Example Warehouse 44
Base SAS Libraries 45
SAS/SHARE Libraries 45
SAS SPD Server Libraries 45
SAS SPD Engine Libraries 45
Libraries for Custom SAS Formats 45
DBMS Libraries 46
ODBC Libraries 46
OLE Libraries 46
Libraries for Enterprise Applications 46
External Files 47
Generic Libraries 47
Microsoft Excel and Microsoft Access Files 47
XML Files 47
Enter Metadata for a Library 48
Preassigned Libraries 48
"Library is Preassigned" Check Box 49
Additional Information about Libraries 49
Supporting Case and Special Characters in Table and Column Names 49
Case and Special Characters in SAS Table and Column Names 49
Case and Special Characters in DBMS Table and Column Names 50
Enabling DBMS Name Options for a New Database Library 50
Enabling DBMS Name Options for an Existing Database Library
Setting Default Name Options for Tables and Columns 51
50
38
Overview of Installation and Setup
4
Chapter 5
Prerequisites for SAS Data Quality 51
Prerequisites for Metadata Import and Export 52
Additional Information about Administrative Tasks
52
Overview of Installation and Setup
Administrators must complete a number of installation and setup tasks before users
(ETL specialists) can begin work in SAS ETL Studio. This chapter describes the main
installation and setup tasks, and it identifies documentation that describes these tasks
in detail.
Note: Many of the steps that are described in this chapter can be automated if you
use the SAS Software Navigator to install SAS ETL Studio and related software. 4
For example, after you have created a metadata repository, the SAS Configuration
Wizard in the SAS Software Navigator enables you to run scripts that will
automatically add metadata for servers, users, and other resources. The SAS Software
Navigator also generates setup instructions that are customized for your site.
Review Project Plans
Installation and setup will be faster and easier if you proceed according to a detailed
project plan. For an overview of warehouse project plans, see “Planning a Data
Warehouse” on page 25 and “Planning Security for a Data Warehouse” on page 26.
Plan Your Change-Managed Metadata Repositories
SAS ETL Studio enables you to create metadata objects that define sources, targets,
and the transformations that connect them. These objects are saved to one or more
metadata repositories. After a metadata server has been installed and started, one of
the first tasks that an administrator must do is define one or more metadata
repositories that are associated with the server.
Your data warehouse project plan should identify the metadata repositories that are
required for your data warehouse. Typically, your metadata repositories will be under
change management. Change management enables multiple SAS ETL Studio users to
work with the same metadata repository at the same time—without overwriting each
other’s changes.
For the example data warehouse, the following metadata repositories must be
created:
3 A foundation repository where all metadata about the example warehouse will be
stored. This repository will be under change management control. The repository
will be named Foundation.
3 A set of project repositories, one for each SAS ETL Studio user. Each project
repository depends on (inherits metadata from) the foundation repository. Each
project repository enables a user to check metadata out of the foundation
repository. After changes are made to checked-out objects, or new metadata objects
are added, the new or updated metadata is checked into the foundation repository.
For the data warehouse example, each project repository will have a name such as
Project: etlUser1.
For details about setting up change-managed repositories for SAS ETL Studio,
metadata administrators should see the SAS ETL Studio chapter in the SAS Intelligence
Setup Tasks for Administrators
4
Required Servers
39
Platform: Planning and Administration Guide. In general, an administrator uses SAS
Management Console to define a change-managed repository (such as a foundation
repository) and one or more project repositories that depend on the change-managed
repository. The administrator designates a SAS ETL Studio user as the owner of each
project repository. Administrators with the appropriate privilege can update a
change-managed repository directly, without having to work with a project repository.
Install SAS ETL Studio and Related Software
Use the SAS Software Navigator to install SAS ETL Studio and related software.
For an overview of installation and setup, see the SAS ETL Studio chapter in the SAS
Intelligence Platform: Planning and Administration Guide.
Your data warehouse project plan should identify the SAS software that is required
for your data warehouse. For example, to answer the business questions that are
described in Chapter 4, “Example Data Warehouse,” on page 27, the software that is
listed in the following table must be installed.
Table 5.1 Software Required to Create the Example Data Warehouse
Software
Required in Order to Perform These Tasks
SAS Management Console
Administer SAS software.
SAS ETL Studio
Build and maintain ETL process flows.
SAS Metadata Server
Read and write metadata in a SAS Metadata Repository.
SAS Workspace Server
Access data and execute SAS code.
SAS OLAP Server
Create cubes and process queries against cubes.
Note: The data sources and targets for the example warehouse are assumed to be
local, and all are assumed to be in Base SAS format or in comma-delimited format. 4
Additional software would be required to access data that is under the control of SAS/
SHARE, a SAS Scalable Performance Data (SPD) Server, a data base management
system (DBMS), or an enterprise application.
Required Servers
As a client, SAS ETL Studio must connect to a SAS Metadata Server to read or write
metadata. It must connect to other servers to run SAS code, to connect to a third-party
database management system, or to perform other tasks. Your data warehouse project
plan should identify the servers that are required for your data warehouse. Table 5.1 on
page 39 lists the minimum servers that must be installed to create the example data
warehouse.
SAS/CONNECT Server
SAS ETL Studio uses a SAS/CONNECT server to submit generated SAS code to
machines that are remote from the default SAS application server. A SAS/CONNECT
server can also be used for interactive access to remote libraries. If your work in SAS
ETL Studio requires either of these services, you should install SAS/CONNECT
40
Start SAS Management Console
4
Chapter 5
software. All of the data in the example data warehouse is assumed to be local, so
SAS/CONNECT is not required.
Start SAS Management Console
SAS Management Console is a Java application that provides a single point of
control for SAS administrative tasks. After the SAS Metadata Server has been started,
administrators can connect to the server, create a metadata repository, and start
entering metadata. Administrators will probably want to use SAS Management Console
to enter the first metadata for a data warehouse or data mart.
Start SAS Management Console as you would any other SAS application on a given
platform. For example, under Microsoft Windows, you can select Start I Programs I
SAS I SAS Management Console.
Note: The SAS Configuration Wizard in the SAS Software Navigator enables you to
run scripts that will automatically add metadata for servers, users, and other resources.
Use SAS Management Console to add metadata that is not provided by the scripts in
the SAS Software Navigator. 4
Create a Metadata Profile and a Foundation Repository
After you start SAS Management Console, a window displays that has various
options for maintaining a metadata profile. A metadata profile is a client-side
definition of where the metadata server is located. The definition includes a machine
name, a port number, and one or more metadata repositories. In addition, the metadata
profile can contain login information and instructions for connecting to the metadata
server automatically. You cannot do any work in SAS Management Console, in SAS
ETL Studio, or in related applications until you create and open the appropriate
metadata profile.
An administrator would perform the following steps to create a metadata profile and
to add the change-managed foundation repository that is described in “Plan Your
Change-Managed Metadata Repositories” on page 38. (Customized instructions for this
task are available from the SAS Software Navigator.)
1 Start SAS Management Console. The Open a Metadata Profile window opens and
2
3
4
5
6
7
8
displays various options for maintaining a metadata profile.
Select Create a new metadata profile and click OK . The Metadata Profile
wizard displays.
Click Next . In the general information window, enter a name for the profile. For
the example data warehouse, the name could be Metadata Admin Profile.
Click Next . In the Connection Information window, enter a machine address,
port, user name, and password that will enable you to connect to the appropriate
SAS Metadata Server as an administrator.
Click Next . The wizard attempts to connect to the metadata server. If the
connection is successful, and no metadata repositories have yet been defined for
the current server, you will be asked if you want to define a metadata repository.
Select Yes to define a metadata repository.
On the Select Repository Type panel, select Foundation.
Enter other information as prompted by the wizard. Verify that the check box for
change-management is selected.
Setup Tasks for Administrators
4
Create a Project Repository for Each User
41
9 Click Finish to exit the Metadata Profile wizard. You are returned to the Open a
Metadata Profile window.
Enter Metadata for Users, Administrators, and Groups
In SAS ETL Studio, the metadata for users and groups is used to support change
management, connections to a remote computer with SAS/CONNECT, and connections
to a DBMS with SAS/ACCESS software.
Also, SAS ETL Studio users can select the metadata for a user or group and
associate it with the metadata for a table, a job, or any other kind of object that can be
displayed in the Inventory tree. To the metadata for a job, for example, you could add
the metadata for the person who needs to be contacted if the job fails.
Your data warehouse project plan should identify the users and groups that are
required for your data warehouse. For the example data warehouse, metadata for the
following persons and groups must be added to the foundation repository:
3 a metadata administrator with the generic name Metadata Admin
3 a number of SAS ETL Studio users with generic names such as etlUser1 and
etlUser2
3 a group for SAS ETL Studio users called ETL User Group.
The metadata for each person or group specifies certain privileges. For example, the
metadata for Metadata Admin specifies administrative privileges. The metadata for
ETL User Group specifies privileges for users who work under change management,
and etlUser1, etlUser2, and other users are members of that group.
The SAS Configuration Wizard in the SAS Software Navigator enables you to run a
script that will automatically add metadata for some users and groups. Use SAS
Management Console to add metadata that is not provided by the scripts in the SAS
Software Navigator. For details about entering metadata for users and administrators
in a change-management context, see the SAS ETL Studio chapter of the SAS
Intelligence Platform: Planning and Administration Guide.
Create a Project Repository for Each User
After metadata identities have been defined for each SAS ETL Studio user, an
administrator can create a project repository for each user. Each project repository
enables a user to check metadata out of the foundation repository. After changes are
made to checked-out objects, or new metadata objects are added, the new or updated
metadata is checked into the foundation repository.
For the data warehouse example, each project repository will have a name such as
Project: etlUser1. For details about setting up change-managed repositories for SAS
ETL Studio, metadata administrators should see the SAS ETL Studio chapter in the
SAS Intelligence Platform: Planning and Administration Guide. In general, an
administrator designates a SAS ETL Studio user as the owner of each project
repository. Administrators with the appropriate privilege can update a change-managed
repository directly, without having to work with a project repository.
42
Enter Metadata for Servers
4
Chapter 5
Enter Metadata for Servers
The SAS Configuration Wizard in the SAS Software Navigator enables you to run a
script that will automatically add metadata for some servers. Use SAS Management
Console to add metadata that is not provided by the scripts in the SAS Software
Navigator.
The following table summarizes how the servers for the example data warehouse
would be made available to SAS ETL Studio users.
Table 5.2 Main Servers for the Example Data Warehouse
Software
Required in Order to Perform
These Tasks
Where Metadata Is Specified
SAS Metadata Server
Read and write metadata in a SAS
Metadata Repository.
Specified in the metadata profiles
for administrators and users.
Administrators should see “Create
a Metadata Profile and a
Foundation Repository” on page 40.
Users should see “Create a
Metadata Profile” on page 57.
SAS Workspace Server
Access data and execute SAS code.
Can be specified as one component
of the default SAS application
server for SAS ETL Studio. See
“Default SAS Application Server”
on page 42.
SAS OLAP Server
Create cubes and process queries
against cubes.
Can be specified as one component
of the default SAS application
server for SAS ETL Studio.
For details about entering metadata for the SAS Data Quality Servers or job
scheduling servers from Platform Computing, see the SAS ETL Studio chapter in the
SAS Intelligence Platform: Planning and Administration Guide.
For details about entering metadata for a SAS/SHARE server, a SAS Scalable
Performance Data (SPD) Server, a DBMS, or an enterprise application, see the
Preparing Data for Use chapter in the SAS Intelligence Platform: Planning and
Administration Guide.
Default SAS Application Server
SAS ETL Studio enables users to select a default SAS application server. The default
SAS application server enables SAS ETL Studio to execute SAS code, to access data,
and to perform other tasks that require a SAS server—without having to specify a
server each time.
When you select a default SAS application server, you are actually selecting a
metadata object that can provide access to a number of servers, libraries, schemas,
directories, and other resources. Typically, a metadata administrator defines the
metadata for a SAS application server and tells users which object to select as the
default in SAS ETL Studio.
For the example data warehouse, assume the metadata object for the default SAS
application server is called SASMain. To support the example data warehouse,
SASMain must include the following components:
Setup Tasks for Administrators
4
Impact of the Default SAS Application Server in SAS ETL Studio
43
3 a SAS Workspace Server component
3 a SAS OLAP Server component.
To enter metadata for SAS application servers, follow the instructions that are provided
by the SAS Configuration Wizard that is associated with the SAS Software Navigator.
See also the Servers in the SAS Intelligence Platform chapter in the SAS Intelligence
Platform: Planning and Administration Guide.
Impact of the Default SAS Application Server in SAS ETL Studio
In a client/server environment, the terms local and remote are relative. The same
resource can be local in one context and remote in another.
Code Generation
When SAS ETL Studio generates code for a job, a resource is local or remote relative
to the default SAS application server that is specified on the SAS Server tab of the
Options window.
To submit a job for execution on a machine that is local to the default SAS
application server, the default SAS application server must have a SAS Workspace
Server component.
To submit a job to a machine that is remote from the default SAS application server,
both of the following conditions must exist:
3 The default SAS application server must have a SAS Workspace Server component.
3 The default SAS application server must have access to a SAS/CONNECT server
on the remote machine where the job is to be executed.
Interactive Access to Data
When SAS ETL Studio is used to access information interactively, the server that is
used to access the resource must be able to resolve the physical path to the resource.
The path can be a local path or a remote path, but the relevant server must be able to
resolve the path. The relevant server is the default SAS application server unless
another SAS application server is specified in the metadata for the resource.
For example, in the source designer wizard for external files, the Host field on the
External File Selection window enables you to specify the SAS application server that is
used to access the external file. This server must be able to resolve the physical path
that you specify for the external file.
As another example, suppose that you use the View Data option to view the contents
of a table. To display the contents of the table, the default SAS application server in
SAS ETL Studio, or a SAS application server that is specified in the metadata for the
table, must be able to resolve the path to the table.
For the relevant server to resolve the path to a table in a library, one of the following
conditions must be met:
3 The metadata for the library does not include an assignment to a SAS application
server, and the default SAS application server can resolve the physical path that is
specified for this library.
3 The metadata for the library includes an assignment to a SAS application server
that contains a SAS Workspace Server component, and the SAS Workspace Server
is accessible in the current session.
3 The metadata for the library includes an assignment to a SAS application server
whose metadata contains a SAS/CONNECT server component, and the SAS/
CONNECT server component is accessible to the default SAS application server.
44
Enter Metadata for Libraries
4
Chapter 5
Note: If you select a library that is assigned to an inactive server, you will receive
the error "Cannot connect to workspace server". Check to make sure that the server
assigned to the library is running and is the active server. 4
Enter Metadata for Libraries
In SAS software, a library is a collection of one or more files that are recognized by
SAS and that are referenced and stored as a unit. SAS ETL Studio uses a combination
of server metadata and library metadata to access the sources and targets that are
referenced in SAS ETL Studio jobs. Accordingly, one of the first tasks for an
administrator might be to specify metadata for the libraries that contain data stores or
other resources.
Both SAS Management Console and SAS ETL Studio enable you to enter metadata
for libraries. A typical approach would be for administrators to use SAS Management
Console to add metadata for an initial set of libraries. SAS ETL Studio users would
then use source designer wizards or target designer wizards to add metadata about
specific tables in a library. Later, administrators and/or users could add metadata for
other libraries as needed.
Note: Entering metadata for a library does not, in itself, provide access to tables in
the library. You must also specify metadata for all tables that you want to access in the
library, as described in “Using Source Designers” on page 61 and “Using Target
Designers” on page 63. 4
Which Libraries Are Needed?
Administrators should ask questions such as these to determine which libraries are
needed for a given data warehouse:
3 In what format are the source tables and target tables? Are they SAS files,
Microsoft Excel files, DBMS tables, flat files, enterprise application files, or files in
which values are separated with commas or other characters?
3 If the tables are in SAS format, do the tables use column formats that are defined
in a SAS format library?
3 If the tables are in SAS format, will SAS/SHARE software be used to provide
concurrent update access to the tables?
3 If the tables are not in SAS format, how do you plan to access these tables? With a
database library (SAS/ACCESS software for relational databases)? With an ODBC
library (SAS/ACCESS for ODBC)? With the external file interface? With an
enterprise application library (such as a library that uses SAS/ACCESS to R/3)?
Answers to questions such as these determine the kind of library metadata that you
need to enter.
Libraries for the Example Warehouse
For the example data warehouse, assume that most data sources and targets are in
Base SAS format, and that some of these tables use custom column formats that are
stored in a SAS library. Accordingly, metadata for the following Base SAS libraries
must added to the foundation repository:
3 one or more Base SAS libraries for data sources
3 one or more Base SAS libraries for data targets.
Setup Tasks for Administrators
4
Which Libraries Are Needed?
45
The general steps for entering library metadata are described in “Enter Metadata for
a Library” on page 48. You do not need to enter metadata for a library that contains
SAS formats, but this library must be properly set up. See “Libraries for Custom SAS
Formats” on page 45.
Assume that some of the source data for the example data warehouse is in
comma-delimited files, and that the external file interface will be used to access these
files. See “External Files” on page 47.
Base SAS Libraries
To access tables in Base SAS format, metadata for the appropriate SAS libraries
must be defined and saved to a metadata repository. To access the tables, SAS ETL
Studio will use the default SAS application server or the server that is specified in the
metadata for the library. The general steps for entering library metadata are described
in “Enter Metadata for a Library” on page 48.
SAS/SHARE Libraries
A SAS/SHARE server enables multiple users to access a library concurrently. To
access tables that are under the control of a SAS/SHARE server, metadata for the SAS/
SHARE server and a SAS/SHARE library must be defined and saved to a metadata
repository.
SAS SPD Server Libraries
The SAS Scalable Performance Data (SPD) Server is a high-performance, multi-user,
parallel-processing data server with a comprehensive security infrastructure, backup
and restore utilities, and sophisticated administrative and tuning options. The SAS
SPD Server stores data in a special format that facilitates parallel processing. You can
use the SAS SPD Server to access tables in SAS SPD Server format, using a special
SAS library that is designed for this purpose.
To use the SAS SPD Server to access tables in SAS SPD Server format, metadata for
the SAS SPD server and a SAS SPD Server library must be defined and saved to a
metadata repository.
SAS SPD Engine Libraries
The SAS Scalable Performance Data (SPD) Engine is included with Base SAS. It is a
single-user data storage solution that shares the high performance, parallel processing,
and parallel I/O capabilities of SAS SPD Server for managing large data volumes, but
without the additional complexity of a full server. The SAS SPD Engine can read and
write data stores in SPD Server format.
To use the SAS SPD Engine to access tables in SAS SPD Server format, metadata for
a SAS SPD Engine library must be defined and saved to a metadata repository. To
access the tables, SAS ETL Studio will use the default SAS application server or the
server that is specified in the metadata for the library.
Libraries for Custom SAS Formats
A format is an instruction that SAS uses to write data values. You use formats to
control the written appearance of data values, or, in some cases, to group data values
together for analysis. Some SAS tables use custom column formats that are stored in a
SAS library.
Note: You do not need to enter metadata for a library that contains custom SAS
formats. However, if a table uses custom formats that are stored in a SAS library, the
46
Which Libraries Are Needed?
4
Chapter 5
library of formats must be available to the SAS application server that is used to
display data in the table or to execute code for the table. 4
For details about setting up a SAS format library, see the Post-Configuration Tasks
chapter in the SAS Intelligence Platform: Planning and Administration Guide.
DBMS Libraries
To access tables in a DBMS such as Oracle or DB2, metadata for the DBMS server
and the appropriate DBMS library must be defined and saved to a metadata repository.
See also the following sections about ODBC libraries and OLE DB libraries.
ODBC Libraries
Open Database Connectivity (ODBC) is an application programming interface (API).
ODBC provides a standard interface for SQL databases. An application that uses the
ODBC interface can connect to any database that has an ODBC driver, such as Microsoft
Access, Microsoft Excel, Borland dBase, or IBM DB2. Use ODBC libraries when an
interface for a specific DBMS is not available, and the DBMS complies with ODBC.
To use ODBC to access tables, the following requirements must be met:
3 The appropriate ODBC driver must be available on the computer where the
database resides.
3 Metadata for the ODBC database server must be available in a current metadata
repository.
For example, assume that you want to access tables in a Microsoft Access database
and the database resides on a computer with the Microsoft Windows XP Professional
operating system. You could use the ODBC Data Source Administrator administrative
tool to define Microsoft Access as a system data source on that computer. You might
create a system data source called msdb, for example. (A system data source can be
more useful than a user data source because it is available to all users and to NT
services on that computer.)
After the ODBC data source has been defined, an administrator could use SAS
Management Console to enter metadata for the ODBC database server. The ODBC
database server is the computer where the ODBC-compliant database resides. The
metadata for the ODBC database server includes the network address for that
computer, as well as the relevant ODBC driver (such as the msdb data source) on that
computer. For details about entering metadata for servers, see the online Help for the
Server Manager plug-in to SAS Management Console.
OLE Libraries
OLE DB is a Microsoft API for access to different data sources. An OLE library uses
the SAS/ACCESS interface for OLE DB providers. Use OLE libraries when an interface
for a specific DBMS is not available and the DBMS complies with OLE DB.
Libraries for Enterprise Applications
Optional data surveyor wizards can be installed in SAS ETL Studio that provide
access to the metadata in enterprise applications such as PeopleSoft and SAP R/3. See
the documentation for these wizards for details about any servers and libraries that
must be defined to support the wizards.
Setup Tasks for Administrators
4
Which Libraries Are Needed?
47
External Files
An external file is a file that is maintained by the machine operating environment or
by a software product other than SAS software. A flat file with comma-separated values
is an example.
External files can be accessed in at least two ways.
3 External File source designer. The External File source designer is a wizard that
guides you through the steps that are required to create and execute a SAS ETL
Studio job. The job extracts information from an external file and writes it to a
SAS table. Typically, the SAS table is used as a source table in another SAS ETL
Studio job. The current External File source designer can extract information from
flat files in fixed or delimited format. Supported file types are TXT, DAT, and CSV.
See “Example: Extracting Information from a Flat File” on page 78.
3 ODBC library. ODBC libraries are used to read and write ODBC-compliant files as
if they were SAS files. They provide interactive access to ODBC-compliant files.
ODBC libraries are useful for applications that comply with ODBC, such as
Microsoft Excel. The general steps for entering library metadata are described in
“Enter Metadata for a Library” on page 48. In the first window of the New Library
wizard, select the ODBC icon.
After an ODBC library has been created, SAS ETL Studio users can display the
ODBC source designer and use it to enter metadata about the tables within the
library. The general steps for using source designers are described in “Using
Source Designers” on page 61.
Generic Libraries
When you display the New Library wizard from the SAS ETL Studio desktop, the
first page of the wizard enables you to select the kind of library that you want to create.
If you cannot find an exact match for the kind of data that you want to access, you can
select a Generic library.
A Generic library enables you to manually specify a SAS engine and the options that
are associated with that engine. Because it is general by design, the Generic library
offers few hints as to what options should be specified for a particular engine.
Accordingly, the Generic library might be most useful to experienced SAS users. For
details about the options for a particular engine, see the SAS documentation for that
engine.
Note: SAS has a number of library templates for specific data formats. The specific
library templates will often give better results than the generic template, which has not
been optimized for particular data formats. Use the templates for a specific format
whenever possible. 4
Microsoft Excel and Microsoft Access Files
See “External Files” on page 47.
XML Files
To provide access to one or more tables that are defined in an XML file, you could
create a Generic library and specify options that are appropriate for the XML
LIBNAME engine and the XML file. After the Generic library (with the XML options)
is registered in a metadata repository, SAS ETL Studio users can use the Generic
source designer to generate metadata for the tables that are defined in the XML file.
48
Enter Metadata for a Library
4
Chapter 5
Enter Metadata for a Library
The New Library wizard in SAS Management Console and SAS ETL Studio enables
you to enter metadata about many different kinds of libraries. For details about
entering metadata for different kinds of libraries, administrators should see the
Managing Libraries chapter in the SAS Management Console: User’s Guide.
The following steps summarize how to use SAS ETL Studio to enter metadata about
a library. These steps are appropriate for an administrator who does not have to use
the change-management facility. The steps for a user would be similar, except that the
user would have to check in the metadata for the new library as a last step.
1 Start SAS ETL Studio as described in “Start SAS ETL Studio” on page 56.
2 Open the metadata profile that specifies the repository where metadata for the
new library should be stored. The steps for opening a metadata profile are
described in “Open a Metadata Profile” on page 58.
3 In SAS ETL Studio, click the Inventory tab to display the Inventory tree.
4 In the Inventory tree, expand the folders until the Libraries folder is displayed.
I New from the menu bar. The New
Library wizard displays.
6 In the New Library wizard, expand the folders to view the folder for the kind of
library for which you want to enter metadata. (The wizard includes folders for
Database Libraries, Enterprise Application Libraries, and SAS
Libraries, for example.)
5 Select the Libraries folder, then select File
7 Expand the folder for the kind of library for which you want to enter metadata,
such as SAS Libraries.
8 Select the particular kind of library for which you want to enter metadata, such as
SAS Base Engine Library and click Next .
9 Enter metadata as prompted by the wizard.
After the metadata for a library has been entered and saved, it is available for use in
SAS ETL Studio. For example, most source designer wizards and target designer
wizards will prompt you to select the library that contains or will contain a given source
table or target table.
Preassigned Libraries
It is possible to assign a SAS library to a server so that the library is assigned
whenever the server is started. Such a library is said to be preassigned. Preassigned
libraries are used whenever you want a SAS library to be available in the current
session without explicitly assigning the library during the session.
For example, suppose that you wanted to use the View Data feature to display a
table that contains custom SAS formats. The SAS library that contains the formats can
be preassigned to the SAS application server that is used to access the table.
Some of the tasks that are associated with preassigning a SAS library must be done
outside of SAS ETL Studio or SAS Management Console. For details, see the
Post-Configuration Tasks chapter of the SAS Intelligence Platform: Planning and
Administration Guide.
Setup Tasks for Administrators
4
Case and Special Characters in SAS Table and Column Names
49
"Library is Preassigned" Check Box
The properties window for a library includes a Library is Preassigned check box.
To display this check box, perform the following steps:
1 From the SAS ETL Studio desktop, in the Inventory tree, open the Libraries folder
and select the library that you want to view or update.
I Properties from the menu bar. The properties window for the
library displays.
2 Select File
3 Select the Options tab, then click the Advanced Options button. The Advanced
Options window is displayed.
4 Select the Pre-Assign tab. The Library is Preassigned check box is on that
tab.
Note: Selecting the Library is Preassigned check box does not preassign the
library. The check box indicates that the library has been pre-assigned, using the
methods that are described in the Post-Configuration Tasks chapter of the SAS
Intelligence Platform: Planning and Administration Guide. 4
Additional Information about Libraries
The online Help for SAS ETL Studio contains additional information about libraries.
To display the relevant Help topics, perform the following steps:
1 From the SAS ETL Studio menu bar, select Help
window displays.
I Contents. The online Help
2 In the left pane of the Help window, select Prerequisites
Metadata for Libraries.
I Specifying
Supporting Case and Special Characters in Table and Column Names
SAS ETL Studio cannot access tables or columns with case-sensitive names or with
special characters in the names unless the appropriate options have been specified. For
the example data warehouse, assume that all tables are in SAS format, and that all
names for tables and columns follow the standard rules for SAS names.
Case and Special Characters in SAS Table and Column Names
By default, the names for SAS tables and columns must follow the standard rules for
SAS names. However, SAS ETL Studio will support case-sensitive names for tables and
columns, as well as special characters in column names, if the appropriate options are
specified in the metadata for the SAS table.
SAS ETL Studio users can set name options in the metadata for individual tables.
For description of this task, see “Setting Name Options for Individual Tables” on page
68.
As an alternative to setting name options in the metadata for individual tables, you
can set default name options for all table metadata that is entered with a source
designer or a target designer in SAS ETL Studio. For details, see “Setting Default
Name Options for Tables and Columns” on page 51.
50
Case and Special Characters in DBMS Table and Column Names
4
Chapter 5
Case and Special Characters in DBMS Table and Column Names
SAS ETL Studio cannot access a DBMS table with case-sensitive names or with
special characters in names unless the appropriate name options are specified in the
metadata for the database library that is used to access the table, and in the metadata
for the table itself.
One approach would be for administrators to specify name options in the metadata
for the database library, as described in this section. Administrators could then let SAS
ETL Studio users know which DBMS name options to specify in the metadata for tables
in that library. SAS ETL Studio users can set name options in the metadata for DBMS
tables. For description of this task, see “Setting Name Options for Individual Tables” on
page 68.
As an alternative to setting name options in the metadata for individual tables, you
can set default name options for all table metadata that is entered with a source
designer or a target designer in SAS ETL Studio. For details, see “Setting Default
Name Options for Tables and Columns” on page 51.
Enabling DBMS Name Options for a New Database Library
The steps in this section describe how to enable name options when you enter the
metadata for a new database library. These steps are appropriate for an administrator
who does not have to use the change-management facility. The steps for a user would
be similar, except that the user would have to check in the metadata for the new library
as a last step.
1 Follow the general instructions in “Enter Metadata for a Library” on page 48. In
the first window of the New Library wizard, select the appropriate kind of
database library and click Next .
2 Enter a name for the library and click Next .
3 Enter a SAS LIBNAME for the library, then click Advanced Options . The
Advanced Options window displays.
4 In the Advanced Options window, click the Output tab.
5 To preserve DBMS column names, select Yes in the Preserve column names as
in the DBMS field.
6 Click the Input/Output tab.
7 To preserve DBMS table names, select Yes in the Preserve DBMS table names
field.
8 Click OK and enter the rest of the metadata as prompted by the wizard.
Enabling DBMS Name Options for an Existing Database Library
The following steps describe one way to update the existing metadata for a database
library in order to specify name options. These steps are appropriate for an
administrator who does not have to use the change-management facility. The steps for
a user would be similar, except that the user would have to check out the library,
update the metadata as described in the following steps, then check in the metadata for
the library as a last step.
1 Start SAS ETL Studio as described in “Start SAS ETL Studio” on page 56.
2 Open the metadata profile that specifies the repository where metadata for the
library is stored. The steps for opening a metadata profile are described in “Open
a Metadata Profile” on page 58.
3 In SAS ETL Studio, click the Inventory tab to display the Inventory tree.
Setup Tasks for Administrators
4
Prerequisites for SAS Data Quality
51
4 In the Inventory tree, expand the folders until the Libraries folder is displayed.
5 Select the Libraries folder, then select the library whose metadata must be
updated.
I Properties from the menu bar. The properties window for the
library displays.
In the properties window, click the Options tab.
On the Options tab, click Advanced Options . The Advanced Options window
displays.
In the Advanced Options window, click the Output tab.
To preserve DBMS column names, select Yes in the Preserve column names as
in the DBMS field.
Click the Input/Output tab.
To preserve DBMS table names, select Yes in the Preserve DBMS table names
field.
Click OK twice to save your changes.
6 Select File
7
8
9
10
11
12
13
Setting Default Name Options for Tables and Columns
You can set default name options for all table metadata that is entered with a source
designer wizard or a target designer wizard in SAS ETL Studio. These defaults apply
to tables in SAS format or in DBMS format.
Note: For details about these defaults as they relate to SAS tables, see “Case and
Special Characters in SAS Names” on page 184. 4
Defaults for table and column names can make it easier for users to enter the correct
metadata for tables. Administrators still have to set name options on database
libraries, and users should at least verify that the appropriate name options are
selected for a given table.
The following steps describe how to set default name options for all table metadata
that is entered with a source designer wizard or a target designer wizard in SAS ETL
Studio.
1 Start SAS ETL Studio.
2 Open the metadata profile that specifies the repository where metadata for the
tables is stored.
3 From the SAS ETL Studio desktop, select Tools I Options from the menu bar.
The Options window is displayed.
4 In the Options window, select the General tab.
5 On the General tab, select Enable case-sensitive DBMS object names to
have source designers and target designers support case-sensitive table and
column names by default.
6 On the General tab, select Enable special characters within DBMS object
names to have source designers and target designers support special characters in
table and column names by default.
7 Click OK to save any changes.
Prerequisites for SAS Data Quality
The Process Library in SAS ETL Studio contains two data quality transformation
templates: Create Match Code and Apply Lookup Standardization. To support these
52
Prerequisites for Metadata Import and Export
4
Chapter 5
templates, an administrator must install SAS Data Quality Server software and
configure a SAS application server to access a quality knowledge base. Optional
prerequisites include setting options for data quality, downloading new and updated
locales, and creating schemes. For details about the SAS Data Quality Server software
and the metadata for that software, administrators should see the SAS ETL Studio
chapter in the SAS Intelligence Platform: Planning and Administration Guide.
Prerequisites for Metadata Import and Export
SAS ETL Studio and SAS Management Console include wizards that enable you to
import metadata from—and to export metadata to—other applications that support the
Common Warehouse Metamodel (CWM) format. For example, it is possible to import a
data model for a set of sources or targets using the Metadata Importer wizard. If the
model to be imported is not in CWM format, you must install optional bridge software
from Meta Integration Technology, Inc. For details, see “Metadata Import and Export”
on page 11.
Additional Information about Administrative Tasks
The online Help for SAS ETL Studio provides additional information about
administrative tasks.
To display Help topics about installation and setup, perform the following steps:
1 From the SAS ETL Studio menu bar, select Help I Contents. The online Help
window displays.
2 In the left pane of the Help window, select Prerequisites.
To display Help topics about all administrative tasks, perform the following steps:
1 From the SAS ETL Studio menu bar, select Help I Contents. The online Help
window displays.
2 In the left pane of the Help window, select Task Overviews I SAS ETL Studio
Task Reference.
3 See the section for administrative tasks.
53
3
P A R T
Using SAS ETL Studio
Chapter
6. . . . . . . . . . Task Overview for Users
Chapter
7 . . . . . . . . . . Specifying the Inputs to Warehouse Data Stores
Chapter
8 . . . . . . . . . . Specifying Warehouse Data Stores
Chapter
9 . . . . . . . . . . Introduction to SAS ETL Studio Jobs
Chapter
10. . . . . . . . .Loading Warehouse Data Stores
Chapter
11. . . . . . . . .Creating Cubes
161
55
89
131
99
71
54
55
CHAPTER
6
Task Overview for Users
Preliminary Tasks for Users 56
Start SAS ETL Studio 56
Specifying Java Options 56
Specifying the Plug-in Location 56
Specifying the Error Log Location 56
Specifying Message Logging 57
Create a Metadata Profile 57
Preparation 57
Default Metadata Repository 57
Task Summary 58
Open a Metadata Profile 58
Select a Default SAS Application Server 59
Main Task Flow for Users 59
Specifying Metadata for Sources and Targets 60
Using Source Designers 61
Overview of Source Designers 61
Preparation 62
Task Summary 62
Additional Information about Source Designers 62
Using Target Designers 63
Overview of Target Designers 63
Preparation 63
Task Summary 63
Additional Information about Target Designers 64
Working with Change Management 64
Understanding Change Management 64
Adding New Metadata 64
Preparation 64
Task Summary 64
Next Tasks 65
Checking Out Existing Metadata 65
Preparation 65
Task Summary 65
Next Tasks 65
Checking In Metadata 66
Preparation 66
Task Summary 66
Additional Information about Change Management 66
Specifying Metadata for DBMS Tables with Keys 66
Viewing the Data in a Table 67
Viewing the Metadata for a Table 67
56
Preliminary Tasks for Users
4
Chapter 6
Updating the Metadata for a Table 67
Impact of Updating a Table’s Metadata 68
Updating Column and Mapping Metadata 68
Setting Name Options for Individual Tables 68
Prerequisites 68
Task Summary 68
Additional Information about User Tasks 69
Preliminary Tasks for Users
After administrators complete the tasks that are described in Chapter 5, “Setup
Tasks for Administrators,” on page 37, you must perform a number of tasks before you
can begin work in SAS ETL Studio.
Start SAS ETL Studio
Start SAS ETL Studio as you would any other SAS application on a given platform.
For example, under Microsoft Windows, you can select Start I Programs I SAS I
SAS ETL Studio. You can also start the application from a command line. Navigate to
the SAS ETL Studio installation directory and issue the
etlstudio.exe
command.
If you do not specify any options, SAS ETL Studio uses the parameters specified in
the etlstudio.ini file. The following sections contain information on options you can
specify on the command line or add to the etlstudio.ini file.
Specifying Java Options
To specify Java options when you start SAS ETL Studio, use the --javaopts option
and enclose the Java options in single quotation marks. For example, the following
command starts SAS ETL Studio on Windows and contains Java options that specify
the locale as Japanese:
etlstudio ---javaopts ’-Duser.language=ja -Duser.country=JP’
Specifying the Plug-in Location
By default, SAS ETL Studio looks for plug-ins in a plugins directory under the
directory in which the application was installed. If you are starting SAS ETL Studio
from another location, you must specify the location of the plug-in directory by using the
--pluginsDir
option. The syntax of the option is
etlstudio --pluginsdir <plugin path>
Specifying the Error Log Location
SAS ETL Studio writes error information to a file named errorlog.txt in the
working directory. Because each SAS ETL Studio session overwrites this log, you might
want to specify a different name or location for the log file. Use the following option to
change the error logging location:
Task Overview for Users
4
Create a Metadata Profile
57
etlstudio --logfile ’<filepath/filename>’
Specifying Message Logging
You can specify the server status messages that are encountered in a SAS ETL
Studio session by using the
--MessageLevel level_value
option. Valid values for level_value include the following:
ALL
all messages are logged
CONFIG
static configuration messages are logged
FINE
basic tracing information is logged
FINER
more detailed tracing information is logged
FINEST
highly detailed tracing information is logged. Specify this option to
debug problems with SAS server connections.
INFO
informational messages are logged
OFF
no messages are logged
SEVERE
messages indicating a severe failure are logged
WARNING
messages indicating a potential problem are logged
Create a Metadata Profile
A metadata profile is a client-side definition of where the metadata server is located.
The definition includes a machine name, a port number, and one or more metadata
repositories. In addition, the metadata profile can contain login information and
instructions for connecting to the metadata server automatically.
You must open a metadata profile before you can do any work in SAS ETL Studio.
This section describes how a user could create a metadata profile for the example data
warehouse.
Preparation
After an administrator has created one or more metadata repositories, the
administrator provides the SAS ETL Studio user with the following information:
3
3
3
3
the network name of the metadata server
the port number used by the metadata server
a login ID and password for that server
the name of the repository that should be selected as the default metadata
repository for this profile.
Default Metadata Repository
When you create a metadata profile, you specify a default metadata repository for
that profile. Typically, the administrator who creates metadata repositories simply tells
SAS ETL Studio users which repository to select as the default. As a user, however, you
might want to be aware of the effect that the default repository has on your work in
SAS ETL Studio. The effect depends on whether you are working with change-managed
metadata repositories.
58
Open a Metadata Profile
4
Chapter 6
If you are working with change-managed repositories, the default metadata
repository must be a project repository that you own. You will use the project repository
to check metadata out of and into the repository that is under change management. For
the example data warehouse, the main metadata repository (Foundation) is under
change-management control. Each user will use his own project repository to check
metadata out of and into the foundation repository.
If you are not working with change-managed repositories, you can update objects in
any metadata repository that is visible in the tree view on the SAS ETL Studio desktop,
but you can add new objects to the default metadata repository only. If you try to add
an object to a repository other than the default repository, the new object will be added
to the default repository.
Task Summary
SAS ETL Studio users perform these steps to create a metadata profile:
1 Start SAS ETL Studio. The Open a Metadata Profile window displays.
2 Select Create a new metadata profile. The Metadata Profile wizard displays.
3 Click Next . In the general information window, enter a name for the profile. For
the example data warehouse, the name could be etlUser1 Profile.
4 Click Next . In the Connection Information window, enter a machine address,
port, user name, and password that will enable you to connect to the appropriate
SAS Metadata Server.
5 Click Next . The wizard attempts to connect to the metadata server. If the
connection is successful, the Select Repositories window displays.
6 In the Select Repositories window, select the appropriate repository as the default
metadata repository for this profile. For the example data warehouse, the default
repository for a user would be a project repository that would be used to check
metadata out of and into the foundation repository.
7 Click Finish to exit the metadata profile wizard. You are returned to the Open a
Metadata Profile window.
Open a Metadata Profile
After a metadata profile has been created, you can open the profile in SAS ETL
Studio. You must open a metadata profile in order to do any work in SAS ETL Studio.
Perform these steps to open a metadata profile:
1 Start SAS ETL Studio. The Open a Metadata Profile window displays.
2 Select Open an existing metadata profile. The selected profile is opened in
SAS ETL Studio.
Another way to open a metadata profile is to start SAS ETL Studio, then select File
I Open a Metadata Profile from the menu bar.
If you are working with change-managed metadata repositories, see “Working with
Change Management” on page 64. Assume that the main metadata repository for the
example data warehouse is under change-management control.
If you are not working with change-managed metadata repositories, the following
statements apply:
3 You can update objects in any metadata repository for which you have write
authority in the tree view on the SAS ETL Studio desktop.
3 You can add only new objects to the default metadata repository.
Task Overview for Users
4
Main Task Flow for Users
59
3 If you try to add an object to a repository other than the default repository, the
new object is added to the default repository.
Select a Default SAS Application Server
One of the first tasks that most users will perform in SAS ETL Studio is to select a
default SAS application server. A default SAS application server lets you access data,
execute SAS code, and perform other tasks that require a SAS server but without
having to specify a server each time. Typically, a metadata administrator defines this
metadata object and then tells the SAS ETL Studio user which object to select as the
default SAS application server.
For the example data warehouse, assume the metadata object for the default SAS
application server is called SASMain. For details about SASMain, see “Default SAS
Application Server” on page 42.
Perform these steps to select a default SAS application server:
I Options to display the Options
window.
Select the SAS Server tab.
On the SAS Server tab, select the desired server from the Server drop-down list.
The name of the selected server appears in the Server field.
Click Test Connection to test the connection to the SAS Workspace Server(s) that
are specified in the metadata for the server. If the connection is successful, go to
the next step. If the connection is not successful, contact the metadata
administrator who defined the server metadata for additional help.
After you have verified the connection to the default SAS application server, click
OK to save any changes. The server that specified in the Server field is now the
default SAS application server.
1 From the SAS ETL Studio menu bar, select File
2
3
4
5
You might want to be aware of the impact of selecting a default SAS application
server. For details, see “Impact of the Default SAS Application Server in SAS ETL
Studio” on page 43.
Main Task Flow for Users
SAS ETL Studio is an application that enables you to manage ETL process
flows—sequences of steps for the extraction, transformation, and loading of data. ETL
process flows are saved in a job: a metadata object that specifies processes that create
output. SAS ETL Studio uses each job to generate or retrieve SAS code that reads
sources and creates targets on a file system.
The following steps summarize the task flow for creating jobs. It is assumed that all
installation and setup tasks have been completed as described in Chapter 5, “Setup
Tasks for Administrators,” on page 37.
1 Identify the job that must be added or updated. This is basically a matter of
identifying the sources and targets that will address a business need in your
project plan, as described in Chapter 4, “Example Data Warehouse,” on page 27.
2 Start SAS ETL Studio. For details, see “Start SAS ETL Studio” on page 56.
3 Create the appropriate metadata profile if one does not already exist. For details,
see “Create a Metadata Profile” on page 57.
60
Specifying Metadata for Sources and Targets
4
Chapter 6
4 Open the appropriate metadata profile. For details, see “Open a Metadata Profile”
on page 58.
5 Add metadata for the job’s inputs (sources). For details, see “Specifying Metadata
for Sources and Targets” on page 60.
6 Add metadata for the job’s outputs (targets). For details, see “Specifying Metadata
for Sources and Targets” on page 60.
7 Create and run the job. For details, see “General Tasks for Jobs” on page 113.
Specifying Metadata for Sources and Targets
After you have completed the tasks that are described in “Preliminary Tasks for
Users” on page 56, you are ready to specify metadata for sources and targets in SAS
ETL Studio jobs.
A source is an input to an operation, and a target is an output of an operation. A
data store can be a source, a target, or both, depending on its role in a process flow. For
example, the display that follows shows the process flow diagram for a SAS ETL Studio
job.
Display 6.1 Process Flow for a SAS ETL Studio Job
In the display, each round object represents the metadata for a table, and each square
object represents the metadata for a process. Moving from left to right in the display:
3 ALL_EMP represents the metadata for a table that is the source for a data
transfer process.
3 ALL_EMP2 represents the metadata for a table that is the target of a load process
and the source for an extract process.
3 All Male Emp represents the metadata for a table that is the target of a load
process.
SAS ETL Studio uses a process flow diagram to generate or retrieve SAS code that
reads sources and creates targets in physical storage. To create a process flow in SAS
ETL Studio, you must first add metadata for the sources and targets in the flow.
Note: Any data store can be a source, or a target, or both. Accordingly, there is no
difference in the metadata for a source and a target. The methods in the following table
can be used to enter metadata for both sources and targets in SAS ETL Studio jobs. 4
Task Overview for Users
4
Overview of Source Designers
61
Table 6.1 Methods for Specifying Metadata for Data Stores
Data Store
Method for Specifying Metadata
A set of tables that are defined in a data model.
Import the data model in CWM format
or in a format for which you have the
appropriate Meta Integration Model
Bridge. See “Metadata Import and
Export” on page 11.
One or more tables that exist in physical storage.
Source designer. See “Using Source
Designers” on page 61.
A comma-delimited file or a similar external file that
exists in physical storage.
External File source designer. See
“Example: Extracting Information
from a Flat File” on page 78.
One or more tables that are defined in an XML file.
The Generic source designer can be
used. See “XML Files” on page 47 and
“Using Source Designers” on page 61.
A table that can be accessed with an Open Database
Connectivity (ODBC) driver, such as a Microsoft Access
table or a Microsoft Excel spreadsheet.
The ODBC source designer can be
used. See “ODBC Libraries” on page
46 and “Using Source Designers” on
page 61.
A single table that does not exist in physical storage but is
created when a SAS ETL Studio job is executed.
Target Table Designer. See “Using
Target Designers” on page 63.
A single table and reuse column metadata that has been
saved to the current repository.
A single complex table, such as a star schema for a data
mart.
Add and maintain a cube.
Cube Designer. See Chapter 11,
“Creating Cubes,” on page 161.
Using Source Designers
Overview of Source Designers
Source designer wizards enable you to generate metadata for tables or external files
that exist in physical storage. In most cases, a source designer displays a list of tables
that currently exist in a library, and it generates metadata for one or more tables that
you select. The metadata is generated from the physical structure of the tables.
The ability to generate metadata for one or more existing tables makes a source
designer a convenient tool for creating the metadata for a set of sources in a SAS ETL
Studio job. However, a source designer wizard is not limited to generating the metadata
for a source in a job. After the metadata for a data store has been added, you can use it
to specify a source or a target in a job. See “Specifying Metadata for Sources and
Targets” on page 60.
62
Preparation
4
Chapter 6
Preparation
Before you use a source designer, the following prerequisites should be met:
3 Administrators should have completed the tasks that are described in Chapter 5,
“Setup Tasks for Administrators,” on page 37.
3 If the source will be accessed with library, metadata for the library should have
been added to the appropriate metadata repository. This step is the same whether
the source is in SAS format or in most other formats. At some sites,
administrators might define all libraries and simply tell SAS ETL Studio users
which libraries to use. See “Enter Metadata for Libraries” on page 44.
3 It is assumed that you are working under change-management control, as
described in “Working with Change Management” on page 64.
Note:
library.
You do not need to check out a library to add metadata about tables in that
4
Task Summary
Follow these steps to generate metadata for one or more tables or external files that
exist in physical storage:
1 From the SAS ETL Studio desktop, select Tools I Source Designer from the
menu bar. The Source Designer selection window displays.
The Source Designer selection window displays a number of specific data
formats that have been licensed for your site. The specific format often gives better
results than the generic format, which has not been optimized for particular kinds
of data. Use the format that most closely matches your data whenever possible.
2 From the Source Designer selection window, select the kind of table for which you
will generate metadata. A wizard for that kind of table displays.
3 Enter metadata as prompted by the wizard. For details, see the online Help for
the wizard.
4 Review the metadata in the last window of the wizard. If the metadata is correct,
click the Finish button. The metadata for the table is added to the Project tree.
For an example of how a source designer can be used, see “Example: Using a Source
Designer to Enter Metadata for SAS Tables” on page 72. For details about writing your
own source designer, see Appendix 2, “Building Java Plug-ins for SAS ETL Studio,” on
page 189.
Additional Information about Source Designers
The online Help for SAS ETL Studio includes examples for all source designer
wizards. To display the relevant Help topics, perform the following steps:
1 From the SAS ETL Studio menu bar, select Help I Contents. The online Help
window displays.
2 In the left pane of the Help window, select Examples I Source Designer
Examples.
Task Overview for Users
4
Task Summary
63
Using Target Designers
Overview of Target Designers
SAS ETL Studio provides at least two target designer wizards: the Target Table
Designer and the Cube Designer. The Cube Designer enables you to add or update
cubes. For details about that wizard, see Chapter 11, “Creating Cubes,” on page 161.
The Target Table Designer enables you to enter metadata for a single table that does
not exist in physical storage . For example, you could use the Target Table Designer to
specify metadata for the following kinds of tables:
3 A table that does not yet exist, but will be created when a SAS ETL Studio job is
executed.
3 A table that reuses column metadata that has been saved to the current repository.
3 A complex table, such as a star schema for a data mart.
The ability to specify metadata for an object that will be created in the future makes
a target designer a convenient tool for specifying the metadata for a target in a SAS
ETL Studio job. However, a target designer wizard is not limited to generating the
metadata for a target in a job. After the metadata for a table or a cube has been added,
it can be used to specify a source or a target in a job. See “Specifying Metadata for
Sources and Targets” on page 60.
Preparation
Before you use a target designer, the following prerequisites should be met:
3 Administrators should have completed the tasks that are described in Chapter 5,
“Setup Tasks for Administrators,” on page 37.
3 If the table will stored in library, metadata for the library should have been added
to the appropriate metadata repository. This step is the same whether the data
store is in SAS format or in most other formats. At some sites, administrators
might define all libraries and simply tell SAS ETL Studio users which libraries to
use. See “Enter Metadata for Libraries” on page 44.
3 It is assumed that you are working under change-management control, as
described in “Working with Change Management” on page 64.
Note:
library.
You do not need to check out a library to add metadata about tables in that
4
Task Summary
Follow these steps to generate metadata for a single table that does not yet exist in
physical storage:
1 From the SAS ETL Studio desktop, select Tools I Target Designer from the
menu bar. The Target Designer selection window displays.
2 From the Target Designer selection window, select Target Table.
3 Enter metadata as prompted by the wizard. For details, see the online Help for
the wizard.
4 Review the metadata in the last window of the wizard. If the metadata is correct,
click the Finish button. The metadata for the table is added to the Project tree.
64
Additional Information about Target Designers
4
Chapter 6
For an example of how a target designer can be used, see “Example: Using the
Target Table Designer to Enter Metadata for a SAS Table” on page 89. For details
about writing your own target designer, see Appendix 2, “Building Java Plug-ins for
SAS ETL Studio,” on page 189.
Additional Information about Target Designers
The online Help for SAS ETL Studio includes examples for the target designer
wizards. To display the relevant Help topics, perform the following steps:
1 From the SAS ETL Studio menu bar, select Help I Contents. The online Help
window displays.
2 In the left pane of the Help window, select Examples I Target Designer
Examples.
Working with Change Management
Understanding Change Management
SAS ETL Studio enables you to create metadata objects that define sources, targets,
and the transformations that connect them. This metadata is saved to one or more
repositories.
When administrators create the metadata repositories for a project, they usually put
them under change-management control. Change management enables multiple SAS
ETL Studio users to work with the same metadata repository at the same time without
overwriting each other’s changes.
Under change management, SAS ETL Studio users without administrative privilege
cannot directly update any metadata in a change-managed repository. Instead, each
user must check out metadata from the change-managed repository and into a project
repository for that user. The user can update the metadata as needed, and when
finished, they can check it back in to the change-managed repository. As long as the
metadata for a resource is checked out by one person, it is locked so that it cannot be
updated by another person until the metadata has been checked back in.
Adding New Metadata
Preparation
Before you can add metadata to a repository that is under change-management
control, you must open an appropriate metadata profile, as described in “Open a
Metadata Profile” on page 58.
Note: When you add a new metadata object, such as the metadata for a table, the
metadata goes directly into the Project tree on the SAS ETL Studio desktop. 4
Task Summary
In SAS ETL Studio, add metadata for a table, a job, or some other resource. The
metadata for the new resource will be added to the Project tree on the SAS ETL Studio
desktop. For details about adding metadata for tables and jobs, see the following
references:
Task Overview for Users
4
Checking Out Existing Metadata
65
3 Chapter 7, “Specifying the Inputs to Warehouse Data Stores,” on page 71
3 Chapter 8, “Specifying Warehouse Data Stores,” on page 89
3 Chapter 10, “Loading Warehouse Data Stores,” on page 131.
Next Tasks
After you have added new metadata to the Project tree, you can update it. After you
have finished any updates, you can check in the metadata to the change-managed
repository. See “Checking In Metadata” on page 66.
Checking Out Existing Metadata
Preparation
Before you can check out metadata from a change-managed repository, you must open
an appropriate metadata profile, as described in “Open a Metadata Profile” on page 58.
Remember the following about check-out operations:
3 You cannot update metadata in the Inventory tree or the Custom tree. You must
check out the metadata to the Project tree and update it there.
3 After the metadata for a resource has been checked out by one person, it is locked
so that it cannot be updated by another person until the metadata has been
checked back in.
3 When you check out a complex object such as a job, the components of the object
that you might need to update are automatically checked out also, such as the
sources and targets in a job.
3 If two or more tables share a common metadata object—such as the metadata for
a primary key, a note, or a document—and you check out one of these tables, only
you can check out the other tables that share that common object. (Other users
cannot access the common metadata object that you have checked out, and the
shared object is required in order to check out a table that uses that object.)
Task Summary
1 In SAS ETL Studio, click the Inventory tab or the Custom tab on the SAS ETL
Studio desktop. The appropriate tree displays.
2 Open the folder for the kind of metadata that you want to check out, such as the
Tables folder for tables in the Inventory tree.
3 Right-click the metadata that you want to check out and select
Change-Management I Check Out. You can also left-click the metadata that
you want to check out, then go the drop-down menu and select Project I Check
Out. The metadata is checked out and displays in the Project tree.
Next Tasks
After you have checked out metadata to the Project tree, you can update it. After you
have finished any updates, you can check in the metadata to the change-managed
repository.
66
Checking In Metadata
4
Chapter 6
Checking In Metadata
Preparation
When you are finished working with all of the metadata that is displayed in the
Project tree, use the check-in feature to store the objects in the change-managed
repository.
Note: A check-in operation checks in all metadata objects that are in the Project
tree. You cannot check in selected objects and leave other objects in the Project tree.
4
Accordingly, you might find it convenient to work with small sets of related objects in
the Project tree.
Task Summary
1 In SAS ETL Studio, click the Project tab on the SAS ETL Studio desktop. The
Project tree displays.
2 Right-click the project repository icon and select Check In Repository. You can
also left-click the project repository icon, open the drop-down menu and select
Project I Check In Repository. The Check In window displays.
3 Enter meaningful comments in the Name field (and perhaps the Description field)
about the changes that were made to all of the objects that you are about to check
in. The text entered here becomes part of the check in/check out history for all
objects that you are checking in. If you do not enter meaningful comments, the
check in/check out history is less useful.
4 When finished entering comments in the Check In window, click OK . All
metadata objects that are in the project repository are checked into the
change-managed repository.
Additional Information about Change Management
The online Help for SAS ETL Studio provides more details about
change-management. To display the relevant Help topics, do the following:
1 From the SAS ETL Studio menu bar, select Help I Contents. The online Help
window displays.
2 In the left pane of the Help window, select Task Overviews I SAS ETL Studio
Task Reference I Using Change Management in SAS ETL Studio.
Specifying Metadata for DBMS Tables with Keys
Tables in a database management system often have primary keys, unique keys, and
foreign keys.
A primary key is one or more columns that are used to uniquely identify a row in a
table. A table can have only one primary key. The column(s) in a primary key cannot
contain null values.
A unique key is also one or more columns that can be used to uniquely identify a row
in a table. A table can have one or more unique keys. Unlike a primary key, a unique
key can contain null values.
A foreign key is one or more columns that are associated with a primary key or
unique key in another table. A table might have one or more foreign keys. A foreign
Task Overview for Users
4
Updating the Metadata for a Table
67
key is dependent upon its associated primary or unique key. In other words, a foreign
key cannot exist without that primary or unique key.
Note: When specifying metadata for a DBMS table with foreign keys, if you want to
preserve the foreign key, you must specify metadata for all of the tables that are
referenced by the foreign keys. 4
For example, suppose that Table 1 had foreign keys that referenced primary keys in
Table 2 and Table 3. To preserve the foreign keys in Table 1, you could use the Metadata
Importer wizard or a source designer wizard to import metadata for Tables 1, 2, and 3.
Viewing the Data in a Table
After the metadata for a table has been entered, you might want to verify that the
corresponding physical table contains the data that you were expecting. Perform the
following steps to view the data that corresponds to the metadata for a table:
1 On the SAS ETL Studio desktop, select the Inventory tree.
2 In the Inventory tree, open the Tables folder.
I View Data from the menu bar. The View
Data window displays the column headings, row numbers, and the rows of data in
the table. If the column headings are ordered and named as expected, then the
metadata for the table is correct.
3 Select the table, then select View
Viewing the Metadata for a Table
Perform the following steps to view the metadata for a table:
1 On the SAS ETL Studio desktop, select the Inventory tree.
2 In the Inventory tree, open the Tables folder.
I Properties from the menu
bar. The properties window for the table is displayed.
4 Use the tabs in this window to view metadata for the table. Each tab has its own
Help button.
3 Select the metadata for the table, then select File
Updating the Metadata for a Table
Perform the following steps to update the metadata for a table that is under change
management.
1 On the SAS ETL Studio desktop, select the Inventory tree.
2 In the Inventory tree, open the Tables folder or the External Tables folder.
I Check Out. The metadata for the table is
checked out. A check mark is displayed next to the table in the Inventory tree. An
icon indicating a checked-out table appears in the Project tree.
4 Display the Project tree, select the table, and select File I Properties from the
menu bar. The properties window for the table is displayed.
3 Select the table, then select Project
68
Impact of Updating a Table’s Metadata
4
Chapter 6
Note that you must display the table from the Project tree in order to update
metadata. Displaying the table from the Inventory tree enables browsing only.
5 Use the tabs in this window to make changes to the metadata for the table. Each
tab has its own Help button. Column metadata is a special case. For details, see
“Updating Column and Mapping Metadata” on page 68.
6 When you are finished updating the metadata, you can check in your changes. In
the Project tree, select the repository icon.
7 From the menu bar on the SAS ETL Studio desktop, select Project I Check In
Repository.
Impact of Updating a Table’s Metadata
Keep in mind that a table can be used in multiple jobs. A table can also be used in
multiple places in the same job. Accordingly, when you update the metadata for a table,
make sure that the updates are appropriate in all contexts where the metadata is used.
For example, if you update the columns for Table 1 in one job, the updates would also
have to be appropriate for Table 1 in the context of another job.
Updating Column and Mapping Metadata
If the metadata for a source has not yet been added to a job, you can update its
column metadata as previously described. If the metadata for a source has been added
to a job, the job might have one or more targets and transformations that depend on the
current column metadata for the source. In that case, use the steps that are described
in “Updating Column and Mapping Metadata” on page 119.
Setting Name Options for Individual Tables
SAS ETL Studio cannot access tables or columns with case-sensitive names or with
special characters in the names unless the appropriate options have been specified in
the metadata for the table.
Prerequisites
For tables in DBMS format, it is assumed that the appropriate name options have
already been set for the database library that is used to access the table, as described in
“Supporting Case and Special Characters in Table and Column Names” on page 49.
Name options do not need to be set on the library that is used to access a table in SAS
format.
Task Summary
The following steps describe one way to enable name options for a table whose
metadata has been saved to a metadata repository. It is assumed that the metadata
repository is under change management.
1 Start SAS ETL Studio, open the appropriate metadata profile, and check out the
table(s) whose metadata must be updated.
2 In the Project tree, select the metadata for the table, then select File I
Properties from the menu bar. The properties window for the table is displayed.
Task Overview for Users
4
Additional Information about User Tasks
69
3 In the properties window, click the Physical Storage tab.
4 On the Physical Storage tab, select Enable case-sensitive DBMS object
names to support case-sensitive table and column names. Select Enable special
characters within DBMS object names to support special characters in table
and column names. For details about these options as they relate to SAS tables,
see “Case and Special Characters in SAS Names” on page 184.
5 Click OK to save your changes.
6 Check in the changed metadata.
Additional Information about User Tasks
The online Help for SAS ETL Studio provides additional information about user
tasks. To display Help topics about the main user tasks, perform the following steps:
1 From the SAS ETL Studio menu bar, select Help I Contents. The online Help
window displays.
2 In the left pane of the Help window, select Task Overviews
Task Reference.
3 See the section for user tasks.
I SAS ETL Studio
70
71
CHAPTER
7
Specifying the Inputs to
Warehouse Data Stores
Sources: Inputs to Warehouse Data Stores 71
Example: Using a Source Designer to Enter Metadata for SAS Tables 72
Preparation 72
Start SAS ETL Studio and Open the Appropriate Metadata Profile 73
Select the Appropriate Source Designer 73
Select the Library That Contains the Tables 74
Select the Tables 74
Save the Metadata for the Table(s) 75
Check In the Metadata for the Table(s) 76
Example: Extracting Information from a Flat File 78
Overview 78
Preparation 78
Start SAS ETL Studio and Open the Appropriate Metadata Profile 78
Display the External File Source Designer 79
Specify How the External File Will Be Accessed 80
Specify How Information Should Be Imported 80
Specify the Width of Columns in the Target 81
Specify Column Variables for the Target 82
Specify the Location and Format of the Target 83
Specify a Descriptive Name for the Target 84
Validate the DATA Step That Will Create the Target 84
Create the Target 85
Check In the Job for the Target 85
Next Tasks 87
Sources: Inputs to Warehouse Data Stores
In general, a source is an input to an operation. In a SAS ETL Studio job, a source is
a data store from which information will be extracted, transformed, and loaded into a
target—a data store in a data warehouse or data mart.
After you complete the tasks that are described in “Preliminary Tasks for Users” on
page 56, you can specify the sources that will be used in a SAS ETL Studio job. Your
project plan should identify the data sources that are required for a particular job. For
example, the sources that are required to answer specific business questions in the
Orion Star Sports & Outdoors project are listed under each business question. See the
Identifying Sources section under each business question in Chapter 4, “Example Data
Warehouse,” on page 27.
Use the examples in this chapter, together with general methods that are described
in “Specifying Metadata for Sources and Targets” on page 60, to specify metadata for
the sources that will be used in a SAS ETL Studio job.
72
Example: Using a Source Designer to Enter Metadata for SAS Tables
4
Chapter 7
Example: Using a Source Designer to Enter Metadata for SAS Tables
This example demonstrates how to use a source designer to enter metadata for
several tables in SAS format. A source designer will be used because the tables already
exist in physical storage. This example is based on some source tables that are needed
for the example data warehouse, as described in “Which Sales Person Is Making the
Most Sales?” on page 29.
Preparation
For the current example, assume that the following statements are true.
3 The CUSTOMER table, ORDERS table, and ORDER_ITEM table are currently
existing operational tables. They contain information that is needed for a data
warehousing project.
3 All of the tables are in SAS format and are stored in a SAS library called Ordetail.
3 Metadata for the Ordetail library has been added to the main metadata repository
for the example data warehouse. For details about libraries, see “Enter Metadata
for Libraries” on page 44.
3 The main metadata repository is under change-management control. For details
about change management, see “Working with Change Management” on page 64.
3 You have selected a default SAS application server for SAS ETL Studio, as
described in “Select a Default SAS Application Server” on page 59.
Specifying the Inputs to Warehouse Data Stores
4
Select the Appropriate Source Designer
73
Start SAS ETL Studio and Open the Appropriate Metadata Profile
Perform the following steps to begin work in SAS ETL Studio:
1 Start SAS ETL Studio as described in “Start SAS ETL Studio” on page 56.
2 Open the appropriate metadata profile as described in “Open a Metadata Profile”
on page 58. For this example, the appropriate metadata profile would specify the
project repository that will enable you to access metadata about the Ordetail
library.
You do not need to check out a library in order to add metadata about tables in that
library. Accordingly, the next task is to select the appropriate source designer.
Select the Appropriate Source Designer
To select the wizard that enables you to enter metadata for a SAS table, from the
menu bar on the SAS ETL Studio desktop, select Tools I Source Designer.
The Source Designer selection window is displayed, as shown in the following display.
Display 7.1 Source Designer Selection Window
The list of available wizards on your machine might be somewhat different from the
list shown in the previous display. Only those data formats for which source designer
wizards have been installed are available. From this window, take the following actions:
1 Click the SAS icon.
2 Click Next .
74
Select the Library That Contains the Tables
4
Chapter 7
The wizard attempts to open a connection to the default SAS application server. If
there is a valid connection to this server, you might be prompted for a user name and a
password. After you have provide that information, you will be taken directly to the
Select a SAS Library window.
The next task is to select the library that contains the tables.
Select the Library That Contains the Tables
After you have connected to a SAS application server, use the Select a SAS Library
window to specify the SAS library that contains the desired table(s). For the current
example, you would select the Ordetail library, as shown in the following display.
Display 7.2 Select a SAS Library Window
After selecting the appropriate library, click Next . The SAS application server is
used to access the library, and the Define Tables window is displayed.
The next task is to select the tables.
Select the Tables
The following display shows the tables that are stored in the Ordetail library.
Specifying the Inputs to Warehouse Data Stores
4
Save the Metadata for the Table(s)
75
Display 7.3 Define Tables Window
In this example, we want to create metadata objects for CUSTOMER, ORDERS, and
ORDER_ITEM. Accordingly, select these tables and click Next . The Wizard Finish
window is displayed.
The next task is to review and save the metadata for the tables.
Save the Metadata for the Table(s)
After you select the table(s), use the Wizard Finish window to review the metadata
that you have entered.
76
Check In the Metadata for the Table(s)
4
Chapter 7
Display 7.4 Wizard Finish Window
Review the text in the metadata pane on the Wizard Finish window. The text shown
in the previous display means that the metadata for three tables called CUSTOMER,
ORDERS, and ORDER_ITEM will be saved to the project repository Project: etlUser1.
When you are satisfied that the metadata is correct, click Finish . The metadata for
CUSTOMER, ORDERS, and ORDER_ITEM will be saved to the project repository
(visible in the Project tree on the SAS ETL Studio desktop).
The next task is to check in the metadata for tables.
Check In the Metadata for the Table(s)
Under change management, new metadata objects are added to the Project tree on
the SAS ETL Studio desktop, as shown in the following display.
Specifying the Inputs to Warehouse Data Stores
4
Check In the Metadata for the Table(s)
77
Display 7.5 Project Tree with Metadata Objects for Three Tables
You must check in the new table metadata in order to save it to the change-managed
repository.
1 In the Project tree, select the repository icon (Project: etlUser1).
2 From the menu bar on the SAS ETL Studio desktop, select Project
Repository.
I Check In
All metadata objects in the project repository will be checked in to the
change-managed repository. The new objects will be visible in the Inventory tree.
78
Example: Extracting Information from a Flat File
4
Chapter 7
Example: Extracting Information from a Flat File
This example demonstrates how to use the External File wizard to extract
information from a flat file.
Overview
The External File source designer is a wizard that guides you through the steps that
are required to create and execute a SAS ETL Studio job. The job extracts information
from an external file and writes it to a SAS table. Typically, the SAS table is used as a
source table in another SAS ETL Studio job.
The External File source designer enables you to do the following tasks:
3 extract information from flat files in fixed or delimited format. Supported file types
are TXT, DAT, and CSV.
3 import column-aligned data or data that is not column-aligned. Data that is not
column-aligned can be imported with single or multiple delimiters separating the
values.
3 import variable length records and fixed- length records.
3 import character, numeric and nonstandard numeric data (such as currency data
or signed numbers).
3 specify how missing values should be treated.
3 read data in which one record is spanned over multiple lines, as well as data in
which multiple records are included in a single data line.
3 remove columns in the imported data; arrange the order of the columns, change
attributes of any column, add new columns.
For column-aligned data, the External File source designer uses a sample of data
from the external file, together with metadata that you enter, to estimate the length
and data type of the columns. You can specify the rows used in sampling of data by
specifying the start record and how many records should be included in the sample.
Preparation
For the current example, assume that the following statements are true:
3 A data warehouse project plan specified a report that requires information from an
external file. The external file is a flat file that is called employeeFlatFile.dat.
3 Information will be extracted from employeeFlatFile.dat into a SAS table called
EmployeeSAS.
3 EmployeeSAS will be stored in a SAS library called Efiout. Assume that metadata
for Efiout has been added to the main metadata repository for the example data
warehouse. For details about libraries, see “Enter Metadata for Libraries” on page
44.
3 The main metadata repository is under change-management control. For details
about change management, see “Working with Change Management” on page 64.
3 You have selected a default SAS application server for SAS ETL Studio, as
described in “Select a Default SAS Application Server” on page 59.
Start SAS ETL Studio and Open the Appropriate Metadata Profile
Perform the following steps to begin work in SAS ETL Studio:
Specifying the Inputs to Warehouse Data Stores
4
Display the External File Source Designer
79
1 Start SAS ETL Studio as described in “Start SAS ETL Studio” on page 56.
2 Open the appropriate metadata profile as described in “Open a Metadata Profile”
on page 58. For this example, the appropriate metadata profile would specify the
project repository that will enable you to access metadata for the Efiout library.
You do not need to check out a library in order to add metadata about source tables
or target tables in that library. Accordingly, the next task is to display the External File
source designer.
Display the External File Source Designer
To display the External File source designer, from the menu bar on the SAS ETL
Studio desktop, select Tools I Source Designer.
The Source Designer selection window is displayed, as shown in the following display.
Display 7.6 Source Designer Selection Window
From this window, take the following actions:
1 Click the External File icon.
2 Click Next .
The wizard attempts to open a connection to the default SAS application server. If
there is a valid connection to this server, you might be prompted for a user name and a
password. After you have provide that information, the External File Selection window
is displayed.
80
Specify How the External File Will Be Accessed
4
Chapter 7
Specify How the External File Will Be Accessed
Perform the following steps to specify how the external file will be accessed:
1 In the External File Selection window, select the SAS application server that will
be used to access the external file, then specify a physical path to the external file.
The external file is probably remote from the SAS application server, so you
might have to enter a remote path in the Path field, such as
\\d9585\sources_external\employeeFlatFile.dat. The following display shows an
External File Selection window with values that are appropriate for the current
example.
Display 7.7 External File Selection Window
2 When the appropriate server and path and have been specified, click Next . The
wizard reads the source file and tries to determine whether the source contains
fixed-width data or delimited data. The Import Parameters window is displayed
with some estimated parameters.
Specify How Information Should Be Imported
Perform the following steps to specify how information should be imported from the
external file:
1 Review the estimated parameters and sample data that are displayed in the Import
Parameters window. Update as needed. The following display shows an Import
Parameters window with values that are appropriate for the current example.
Specifying the Inputs to Warehouse Data Stores
Display 7.8
4
Specify the Width of Columns in the Target
81
Import Parameters Window
2 When the import parameters are correct, click Next . The wizard reads the source
file and derives default metadata for columns in the target (the SAS table), based
on columns in the source (the external file).
For the current example, assume that the data in employeeFlatFile.dat is
arranged in columns, and the Set Column Definitions window is displayed. The
next task is described in “Specify Column Variables for the Target” on page 82.
However, if the data in the external file is not arranged in columns, the Fixed
Width Column Definition window is displayed. In this scenario, the next task is
described in “Specify the Width of Columns in the Target” on page 81.
Specify the Width of Columns in the Target
If the data in the external file is not arranged in columns, use the Fixed Width
Column Definition window to view the data in the source (external file) and specify the
width of the columns in the target (SAS table).
1 To specify the width of a column, study the example data, decide where the
columns should be, then click the location where the column should be. An arrow
is added at each column location, as shown in the following display.
82
Specify Column Variables for the Target
4
Chapter 7
Display 7.9 Fixed Width Column Definition Window
Note: The values and columns in the previous display do not match the data in
the employeeFlatFile.dat file. They are taken from a different external file, one
that does not arrange its data in columns.
4
2 After the appropriate columns have been specified, click Next . A temporary SAS
data set is created with the column widths that you have specified on the Fixed
Width Column Definition window. The Set Column Definition window is displayed,
showing the effect of any changes that you made on the Fixed Width Column
Definition window.
Specify Column Variables for the Target
1 In the Set Column Definition window, you can accept the default column variable
names in the Columns in the target group box, or you can update them.
Scroll to the right to view or update the Description, Length, Type, Format,
and Informat fields. The following display shows a Set Column Definition window
with values that are appropriate for the current example.
Specifying the Inputs to Warehouse Data Stores
Display 7.10
4
Specify the Location and Format of the Target
83
Set Column Definition Window
The Subset data button in this window launches the Expression Builder
window. In the context of the External File source designer, the Expression
Builder enables you to build a WHERE clause to subset the data that is being
imported from an external file. (To see an example of how the Expression Builder
can be used to build a WHERE clause, see “Configure the SQL Join
Transformation” on page 137.)
2 When the column metadata is correct, click Next . The SAS Destination window is
displayed.
Specify the Location and Format of the Target
When the SAS Destination window is displayed, a number of fields have default
values that must be updated. The following display shows the SAS Destination window
before you have specified the desired library, member name (table name), and file
format for the target (SAS data set or SAS data view).
84
Specify a Descriptive Name for the Target
Display 7.11
4
Chapter 7
SAS Destination Window
1 In the SAS Destination window, select the library where the target will be stored
(Efiout), a member name for the target (EmployeeSAS), and the file format of the
target (SAS data set). The name for the target must follow the rules for SAS
names.
2 When the physical storage information is correct, Click Next . The General
Properties window for the target is displayed.
Specify a Descriptive Name for the Target
Perform the following steps to specify a descriptive name for the target:
1 In the General Properties window, specify a descriptive name for the target, and
perhaps a brief narrative description.
The default descriptive name for the target is the member name that was
entered in the SAS Destination window. A descriptive name does not have the
same restrictions as a member name, so it can be changed to something that is
easier to understand. For the current example, assume that the SAS data set
name that you entered in the previous window (EmployeeSAS) is acceptable as a
descriptive name.
2 When the general properties are correct, click Next . The Import Data Step
Validation window is displayed.
Validate the DATA Step That Will Create the Target
In the Import Data Step Validation window, click Next to generate a SAS DATA
step from the metadata that you have entered. If the DATA step has no errors, the
Wizard Finish window displays. If the DATA step has errors, a window displays that
enables you to view the SAS log and take other corrective action.
Specifying the Inputs to Warehouse Data Stores
4
Check In the Job for the Target
85
For this example, assume that the DATA step is valid, and the Wizard Finish
window is displayed.
Create the Target
In the Wizard Finish window, review the metadata that you have entered. When you
are satisfied that the metadata is correct, click Finish . The following actions occur:
3 Metadata for the source (the external file) is added to a current metadata
repository.
3 Metadata for the target (the SAS table) is added to a current metadata repository.
3 Metadata for the job that extracts information from the source and writes it to the
target is added to a current metadata repository.
3 The job is submitted for execution.
3 If the job is successful, the target is created on the file system.
Check In the Job for the Target
Under change management, new metadata objects are added to the Project tree on
the SAS ETL Studio desktop, as shown in the following display.
86
Check In the Job for the Target
Display 7.12
4
Chapter 7
Project Tree with Output from the External File Source Designer
In the previous display, Create EmployeeSAS is the metadata for the job. Jobs that
are created by wizards have names in the format Create target_name, where
target_name is the name of the target.
employeeFlatFile.dat is the metadata for the external file. It will have the same
name as the external file.
EmployeeSAS is the metadata for the SAS table into which information was
extracted from the external file. The target has the descriptive name that you specified
in the External File wizard.
Specifying the Inputs to Warehouse Data Stores
4
Next Tasks
You must check in the new metadata in order to save it to the change-managed
repository.
1 In the Project tree, select the repository icon (Project: etlUser1).
2 From the menu bar on the SAS ETL Studio desktop, select Project
Repository.
I Check In
All metadata objects in the project repository will be checked in to the
change-managed repository. The new objects will be visible in the Inventory tree.
Next Tasks
After you have specified the metadata for one or more sources, you can specify the
metadata for the corresponding targets—the data stores that will contain the
information that will be extracted and transformed from the sources.
87
88
89
CHAPTER
8
Specifying Warehouse Data
Stores
Targets: Warehouse Data Stores 89
Example: Using the Target Table Designer to Enter Metadata for a SAS Table
Preparation 90
Start SAS ETL Studio and Open a Metadata Profile 90
Select the Target Designer 90
Enter a Name and Description 91
Select Column Metadata from Existing Tables 92
Specify Column Metadata for the New Table 93
Specify Physical Storage Information for the New Table 94
Usage Hints for the Physical Storage Window 94
Save Metadata for the Table 95
Check In the Metadata 96
Next Tasks 97
89
Targets: Warehouse Data Stores
In general, a target is an output of an operation. In a SAS ETL Studio job, the main
targets are data stores in a data warehouse or data mart.
After you have specified the sources for a SAS ETL Studio job, you can specify the
targets for that job. Your project plan should identify the targets that are required for a
particular job. For example, the targets that are required to answer specific business
questions in the Orion Star Sports & Outdoors project are listed under each business
question. See the Identifying Targets section under each business question in Chapter
4, “Example Data Warehouse,” on page 27.
Use the examples in this chapter, together with general methods that are described
in “Specifying Metadata for Sources and Targets” on page 60, to specify metadata for
the targets that will be used in a SAS ETL Studio job.
Example: Using the Target Table Designer to Enter Metadata for a SAS
Table
This example demonstrates how to use a target designer to enter metadata for a
table in SAS format. A target designer is used for the following reasons:
3 The table does not yet exist in physical storage; it will be created by a SAS ETL
Studio job.
3 The table will reuse column metadata from other tables that have already been
registered in a current metadata repository.
90
Preparation
4
Chapter 8
The example is based on a target table that is needed for the example data
warehouse, as described in “Which Sales Person Is Making the Most Sales?” on page
29. The table in this example will subsequently serve as the target in the SAS ETL
Studio job that is described in “Example: Creating a Job That Joins Two Tables and
Generates a Report” on page 132.
Preparation
For the current example, assume that the following statements are true:
3 A project plan identified the need for a new table called Total_Sales_By_Employee.
The new table will be created by joining two other tables, ORDER_FACT and
ORGANIZATION_DIM. The new table will include employee name, total revenue,
employee ID, job title, company, and department.
3 The table will be in SAS format and will be stored in a SAS library called Ordetail.
3 Metadata for the Ordetail library has been added to the main metadata repository
for the example data warehouse. For details about libraries, see “Enter Metadata
for Libraries” on page 44.
3 The main metadata repository is under change management control. For details
about change management, see “Working with Change Management” on page 64.
3 You have selected a default SAS application server for SAS ETL Studio, as
described in “Select a Default SAS Application Server” on page 59.
Start SAS ETL Studio and Open a Metadata Profile
Perform the following steps to begin work in SAS ETL Studio:
1 Start SAS ETL Studio as described in “Start SAS ETL Studio” on page 56.
2 Open the appropriate metadata profile as described in “Open a Metadata Profile”
on page 58. For this example, the appropriate metadata profile has access to
metadata about the Ordetail library.
You do not need to check out a library in order to add metadata for tables in that
library. Accordingly, the next task is to select the appropriate target designer.
Select the Target Designer
Follow these steps to select the wizard that enables you to enter metadata for a SAS
table:
I Target
Designer. The Target Designer selection window is displayed as follows. Note
that the list of available target designers might differ at your site.
1 From the menu bar on the SAS ETL Studio desktop, select Tools
Specifying Warehouse Data Stores
Display 8.1
4
Enter a Name and Description
Target Designer Selection Window
2 In the Target Designer selection window, click the Target Table icon and click
Next . The wizard attempts to open a connection to the default SAS application
server. If the connection is successful, the name and description window is
displayed.
Enter a Name and Description
Use the first window in the Target Table Designer to enter a name and description
for the metadata object that will specify the table.
Note: The metadata object might or might not have the same name as the
corresponding physical table. You will specify a name for the physical table in a later
window in this wizard. 4
In this example, the name of the metadata object is Total_Sales_By_Employee. The
description is as follows: “Provides a total sales figure and job information for each
salesperson. The table is created by joining the source tables ORDER_FACT and
ORGANIZATION_DIM.”
91
92
Select Column Metadata from Existing Tables
4
Chapter 8
Display 8.2 Name and Description Window
When the text is complete, click Next to display the import columns window.
Select Column Metadata from Existing Tables
If you want the columns in the new table to be similar to the columns in tables that
are already defined, use the import columns window to import metadata for the
appropriate columns.
For example, as noted in “Preparation” on page 90, the tables ORGANIZATION_DIM
and ORDER_FACT will be joined and transformed to supply data to the target
Total_Sales_By_Employee. Accordingly, it would be appropriate to import selected
columns from ORGANIZATION_DIM and ORDER_FACT.
Follow these steps to import metadata for the appropriate columns:
1 In the import columns window, locate the Available Columns tree. In that tree,
click the icon for the table ORGANIZATION_DIM. Then click the right arrow to
move all of the columns in this table into the Selected Columns list box.
2 In the Available Columns tree, click the icon for the table ORDER_FACT, then
click the right arrow again to move the columns of that table into the Selected
Columns list box.
In this example, a pop-up message is displayed to indicate that one column in
the table ORDER_FACT is not added to the Selected Columns list box, because
that same column was already added from the table ORGANIZATION_DIM. Click
OK to clear the pop-up message.
Specifying Warehouse Data Stores
Display 8.3
4
Specify Column Metadata for the New Table
Import Columns Window
3 Click Next to display the target columns window.
Specify Column Metadata for the New Table
Use the target columns window to review and update any imported metadata for
columns. You can also add metadata for new columns.
Display 8.4 Target Columns Window
93
94
Specify Physical Storage Information for the New Table
4
Chapter 8
Scroll down through the target columns to verify that you have the columns that you
need. For our example, the columns are correct. When we create and run the job as
described in “Example: Creating a Job That Joins Two Tables and Generates a Report”
on page 132, we will modify these original column specifications.
Scroll to the top, then scroll right to see the column metadata. You can change any
metadata value by selecting it with the left mouse button. In our example, you could
add descriptions to the columns that came from the ORDER_FACT table.
Note that you are defining column metadata for the new table. You have not yet
created the new table on a file system. The metadata in the current window indicates
where the data can be found and how it is to be formatted.
When you have reviewed and updated the column metadata, click Next to display
the physical storage window.
Specify Physical Storage Information for the New Table
Use the physical storage window to specify the format and location of the new table,
as shown in the following display.
Display 8.5 Physical Storage Window
For our example table, you would follow these steps:
1 In the DBMS field, select SAS.
2 In the Library field, click the down arrow. A list of existing libraries is displayed.
3 Scroll down through the list and choose the library Ordetail.
4 In the Name field, accept the default, Total_Sales_By_Employee. The default is
the name that you entered in the first window of the Target Table Designer wizard.
5 After you have specified a format, a library, and a table name, click Next to go to
the finish window.
Usage Hints for the Physical Storage Window
Keep the following in mind as you use the physical storage window:
Specifying Warehouse Data Stores
4
Save Metadata for the Table
95
3 The name that you specify in the Name field must follow the rules for table names
in the format that is selected in the DBMS field. For example, if SAS is the selected
DBMS, the name must follow the rules for SAS data sets. If you select another
DBMS, the name must follow the rules for tables in that DBMS.
3 For a SAS table or a table in a database management system, you can enable the
use of mixed-case names or special characters in names. See “Setting Name
Options for Individual Tables” on page 68. See also the usage note “Case and
Special Characters in SAS Names” on page 184.
3 You can specify new libraries or edit the metadata definitions of existing libraries
using the New and Edit buttons.
3 You can use the Table Option button to specify options for SAS tables and tables
in a database management system.
Save Metadata for the Table
After you have specified physical storage information, you review all of the metadata
that you have defined for your new table.
In the finish window, scroll down to confirm that you have the metadata that you
need. If you need to change any of the metadata, click Back to display the wizard
windows that you need to make your changes.
Display 8.6 Finish Window
When you have confirmed that the metadata is correct, click Finish to store the
metadata for your new table. The table is displayed in the Project tree. Next, you check
in the metadata object for the table.
96
Check In the Metadata
4
Chapter 8
Check In the Metadata
Under change management, new metadata objects are added to the Project tree on
the SAS ETL Studio desktop.
Display 8.7 Project Tree with a Metadata Object for a New Table
Follow these steps to check the new table into the change-managed repository:
1 In the Project tree, select the repository icon (Project: etlUser1).
2 From the menu bar on the SAS ETL Studio desktop, select Project
Repository.
I Check In
The metadata object in the project repository is checked into the change-managed
repository. The new object is displayed as checked-out in the Inventory and Project
trees. The new table is now ready to be used in a job, as described in “Example:
Creating a Job That Joins Two Tables and Generates a Report” on page 132.
Specifying Warehouse Data Stores
4
Next Tasks
Next Tasks
After you have specified the metadata for one or more targets, you can specify
metadata for the job that will read the appropriate sources and create the desired
targets on a file system.
97
98
99
CHAPTER
9
Introduction to SAS ETL Studio
Jobs
Overview of Jobs 100
What Is a Job? 100
Jobs with Generated Source Code 100
Jobs with User-Written Source Code 101
Jobs Must Be Executed 102
Jobs Can Be Scheduled 102
Main Windows for Jobs 102
New Job Wizard 103
Process Designer Window 105
Process Editor Tab 107
Source Editor Tab 107
Log Tab 107
Output Tab 107
Process Library Tree 107
Additional Information about the Process Library Transformations
Java Transformations and SAS Code Transformations 109
Job Properties Window 109
Table Properties Window 110
Transformation Property Windows 111
Transformation Generator Wizard 112
General Tasks for Jobs 113
Creating and Running Jobs 113
Prerequisites 113
Check Out Any Metadata That Is Needed 113
Create and Populate the New Job 114
View or Update the Job as Needed 114
Run and Troubleshoot the Job 115
Verify the Job’s Outputs 115
Check In the Job 115
Working under Change-Management Control 116
Using the New Job Wizard 116
Using Source or Target Designers to Create Jobs 116
Creating Jobs That Retrieve User-Written Code 116
Viewing the Basic Metadata for a Job 117
Updating the Basic Metadata for a Job 117
Viewing the Data for a Source or a Target in a Job 117
Viewing the Metadata for a Table or Transformation in a Job 118
Updating the Metadata for a Table or Transformation in a Job 118
Impact of Updating a Table’s Metadata 119
Updating Column and Mapping Metadata 119
Running a Job 120
109
100
Overview of Jobs
4
Chapter 9
Deploy a Job for Scheduling 120
Example: Creating a SAS Code Transformation Template 120
Overview 120
Preparation 121
Start SAS ETL Studio and Open the Appropriate Metadata Profile 122
Display the Transformation Generator Wizard 122
Specify SAS Code for the Transformation Template 123
Define Any User-Defined Variables 124
Specify the Remaining Options for the Transformation Template 125
Save the Transformation Template 126
Document Any Usage Details for the Template 127
General Tasks for SAS Code Transformation Templates 128
Using a SAS Code Transformation Template in a Job 128
Identifying a SAS Code Transformation Template 128
Importing and Exporting SAS Code Transformations 128
Exporting a SAS Code Transformation 128
Importing a SAS Code Transformation 129
Controlling Access to a SAS Code Transformation 129
Deleting Folders for SAS Code Transformations 129
Additional Information about Jobs 130
Overview of Jobs
After you have entered metadata for sources and targets, you are ready to load the
targets in a data warehouse or data mart. This chapter gives an overview of SAS ETL
Studio jobs. Use the general steps in this chapter, together with the examples that are
described in the next chapter, to load targets in your data warehouse or data mart.
What Is a Job?
In SAS ETL Studio, a job is a metadata object that specifies processes that create
output. SAS ETL Studio uses each job to generate or retrieve SAS code that reads
sources and creates targets on a file system.
Jobs with Generated Source Code
If you want SAS ETL Studio to generate code for a job, you define a process flow
diagram that specifies the sequence of each source, target, and process in a job. In the
diagram, each source, target and process has its own metadata object.
For example, the following display shows the diagram for a job that will read data
from a source table called STAFF, sort the data, then write the sorted data to a target
table called Staff Sorted.
Introduction to SAS ETL Studio Jobs
4
Jobs with User-Written Source Code
101
Display 9.1 Simple Process Flow Diagram
In the display, each round object represents the metadata for a table, and each
square object represents the metadata for a process. Given the direction of the arrows
in the previous process flow diagram, STAFF specifies metadata for the source table.
SAS Sort specifies metadata for the sort process. Loader specifies metadata for a
process that loads data into the target table, Staff Sorted. The Staff Sorted object
specifies metadata for the Staff Sorted table.
Each process in a process flow diagram is specified by a metadata object called a
transformation. In the previous display, SAS Sort and Loader are transformations. A
transformation specifies how to extract data, transform data, or load data into data
stores. Each transformation that you specify in a process flow diagram generates or
retrieves SAS code.
Jobs with User-Written Source Code
SAS ETL Studio enables you to do the following:
3 Specify user-written code for an entire job or a transformation within a job. For a
summary of this task, see “Creating Jobs That Retrieve User-Written Code” on
page 116.
3 Drag a User-Written Code transformation template from the Process Library and
drop it into the process flow diagram for a job. You can then update the default
metadata for the transformation so that it specifies the location of user-written
program. For an overview of the Process Library and its transformation templates,
see “Process Library Tree” on page 107.
3 Use the Transformation Generator wizard to create your own SAS code
transformation templates and add them to the Process Library. After a
transformation template has been added to the Process Library, you can drag and
drop it into any job. For a description of this wizard, see “Transformation
Generator Wizard” on page 112.
102
Jobs Must Be Executed
4
Chapter 9
The online Help for SAS ETL Studio provides additional information about working
with user-written components. To display the relevant Help topics, do the following:
I Contents. The online Help
window displays.
2 In the left pane of the Help window, select SAS ETL Studio Task Reference I
Maintaining Jobs I User-Written Components and SAS ETL Studio.
1 From the SAS ETL Studio menu bar, select Help
Jobs Must Be Executed
After you have defined the metadata for a job, you can submit the job for execution.
Until you do that, the targets (output tables) might not exist on the file system. For a
description of this task, see “Running a Job” on page 120.
Jobs Can Be Scheduled
If the appropriate software has been installed, you can deploy a SAS ETL Studio job
for scheduling. After a job is deployed, an administrator can use SAS Management
Console to schedule the job to run at a specified date and time or when a specified event
occurs.
In SAS Management Console, administrators create and schedule groups of jobs,
called flows. Each job within a flow can be triggered to run based on a certain time, the
state of a file on the file system, or the status of another job within the flow. Platform
Computing’s Load Sharing Facility (LSF) is used to schedule the job.
Note: The Schedule Manager plug-in to SAS Management Console uses Platform
JobScheduler to schedule deployed jobs. However, if you select and deploy these jobs to
any workspace server location, they then will be written out to a SAS program file in a
directory that you specify. Then you can schedule them with any scheduler. These
alternative scheduling processes that do not use Platform JobScheduler are not
supported by SAS Technical Support. 4
The online Help for SAS ETL Studio provides details about deploying and scheduling
jobs. Perform these steps to display the relevant Help topics in SAS ETL Studio:
I Contents. The online Help
window displays.
2 In the left pane of the Help window, select SAS ETL Studio Task Reference I
Maintaining Jobs I Deploying a Job for Scheduling.
1 From the SAS ETL Studio menu bar, select Help
For scheduling setup and installation, administrators should see the SAS ETL Studio
chapter in the SAS Intelligence Platform: Planning and Administration Guide.
For details about using the Schedule Manager plug-in to SAS Management Console,
see the online Help for the Schedule Manager. See also the Managing Job Schedules
chapter in the SAS Management Console: User’s Guide.
Main Windows for Jobs
The following table lists the main windows and components that are used to
maintain jobs and tables in SAS ETL Studio. Each component is briefly described in
the sections that follow.
Introduction to SAS ETL Studio Jobs
4
New Job Wizard
103
Table 9.1 Jobs Interface
Component
Description
“New Job Wizard” on page 103
Enables you to select one or more tables as the
targets (outputs) of a job. Can also be used to
create an empty job into which you can drag and
drop tables and transformation templates.
“Process Designer Window” on page 105
Enables you to create process flow diagrams, to
generate and submit code for jobs, and to
perform related tasks.
“Process Library Tree” on page 107
Enables you to drag and drop transformation
templates into the process flow diagrams for jobs.
“Job Properties Window” on page 109
Enables you to view or update the basic
metadata for a job (metadata other than its
process flow diagram).
“Table Properties Window” on page 110
Enables you to view or update the metadata for
a source table or a target table, such as
metadata for its columns, indexes, keys, and
other attributes.
“Transformation Property Windows” on page 111
Enables you to view or update the metadata for
a transformation in the process flow diagram for
a job.
“Transformation Generator Wizard” on page 112
Enables you to create a user-written, SAS code
transformation and make it available in the
Process Library tree. This is one of the easiest
ways to customize SAS ETL Studio.
New Job Wizard
Use the New Job wizard to select one or more tables as the targets (outputs) of a job.
This wizard can also be used to create an empty job into which you can drag and drop
tables and transformation templates.
One way to display the New Job wizard is to select Tools I Process Designer from
the menu bar on the SAS ETL Studio desktop. The first window in the wizard is shown
in the following display.
104
New Job Wizard
4
Chapter 9
Display 9.2 New Job Wizard
The first window enables you to enter a name and description for the new job.
The second window of the wizard enables you to select one or more tables as the
targets (outputs) of a job, as shown in the following display.
Display 9.3 New Job Wizard, Second Window
The wizard uses the selected table(s) to generate a transformation template—a
process flow diagram that includes drop zones for metadata that the user must supply.
Introduction to SAS ETL Studio Jobs
4
Process Designer Window
105
For example, if the Staff Sorted table is selected as the target, the wizard would
generate the transformation template that is shown in the following display.
Display 9.4 Transformation Template for Sort Staff Job
To update a process flow diagram, drag and drop tables from the Inventory tree or
from another tree in the tree view. Drag and drop transformation templates from the
Process Library tree.
Alternatively, in the second window of the New Job wizard, you can select no targets
and simply click Finish after entering a name for the job. The wizard will open an
empty job in the Process Designer window. After you have an empty job, you can create
a process flow diagram by dragging and dropping tables and transformations into the
Process Designer window. This is the approach that is described in “Create and
Populate the New Job” on page 114.
Process Designer Window
Use the Process Designer window to perform these tasks:
3 Maintain the process flow diagram for the selected job.
3 View or update the metadata for sources, targets and transformations within the
selected job.
3 View or update the code that is generated for the entire selected job or for a
transformation within that job.
3 View a log that indicates whether code was successfully generated for the selected
job or for one of its transformations (and was successfully executed, if the code was
submitted for execution).
3 View any output that the selected job or one of its transformations sends to the
SAS output window.
106
Process Designer Window
4
Chapter 9
The following display shows a typical view of this window.
Display 9.5 Process Designer Window
In the previous display, the Process Designer window contains the process flow
diagram for the Sort Staff job that is described in “Jobs with Generated Source Code”
on page 100. Note that the Process Editor tab is shown by default. You might need
to use the Options window to display the other tabs in the Process Designer window or
to specify options for these tabs. For details, see “Options Window” on page 17.
The following steps describe one way to open an existing job in the Process Designer
window:
1 From the SAS ETL Studio desktop, display the Inventory tree.
2 In the Inventory tree, expand the Jobs group.
I View Job from the menu bar. The
process flow diagram for the job displays in the Process Editor tab of the
Process Designer window.
3 Select the desired job, then select View
If the diagram is too large to view in the Process Editor tab, select View I
Overview from the menu bar. A small image of the complete process flow diagram
displays in the Overview window.
To change the size or the orientation of the process flow diagram, select Process I
Zoomor Process I Layout from the menu bar.
The tabs in the Process Designer window are described in the following sections. To
display the online Help for each tab, select the tab and press the F1 key.
Introduction to SAS ETL Studio Jobs
4
Process Library Tree
107
Process Editor Tab
Use the Process Editor tab to add and maintain a process flow diagram for the
selected job. For a summary of how you can use the Process Editor to create a process
flow diagram for a job, see “Creating and Running Jobs” on page 113.
Source Editor Tab
Use the Source Editor tab to view or modify SAS code for the selected job. For
example, if the Sort Staff job was displayed in the Process Editor tab, and you
selected the Source Editor tab, code for the entire job would be generated and
displayed. The following display shows some of the code that would be generated for
the Sort Staff job.
Display 9.6 Source Editor Tab
Log Tab
Use the Log tab to view the SAS log that is returned from the code that was
submitted for execution. The Log tab can help you identify the cause of problems with
the selected job or transformation. For a summary of how you can use the Log tab, see
“Run and Troubleshoot the Job” on page 115.
Output Tab
Use the Output tab to view any printed output from a SAS program. For example,
SAS ETL Studio jobs that produce reports can specify that the reports are sent to the
Output tab.
Process Library Tree
The Process Library tree is one of the tabs in the tree view of the SAS ETL Studio
desktop. If you select this tab, it displays a collection of transformation templates. As
108
Process Library Tree
4
Chapter 9
shown in the following display, the templates are organized into folders, such as
Analysis, Data Transforms, Output, and Publish.
Display 9.7 Process Library Tree
A transformation template is a process flow diagram that includes drop zones for
metadata that the user must supply to make the transformation complete. A template
typically consists of a transformation object and one or more drop zones for sources,
targets, or both, as shown in the following display.
Display 9.8 SAS Sort Transformation Template
Introduction to SAS ETL Studio Jobs
4
Job Properties Window
109
There are several kinds of drop zones:
3 Dashed line boxes. Before a template is populated with the minimum sources and
targets, drop zones are indicated by dashed line boxes, as shown in the previous
display.
3 Lines between objects in a process flow diagram. After a template is populated
with the minimum sources and targets, drop zones are indicated by lines between
objects in the process flow diagram, as shown in Display 9.5 on page 106.
3 Transformation objects themselves. Transformations that can take multiple inputs
or outputs have drop zones on the transformation itself.
The SAS Sort template shown in the previous display could be used to create the
diagram that is shown in Display 9.5 on page 106. For a summary of how you can use
the Process Editor and the Process Library tree to create a process flow diagram for a
job, see “Create and Populate the New Job” on page 133.
Additional Information about the Process Library Transformations
For details about each standard transformation in the Process Library, including an
example of how each transformation can be used in a SAS ETL Studio job, see
“Additional Information about Jobs” on page 130.
Java Transformations and SAS Code Transformations
The Process Library tree contains two different kinds of transformation templates:
Java plug-in transformation templates and SAS code transformation templates.
Java plug-in transformation templates are created with the Java programming
language. Examples include most of the default templates in the Analysis folder, such
as SAS Sort and SAS Splitter. For details about creating your own Java plug-ins, see
Appendix 2, “Building Java Plug-ins for SAS ETL Studio,” on page 189.
SAS code transformation templates are created with the Transformation Generator
wizard. Examples include the default templates in the Output folder and the Publish
folder. With the exception of the User-Written Code template, which is a Java plug-in,
all other templates in the Process Library that have the user-written icon are SAS code
transformations.
SAS code transformations are unique in two ways:
3 When you right-click a SAS code transformation in the Process Library tree, the
pop-up menu has two unique options: Edit Source and Transformation Export.
3 You can easily add your own SAS code transformations to the Process Library tree,
where you can drag and drop them into the process flow diagram for any job.
For details about the Transformation Generator wizard, see “Transformation
Generator Wizard” on page 112. For details about working with SAS code
transformations, see “Example: Creating a SAS Code Transformation Template” on
page 120 and “General Tasks for SAS Code Transformation Templates” on page 128.
Job Properties Window
Use the properties window for a job to view or update its basic metadata. For
example, you can specify whether the code for the current job will be generated by SAS
ETL Studio or will be retrieved from a specified location. You can also use this window
to specify code that should be run before or after a job executes. The following display
shows a typical window.
110
Table Properties Window
4
Chapter 9
Display 9.9 Job Properties Window
If you want to specify user-written code for the Sort Staff job that is described in
“Jobs with Generated Source Code” on page 100, you can enter metadata that is similar
to the metadata that is shown in the previous display. In the job properties window
shown in the previous display, the User Written option has been selected, and the
physical path to a source code file has been specified.
If you wanted to execute code before or after the Sort Staff job is executed, you can
click the Pre and Post Process tab and specify the code. For example, you might
want to issue a SAS LIBNAME statement before the job is run.
For a summary of how to use the job properties window, see “Viewing the Basic
Metadata for a Job” on page 117 and “Updating the Basic Metadata for a Job” on page
117.
Table Properties Window
Use the table properties window for a source or a target to view or update the
metadata for its columns, indexes, keys and other attributes. The following display
shows a typical window.
Introduction to SAS ETL Studio Jobs
Display 9.10
4
Transformation Property Windows
111
Table Properties Window
The window shown in the previous display contains the metadata for the Staff Sorted
table from Display 9.1 on page 101. For a summary of how to use this window in the
context of a job, see “Viewing the Metadata for a Table or Transformation in a Job” on
page 118 and “Updating the Metadata for a Table or Transformation in a Job” on page
118.
Transformation Property Windows
Use a transformation properties window to view or update the metadata for a process
in a job. The metadata for a transformation specifies how SAS ETL Studio will
generate code for the corresponding process. The window for each kind of
transformation has one or more tabs that are unique to the corresponding process. The
following display shows a typical window.
112
Transformation Generator Wizard
Display 9.11
4
Chapter 9
Transformation Properties Window
The window shown in the previous display contains the metadata for the SAS Sort
transformation from Display 9.1 on page 101. Note that the rows in the output table for
this transformation will be sorted by employee ID. For a summary of how to use
transformation property windows, see “Viewing the Metadata for a Table or
Transformation in a Job” on page 118 and “Updating the Metadata for a Table or
Transformation in a Job” on page 118.
Transformation Generator Wizard
One of the easiest ways to customize SAS ETL Studio is to write your own SAS code
transformation templates. Unlike Java-based plug-ins that require software
development, SAS code transformation templates are created with a wizard.
The Transformation Generator wizard guides you through the steps of specifying
SAS code for a transformation template and saving the template to the current
metadata repository. After the template is saved, it is displayed in the Process Library
tree, where it is available for use in any job.
To display the Transformation Generator wizard, go to the SAS ETL Studio desktop,
then select Tools I Transformation Generator from the menu bar. The general
information window of the wizard is displayed, as shown in the following display.
Introduction to SAS ETL Studio Jobs
Display 9.12
4
Creating and Running Jobs
113
General Information Window, Transformation Generator Wizard
The general information window enables you to enter a name and description for the
new transformation template. It also enables you to specify the folder where the new
template will appear in the Process Library tree.
For details about using the Transformation Generator wizard, see “Example:
Creating a SAS Code Transformation Template” on page 120.
General Tasks for Jobs
Creating and Running Jobs
Here is a summary of the main tasks for creating and running jobs. For examples
that illustrates all of these tasks, see Chapter 10, “Loading Warehouse Data Stores,” on
page 131.
Prerequisites
It is easier to create a job if metadata for the sources and targets in the job are
created first. For details about these tasks, see Chapter 7, “Specifying the Inputs to
Warehouse Data Stores,” on page 71 and Chapter 8, “Specifying Warehouse Data
Stores,” on page 89.
Check Out Any Metadata That Is Needed
You must check out the metadata for any existing sources and targets that you want
to add to a job.
1 On the SAS ETL Studio desktop, select the Inventory tree.
114
Creating and Running Jobs
4
Chapter 9
2 In the Inventory tree, open the Tables folder.
3 Select all source tables and target tables that you want to add to the new job, then
select Project I Check Out. The metadata for these tables will be checked out
and will appear in the Project tree.
The next task is to create and populate the job.
Create and Populate the New Job
With the relevant sources and targets checked out in the Project tree, follow these
steps to create and populate a new job. To populate a job, you will create a complete
process flow diagram, from sources, through transformations, to targets.
I Process Designer from the
menu bar. The New Job wizard displays. (You can use this wizard to create an
empty job, into which you can drag and drop tables and transformations. That is
the approach that is described here.)
1 From the SAS ETL Studio desktop, select Tools
2 Enter a name for the job and click Finish .
3 An empty job will open in the Process Designer window.
4 Add metadata for sources, targets, and transformations as needed. The goal is to
create a complete process flow diagram, from sources, through transformations, to
targets. Drag and drop transformation templates from the Process Library tree.
Drag and drop tables from the Inventory tree or from another tree in the tree
view. If you try to drop an object in a zone where it is invalid, an error message
will be written to the Status bar at the bottom of the SAS ETL Studio desktop.
As you add sources, targets, and transformations to a process flow diagram, SAS ETL
Studio automatically maps source columns to target columns. Depending on the nature
of the job, you might or might not need to update the automatic column mappings or
the other default metadata in a job.
The next task is to view or update the job, as needed.
View or Update the Job as Needed
The following steps describe a general approach for viewing or updating the default
metadata in a job. The specific updates will vary according to the sources, targets, and
transformations in a job and the purpose of the job. The examples in Chapter 10,
“Loading Warehouse Data Stores,” on page 131 describe two scenarios in which a few,
specific updates are needed to the automatic column mappings and the other default
metadata in a job.
1 In the Process Designer window, select the first source in the flow, then select File
I Properties from the menu bar. A properties window displays.
2 Click the Columns tab to confirm that the needed columns are present. Add,
delete, or replace columns as necessary. Repeat these steps for each source and
target in the job, as needed. For details about updating column metadata, click
the Help button on the Columns tab. See also “Updating Column and Mapping
Metadata” on page 119.
3 In the Process Designer window, select the first transformation in the flow, then
select File
I Properties from the menu bar. A properties window displays.
4 Update the transformation as necessary to achieve the purpose of the job. Be sure
to display the Mapping tab for the transformation to be sure that data flows
correctly through the transformation. As needed, repeat these steps for each
transformation in the job, working from working in a source-to-target direction.
Introduction to SAS ETL Studio Jobs
4
Creating and Running Jobs
115
For details about updating mapping metadata, click the Help button on the
Mapping tab. See also “Updating Column and Mapping Metadata” on page 119.
When all metadata in the job is correct, the next task is to run the job.
Run and Troubleshoot the Job
After the metadata for a job is complete, you must submit the job for execution in
order to create targets on the file system.
I Submit
from the menu bar. SAS ETL Studio generates code for the job and submits the
code to a SAS application server. The server executes the code. A pop-up window
is displayed to indicate that the job is running.
1 With the job displayed in the Process Designer window, select Process
2 If a pop-up error message appears, or if you simply want to look at the log for the
completed job, click the Log tab in the Process Designer window.
3 In the Log tab, scroll through the SAS log information that was generated during
the execution of the job. (The code that was executed for the job is available in the
Source Code tab of the Process Designer window. The source code is continuously
updated as you make changes to the job, and it is checked and updated as
necessary when you submit the job.)
4 If you find errors in the source code for a step, select the corresponding
transformation in the process flow diagram, then select File
the menu bar. A properties window displays.
I Properties from
5 Correct the metadata and resubmit the job until there are no more errors.
6 After the job runs without error, save the job. Select File
bar.
I Save from the menu
The next task is to verify that the job created the correct output.
Verify the Job’s Outputs
After the job runs without error and has been saved, you should confirm that the
targets contain the data you need, in the format that best communicates the purpose of
the targets.
1 To view the data for a target in the job’s process flow diagram, select the desired
target, then select View I View Data from the menu bar. The data in the target
is displayed. Confirm that the correct data is displayed and that the data is
correctly formatted for the purpose of the target.
If a target needs to be improved, change the properties of that target or the
transformations that feed data to that target. If the outputs are correct, and you are
working in a change-managed repository, you can check in the job.
Check In the Job
Perform these steps to check in a job in the Project tree:
1 In the Project tree, select the repository icon.
I Check In Repository from
the menu bar. All of the objects in the Project repository are checked in to the
change-managed repository.
2 On the SAS ETL Studio desktop, select Project
116
Working under Change-Management Control
4
Chapter 9
Working under Change-Management Control
Unless your user profile includes administrative privileges, you will be working
under change management control. For a general description of how change
management affects user tasks in SAS ETL Studio, see “Working with Change
Management” on page 64.
When working with jobs, the main impacts of change management are as follows:
1 To update an existing job, you must check out the job.
2 When you check out a job, the metadata that is associated with the job will be
checked out and will appear in the Project tree. The metadata that will be checked
out includes the metadata object for the job as a whole and the metadata objects
for any sources and targets that have been added to the job.
3 You must check out any existing sources and targets that you want to add to a job.
4 Metadata for new objects such as jobs, sources, and targets is added to the Project
tree. At some point, you must check in new objects to the change-managed
repository.
Using the New Job Wizard
See “New Job Wizard” on page 103.
Using Source or Target Designers to Create Jobs
Most source designers and target designers do not create jobs, but some do. The
External File source designer and the Cube Designer create and execute jobs. The
metadata for the job is saved so that you can run it as desired—to refresh the data in
the target, for example.
For details about using the External File source designer, see “Example: Extracting
Information from a Flat File” on page 78.
For details about using the Cube Designer, see “Example: Building a Cube from a
Star Schema” on page 164.
Creating Jobs That Retrieve User-Written Code
When you create a job, SAS ETL Studio will generate code for that job unless you
specify otherwise. This generated code will often suffice, but in some cases, you might
want to specify user-written code for a whole job or for transformations in a job.
In order to track the jobs in a data warehouse, it is best to capture as much metadata
as possible about a job, even if the job is handled by user-written code. Accordingly, a
good way to specify user-written code for a job is to use SAS ETL Studio wizards to
create a job as usual, then update the properties for the whole job or for transformations
within the job so that the metadata specifies the location of user-written code.
The general steps for doing this are as follows:
1 Use SAS ETL Studio wizards to create a job.
2 Display the properties window for the job or for a transformation within a job.
Follow the instructions in “Updating the Basic Metadata for a Job” on page 117 or
“Updating the Metadata for a Table or Transformation in a Job” on page 118.
3 In the properties window for the job or a transformation within the job, click the
Process tab.
Introduction to SAS ETL Studio Jobs
4
Viewing the Data for a Source or a Target in a Job
117
4 On the Process tab, specify the location of user-written code.
The online Help for SAS ETL Studio provides more details about user-written code
for jobs and transformations. To display the relevant Help topics:
1 From the menu bar on the SAS ETL Studio desktop, select Help
The online Help window displays.
I Contents.
I User-Written
I Understanding User-Written Source
2 In the left pane of the Help window, select Task Overviews
Components and SAS ETL Studio
Code for Jobs.
Viewing the Basic Metadata for a Job
Use the property window for a job to view its basic metadata. For example, you can
find out if user-written code has been specified for the entire job, or if any code is
supposed to run before or after the job.
1 From the SAS ETL Studio desktop, display the Inventory tree.
2 In the Inventory tree, expand the Jobs folder.
I Properties from the menu bar. A
properties window for the job is displayed.
3 Select the desired job, then select File
4 Use the tabs in this window to view the metadata for the jobs. Each tab has its
own Help button.
Updating the Basic Metadata for a Job
Use the property window for a job to update its basic metadata. For example, you
can specify user-written code for the entire job, or you can specify code that should be
run before or after the job. Assume that the metadata for the job is currently checked
into a change-managed repository.
1 On the SAS ETL Studio desktop, select the Inventory tree.
2 In the Inventory tree, open the Jobs folder.
I Check Out. The metadata that is
associated with the job will be checked out and will appear in the Project tree. The
metadata that will be checked out includes the metadata object for the job as a
whole and the metadata objects for any sources and targets that have been added
to the job.
3 Select the desired job, then select Project
4 In the Project tree, select the metadata for the job, then select File
from the menu bar. The properties window for the job displays.
I Properties
5 Use the tabs in this window to update the metadata for the job. Each tab has its
own Help button.
6 When you are finished updating the metadata, you can check in your changes. In
the Project tree, select the repository icon.
7 From the menu bar on the SAS ETL Studio desktop, select Project
Repository.
I Check In
Viewing the Data for a Source or a Target in a Job
After the metadata for a source table or a target table has been added to a job, you
might want to verify that the corresponding physical table contains the data that you
118
Viewing the Metadata for a Table or Transformation in a Job
4
Chapter 9
were expecting. Perform the following steps to view the data that corresponds to the
metadata for a source or a target.
Note: The metadata for a target might not point to a physical table until after the
target’s job has been run for the first time. Before the first run, new target tables might
exist as metadata only. 4
The following steps describe one way to view the data for a source or a target in the
process flow diagram for a job:
1 From the SAS ETL Studio desktop, display the Inventory tree.
2 In the Inventory tree, expand the Jobs folder.
I View Job from the menu bar. The
process flow diagram for the job displays in the Process Editor tab of the
Process Designer window.
4 To view the data for a source or a target in the process flow diagram, select the
desired source or target, then select View I View Data from the menu bar. The
data in the source or target is displayed. If the data is correctly displayed, the
metadata for the source or target is correct.
3 Select the desired job, then select View
Viewing the Metadata for a Table or Transformation in a Job
To view the metadata for a data store or a transformation in the process flow
diagram for a job, perform the following steps:
1 From the SAS ETL Studio desktop, display the Inventory tree.
2 In the Inventory tree, expand the Jobs folder.
3 Select the desired job, then select View I View Job from the menu bar. The
process flow diagram for the job displays in the Process Editor tab of the
Process Designer window.
4 To view the metadata for a data store or transformation in the process flow
diagram, select the desired object, then select File I Properties from the menu
bar. A properties window for the object is displayed.
5 Use the tabs in this window to view the metadata for the object. Each tab has its
own Help button.
Updating the Metadata for a Table or Transformation in a Job
Perform the following steps to update the metadata for a data store or
transformation in a job. Assume that the metadata for the job is currently checked into
a change-managed repository.
1 On the SAS ETL Studio desktop, select the Inventory tree.
2 In the Inventory tree, open the Jobs folder.
I Check Out. The metadata that is
associated with the job will be checked out and will appear in the Project tree. The
metadata that will be checked out includes the metadata object for the job as a
whole and the metadata objects for any data stores that have been added to the job.
4 In the Project tree, select the metadata for the job, then select View I View Job
from the menu bar. The process flow diagram for the job displays in the Process
Editor tab of the Process Designer window.
3 Select the desired job, then select Project
Introduction to SAS ETL Studio Jobs
4
Updating the Metadata for a Table or Transformation in a Job
119
5 To update the metadata for a data store or transformation in the process flow
diagram, select the desired object, then select File I Properties from the menu
bar. A properties window for the object is displayed.
6 Use the tabs in this window to update the metadata for the object. Each tab has
its own Help button.
7 When you are finished updating the metadata, you can check in your changes. In
the Project tree, select the repository icon.
8 From the menu bar on the SAS ETL Studio desktop, select Project I Check In
Repository.
Impact of Updating a Table’s Metadata
Keep in mind that a table, such as a source table or a target table, can be used in
multiple jobs. A table can also be used in multiple places in the same job. Accordingly,
when you update the metadata for a table, make sure that the updates are appropriate
in all contexts where the metadata is used. For example, if you update the columns for
Table 1 in one job, the updates would also have to be appropriate for Table 1 in the
context of another job.
Updating Column and Mapping Metadata
In general, perform the following steps to update the column metadata or mapping
metadata in a job. Assume that the metadata for the job is currently checked into a
change-managed repository.
1 On the SAS ETL Studio desktop, select the Inventory tree.
2 In the Inventory tree, open the Jobs folder.
I Check Out. The metadata that is
associated with the job will be checked out and will appear in the Project tree. The
metadata that will be checked out includes the metadata object for the job as a
whole and the metadata objects for any sources and targets that have been added
to the job.
In the Project tree, select the metadata object for the job, then select View I View
Job from the menu bar. The process flow diagram for the job is displayed in the
Process Editor tab of the Process Designer window.
In the Process Designer window, select the table whose columns you want to
update, or select the transformation whose mappings you want to update. Then
select File I Properties from the menu bar. The properties window for the table
or transformation displays
For a table, click the Columns tab. Update the columns as needed. For a
transformation, click the Mappings tab. Update the mappings as needed. Click
the Help button on each tab to see topics that describe how to edit columns and
mappings.
After making your changes, make sure that source columns are correctly mapped
through the job. For one-to-one mappings , the column lengths and data types for
the source and target columns must match. For derived mappings (mappings in
which the target column is a function of the source column), the column lengths
and data types for the source and target columns might be different.
To verify that the updated columns are correctly mapped through the job,
display the property windows for tables and transformations that follow the
updated table. For tables, review the metadata in the Columns tab. For
transformations, review the metadata in the Mapping tab. Make updates as
needed. Each tab has its own Help button.
3 Select the desired job, then select Project
4
5
6
7
120
Running a Job
4
Chapter 9
8 When you are finished updating the metadata, you can check in your changes. In
the Project tree, select the repository icon.
9 From the menu bar on the SAS ETL Studio desktop, select Project
Repository.
I Check In
Running a Job
After you define the metadata for a job, you must submit the job for execution in
order to create targets on the file system.
If the job to be submitted is displayed in the Process Designer window, select
Process I Submit from the menu bar. The job is submitted to the default SAS
application server and to any server that is specified in the metadata for a
transformation within the job.
If the job to be submitted is not displayed in the Process Designer window, perform
the following steps:
1 From the SAS ETL Studio desktop, display the Inventory tree.
2 In the Inventory tree, expand the Jobs folder.
I View Job from the menu bar. The
process flow diagram for the job displays in the Process Editor tab of the
Process Designer window.
4 Select Process I Submit from the menu bar. The job is submitted for execution.
3 Select the desired job, then select View
Deploy a Job for Scheduling
If the appropriate software has been installed, you can deploy a SAS ETL Studio job
for scheduling. After a job is deployed, an administrator can use SAS Management
Console to schedule the job to run at a specified date and time or when a specified event
occurs. For details, see “Jobs Can Be Scheduled” on page 102.
Example: Creating a SAS Code Transformation Template
This example demonstrates how to create a user-written SAS code transformation
template.
Overview
As described in “Transformation Generator Wizard” on page 112, one of the easiest
ways to customize SAS ETL Studio is to write your own SAS code transformation
templates. The Transformation Generator wizard guides you through the steps of
specifying SAS code for a transformation template and saving the template in the
current metadata repository. After a template is saved, it is displayed in the Process
Library tree, where it is available for use in any job.
The Transformation Generator wizard is used to create custom SAS code
transformation templates. The wizard enables you to enter the SAS code that runs
when the template is executed as part of a job. This code typically includes macro
variables. When you use a macro variable, the person who configures the job in which
the template appears must specify the value of the variable, and SAS ETL Studio
generates the %let statement that creates the variable and assigns a value to it.
Introduction to SAS ETL Studio Jobs
4
Preparation
121
The rules for writing SAS code transformations templates are as follows:
3 A template can have 0 or 1 input tables or transformation objects and 0 or 1
output tables or transformation objects.
3 You cannot use hard-coded names for the input or output.
3 The code that is entered must have valid SAS syntax.
Preparation
For this example, assume that a SAS data set called TigersHitting2002 contains
batting statistics for a baseball team. The following display shows the content and
structure of this data set.
Display 9.13
Contents of Data Set TigersHitting2002
The goal is to create a transformation template that takes a data set such as
TigersHitting2002 as input and produces a report. The report will display a user-defined
title, a user-defined set of columns, and it will calculate the sum of the values in one
column of the table. The following display shows the kind of output that is desired.
Display 9.14
Example Hitting Statistics Report
Assume the following about the current example:
3 The main metadata repository is under change-management control. In this
example, however, assume that an administrator is creating the new template, so
the template would be added to directly to the Process Library tree, without
having to be checked in. For details about change management, see “Working with
Change Management” on page 64.
3 You have selected a default SAS application server for SAS ETL Studio, as
described in “Select a Default SAS Application Server” on page 59.
122
Start SAS ETL Studio and Open the Appropriate Metadata Profile
4
Chapter 9
Start SAS ETL Studio and Open the Appropriate Metadata Profile
Perform the following steps to begin work in SAS ETL Studio:
1 Start SAS ETL Studio.
2 Open the appropriate metadata profile. For the current example, the metadata
profile would be for an administrator who has the appropriate level of privilege to
directly update metadata in the main metadata repository, without having to work
through a project repository.
The next task is to display the Transformation Generator wizard.
Display the Transformation Generator Wizard
Perform the following steps to display the wizard that will guide you through the
process of creating a user-defined SAS code transformation template.
I Transformation Generator
from the menu bar. The first window of the wizard is displayed, as shown in the
following display.
1 From the SAS ETL Studio desktop, select Tools
Display 9.15
First Window in the Transformation Generator Wizard
2 Enter a name and a description for the new transformation template, as shown in
the previous display.
3 Specify the folder in the Process Library tree in which you want to store the new
transformation. You do this by specifying a relative path from the Process Library
folder to the directory that will hold the transformation. If the path contains two
Introduction to SAS ETL Studio Jobs
4
Specify SAS Code for the Transformation Template
123
or more directory levels, separate directory level names with a period. For
example, UserDefined.Reports
4 When you are finished with this window, click Next .
The next task is to specify SAS code for this transformation.
Specify SAS Code for the Transformation Template
In the SAS Code window of the wizard, enter SAS code for the transformation
template. The following display shows the code that could be entered for the current
example.
Display 9.16
SAS Code Window
A number of macro variables appear in the code. The variable &SYSLAST is a
system variable that refers to the last data set created. The &SYSLAST variable
enables a transformation in a process flow diagram to use the output from the previous
transformation.
Another system variable, &_OUTPUT, is also available, but we have not used it in
this example. &_OUTPUT enables a transformation in a process flow diagram to send
its output to a temporary work table.
The other variables that are shown in the previous display, such as
&ColumnsToPrint, are user-defined variables. Any user-defined variables must be
defined in the SAS Code Options window.
After you have finished writing your SAS code, click Next .
124
Define Any User-Defined Variables
4
Chapter 9
Define Any User-Defined Variables
In the SAS Code Options window of the wizard, define any user-defined variables
that you used in the SAS Code window. The following table shows the values that would
be entered for the user-defined variables that are shown Display 9.16 on page 123.
Table 9.2 User-Defined Variables from the SAS Code Window
Option Name
Macro Variable
Description
Type
Home runs
HomeRuns
Home runs hit
OPTION
Columns to print
ColumnsToPrint
Name of the columns
to print
INPUTS SAS
Report title
ReportTitle
Title of the report
OPTION
The following display shows the SAS Code Options window after the values in the
previous table have been entered.
Display 9.17
SAS Code Options Window
The SAS Code Options window enables you to specify five types of variables:
3 OPTION
3 INPUTS SAS
3 INPUTS SQL
3 OUTPUTS SAS
3 OUTPUTS SQL
The variables that you define in the SAS Code Options window will be used in the
transformation template that you are creating. For example, variables of type OPTION
Introduction to SAS ETL Studio Jobs
4
Specify the Remaining Options for the Transformation Template
125
will appear on the Options tab of the properties window for the PrintHittingStatistics
template. Users will display the Options tab of the window and enter values for each
option.
The INPUTS and OUTPUTS variables will appear on the Column Options tab of the
properties window for the transformation template that you are creating. For example,
users will display the Column Options tab of the properties window for the
PrintHittingStatistics template and select columns that correspond to the
ColumnsToPrint variable of type INPUTS SAS.
To define any user-defined variables that you used in the SAS Code Options window,
perform the following steps for each variable:
1 Click the New button. A new row displays in the options table.
2 In the Option Name field, enter a descriptive name. Replace the initial value
(Untitled). Double-click the value to highlight it, then type over the highlighted
value.
3 In the Macro Variable field, enter the name of the macro variable as it appears
in the SAS Code Options window.
4 In the Description field, enter a description of the variable.
5 In the Type field, double-click the current value. A down arrow displays. Click the
down arrow to reveal a list of types, and select one of them.
When you are finished defining the user-defined variables in your transformation,
click Next .
Specify the Remaining Options for the Transformation Template
Use the Transform Options window to specify the remaining options for your
transformation template. The Transform Options window for the example
transformation resembles the following display.
126
Save the Transformation Template
Display 9.18
4
Chapter 9
Transform Options Window
Use the controls that are described as follows:
Register transform to metadata server—Select this check box if you want to
save your transformation as a metadata object in the current metadata repository. Do
this if you want the transformation template to be available in the Process Library tree.
For this example, assume that this option is selected.
Save transform to a local file—Select this check box if you want to save your
transformation as an XML file on the local file system. Other SAS ETL Studio users
can imported transformations that are saved this way.
File—The name of, and path to, the XML file that was previously described.
Generate SYSLAST for this step—Determines whether the &SYSLAST macro
variable is available to your code. Leave this check box selected unless your
transformation does not require any input.
This transform displays an output template—If you select this check box,
when a user drags your transformation to a process flow diagram, the template
displayed includes a drop zone for an output table or transformation.
Prompt—Specifies the text that you want displayed in the output drop zone.
This transform displays an input template—If you select this check box,
when a user drags your transformation to a process flow diagram, the template
displayed includes a drop zone for an input table or transformation.
Prompt—Specifies the text that you want displayed in the input drop zone.
When you are finished defining options for your transformation, click Next .
Save the Transformation Template
Use the Wizard Finish window to review the metadata that you have entered. When
you are satisfied, click Finish . The transformation is created and saved in your
metadata repository or an XML file (or both), as specified in Display 9.18 on page 126.
Introduction to SAS ETL Studio Jobs
4
Document Any Usage Details for the Template
127
For this example, assume that the SAS code transformation was saved to the current
metadata repository. The template will now be visible in the Process Library tree, as
specified in Display 9.12 on page 113. The following display illustrates the updated
Process Library tree.
Display 9.19
Process Library Tree With User-Defined Transformation Template
The new template, PrintHittingStatistics, can now be used to create a job, as
described in “Example: Using a SAS Code Transformation Template in a Job” on page
155.
Document Any Usage Details for the Template
The person who creates a user-written transformation template should document
how it can be used to get the desired result. SAS ETL Studio users would need to know
the following:
3 Any requirements for inputs and outputs.
For example, the columns in the source table for the PrintHittingStatistics
template are assumed to be similar to the columns that are shown in Display 9.13
on page 121.
3 Where the template sends its output: to a table, to the Output tab in the Process
Designer window, or elsewhere.
3 How to specify any values that are required by the template.
For example, to produce the report that is shown in Display 9.14 on page 121, a
title must be specified, a set of columns must be selected from the source, and the
sum of the values in the HR column must be calculated.
128
General Tasks for SAS Code Transformation Templates
4
Chapter 9
General Tasks for SAS Code Transformation Templates
Using a SAS Code Transformation Template in a Job
See “Example: Using a SAS Code Transformation Template in a Job” on page 155.
Identifying a SAS Code Transformation Template
SAS provides a number of SAS code transformation templates in the Process Library
tree. Perform the following tasks to identify a transformation as a SAS code
transformation:
1 From the SAS ETL Studio desktop, display the Process Library tree.
2 Open the folders to display the transformations. Right-click a transformation to
display a pop-up menu. SAS code transformations have two unique pop-up menu
options: Edit Source and Transformation Export.
The Edit Source option enables you to edit the SAS code for the selected
transformation. For details about transformation export, see “Importing and Exporting
SAS Code Transformations” on page 128.
Importing and Exporting SAS Code Transformations
The Transformation Generator wizard enables you to save a SAS code transformation
in one of two ways. First, you can save it as a metadata object in your metadata
repository. Such a transformation is said to be imported because it is ready for use in a
SAS ETL Studio job. Second, you can save a SAS code transformation as an XML file.
Such a transformation is said to be exported because it is not available for use in jobs.
The export feature enables you to create a custom transformation template and make it
available to SAS ETL Studio users who are using different metadata repositories.
The following sections explain how to export a transformation at the time you define
it, how to export a transformation that is currently registered in your metadata
repository, and how to import a transformation from an XML file and register it in the
current metadata repository.
Exporting a SAS Code Transformation
As previously described, you can export a SAS code transformation at the time you
create it or at a later time.
Perform these steps to export a new transformation when you are creating it:
1 Create the transformation using the Transformation Generator wizard, as
described in “Example: Creating a SAS Code Transformation Template” on page
120.
2 In the Transform Options window, select Save transform to a local file, and
enter a filename in the File text box. When you have finished running the wizard,
the SAS code transformation is saved in XML format in the file you specified.
Introduction to SAS ETL Studio Jobs
4
Deleting Folders for SAS Code Transformations
129
Perform these steps to export a transformation that already exists in your metadata
repository:
1 Select the SAS code transformation in the Process Library tree.
2 From the SAS ETL Studio desktop, select Tools I Transformation Export from
the menu bar. The Export Transform window displays.
3 Enter a filename for the XML file in the File name text box.
4 Click OK to export the transformation.
Importing a SAS Code Transformation
Perform these steps to import a SAS code transformation that has been saved in an
XML file:
I Transformation Import from
the menu bar. The Transformation Importer window displays. Build a list of XML
files to import by performing the following steps one or more times.
2 Click Add . An Import Transform window appears.
3 Browse for and select an XML file that represents a transformation, and click OK .
4 Click OK in the Transform Importer window to import the transformations.
1 From the SAS ETL Studio desktop, select Tools
Controlling Access to a SAS Code Transformation
As described in “Planning Security for a Data Warehouse” on page 26, administrators
should develop a security plan for controlling access to libraries, tables, and other
resources that are associated with a data warehouse. Part of the security plan might be
to allow only certain users to use a SAS code transformation. This security must be set
up using SAS Management Console.
Perform these steps to apply security to a SAS code transformation:
1 Start SAS Management Console. Open the metadata profile that contains the SAS
code transformation for which access privileges must be defined.
2 Select Environment Management I Authorization Manager I Resource
Management I By Type I Prototype from the navigation tree.
3 In the Prototype list, select the transformation for which you want to provide
security, then select File I Properties from the menu bar. The properties
window for the selected prototype displays.
4 From the properties window, click the Authorization tab.
5 Use the Authorization tab to define security for the transformation. Click the
Help button on the tab for details.
Deleting Folders for SAS Code Transformations
As described in “Transformation Generator Wizard” on page 112, when you create a
SAS code transformation template, you can specify a folder for that template in the
Process Library tree. For example, in Display 9.12 on page 113, the UserDefined folder
in the Process Library will contain a subfolder, Reports, which will contain the SAS
code template, PrintHittingStatistics.
You cannot directly delete a folder that contains SAS code transformation templates.
You must delete the templates in the folder, then exit SAS ETL Studio. The next time
that you open the Process Library, the folder will be gone.
130
Additional Information about Jobs
4
Chapter 9
Perform these steps to delete a folder that contains SAS code transformation
templates:
1 In the Process Library tree, delete all SAS code transformation templates in the
folder. To delete a template, select its icon, then select Edit I Delete from the
menu bar. (You cannot delete Java transformation templates.)
2 Exit SAS ETL Studio.
3 Start SAS ETL Studio and view the Process Library tree. The empty folder is no
longer in the Process Library tree.
Additional Information about Jobs
The online Help for SAS ETL Studio provides additional information about how to
maintain jobs. Perform these steps to display the relevant Help topics:
1 From the SAS ETL Studio menu bar, select Help
window displays.
2 In the left pane of the Help window, select Jobs
I Contents. The online Help
I Maintaining Jobs.
The Process Library contains a number of templates that can be used to build jobs.
To display a description of the standard transformations that are available in the
Process Library, perform the following steps:
1 From the SAS ETL Studio menu bar, select Help
window displays.
I Contents. The online Help
2 In the left pane of the Help window, select SAS ETL Studio Desktop
Library Tree.
I Process
To display examples that illustrate how the Process Library templates can be used in
a SAS ETL Studio job, perform the following steps:
1 From the SAS ETL Studio menu bar, select Help
window displays.
I Contents. The online Help
2 In the left pane of the Help window, select Examples
Examples.
I Process Library
131
CHAPTER
10
Loading Warehouse Data Stores
Jobs: Process Flows That Load Warehouse Data Stores 131
Example: Creating a Job That Joins Two Tables and Generates a Report
Preparation 132
Start SAS ETL Studio and Open the Appropriate Metadata Profile
Check Out Any Metadata That Is Needed 132
Create and Populate the New Job 133
Configure the SQL Join Transformation 137
Configure the Columns in the Target and the Loader 140
Configure the Publish to Archive Transformation 141
Run and Troubleshoot the Job 142
Verify the Job’s Outputs 143
Check In the Job 145
Example: Using Slowly Changing Dimensions 145
Preparation 145
Create and Populate the Job 145
Configure ORGANIZATION_DIM 148
Configure the SCD Type 2 Loader 150
Run the Job and View the Results 154
Check In the Job 155
Example: Using a SAS Code Transformation Template in a Job 155
Preparation 155
Start SAS ETL Studio and Open the Appropriate Metadata Profile
Check Out Any Metadata That Is Needed 156
Create and Populate the New Job 156
Update the Template as Necessary 158
Run and Troubleshoot the Job 159
Verify the Job’s Outputs 160
Check In the Job 160
132
132
156
Jobs: Process Flows That Load Warehouse Data Stores
After you have specified the metadata for one or more sources and targets, you can
specify metadata for the job that will read the appropriate sources and create the
desired targets on a file system. Use the examples in this chapter, together with the
general steps that are described in Chapter 9, “Introduction to SAS ETL Studio Jobs,”
on page 99, to create jobs that will create and load the desired targets.
132
Example: Creating a Job That Joins Two Tables and Generates a Report
4
Chapter 10
Example: Creating a Job That Joins Two Tables and Generates a Report
This example demonstrates one way to use the New Job wizard, the Process Library,
and the Process Designer window to enter metadata for a job. The example describes
one way to create a report that is needed for the example data warehouse, as described
in “Example: Creating a SAS Code Transformation Template” on page 120.
Preparation
Assume the following about the job in the current example:
3 A data warehouse project plan identified the need for a report that ranks
salespeople by total sales revenue. The report will be produced by a SAS ETL
Studio job. The job will combine sales information with human resources
information. A total revenue number will be summarized from individual sales. A
new target table will be created, and that table will be used as the source for the
creation of an HTML report.
3 Metadata for both source tables in the job (ORGANIZATION_DIM and
ORDER_FACT) is available in a current metadata repository.
3 Metadata for the main target table in the job (Total_Sales_By_Employee) is
available in a current metadata repository. “Example: Using the Target Table
Designer to Enter Metadata for a SAS Table” on page 89 describes how the
metadata for this table could be specified. As described in that section, the
columns in Total_Sales_By_Employee were modeled after the columns in one
source table, ORGANIZATION_DIM. However, when the job is fully configured in
this example, the Total_Sales_By_Employee table will contain selected columns
from both source tables: ORGANIZATION_DIM and ORDER_FACT.
3 All sources and targets are in SAS format and are stored in a SAS library called
Ordetail.
3 Metadata for the Ordetail library has been added to the main metadata repository
for the example data warehouse. For details about libraries, see “Enter Metadata
for Libraries” on page 44.
3 The main metadata repository is under change-management control. For details
about change management, see “Working with Change Management” on page 64.
3 You have selected a default SAS application server for SAS ETL Studio, as
described in “Select a Default SAS Application Server” on page 59.
Start SAS ETL Studio and Open the Appropriate Metadata Profile
Perform the following steps to begin work in SAS ETL Studio:
1 Start SAS ETL Studio as described in “Start SAS ETL Studio” on page 56.
2 Open the appropriate metadata profile as described in “Open a Metadata Profile”
on page 58. For this example, the appropriate metadata profile would specify the
project repository that will enable you to access metadata for the required sources
and targets: ORGANIZATION_DIM, ORDER_FACT, and
Total_Sales_By_Employee.
Check Out Any Metadata That Is Needed
To add a source or a target to a job, the metadata for the source or target must be
defined and available in the Project tree. In the current example, assume that the
Loading Warehouse Data Stores
4
Create and Populate the New Job
133
metadata for the relevant sources and targets must be checked out. The following steps
would be required:
1 On the SAS ETL Studio desktop, select the Inventory tree.
2 In the Inventory tree, open the Tables folder.
3 Select all source tables and target tables that you want to add to the new job:
ORGANIZATION_DIM, ORDER_FACT, and Total_Sales_By_Employee.
4 Select Project I Check Out from the menu bar. The metadata for these tables
will be checked out and will appear in the Project tree.
The next task is to create and populate the job.
Create and Populate the New Job
With the relevant sources and targets checked out in the Project tree, follow these
steps to create and populate a new job. To populate a job means to create a complete
process flow diagram, from sources, through transformations, to targets.
1 From the SAS ETL Studio desktop, select Tools
menu bar. The New Job wizard is displayed.
I Process Designer from the
2 Enter a name and description for the job. Type the name
Total_Sales_By_Employee, press the TAB key, the enter the description
Generates a report that ranks salespeople by total sales revenue.
3 Click Finish . An empty job will open in the Process Designer window. The job has
now been created and is ready to be populated with two sources, a target, a SQL
Join transformation, and a Publish to Archive transformation.
4 From the SAS ETL Studio desktop, click the Process tab to display the Process
Library.
5 In the Process Library, open the Data Transforms folder.
6 Click, hold, and drag the SQL Join transformation into the empty Process
Designer window. Release the mouse button to display the SQL Join
transformation template in the Process Designer window for the new job. The SQL
Join transformation template is displayed with drop zones for two sources and one
target, as shown in the following display.
134
Create and Populate the New Job
4
Chapter 10
Display 10.1 The New SQL Join Transformation in the New Job
7 From the SAS ETL Studio desktop, click the Project tab to display the Project
tree. You will see the new job and the three tables that you checked out.
8 In the Project tree, click and drag the ORGANIZATION_DIM table into one of the two
input drop zones in the Process Designer window, then release the mouse button.
The ORGANIZATION_DIM table appears as a source in the new job.
9 Repeat the preceding step to identify the ORDER_FACT table as the second of the
two sources in the new job.
10 Click and drag the table Total_Sales_By_Employee into the output drop zone in
the Process Designer window. The target replaces the drop zone and a Loader
transformation appears between the target and the SQL Join transformation
template, as shown in the following display.
Loading Warehouse Data Stores
Display 10.2
4
Create and Populate the New Job
135
Sources and Targets in the Example Job
11 From the SAS ETL Studio desktop, click the Process tab to display the Process
Library.
12 In the Process Library, open the Publish folder. Click and drag the Publish to
Archive transformation into any location in the Process Designer and release the
mouse button. As shown in the following display, an icon and an input drop zone
appear in the Process Designer.
136
Create and Populate the New Job
4
Chapter 10
Display 10.3 Example Job with Publish to Archive
13 In the Process Designer window, click and drag the target
Total_Sales_By_Employee over the input drop zone for the Publish to
Archive transformation. Release the mouse button to identify the target as the
source for Publish to Archive, as shown in the following display.
Loading Warehouse Data Stores
Display 10.4
4
Configure the SQL Join Transformation
137
Target Table Used as the Source for Publish to Archive
The job now contains a complete process flow diagram, from sources, through
transformations, to targets. The next task is to update the default metadata for the
transformations and the target.
Configure the SQL Join Transformation
The example job now contains the necessary sources, target, and transformations.
Follow these steps to configure the SQL Join transformation.
1 In the Process Designer window, select the SQL Join transformation object, then
2
3
4
5
select File I Properties from the menu bar. A properties window is displayed.
Click the SQL tab. Note that all columns from both source tables are included in
the join operation by default.
Click the Mapping tab. Click the Employee_Country column and press the
DELETE key. The Employee_Country column and mapping are removed. This
column is not needed in the report.
In the target table on the right of the Mapping tab (a temporary work table),
retain the Company column. Select the Department column. Press the DELETE
key twice to delete the Department column and the Section column.
In the target table on the right of the Mapping tab, retain the Org_Group column,
the Job_Title column, and the Employee_Name column. Select the
Employee_Gender column. Delete the next 20 columns. Retain the
138
Configure the SQL Join Transformation
4
Chapter 10
Total_Retail_Price column, which will be summarized to create the total
revenue number for each salesperson.
6 In the target table on the right of the Mapping tab, select the
CostPrice_Per_Unit column. Delete the last two columns. The temporary target
now contains only the columns that are needed in the report. Eliminating
extraneous columns at this early stage maximizes the job’s run-time performance.
7 In the target table on the right of the Mapping tab, click twice in the Expression
column for Total_Retail_Price. Then click again in the icon that appears at the
right side of the field. This action displays the Expression Builder, which will be
used to enter the expression that will summarize individual sales into a total
revenue number for each salesperson.
8 In the Expression Builder, enter the following expression and click OK, as shown in
the following display. The Expression Builder window closes and the expression
appears in the Expression column of the Mapping tab.
SUM(ORDER_FACT.Total_Retail_Price)
Display 10.5 SUM Statement in the Expression Builder
The following display shows the configuration of the Mapping tab.
Loading Warehouse Data Stores
Display 10.6
4
Configure the SQL Join Transformation
139
Mapping Source Columns in the SQL Join Transformation
9 To see how the SQL code is updated based on the contents of the Mapping tab (and
other tabs in the SQL Join transformation), click the SQL tab. In the SQL code
that is shown in the following display, note that the number of target columns has
been reduced to six, and a SUM expression has been added for the
Total_Retail_Price column.
Display 10.7
SQL Code Configured Automatically
140
Configure the Columns in the Target and the Loader
4
Chapter 10
10 The SQL Join transformation is now ready. Click OK to save input and close the
properties window.
Configure the Columns in the Target and the Loader
In our example job, the SQL Join transformation is now ready to run. Follow these
steps to configure the target table Total_Sales_By_Employee.
1 In the Process Designer window, select the target Total_Sales_By_Employee,
2
3
4
5
6
then select File I Properties from the menu bar. A properties window is
displayed.
In the properties window, click the Columns tab.
Click the Total_Retail_Price column. Change the name to Total_Revenue.
The new name is a better representation of the newly summarized data.
In the Total_Revenue column, scroll right to display the Format column. Enter
the format DOLLAR13.2 to specify the appearance of this column in the HTML
output file.
In the Total_Revenue column, click twice in the Sort column to display a
pull-down icon. Click the icon and select the DSCFORMATTED option. This
option sorts the rows in descending order, based on the formatted value of the
Total_Revenue column.
Reorder the columns by selecting the rows in the list view and clicking the up or
down arrows. The end result is a column order that formats the report for easy
reading, as shown in the following display. When the column order is ready, the
target is ready. Click OK to save input and close the properties window.
Display 10.8 Configured Target Columns
Loading Warehouse Data Stores
4
Configure the Publish to Archive Transformation
141
7 In the Process Designer window, select the Loader transformation, then select
File
I Properties from the menu bar. A properties window is displayed.
8 In the properties window, click the Mapping tab to confirm that the columns of the
SQL Join transformation are correctly mapped to the columns of the target, as
shown in the following display.
Display 10.9
Column Mapping in the Loader
9 In the properties window, click the Load Technique tab. Select the Drop Target
radio button to replace the physical table each time the job is run.
The Loader is now configured and is ready to run.
Configure the Publish to Archive Transformation
The example job is now fully configured through the SQL Join and Loader
transformations, and through the target table. Follow these steps to configure HTML
output using the Publish to Archive transformation. The Publish to Archive
transformation generates a SAS package file and an optional HTML report. The
package file can be published by SAS programs that use the publishing functions in
SAS Integration Technologies software.
1 In the Process Designer window, select the Publish to Archive transformation,
then select File I Properties from the menu bar. A properties window is
displayed.
2 In the properties window, click the Options tab. Type in values for the fields that
are shown in the following display.
142
Run and Troubleshoot the Job
4
Chapter 10
Display 10.10 Options in the Publish to Archive Transformation
3 Click OK to save input and close the properties window. The Publish to Archive
transformation, and the entire job, are now ready to run.
Run and Troubleshoot the Job
After the metadata for a job is complete, you must submit the job for execution in
order to create targets on the file system.
I Submit
from the menu bar. SAS ETL Studio generates code for the job and submits the
code to a SAS application server. The server executes the code. A pop-up window
is displayed to indicate that the job is running.
2 If a pop-up error message appears, or if you simply want to look at the log for the
completed job, click the Log tab in the Process Designer window.
3 In the Log tab, scroll through the SAS log information that was generated during
the execution of the job, as shown in the following display.
1 With the job displayed in the Process Designer window, select Process
Loading Warehouse Data Stores
Display 10.11
4
Verify the Job’s Outputs
143
Log Tab with Text from the Example Job
The code that was executed for the job is available in the Source Code tab of
the Process Designer window.
4 If you find errors in the source code for a step, select the corresponding
transformation in the process flow diagram, then select File
the menu bar. A properties window displays.
I Properties from
5 Correct the metadata and resubmit the job until there are no more errors.
6 After the job runs without error, save the job. Select File
bar.
I Save from the menu
The next task is to verify that the job created the correct output.
Verify the Job’s Outputs
After the job runs without error and has been saved, you should confirm that the
target(s) contain the data you need, in the format that best communicates the purpose
of the target(s). In the current example, the main target table is the
Total_Sales_By_Employee table. The example job also creates an HTML report.
1 To view the data in the Total_Sales_By_Employee target, select the target, then
select View I View Data from the menu bar. The data in the target is displayed
in a View Data window, as shown in the following display.
144
Verify the Job’s Outputs
4
Chapter 10
Display 10.12 Viewing the Target
2 Confirm that the target contains the data you need, in the format that best
communicates the purpose of the target.
3 To display the HTML report, open the output file. In this case, the example
generated a file in the public directory on the SAS application server. The file
specification is as follows:
\\D9585\public\salesRank.html
The following display shows how the example file appears in a Web browser.
Display 10.13 HTML Report Generated by the Example Job
Loading Warehouse Data Stores
4
Create and Populate the Job
145
If a target needs to be improved, change the properties of that target or the
transformations that feed data to that target. If the outputs are correct, you can check
in the job.
Check In the Job
To check in a job in the Project tree:
1 In the Project tree, select the repository icon.
I Check In Repository from
the menu bar. All of the objects in the project repository are checked in to the
change-managed repository.
2 On the SAS ETL Studio desktop, select Project
Example: Using Slowly Changing Dimensions
This example shows you how to use slowly changing dimensions to capture a history
of changes to the data in a table. The history of changes enables analysis.
The example joins two source tables with the SQL Join transformation and loads a
target table using the SCD Type 2 Loader transformation. The target table,
ORGANIZATION_DIM, enables the analysis of trends in hiring, promotion, and salary
for the employees in a company.
Historical information is maintained in the target table by retaining outdated rows
alongside the current row for each record. When an existing record is updated, the
existing row is closed out (no longer updated) and the new current row is added.
In this example, the SCD Type 2 Loader detects changes between existing target
rows and incoming source rows. When a change is detected, the existing target row
receives a new end date/time value that closes out that row. Then the new row is
written into the target using the start and end date/time values from the source. The
new row becomes the current row for that record.
Preparation
Two source tables, ORGANIZATION and STAFF, have been loaded from
transactional data into an enterprise data warehouse. These two sources will be joined
using the SQL Join transformation template. The output of the SQL Join
transformation becomes the input to the SCD Type 2 Loader transformation, which
loads the target table ORGANIZATION_DIM.
ORGANIZATION_DIM has been created with the Target Designer. Initially, the table
contains a combination of columns from the ORGANIZATION and STAFF tables. These
columns will be changed in the course of this example to arrive at the final
configuration.
Metadata has been created for all four tables. All four tables are available for
checkout from the foundation repository.
Create and Populate the Job
Follow these steps to create the Load the Organization Dimension job and to
populate that job with transformations and tables:
146
Create and Populate the Job
4
Chapter 10
1 Start SAS ETL Studio and connect to the appropriate repository on the metadata
server.
2 In SAS ETL Studio, in the Shortcuts pane, click Process Designer to start the
New Job Wizard.
3 In the New Job Wizard, type the job name Load the Organization Dimension
and click Finish. An empty Process Designer window is displayed.
4 In the tree view, click the Process Library tab, then expand the Data
Transforms folder.
5 In the Data Transforms folder, click and drag SQL Join into the Process
Designer window. The transform appears in the job with two source drop areas
and one target drop area.
6 In the Data Transforms folder, click and drag SCD Type 2 Loader into the
Process Designer. Release the mouse button when the cursor is in the target drop
area of the SQL Join transformation.
Display 10.14 Transformations Added to the Job
7 In the tree view, click the Inventory tab and expand the Tables folder.
8 In the Tables folder, select STAFF, ORGANIZATION, and ORGANIZATION_DIM.
Right-click and select Change Management
appears in the icons for all four tables.
I Check Out. A check mark
9 In the tree view, select the Project tab to continue work with the checked-out
tables.
10 In the Project tree, click and drag STAFF into one of the two source drop areas of
the SQL Join transformation.
Loading Warehouse Data Stores
4
Create and Populate the Job
147
Display 10.15 Data in the STAFF Source Table
11 In the Project tree, click and drag ORGANIZATION into the second source drop area
of the SQL Join transformation.
12 In the Project tree, click and drag ORGANIZATION_DIM into the target drop area of
the SCD Type 2 Loader. The job is now fully populated with tables and
transformations.
Display 10.16 Data in the ORGANIZATION Source Table
148
Configure ORGANIZATION_DIM
4
Chapter 10
Display 10.17 Fully Populated Job
Configure ORGANIZATION_DIM
Follow these steps to configure the target table ORGANIZATION_DIM.
1 In the Process Designer, double-click ORGANIZATION_DIM to display its properties
window.
2 In the properties window, click the Columns tab.
3 In the Columns tab, delete, rename, and rearrange columns to create the planned
configuration.
Loading Warehouse Data Stores
Display 10.18
4
Configure ORGANIZATION_DIM
149
Configured Columns in ORGANIZATION_DIM
4 ORGANIZATION_DIM needs two new columns to meet business requirements. To
5
6
7
8
9
add the first column, click Term_Date and click New. A new untitled column
appears beneath Term_Date.
Replace the default name of the new column with the name Load_Time. This
column will contain the date and time that each row was physically loaded into
ORGANIZATION_DIM. This data will be provided by the SCD Type 2 Loader.
In the properties window of ORGANIZATION_DIM, in the row for Load_Time,
double-click the Type column and select Numeric.
In the row for Load_Time, double-click the Format column and type DATETIME20.,
which is a numeric format.
To add the other new column, click Employee_ID and click New to display a new
untitled column. Replace the default column name with the name Gen_Emp_ID.
This column will be added to the primary key of ORGANIZATION_DIM to isolate
the dimension table from possible duplication of values in the business key column
Employee_ID. Later in this example, the SCD Type 2 Loader will be configured to
generate key numbers.
Press the TAB key twice, then double click and select the Numeric data type.
10 Press the TAB key once, then click and type 12., which is a numeric format.
150
Configure the SCD Type 2 Loader
4
Chapter 10
Display 10.19 Configured Target Table ORGANIZATION_DIM
11 Click OK to save changes and close the properties window.
Configure the SCD Type 2 Loader
Follow these steps to specify change tracking columns, specify the business key
column, add new columns for load time and generated key:
1 In the Process Designer, double-click the SCD Type 2 Loader to display its
properties window.
2 In the properties window, click the Change Tracking tab.
3 In the Change Tracking tab, click and hold on Employee_ID. Drag down to select
the new begin date/time column Job_Start_Date.
4 Click, hold, and drag on Load Time. Select the new end date/time column
Job_End_Date.
Loading Warehouse Data Stores
4
Configure the SCD Type 2 Loader
151
Display 10.20 Change Tracking Columns in the SCD Type 2 Loader
5 Click Apply and click the Business Key tab.
6 In the Business Key tab, click New to display the ORGANIZATION_DIM Columns
window.
7 In the Columns window, click Employee_ID, then click OK to return to the
Business Key tab.
152
Configure the SCD Type 2 Loader
4
Chapter 10
Display 10.21 Business Key Specified in the SCD Type 2 Loader
8 In the Business Key tab, click Apply to save changes and click the Options tab.
9 In the Options tab, click in the field to the right of Load Time Column. Type the
column name Load_Time.
10 Click Apply, then click the Generated Key tab.
11 In the Generated Key tab, click the down arrow to open the pull-down menu and
select the column Gen_Emp_ID.
Loading Warehouse Data Stores
4
Configure the SCD Type 2 Loader
Display 10.22 Generated Key Definition in the SCD Type 2 Loader
12 Click Apply, then click the Mapping tab.
13 In the Mapping tab, click and drag between columns to create new mappings, as
shown in the following display.
153
154
Run the Job and View the Results
4
Chapter 10
Display 10.23 Mapped Columns in the SCD Type 2 Loader
14 Click OK to save changes and close the properties window.
Run the Job and View the Results
The job is now fully configured and is ready to run. In the Process Designer,
right-click and select Save. Then right-click and select Submit.
If job execution terminates due to errors, click the Log tab, locate the error, resolve
the error in the Process Editor, and submit the job again.
To view the results of the job, click the Process Editor tab, right-click
ORGANIZATION_DIM, and select View Data.
Display 10.24 Data in ORGANIZATION_DIM
Loading Warehouse Data Stores
4
Preparation
155
Check In the Job
To check in a job in the Project tree:
1 In the Project tree, select the repository icon.
2 On the SAS ETL Studio desktop, select Project I Check In Repository from
the menu bar. All of the objects in the project repository are checked in to the
change-managed repository.
Example: Using a SAS Code Transformation Template in a Job
This example demonstrates how a user-written SAS code transformation template
can be used in a job. This example is based on the PrintHittingStatistics template that
is described in “Example: Creating a SAS Code Transformation Template” on page 120.
Preparation
Assume the following about the job in the current example:
3 A data warehouse project plan identified the need for a report that displays hitting
statistics for baseball teams. The following display shows the kind of output that
is desired.
Display 10.25
Example Hitting Report
3 The input for the report is a table that contains batting statistics for a baseball
team. The columns in the source table are assumed to be similar to the columns
shown in the following display.
Display 10.26
Contents of Table: TigersHitting2002
3 Metadata for the source table, a SAS data set called TigersHitting2002, is
available in a current metadata repository.
156
Start SAS ETL Studio and Open the Appropriate Metadata Profile
4
Chapter 10
3 The report will be produced by a SAS ETL Studio job, using the
PrintHittingStatistics transformation template. The template has already been
created as described in “Example: Creating a SAS Code Transformation Template”
on page 120. Usage details for the template have been documented, as described
in “Document Any Usage Details for the Template” on page 127.
3 Output for the report will be sent to the Output tab of the Process Designer
window. The appropriate option must be set so that theOutput tab appears in the
Process Designer window. For details, see “Process Designer Window” on page 105.
3 The main metadata repository is under change-management control.
3 You have selected a default SAS application server for SAS ETL Studio.
Start SAS ETL Studio and Open the Appropriate Metadata Profile
Perform the following steps to begin work in SAS ETL Studio:
1 Start SAS ETL Studio..
2 Open the appropriate metadata profile. For this example, the appropriate
metadata profile would specify the project repository that will enable you to access
the PrintHittingStatistics transformation template and the metadata for the
required source, TigersHitting2002.
Check Out Any Metadata That Is Needed
To add a source or a target to a job, the metadata for the source or target must be
defined and available in the Project tree. In the current example, assume that the
metadata for the relevant source must be checked out. The following steps would be
required:
1 On the SAS ETL Studio desktop, select the Inventory tree.
2 In the Inventory tree, open the Tables folder.
3 Select the source table that you want to add to the new job: TigersHitting2002.
4 Select Project I Check Out from the menu bar. The metadata for this table will
be checked out and will appear in the Project tree.
The next task is to create and populate the job.
Create and Populate the New Job
With the relevant source checked out in the Project tree, follow these steps to create
a complete process flow diagram, from sources, through transformations, to targets.
1 From the SAS ETL Studio desktop, select Tools I Process Designer from the
menu bar. The New Job wizard is displayed.
2 Enter a name and description for the job. Type the name PrintHittingStats
Job, press the TAB key, the enter the description Generates a report that
prints hitting statistics for a baseball team.
3 Click Finish . An empty job will open in the Process Designer window. The job has
now been created and is ready to be populated with the PrintHittingStatistics
transformation template and the source table, TigersHitting2002.
4 From the SAS ETL Studio desktop, click the Process tab to display the Process
Library.
5 In the Process Library, open the UserDefined folder and the Reports subfolder.
Loading Warehouse Data Stores
4
Create and Populate the New Job
157
6 Click, hold, and drag the PrintHittingStatistics transformation into the
empty Process Designer window. Release the mouse button to display the template
in the Process Designer window for the new job, as shown in the following display.
Display 10.27
PrintHittingStatistics Template, Unpopulated
7 From the SAS ETL Studio desktop, click the Project tab to display the Project
tree. You will see the new job and the source table that you checked out,
TigersHitting2002.
8 In the Project tree, click and drag the TigersHitting2002 table into the drop
zone (dashed-line box) in the Process Designer window, then release the mouse
button. The TigersHitting2002 table appears as a source in the new job.
9 Click and drag the Total_Sales_By_Employee table into the output drop zone in
the Process Designer window. The target replaces the drop zone and a Loader
transformation appears between the target and the SQL Join transformation
template, as shown in the following display.
Display 10.28
PrintHittingStatistics Template, Populated
158
Update the Template as Necessary
4
Chapter 10
The job now contains a complete process flow diagram, from the source through the
transformation. No target is required in the process flow diagram because output for
the job will be sent to the Output tab of the Process Designer window.
The next task is to update the default metadata in the process flow diagram.
Update the Template as Necessary
The example job now contains a complete process flow diagram. The job is not ready
to run, however. In order to produce the report that is shown in Display 10.25 on page
155, a title must be specified, a set of columns must be selected from the source, and
the sum of the values in the HR column must be calculated. It is assumed that the steps
for doing these tasks have been documented by the person who created the
PrintHittingStatistics template.
Follow these steps to update the transformation in the process flow diagram:
1 In the Process Designer window, select the PrintHittingStatistics
transformation, then select File
window is displayed.
I Properties from the menu bar. A properties
2 Click the Options tab. The default options for the PrintHittingStatistics
transformation are shown in the following display.
Display 10.29 Options Tab, PrintHittingStatistics Properties Window
3 In the Home runs field, enter the name of the source table column that contains
home run values. In Display 10.26 on page 155, this is the HR column.
4 In the Report title field, enter a name for the report, such as Tigers Hitting
Statistics 2002.
5 Click the Column Options tab. Use this tab to select columns from the source
table that should appear in the report. For the report that is shown in Display
10.25 on page 155, select the columns Name, G, AB, HR, and RBI. When you are
finished, the Column Options tab should look similar to the following display.
Loading Warehouse Data Stores
Display 10.30
4
Run and Troubleshoot the Job
159
Column Options Tab, PrintHittingStatistics Properties Window
6 When you are finished entering metadata, click OK to save your changes.
The job is now ready to run.
Run and Troubleshoot the Job
After the metadata for a job is complete, you must submit the job for execution in
order to create targets on the file system.
1 With the job displayed in the Process Designer window, select Process I Submit
from the menu bar. SAS ETL Studio generates code for the job and submits the
code to a SAS application server.
2 If a pop-up error message appears, or if you simply want to look at the log for the
completed job, click the Log tab in the Process Designer window.
3 In the Log tab, scroll through the SAS log information that was generated during
the execution of the job, as shown in the following display.
160
Verify the Job’s Outputs
4
Chapter 10
Display 10.31 Log Tab with Text from the Example Job
The code that was executed for the job is available in the Source Editor tab of
the Process Designer window.
4 If you find errors in the source code for a step, select the corresponding
transformation in the process flow diagram, then select File
the menu bar. A properties window displays.
I Properties from
5 Correct the metadata and resubmit the job until there are no more errors.
6 After the job runs without error, save the job. Select File
bar.
I Save from the menu
The next task is to verify that the job created the correct output.
Verify the Job’s Outputs
After the job runs without error and has been saved, you should confirm that the
target(s) contain the data you need, in the format that best communicates the purpose
of the targets. In the current example, the output is sent to the Output tab of the
Process Designer window. When you click that tab, a report similar to the one shown in
Display 10.25 on page 155 should be displayed.
If the report needs to be improved, change the properties of the transformation that
feeds data to the report. If the outputs are correct, you can check in the job.
Check In the Job
To check in a job in the Project tree:
1 In the Project tree, select the repository icon.
I Check In Repository from
the menu bar. All of the objects in the project repository are checked in to the
change-managed repository.
2 On the SAS ETL Studio desktop, select Project
161
CHAPTER
11
Creating Cubes
Overview of Cubes 161
General Tasks for Cubes 162
Prerequisites for Cubes 162
Working under Change-Management Control 162
Using the Cube Designer to Create a Cube 162
Viewing the Data in a Cube 163
Updating a Cube or Its Metadata 163
Example: Building a Cube from a Star Schema 164
Preparation 164
Start SAS ETL Studio and Open the Appropriate Metadata Profile 165
Use the Cube Designer 165
Display the Cube Designer 165
Enter General Information 166
Select Input for the Cube 166
Select a Table for Drill-Through Reporting 167
Define Dimensions, Hierarchies, and Levels 167
Specify Measures (Columns) and Measure Details 170
Specify Member Properties 170
Specify Aggregations 171
Create the Cube 171
Check In the Cube 171
Example: Using the Source Editor to Submit User-Written Code for a Cube 172
Preparation 172
Write the Code 172
Submit the Code 174
Check In the Cube 174
Additional Information about Cubes 175
Overview of Cubes
A cube is a logical set of data that is organized and structured in a hierarchical,
multidimensional arrangement. It is a data store that supports online analytical
processing (OLAP).
When you define a cube, you define the dimensions and measures for the cube along
with information about how aggregations should be created and stored. There are two
main ways to create a SAS cube:
3 Use the Cube Designer wizard in SAS ETL Studio or SAS OLAP Cube Studio to
define and create the cube. The Cube Designer generates a long form of OLAP
procedure code that stores the cube definition in a metadata repository. If you
162
General Tasks for Cubes
4
Chapter 11
specify the appropriate option, the wizard can submit a shorter form of OLAP
procedure code to create the cube on the file system.
3 Use the SAS OLAP procedure to create a cube. You can submit the OLAP
procedure code interactively (using the Source Editor window in SAS ETL Studio
or another SAS Program Editor), or you can submit the code in batch mode. The
code stores the cube definition in a metadata repository, then creates the specified
cube on the file system.
General Tasks for Cubes
Prerequisites for Cubes
A cube can be quite complex. Accordingly, someone who is familiar with OLAP
design and the business goals for a particular cube should design the cube before you
create it. For details about the design and structure of a cube, see the SAS OLAP
Server Administrator’s Guide.
The metadata for the source tables that supply information to the cube must be
available from a metadata repository. For examples of the kind of tables that can serve
as inputs to a cube, see “What Are the Time and Place Dependencies of Product Sales?”
on page 32.
The Cube Designer wizard does not require a connection to a SAS OLAP Server, but
it does require an OLAP schema, a metadata object that is used to control access to a
group of cubes. Accordingly, before using the Cube Designer in SAS ETL Studio, it is
recommended that administrators perform the following tasks:
3 Install a SAS OLAP Server.
3 Add metadata for the SAS OLAP Server. (You can specify the SAS OLAP Server
as one component of the default SAS application server for SAS ETL Studio.)
3 Define an OLAP schema and assign the SAS OLAP Server to the schema.
For details about these tasks, see the SAS OLAP Server Administrator’s Guide.
Working under Change-Management Control
Unless your user profile includes administrative privileges, you will be working
under change-management control. For a general description of how change
management affects user tasks in SAS ETL Studio, see “Working with Change
Management” on page 64.
When working with cubes in SAS ETL Studio, the main impacts of change
management are as follows:
1 To update an existing cube, you must check out the cube.
2 Metadata for a new cube is added to the Project tree. At some point, you must
check in new objects to the change-managed repository.
Using the Cube Designer to Create a Cube
Assume that the prerequisites that are described in “Prerequisites for Cubes” on
page 162 have been met. The general steps for using the Cube Designer wizard to add a
cube are as follows.
Creating Cubes
4
Updating a Cube or Its Metadata
163
I Target Designer from the
menu bar. The Target Designer selection window is displayed.
2 Select the Cube Designer and click Next .
3 Enter other metadata as prompted by the wizard.
1 From the SAS ETL Studio desktop, select Tools
For an example of how the Cube Designer can be used, see “Example: Building a
Cube from a Star Schema” on page 164. For an alternative, see “Example: Using the
Source Editor to Submit User-Written Code for a Cube” on page 172.
Viewing the Data in a Cube
You cannot view the contents of a cube in SAS ETL Studio. You can use Microsoft
Excel or SAS Enterprise Guide to view the data in a cube. For details, see the SAS
OLAP Server Administrator’s Guide.
Updating a Cube or Its Metadata
After a cube is built on the file system, you can update its metadata or the cube itself.
The properties window for a cube enables you to view or update some of its basic
metadata. The basic metadata includes a descriptive name for the cube’s metadata
object, metadata for the user who is responsible for the cube, and a read-only table that
shows the cube’s structure. To update other cube metadata, or to update the physical
cube, you must use the Cube Designer wizard.
Perform the following steps to update the metadata for a cube or to update the cube
itself. The cube is assumed to be under change management control.
1 On the SAS ETL Studio desktop, display the Inventory tree.
2 In the Inventory tree, open the OLAP folder.
I Check Out. The metadata
for the cube is checked out. A check mark is displayed next to the cube in the
Inventory tree. An icon indicating a checked-out cube appears in the Project tree.
4 Display the Project tree, right-click the cube, then select the appropriate option
from the pop-up menu.
Note that you must display the cube from the Project tree in order to update it.
Displaying the cube from the Inventory tree enables browsing only.
3 Select the cube to be updated, then select Project
The options that you can select from the pop-up menu include the following:
Properties
The properties window displays information about the cube and
includes the following tabs:
General
The General tab displays the cube’s name and
description. It also lists users who have been
assigned either owner or administrator
responsibility for the cube.
Extended
attributes
The Extended attributes tab displays site-defined
metadata that is not part of the standard
metadata for cube. You can enter attribute
information on this tab.
Advanced
The Advanced tab displays the metadata
information registered for the selected cube in
the active metadata repository. The information
on the Advanced tab is read-only.
164
Example: Building a Cube from a Star Schema
4
Structure
Chapter 11
The Structure tab displays the cube structure. It
has a standard navigational tree structure on the
left side and a blank window on the right side.
The navigational tree contains folders that
represent the components in the selected cube,
such as dimensions, hierarchies, measures, and
aggregations. The information on the Structure
tab is read-only.
Create
The selected cube metadata is re-read and the cube is re-created.
The existing cube is overwritten.
Edit cube
structure
The Cube Designer is displayed. You can then step through the
Cube Designer windows to edit the metadata for the cube.
Manual Tuning
You can add new aggregations, modify user-defined aggregations,
and delete aggregations for the cube from the Manual Tuning
window.
Save PROC
OLAP code
The PROC OLAP code that is used to create the selected cube is
saved in a text file. In the Path field on this window, enter a fully
qualified path to the location of a text file. For example, you might
enter
c:\finance_code.txt
for a cube that contains financial data.
Delete
The cube metadata is deleted.
Group
You can specify a user-defined group for a selected object. The Select
Group window allows you to select the user-defined group into which
the current object should be placed.
Refresh
The cube metadata is re-read, and the cube is updated.
Example: Building a Cube from a Star Schema
This example demonstrates how to use the Cube Designer to create a cube that is
based on a star schema. The example is based on the scenario that is described in
“What Are the Time and Place Dependencies of Product Sales?” on page 32.
Preparation
For the current example, assume that the following statements are true:
3 A warehouse project plan identified the need for a SAS cube to support OLAP
reporting.
3 The cube will be based on a star schema in which ORDER_FACT is the central
fact table, and CUSTOMER_DIM, GEOGRAPHY_DIM, ORGANIZATION_DIM,
and TIME_DIM are the dimension tables. For details about this star schema, see
“Identifying Targets” on page 34.
3 The star schema has already been created, and metadata for the star schema has
already been added to a metadata repository.
Creating Cubes
4
Use the Cube Designer
165
3 The metadata repository is under change management control. For details about
cubes and change management, see “Working with Change Management” on page
64.
3 The prerequisites that are described in “Prerequisites for Cubes” on page 162 have
been met.
Start SAS ETL Studio and Open the Appropriate Metadata Profile
Perform the following steps to begin work in SAS ETL Studio:
1 Start SAS ETL Studio as described in “Start SAS ETL Studio” on page 56.
2 Open the appropriate metadata profile as described in “Open a Metadata Profile”
on page 58. For this example, the appropriate metadata profile would specify the
project repository that will enable you to access metadata about the star schema.
You do not need to check out the star schema in order to specify it as the input to the
cube. Accordingly, the next task is to display the Cube Designer and enter metadata as
prompted by the wizard.
Use the Cube Designer
Perform these steps to create a cube using the Cube Designer. For details about the
fields in each window, click the Help button.
Display the Cube Designer
Perform these steps to display the Cube Designer:
1 From the menu bar on the SAS ETL Studio desktop, select Tools
Designer. The Target Designer selection window is displayed.
I Target
166
Use the Cube Designer
4
Display 11.1
Chapter 11
Target Designer Selection Window
2 Select the Cube Designer icon and click Next . The Cube Designer is displayed.
The next task is to enter general information about the cube.
Enter General Information
In the General window, enter the following information:
3 Cube Name
3 Description
3 Repository
3 OLAP Schema
3 Path (physical path where the cube will be stored)
3 Input Type.
For input type, select Star Schema. Click Next when finished
The next task is to select the input for the cube.
Select Input for the Cube
In the Input window, select a data source for your cube. For this example, select the
ORDER_FACT table, which is the central fact table for a star schema. (If a source table
does not exist for your data, you can select Define Table, and then define the source
from which you will import metadata.)
Note: If the cube is built from a star schema, then the keys that link the dimension
table and the fact table are also defined by using the DIMKEY= and FACTKEY=
options. See the SAS OLAP Server Administrator’s Guide for further information. 4
Creating Cubes
4
Use the Cube Designer
167
Click Next when finished. The next task is to select a table for drill-through
reporting.
Select a Table for Drill-Through Reporting
In the Drill-Through window, determine whether you will have a drill-through table.
In this example, you will not use a drill-through table, so you can select the option No
table for Drill-Through.
Click Next when finished. The next task is to define dimensions, hierarchies, and
levels for the cube.
Define Dimensions, Hierarchies, and Levels
1 In the Dimension Tables window, select dimension tables that are associated with
the ORDER_FACT star schema that you specified as the data source for the cube.
For this example, select the following tables:
3 CUSTOMER_DIM
3 GEOGRAPHY_DIM
3 ORGANIZATION_DIM
3 TIME_DIM.
2 Now that your basic metadata server and cube information has been entered,
define the different dimensions and their respective levels and hierarchies. This
example cube has these dimensions and levels:
3 Time
3
3
3
3
3
Year_ID
Quarter
Month_Name
Week_Name
Date_ID.
168
Use the Cube Designer
4
Chapter 11
For the Time dimension, the following star schema information is also
included:
Table
TIME_DIM
Key
Date_ID
Fact Key
Order_Date
3 Customers
3 Customer_Name
3 Customer_Age
3 Customer_Gender
3 Customer_Group
3 Customer_Type.
For the Customers dimension, the following star schema information is
also included:
Table
CUSTOMER_DIM
Key
Customer_Id
Fact Key
Customer_Id
3 Geography
3 Continent_Name
3 Country
3 State
3 Region
3 Province
3 County
3 City.
For the Geography dimension, the following star schema information is
also included:
Table
GEOGRAPHY_DIM
Key
Street_Id
Fact Key
Street_Id
3 Organization
3 Employee_Name
3 Job_Title
3 Salary
3 Gender
Creating Cubes
4
Use the Cube Designer
169
3 Company
3 Department
3 Org_Group
3 Section.
For the Organization dimension, the following star schema information is
also included:
Table
ORGANIZATION_DIM
Key
Employee_Id
Fact Key
Employee_Id
Define the dimensions for the cube. For each dimension, you define the dimension,
its levels, and its hierarchies.
3 At the Dimensions window, select the Add button. This opens the Dimension
Designer—General window. Enter the following information:
3 Dimension name
3 Caption
3 Description
3 Type of dimension (standard or time)
3 Sort order.
When you define the dimensions for a cube based on a star schema, you will
need to provide additional information about the dimensions in the
Dimension Designer—General window. On the Star Schema Dimension
Tables Definition panel, enter the following information:
3 Table
3 Key
3 Fact Key
3 Data Set Options.
3 Select the necessary dimension levels at the Dimension Designer—Levels
window.
3 Define properties such as format, time type, and sort order at the Dimension
Designer—Level Properties window.
3 Define hierarchies for the levels at the Dimension Designer—Define a
Hierarchy window.
3 Repeat this task for each dimension.
Note: You use the DIMENSION, HIERARCHY, and LEVEL statements here.
For time-specific levels in a dimension, the LEVEL statement is required. Also,
there can be only one time-specific dimension. 4
Click Next when finished. The next task is to specify measures (columns) for the
cube.
170
Use the Cube Designer
4
Chapter 11
Specify Measures (Columns) and Measure Details
1 In the Selected Measures window, select the following columns and associated
Sum statistics:
3 Total_Retail_Price /Sum
3 Quantity /Sum
3 CostPrice_Per_Unit /Sum
3 Discount /Sum.
2 Specify detail information for the measures. In the Measure Details window, enter
any necessary information for the different measures:
3 Caption
3 Format
3 Units
3 Description.
For the measure Total_Retail_Price, enter a format value of DOLLAR12.2. For
the measure CostPrice_Per_Unit, enter a format value of DOLLAR10.2.
Click Next when finished. The next task is to specify member property information
for the levels in the cube.
Specify Member Properties
1 In the Member Property window, select the Add button to create a new member
property. In the Define a Member Property window, enter the following
information about the member property:
3 Name
3 Level
3 Column
3 Format
3 Caption
3 Description
3 Selected Hierarchies.
In this example, the following member properties are created:
Selected
Hierarchy
Property Name
Level
Column
Caption
WeekDay_Number_US
date
weekday_no
US WeekDay Number
WeekDay_Number_EU
date
weekday_eu
EU WeekDay Number
Week_Number_EU
week_name
week_no
EU Week Number
YWD
Month_Number
month_name
month_no
Month
YMD
Number
Month_Number
month_name
month_no
Month
Number
Holiday_US
date
Holiday_US
US
Holidays
YQMD
Creating Cubes
4
Check In the Cube
171
Click Next when finished. The next task is to specify aggregations for the cube.
Specify Aggregations
Aggregations are summaries of detailed data that is stored with a cube or referred by
a cube. They can help reduce the build time that is required for the cube and contribute
to faster query response.
1 In the Generated Aggregations window, select the Add button to specify
aggregations and associated levels. Order the levels for the aggregations to follow
the hierarchy drill path. The aggregations include the following:
3 RegionalCustomerUse
3 QuarterlyCustomerUse
3 YearlyCustomerUse
3 WorldwideStaff
3 WorldwideSalaries.
Note: When you create cubes in the Cube Designer, a default aggregation,
which is the NWAY aggregation, is automatically created and listed in the
Generated Aggregations window. 4
Click Next when finished. The next task is to review the metadata that you have
entered and create the cube.
Create the Cube
In the Finish window, select whether you want the cube to be physically created after
the metadata is saved. When you click Finish, the metadata for the cube is always
saved.
If you select Save the metadata and create the cube, the short form of the
OLAP procedure code is generated along with the necessary LIBNAME statements, and
the code is submitted to a SAS application server. You can also select whether to save
the OLAP procedure code that is generated. At the Save PROC OLAP Code window,
enter the file location where you want to save the resulting code.
If the cube you created is processed successfully and a cube is built, the cube will
appear in the Project tree.
Note: When a SAS OLAP cube is created, a directory for that cube is also created.
This directory is assigned the same name as the cube, but in uppercase letters. . 4
For example, when you save a cube in
c:\olapcubes
and name the cube
Campaigns
the cube is saved in the directory
c:\olapcubes\CAMPAIGNS
Check In the Cube
Under change management, new metadata objects are added to the Project tree on
the SAS ETL Studio desktop. You must check in the new table metadata in order to
save it to the change-managed repository.
172
Example: Using the Source Editor to Submit User-Written Code for a Cube
4
Chapter 11
1 In the Project tree, select the repository icon (such as Project: etlUser1).
2 From the menu bar on the SAS ETL Studio desktop, select Project
Repository.
I Check In
All metadata objects in the project repository will be checked in to the
change-managed repository. The new objects will be visible in the Inventory tree.
Example: Using the Source Editor to Submit User-Written Code for a
Cube
This example demonstrates how to use the Source Editor window in SAS ETL Studio
to submit user-written OLAP procedure code. The code will store the cube definition in
a project repository, then create the specified cube on the file system. You must then run
SAS ETL Studio and check in the new cube, just as you would if you had used the Cube
Designer to create the cube. The content and structure of the cube is the same as the
cube that is described in “Example: Building a Cube from a Star Schema” on page 164.
Preparation
For this example, assume that the following statements are true:
3 A warehouse project plan identified the need for a SAS cube to support OLAP
reporting.
3 The cube will be based on a star schema in which ORDER_FACT is the central
fact table, and CUSTOMER_DIM, GEOGRAPHY_DIM, ORGANIZATION_DIM,
and TIME_DIM are the dimension tables. For details about this star schema, see
“Identifying Targets” on page 34.
3 The star schema has already been created, and metadata for the star schema has
already been added to a metadata repository.
3 The metadata repository is under change-management control. For details about
cubes and change management, see “Working under Change-Management Control”
on page 162.
3 The prerequisites that are described in “Prerequisites for Cubes” on page 162 have
been met.
Write the Code
Use the SAS OLAP procedure to write a program that will store the cube definition
in a project repository, then create the specified cube on the file system. Here is an
example program:
proc olap cube=Star
path=c:\cubes
fact=olapsio.ordfact
metasvr host=localhost
port=9999t
protocol=bridge
userid=userid
pw=pw
repository=Project:etlUser1
olap_schema=OLAP Schema
Creating Cubes
4
Write the Code
;
dimension Time hierarchies=(YWD YMD YQMD) type=time
dimtbl=olapsio.timedim dimkey=date_ID factkey=order_date
;
hierarchy YWD caption="Year-Week-Day"
levels=(Year_ID Week_Name Date_ID );
hierarchy YMD caption="Year-Month-Day"
levels=(Year_ID Month_Name Date_ID);
hierarchy YQMD caption="Year-Quarter-Month-Day"
levels=(Year_ID Quarter Month_name Date_ID);
level year_ID
type=year;
level quarter
type=quarters;
level month_name
type=months;
level week_name
type=weeks;
level date_ID
type=days;
property WeekDay_Number_US caption="US WeekDay Number" column=weekday_no
level=date;
property WeekDay_Number_EU caption="EU WeekDay Number" column=weekday_eu
level=date;
property Week_Number_EU
caption="EU Week Number"
column=week_no
hierarchy=YWD
level=week_name;
property Month_Number
caption="Month Number"
column=month_no
hierarchy=YMD
level=month_name;
property Month_Number
caption="Month Number"
column=month_no
hierarchy=YQMD level=month_name;
property Holidays_US
caption="US Holidays"
column=Holiday_us
level=date;
dimension Customers hierarchies=(PersonalData CompanyUsage)
dimtbl=olapsio.custdim dimkey=customer_id factkey=customer_id;
hierarchy PersonalData levels=(Customer_Name Customer_Age Customer_Gender);
hierarchy CompanyUsage
empty_char=_missing_
levels=(Customer_Group Customer_Type);
dimension Geography hierarchies=(Geography)
dimtbl=olapsio.geogdim dimkey=street_id factkey=street_id;
hierarchy Geography
empty_char=_missing_
levels=(Continent_Name Country State Region Province County City)
;
dimension Organization hierarchies=(PersonalStats Organization)
dimtbl=olapsio.orgdim dimkey=employee_id factkey=employee_id;
hierarchy PersonalStats levels=(Employee_name Job_Title Salary Gender);
hierarchy Organization
empty_char=_missing_
levels=(Company Department Org_Group Section Job_Title);
MEASURE DiscountSUM STAT=SUM COLUMN=Discount;
MEASURE CostPrice_Per_UnitSUM STAT=SUM COLUMN=CostPrice_Per_Unit
173
174
Submit the Code
4
Chapter 11
FORMAT=DOLLAR10.2
;
MEASURE QuantitySUM STAT=SUM COLUMN=Quantity
CAPTION=’Sum of Quantity’
;
MEASURE Total_Retail_PriceSUM STAT=SUM COLUMN=Total_Retail_Price
FORMAT=DOLLAR12.2
;
AGGREGATION Continent_Name Country State Region Customer_Group Customer_Type
/ NAME=’RegionalCustomerUse’
;
AGGREGATION Year Quarter Customer_Group Customer_Type
/ NAME=’QuarterlyCustomerUse’
;
AGGREGATION Year Customer_Group Customer_Type
/ NAME=’YearlyCustomerUse’
;
AGGREGATION Continent_Name Country State Region Province Company Department
Org_Group Section
/ NAME=’WorldwideStaff’
;
AGGREGATION Continent_Name Country State Region Province Employee_Name
Job_Title Salary
/ NAME=’WorldwideSalaries’
;
run;
For details about the OLAP procedure, see the SAS OLAP Server Administrator’s
Guide.
Submit the Code
Perform these steps to submit your SAS code to the Source Editor window in SAS
ETL Studio :
1 From the SAS ETL Studio desktop, select Tools I Source Editor from the menu
bar. The Source Editor window is displayed.
2 Paste the SAS code for the cube into the Source Editor window.
3 To submit the code, select Editor I Submit from the menu bar. The code is
submitted to the default SAS application server.
4 After the code has completed execution, use the Log tab on the Source Editor
window to view any messages, statistics, warnings, or errors. If you find errors,
edit and resubmit the code until the code runs successfully.
In the current example, when the code is successful, it will write the cube to the
specified project repository. The next task is to run SAS ETL Studio and check in the
cube to the change-managed repository (just as you would if you used the Cube
Designer to create a new cube).
Check In the Cube
Under change management, new metadata objects are added to the Project tree on
the SAS ETL Studio desktop. You must check in the new table metadata in order to
save it to the change-managed repository. Perform these steps to check-in a cube:
Creating Cubes
4
Additional Information about Cubes
175
1 Run SAS ETL Studio and open the metadata profile that specifies the project
repository where the new cube was added.
2 In the Project tree, select the repository icon (such as Project: etlUser1).
3 From the menu bar on the SAS ETL Studio desktop, select Project
Repository.
I Check In
All metadata objects in the project repository will be checked in to the
change-managed repository. The new objects will be visible in the Inventory tree.
Additional Information about Cubes
The online Help for SAS ETL Studio provides additional information about cubes.
Perform these steps to display the relevant Help topics:
1 From the SAS ETL Studio menu bar, select Help
window is displayed.
I Contents. The online Help
2 In the left pane of the Help window, select Cubes.
176
177
4
P A R T
Appendixes
Appendix
1. . . . . . . . . Usage Notes
Appendix
2. . . . . . . . . Building Java Plug-ins for SAS ETL Studio
Appendix
3. . . . . . . . . Recommended Reading
179
207
189
178
179
APPENDIX
1
Usage Notes
General Usage Notes 180
Do Not Use MLE Library Tables as Targets in SAS ETL Studio Jobs 180
Impact of TEMP=YES Option for Tables in an SPD Server Library 180
Migrating from SAS/Warehouse Administrator to SAS ETL Studio 180
New Schema Names Must Match the Names in the DBMS 180
ODS Output from Stored Processes Generated by SAS ETL Studio 180
Possibly Unusable DBMS Tables after Dropping or Re-creating 181
Saving Metadata Changes to the Corresponding Physical Table 181
Signon Scripts for SAS/CONNECT Servers 182
SQL Join Transformation 182
Reordering Group by Rows or Columns 182
Using Compound Expressions 182
Submitting a Job From the Source Editor When Source Code Has Been Inadvertently
Selected 182
Update Table Metadata Cannot Be Used on DBMS Tables That Have Case or Special Character
Options Selected 183
Verify Output from a Job That Updates a DBMS 183
Usage Notes for Source Designers and Target Table Designers 183
Access to Data on z/OS Platforms 183
Access to Tables Using ODBC DB2 z/OS Pass-Through 184
Case and Special Characters in SAS Names 184
How Source Designers for SAS Tables Imports Integrity Constraints 184
Importing Keys and Indexes from SAS/SHARE Libraries 184
Metadata for a Library and Its Tables Must Be Stored in the Same Metadata Repository 185
ODBC Informix Library 185
Password-Protected SAS Data Sets Are Not Fully Supported 185
Separate Login for Each Authentication Domain for Database Servers 185
Setting Table Options 186
Teradata Source Designer Hangs Unless a User ID and Password Can Be Supplied 186
Unrestricted Users Cannot Run Source Designers or Target Table Designers 186
Update Table Metadata on z/OS Platforms 187
180
General Usage Notes
4
Appendix 1
General Usage Notes
Do Not Use MLE Library Tables as Targets in SAS ETL Studio Jobs
Components affected: SAS ETL Studio jobs; tables in metadata LIBNAME engine
(MLE) libraries.
A table that is stored in a library that was assigned or preassigned using the MLE
should not be specified as a target in a SAS ETL Studio job. If you use an MLE library
table as a target in a job, the job might fail and the metadata for the job might become
corrupted.
Impact of TEMP=YES Option for Tables in an SPD Server Library
Components affected: tables in a SAS Scalable Performance Data (SPD) Server
library.
The properties window for an SPD Server library includes an Options tab. On the
Options tab, there is an Advanced Options button. If you click theAdvanced Options
button and then select the Server Connection Information tab, you can specify YES
or NO in the Temp field. The Temp field specifies whether a temporary LIBNAME domain
is created for the library. If you specify YES, any data objects, catalogs, or utility files
created in the library are deleted when you end the SAS session. If you select YES in the
Temp field, tables in the library will not be saved to a persistent location. Accordingly,
you cannot use the View Data feature in SAS ETL Studio to view tables in the library.
Migrating from SAS/Warehouse Administrator to SAS ETL Studio
Components affected: SAS/Warehouse Administrator environments that are being
migrated to SAS ETL Studio.
For information about migrating from SAS/Warehouse Administrator to SAS ETL
Studio, see Migration: Converting from SAS/Warehouse Administrator to SAS ETL
Studio, which is available at support.sas.com/rnd/migration/planning/files/
etlstatement.html
New Schema Names Must Match the Names in the DBMS
Components affected: New Schema Wizard, properties window of a DBMS table.
When you are adding or editing a schema in a New Schema wizard or in the
Physical Storage tab of the Properties window of a DBMS table, the name of the
schema in the metadata must exactly match (including case) the name of the
corresponding schema in the DBMS.
ODS Output from Stored Processes Generated by SAS ETL Studio
Components affected: stored processes generated from SAS ETL Studio that are
executed in applications that use the SAS Output Delivery System (ODS) to format
output.
Usage Notes
4
Saving Metadata Changes to the Corresponding Physical Table
181
If a stored process is used to create output that will be formatted by ODS, the code
that creates the output must appear between the
%stpbegin
and
%stpend
delimiters. The following example illustrates the syntax:
%stpbegin;
output_code
output_code
. . .
%stpend;
Most SAS ETL Studio jobs are used to create or update data stores, not to create
reports and other output that can be formatted with ODS. Accordingly, when SAS ETL
Studio generates code for a stored process, the stored process does not include the
%stpbegin
and
%stpend
delimiters. However, a SAS ETL Studio job can be used to create a report or other
output that can be formatted with ODS. The report transformations in the Process
Library are used to create reports, for example.
If you generate a stored process for a SAS ETL Studio job and you want to execute
that stored process in an application that uses ODS to format output, you must edit the
stored process and insert the
%stpbegin
and
%stpend
delimiters around the block of code that creates the output.
Possibly Unusable DBMS Tables after Dropping or Re-creating
Components affected: properties window for a Loader transformation.
When SAS drops and re-creates a table in a DBMS, it can destroy key metadata that
is necessary for operation. For example, the act of dropping and creating Siebel
interface tables in Oracle results in tables that are unusable for running the Siebel
process that uses those interface tables.
To prevent this from happening, select Truncate Table on the Load Technique tab
before running the job.
Saving Metadata Changes to the Corresponding Physical Table
Components affected: properties window for a Loader transformation, physical tables
that are updated by SAS ETL Studio jobs.
For jobs that have been run once and contain a Loader transformation, metadata
changes to columns are saved in the physical target only when you select Drop Target
182
Signon Scripts for SAS/CONNECT Servers
4
Appendix 1
in the Load Technique tab of the Loader transformation. Drop Target is not selected
by default.
Signon Scripts for SAS/CONNECT Servers
Components affected: SAS ETL Studio jobs that submit generated code to remote
computers.
SAS ETL Studio uses a SAS/CONNECT server to submit generated SAS code to
computers that are remote from the default SAS application server. A SAS/CONNECT
server can also be used for interactive access to remote libraries.
For SAS ETL Studio to generate the appropriate code for scripted signon to a
SAS/CONNECT server, you must specify a valid user ID and password in the signon
script.
SQL Join Transformation
Components affected: properties window for an SQL Join transformation.
Reordering Group by Rows or Columns
In the properties window for the SQL Join transformation, on the Group By tab, you
can select and reorder only one row or column at time in the Column Name table.
Using Compound Expressions
In the properties window for the SQL Join transformation, you can enter expressions
in the flowing tabs:
3
3
3
3
Tables
Mapping
Where
Having
If you enter an expression in which AND or OR are combined with any of the
following functions, you must enclose those functions in parentheses.
3
3
3
3
DATE()
DATETIME()
TIME()
TODAY()
Here are some examples:
Delivery_Date > (TODAY()) AND Order_Type = "AB"
(Delivery_Date > TODAY()) AND Order_Type = "AB"
Submitting a Job From the Source Editor When Source Code Has Been
Inadvertently Selected
Components affected: the Source Editor tab in the Process Designer window.
Usage Notes
4
Access to Data on z/OS Platforms
183
The Process Designer window includes a Source Editor tab. Use the Source
Editor tab to view and update the SAS code for a selected job.
If you display the code for a job in the Source Editor tab, it is possible to
inadvertently select some of the code in the tab. If you then submit the job for
execution, only the selected code is submitted and the job will fail. One remedy is to
switch to the Process Editor tab and resubmit the job.
Update Table Metadata Cannot Be Used on DBMS Tables That Have
Case or Special Character Options Selected
Components affected: the Update Table Metadata feature; DBMS tables that have
case or special character options selected on the Physical Storage tab of their
property windows.
The Update Table Metadata feature cannot be used on DBMS tables that have
case and special character options selected on the Physical Storage tab of their
property windows. With such tables, the Update Table Metadata feature mistakenly
puts SAS name literals around the table names saved in the metadata repository, which
might cause any jobs containing the updated table to fail.
Verify Output from a Job That Updates a DBMS
Components affected: the View Data feature; jobs in which the target data is stored
in a data base management system (DBMS).
Some DBMS’s do not commit changes as soon as they are requested. Accordingly, if a
SAS ETL Studio job updates a table in a DBMS and you try to verify the update by
using the View Data feature, the changes might not show up immediately.
If you want SAS changes to a DBMS table to show up immediately, select YES in the
Whether to COMMIT immediately after a transaction field in the metadata for
the DBMS library that is used to access the DBMS table.
To select this option for a DBMS library, display the property window for the library,
select Options, and then click Advanced Options. Click the Input/Output tab. In the
Whether to COMMIT immediately after a transaction field , select YES and then
click OK to save your changes.
Usage Notes for Source Designers and Target Table Designers
Access to Data on z/OS Platforms
Components affected: source designers and Target Table Designers that are used to
access data on a z/OS machine.
Data on a z/OS platform must be stored in a UNIX System Services (USS) directory
rather than in an MVS bound library. For a USS directory, the physical name of the
library is the same as the directory path. See "LIBNAME Statement: z/OS" in the SAS
Companion for z/OS for more information.
See Also: Update Table Metadata on z/OS Platforms
184
Access to Tables Using ODBC DB2 z/OS Pass-Through
4
Appendix 1
Access to Tables Using ODBC DB2 z/OS Pass-Through
Components affected: the source designer and the Target Table Designer for data in
ODBC DB2/z/OS format.
To use the pass-through facility for ODBC DB2/zOS to access tables, you must
configure the password and user ID. Since DB2/zOS pass-through does not support the
PASSWORD= and USER= options, you must configure these options on the ODBC
DB2/zOS source using the ODBC Administrator.
Case and Special Characters in SAS Names
Components affected: source designers and Target Table Designers for data in SAS
format; all windows that enable you to specify names for SAS tables and columns.
By default, the names for SAS tables and columns must follow the standard rules for
SAS names. However, SAS ETL Studio supports case-sensitive names for tables,
columns, and special characters in column names if you specify the appropriate options
in the metadata for the SAS table. Double-byte character set (DBCS) column names are
supported in this way, for example. Note the following exceptions:
3 Special characters are not supported in SAS table names.
3 Leading blanks are not supported for SAS column names. Leading blanks in a
SAS column name are stripped out.
3 Neither the External File source designer nor SAS/SHARE libraries and tables
support case-sensitive names for SAS tables or special characters in column
names. When using these components, the names for SAS tables and columns
must follow the standard rules for SAS names.
How Source Designers for SAS Tables Imports Integrity Constraints
Components affected: the source designers for data in SAS format.
The source designers for data in SAS format import metadata for SAS tables,
including the metadata for integrity constraints. Integrity constraints are similar to
keys in DBMS tables. To successfully import the metadata for foreign key integrity
constraints in SAS tables, the following conditions must be met:
3 Primary key integrity constraints and foreign key integrity constraints must have
unique names across all SAS tables in all SAS libraries from which metadata will
be imported.
3 In the Define Tables window in the source designer, select the primary key
constraint table and all related foreign key constraint tables. Otherwise, the
metadata will be incomplete. (If the metadata is incomplete, then all registrations
must be deleted and the complete set of related tables would need to be imported
again to get the complete set of metadata objects.)
After you import the metadata for a table, you can view the metadata for any keys by
displaying the properties window for the table and clicking the Keys tab.
Importing Keys and Indexes from SAS/SHARE Libraries
Components affected: the source designer for data in SAS/SHARE libraries.
When working with tables in SAS/SHARE libraries, you can import keys and indexes
for SAS tables but not for DBMS tables.
Usage Notes
4
Separate Login for Each Authentication Domain for Database Servers
185
Metadata for a Library and Its Tables Must Be Stored in the Same
Metadata Repository
Components affected: all source designers and Target Table Designers.
The metadata for a library and the metadata for the tables in the library must be
stored in the same metadata repository. Other configurations are not supported in this
release.
ODBC Informix Library
Components affected: ODBC Informix libraries; the source designer and the Target
Table Designer for data in ODBC Informix format.
Follow these steps to preserve the case of your table names when using an ODBC
Informix library:
I Source Designer from the
menu bar. The Source Designer selection window displays.
1 From the SAS ETL Studio desktop, select Tools
2 Open the ODBC Sources folder in the Source Designer selection window.
3 In the ODBC Sources folder, select ODBC Informix. The ODBC Informix source
designer is displayed. The first window enables you to select an ODBC Informix
library.
4 Select the appropriate ODBC Informix library, then click Edit. A library
properties window displays.
5 On the library properties window, click the Options tab.
6 On the Options tab, click Advanced Options . The Advanced Options window is
displayed.
7 In the Advanced Options window, select the Output tab.
8 On the Output tab, select YES in the Preserve column names, as in the DBMS
field.
9 Enter the following expression in the Options used in DBMS CREATE TABLE
field:
QUOTE_CHAR=
10 Select theInput/Output tab.
11 Select Yes in the Preserve DBMS table names field.
12 Click OK to save your changes.
Password-Protected SAS Data Sets Are Not Fully Supported
Components affected: source designers for data in SAS format; the View Data option
on the View menu.
Source designers will not import column metadata from password-protected SAS
data sets (tables). You cannot use the SAS ETL Studio View Data feature to view a
password-protected SAS data set.
Separate Login for Each Authentication Domain for Database Servers
Components affected: source designers for tables in DBMS format, other features
that access DBMS tables.
186
Setting Table Options
4
Appendix 1
Administrators define the metadata for users and groups as part of the setup tasks
for a data warehousing project. The login metadata for each user and group includes an
authentication domain.
You (or a group to which you belong) must have a login for the authentication domain
that is associated with the relevant database server definition. The user ID and
password in that login must correspond to an account that has been established with
the database. Otherwise, you will not be able to read any existing tables in the
relational database, and you will not be able to use a source designer or target designer
to access tables in the relational database.
Accordingly, you must have a separate login for each authentication domain that
contains a database server that you need to access. For more information about defining
login metadata for users and groups, see the SAS Management Console: User’s Guide.
Setting Table Options
Components affected: Target Table Designers, the property windows for tables.
Both the Target Table Designers and the property windows for tables include a
physical storage tab or window. This tab or window includes a Table Options button.
Click that button to specify options for the current table.
For an summary of how to update the metadata for a table, see “Updating the
Metadata for a Table” on page 67. For details about options for SAS tables (data sets
and data views), see SAS Language Reference: Dictionary.
Teradata Source Designer Hangs Unless a User ID and Password Can
Be Supplied
Components affected: source designer for data in Teradata format.
Source designer wizards enable you to import metadata for one or more tables in a
library. One of the first windows in the wizard enables you to select the library that
contains the tables. When you select a library, a connection is made to a SAS
application server. The server accesses the selected library and lists any tables that are
associated with that library. The Teradata source designer will not be able to connect to
a Teradata database library unless both of the following conditions are met:
3 A Windows environment variable, GUILOGON, is defined and set to NO on the
computer where SAS/ACCESS to Teradata is running. (This will typically be the
SAS Workspace Server component of the SAS application server that is used to
access the Teradata database.) For details about how to define Windows
environment variables, see the appropriate Windows documentation.
3 A valid login is supplied to the Teradata database server.
There are two main ways to supply a valid login to the Teradata database server:
3 Add a default login to the metadata for the Teradata database library. For details,
the metadata administrator should see the Managing Data Base Libraries section
of the SAS Management Console: User’s Guide.
3 Implement a single sign on (SSO) for the Teradata database on Windows. For
details about SSO, the database administrator should see the appropriate
Teradata documentation.
Unrestricted Users Cannot Run Source Designers or Target Table
Designers
Components affected: all source designers and Target Table Designers.
Usage Notes
4
Update Table Metadata on z/OS Platforms
187
Because of password masking, unrestricted users should not run source designers or
Target Table Designers. In order to use these wizards, users should start a SAS ETL
Studio session with a user ID that is not defined as unrestricted.
For details about unrestricted users, see the security chapters in the SAS Intelligence
Platform: Planning and Administration Guide.
Update Table Metadata on z/OS Platforms
Components affected: the Update Table Metadata feature; tables on z/OS
platforms.
The Update Table Metadata feature updates table metadata so that it matches the
corresponding physical table. However, if the physical table resides on a z/OS platform,
the update might fail for large tables (tables with more than 100 columns, for example).
A z/OS limit on the number of characters in a single line causes this problem.
188
189
APPENDIX
2
Building Java Plug-ins for SAS
ETL Studio
Overview 189
Shortcut Plug-ins 190
PluginInterface 190
ShortcutInterface 190
Installing a Shortcut Plug-in 190
Example: Building a Source Designer Plug-in 191
Mapping the Metadata and Building the Plug-in
Installing and Running the Plug-in 206
Plug-in Output 206
191
Overview
SAS ETL Studio plug-ins are Java files that provide specific functions by creating
specific types of metadata. For example, as described in “Java Transformations and
SAS Code Transformations” on page 109, a number of the transformation templates in
the Process Library are Java plug-ins, such as the SAS Sort template and the Create
Match Code template.
Several plug-ins are installed by default, and other plug-ins are available from SAS
to provide specialized functions. You can also develop your own plug-in transformation
templates, source designer wizards, target designer wizards, and new object wizards.
To develop Java plug-ins, you should be familiar with the following:
3 Java plug-in software. For details about this software, see the following location:
java.sun.com/products/plugin
3 SAS Management Console plug-ins, which are similar to the plug-ins for SAS ETL
Studio. See the Guide to Building SAS Management Console Plug-Ins, which is
provided on the SAS Management Console installation CD.
3 SAS Metadata Model. For details, see SAS Open Metadata Architecture: Reference,
which is available on the SAS Online Doc CD and in SAS Help and Documentation.
3 The SAS ETL Studio Plug-In Framework. For details about this framework, see
the SAS BI Package Libraries at support.sas.com/rnd/gendoc/bi/api/
190
Shortcut Plug-ins
4
Appendix 2
Shortcut Plug-ins
Use the ShortcutInterface and PluginInterface to add a Java plug-in to the Tools
menu, to the Shortcut Bar on the SAS ETL Studio desktop, or to both. The methods for
each of these interfaces are described as follows:
PluginInterface
public void initPlugin()
performs any necessary initialization for the plug-in
public void dispose()
performs any necessary cleanup for disposing of the plug-in
public String getDescription()
returns a string that contains a description of the plug-in
public Icon getIcon()
returns a 16x16 icon for the plug-in that will be displayed on the Tools menu
public String getName()
returns a string that represents the name of the plug-in.
ShortcutInterface
public void onSelected()
contains the actions to take when the user opens the plug-in
public Icon getLargeIcon()
returns a 32x32 icon for the plug-in that will be displayed on the shortcut bar
public JMenuItem getMenuItem()
returns a menu item (using JMenuItem) that will be added to the Tools menu. If
you want, you can define a mnemonic, an accelerator key, or both by using this
method with JMenuItem.setMnemonic() and JMenuItem.setAccelerator(),
respectively.
public int getLocations()
returns one of three values:
SHOW_ON_SHORTCUT
displays the plug-in only on the shortcut bar
SHOW_ON_MENU
displays the plug-in only on the Tools menu
SHOW_ON_ALL
displays the plug-in on both the shortcut bar and the Tools menu.
Installing a Shortcut Plug-in
After you have created a plug-in, create a JAR file containing the implementation of
ShortcutInterface for your plug-in, along with any needed images, classes, or other files.
In the manifest for the JAR, you must include a line that defines the Plugin-Init
attribute. The sample JAR that is shipped with SAS ETL Studio (in the
Building Java Plug-ins for SAS ETL Studio
4
Mapping the Metadata and Building the Plug-in
191
com.sas.wadmin.visuals package) contains a plug-in called SampleShortcutPlugin. This
sample contains the following attribute line in its manifest:
Plugin-Init: com.sas.wadmin.visuals.SampleShortcutPlugin.class
Save this JAR in the plug-ins directory in the SAS ETL Studio home directory. For
example, if you installed SAS ETL Studio in C:\Program Files\SAS\SAS ETL
Studio\9.1, save the JAR for your new plug-in in C:\Program Files\SAS\SAS ETL
Studio\9.1\plugins. After you do this, the next time you start SAS ETL Studio this
plug-in is automatically loaded and displayed.
After you have created a JAR for SampleShortcutPlugin in the plug-ins directory and
restarted SAS ETL Studio, your new plug-in will be available from the the Shortcut bar
and Tools menu.
The shortcut plug-ins are added at the bottom of the Shortcut bar, just above the
Options item in the Tools menu, or both.
Example: Building a Source Designer Plug-in
This section shows you how to develop a source designer plug-in for SAS ETL Studio.
The SourceDesignerPlugin sample provides a method for building a new source
designer, along with links to Web site resources for more detailed information.
Before you can design a new source designer plug-in, determine the format of the
source and the metadata that you want to capture about the source. You need this
information in order to design property windows that will gather information about
your source.
Mapping the Metadata and Building the Plug-in
Decide what type of metadata you want to register as a result of running your
plug-in. For more details about defining metadata, see the SAS Metadata Model in the
SAS Open Metadata Architecture: Reference, which is available in SAS Help and
Documentation.
Source designer plug-ins are integrated into SAS ETL Studio using the
SourceDesignerInterface, which is a Java interface. For technical details about the SAS
ETL Studio Plug-In Framework and the SourceDesignerInterface
(com.sas.wadmin.plugins.SourceDesignerInterface), see the SAS BI Package Libraries
at support.sas.com/rnd/gendoc/bi/api/
You can also refer to the following sample Java programs:
3 Manifest.mf:
Manifest-Version: 1.0
Main-Class: plugindir
Created-By: 1.3.0 (Sun Microsystems Inc.)
Plugin-Init: plugindir.SourceDesignerPlugin.class
3 PropertyBundle.properties
ImageLocation.notrans = com/sas/wadmin/visuals/res/
StepOut.image=DataSetSource16.gif
Common.warehouse_w2.image=warehouse_w2.gif
Common.warehouse_w3.image=warehouse_w3.gif
Common.warehouse_w4.image=warehouse_w4.gif
Common.warehouse_w5.image=warehouse_w5.gif
192
Mapping the Metadata and Building the Plug-in
4
Appendix 2
Common.warehouse_w6.image=warehouse_w6.gif
wa_source_connectInfo.image=wa_source_connectInfo.gif
gen_select_table.image=gen_select_table.gif
gen_target_location.image=gen_target_location.gif
gen_summary.image=gen_summary.gif
gen_subset_tables.image=gen_subset_tables.gif
FinishTab.Title.txt=Finish
3 SourceDesignerPlugin.class
3 SourceDesignerPlugin.java
/**
* Title:
* Description:
* Copyright:
* Company:
* */
SourceDesignerPlugin
Implements a basic Source Designer Interface
Copyright (c) 2003 by SAS Institute Inc. Cary, NC 27513 USA
SAS Institute Inc.
package plugindir;
import javax.swing.Icon;
import javax.swing.ImageIcon;
import plugindir.visuals.*;
import
import
import
import
import
import
com.sas.plugins.PluginResourceBundle;
com.sas.wadmin.plugins.SourceDesignerInterface;
com.sas.workspace.WATransitionWizardModel;
com.sas.workspace.WAWizardDialog;
com.sas.workspace.Workspace;
com.sas.workspace.visuals.WizardFinishTab;
/**
*
* The SourceDesignerInterface is used to describe Source Designer addins
* @see com.sas.plugins for additional information about the plug in
* methodology
*
*/
public class SourceDesignerPlugin extends Object implements
SourceDesignerInterface
{
protected WAWizardDialog
m_wizardDialog;
protected WATransitionWizardModel
m_wizardModel;
protected String
m_name;
protected ImageIcon
m_icon;
protected String
m_tooltip;
protected String
m_category;
protected Workspace
m_workspace;
private static PluginResourceBundle bundle =
new PluginResourceBundle( SourceDesignerPlugin.class );
Building Java Plug-ins for SAS ETL Studio
4
Mapping the Metadata and Building the Plug-in
193
protected String[][]
m_transitionList =
{ {"tab1", "NEXT", "tab2"},
{"tab2", "NEXT", "tab3"}};
/**
* Common constructor that enables the appropriate fields for the given
* metadata object.
*/
public SourceDesignerPlugin()
{
m_name = "SourceDesignerPlugin";
m_icon = bundle.getImageIcon("Icon.image" );
m_tooltip = "SD Tooltip";
m_category = "Source Designers";
m_workspace = Workspace.getWorkspace();
}//end public SourceDesignerPlugin()
/**
* This method should be used by the wizard to add the wizard tabs
* to the wizard dialog,and add the wizard transitions so the wizard model.
*
* @param wizardDialog is the wizard dialog that is calling
* to place this plugin into itself
* @param wizardModel is the wizard dialog transition model which
* the plugin should add transitions to @return true if the initialization
* was successful, false otherwise
*/
public boolean initializeWizard(WAWizardDialog wizardDialog,
WATransitionWizardModel wizardModel)
{
m_wizardDialog = wizardDialog;
m_wizardModel = wizardModel;
m_wizardDialog.setHelpProduct("hlp");
ImageIcon image = bundle.getImageIcon( "wa_source_connectInfo.image" );
m_wizardDialog.addTab("Tabber1 Title",
"tab1",
new Tab1(),
"wa_source_connectInfo.gif",
image,
false );
image = bundle.getImageIcon( "gen_subset_tables.image" );
m_wizardDialog.addTab( bundle.getString(
"TableSelectionMethodWizardTab.Title.txt"),
"tab2",
new Tab2(),
"gen_subset_tables.gif",
image,
false );
image = bundle.getImageIcon("gen_summary.image" );
194
Mapping the Metadata and Building the Plug-in
4
Appendix 2
WizardFinishTab finish = new WizardFinishTab();
finish.setHelpTopic("finishwindow");
m_wizardDialog.addTab(bundle.getString("FinishTab.Title.txt"),
"tab3",
finish,
"gen_summary.gif",
image,
true );
m_wizardModel.addTransitions( m_transitionList );
return true;
}//end public initializeWizard ( Frame frame, String title )
/**
* Method defined in PluginInterface...
*/
public void initPlugin() {}
/**
* Returns the name of the plugin.
*
* @return String name of this plugin.
*/
public String getName()
{
return m_name;
}//end public String getName()
/**
* Return the tab name of the initial tab in this wizard
*
* @return a string that is the initial tab name of this wizard.
* This is the name specified in the transition list. Note that
* this name is NOT visible; it is a unique per wizard name that
* is used only within the wizard to manage transitions. It matches
* the transition list names that the plugin provided. It is a good
* idea to prefix your tab names with the name of your plugin in
* order to ensure that they are unique.
* For example "OracleImporterTab4".
*/
public String getInitialTabName()
{
return "tab1";
}
/**
* Return a string array of all of the tabs that are endpoint tabs
* in the wizard (the tabs that should have finish turned on
* after them).
*
* @return String[] array of all the tabs that are the endpoint
* tabs in the wizard
*/
Building Java Plug-ins for SAS ETL Studio
4
Mapping the Metadata and Building the Plug-in
195
public String[] getLastTabNames()
{
String[] value = {"tab3"};
return (value);
}
/**
* Required by PluginInterface, returns the icon to be used with the
* Interface
* In the Source Designer, this is the icon that shows up in the tree.
*
* @return Icon to be displayed with the Plugin
*/
public Icon getIcon(){return m_icon;};
/**
* Return a tooltip string that to be displayed
*
* @return String containing the tooltip to be displayed.
*/
public String getToolTip() {return m_tooltip;};
/**
* The designer can choose to place the plugin in any category that the
* designer chooses.
* You can concatenate categories with a "."; each level is a level Source
* Designer selection tree. For example, a category name of Levels.MyStuff
* would show up as:
*
* - Source Designers
*
- Levels
*
- MyStuff
*
+ mynewtransform
*
* Designers should take care not when describing these hierarchies
* such that they fit in well with other similar designers.
*
* @return the Category to place this addin into
*/
public String getCategory() {return m_category;}
/**
* Required by the PluginInterface: returns the description of the Plugin.
*
* @return String containing the description of the plugin
*/
public String getDescription() {return "";}
public void dispose()
{
}
}//end public class
3 Panel1.class
3 Panel1.java
196
Mapping the Metadata and Building the Plug-in
4
Appendix 2
/**
* Title:
Panel1
* Description: Panel1
* Copyright:
Copyright 2003, SAS Institute Inc * Company:
* Inc. * @version 1.0
*/
package plugindir.visuals;
import
import
import
import
import
SAS Institute
java.awt.GridBagConstraints;
java.awt.GridBagLayout;
java.awt.Insets;
java.awt.event.ActionEvent;
java.awt.event.ActionListener;
import javax.swing.*;
import javax.swing.JRadioButton;
import javax.swing.border.EtchedBorder;
import com.sas.metadata.MdException;
import com.sas.plugins.PluginResourceBundle;
import com.sas.workspace.WAPanel;
/**
* Panel1
*/
public class Panel1 extends WAPanel
{
/** Property bundle */
private static PluginResourceBundle bundle =
new PluginResourceBundle( Panel1.class );
protected JLabel m_label = new JLabel("Put Label here..");
/** Boolean to turn on a border around this panel */
protected boolean
m_fBorder=false;
/**
* Constructs a panel1
*
* @param fBorder - create a border around this panel (true) or not
* (false)
*/
public Panel1(boolean fBorder)
{
super();
m_fBorder = fBorder;
initialize();
layoutWidgets();
}
/**
* Initialization routine.
* on the panel.
Creates and initializes all of the widgets
Building Java Plug-ins for SAS ETL Studio
4
Mapping the Metadata and Building the Plug-in
197
*/
public void initialize()
{
super.initialize();
}//end public void initialize()
/**
* Validate the data on the panel.
*/
public boolean validateData()
{
return true;
}//end public boolean validateData()
/**
* Just like in a property tab, this method is called before the panel
* is made visible to do the model/view data exchange.
* @param saveToModel true - move widget values to model values;
*
false - move model values to widgets values
*/
public boolean doDataExchange(boolean bSaveToModel) throws MdException
{
if (bSaveToModel == false)
{
}
return true;
}//end public boolean doDataExchange(boolean bsaveToModel)
throws MdException
/**
* Arrange the widgets in displayed panel.
*
*/
public void layoutWidgets()
{
//Let’s layout the button panel
GridBagLayout gridBagLayout1 = new GridBagLayout();
GridBagConstraints gbc1 = new GridBagConstraints();
WAPanel myPanel = new WAPanel();
myPanel.setLayout( gridBagLayout1 );
myPanel.setBorder(new EtchedBorder(EtchedBorder.LOWERED));
// Add the radio buttons to the panel
gbc1.gridx = 0;
gbc1.gridy = 0;
gbc1.gridwidth = GridBagConstraints.RELATIVE;
gbc1.gridheight = 1;
gbc1.weightx = 1.0;
gbc1.weighty = 1.0;
gbc1.anchor = GridBagConstraints.WEST;
gbc1.fill = GridBagConstraints.HORIZONTAL;
gbc1.insets = new Insets(0,5,0,0);
gridBagLayout1.setConstraints( m_label, gbc1 );
myPanel.add( m_label );
198
Mapping the Metadata and Building the Plug-in
4
Appendix 2
//The Main panel’s gridbaglayout stuff
GridBagLayout gridBagLayout = new GridBagLayout();
GridBagConstraints gbc = new GridBagConstraints();
setLayout( gridBagLayout );
// Add the radio buttons to the panel
gbc.gridx = 0;
gbc.gridy = 0;
gbc.gridwidth = GridBagConstraints.RELATIVE;
gbc.gridheight = 1;
gbc.weightx = 1.0;
gbc.weighty = 1.0;
gbc.anchor = GridBagConstraints.NORTHWEST;
gbc.fill = GridBagConstraints.HORIZONTAL;
gbc.insets = new Insets(0,0,0,0);
gridBagLayout.setConstraints( myPanel, gbc );
add( myPanel );
}//end public void layoutWidgets()
}
3 Panel2.class
3 Panel2.java
/**
* Title:
Panel2
* Description: Panel2
* Copyright:
Copyright 2003, SAS Institute Inc * Company:
* Inc. * @version 1.0
*/
package plugindir.visuals;
import java.awt.GridBagConstraints;
import java.awt.GridBagLayout;
import java.awt.Insets;
import javax.swing.JLabel;
import javax.swing.border.EtchedBorder;
import com.sas.metadata.MdException;
import com.sas.plugins.PluginResourceBundle;
import com.sas.workspace.WAPanel;
/**
* Panel 2
*
*/
public class Panel2 extends WAPanel {
/** Property bundle */
private static PluginResourceBundle bundle =
new PluginResourceBundle(Panel2.class);
/** Boolean to turn on a border around this panel */
SAS Institute
Building Java Plug-ins for SAS ETL Studio
4
Mapping the Metadata and Building the Plug-in
199
protected boolean m_fBorder = false;
protected JLabel m_label;
/**
*
* @param fBorder - create a border around this panel (true) or not (false)
*/
public Panel2(boolean fBorder) {
super();
m_fBorder = fBorder;
initialize();
layoutWidgets();
}
/**
* Initialization routine. Creates and initializes all of the widgets
* on the panel.
*/
public void initialize() {
m_label = new JLabel("Put Label here ");
super.initialize();
} //end public void initialize()
/**
* Validate the data on the panel.
*/
public boolean validateData() {
return true;
} //end public boolean validateData()
/**
* Just like in a property tab, this method is called before the
* panel is made visible to do the model/view data exchange.
* @param saveToModel true - move widget values to model values;
*
false - move model values to widgets values
*/
public boolean doDataExchange(boolean bSaveToModel) throws MdException {
if (bSaveToModel == false) {
} else
{
}
return true;
} //end public boolean doDataExchange(boolean bsaveToModel)
throws MdException
/**
* Arrange the widgets in displayed panel.
*
*/
public void layoutWidgets() {
//Let’s layout the button panel
GridBagLayout gridBagLayout1 = new GridBagLayout();
GridBagConstraints gbc1 = new GridBagConstraints();
WAPanel myPanel = new WAPanel();
200
Mapping the Metadata and Building the Plug-in
4
Appendix 2
myPanel.setLayout(gridBagLayout1);
myPanel.setBorder(new EtchedBorder(EtchedBorder.LOWERED));
// Add the radio buttons to the panel
gbc1.gridx = 0;
gbc1.gridy = 0;
gbc1.gridwidth = GridBagConstraints.RELATIVE;
gbc1.gridheight = 1;
gbc1.weightx = 1.0;
gbc1.weighty = 1.0;
gbc1.anchor = GridBagConstraints.WEST;
gbc1.fill = GridBagConstraints.HORIZONTAL;
gbc1.insets = new Insets(0, 5, 0, 0);
gridBagLayout1.setConstraints(m_label, gbc1);
myPanel.add(m_label);
//The Main panel’s gridbaglayout stuff
GridBagLayout gridBagLayout = new GridBagLayout();
GridBagConstraints gbc = new GridBagConstraints();
setLayout(gridBagLayout);
// Add the radio buttons to the panel
gbc.gridx = 0;
gbc.gridy = 0;
gbc.gridwidth = GridBagConstraints.RELATIVE;
gbc.gridheight = 1;
gbc.weightx = 1.0;
gbc.weighty = 1.0;
gbc.anchor = GridBagConstraints.NORTHWEST;
gbc.fill = GridBagConstraints.HORIZONTAL;
gbc.insets = new Insets(0, 0, 0, 0);
gridBagLayout.setConstraints(myPanel, gbc);
add(myPanel);
} //end public void layoutWidgets()
}
3 Tab1.class
3 Tab1.java
/**
* Title:
Tab1
* Description: Tab1
* Copyright:
Copyright 2003, SAS Institute Inc * Company:
* Institute Inc. * @version 1.0
*/
package plugindir.visuals;
import java.awt.GridBagConstraints;
import java.awt.GridBagLayout;
import java.awt.Insets;
import com.sas.plugins.PluginResourceBundle;
import com.sas.workspace.WsDescriptionWizardTab;
SAS
Building Java Plug-ins for SAS ETL Studio
4
Mapping the Metadata and Building the Plug-in
201
/**
* Tab1
*
*
*/
public class Tab1 extends WsDescriptionWizardTab
{
/** Property bundle */
private static PluginResourceBundle bundle =
new PluginResourceBundle(Tab1.class);
private PluginResourceBundle m_eda_bundle;
protected Panel1 myPanel1;
/**
* Main constructor
*/
public Tab1()
{
super();
setHelpTopic("selecttablesbyapplicationareawindow");
myPanel1 = new Panel1(false);
initialize();
}
/**
* Initialize the widgets and their layout.
*/
public void initialize()
{
this.setLayout(new GridBagLayout());
this.add(myPanel1, new GridBagConstraints(0, 0, 1, 1, 1.0, 1.0
,GridBagConstraints.NORTHWEST, GridBagConstraints.BOTH,
new Insets(0, 0, 0, 0), 0, 0));
}//end public void initialize()
/**
* Transfer data to and from the model.
*
* @param bSaveToModel True if transfering from view to model, false if
* vice versa
*/
public boolean doDataExchange( boolean bSaveToModel ) throws
com.sas.metadata.MdException
{
return myPanel1.doDataExchange(bSaveToModel);
}//end public boolean doDataExchange( boolean bSaveToModel ) throws
com.sas.metadata.MdException
/**
* Validate data entered into panel.
202
Mapping the Metadata and Building the Plug-in
4
Appendix 2
*
* @return boolean to determine if there is validate data in the panel
* or not
*/
public boolean validateData()
{
return myPanel1.validateData();
}//end public boolean validateData()
/**
* Run when the Next button is selected.
*/
public void onNext()
{
super.onNext();
}//end public void onNext()
/**
* Run when the back button is selected.
*/
public void onBack()
{
super.onBack();
}//end public void onBack()
/**
* Create the finish string that shows up in WAWizardFinish
*/
public String createFinishString()
{
String finishString = "This is the finish string";
return finishString;
}//end public String createFinishString()
}//
3 Tab2.class
3 Tab2.java
/**
* Title:
Tab2
* Description: Tab2
* Copyright:
Copyright 2003, SAS Institute Inc * Company:
* Institute Inc. * @author
* @version
1.0
*/
package plugindir.visuals;
import java.awt.GridBagConstraints;
import java.awt.GridBagLayout;
import java.awt.Insets;
import com.sas.metadata.CMetadata;
SAS
Building Java Plug-ins for SAS ETL Studio
4
Mapping the Metadata and Building the Plug-in
import com.sas.metadata.MdObjectFactory;
import com.sas.metadata.MdObjectStore;
import com.sas.metadata.PhysicalTable;
import com.sas.metadata.SASLibrary;
import com.sas.plugins.PluginResourceBundle;
import com.sas.workspace.WAPropertyTab;
import com.sas.workspace.WAWizardDialog;
import com.sas.workspace.Workspace;
import com.sas.workspace.WsDescriptionWizardTab;
/**
* Tab2
*
*/
public class Tab2 extends WsDescriptionWizardTab
{
/** Property bundle */
private static PluginResourceBundle bundle =
new PluginResourceBundle(Tab2.class);
private PluginResourceBundle m_eda_bundle;
protected Panel2 myPanel2;
/**
* Main constructor
*/
public Tab2()
{
super();
setHelpTopic("Tabber2");
myPanel2 = new Panel2(false);
initialize();
}
/**
* Initialize the widgets and their layout.
*/
public void initialize()
{
this.setLayout(new GridBagLayout());
this.add(myPanel2, new GridBagConstraints(0, 0, 1, 1, 1.0, 1.0
,GridBagConstraints.NORTHWEST, GridBagConstraints.BOTH,
new Insets(0, 0, 0, 0), 0, 0));
}//end public void initialize()
/**
* Transfer data to and from the model.
*
* @param bSaveToModel True if transfering from view to model, false
* if vice versa
*/
public boolean doDataExchange( boolean bSaveToModel ) throws
com.sas.metadata.MdException
203
204
Mapping the Metadata and Building the Plug-in
4
Appendix 2
{
if (bSaveToModel == false)
myPanel2.doDataExchange(bSaveToModel);
else
// this is performed after the user has selected FINISH on the
wizard screen
write_metadata();
return true;
}//end public boolean doDataExchange( boolean bSaveToModel ) throws
com.sas.metadata.MdException
/**
* Validate data entered into panel.
*
* @return boolean to determine if there is validate data in the panel
* or not
*/
public boolean validateData()
{
return myPanel2.validateData();
}//end public boolean validateData()
/**
* Run when the Next button is selected.
*/
public void onNext()
{
super.onNext();
}//end public void onNext()
/**
* Run when the back button is selected.
*/
public void onBack()
{
super.onBack();
}//end public void onBack()
/**
* Create the finish string that shows up in WAWizardFinish
*/
public String createFinishString()
{
String finishString = "This is the finish string for tab2";
return finishString;
}//end public String createFinishString()
public void write_metadata() throws com.sas.metadata.MdException {
WAWizardDialog myWizard = (WAWizardDialog) this.getTopLevelAncestor();
//Get the Right repository to add it to, we hope...
Workspace workspace = Workspace.getWorkspace();
Building Java Plug-ins for SAS ETL Studio
4
Mapping the Metadata and Building the Plug-in
205
CMetadata myRepository = workspace.getDefaultRepository();
String strID = myRepository.getFQID().substring(9, 17);
MdObjectStore store =
(MdObjectStore) myWizard.getWizardData("OBJECTSTORE");
SASLibrary dbLibrary = (SASLibrary) myWizard.getWizardData("Library");
PhysicalTable newTable =
(PhysicalTable) MdObjectFactory.createComplexMetadataObject(
store,
store,
"TableName",
"PhysicalTable",
strID);
myWizard.setMasterObject(newTable);
//Let’s set the attributes for this table
newTable.setIsCompressed(0);
newTable.setIsEncrypted(0);
newTable.setDBMSType("");
newTable.setSASTableName("TableName");
newTable.setTableName("TableName");
newTable.setName("TableName");
newTable.setDesc("Table Description");
newTable.setNumRows(-1);
// we are assuming everything is DATA not View at this point in the game...
newTable.setMemberType("DATA");
for (int i = 0; i < 10; i++) {
com.sas.metadata.Column newColumn =
(com.sas.metadata.Column) MdObjectFactory.createComplexMetadataObject(
store,
store,
"Column" + i,
"Column",
strID);
newTable.addElementToChangeList(newColumn);
newColumn.setSASColumnName("Column" + i);
newColumn.setSASColumnType("C");
newColumn.setSASColumnLength(10);
String format = "$10.";
newColumn.setSASFormat(format);
newColumn.setSASInformat("$10.");
newColumn.setColumnName("ColumnName" + i);
newColumn.setIsNullable(1);
newTable.getColumns().addElement(newColumn);
}
newTable.updateMetadataAll();
} //end public void tableDefinition()
}//
206
Installing and Running the Plug-in
4
Appendix 2
In the sample source designer programs, the SourceDesignerPlugin.java class
provides the needed plug-in navigation, where tabs display each panel of the plug-in.
For example, public class Tab1 and public class Tab2 extend WsDescriptionWizardTab.
Each tab then references a panel that displays that panel. For example, public class
Panel1 and public class Panel2 extend WAPanel.
Installing and Running the Plug-in
In SAS ETL Studio, you must provide a JAR file that contains all class files, property
bundles, and a manifest. Place this JAR file in the plug-ins subdirectory where SAS
ETL Studio is located—for example, ETLStudioDirectoryLocation\9.1\plugins.
In the JAR file for each plug-in must be a manifest that includes the following
information:
Manifest-Version:
Main-Class:
Created-By:
Plugin-Init:
1.0
plugindir /* Directory where your plug-in class that */
/* extends SourceDesignerInterface resides */
1.3.0 (Sun Microsystems Inc.)
plugindir.SourceDesignerPlugin.class
You might also need to set the Class-Path for the plug-in to run properly.
Plug-in Output
The write_metadata method in Tab2 shows an example of writing the physical table,
TableName, with 10 columns, named Column0 through Column9. This table shows up
in the Custom tree of SAS ETL Studio.
207
APPENDIX
3
Recommended Reading
Recommended Reading
207
Recommended Reading
Here is the recommended reading list for this title:
3 Cody’s Data Cleaning Techniques Using SAS Software
3 Communications Access Methods for SAS/CONNECT and SAS/SHARE
3
3
3
3
3
3
Moving and Accessing SAS Files
PROC SQL: Beyond the Basics Using SAS
SAS Intelligence Platform: Planning and Administration Guide
SAS Management Console: User’s Guide
SAS OLAP Server Administrator’s Guide
SAS SQL Procedure User’s Guide
For a complete list of SAS publications, see the current SAS Publishing Catalog. To
order the most current publications or to receive a free copy of the catalog, contact a
SAS representative at
SAS Publishing Sales
SAS Campus Drive
Cary, NC 27513
Telephone: (800) 727-3228*
Fax: (919) 677-8166
E-mail: [email protected]
Web address: support.sas.com/pubs
* For other SAS Institute business, call (919) 677-8000.
Customers outside the United States should contact their local SAS office.
208
209
Glossary
administrator
the person who is responsible for maintaining the technical attributes of an object
such as a table or a library. For example, an administrator might specify where a
table is stored and who can access the table. See also owner.
alternate key
another term for unique key. See unique key.
analysis data set
in SAS data quality, an output data set that is created by applying a scheme to a
variable or column that contains character values. The analysis data set identifies
clusters of similar values, as well as the value that occurs most frequently in each
cluster.
business key
one or more columns in a dimension table that comprise the primary key in a source
table in an operational system.
change management
in the SAS Open Metadata Architecture, a facility for metadata source control,
metadata promotion, and metadata replication.
change-managed repository
in the SAS Open Metadata Architecture, a metadata repository that is under
metadata source control.
cluster
in SAS data quality, a set of character values that have the same match code.
cross-reference table
a table that contains only the current rows of a larger dimension table. Columns
generally include all business key columns and a digest column. The business key
column is used to determine if source rows are new dimensions or updates to existing
dimensions. The digest column is used to detect changes in source rows that might
update an existing dimension. During updates of the fact table that is associated
with the dimension table, the cross-reference table can provide generated keys that
replace the business key in new fact table rows.
custom repository
in the SAS Open Metadata Architecture, a metadata repository that must be
dependent on a foundation repository or custom repository, thus allowing access to
210 Glossary
metadata definitions in the repository or repositories on which it depends. A custom
repository is used to specify resources that are unique to a particular data collection.
For example, a custom repository could define sources and targets that are unique to
a particular data warehouse. The custom repository would access user definitions,
group definitions, and most server metadata from the foundation repository. See also
foundation repository, project repository.
data analysis
in SAS data quality, the process of evaluating input data sets in order to determine
whether data cleansing is needed.
data cleansing
the process of eliminating inaccuracies, irregularities, and discrepancies from
character data.
data lineage
a search that seeks to identify the tables, columns, and transformations that have an
impact on a selected table or column. See also impact analysis, reverse impact
analysis, transformation.
data transformation
in SAS data quality, a data cleansing process that applies a scheme to specified
character values. The scheme creates match codes internally in order to create
clusters. All values in each cluster are then transformed to the single value that
occurs most frequently in each cluster.
database library
a collection of one or more database management system files that are recognized by
SAS and that are referenced and stored as a unit. Each file is a member of the library.
database server
a server that provides relational database services to a client. Oracle, DB/2 and
Teradata are examples of relational databases.
delimiter
a character that separates words or phrases in a text string.
derived mapping
a mapping between a source column and a target column in which the value of the
target column is a function of the value of the source column. For example, if two
tables contain a Price column, the value of the target table’s Price column might be
equal to the value of the source table’s Price column multiplied by 0.8.
digest column
a column in a cross-reference table that contains a concatenation of encrypted values
for specified columns in a target table. If a source row has a digest value that differs
from the digest value for that dimension, then changes are detected and the source
row becomes the new current row in the target. The old target row is closed out and
receives a new value in the end date/time column.
dimension
one or more rows in a dimension table that have the same business key value.
dimension table
in a star schema, a table that contains the data for one of the dimensions. The
dimension table is connected to the star schema’s fact table by a primary key. The
dimension table contains fields for each level of each hierarchy that is included in the
dimension.
Glossary 211
fact table
the central table in a star schema. The fact table contains the individual facts that
are being stored in the database as well as the keys that connect each particular fact
to the appropriate value in each dimension.
foreign key
one or more columns that are associated with a primary key or unique key in another
table. A table can have one or more foreign keys. A foreign key is dependent upon its
associated primary or unique key. In other words, a foreign key cannot exist without
that primary or unique key.
foundation repository
in the SAS Open Metadata Architecture, a metadata repository that is used to
specify metadata for global resources that can be shared by other repositories. For
example, a foundation repository is used to store metadata that defines users and
groups on the metadata server. Only one foundation repository should be defined on
a metadata server. See also custom repository, project repository.
generated key
a column in a dimension table that contains values that are sequentially generated
using a specified expression. Generated keys are used to implement surrogate keys
and retained keys.
global resource
an object, such as a server or a library, that is shared on a network.
impact analysis
a search that seeks to identify the tables, columns, and transformations that would
be affected by a change in a selected table or column. See also transformation, data
lineage.
intersection table
a table that describes the relationships between two or more tables. For example, an
intersection table could describe the many-to-many relationships between a table of
users and a table of groups.
job
a metadata object that specifies processes that create output.
locale
a value that reflects the language, local conventions, and culture for a geographic
region. Local conventions can include specific formatting rules for dates, times, and
numbers, and a currency symbol for the country or region. Collating sequences,
paper sizes, and conventions for postal addresses and telephone numbers are also
typically specified for each locale. Some examples of locale values are
French_Canada, Portuguese_Brazil, and Chinese_Singapore.
lookup standardization
a process that applies a scheme to a data set for the purpose of data analysis or data
cleansing.
match code
a version of a character value from which some of the vowels have been removed,
insignificant words (if any) have been removed, and the capitalization and formatting
of words have been standardized. Match codes are used to identify clusters of similar
values in a character variable or column. They can be used to reduce the number of
duplicate entries in a data set.
metadata administrator
a person who defines the metadata for servers, metadata repositories, users, and
other global resources.
212 Glossary
metadata model
a definition of the metadata for a set of objects. The model describes the attributes
for each object, as well as the relationships between objects within the model.
metadata object
a set of attributes that describe a table, a server, a user, or another resource on a
network. The specific attributes that a metadata object includes vary depending on
which metadata model is being used.
metadata repository
a collection of related metadata objects, such as the metadata for a set of tables and
columns that are maintained by an application. A SAS Metadata Repository is an
example.
metadata server
a server that provides metadata management services to one or more client
applications. A SAS Metadata Server is an example.
metadata source control
in the SAS Open Metadata Architecture, a feature that enables multiple users to
work with the same metadata repository at the same time without overwriting each
other’s changes. See also change management.
operational data
data as it exists in the operational system, which is used as source data for a data
warehouse.
operational system
one or more programs (frequently relational databases) that provide source data for a
data warehouse.
owner
the person who is responsible for the contents of an object such as a table or a
library. See also administrator.
primary key
one or more columns that are used to uniquely identify a row in a table. A table can
have only one primary key. The column(s) in a primary key cannot contain null
values. See also unique key, foreign key.
process flow diagram
a diagram in the Process Editor that specifies the sequence of each source, target,
and process in a job. In the diagram, each source, target, and process has its own
metadata object. Each process in the diagram is specified by a metadata object called
a transformation.
project repository
a repository that must be dependent on a foundation repository or custom repository
that will be managed by the Change Management Facility. A project repository is
used to isolate changes from a foundation repository or from a custom repository. The
project repository enables metadata programmers to check out metadata from a
foundation repository or custom repository so that the metadata can be modified and
tested in a separate area. Project repositories provide a development/testing
environment for customers who want to implement a formal change management
scheme. See also custom repository, foundation repository.
Quality Knowledge Base
a collection of locales and other information that is referenced during data analysis
and data cleansing. For example, to create match codes for a data set that contains
street addresses in Great Britain, you would reference the ADDRESS match
definition in the ENGBR locale in the Quality Knowledge Base.
Glossary 213
retained key
a numeric column in a dimension table that is combined with a begin-date column to
make up the primary key. During the update of a dimensional target table, source
rows that contain a new business key are added to the target. A key value is
generated and added to the retained key column and a date is added to the
begin-date column. When a source row has the same business key as a row in the
target, the source row is added to the target, including a new begin-date value. The
retained key of the new column is copied from the target row.
reverse impact analysis
See data lineage.
SAS application server
a server that provides SAS services to a client. In the SAS Open Metadata
Architecture, the metadata for a SAS application server specifies one or more server
components that provide SAS services to a client.
SAS Management Console
a Java application that provides a single user interface for performing SAS
administrative tasks.
SAS OLAP Server
a SAS server that provides access to multidimensional data. The data is queried
using the multidimensional expressions (MDX) language.
SAS Open Metadata application
a client application that connects to the SAS Metadata Server and uses metadata
from one or more SAS Metadata Repositories.
SAS Open Metadata Architecture
a general-purpose metadata management facility that provides metadata services to
SAS applications. The SAS Open Metadata Architecture enables applications to
exchange metadata, which makes it easier for these applications to work together.
SAS/CONNECT server
a server that provides SAS/CONNECT services to a client. When SAS ETL Studio
generates code for a job, it uses SAS/CONNECT software to submit code to remote
computers. SAS ETL Studio can also use SAS/CONNECT software for interactive
access to remote libraries.
SAS/SHARE library
a SAS library for which input and output requests are controlled and executed by a
SAS/SHARE server.
SAS/SHARE server
the result of an execution of the SERVER procedure, which is part of SAS/SHARE
software. A server runs in a separate SAS session that services users’ SAS sessions
by controlling and executing input and output requests to one or more libraries.
scheme
a data set that is created from a character variable or column and which is applied to
that same character data for the purpose of transformation or analysis.
sensitivity
in SAS data quality, a value that determines the granularity of the clusters that are
generated during data analysis and data cleansing.
server administrator
a person who installs and maintains server hardware or software. See also metadata
administrator.
214 Glossary
server component
in SAS Management Console, a metadata object that specifies information about how
to connect to a particular kind of SAS server on a particular computer.
slowly changing dimension
a set of strategies that are used to track changes in a dimension table. A type 1 SCD
is updated by writing a new value over an old value. A type 2 SCD is updated by
creating a new row when a value changes in an old row. A type 3 SCD is updated by
moving an old value into a new column and then writing a new value into the
column that contains the most recent value.
snowflake schema
tables in a database in which a single fact table is connected to multiple dimension
tables. The dimension tables are structured to minimize update anomalies and to
address single themes. This structure is visually represented in a snowflake pattern.
See also star schema.
source
an input to an operation.
star schema
tables in a database in which a single fact table is connected to multiple dimension
tables. This is visually represented in a star pattern. SAS OLAP cubes can be
created from a star schema.
surrogate key
a numeric column in a dimension table that is the primary key of that table. The
surrogate key column contains unique integer values that are generated sequentially
when rows are added and updated. In the associated fact table, the surrogate key is
included as a foreign key in order to connect to specific dimensions.
target
an output of an operation.
transformation
a metadata object that specifies how to extract data, transform data, or load data
into data stores. Each transformation that you specify in a process flow diagram
generates or retrieves SAS code. You can specify user-written code in the metadata
for any transformation in a process flow diagram.
transformation template
a process flow diagram that consists of a transformation object and one or more drop
zones for sources, targets, or both.
unique key
one or more columns that can be used to uniquely identify a row in a table. A table
can have one or more unique keys. Unlike a primary key, a unique key can contain
null values. See also primary key, foreign key.
Index 215
Index
A
accessing data
interactively 43
z/OS 183
administrator setup tasks 38
case and special characters support 49
change-managed metadata repositories 38
foundation repository 40
metadata for libraries 44
metadata for servers 42
metadata for users, administrators, and
groups 41
metadata profile 40
prerequisites for metadata import and export 52
prerequisites for SAS Data Quality 51
project plans 38
project repositories 41
software installation 39
starting SAS Management Console 40
administrators
entering metadata for 41
analytic intelligence 6
authentication domains
login for database servers 185
B
Base SAS libraries 45
business intelligence 6
C
case sensitivity 49, 184
change management 11
adding metadata 64
change-managed metadata repositories 38
checking in metadata 66
checking out metadata 65
cubes and 162
jobs and 116
user tasks 64
cleansing data 12, 24
code
code generation 43
jobs with generated code 100
jobs with user-written code 101, 116
submitting user-written code for cubes 172
column metadata
updating 68, 119
column names
case and special characters 49
default name options 51
components, user-written 12
compute services 12
Cube Designer 63, 162
building cubes from star schema 165
cubes 161
building from star schema 164
change management for 162
checking in 171
creating 161
creating with Cube Designer 162
examples 164, 172
prerequisites for 162
submitting user-written code for 172
updating 163
updating metadata 163
viewing data in 163
custom SAS formats 45
D
data access
interactive 43
z/OS 183
data analysis 12
data cleansing 12, 24
data marts
creating 25
data quality transformation templates
data services 11
data sets
password-protected 185
data stores
specifying metadata for 60
updating metadata in jobs 118
viewing metadata in jobs 118
data transfers 12
data validation 24
data warehouses 24
cleansing data 24
creating data marts 25
creating dimensional data 25
denormalizing source data 24
designing 23
12, 51
example 27
extracting source data 24
libraries for 44
loading data 24
planning 25
security plan for 26
software requirements 39
validating data 24
database servers
login for authentication domains 185
DB2
table access with ODBC DB2 z/OS passthrough 184
DBMS
verifying output when updating 183
DBMS column names
case and special characters 50
DBMS libraries 46
DBMS names
schema names and 180
DBMS table names
case and special characters 50
DBMS tables
case and special characters 183
dropping 181
metadata for tables with keys 66
re-creating 181
Update Table Metadata and 183
default SAS application server 42
code generation and 43
impact of 43
interactive data access 43
selecting 59
denormalizing source data 24
desktop 14
dimensional data 25
E
enterprise applications
libraries for 46
error log
location 56
ETL process flows 5
ETL Q link 6
example data warehouse 27
libraries for 44
explicit data transfers 12
216
Index
exporting
metadata 11, 52
SAS code transformations 128
External File source designer 47
External File wizard
extracting data from flat files 78
external files 47
extracting data from 78
extracting data 24
from flat files 78
F
flat files
extracting data from 78
flows 102
formats
libraries for custom SAS formats
foundation repository
creating 40
45
G
generated code 43
jobs with 100
groups
entering metadata for
41
H
Help 4, 13
historical data
145
I
implicit data transfers 12
importing
integrity constraints 184
keys and indexes 184
metadata 11, 52
SAS code transformations 128
indexes
importing from SAS/SHARE libraries 184
installation 38, 39
integrity constraints
importing with source designers 184
intelligent storage 6
interactive data access 43
J
Java options 56
Java plug-in transformation templates 109
Java plug-ins
building 189
building source designer plug-ins 191
example 191
location 56
shortcut plug-ins 190
Java transformations 109
job properties windows 109
job scheduling 12, 102
deploying jobs 120
jobs 100
change management for 116
checking in 115
checking out metadata 113
creating 113
creating with source designers 116
creating with target designers 116
DBMS updates and verifying output 183
definition 59, 100
deploying for scheduling 120
examples 132, 155
executing 102
generated source code with 100
joining tables 132
MLE library tables as targets 180
New Job wizard 103
populating 114
report generation 132
retrieving user-written code 116
running 113, 115, 120
SAS code transformation templates in 128
submitting from Source Editor 182
task flow for creating 59
troubleshooting 115
updating 114
updating basic metadata 117
updating metadata for data stores 118
updating metadata for tables 118
updating metadata for transformations 118
user-written source code with 101
verifying output 115
viewing 114
viewing basic metadata 117
viewing metadata for data stores 118
viewing metadata for tables 118
viewing metadata for transformations 118
viewing source data 117
viewing target data 117
windows for 102
joining tables 132
K
keys
importing from SAS/SHARE libraries 184
metadata for DBMS tables with 66
L
libraries
Base SAS libraries 45
DBMS libraries 46
determining need for 44
entering metadata for 44, 48
external files 47
for custom SAS formats 45
for enterprise applications 46
for example data warehouse 44
generic 47
Microsoft Excel and Access files
New Library wizard 48
ODBC libraries 46
47
OLE libraries 46
preassigned 48
SAS/SHARE libraries 45
SAS SPD Engine libraries 45
SAS SPD Server libraries 45
storing metadata in metadata repository
XML files 47
loading data 24
local resources 43
Log tab 107
login
authentication domains for database
servers 185
185
M
mapping metadata
updating 68, 119
menu bar 15
message logging 57
message window 15
metadata
adding 64
checking in 66
checking out 65, 113
DBMS tables with keys 66
entering, for libraries 44, 48
entering, for servers 42
entering, for source tables 72
entering, for tables 89
entering, for users, administrators, and
groups 41
exporting 11, 52
importing 11, 52
saving changes 181
source designers and 61
specifying, for data stores 60
specifying, for sources and targets 60
storing for libraries and tables 185
target designers and 63
updating basic job metadata 117
updating cube metadata 163
updating data store metadata 118
updating table metadata 67, 118
updating transformation metadata 118
viewing basic job metadata 117
viewing data store metadata 118
viewing table metadata 67
viewing table metadata in jobs 118
viewing transformation metadata in jobs 118
metadata profiles 13
creating 40, 57
opening 58
metadata repositories 13
change-managed 38
default 57
storing metadata for libraries and tables 185
metadata server 13
Microsoft Access files 47
Microsoft Excel files 47
migration
SAS/Warehouse Administrator to SAS ETL
Studio 180
MLE library tables
as targets in jobs 180
multi-tier support 11
Index 217
N
name options
defaults for tables and columns 51
for individual tables 68
names
DBMS names and schema names 180
SAS names 184
New Job wizard 103
New Library wizard 48
normalized data 24
O
ODBC DB2 z/OS pass-through
accessing tables 184
ODBC Informix library 185
ODBC libraries 46
accessing external files 47
ODS
output from stored processes 180
OLE libraries 46
online Help 4
for windows 13
Open a Metadata Profile window 13
Options window 17
Orion Star Sports and Outdoors 27
output
ODS output from stored processes 180
source designer plug-ins 206
verifying after DBMS updates 183
verifying job output 115
Output tab 107
P
planning 6
preassigned libraries 48
Process Designer window 16, 105
Process Editor tab 107
process flow diagrams 16
process flows 5
Process Library 12
Process Library tree 107
project plans 38
project repositories
creating, for each user 41
Publish to Archive transformation 141
R
remote resources 43
reports
creating with jobs 132
repositories
See metadata repositories
S
SAS application server
See default SAS application server
SAS Application Services 9
SAS Business Intelligence Infrastructure 8
SAS Application Services 9
SAS Foundation servers 8
SAS Foundation Services 9
SAS Client Services 10
SAS code transformation templates 109
creating 120
example 155
identifying 128
in jobs 128
SAS code transformations 109
access control 129
deleting folders for 129
exporting 128
importing 128
SAS/CONNECT servers
required for SAS ETL Studio 39
signon scripts for 182
SAS Data Quality Server
prerequisites for 51
SAS ETL Studio 5
components 13
features 10
installation 38, 39
migrating from SAS/Warehouse Administrator
to 180
online Help 4, 13
SAS Intelligence Platform 8
SAS Intelligence Value Chain 6
starting 56
usage notes 20, 180
windows 13
wizards 18
SAS Foundation 8
SAS Foundation servers 8
SAS Foundation Services 9
SAS Intelligence Platform 8
SAS Business Intelligence Infrastructure 8
SAS Client Services 10
SAS Foundation 8
SAS Intelligence Value Chain 6
SAS Management Console
starting 40
SAS Metadata Server 9
SAS names
case and special characters in 184
SAS OLAP Server 9
SAS/SHARE libraries 45
importing keys and indexes from 184
SAS SPD Engine libraries 45
SAS SPD Server libraries 45
TEMP=YES option for 180
SAS Stored Process Server 9
SAS/Warehouse Administrator
migrating to SAS ETL Studio 180
SAS Workspace Server 9
SCD Type 2 Loader
configuring 150
schema names
DBMS names and 180
security
for data warehouses 26
servers
See also default SAS application server
database servers 185
entering metadata for 42
metadata server 13
required 39
SAS Data Quality Server 51
SAS Foundation servers 8
setup tasks
administrators 38
shortcut bar 15
shortcut plug-ins 190
installing 190
signon scripts
SAS/CONNECT servers 182
slowly changing dimensions 145
software installation 38, 39
source code
jobs with generated code 100
jobs with user-written code 101
source data
extracting and denormalizing 24
viewing in jobs 117
source designer plug-ins
building 191
installing and running 206
output 206
source designers 61
creating jobs with 116
entering metadata for source tables 72
External File source designer 47
extracting data from flat files 78
importing integrity constraints for tables 184
Teradata 186
unrestricted users and 186
usage notes for 183
Source Editor
submitting jobs from 182
submitting user-written code for cubes 172
Source Editor tab 107
Source Editor window 16
source tables
metadata for 72
sources 71
definition 60
examples 72, 78
specifying metadata for 60
viewing job data for 117
SPD Engine libraries 45
SPD Server libraries 45
TEMP=YES option for 180
special characters 49, 184
SQL Join transformation 137, 182
star schema
building cubes from 164
starting SAS ETL Studio 56
status line 15
stored processes
ODS output from 180
submitting code
user-written code for cubes 172
submitting jobs
from Source Editor 182
T
table names
case and special characters
default name options 51
table options
setting 186
49
218
Index
table properties windows 110
tables
accessing with ODBC DB2 z/OS passthrough 184
entering metadata for 89
entering metadata for source tables 72
history of data changes 145
importing integrity constraints for 184
in SPD Server library 180
joining 132
name options for 68
setting options 186
updating metadata for 67
updating metadata in jobs 118
viewing data in 67
viewing metadata for 67
viewing metadata in jobs 118
target data
viewing in jobs 117
target designers 63
creating jobs with 116
Target Table Designers 63
entering metadata for tables 89
unrestricted users and 186
usage notes for 183
target tables
entering metadata for 89
targets 89
definition 60
entering metadata for tables 89
example 89
MLE library tables as 180
specifying metadata for 60
viewing job data for 117
task flow 59
templates
See transformations
TEMP=YES option
for SPD Server library tables 180
Teradata source designer
user ID and password 186
toolbar 15
Transformation Generator wizard 112, 122
transformation properties windows 111
transformations 12
See also SAS code transformation templates
See also SAS code transformations
data quality transformation templates 12, 51
Java plug-in templates 109
Java transformations 109
Publish to Archive transformation 141
SQL Join transformation 137, 182
templates 107
updating metadata in jobs 118
viewing metadata in jobs 118
tree view 15
trees 15
trend analysis 145
U
unrestricted users
running source designers and Target Table Designers 186
Update Table Metadata
DBMS tables and 183
z/OS 187
usage notes 20, 180
for source designers and Target Table Designers 183
user tasks 56
change management 64
creating metadata profile 57
default SAS application server 59
main task flow 59
metadata for DBMS tables with keys 66
metadata for sources and targets 60
name options for tables 68
opening metadata profile 58
preliminary 56
source designers 61
starting SAS ETL Studio 56
target designers 63
updating table metadata 67
viewing table data 67
viewing table metadata 67
user-written code
jobs with 101
retrieving in jobs 116
submitting for cubes 172
user-written components 12
users
entering metadata for 41
V
validating data 24
W
warehouse design 23
warehouse project plans 38
windows 13
desktop 14
for jobs 102
job properties windows 109
online Help for 13
Open a Metadata Profile 13
Options 17
Process Designer 16, 105
Source Editor 16
table properties windows 110
transformation properties windows 111
wizards 18
X
XML files
47
Z
z/OS
data access 183
table access with ODBC DB2 z/OS passthrough 184
Update Table Metadata 187
Your Turn
If you have comments or suggestions about the SAS 9.1.3 ETL Studio: User’s Guide,
please send them to us on a photocopy of this page, or send us electronic mail.
For comments about this book, please return the photocopy to
SAS Publishing
SAS Campus Drive
Cary, NC 27513
E-mail: [email protected]
For suggestions about the software, please return the photocopy to
SAS Institute Inc.
Technical Support Division
SAS Campus Drive
Cary, NC 27513
E-mail: [email protected]