1
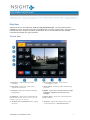
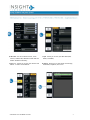
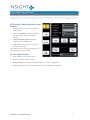
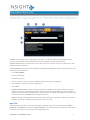
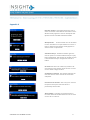
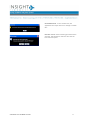
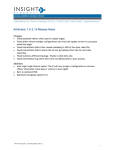
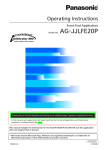
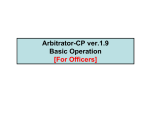
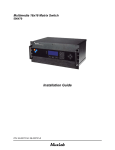
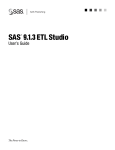
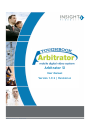
Arbitrator SI
User Manual
Version 1.9.2 | Revision A
Table of Contents
Overview.......................................................................................................................... 3
To Record Video ................................................................................................................. 4
To Create a Bookmark .......................................................................................................... 5
To Adjust Camera Settings ..................................................................................................... 5
To Access Video Information ................................................................................................... 5
Meta Data......................................................................................................................... 5
Officer ............................................................................................................................ 5
LPR (License Plate Recognition) when Enabled ............................................................................. 6
To View System Status .......................................................................................................... 6
The Archive Tab ................................................................................................................. 7
View a Video File ................................................................................................................ 8
Create a Bookmark .............................................................................................................. 8
How to Burn Files ................................................................................................................ 8
Upload Tab ....................................................................................................................... 8
Login Tab ......................................................................................................................... 9
Disclaimer .......................................................................................................................11
Appendix A ......................................................................................................................12
ArbitratorSI-1.9.2-UserManual-revA.doc
2
Overview
Arbitrator SI has five menu tabs: Live, Archive, Config, Upload and Login. Currently selected menu is
highlighted in yellow. This menu allows user and administrator to view live camera activity, review previously
recorded video files, configure the system, upload/export/burn to CD/DVD video files with metadata
information and manage user login Information.
The Live View
A) Bookmark - Creates a bookmark while
recording.
F) Record (Rec) and Stop - Turns camera
recording on or off.
B) Auto Zoom - Zooms in or out at preset
magnification intervals.
G) Audio 2 Mute - Mutes the audio channel being
recorded.
C) Backlight - Adjusts the camera’s backlight
compensation.
H) Status - Allows user to view the P2 Card storage,
bookmarks, snapshots, and any status/error
messages.
D) LPR/Patrol – Allows user to switch between
LPR and Patrol mode. NOTE: This button will only be
I) Camera Select - Allows you to switch between
multiple cameras
displayed if configured in the Congif tab.
E) W (Wide) and T (Telephoto) Lens - Adjusts
the zoom.
ArbitratorSI-1.9.2-UserManual-revA.doc
J) Snapshot - Takes a still image of the current
screen and saves to “Snapshot Directory”.
3
K) Adv Cam- You can set Audio Control, Focus
Control, Camera LED, LPR/Patrol mode and test
Audio1/Audio2 functionality.
L) Info - Allows you to view your Meta Data (GPS,
Radar, and GPIO).
L) Info cont.- Allows you to view your General and
Officer 1/ Officer 2 information.
M) Status - Allows you to view the P2 Card storage,
bookmarks, snapshots, and errors.
ArbitratorSI-1.9.2-UserManual-revA.doc
4
To Record Video
1. Press “Rec” to start recording.
2. To stop recording press “Stop”
Note: When the user stops recording, depending on the settings selected for the Event Type, they will be either
forced to enter “Event Type”, not be required to enter “Event Type”, or will be given the option to close the
“Event Type” window by clicking on the Red “X”. The box with the Red “X” is only available in “Enable”
mode for “Event Type”.
To Create a Bookmark
IMPORTANT: Bookmarks highlight specific events within the recorded video, so it is critical that bookmarks are
identified appropriately according to department policy. Bookmarks are uploaded with the video file and can
be queried in the CMS database.
1. Press “Bookmark”, if it successfully saves a yellow bar will momentarily appear and disappear. If the
bookmark should not be successfully saved a red bar will appear with the word “ERROR”.
To Adjust Camera Settings
1. Press “Adv Cam” to view and adjust advanced camera settings.
2. Modify the following settings to suit user need.
Camera LED controls the recording LED. A red light will remain lit if the Camera LED is set to on.
•
•
Auto Exposure sets the brightness of the image by adjusting exposure level.
• Focus Controls configures image sharpness manually or automatically.
• Audio1 Test and Audio2Test verifies audio transmission by selecting one of the audio channel buttons.
• Audio 2 Select allows the user to select the audio that the user wishes to record.
To Access Video Information
1. Press “Info” to view Meta Data and Officer Information.
Meta Data
•
GPS (Global Positioning System) displays Latitude, Longitude, and Speed.
•
Radar displays your Own and Target Radar information.
•
GPIO (General Purpose Input Output) lists your Triggers and highlights them individually when they are
activated.
Officer
General displays Area, Source and Shift times.
• Officer1 and Officer2 displays Officer’s Name and ID.
ArbitratorSI-1.9.2-UserManual-revA.doc
5
LPR (License Plate Recognition) when
Enabled
1.
Press “Adv Cam” to view and adjust LPR
mode settings.
2.
Select the “LPR Mode” from the dropdown
list. (Note: Patrol mode is the default
setting.)
3.
Adjust LPR Shutter Speed by selecting
settings from the dropdown list.
4.
“LPR Zoom” allows the user to select the
desired zoom for LPR.
Note: LPR button on Live Tab will appear only if
the configuration is set to enable.
To View System Status
1.
Press “Status” to view system health.
2.
Review the system status including:
•
Storage Capacity - Indicates the available disk space on the recording device.
•
Status - Displays the system messages including errors, bookmarks and snapshots.
ArbitratorSI-1.9.2-UserManual-revA.doc
6
The Archive Tab
The Archive Tab allows users to review recorded videos. User may add bookmarks (event type and description)
and snapshots.
Below are the different buttons that are available in the Archive Tab:
A) Archive Menu-Allows the users to navigate
through the stored videos which are saved in
chronological order.
F) Audio 1 and Audio2- These functions are muted
by default to review audio you must select desired
channel.
B) Allocated Disk Space-Allows users to view
how much space will be used from the disk
with the selected files to burn. Note: This
appears only if a disk is inserted.
G) Bookmark Tab-In this tab the users can view
bookmarks and enter the information on a new
Bookmark.
C) Display Screen-This is where the selected
video will be played.
H) Bookmark button-Enters a reference point on the
saved video.
D) Burn Button-Allows the user to burn a copy
of desired file.
I) Playback Controls- Rewind (x2, x4, x20);
Pause/Play, Half/quarter speed, Fast Forward (x2,
x4, x20), and the slider bar. NOTE: The slider bar
allows easy navigation backwards and forwards on
the video.
E) Info Button-Allows the users to view MetaData, officer, and Bookmark Information
under the respective tabs.
J) Snap Shot-Allows the users to create a Snap Shot
from the video being viewed and saved to the
default folder (c:\SI\Snapshots)
ArbitratorSI-1.9.2-UserManual-revA.doc
7
View a Video File
1.
2.
3.
From the Archive Menu, select Slot number to expand file view to respective dates
Select the Date/Time to expand file view to respective files
Double-click on video file for playback.
Create a Bookmark
1. Press “Bookmark”.
2. Input bookmark information as follows:
•
Date/Time-A dropdown list contains all timestamps of bookmarks associated with the selected video file.
•
Event Type-Enter freeform text regarding the type of event or select from the dropdown list if Event
Types had been loaded.
•
Description-Enter freeform text regarding the event.
•
Press “OK” to save bookmark. IMPORTANT: If you have not previously saved the information by clicking
“OK”, clicking the “Reload” button will clear all free form text fields.
NOTE: Bookmarks can be configured as a drop-down selection for the user. The configuration can also be set to
force the user to select a Bookmark Event Type or can enable the choice to standardize bookmarks in the
“Live” tab. The drop down list is also available in the Archive section.
How to Burn Files
1. Select file/s.
2. Select DVD format. See Figure 1 Appendix B
3. Click “Burn”.
4. User will select Yes or No to include Standalone player. (Depending on selected DVD format this option will
be displayed and if enabled in Config Tab). See Figure 3 Appendix B
5. Select number of copies. See Figure 2 Appendix B. Note: Burning process will begin.
6. Media device must be inserted before selecting files to estimate “Allocated disc space”.
NOTE: CD is only supported for Data format, but DVD is recommended. RW- Media is supported to write but
not for the deletion of current files stored in the RW-Media.
Upload Tab
Arbitrator SI supports multiple methods of file extraction. The preferred method is for the mobile system to
automatically upload the files to the CMS Video Management System through a network connection. If
automatic upload is not a viable option, the system can be configured for Manual Upload.
Note: If network connectivity is not available, administrators can export files directly from the recorder to
their PC or they can burn a CD/DVD with the files directly from the SI. These features require a password to log
in or a USB key with “wadmin” file to authenticate Admin access.
ArbitratorSI-1.9.2-UserManual-revA.doc
8
A) Buffer-Files are buffered to an upload directory on the local machine before being pushed across the
network. The Status Bar lets the administrator know the progression of the buffering process.
B) Export-Administrators can export files in their native format to a location on the local system. Note: This
feature is password protected.
C) Burn CD/DVD-Files that cannot be uploaded to the CMS Video Management System can be burned to a CD or
DVD directly from the vehicle.
•
Click “Burn CD/DVD”.
•
Enter User Password.
•
Select burning device.
•
User will select Yes or No to include a standalone player. See Figure 3, Appendix A.
•
Select amount of copies. See Figure 2, Appendix A.
•
Click “Burn”.
•
Progress status Bar-When the files have been buffered, the system will be ready to initiate the upload
process. In the event of an automatic upload, this process will begin immediately after receiving Beacon
Notification with the status being displayed on this progress bar. If manual upload has been set up, the user
will need to select the “Upload” button to begin the process.
•
Action-All actions taken during the upload process will be listed here. The status of the action, successful
buffering, uploading or exporting will be listed as well as any errors.
Login Tab
In this tab users will be able to enter the information pertaining to the current recording session. Officer
Names, ID’s, Shift Pattern, as well as the Area and Source, are all fields that will be required to be filled out
in order for the video to record, upload, and be queried properly.
ArbitratorSI-1.9.2-UserManual-revA.doc
9
IMPORTANT: Each time an Officer begins a new shift, they should login with their information. All of the fields
in the Login Tab are available as searchable criteria in the CMS Video Management System so it is critical that
this information be accurate.
A) Shift Information-The start and end time of the current shift should be entered here. Shift patterns should
be based on the shifts of the users currently using the system.
B) Vehicle Information-These fields control the recorded Area and Source of the vehicle. Area is a description
of the general location of where the mobile unit is at the time of the recording. Source is the description of the
vehicle itself (i.e. area may be noted as Central and Source may be noted as vehicle number 102).
C) Officer 1 - This field should reflect the current user of the system during the recording session.
D) Officer 2 - This field is used in the event of multiple users.
IMPORTANT: After filling out the login information completely, click “Apply” to save settings entered or
“Cancel” to discard all entries. User Information entered must be the same as the user in CMS.
ArbitratorSI-1.9.2-UserManual-revA.doc
10
Disclaimer
By providing this document, Insight Video Net, LLC, makes no representations regarding the corrections and
completeness of its contents and reserves the right to alter this document at any time without notice. All
marks referenced herein with R or TM symbol are registered trademarks or trademarks of Insight Video Net LLC
or it’s subsidiaries. All rights reserved. All other marks are trademarks of their respective owners.
Copyright 2008 Insight Video Net, LLC.
Email: [email protected]
Phone: 909. 373.1800
Website: www.InsightVideoNet.com
ArbitratorSI-1.9.2-UserManual-revA.doc
11
Appendix A
DVD Burn Format- This window allows the user to
select the format of the DVD user would like to burn.
Window usually appears in Archive and Upload Tab.
Options include: Data DVD and Authored DVD.
Multiple DVD’s - On this window user will be asked
to enter the amount of copies wanted for the file/s
that are being burned. Window usually appears in
Archive and/or in Upload Tab.
Standalone Player- Standalone window gives the
user the option to include Standalone Player to play
back the Data DVD. This window will prompt the user
if the Standalone Player configuration was set to
Enable.
No media-User does not contain any media in the
drive therefore this window alerts the user to insert
correct media to begin the burn.
CD/DVD Burn Complete- This window indicates the
user that the burn was a success and it has been
completed.
Permanent File Deletion- After every burn user has
the option of keep the video files burnt or
permanently delete them.
Wrong Media- If inserting non-supported disc or
incorrect media this window alerts the user to insert
correct disc to continue.
ArbitratorSI-1.9.2-UserManual-revA.doc
12
Used Media Found- If disc contains files, the
application will require the user to change to a blank
disc.
DVD Burn Cancel- When a burning process has been
canceled, this window will warn the user that the
burn was interrupted.
ArbitratorSI-1.9.2-UserManual-revA.doc
13