1
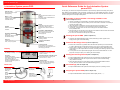
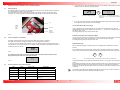
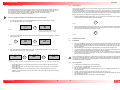
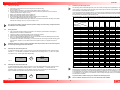
perma-tec GmbH & Co. KG 6.8 perma PRO Setting the discharge period 5.4 There are two push-buttons on the control unit (refer to figure 8) which can be used for a menu-guided change of the settings. For operating the lubricator, it makes a difference if you push a button quickly or if you hold the button down for a longer period of time. For the control system to recognize that a button has been pushed for a long period of time, you have to hold the button down for at least four seconds. If you hold the button down for less than four seconds, this is recognized as a quick push of the button. The discharge period can be set any time (refer to figures 15 to 18) without having to install a new PRO LCunit and without having to interrupt the operation. It does not matter if the perma PRO is switched on or off, since the system switches back to its original operating status after the changes have been made. The only difference is the information shown on the display before and after the settings. In the following example, the lubricator is switched off. You must hold down the buttons until the indication of the display changes! ♦ Control Buttons With the MODE/SAVE button (refer to figure 11), you can reach the configuration menu, change the mode and save the modified settings for further operation. To reach the configuration menu, hold the MODE/SAVE button down until the display changes. Then, the lubricator shows the current settings. MODE SAVE Figure 11 –– Config. Time MODE SAVE i5 Days With the ON/OFF/SELECT button (refer to figure 12), you can switch the lubricator on and off and you can increase the discharge period gradually. Every time that you push the button, the discharge period is increased by either a day, a week or a month. Figure 15 Lubricator is switched off ♦ The figures on the display are blinking and the current setting mode is shown (e.g.. I5 Days). ON/OFF SELECT Figure 12 You can now switch within the setting mode from days to weeks to months every time that you press the MODE/SAVE button. Config. Time MODE SAVE 0i Weeks Config. Time MODE SAVE 0i Months 6. Operation and Control 6.1 Preparations ♦ Figure 16 The figures on the display are blinking and the setting mode is shown. ♦ ♦ ♦ If you have reached the desired setting mode, push the ON/OFF/SELECT button as many times as it takes to set the number of days, weeks or months. ♦ Config. Time 0i Days ON/OFF SELECT Config. Time 02 Days ON/OFF SELECT Config. Time 30 Days Figure 17 The figures on the display are blinking and gradually increasing with every push of the button. The example shows the setting of days. For the initial setting into operation of a perma PRO, the pump system in the drive unit is pre-filled with SF 04 from perma’s standard range of lubricants. An exception is made with regard to lubricants for the food industry. A complete discharge of this pump filling is guaranteed after approx. 10 discharges (carry out additional discharges, if necessary). 6.2 When setting the days, you can select a figure between 1 and 30. After 30, the count starts again with the figure 01. When setting the weeks, you can select a figure between 1 and 24. After 24, the count starts again with the figure 01. When setting the months, you can select a figure between 1 and 24 depending on the size of the PRO LC-unit (refer to table 1) and on the position of the jumper. After 24, the count starts again with the figure 01. Prior to Operation ♦ ♦ ♦ ♦ ♦ ♦ ♦ Lubrication Systems Prior to the installation of the lubricator, the lubrication point and the complete connection tube must be sufficiently prelubricated with the same lubricant that the PRO LC-unit contains. For this, permatec offers a 400 g lubrication cartridge for grease presses with the corresponding lubricant (refer to table 5b, chapter 9). When installing the perma PRO, the supplied perma-tec mounting device should be used. The lubricant tube must be installed and mounted correctly. The length of the lubricant tube may not exceed a maximum of 5 meters and the tube must be a perma-tec product. Please check if the thread of the perma PRO (G 3/8 or G 1/8) corresponds to the connection thread of the lubrication point. If this is not the case, you can order a corresponding reducer or other parts from the perma accessory range. 16 13 Check all parts of the lubricator for obvious damages! Is the new PRO LC-unit filled with the required lubricant? Did you insert a new battery set? Did you set the drive unit to the correct size of the PRO LC-unit by inserting the jumper into the corresponding slot? Has the cover disc with plug been removed from drive unit (see Chap. 1.2)? Was the drive unit set to the discharge period requested by the operator while taking into account the required discharge volume? Did you assemble and mount all of the parts correctly and tightly?