1
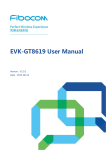
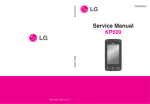
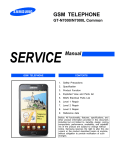
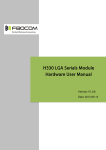
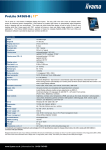
EVK-GT8230 User Manual Version: V2.0.0 Date: 2013-09-13 Confidential Material This document contains information highly confidential to Fibocom Wireless Inc. (Fibocom). Fibocom offers this information as a service to its customers, to support application and engineering efforts that use the products designed by Fibocom. The information provided is based upon requirements specifically provided to Fibocom by the customers. All specifications supplied herein are subject to change. Disclosure of this information to other parties is prohibited without the written consent of Fibocom. Copyright Copy, Reproduce, Distribute and/or Edit of this document or part of it as well as utilization of its contents and communication thereof to others without express authorization are prohibited. Offenders will be held liable for payment of damages. All rights created by patent grant or registration of a utility model or design patent are reserved. Copyright ©2013 Fibocom Wireless Inc. All rights reserved. Trademarks Notice The FIBOCOM Logo is registered by Fibocom Wireless Inc. All other product or service names or logos are the property of their respective owners. Copyright ©2013 Fibocom Wireless Inc. All rights reserved. Revision History Version Date Remarks V1.0.0 2013-09-03 Initial Version V1.0.1 2013-01-04 Update the name of the document 1. Update developer kit product picture. V1.0.2 2013-01-30 2. Add some notes for mini PCIe. 3. Delete POWER_ON and POWER_OFF. V2.0.0 2013-09-13 EVK-GT8230 User Manual Update the name of the document; Add chapter 3 Page 2 of 22 Applicability Table No. Type Note 1 H330 Need ADP-H330-xxx-yy 2 H350 Need ADP-H350-xxx-yy 3 EVK-GT8230 User Manual Page 3 of 22 Contents 1 2 EVK Introduction.................................................................................................................................................................................. 5 1.1 Product Review...................................................................................................................................................................... 5 1.2 Developer Board Structure ............................................................................................................................................... 5 1.3 Block Diagram ........................................................................................................................................................................ 6 EVB Function Description................................................................................................................................................................. 7 2.1 3 Power Supply ......................................................................................................................................................................... 7 2.1.1 Direct Power Supply................................................................................................................................................... 7 2.1.2 Power Adaptor ............................................................................................................................................................. 8 2.1.3 Power Supply Peripherals ........................................................................................................................................ 8 2.2 UART1 (COM) .......................................................................................................................................................................... 9 2.3 UART1 (USB).......................................................................................................................................................................... 10 2.4 USB Interface ........................................................................................................................................................................ 11 2.5 UART2(COM) .................................................................................................................................................................. 11 2.6 SIM Card Interface .............................................................................................................................................................. 12 2.7 Audio ....................................................................................................................................................................................... 12 2.7.1 Audio1 ........................................................................................................................................................................... 13 2.7.2 Audio2 ........................................................................................................................................................................... 13 2.7.3 Speaker ......................................................................................................................................................................... 14 2.8 RESET Button ........................................................................................................................................................................ 14 2.9 Test Point................................................................................................................................................................................ 15 2.10 Default Jumper Switch ..................................................................................................................................................... 18 Adapter Introduction ....................................................................................................................................................................... 19 3.1 Adapter Overview .............................................................................................................................................................. 19 3.2 Appearance ........................................................................................................................................................................... 19 3.3 Adapter Structure ............................................................................................................................................................... 20 3.4 Adapter Operation ............................................................................................................................................................. 21 3.5 3.4.1 Work with GT8230 .................................................................................................................................................... 21 3.4.2 Only Adapter............................................................................................................................................................... 21 Installation............................................................................................................................................................................. 21 EVK-GT8230 User Manual Page 4 of 22 1 EVK Introduction 1.1 Product Review EVK-GT8230 is the developer board of Fibocom 3G module, it worked with corresponding adapter. This Manual describes the developer board EVK-GT8230, ensures the users can quickly and conveniently develop wireless communications using Fibocom Module. 1.2 Developer Board Structure Figure 1-1 GT8230 EVK-GT8230 User Manual Page 5 of 22 1.3 Block Diagram GT8230 includes four functional blocks: Interface, Button, Test point and Power. This picture shows the Block Diagram: Figure 1-2 Block Diagram Note: Reset button only reset Mini PCIe, it cannot reset adapter. EVK-GT8230 User Manual Page 6 of 22 2 EVB Function Description This section describes the different functions of each block; take ADP-H330 (H330 Adapter) as an example. 2.1 Power Supply This developer board supports two kinds of power supply inputs. The first power supply option can be directly connected with V40BAT (pin JP3) and GND (Pin JP2) to 4V (Note: For mini PCIe, use DC3.3V power supply), and second Power Supply option can be connected through the DC-DC adaptor, supplying 9V through (JP1). As shown in Figure 2-1: Selection of Direct Power Supply, set the power selector switch (SWP1) to the left Selection of Power Adaptor, set the power selector switch (SWP1) to the Right Figure 2-1 Power Switch 2.1.1 Direct Power Supply Direct Power Supply: The power supply is connected directly to the module, so the voltage range must comply with the H330 Specifications. Power Connector Description DC Power Supply V40BAT(JP3) Voltage Range: 3.3 V ~ 4.2 V GND(JP2) Recommended Voltage: 4.0V Input Current: > 2.0A Note:Please use correct Voltage to avoid damage. EVK-GT8230 User Manual Page 7 of 22 2.1.2 Power Adaptor When an external power adaptor is plugged in, the developer board will use a DC-DC Buck circuit to convert to 4V supply and LV40 indicator will be ON. Power Connector Description Straight Insert Voltage Socket, Φ2.5mm; Input Voltage: 8V~15V; Input Power: ≥9W. 2.1.3 Power Supply Peripherals There are two LDO chips (UP2 and UP3) on the developer board. 3.3V voltage generated after VBAT40 pass through UP2, 1.8V voltage generated after VDD33 pass through UP3, these two set of voltages support other IC, LED and circuit on the developer board. Jumper Switch JP4 JP6 JM5 Description Jumper In: Turn ON 3.3V voltage output Jumper Out: No 3.3V Voltage Output Jumper In : Enable LED Indicator for UART, GPIO Jumper Out : No LED indicator Jumper In : Enable LED Indicator for Power ON Jumper Out : No LED indicator Select Power Supply for CODEC inside the module; JM11 Jumper on Pin 1: VBAT connected with VSPK_M: power supplied by VBAT Jumper on Pin 3: VDD33 connected with VSPK_M: power supplied by VDD33 Supply power to VDD_MMC inside the module; JM12 (Not Used) 1V8 connected with VDD_MMC: power supplied by 1V8; VDD33 connected with VDD_MMC: power supplied by VDD33 Supply power to CODEC on the developer board; JA2 Jumper on Pin 1: VBAT connected with VSPK: power supplied by VBAT; Jumper on Pin 3: VDD33 connected with VSPK: power supplied by VDD33 Note: When you test the parameter of current, please unplug the above six jumpers. The tested current will be the current consumed by module only. EVK-GT8230 User Manual Page 8 of 22 Jumpers Locations: Figure 2-2 Jumpers Locations 2.2 UART1 (COM) UART1 is a full 8-line interface, there are six LED indicators (LRI/LDCD/LDSR/ DTR/LRTS/LCTS), used to display the corresponding pin logic level in the module, it can be directly connected to PC or other DTE equipments. Developer board contains RS-232 Transceiver SP3238EEA inside. PC and other DTE equipments can test all the functions of the module through this interface and AT Commands. The following picture shows the connection of UART1: DCE lever shifter SP3238EEA DTE Jumper Switch Description JU7 All 9 Jumpers In, Turn ON UART1 Signal connection EVK-GT8230 User Manual Page 9 of 22 Figure 2-3 Jumpers Locations Note: For mini PCIe, connect the mini USB cable to the high speed USB port of the developer board, in the meantime, unplug jumper switch JP7, otherwise, this port cannot be used. 2.3 UART1 (USB) U ART1 (USB) connector and UART1 connector are using the same internal UART interface inside the developer board, so they have the same functions and commands. The developer board contains a UART to USB converter chip (PL2303), it provides four lines(TXD/RXD/CTS/RTS)to UART interface of module after conversion, this USB connector is the mini USB connector, users can connect to the PC through switching cable (USB transfer to mini USB). There is a LED indicator(LUSB-UART)next to the USB interface, used to display the connection between the interface and PC. If it is connected successfully, the light will on. The following picture shows the connection of USB (UART1): DCE PL-2303X DTE Jumper Switch Description JU9 Turn on/off USB interface as communication interface Note: You cannot use USB (UART1) and UART1 interface at the same time, please switch between JU9 and JU7. Install corresponding driver (USB to Serial port driver,EVB use PL2303 interface chip) when use USB interface. Mini PCIe doesn’t support this port. EVK-GT8230 User Manual Page 10 of 22 Figure 2-4 Jumpers Locations 2.4 USB Interface The USB interface is a high-speed data transmission interface, a LED indicator (LUSB) used to display the connection between the interface and PC terminal. This USB interface is a mini USB interface, users can connect to the PC through switching cable (USB transfer to mini USB). If it is connected successfully, the light will on. The following picture shows the connection of High Speed USB: DTE DCE Jumper Switch Description JU4 for connecting to USB_ID Note:Install corresponding driver(driver for H330 module)when use USB interface. Figure 2-5 Jumpers Locations 2.5 UART2(COM) UART2 is a 2-lines interface (RXD/TXD) which can test the second UART of H330. It can be directly connected to PC or other DTE equipments. The following picture shows the communication process: DCE lever shifter SP3232EEA Jumper Switch Description JU6 Enable/disable UART2 EVK-GT8230 User Manual DTE Page 11 of 22 Note: For mini PCIe, connect the mini USB cable to the high speed USB port of the developer board, in the meantime, unplug jumper switch JP7, otherwise, this port cannot be used. 2.6 SIM Card Interface Developer board includes a complete SIM card socket and interface circuit. The following picture shows the diagram: Figure 2-6 SIM Card Circuit 2.7 Audio Interface Developer board includes two audio interfaces and a speaker interface. The second audio interface and speaker interface are connected to the same audio network of the module, so you cannot use these two interfaces at the same time. Besides, developer board provides two Audio frequency modulation Options. Option 1: use of the CODEC inside the module Some modules does not support CODEC, please refer to the module hardware user manual. Option 2: use the External CODEC in the EVB Jumper Switch Description JA6 Jumper to JA6 select the CODEC inside the module JA7 Jumper to JA7 select the use of External CODEC in the EVB JA3 Jumper to JA3 select the use of External CODEC in the EVB Figure 2-7 Jumpers Locations EVK-GT8230 User Manual Page 12 of 22 2.7.1 Audio1 The handle socket JA1 on the developer board is the first channel audio interface. Jumper Switch JA6 Description JA6(5-6pin) On/off,connect to MIC+ of the headset JA6(7-8pin) On/off,connect to MIC- of the headset JA6(9-10pin) On/off, connect to EAR- of the headset JA6(11-12pin) On/off, connect to EAR+ of the headset As shown in this picture: Figure 2-8 Handle Socket JA1 2.7.2 Audio2 The handle socket JA4 on the developer board is the second channel audio interface. Jumper Switch JA4 Description JA4(1-2pin) On/off,connect to AUXI- of the handle JA4(3-4pin) On/off,connect to AUXI+ of the handle JA4(13-14pin) On/off,connect to AUXO+ of the handle JA4(15-16pin) On/off,connect to AUXO- of the handle As shown in this picture: Figure 2-9 Handle Socket JA4 EVK-GT8230 User Manual Page 13 of 22 2.7.3 Speaker The speaker interface and handle socket are connected to the same audio interface of the module, therefore, these two interfaces cannot be used simultaneously. Jumper Switch JA8 Description JA8(1-2pin) On/off, connect to AUXO- of the speaker JA8(3-4pin) On/off, connect to AUXO+ of the speaker JA8(5-6pin) On/off, PA power supply Figure 2-10 Jumpers Locations 2.8 RESET Button The developer board has a RESET button. The following picture shows the diagram: Figure 2-11 RESET Circuit Jumper Switch Description JM14 Enable/disable,RESET switch Figure 2-12 Jumpers Locations EVK-GT8230 User Manual Page 14 of 22 2.9 Test Point For testing and debugging, there are several multi-group test pin on the developer board, please refer to the following table: Jumper Switch Test group Test PIN pin 1: VRTC_1V8 pin 2: VBACKC JM3 VRTC & ADC pin 3: ADC2 pin 4: ADC1 Jumper Switch Test group Test PIN pin1: CLKOUT0 pin2: CLK32K pin3: USIF1_SCLK JM8 CLOCK & EINT pin4: T_OUT0 pin5: EINT2 pin6: GND pin7: EINT1 pin1: MMC_DAT3 pin2: MMC_DAT0 pin3: MMC_CD JM10 MMC pin4: MMC_DAT1 pin5: MMC_CLK pin6: MMC_DAT2 pin7:MMC_CMD pin1: I2C_SCL JA3 PCM pin3: I2C_SDA EVK-GT8230 User Manual Page 15 of 22 pin5: I2S_RX pin7: I2S_TX pin9: I2S_WA0 pin11: I2S_CLK0 pin13: CLKOUT0 pin1: USB_VBUS pin2: HSIC_USB_DATA JU1 HSIC pin3: HSIC_USB_STRB pin4: GND pin 1: 1V8 pin 2: NC pin 3: MIPI_RX_DATA / SPI MISO pin 4: MIPI_RX_FLG / SPI MOSI pin5: MIPI_RX_RDY / SPI Clock pin6: MIPI_RX_WAKE JM4 MIPI pin7: MIPI_TX_DATA / SPI_MRDY pin8: MIPI_TX_FLG / SPI_SRDY pin9: MIPI_TX_RDY pin10: MIPI_TX_WAKE pin11: GPIO_049 pin12: GND JM1 EVK-GT8230 User Manual Other pin 1: I2SCLK1 Page 16 of 22 pin 2: USIM_DM pin 3: USIM_DP pin 4: DACOUT EVK-GT8230 User Manual Page 17 of 22 2.10 Default Jumper Switch The following picture shows the default jumper switch position on the developer board: Figure 2-13 Jumpers Location No. Jumper Switch Quantity Description 1 JM14 1 RESET connection 2 JP4 1 4V switch to 3.3V connection 3 JM5 1 Module output 1.8V to indicator 4 JP7 (pin2-pin3) 1 Supply 1.8V connection from power 5 JU6 3 UART2 connection 6 JP6 1 Power supply for LED indicator 7 JU7 9 UART1 connection 8 JA6 8 Audio connection 9 JM11 (pin2-pin3) 1 Power supply for CODEC inside the module EVK-GT8230 User Manual Page 18 of 22 3 Adapter Introduction 3.1 Adapter Overview The adapter is used to connect module and developer board together, here take H330 Adapter (ADP-H330) as an example. 3.2 Appearance The following figure shows ADP-H330. Figure 3-1 ADP-H330 Top View Figure 3-2 ADP-H330 Bottom View EVK-GT8230 User Manual Page 19 of 22 3.3 Adapter Structure Figure 3-3 ADP-H330 No. Category Description 1 Test point DC4V interface 2 USB interface USB communication interface 3 Jumper USB power supply switch control 4 5 Jumper Power selection: connect VUSB and VBAT, VUSB supplies the power Power selection: connect DC4V and VBAT, DC4V supplies the power 6 Button On button, power on the module 7 Button Off button, power off the module 8 Button Reset button, reset the module (standard module is power off after reset) 9 Test point JTAG test point, used for Debug 10 Module H330 communication module EVK-GT8230 User Manual Page 20 of 22 11 Antenna interface Main antenna interface, U.FL connector 12 Antenna interface Diversity antenna interface, U.FL connector 13 Connector Connector between Adapter and EVB; 80Pin Note: If you connect Adapter to the developer board, please remove jumper ③ and ④. 3.4 Adapter Operation 3.4.1 Work with GT8230 1) Adapter doesn’t need power supply; the jumper of adapter can be removed. 2) Please notice the direction of adapter and developer board. 3) Adapter 80 Pin corresponds to developer board 80 Pin socket. Note: Misplace may cause damage to the module. 4) USIM card can be installed at the bottom of adapter or developer board GT8230. Note: Do not insert the SIM card at the same time, it may works abnormal. 3.4.2 Only Adapter 5 pin (as shown in Figure3-3), press Power ON. Use external DC+4V power first, jumpers connect to ○ If you want to use USB to supply the power, please connect the jumpers in ③ and ④. Note: The load capacity of USB port must be 5V, 700mA or above, otherwise the module maybe abnormal. 3.5 Installation Adapter installation: Figure 3-4 Adapter (H330 Adapter) Installation Diagram EVK-GT8230 User Manual Page 21 of 22 Note: Please pay attention to the direction of Adapter to avoid damage. MINI PCI Installation: Figure 3-5 H330 Mini PCIe Installation Diagram Note: Before install Mini PCIe, please remove the J5 screw on the developer board, otherwise it cannot be installed. EVK-GT8230 User Manual Page 22 of 22