1
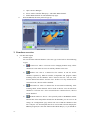
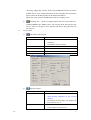
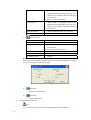
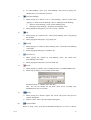
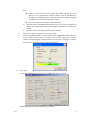
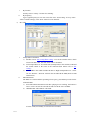
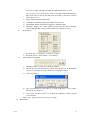
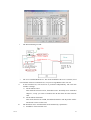
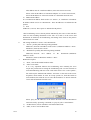
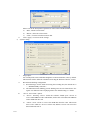
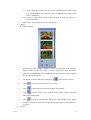
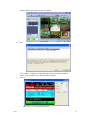
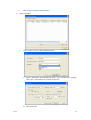
U
ser’s M
an u al
User’s
Manual
Notes:
1. This User’s Manual is for the following products.
a)
b)
USB2.0 Box (USB-S,USB-T,USB-C)
PCI Receiving Card (PCI-S,PCI-T,PCI-C)
2. The real operation maybe little different from this manual.
3. When user install several DVB devices on one PC, the software
will handle the device by following priority:
USB-S
USB-T
USB-C
PCI-S
PCI-T
PCI-C
The software supports only one device on the same time if several
device on the PC.
Content
Product Profile
The box contains
Other requirements
Protocol Support
Signal Switch Support
OS Support
PC requirements
Hardware Features
Software Functions Overview
Installation Guide
Check items before installation
Installation
Functions overview
List Box Description
Function Buttons Overview
Volume Control
Process Slider
1/1
3
3
3
3
3
3
3
4
5
5
5
6
7
7
10
14
14
1
Status Bar
Strength/Quality indicator
Operation Guide
Sat config
Ter config
IP Config
IP Broadcast
System Config
Capture
Preview
EPG
Teletext
Record Schedule
Time-Shifting
MPEG2 Video Broadcasting
Trouble Shooting
“Fail to Init device” message
Black playing screen
Drop frame
Can not lock channel
Can not start IP or IP data not found
Can not play IP media Link
Drop frame while recording
EPG inactive
Teletext information not found
Can not recall to old channel
Can not start DVBWorld
Locking channel is ok, but no data or fail to scan programs
2/2
14
15
15
15
17
18
21
24
25
25
26
26
27
28
29
31
31
31
31
31
32
32
32
32
32
32
32
32
2
1. Product Profile
a)
The box contains
i.
For DVB USB2.0 Box
1)
Power Adapter (For DVB-S USB Box only):
Input: AC 100V~240V/50~60Hz, Output: DC 5V/2A Or DC 9V/2A,
according the different hardware revision.
2) USB2.0 Receiving Box
3) USB2.0 Cable
ii.
For DVB PCI Receiving Card
1) One DVB PCI Receiving Card
2) Remote Controller Receiving Cable
iii.
Remote Controller
iv.
Manual
v.
Installation CD
b) Other requirements
i.
For DVB-S Products
1) Dish
2) LNB
3) Signal cable for connecting LNB to Receiving Box or Card
ii.
For DVB-T Products
1) A simple antenna is needed
c) Protocol Supports
i.
Compatible to DVB Standard
ii.
Supports MPEG2 Video/Audio/AC3 stream
iii.
For USB Box, supports USB2.0 interface, does not support USB1.1
iv.
For PCI Card, support PCI 2.2
d) Signal Switch Types DVB-S Product Supported
i.
22KHz tone device
ii.
DiSEqC2.0 multi-switch
iii.
DiSEqC1.2 motor
iv.
DiSEqC1.1 4 way switch
v.
Tone Burst device
e) OS Supports
i.
Microsoft Windows 2000, with DirectX 8.1 or above and Microsoft Media Player
9.0C or above
ii.
Microsoft Windows XP, with DirectX 8.1 or above and Microsoft Media Player
9.0C or above
iii.
For USB2.0 Box, need Windows2000 SP4 or Windows XP SP2
f) PC requirements
i.
500MHz CPU or above
ii.
8M Bytes Video RAM or above
iii.
128M Bytes RAM or above
iv.
50M Bytes hard disk free size
3/3
3
v.
vi.
USB2.0 support (For USB Box)
PCI 2.2 Bus (For PCI Card)
g) Hardware Features
i.
Interface
USB Box:
USB2.0 Interface
Power Adapter (For DVB-S Box only):
DC 5V/2A or DC 9V/2A, according the different hardware revision.
Remote Controller Receiver on board
PCI Card:
PCI2.2 Bus
Remote Controller Connector
Signal connector without loop through (Loop through connector is of no use)
LNB voltage: 13V/18V, 300mA max (For DVB-S Products only)
No power supply for antenna by RF-IN port (For DVB-T Products only)
ii.
DVB-S Products Tuner: Sharp 0194
Receiving frequency coverage: 950MHz to 2150MHz
Input level: -65dBm to -25dBm
Input structure: F type Female
Nominal input impedance: 75Ω
Channel selection system: PLL synthesizer (Clock 4.0MHz)
Step frequency: 500KHz
Symbol rate: 2Msps to 45Msps
Roll-off Factor: 35% (root-raised consine)
FEC:
Inner decoder: Viterbi soft decoder, Constraint length M=7
Punctured codes 1/2,2/3,3/4,5/6,7/8
Outer decoder: Reed-solomon decoder, for 16parity bytes
Block lengths 204bytes or 188bytes
iii.
DVB-T Products Tuner: Philips TU1216 Serial
Fully compliant with ETS 300 744 & NorDig 2
Specifications for DVB-T reception
2K & 8K COFDM Modes supported
All modes supported including hierarchial modes
Fast Scan, Digital Frequency Correction and Automatic Frequency offset detection
Consolidated Pulse Killer algorithm to fight against Impulse noise
Ultra low Phase Noise, Digitally-controlled PLL Tuner
I2C Bus Interface
Digital SAW filter
Fulfill Cenelec requirements, EN55013 & EN55020
Receiving frequency coverage:
Low band 48.25MHz to 154.25MHz
Mid band 161.25MHz to 439.25MHz
High band 447.25MHz to 855.25MHz
4/4
4
Band width support: 6,7 and 8 MHz
h) Software Functions Overview
i.
Digital TV or Radio Playing
ii.
Recording and Pre-Set Recording schedule (For favorite list channels only)
iii.
Recording file playback
iv.
Time-Shifting
v.
Still Picture Capture
vi.
Preview
vii.
EPG
viii.
Teletext
ix.
Subtitle
x.
IP PID scanning
xi.
IP data broadcasting in LAN
xii.
MPEG2 Video broadcasting in LAN
xiii.
Generate IP data broadcasting task automatically
xiv.
IP MPEG4 media playing
xv.
IP MPEG4 media recording
xvi.
Drag Position, Fast Forward, Rewind when playback
xvii.
Multi language Switch
xviii.
Recall
xix.
Favorite List Support
xx.
full screen support
xxi.
R/C support
2. Installation Guide
a)
5/5
Check following
i.
If your device is a PCI Card, please turn off your PC power
ii.
If your device is a DVB-S Product, please check Dish ready
iii.
If your device is a PCI Card, please insert it into the PCI slot and make sure fixing
it
iv.
Start your computer
v.
If your device is a USB2.0 Box, check the “Device Manager” on your PC:
1) Right click “My Computer”, click “Property”.
2) Open “Hardware” page, click “Device Manager”.
3) Select “Universal Serial Bus Controller”.
4) You can find two items for USB2.0 host device:
Standard Enhance PCI to USB Host Controller
For Windows2000 will find “USB2.0 Root Hub”, for XP will find “USB
Root Hub”
5
5)
In absence of these two items, please install the drivers for USB2.0 host
device before setup DVBWorld.
6) We strongly recommend install the USB2.0 host driver from Windows2000
SP4 or Windows XP SP2.
vi.
If your device is a USB Box, connect USB Box to your PC with USB2.0 Cable.
For DVB-S USB Box then connect the Power adapter to USB Box, you can see the
indicator light in the box.
vii.
Please cancel the device installation wizard.
viii.
Connect the signal cable to USB Box or PCI Card.
b) Installing
i.
Start the installation CD, and you will see the following panel:
ii.
iii.
Click “Install Software” button
Please follow the wizard and finish all the steps
*If install the software in order to receive DVB program and IP data by DVB
device, please select “Server”. If install the software in order to receive the Video
or IP data from the LAN, please select “Client”.
iv.
Restart the computer after close all the active applications.
Note: If you are using a USB2.0 adapter PCI card/PCMCIA etc. to support the
USB2.0, please turn off the USB Box power before you restart the computer. Please
restart your computer directly if USB2.0 supported by motherboard.
v.
Recommend to enable “Disk DMA channel” to improve Recording performance.
6/6
6
vi.
1) Open “Device Manager”.
2) Select “Disk Controller Property”, and enable DMA channel.
3) Enable DMA channel on related BOIS setup page.
Start DVBWorld, the main panel will pop up:
3. Functions overview
a)
List Box Description
i.
List Box types:
You can click the relational button to select one type for the list box from following
4 types.
1)
Favorite List: This is a favorite list for changing channel easily, all the
channels are from other list. You can add any channel to this List.
2)
Satellite List: This is a channel list for satellite. It will list all the
channels separated by different satellite, transponder and program. When
scanning finish, all the channels will be listed in this list. You can select
favorite channel and add to “Favorite List”. If there is no any satellite device
connected to PC, this List will be disabled.
3)
Terrestrial List: This is a channel list for terrestrial broadcasting. After
scanning finish, all the channels will be listed in this list. You can add favor
channels to “Favorite List”. If no terrestrial device connected to PC, this list
will be disabled.
4)
IP Media Link List: This is a list especially used for IP MPEG4 satellite
internet link. If the transponder includes the IP data PIDs, you can set it in “IP
config” on “Configuration” page. Please take care of that the channels in this
list is only the .nsc file link path, this file is used to link to IP net and play the
MPEG4 program (It is the same function like Media Player), so you should set
7/7
7
“IP config” rightly and “start IP” firstly. The DVBWorld will not scan out the
IP PIDs since it is not enough information in the transponder data stream PSI,
please contact the IP data provider for IP channel information.
When click “Play” button, DVBWorld will ask for recording or not.
5)
ii.
Recording List: All the recording playback files are listed in this List,
including MPEG2 files, MPEG4 files. You can play all the files listed in this
list box, and you can operate some functions like Pause, Drag, Rewind, Fast
Forward, etc.
List operation
1)
Edit Function Description:
List Box Type Selected
2)
Favorite List
When select one channel, edit this channel
parameters.
No channel selected, inactive.
Satellite List
Show the information of the channel.
Terrestrial List
Show the information of the channel.
IP Media Link List
Inactive
Recording File List
Inactive
Add one to/Open:
List Box Type Selected
8/8
Function Act
Function Act
Favorite List
When select one channel, add a new channel
which default parameters as the selected
channel.
No channel selected, add a new channel, all
the parameters are ‘0’.
Satellite List
When select a satellite, add all the channels
in this satellite to Favorite List.
8
When select a transponder, add all the
channels in this transponder to Favorite List.
When select a channel, add this channel to
Favorite List.
Please see more information.
Terrestrial List
When select a transponder, add all the
channels in this transponder to Favorite List.
When select a channel, add this channel to
Favorite List.
IP Media Link List
Import one IP Link file (.nsc) to this List.
Recording File List
Import one Recording File to this List.
3)
Add all to Favor:
List Box Type Selected
Function Act
Favorite List
Inactive.
Satellite List
Add all the channels in this satellite to
Favorite List.
Please see more information.
Terrestrial List
Add all the channels to Favorite List.
IP Media Link List
Inactive.
Recording File List
Inactive.
More information:
When select some channels and add to Favorite List, following dialog box will pop
out. You can select the media type to add.
4)
Delete one:
Delete one selected item.
5)
Delete all the items.
Function Buttons Overview
b)
Play:
i.
1)
9/9
Delete All:
In “Stop” status, play the selected channel, IP Link, Recording File.
9
2)
In “Time-Shifting” status, stop “Time-Shifting” and switch to playing live
channel after you confirm this operation.
Pause/Time-Shifting:
ii.
1)
2)
When playing live channel, acts as “Time-Shifting” function, switch from
“playing” to “Pause-in-Time-Shifting”, then to “Playing-in-Time-Shifting”.
“Pause-in-Time-Shifting”: Pause in Time-Shifting status.
“Playing-in-Time-Shifting”: Playing in Time-Shifting status.
When playing Recording File, just acts as “Pause” function.
Stop:
iii.
1)
2)
When playing live channel with / without Time-Shifting status, stop playing
this channel.
When playing Recording File, stop playing file.
Rewind:
iv.
1)
2)
When playing live channel in Time-Shifting status, rewind the Time-Shifting
video buffer.
When playing Recording file, rewind the file.
Fast Forward:
v.
1)
2)
vi.
When playing live channel in Time-Shifting status, fast forward the
Time-Shifting video buffer.
When playing Recording file, fast forward the file.
Record:
1)
2)
When playing live channel, start recording the video as standard MPEG2 file.
When stop recording, you can modify the file name:
The default name is “Channel name date time”.
Note: You can not modify the file name when pre-set recording stop,
DVBWorld uses the pre-set name.
vii.
Capture:
1)
2)
viii.
When playing live channel, capture the current still picture and open the
Capture Dialog Box.
When in “Stop” status, open the Capture Dialog Box.
Record schedule:
When in “Stop” status, open Record Schedule Dialog Box to create or edit the
10/10
10
pre-set recording tasks.
ix.
Configuration:
Open Configuration Tool Box, includes “Sat config” page, “IP Config” page, “IP
Broadcasting” page, and “System Config” page. Please refer to “Operation
Guide Sat config” for detail.
x.
IP Shortcut Switch
1)
2)
3)
Switch IP from “stop” status to “start” status.
Switch IP from “Start” status to “Stop” status.
This shortcut button acts like that open “Configuration-->IP config” and click
“Start IP” or “Stop IP”.
Preview:
xi.
Select a transponder and click this button, preview this transponder. Please refer to
“operation Guide->Preview” for detail.
EPG:
xii.
Just activate in “Playing Channel” status, click this button to get EPG information
of this channel. Please refer to “Operation Guide->EPG”.
Teletext:
xiii.
Just activate in “Playing Channel” status, click this button to get Teletext
information transferred by this channel. Please refer to “Operation->Teletext”.
xiv.
Language:
Click this button to pop out a menu for selecting the Audio PID.
xv.
Channel Up:
Switch to previous channel.
xvi.
Channel Down:
Switch to next channel.
xvii.
Recall:
Switch to the favorite channel which played previously. “Recall” function just
activates for Favorite List Channels, but can not recall to the channels which in
“Satellite List” or “Terrestrial List”.
Network Broadcasting Shortcut switch:
xviii.
1)
11/11
Network Broadcasting function: After start IP, DVBWorld can broadcast all
11
2)
xix.
the IP data to the LAN, and the data can be received by any computer in the
LAN. About IP Data please refer to “Operation Guide->IP Config”
Click this button to start or stop IP data broadcasting.
TV Mode:
1)
TV Mode window for playing channel:
2)
In TV Mode, just one way to switch back to normal mode, right click the
playing window, a menu pops up, select “TV Mode” to change the mode.
Note: This menu will pop up when right click the play window either in playing
status or other status. This menu includes all the functions activated by the buttons
12/12
12
on the main panel.
xx.
Subtitle:
While playing TV, the software is using a default subtitle language except no subtitle
information. If want to change a subtitle, right click the playing window, a menu which
includes “Subtitle” item pop up. “Subtitle” lists all the languages of this TV, the user can
change it immediately.
This is the only way to change subtitle.
Help:
xxi.
Open the help file.
Volume Control
c)
Speaker Mute Button.
Left audio track Mute Button.
Right audio track Mute Button.
Adjust the volume.
Note: DVBWorld does not support balance.
Process Slider:
d)
i.
ii.
e)
Playing recording file, it indicates the playing process.
Time-Shifting, it indicates the video buffer. Set the maximum buffer time by
“Configuration system Config”, the default is 1 minute.
Status Bar
There are 4 parts in the status bar:
i.
Channel Name and information:
ii.
Free size of the storing disk:
iii.
IP Status:
IP inactive
1)
iv.
v.
IP active
2)
Clock, or Timer for playing recording files:
DVBWorld work status icons:
1)
13/13
Playing live channel status.
2)
Playing recording files status
3)
Playing IP media Link status.
4)
Stop status, DVBWorld does nothing.
5)
Recording status.
13
f)
6)
Playing in Time-Shifting status
7)
Pause in Time-Shifting status.
8)
Preview status.
9)
Rewind status.
10)
Fast forward status.
Strength/Quality indicator
Green color indicates locking successfully.
Red color indicates fail to lock.
DVBWorld updates the “Strength” and “Quality” value betimes, so it is a good indicator
for dish setup.
4. Operation Guide
a)
Sat config
If a DVB-S product is installed on PC, DVBWorld will show this page.
i.
14/14
Dish
There are 4 dishes for selecting. A “dish” means a signal passageway, select
different dish will affect all the information on the page, this page just show the
information of your selected dish.
1) Dish Type
Fixed: The dish is fixed when set up.
DiSEqC1.2:
DiSEqC1.2 is a special protocol for dish motor which drives the dish to
14
ii.
iii.
15/15
aim the satellite according to following controls.
Drive East: Drive the motor turn to East direction until unclinch it or
reach the east limit.
Drive West: Drive the motor turn to west direction until unclinch it
or reach the west limit.
Set East Limit: Set the east limit to ensure the motor will not reach
the real limit. If not set a limit, the motor will continue to drive the
dish to East although it can not turn east too much, the load of motor
will be so large that it possibly will be damaged.
Set West Limit: Refer to “Set East Limit”
Cancel Limit: Cancel the east and west limit. Recommend to set the
west and east limit to protect the motor.
Go to Zero: Drive the dish to zero position.
2) Satellite the dish aimed: Please select right satellite for this dish. Otherwise
you can not scan any channels.
3) Degree: Degree of the satellite position on the sky.
LNB and Control:
Note: Select right LNB type according to your satellite.
1) LNB: 3 types for selecting.
Normal
Local Frequency1: 5150MHz
Local Frequency2: 5750MHz
Normally, this LNB type is for C-Band signal.
Universal
Local Frequency1: 10600MHz
Local Frequency2: 9750MHz
This LNB type is for Ku-Band signal.
Custom
Local Frequency1 Default: 11300MHz
Local Frequency2 Default: 0MHz
This type is for custom. Set parameters according to your LNB.
2) Control
22KHz Tone
If using a 22KHz switch device, you should check if you should enable
the 22KHz tone.
Tone Burst
If using a Tone Burst switch device, you should select a passageway,
Mini A or Mini B.
DiSEqC2.0
You can use a DiSEqC2.0 device which has 4 inputs and 1 output, to
select one of 4 satellite signals.
Transponder (TP): All the transponders of this satellite.
1) Add TP: Add one TP to this satellite TP data base.
2) Del TP: Delete one TP from this satellite data base.
15
Note:
iv.
v.
b)
“Add TP” and “Del TP” used to modify the satellite TP data base. This
data base is very important for scanning satellite. If the TP parameters are
not right, the scanning program will lose locking, please modify it by hand
according to the information from the providers.
Does not recommend modify the satellite data base.
3) Lock TP: Click it, DVBWorld will lock this TP. You can see the Strength and
Quality on the main panel. This is used to adjust dish direction to aim to the
satellite.
4) Scan TP: Click it to lock this TP and scan the channels.
Please click “Apply” button to activate your settings.
Scan Sat: Click this button to scan this satellite. The DVBWorld lock the TPs listed
in the satellite TP list. Please set “LNB” and “Control” right before scan the
satellite. About the satellite TP list parameters, maybe some are incorrect, so please
check the TPs if you have enough satellite information.
Ter Config
If a DVB-T USB2.0 Box connects to PC, DVBWorld will show this page.
DVBWorld supports scanning channels by 3 methods:
16/16
16
i.
By location
Usually select a country / location for scanning.
ii.
By frequency
Type a right frequency to scan. You can select exact “Scan setting” or keep “Auto”.
After set all the settings, click “Scan” button to scan channels.
c) IP Config
i.
ii.
Transponder information
1) Satellite: From “Sat Config Sat Config”. List all the satellite names which
selected for dish 1 4, the same name will be discarded.
2) Left Transponder List: List all the TPs (Transponder) in this satellite, LNB and
the switch control is the same as the relational dish. Please refer to “Sat
Config”.
3) Please add the TPs which includes IP data to “Right Transponder List”. Select
one for “Start IP”. “Start IP” will lock the TP and load the PIDs (Refer to PID
information).
PID information
The PIDs are used for IP data separating. Please query your IP data provider for the
relational PIDs.
1) Scan PID: When IP Function and video playing not on working, this button is
active. Click it to lock the selected TP and scan all the active IP PIDs.
2) Add/Edit PID: Add a PID or edit a PID.
If select a PID, will modify it if it has not been loaded.
17/17
17
iii.
If not select a PID, will add a new PID. The PID default status is “load”.
You can type by Hex mode or Dec mode, it will affect PID information list
PID mode. This list shows the PID mode according to the latest selection
while add new one.
3) Delete PID: Delete an unloaded PID.
4) Load PID: Set this PID to DVB Net Adaptor and activate it.
5) Unload PID: Inform the DVB Net Adaptor to unload this PID.
6) PID MAC Address: It is a MAC Address pick up from the data of this PID.
Some IP data providers maybe need this MAC for end front receiving.
Data Statistic
iv.
1) Received bytes + Error Bytes = Total received bytes.
2) Received packets + Error Packets = Total Packets.
MAC Address Information
1)
2)
3)
This MAC address is used by the DVB Net Adaptor.
Some IP data provider will dispatch a MAC to the IP data user. So DVBWorld
provides “New MAC” to change the MAC for DVB Net Adaptor.
Click “New MAC”:
4)
Type your MAC(Hex) in the edit box, or click “H/W MAC” to get a MAC
from the device hardware.
5) Click “OK”, the MAC will be set to DVB Net Adaptor. It maybe spends
several minutes.
v.
Please click “Apply” button to activate your settings.
d) IP Broadcast
18/18
18
i.
The IP broadcasting in LAN:
* The server installed DVB device. The client installed the IP receiver software, need
not relational software for DVB device, except receiving MPEG2 video in LAN.
ii.
In the broadcast list, each task item is performed independently. The task item
includes 2 settings:
1) The broadcast source.
This means the network card A, the IP data source. Normally select “DVB Net
Adaptor”, except you want to broadcast the IP data from the other network
card.
2) The broadcast destination.
This means the network card B, the IP data destination. The IP packets will be
transferred to LAN via this card.
iii.
The broadcast source and destination are determined by 3 parameters:
1) IP Address of the Network card
19/19
19
This address must be a multicast address (224.0.0.0-239.255.255.255).
Please select the IP address of “DVB Net Adaptor” as a source network card,
Select the IP address of “Network Card B” as a destination network card.
2) Multicast IP Address
It is a multicast IP address which used to set “Source”, or a multicast or broadcast
IP address which used to set “Destination”. These IP addresses are indicated in IP
packets.
3) Port
UDP Port (1-65535). These ports are indicated in IP packets.
iv.
v.
*The broadcasting receives the IP packets indicated by the source of the task then
send to LAN according destination of the task. If 2) and 3) of the source and
destination are different, the broadcasting will change these items in the packets
when transfer it to LAN.
The setting methods of “Source” and “Destination”.
1) “Source” possibly has following setting methods:
Multicast:(<network card address of the source>)<Multicast Address>:<Port>
Broadcast: (0.0.0.0)0.0.0.0:<Port>
2) “Destination” possibly has following setting methods:
Multicast:(<network card address of the destination>)<Multicast
Address>:<Port>
Broadcast: (0.0.0.0)<Broadcast Address>:<Port>
Buttons description:
1) “Start”, start all the loaded broadcast tasks.
2) “Auto Create Task”
It is a very important function for broadcasting since normally the users
maybe not professional in setting the broadcasting task. Use this function to
start IP broadcasting and auto create a task when meet a new “source packet”,
this will keep the “Multicast IP Address” and “Port” as the same as the source
IP packets when transfer to LAN. So except special use, click this button to
start broadcast, this need the user to select the IP address of “Source Network
Card” and “Destination Network Card”.
3)
4)
20/20
Please query the IP addresses of the Source Network Card and Destination
Network Card by “Ipconfig” command, or query it by the “Control Panel”.
“Load/Unload”, load or unload the selected broadcast task.
“Add”, create a new broadcast task.
20
Please refer to the description of parameters of the Source and Destination.
5) “Edit”, edit the selected task.
6) “Delete”, delete the selected task.
7) “Clear”, clear the broadcast statistic data.
vi.
Click “Apply” to activate all the settings.
e) System Config
i.
ii.
iii.
21/21
Image adjust
You can adjust the items: Red Blue Brightness Contrast Saturation, 50% by default.
This function will be different or disabled according the different software version.
Record/Time-Shifting configuration
1) Record Storage: Set the folder for storing the recording files, the default one is
“…\DVBWorld\My video file\”.
2) The Maximum Time-Shifting period: Shifting time must be limited since live
signal. It is different between playing DVD. The default setting is 1 minute.
“Server” and “Client” options
1) “Server”: Selecting “Server” means the software should open a device to
receive DVB MPEG2 Video and IP Data, and be able to broadcast the MPEG2
Video and IP data in LAN.
2) “Client”: select “Client” to receive the DVB data from the LAN. This means
there is a PC which is a “Server” in the LAN, and this “Client” can receive the
data transferred from it.
21
3)
“Scan”: When the software is set as “Client”, this button will be active. Click
it to scan the MPEG2 video from the LAN. The MEPG2 Video will be listed
in the “Channel list”.
4) If “Server” and “Client” option is changed, need to restart the software to
activate the option.
iv.
Please click “Apply” button to activate your settings.
f) Capture
The capture window:
i.
When playing, click “Capture” button to capture one still picture and add to the
capture window. Or in “Stop” status, it will not capture, but show the pictures
captured after DVBWorld start. DVBWorld start next time, the capture window
does not include any pictures.
ii.
The pictures will be stored when captured. Click
iii.
Click
to show one selected picture in 1:1 mode.
iv.
Click
to delete the selected picture from the storing folder.
v.
Click
to delete all the pictures showed on the capture window, and delete
and continue to capture.
them in the storing folder.
vi.
g)
22/22
Click
to open the storing folder. The picture names showed on the picture
window are not the real file names in the storing folder. They are the numbers for
this show.
Preview
22
Double click the little picture to play this channel.
h)
EPG
i)
Click “Update” to update the EPG (Electronic Program Guide) information.
Double Click the EPG item to add in recording schedule.
Teletext
i.
23/23
Click “Save” to save this Teletext picture.
23
ii.
Click “Print” to print this Teletext picture.
j) Record Schedule
i.
24/24
Click “Create” to create a Record Schedule Task:
1)
Import “Task Name” and “Record File Name”, select a channel for recording,
click “Next”. The channels are from the favorite list.
2)
Three task mode:
24
One time only.
Daily: DVBWorld will perform this task every day.
Weekly: DVBWorld will perform this task every week according to the
settings.
3) Finish.
Time-Shifting
k)
i.
Time-Shifting is a good way to ensure you not missing any video when leave for a
while.
ii.
When playing, click
to Time-Shifting, DVBWorld will start buffering the
video data and pause the channel playing. The buffer maximum time limit is
defined by “Configuration System Config”. When Time-Shifting buffer is up to
this limit, DVBWorld will discard the old data to ensure the buffer data is the latest,
and start playing from the buffer beginning (The distance from playing position to
live position is the maximum Time-Shifting buffer time, playing position bar on the
left and live position on the right will not move from now on).
iii.
Click
again, DVBWorld will play in Time-Shifting status, playing will start
from the pause position. Furthermore, drag the playing position bar to review the
Time-Shifting buffer. You can rewind or fast forward the Time-Shifting buffer.
l) MPEG2 Video Broadcasting
i.
This function is active while the software is set as “Server”. Refer to “System
Config”.
ii.
Right click any TV channel in the favorite list, then a menu will pop up:
25/25
25
iii.
iv.
v.
vi.
vii.
viii.
ix.
x.
26/26
This menu includes all the operations of the channels. Except “Multicast”, all items
can be replaced by clicking the buttons below the channel list box.
Click “Multicast”:
“Source program” lists all the channels in the same transponder that includes the
channel right clicked. The channels all are listed in the favorite list.
Add the channels to “Broadcast program” box.
Select a “NIC” to transfer the data to LAN.
Click “Multicast” button to start Video Broadcasting.
To stop video broadcasting, right click the channel list box, click “Stop multicast”.
After the “Server ”“Multicast” the video in LAN, the “Client” can receive the data
from LAN. Start “Client” software, it will scan the channels automatically. Refer to
“System config”.
26
5. Trouble Shooting
a)
“Fail to Init device” message.
i.
No power supplies the DVB-S USB2.0 Box. Please power on the USB Box, click
“Yes”.
ii.
USB2.0 Host Device Driver missed. Please install the latest driver for the USB2.0
host controller.
iii.
PC did not identify the USB2.0 Box.
1) Re-power on the USB Box. Re-connect to PC for DVB-T USB2.0 Box.
2) If PC will miss this device again, your driver for the USB2.0 Host device
maybe the old one, and with some bugs. Please upgrade your OS to
Window2000 SP4 or Windows XP SP2.
b) Black playing screen.
i.
When the signal is not so good, sometimes it is caused by MPEG2 Decoder. Please
stop this channel and re-play.
ii.
Black screen occurs again, please close DVBWorld and restart it.
iii.
Black screen continues several times, please close DVBWorld and re-power on the
USB Box.
c) Drop frame.
i.
The signal quality is not good. For DVB-S USB2.0 Box please check your dish,
LNB, Signal Line. For DVB-T USB2.0 Box, please use a better antenna for
receiving.
ii.
The PC performance is too bad. Check whether the disk DMA enable, please
enable DMA. Refer to DMAEnable.
iii.
The VGA card performance is not good for playing. Please check the settings for
VGA card, try to improve the performance.
d) Not able to lock channel.
i.
For DVB-S USB2.0 Box:
1) Check signal input firstly.
2) Check dish settings like “LNB”, “Control”. If move the switch position of the
signal after scan the channels, this phenomenon will occur. When adding the
channels to the list, DVBWorld will let channels remember the current dish
settings, modification of dish settings or signal switch position moving will
not affect the channel settings. So recommend to re-scan all the channels after
any dish/signal change.
3) Check the TP parameters, maybe the parameters are incorrect. Refer to
OperationGuideSatConfig.
27/27
27
ii.
For DVB-T USB2.0 Box:
1) No signal at all.
2) The parameters for this channel are incorrect.
3) Try to scan all the channels.
e) Not able to start IP or IP data not found.
i.
Has the channel been locked?
ii.
Are PIDs correct?
iii.
Is MAC Address right if possible?
iv.
Has DVB Net Driver been installed?
f) Not able to play IP media Link.
IP Media Link depends on right IP Configuration settings.
i.
Please “Start IP”. Refer to OperationGuideIPConfig.
ii.
Check with the Media provider, ensure “PID information” include the right PID
which load Media data.
iii.
Check your .nsc file is delivered by Media provider and transfer by satellite TP.
g) Drop frame while recording.
Record function depends on PC high performance.
i.
CPU speed maybe a key feature, please not less than 500MHz.
ii.
Normally disk feature is very important for recording. Please open DMA transfer.
Refer to DMAEnable.
h) EPG inactive.
i.
This is a channel without EPG information.
i) Teletext information not found.
i.
No information transferred by this channel.
j) Not able to recall to old channel.
i.
The “Recall” function is just active for Favorite List. It will discard other list
channels. Refer to FunctionOverViewRecall.
k) Not able to start DVBWorld.
i.
There is a “DVBWorld” in running. Please open “Task Manager” for a check, and
close “DVBWorld”.
ii.
If power off the DVB-S USB2.0 Box or disconnect the USB Box from PC while
DVBWorld running, DVBWorld maybe need more time to stop running. Please
keep on waiting for several minutes. It’s not recommend to power off USB Box or
remove USB Box connecting to PC while DVBWorld running.
l) Locking channel is ok, but no data. Or not able to scan some TPs but locking is ok.
For USB2.0 box, normally it is caused by incorrect USB2.0 host driver revision. Please
upgrade your OS to Windows2000 SP4, or Windows XP SP2.
28/28
28