1
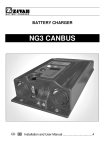
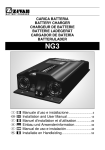
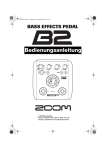
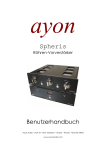
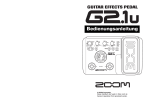
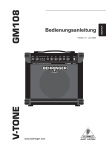
BEDIENUNGSANLEITUNG
OWNERS MANUAL
PRE ONE
Tube
Microphone
Preamp
PRE ONE
Tube
Microphone
Preamp
Sehr geehrter Kunde!
Wir gratulieren Ihnen zu Ihrer Entscheidung für einen Hitec Audio
PRE ONE Mikrofonvorverstärker. Bei der Spezifikation und der
Ausführung dieses Röhrenvorverstärkers haben wir besondere
Sorgfalt walten lassen. Röhrenvorverstärker wie der Hitec Audio
PRE ONE werden seit langem von professionellen Toningenieuren
wegen ihres warmen und natürlichen Klangs hoch geschätzt. Der
PRE ONE bietet den typischen Röhrensound, ist sehr einfach zu
bedienen, besitzt sehr kompakte Abmessungen und ist dabei für
jedermann erschwinglich.
Dear customer!
Congratulations on your decision for the Hitec Audio PRE ONE
microphone preamp. We put all our effforts in the specification
and the design of this tube microphone preamplifier. Since years
Tube preamps like the Hitec Audio PRE ONE have been applied by
professional sound engineers and are appreciated for their warm
and natural sound character. The PRE ONE offers the typical tube
sound, is easy to use, compact in size and affordable for
everybody.
Features:
A wide freqeuncy range, crystal clear sound reproduction, a high
signal to noise ratio and a proprietary tube sound are the
highlights of the Hitec Audio PRE ONE.
Merkmale
Ein weiter Übertragungsbereich, kristallklare Wiedergabe, hoher
Signal-/Rauschabstand und ein charakteristischer Röhrenklang sind
die Kennzeichen des Hitec Audio PRE ONE.
•
•
•
•
•
•
•
•
•
•
• One Channel Tube Microphone Preamp
• Selected Tube for a Warm Sound
• 60dB Gain Range and up to +10dB Output Level
• Balanced XLR Mic Input
• 6.3mm Jack Input at Line Level
• Balanced XLR and 1/4“ Jack Output
• Selectable +48 volt Phantom Power
• 20dB Pad Switch
• Phase Reverse Switch
• Peak LED
Einkanaliger Mikrofonröhrenvorverstärker
Selektierte Röhre für einen warmen Klang
60dB Verstärkung und bis zu +10dB Ausgangspegel
XLR Mikrofoneingang
6.3mm Klinkeneingang auf Line Pegel
Symmetrische Klinken- und XLR Ausgänge
+48V Phantomspeisung schaltbar
20dB Pad Schalter
Phasenumkehr-Schalter
Peak LED
Mikrofon Eingang
Anschluss:
Impedanz:
Max. Eingangspegel:
Eingangsgleichtaktunterdrückung:
Äquivalentes Eingangsrauschen:
symmetrisch, XLR female
2kOhm
-10dBu bzw. +10dBu mit 20dB Pad Schalter
typisch >80dB @ 1kHz
typisch -125dBu an einer 150Ohn Last. A-gewichtet
Microphone Input
Connection:
Impedance:
Max. Input Level:
Common mode Rejection:
Equivalent Input Noise:
balanced, XLR female
2kOhm
-10dBu resp. +10dBu with 20dB Pad Switch
>80dB @ 1kHz
-125dBu @ 150Ohn Load, A-weighted
Line Eingang
Anschluss:
Impedanz:
Max. Eingangspegel:
Verstärkung:
6.3mm Klinke unsymmetrisch
>1MOhm
0dBu oder +20dBu mit 20dB Pad Schalter
26dB bis 60dB
Line Input
Connection:
Impedance:
Max. Input Level:
Gain:
6.3mm Jack unbalanced
>1MOhm
0dBu or +20dBu with 20dB Pad Switch
26dB to 60dB
Ausgänge
Anschluss:
Impedanz:
Max. Ausgangspegel:
symmetrisch, XLR male und 6.3mm Klinke unsymmetrisch
symmetrisch 600Ohm, unsymmetrisch 300Ohm
+27dBu (XLR), +21dBu (Klinke)
Outputs
Connection:
Impedance:
Max. Output Level:
balanced, XLR male and 6.3mm Jack unbalanced
balanced 600Ohm, unbalanced 300Ohm
+27dBu (XLR), +21dBu (Jack)
System
Verstärkungsbereich:
Ausgangsregelbereich:
Phantomspeisung:
PAD:
Phase:
Frequenzgang:
THD & Rauschen:
Netzversorgung:
Mikrofoneingang +26dB bis +60dB
Lineeingang +16dB bis +50dB
-unendlich bis +10dB
+48V
20dB
vertauscht PIN 2 und 3 des XLR-Ausgangs
10Hz bis 45kHz (-3dB)
0,08% @ -10dBu / 1kHz / 30dB Verstärkung / A-gewichtet
9VAC, 1300mA (12W typische Leistungsaufnahme)
A Brand of Musik Produktiv
Fuggerstrasse 6 • 49479 Ibbenbüren • Germany
Tel: +49-5451-909 0 • Fax: +49-5451-909 109
[email protected]
System
Gain Range:
Output Level Range:
Phantom Power:
PAD:
Phase:
Frequency Range:
THD & N:
Power Supply:
Mic Input +26dB to +60dB
Line Input +16dB to +50dB
-infinity to +10dB
+48V
20dB
reverses PIN 2 and 3 of XLR Output
10Hz to 45kHz (-3dB)
0,08% @ -10dBu / 1kHz / 30dB Gain / A-weighted
9VAC, 1300mA (12W typical Power Consumption)
www.hitec-audio.com
Beschreibung der Rückseite (von links nach rechts)
The Back Panel (from left to right)
(1) Netzteilanschluss
An diesem Eingang schließen sie das im Lieferumfang
enthaltene Netzteil an.
(2) XLR Ausgang
Der XLR Ausgang des PRE ONE ist symmetrisch. Er ist dafür
ausgelegt, direkt mit dem XLR Eingang eines Mischpults
verbunden zu werden. Hinweis: XLR und Klinkenausgang
können gleichzeitig genutzt werden. XLR Pinbelegung:
Pin 1 = Schirm, Pin 2 = „heiß“, Pin 3 = „kalt“
(1) Power Supply Connector
Connect the included power supply at this point.
(2) XLR Output Connector
The XLR output of the PRE ONE is balanced. The XLR output is
meant for running from the PRE ONE directly into the input of a
XLR input of a mixing console. Note: The XLR and 1/4" output
connectors can be used simultaneously. XLR Pin configuration:
Pin 1 = Ground, Pin2 = Positive and Pin3 = Negative
1
2
3
5
4
(3) Stereoklinkenausgang
Der 6,3mm Klinkenausgang des PRE ONE ist als Stereoklinke Impedanz-symmetrisch. Er ist dafür
ausgelegt direkt mit dem Klinkeneingang eines Mischpults oder eines Verstärkers verbunden zu
werden. Hinweis: XLR und Klinkenausgang können gleichzeitig genutzt werden.
(3) 1/4" TRS Output Connector
The 1/4" output connector of the PRE ONE is impedance-balanced TRS. The 1/4" output is meant
for running from the PRE ONE directly into 1/4" inputs of mixiers or power amplifiers. Note: The
XLR and 1/4" output connectors can be used simultaneously.
(4) XLR Eingang
Der XLR Eingang des PRE ONE ist symmetrisch. Er ist für den Anschluss von Mikrofonen ausgelegt.
XLR Pinbelegung: Pin 1 = Schirm, Pin 2 = „heiß“, Pin 3 = „kalt“
(4) XLR Input Connector
The XLR Input connector of the PRE ONE is balanced. The XLR input is designed for microphone
connections.. XLR Pin configuration: Pin 1 = Ground, Pin2 = Positive and Pin3 = Negative
(5) Stereoklinkeneingang
Der 6,3mm Klinkeneingang des PRE ONE ist unsymmetrisch. Er ist dafür ausgelegt, direkt mit
Kabeln unsymmetrischer Instrumente verbunden zu werden.
(5) 1/4" Balanced TRS Input Connector
The 1/4" input connector of the Mini-Pre is unbalanced TS. The 1/4" input is ideal for running
instrument cables directly into the Mini-Pre.
Beschreibung der Front (von links nach rechts)
The Front Panel (from left to right)
(6) Regler „Gain“ für die Eingangsverstärkung
Mit diesem Regler bestimmen Sie den Gesamtpegel am
Eingang des PRE ONE. Drehen des Reglers im Uhrzeigersinn
regelt die Verstärkung im Bereich von +24dB bis +60dB.
Mit Hilfe des PAD Tasters - siehe (10) – können Sie die Verstärkung auf einen Bereich von +6dB bis +40dB umstellen.
6
7
8
(7) LED „Peak“
Die rote Peak LED zeigt durch ihr Aufleuchten an, dass der
Eingang des PRE ONE ernsthaft übersteuert ist. Empfehlung:
stellen Sie den Gain Regler so ein, dass die Peak LED nur bei
sehr starken Signalspitzen kurz aufleuchtet.
(8) LED „Power“
Die grüne Power LED zeigt an, dass der PRE ONE mit Strom versorgt wird und betriebsbereit ist.
(9) Taster „+48V“
Mit diesem Taster aktivieren Sie die integrierte 48 Volt Phantomspeisung für die Mikrofone, die
eine externe Spannungsversorgung benötigen.
(10) Taster „+20dB PAD“
Mit diesem Taster wählen Sie den Bereich der Eingangsverstärkung des PRE ONE. Im nicht gedrückten Zustand ist der Bereich der Verstärkung von +26dB bis +60dB. Im gedrückten Zustand
ist der Bereich der Verstärkung von +6dB bis +40dB.
9
10
11
12
(6) Input Gain Control +24 to +60dB
Use the Input gain control to set the overall amount of input
gain being fed into the PRE ONE turning the Gain control
clock wise will increase the gain from +24 to +60dB. Stages
include: +24 to 60dB and +6 to +40dB (+20dB pad).
(7) Peak LED
The red Peak LED is used to indicate that the input signal is
severely clipping. Note: Set the Input Gain control so that the
Peak LED occasionally lights with strong signal peaks.
(8) Power LED
The green Power LED indicates that power has been supplied to the PRE ONE and the unit is
currently in operation mode.
(9) +48volt Switch
The +48 volt switch (pushed in) is used to supply power to any microphone that requires an
external power supply.
(10) +20dB Pad Switch
The +20dB Pad switch is used to select the desired gain range of the PRE ONE. When the switch
is not depressed, the PRE ONE is in normal +26 to 60dB mode. When the +20dB Pad switch is
pressed, the gain range of the PRE ONE is +6 to +40dB.
(11) Taster „Phase“
Der Taster Phase des PRE ONE ermöglicht die Umschaltung der Phasenlage des Ausgangssignals.
Durch Drücken der Taste wird das Signal um 180° in der Phasenlage gedreht.
(11) Phase Switch
The Phase switch of the PRE ONE is used to adjust the phase output of the unit. When the switch
is depressed (out) the output is normal, or in phase. When the Phase switch is engaged (pressed
in), the output signal is out of phase.
(12) Regler „dB Output Level“
Mit diesem Regler bestimmen Sie den Ausgangspegel des PRE ONE, der an angeschlossene
Geräte übertragen wird. Bei Linksanschlag des Reglers ist das Signal ganz ausgestellt. Bei Rechtsanschlag des Reglers wird das Ausgangssignal um weitere +10dB - zusätzlich zur Eingangsverstärkung (siehe (6)) - verstärkt. Der Regelbereich reicht von „minus Unendlich“ bis +10dB.
(12) Output Control -infinity to +10dB
The Output control of the PRE ONE is used to set the overall output signal of the PRE ONE being
sent to a receiving device. When the control knob is turned completely to the left, there is no
output signal being sent to a receiving device. Adjusting the control knob to clockwise, output
signal is being increased. The range is from -•‡ to +10dB.
Anwendungsbeispiele
Applications
Neben der eigentlichen Anwendung des PRE ONE als tragbarem Mikrofonvorverstärker in Röhrentechnik, können Sie den PRE ONE noch für eine Reihe weiterer Einsatzgebiete verwenden.
In addition to being designed specifically for portable desktop tube microphone preamp
applications, the Mini Tube Pre is also ideal to be used in numerous other applications. These
applications include the following:
Aufnahmen mit dem Computer
Verwenden Sie den PRE ONE als Interface für digitale Aufnahmetechnik. Der PRE ONE ist ideal um
dem digitalen, steril klingenden Equipment etwas „Seele“ einzuhauchen.
Live Sound
Der PRE ONE eignet sich bestens für Live Gesang und auch Instrumente. wie z.B. akustische
Gitarren mit integrierten Tonabnehmern. So können Sie Signalen einen warmen Klangcharakter verleihen, die ansonsten durch die Vorverstärkung der Mischpulteingänge einen eher sterilen Sound
hätten. Dank seiner kompakten Abmessungen ist der PRE ONE ein perfektes Werkzeug für die Bühne.
Digital Recording
You can also use the PRE ONE as an interface for digital recording equipment such as hard disk
recorders or computer based DAW’s. The PRE ONE is great to enhance the streile digital sound
with some „soul“.
Live Sound
The PRE ONE i s espacially suited for live vocals and instruments like e.g. acoustic guitars with pickups.
So you are able to warm the tone of these signals that otherwise are sterilzed by microphone input of
the attached mixer. Thanks to its compact size the PRE ONE is the right tool on stage.
www.hitec-audio.com