1
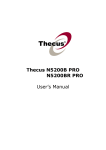
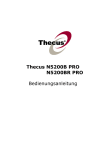
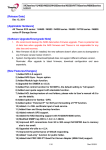
Stackable User Guide
The stackable feature is very unique function that provided by Thecus in
N5200PRO/1U4500 series products. What is stackable feature capable to do; simply it
could expand the capacity up to the other 5 stack target volume which they are located
in different systems and can be stacked through single network access like SMB or
AFP acting as share folder type. Please refer the figure below and details setup
procedure.
Since the FW v2.00.04 that
N5200PRO/1U4500 has
stackable feature supported.
On the Web UI menu tree, the stackable feature is located under main category
“Storage”. Please refer the figure below for reference.
A. Add Stack Target Volume
From the figure above, press “Add” to access the stackable target device setting page.
Please refer below figure for details.
With the added
stack target you
could “Enable” or
“Disable” now or
later per usage
needed.
Next, please input
stackable target IP
address alone
with “Discovery”
button. Then
system will list
available target
volume from
input IP address
for selection.
Now you may
have question that
how can I have the stack target volume. Please refer to the section F. How to create
stack target volume
Once the IP with volume has set then you may need to input valid user name and
password to validate the access right if applicable. If there is no user name and
password needed to access target volume then left it blank.
The Export share name will become the network share name and be displayed through
network access such as SMB. You may refer the figures below to see the result. Please
be noticed the naming limitation.
From the figure above, the export share name has input “pmmeeting”. The figures
below has shows the result before and after via Microsoft network access after setting
has completed. .
No Stack Target
Stack target with export
share name “pmmeeting”
The Browseable is same as what you
have set for system share folder.
Simply it is visible or not while you
have access through web disk. You
may refer the figures below for
reference when “Yes” or “No”
selected.
Visible when Browseable is “Yes”
Invisible when set to “No”
The Public is same as what you have set for system share folder that associated with
ACL permission setup. With “Yes” or “No” selected that will bring you the ACL
check box available or gray out on the Stack target list page.
ACL gray out with Public is “Yes”
ACL available with Public is “No”
B. Make Stack Target Active
After setting has completed with “Apply” button confirmed, system will bring you
back to “Stack Target List” page as figure shows below. Now you could see there is
one stack target device has been attached into this stack master.
At this moment, you are one step away to start working with your stack target
volume.
With this newly attached stack target device, you will see the information displayed
and also several items you could operate further.
In general, if attached stack target device has been used by other N5200PRO/1U4500
as stack target volume then the “Format” item will be gray out and system can
recognized straight away with capacity shows.
Or you will get “Format” item available and ‘Status” will shows “Unknown file
system” alone with “Capacity” unavailable. The figure above you may refer.
Now, press the “Format” and system will prompt twice with different dialog box for
conformation to precede the task.
In the 2nd dialog box confirmation, you have to type exactly “Yes’ wording in case
sensitive to firm the action or system will not carry on for formatting. You may refer
the figures below.
First step of confirmation
Second step of confirmation
After the “Format”
has been done then
the stack target
volume is created
successfully. You
will see the volume
capacity and status.
Please refer the
figure for
information.
C. Edit Stack Target
Press the “Edit” item from associated stack target list, system will bring up the details
for your modification needed.
After change has been made press “Apply” to confirm or “Back” to ignore any
modification has made. If any change has been made, the associated information will
be updated on “Stack Target List” page.
D. ACL for Stack Target
If the stack target setting set to “Public” then ACL will be gray out. Alternatively, if
“Public” setting is No then ACL is available for you to setup the user access
permission for the stack target.
The ACL setting is exactly same as system folder that you may have setup previously.
E. Reconnect Stack Target
The enabled stack target device may disconnect by some reasons like power or
network disconnect. With such event happened, the “Reconnect” item will available
for connection retries purpose.
F. How to create stack target volume
The stack target is the one that you have created iSCSI volume under RAID space
allocation. On the other hand, the iSCSI volume in N5200PRO/1U4500 can be acted
as iSCSI target for Initiator or stack target for stackable. Please refer the figure below
that shows the example of volume allocation lists which has created iSCSI volume
included.
From the volume allocation list above with type iSCSI associate items, all can be set
for stack target of stackable.
But please make sure the selected iSCSI target’s availability and not been used by any
other iSCSI initiator or the data inside will be destroyed complete with no chance to
get it back.