1
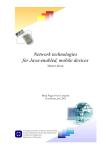
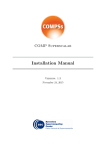
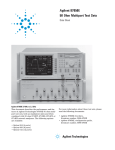
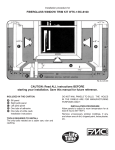
SkyFreeGPS
GPS Receiver Simulator
USER GUIDE
Application requirements
In order to use SkyFreeGPS please consider the following requirements:
•
JAVA 2 Platform, Micro Edition - J2ME;
•
Sun’s Wireless Toolkit for CLDC with a Bluetooth and touch screen enabled device;
•
a calibrated map .
1
SkyFreeGPS runs in Sun’s JAVA Wireless Toolkit emulator requiring a Bluetooth and pointer
supporting device. The application is intended to be used on a personal computer for testing a
GPS based application during the development process, although it could also be used on a
device that meats the specified requirements. In the course of this project the application has
only been used in WTK as a pointer enabled device was not available.
For the use of its map enabled features, SkyFreeGPS also requires a valid calibrated map in
the form of two files: one containing the image of the map and one the calibration data.
The image should be stored in a .PNG file, whilst the calibration data must be stored as text
under any file extension. SkyFreeGPS will read the first four lines of the file, assigning each
line to the next following values in the given order:
-
latitude for the most up left corner pixel of the image,
-
longitude for the most up left corner pixel of the image,
-
latitude for the most down right corner pixel of the image,
-
longitude for the most down right corner pixel of the image.
Latitude and longitude should be specified in decimal degrees, as presented in the next figure.
Figure 1. Example of map calibration data
There is no restriction to the content of the file following the first four lines, so feel free to add
any useful information regarding the map. A file with less than four lines will not be accepted,
1
This could be optional in case the map enabled features of the application are not being used
SkyFreeGPS User Guide
Page 1 of 12
nor a file in which the first four lines don’t contain double type values. However trying to use a
file that doesn’t meet the previous requirements should not interrupt the application.
The data calibration file name doesn’t have to be the same as the image file name. Thus you
could have an image file named “Switzerland.png” and a corresponding calibration file named
“calibration.txt”.
Set up SkyFreeGPS for use
Using SkyFreeGPS with WTK
For running the application, a new project must be created in WTK using one of the two
classic available options: Create project from JAD, JAR file or New Project under the File
menu. The MIDlet of the application is the SkyFreeGPS file located in the folder with the
same name.
API selection must meet at minimum JSR 82, JSR 75 and JSR 179, with MIDP 2.1 profile and
CDLC 1.1 configuration.
Enabling pointer use on any WTK emulator’s device
Not all devices of the WTK emulator support pointer driven applications. To be able to use
SkyFreeGPS on any device the touch screen facility should be activated. In order to do this
you must find the properties file of the selected device. It is usually located under the folder
WTK2.5.2\wtklib\devices. Choose the folder with the device’s name and open the .properties
file using a basic text editor like Notepad. Locate the touch_screen parameter and change its
value to true. The line should look like this:
touch_screen=true
Save the changes and close the file. The changes will take effect the next time WTK is
launched. It is recommended not to change the parameters of to many devices as this could
interfere with testing of other applications. Best to chose one device for running SkyFreeGPS
and stick to it, preferably one of the default emulator’s devices which don’t correspond to any
particular real device model.
Using maps
Maps must be accessible to the emulator’s device. Therefore all files related to maps should
be saved in the device’s file system. This is usually located under the folder
j2mewtk\2.5.2\appdb\”devices_name”\filesystem\root1. Once the folder located, it is
SkyFreeGPS User Guide
Page 2 of 12
recommended to create a shortcut on your desktop for faster access in the future, especially if
planning to use the map modes and to add new maps all along.
Note that in order to be used in SkyFreeGPS, maps must be calibrated. Therefore, at all times,
the two mentioned files are required: the one with the image and the one with the calibration
data. There are plenty of tools permitting to calibrate a map. For further references please
consult the useful links provided at the end of this document.
Using SkyFreeGPS
The main menu of the application contains the following options:
Select Map
Real Time Mode
Track Mode
Keyboard Mode
Log File Mode
Help
Exit
Before explaining in more details all of these menus, here are some specifications regarding
the sentences build by SkyFreeGPS for a better understanding of how the application works.
Upon launching, the application will try to open a Bluetooth connection. As soon as a client is
connected, SkyFreeGPS will start sending streams with a one per second frequency. These
streams contain two lines: one for the GGA sentence and the second for the RMC sentence.
These sentences can be empty or not, depending on the status of the application. Under the
main menu, select map menu and help menu the application can only build empty sentences.
Under the other menus SkyFreeGPS will either send blank or valid sentences based on the
user’s actions. This is explained in more detail in the following paragraphs regarding these
menus.
A blank sentence contains only the current UTC time information and no details about
location or velocity or altitude etc. Here is an example of an empty stream:
"$GPRMC,132715,V,,,,,,,10032008,003.1,W*6A"
"$GPGGA,132715,,,0,00,,,,,,,*7D"
SkyFreeGPS User Guide
Page 3 of 12
Select Map
Use this option to select or change the map to be used in the map based modes (Real Time
and Keyboard). Three files can be selected under this menu:
-
the image of the map,
-
the image calibration data,
-
the POIs of the map.
Figure 2. Select map screen
The first two files are mandatory for using a map, so a “No File” value for the first to items
can not be used for displaying a map. “Select map” will not read the selected files for
displaying the map on the screen. This will be done by a map based option of the menu.
The first time the application is used on a device no file is selected. Once a file has been
selected the information will be saved and used next time the application is re-launched. This
will save you the trouble of selecting a map each time you run the application.
Browse : opens a new window for browsing the file system folder. To select a file, navigate to
one of the three mentioned items and select Browse from the menu. Several confirmations
messages will be launched by the device emulator2. Once you have selected the file, click Ok
to return to the Select Map screen. Repeat the operation for each file you wish to select.
Ok : saves the file selection. Once the files have been selected, click the Ok menu option to
save the file names and locations.
2
The confirmations will no longer be needed once the application is signed.
SkyFreeGPS User Guide
Page 4 of 12
Cancel : cancel the selection process. Select this option of the menu to cancel the current
selection and return to the previous selection.
Ok and Cancel options will end the Select Map mode. The application will return to the calling
screen: the main menu or a map based mode.
Recommendation : use the extension “.cal” for the data calibration file for an easier
identification of this type of files.
Real Time Mode
Use this option to set up in real time the locations to be sent through the NMEA sentences.
Locations can be selected on a map. Real time means that each second SkyFreeGPS will
use the current indicated location to build Bluetooth streams.
If the map size is larger than the screen size, drag the map by holding down the ’7’ key.
Without pressing the ‘7’ key, SkyFreeGPS will treat the mouse (pointer) dragging as the track
to be sent via Bluetooth. The map can also be moved by using the up, down, left and right
device keys.
Press ‘1’ and click or drag the mouse/pointer on the map to display locations.
Press the ‘3’ key and click on the map to set up a point of interest. The POI will be marked on
the map and added to the list of POIs of the current map.
Figure 3. Real time mode screen
Start sending : starts sending valid NMEA sentences using the current position. When setting
up the streams, SkyFreeGPS is using the current position and speed. To indicate a position
SkyFreeGPS User Guide
Page 5 of 12
click the mouse on the map or drag the mouse on the map to follow a path. If no location is
indicated at the time SkyFreeGPS is building the Bluetooth stream, the last indicated location
will be used. That means that if you click once on the map and pause for more than one
second, the same location will be sent until your next click on the map.
Stop sending : starts sending blank NMEA sentences. Empty sentences will not be stored to
the LogFile list. You can always go back to sending valid sentences by selecting Start
sending again.
Export LogFile : exports the list of valid NMEA sentences that has been sent via Bluetooth.
From the beginning of the use of this run mode, each valid stream is added to a vector.
Choosing this option will display a new window for selecting the export file name.
Export : saves the list in the selected file. If the file already exists the content of the file
will be replaced, if not the file will be created.
Browse : allows the selection of an existing file or the creation of a new file to be
selected3.
Use last name : replaces the content of the field with the name of the last used file. Use
this option if you don’t want to export every time to a new file.
Use map name : replaces the content of the field with the name of the map image by
changing the extension. For example if you export a track for the map image stored in
the file “Geneva.png”, SkyFreeGPS will propose a log file named “Geneva.log”.
Cancel : returns to the browse map window without exporting the track to a file.
Change speed : changes the speed of the current position. A new window will be displayed.
In this window, change the speed and click Ok to go back to the map window or click Cancel
to return to the map without changing the speed.
Change map : changes the displayed map. This option opens the Select Map window. When
selecting this option the log file vector is emptied.
Track Mode : switches to Track Mode using the same map. No information is passed on the
track mode except for the map and the last used speed. The real time log file vector will be
lost.
Save POIs : saves the defined POIs to the specified file. A new window will be opened for
specifying the file name.
Save : saves the POIs list in the selected file. If the file already exists the content of the
file will be replaced, if not the file will be created.
3
There is no restriction to the extension used for the log file.
SkyFreeGPS User Guide
Page 6 of 12
Browse : allows the selection of an existing or newly created file.
Cancel : returns to the previous window without exporting the POIs to file.
Important! The POIs file is not automatically saved/updated when the map is no longer
displayed either because the map is changed or because the user quits the Track Mode.
Back to menu : returns to the Main Menu.
Track Mode
When needing a specific route that must occur in precise conditions in terms of positions,
speed and realistically correct values, use the Track Mode. From any starting point Real Time
Mode can simulate covering any distance in just one second, regardless of the selected
speed. In other words there is no correlation between distance and velocity, as each location
is selected by the user in real time, independently of the previous one. This is no longer the
case with the Track Mode. First you need to set up a track and then SkyFreeGPS will
compute each location to be sent, based on speed and heading.
Figure 4. Track mode screen
This is a map based mode as well, which means a calibrated map must be selected before
using this feature. Same specifications apply as in the Real Time Mode for displaying and
moving the map, as well as for displaying the coordinates of a location on the map, or for
defining POIs.
SkyFreeGPS User Guide
Page 7 of 12
Click on the map to set up the key locations that define the track. SkyFreeGPS will display the
track on the map by drawing a line between the last clicked location and the previous one. In
addition, each selected track point is marked by a small rectangle for an easier identification.
Important! Change the speed before setting up the next track location if you want a different
velocity from that point on.
Clear track : cancels the previously defined track. It clears the track from the map and also
from the track vector. Once the track is cleared the ‘Start sending’ option can no longer be
used.
Start sending : computes the points to be sent and stores them in a vector. The final track
points to be sent are determined based on the drawn track and the speed between each two
track points. Once the calculations finished it starts sending valid NMEA sentences using the
computed values, beginning with the first selected location. Once the end of the computed
positions vector has been reached, SkyFreeGPS returns to sending blank sentences.
Stop sending : returns to sending blank NMEA sentences.
Restart sending : once the sending of a calculated track has been interrupted by choosing
Stop sending, the calculated vector is not lost. By choosing this option the application will
restart sending valid stream using the positions from the beginning of the vector.
Export LogFile : saves/updates the log file of the track. See specifications above.
Change speed : changes the speed for all track points starting from the next selected one. In
the new opened window, change the speed and select Ok option from the menu to save the
change or Cancel to ignore it and return to the previous screen.
Change map : select a new map to be displayed on the screen in the Select Map window.
Real Time : switches to the Real Time Mode window.
Save POIs : saves/updates the map’s POI file. See specifications above.
Back to menu : returns to the Main Menu.
Keyboard Mode
This mode doesn’t use neither a map nor the pointer. Furthermore, it doesn’t send empty
sentences as we have seen for the previous two modes. The principle is the following: the
application builds the NMEA sentences based on the parameters chosen by the user. These
parameters refer to location (latitude and longitude), speed and heading.
SkyFreeGPS User Guide
Page 8 of 12
There are to ways of changing the position: either by typing it on the keyboard or by using the
up, down, left and right keys. These two possibilities correspond to two different windows
available under this menu - a text and a graphic window.
Figure 5. Keyboard mode - Text screen
Figure 6. Keyboard mode - Graphic screen
Text window : allows to change the coordinates of the current position and all other specified
parameters. The check field Update fields, will determine the display of the two NMEA
sentences, when selected. Change the values of the fields and notice the change in the
NMEA sentences. The field Meters/pixel refers to the Graphic window. To change to the
graphic mode select Graphic. To return to the main menu select Main menu.
Graphic window: permits to change the only current position. The red point represents the
current position. To change this position use the up, down, left and right keys. To position the
current red point to the centre of the to axes select Center. To change the speed at which the
red point moves : press the key 1 to increase the speed with one unit or press the key 3 to
decrease it with one unit.
The graphic window will not change the values of the other parameters. To return to the
previous window select Text. You can only return to the main menu from the text window.
Log File Mode
SkyFreeGPS can read previously saved log files and replicate the sentences from the file.
When the end of the file is reached the application sends empty sentences. Upon selection of
this menu SkyFreeGPS is loading a window for selecting the log file to be used:
Browse : selects a file from the devices file system.
SkyFreeGPS User Guide
Page 9 of 12
OK : confirms the selection and launches the Log File Mode screen.
Cancel : returns to the main menu without saving the selection of the log file.
Figure 7. Sending data from a log file
Change track : returns to the selection window mentioned previously, for selecting another log
file to be used.
Back to menu : returns to the main menu.
Help
Explains the previous menus. Select an item to display its content. Click Back to return to the
previous screen.
Exit
Select Exit to close the application. Some of the values will be saved and used next time the
application is run on the same device, like for example: the selected files regarding the map,
the file used for exporting a track.
SkyFreeGPS User Guide
Page 10 of 12
Conclusion Quick steps to start using de application
1.
Create a new project in WTK for SkyFreeGPS, either from scratch (if you’re using the
source code) or from the JAD/JAR file.
2.
Activate the use of the pointer on the preferred emulator’s device by changing the
touch_screen parameter tod true in the properties file.
3.
Save at least one calibrated map in the device’s file system.
4.
First open the support application SkyFreeGPS and allow Bluetooth connection.
5.
Open the application that requires GPS sentences. Connect your application to
SkyFreeGPS.
6.
Select one of the four available running modes of SkyFreeGPS and start sending valid
GPS sentences. Watch the behaviour of the tested application under different GPS track
scenarios.
SkyFreeGPS User Guide
Page 11 of 12