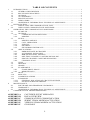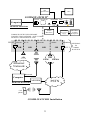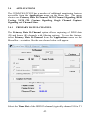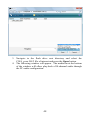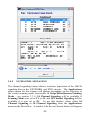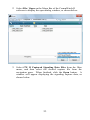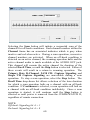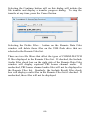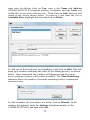
1
COMM-WATCH II®
MODEL CW-2
USER MANUAL
December 13, 2010
TABLE OF CONTENTS
1 2 3 4 5 INTRODUCTION ...................................................................................................................... 1 1.1 GENERAL DESCRIPTION ........................................................................................... 1 1.2 RECEIVING/UNPACKING ........................................................................................... 2 1.3 OPTIONS......................................................................................................................... 2 1.4 ACCESSORIES ............................................................................................................... 3 1.5 SPECIFICATIONS.......................................................................................................... 4 1.6 INDICATORS ................................................................................................................. 7 1.7 ADDITIONAL INFORMATION/ TECHNICAL ASSISTANCE ................................. 8 INSTALLATION ..................................................................................................................... 10 2.1 INSTALLING THE COMM-WATCH II UNIT .......................................................... 10 2.2 INSTALLING COMM-WATCH II SOFTWARE ....................................................... 16 OPERATION: THE COMM-WATCH II SOFTWARE ......................................................... 18 3.1 START-UP .................................................................................................................... 18 3.2 OPTIONS....................................................................................................................... 21 3.2.1 COMMUNICATION SETTINGS ......................................................................... 22 3.2.2 MODEM................................................................................................................. 23 3.3 SETUP ........................................................................................................................... 24 3.3.1 MISCELLANEOUS .............................................................................................. 24 3.3.2 CALL OPERATION.............................................................................................. 25 3.3.3 EVENTS................................................................................................................. 29 3.3.4 SECURITY ............................................................................................................ 34 3.3.5 SECONDARY INTERFACE ................................................................................ 38 3.4 APPLICATIONS ........................................................................................................... 43 3.4.1 PRIMARY RATE D-CHANNEL ......................................................................... 43 3.4.2 24 CHANNEL SIGNALING ................................................................................. 49 3.4.3 BER (Bit Error Rate) TESTING ............................................................................ 50 3.4.4 MULTIPLE CHANNEL CAPTURE SIGNALING ............................................. 51 3.4.5 SINGLE CHANNEL CAPTURE SIGNALING ................................................... 55 3.4.6 CHANNEL SCAN ................................................................................................. 59 3.5 VIEW ............................................................................................................................. 61 3.6 HISTORY ...................................................................................................................... 61 3.7 GRAPH .......................................................................................................................... 62 3.8 FLASH DRIVE ............................................................................................................. 63 3.8.1 FLASH DRIVE SPACE ........................................................................................ 63 3.8.2 REMOTE DATA ................................................................................................... 64 3.9 HELP.............................................................................................................................. 67 3.10 RESULTS ...................................................................................................................... 67 3.11 COMMUNICATIONS .................................................................................................. 71 3.12 EXAMPLES .................................................................................................................. 75 3.12.1 GENERAL ISOLATION OF CIRCUIT FAILURES ........................................... 75 3.12.2 ON-SITE AUDIO RECORDING .......................................................................... 77 MAINTENANCE..................................................................................................................... 81 4.1 SOFTWARE AND FIRMWARE UPGRADES ........................................................... 81 4.2 WARRANTY ................................................................................................................ 83 ADDITIONAL INFORMATION/ TECHNICAL ASSISTANCE ............................... 84 4.3 COMM-WATCH II TROUBLESHOOTING ......................................................................... 85 APPENDIX A
APPENDIX B
APPENDIX C
APPENDIX D
APPENDIX E
APPENDIX F
CAPTURED EVENT MESSAGES
DATA OVERVIEW
COMM-WATCH II COMMUNICATION
SPRINT CDMA MODEM ACTIVATION
VERIZON CDMA MODEM ACTIVATION
GLOSSARY
i
Windows® is a copyright of Microsoft Corp.
All other trademarks are the property of Electrodata, Inc. ©2010 Electrodata, Inc.
ii
1
INTRODUCTION
1.1
GENERAL DESCRIPTION
COMM-WATCH II® is a comprehensive remote monitor and alarm
instrument for tele-communications. COMM-WATCH II acts as a
sentinel for faults and errors on T1, E1 or J1 circuits. Reliable and
vigilant, it monitors both the receive (NETWORK) and transmit (SITE)
sides of the circuit. It reports failures or alarm conditions and
performance measurements to off-site locations. COMM-WATCH II
also provides channel related information for PRI and conventional
signaling as well as an extensive capture capability. The remote user is
able to determine whether the failure is network generated or is caused
by on-site equipment.
FEATURES:
•
•
•
•
•
•
•
•
•
•
Supports multiple technologies for wireless and wired
alarm/failure communication including cellular
Stores circuit data in three sets of registers: 15 minute windows
for 24 hours, 1 hour windows for 7 days, and continuously until
reset.
Date and time stamps up to 200 definable events
Supports primary and secondary alarm communication links
Provides contact closure for external alarm systems
Senses external contact closure for event triggering
Windows® compatible software
Variable alarm thresholds
Multiple units interconnect to monitor sites with more than one
critical circuit
High impedance connections ensure that COMM-WATCH II
itself does not cause a network failure.
1
1.2
RECEIVING/UNPACKING
The standard shipment of a COMM-WATCH II includes: the remote
monitor and alarm unit and a CD-ROM containing the CommWatch II
Windows® software and an electronic version of this manual.
1.3
OPTIONS
The following options are available when ordering the COMM-WATCH
II. One and only one secondary interface option (options 1 through 6)
must be selected when placing an order.
Option
Description
01
Wired Ethernet network connection (RJ-45)
02
Wi-Fi Ethernet network connection
03
Bluetooth
04
Cellular communication (GSM)
05
Cellular communication (CDMA)
06
MODEM for use with POTS
50
Accessory Kit (case, power supply, USB
cable, dual bantam to RJ-48, RJ-48 to RJ-48)
2
1.4
ACCESSORIES
The following accessories may be purchased separately for the COMMWATCH II:
COMM-WATCH II ACESSORIES
Number
Description
140097
Rack Mount Adapter (adapts one to three units)
400020
PS-6 Power Supply
600055
RJ48 to RJ48 Patch Cord
600059
Dual Bantam to RJ-48 Patch Cord
If you wish to order any of the accessories listed above, please call
Electrodata, Inc. (1-800-441-6336) or your local Electrodata
representative.
3
1.5
SPECIFICATIONS
MEASUREMENTS
Clock Slips
Line Measurements:
Bipolar Violations (BPV)
BPV Errored Seconds
Severely Errored Seconds
Unavailable Seconds
Excess Zero Seconds
Path Measurements:
Frame Errors
CRC-6 Errors (T1 & J1)
CRC-4 Errors (E1)
Errored Seconds
Severely Errored Seconds
Unavailable seconds
Bit-Error-Rate:
QRSS, 63, 127, 511, 2047, 2E15-1,
2E20-1, 2E23-1, DALY, All 1's, All
0's, Alt 1/0, 3 in 24, 2 in 8, 1:7
Loop Code Detect:
CSU or NIU (detected but no loopback provided)
Status:
Yellow Alarm (T1 & J1)
Blue Alarm / AIS
Signal Loss
Frame Loss
B8ZS Detect (T1 & J1)
Remote (E1)
Dist MF (E1)
D-Channel:
Setup Frames
Calling Party Number
Called Part Number
Signaling Bits:
Capture on all channels
Audio Capture:
Capture to External Drive and
Analog Output
4
DATA STORAGE
All Measurements:
15 minute bins for last 24 hours
1 hour bins for last 7 days
Since last reset
Defined Events:
Maximum of 200 total (date and
time stamped)
External Drive:
USB Flash Drive
ALARM AND CONTROL
Primary Interface:
USB Type B (local control)
Secondary Interface:
RJ-45 Ethernet (option 01)
WiFi Ethernet (option 02)
Bluetooth (option 03)
Cellular (GSM) (option 04)
Cellular (CDMA) (option 05)
RJ-11 Modem (option 06)
Software:
Windows XP & Windows Vista
compatible
Alarm Link:
Primary and secondary
DISPLAY
Red LEDs:
Network ALERT
Site ALERT
Green LEDs:
Network SIGNAL
Site SIGNAL
Amber LEDs:
Power
REMOTE active
DATA present
External Drive active (rear)
5
RECEIVER
Standard:
T1, E1 or J1
Clock Source:
Recovered from received data
Line Code:
AMI, B8ZS, Auto (T1 & J1)
HBD3 (E1)
Framing:
SF, ESF, Auto (T1 & J1)
FAS, FAS+CRC-4, MFAS,
MFAS+CRC-4, Auto (E1)
Connector:
RJ-48 (female)
Impedance:
Greater than 1000 ohms
Level Range:
DSX + 6 dB to DSX - 36 dB
INPUT
POWER
DC Operation:
+12Vdc, <500 mA
AC Operation:
115Vac, 60 Hz (optional adapter)
PHYSICAL
Size:
Weight:
Operating Temperature:
Storage Temperature:
Humidity:
Rack Mount:
7.5" L x 5.5" W x 1.5" H
1.5 lbs
-20°C to 60°C
-30°C to 80°C
10% to 90% noncondensing
3 units per 1.75" panel (optional)
6
1.6
INDICATORS
There are seven indicator lights on the front panel of the COMMWATCH II and one indicator on the rear panel. When lit, these
indicators have the following meaning:
•
•
•
•
•
•
POWER (amber):
Indicates that 12VDC power is applied
to the COMM-WATCH II and the secondary interface is
initialized. When flashing, indicates that power is applied and
the secondary interface is initializing.
SIGNAL (green, 2x): When solid, indicates that a T1, E1 or J1
signal has been detected and that frame synchronization has been
established. When flashing, indicates that a signal has been
detected but no frame synchronization is present (one indicator
for the NETWORK circuit and one indicator for the SITE
circuit).
ALERT (red, 2x):
Indicates that line errors, path errors or
alarms have been recorded by the COMM-WATCH II (one
indicator for the NETWORK circuit and one indicator for the
SITE circuit).
REMOTE (amber):
When solid, indicates that connection
has been established between the CommWatch II software and
the COMM-WATCH II unit. When occasionally flashing,
indicates that the COMM-WATCH II unit is configured to use
the remote server.
DATA (amber):
Not used.
ACTIVE (red, rear):
Indicates that communication is
occurring with the external flash drive. DO NOT REMOVE
FLASH DRIVE WHEN LIT.
7
1.7
ADDITIONAL INFORMATION/ TECHNICAL
ASSISTANCE
If you need additional information or technical assistance, please contact
us by:
•
•
•
Phone: 216-663-3333 or 800-441-6336 (8 a.m. to 5 p.m. EST, M-F)
Fax: 216-663-0507
E-mail: [email protected]
Please remember to fill out and return the WARRANTY
REGISTRATION CARD included with this manual. This will put you
on our mailing list to receive technical information about new features
and software updates for the COMM-WATCH II.
8
NIU
(Smart Jack)
CSU
COMM-WATCH II®
NETWORK
PRIMARY SECONDARY
SITE
CONTACT
USB
OUTPUT INPUT
Computer
AUDIO
OUT
POWER
12VDC
ACTIVE
REMOTE MONITOR
Audio
Receiver
Electrodata
PS-6 Power
Supply
COMM-WATCH II SECONDARY
CONNECTION OPTIONS – ONLY ONE
OPTION CAN BE INSTALLED
RJ-45
Ethernet
Wi-Fi
OR
Cellular
Bluetooth
OR
OR
OR
OR
GSM
CDMA
Ethernet
Network
Bluetooth
Computer
MODEM
PSTN
REMOTE MONITOR
Cell
phone
1
4
7
*
2
5
8
0
3
6
9
#
COMM-WATCH II Installation
9
MODEM
RJ-11
100-240VAC
50-60Hz
Receptacle
INTERNAL
TO
COMMWATCH II
2
INSTALLATION
2.1
INSTALLING THE COMM-WATCH II UNIT
The COMM-WATCH II is connected in series between the NIU
(Network Interface Unit, a.k.a. “Smart-Jack”) and the CSU (Customer
Service Unit).
•
Remove the RJ-48 cable from the CSU, and insert it into the RJ48 jack on the COMM-WATCH II labeled “NETWORK”.
Insert a second RJ-48 cable into the CSU, and into the RJ-48
jack on the COMM-WATCH II labeled “SITE”.
*Note: The RJ-48 connectors on the COMM-WATCH II are internally
connected in parallel and present a low insertion loss connection between
the NIU and CSU. It is possible to use a single RJ-48 for bridging
applications.
The COMM-WATCH II is powered from 12VDC through the circular
jack on the rear panel labeled POWER 12VDC. To supply power to the
COMM-WATCH II from 115Vac, plug the optional PS-6 power supply
into a 115VAC outlet and into the POWER 12VDC jack on the COMMWATCH II.
The COMM-WATCH II has a USB Type B female port labeled
PRIMARY, which can be connected to a PC for local control and
monitoring. On any particular COMM-WATCH II, one of the following
options will be installed: RJ-45 Ethernet (option 1), Wi-Fi Ethernet
(option 2), Bluetooth (option 3), GSM cellular (option 4), CDMA
cellular (option 5), RJ-11 Modem (option 6).
NOTE: Only one secondary interface option can be installed on a
COMM-WATCH II.
•
To use the RJ-45 Ethernet option, connect the jack labeled
SECONDARY (ETHERNET) on the COMM-WATCH II to an
Ethernet hub using a “straight through” cable, or directly to a PC
using a crossover cable.
•
To use the Wi-Fi Ethernet, ensure that the appropriate antenna is
installed in the jack labeled SECONDARY (WIRELESS) on the
10
rear panel of the COMM-WATCH II.
•
To use the GSM cellular option, ensure that the appropriate
antenna is installed in the jack labeled SECONDARY
(WIRELESS) on the rear panel of the COMM-WATCH II.
To use the GSM cellular option, a subscription to a cellular
service is necessary. For full functionality, the service must
support text messaging and data transfer.
In addition, a SIM (Subscriber Identity Module) card must be
installed into the COMM-WATCH II secondary interface
module. To do this, follow these steps:
NOTE: Preventative electrostatic discharge measures must be
taken when handling the COMM-WATCH II while
disassembled!
1) Remove all external connections from the COMM-WATCH
II.
2) Remove the two screws from the front panel of the COMMWATCH II, as shown below.
Remove
screws
3) Remove the front panel from the COMM-WATCH II, as
shown below.
11
4) Slide the COMM-WATCH II cover towards the front end of
the COMM-WATCH II, as shown below.
5) Locate the secondary interface module and its SIM card slot
12
Secondary
Interface Module
SIM card slot
(Insert card in this direction)
6) Install an appropriate SIM card into the secondary interface
module as shown below.
7) Slide the COMM-WATCH II cover towards the rear of the
COMM-WATCH II until it engages with the rear panel.
8) Re-install the front panel onto the COMM-WATCH II,
13
ensuring that the indicator lights are properly positioned.
9) Firmly re-insert the screws into the front panel.
10) Re-attach all external connections.
•
To use the CDMA cellular option, ensure that the appropriate
antenna is installed in the jack labeled SECONDARY
(WIRELESS) on the rear panel of the COMM-WATCH II.
Before using the CDMA modem for the first time, it must be
activated. The activation procedures vary depending on the
service provider. See Appendices D and E for details on
activation with Sprint and Verizon, respectively. If another
service provider is used, please contact Electrodata for further
instruction.
To use the CDMA cellular option, a subscription to a cellular
service is necessary. For full functionality, the service must
support text messaging and data transfer. When subscribing for
cellular service, you must know the electronic serial number
(ESN) of the CDMA modem in the COMM-WATCH II. To
determine this number, the COMM-WATCH II cover must be
removed as depicted for the SIM card installation above. The
ESN is printed on the CDMA modem label below the barcodes.
•
To use the Bluetooth option, no additional hardware setup needs
to be performed.
•
To use the RJ-11 Modem option, connect the jack labeled
SECONDARY (MODEM) to a standard telephone line (POTS).
The COMM-WATCH II provides local audio monitoring of ISDN BChannel audio. To utilize this feature, plug a receiving audio device into
the standard headset jack labeled AUDIO OUT on the rear panel of the
COMM-WATCH II. Additional software configuration is required for
use of this feature (see section 3.4.1).
The COMM-WATCH II can interface with additional equipment through
the use of the CONTACT INPUT and CONTACT OUTPUT terminals
on the rear panel. Connect any additional equipment to the CONTACT
INPUT terminals to provide extended fault monitoring. Connect any
additional equipment to be controlled to the CONTACT OUTPUT
terminals. The equipment connected to the CONTACT INPUT terminals
14
should present an open-circuit to trigger a COMM-WATCH II event, and
a short-circuit to indicate good status. The equipment connected to the
CONTACT OUTPUT terminals should sense a short-circuit condition
and respond appropriately. See section 3.3.1 for CONTACT OUTPUT
setup and section 3.3.3 (Miscellaneous Setup) for External Alarm In
(CONTACT INPUT) configuration.
The USB type A jack (not the type B jack labeled PRIMARY) on the
rear panel of the COMM-WATCH II has the following exclusive uses
depending on configuration:
•
•
•
•
•
Primary Rate ISDN frame capture
Primary Rate ISDN audio capture
Standard signaling bit capture
Results and setup storage
Daisy-chain multiple COMM-WATCH II units
To use all but the last of these features, insert a standard USB flash drive
into the jack labeled USB on the rear panel of the COMM-WATCH II.
Each time a USB flash drive is inserted, the results and setup information
are automatically copied to the flash drive. See section 3.4 for more
details on software setup for the other features. If remote access to
multiple COMM-WATCH II units through a single connection is
desired, the COMM-WATCH II units may be connected together in a
daisy-chain fashion. This is accomplished by connecting the USB type
A jack of the first COMM-WATCH II unit to the USB type B jack
labeled PRIMARY on the second COMM-WATCH II unit. The type A
jack on the second unit may then be connected to the type B jack on a
third unit, and so on. When remote connection is established with the
first COMM-WATCH II unit (using either the PRIMARY or
SECONDARY interface), statistics and control of all successive units
will be available. The figure below details the daisy-chain connection of
multiple COMM-WATCH II units. There can be no more than 8
COMM-WATCH II units total in a daisy-chain configuration.
15
PRIMARY SECONDARY
NETWORK
CONTACT
SITE
USB
OUTPUT INPUT
Computer
AUDIO
OUT
POWER
12VDC
ACTIVE
REMOTE MONITOR
PRIMARY SECONDARY
NETWORK
CONTACT
SITE
USB
OUTPUT INPUT
AUDIO
OUT
POWER
12VDC
ACTIVE
…
PRIMARY SECONDARY
NETWORK
CONTACT
SITE
USB
OUTPUT INPUT
AUDIO
OUT
POWER
12VDC
ACTIVE
COMM-WATCH II Daisy Chain Connection
2.2
INSTALLING COMM-WATCH II SOFTWARE
NOTE: Programs must be installed and run with PC administrator
privileges!
NOTE: For the program text to appear properly, the Windows DPI
Scaling must be set to 120 DPI. This can be done from the Windows
Control Panel.
To install the Windows® software from the CD provided:
1. Insert the SOFTWARE AND PRODUCT INFORMATION disk
provided with the COMM-WATCH II into your optical drive.
2. Use the Windows file explorer to navigate to the root directory
of the optical drive which contains the COMM-WATCH II
software.
3. Execute the application named CommWatchII.exe.
4. On the installation application window that appears, click the
Setup button.
5. Follow the on-screen instructions to complete the installation.
16
To install the Windows® software from the Electrodata website:
1. Use an internet browser to navigate to the Electrodata homepage
at www.electrodata.com
2. Select the Software Updates option to navigate to the
Downloads page (www.electrodata.com/download.htm).
3. Locate the section titled “Latest COMM-WATCH Windows
Software”
4. Select the download option for the appropriate version of the
COMM-WATCH II unit.
5. When finished downloading, run the self-extracting installation
utility to install the PC software.
6. Follow the on-screen instructions to complete the installation.
17
3
OPERATION: THE COMM-WATCH II SOFTWARE
3.1
START-UP
Open the program by double-clicking on the COMM-WATCH II icon or
by selecting the CommWatch II program from the Windows start menu
(default installation location: Start/Programs/Electrodata).
If the
method of remote communication with the COMM-WATCH II has not
been specified, or if the specified method is not available, the
Communication Settings window will appear when the CommWatch II
software is started.
Select the desired method of communication with the COMM-WATCH
II using the Local Com Port drop-down list in the Communication
Settings window. If you are unsure as to the correct COM port, please
reference the Device Manager in the System portion of the Windows
Control Panel. If “TCP/IP” has been selected from the list, the
remaining connection options should be adjusted to accommodate your
setup. Use the table below to aid in determining how to adjust the
communication settings:
18
Remote Connection Method
USB
Wired Ethernet
Wireless Ethernet
Bluetooth
GSM Cellular
CDMA Cellular
RJ-11 MODEM
Communication Settings
Local Com Port: COM port of USB connection1
Connect Using Electrodata Server: N/A
Address: N/A
Port: N/A
Local Com Port: TCP/IP
Direct Connect: Selected
Address: COMM-WATCH II Address2
Port: COMM-WATCH II Port2
OR
Local Com Port: TCP/IP
Connect Using Electrodata Server: Selected3
Address: N/A
Port: N/A
Local Com Port: TCP/IP
Direct Connect: Selected
Address: COMM-WATCH II Address 2
Port: COMM-WATCH II Port 2
OR
Local Com Port: TCP/IP
Connect Using Electrodata Server: Selected3
Address: N/A
Port: N/A
Local Com Port: COM port of Bluetooth connection1
Connect Using Electrodata Server: N/A
Address: N/A
Port: N/A
Local Com Port: TCP/IP
Connect Using Electrodata Server: Selected3
Address: N/A
Port: N/A
Local Com Port: TCP/IP
Connect Using Electrodata Server: Selected3
Address: N/A
Port: N/A
Local Com Port: Com Port of PC MODEM1
Connect Using Electrodata Server: N/A
Address: N/A
Port: N/A
1 – See Windows Device Manager in the Windows Control Panel for exact COM port number assignment
2 – Set in the Ethernet Settings window (section 3.3.5.1), factory default is address: 192.168.001.180 and port: 333
3 – The COMM-WATCH II must be configured for server use. See section 3.3.5.
If the Connect Using Electrodata Server option is selected, the site
setup must be performed as explained in section 3.10.
19
When finished, press OK. If connecting via USB or Bluetooth,
communication with the COMM-WATCH II will begin automatically.
Otherwise, the site connection must be performed as explained in section
3.10. To access the Communication Settings window at any time, use
the Options/Serial Port menu selection from the CommWatch II Menu
Bar.
When connected (either through the COMM-WATCH II primary or
secondary interface), and all of the communication settings under
Options/Serial Port are correct, the COMM-WATCH II screen should
look similar to the following:
Menu
Bar
A
C
B
The screen is divided into three sections.
The upper-right section (A) displays the currently selected result period.
The current period (Current 15 Minute, Current Hour, or Running
Total) may be selected from the View menu on the Menu Bar.
The bottom (B) shows events captured in the COMM-WATCH II. Each
event is date and time stamped, and identified as coming from either the
Network or the Site. The vertical bar at the left of the captured events is
an events memory “fuel gauge”; as the events memory in the COMMWATCH II becomes full, the height of this bar will increase and its color
will change from green to yellow to red.
The upper-left (C) contains a simulation of the indicators on the COMM-
20
WATCH II. The site name, the framing format, and the line code are also
shown. This section contains buttons which enable you to clear all events
or all results. When you select either of these “clear” buttons, a warning
will appear asking if you are certain that you want to do this. Once
cleared, the information cannot be recovered. There is a software status
indication between the Menu Bar and the front panel simulation which
details the current action of the CommWatch II software.
In the case where remote connection is established to a daisy-chain
configuration, the Site name in section (C) is displayed in a list box, as
shown below. Selecting a particular COMM-WATCH II unit from the
Site list will cause the CommWatch II software to establish connection
with that unit only. All subsequent data displayed on the CommWatch II
software is from that unit, and all commands issued from the
CommWatch II software will go to that unit.
3.2
OPTIONS
Before using the COMM-WATCH II remote monitoring unit, both the
unit and the software should be properly configured as explained in the
following sections.
21
3.2.1
COMMUNICATION SETTINGS
To access the Communication Settings window, select Options/Serial
Port on the Menu Bar. Use the Local Com Port list box to select the
desired method of remote connection to the COMM-WATCH II.
Connection with the COMM-WATCH II through the PRIMARY
interface (USB) is displayed in this list as “Com#”.
Selecting TCP/IP for the Local Com Port will enable the remaining
communication settings. Using this option, remote connection with the
COMM-WATCH II can be established either directly (Direct Connect)
or via the Electrodata server (Connect Using Electrodata Server). If
Direct Connect is selected, enter the Address and Port for the COMMWATCH II unit. If Connect Using Electrodata Server is selected, the
server availability—as seen from the PC—will be displayed in the
Electrodata Server frame. The Electrodata server can only be used if
“Server Available” is displayed in this frame.
When finished with the Communication Settings, click OK. If
connecting via USB or Bluetooth, the CommWatch II software will
22
attempt to establish connection with the COMM-WATCH II unit
automatically. Otherwise, the site connection must be performed as
explained in section 3.10.
3.2.2
MODEM
To change the PC MODEM settings, select Options/MODEM from the
Menu Bar. You may want to check to see that the modem settings are
correct. The following values are default and would only need to be
changed in unique cases.
Also under the Options category are some choices that you may check if
desired:
• Initialize Modem at Startup - Automatically send the Modem
Initialization string to your PC modem when the COMMWATCH II software begins execution.
• Activate Terminal at Startup - Automatically bring up the
Terminal screen at Startup.
• Dial at Startup - Automatically dial the last number dialed, at
Startup.
• Save Settings on Exit - This will save all Option and Serial Port
settings on Exit.
23
3.3
SETUP
To set up the COMM-WATCH II to notify you of certain conditions, you
must complete Setup. When you click on Setup in the Menu Bar, there
are five choices: Events, Call Operation, Miscellaneous, Password and
a Settings option.
3.3.1
MISCELLANEOUS
First, set up the Miscellaneous options. Go to Setup (on the Menu Bar),
and choose Miscellaneous. The following screen will appear.
Enter a Site Name to uniquely identify the COMM-WATCH II that you
are setting up. This is especially important if you are supporting more
than one COMM-WATCH II. Then, choose the correct Framing Mode,
and the corresponding Line Code and Framing Format. Selecting
Auto for the Framing Format option will allow the COMM-WATCH II
to automatically detect and select the appropriate framing style for the
24
connected circuit. The available options for Line Code and Framing
Format will change based on the selection for Framing Mode.
The Relay Output can be configured for Alarm, operation in response
to an event, or for Control, operation in response to specific ISDN DChannel Layer 3 frames. When in Alarm mode, CONTACT OUTPUT is
normally closed and becomes open in response to any programmable
event (see section 3.3.3). When in Control mode, CONTACT OUTPUT
is normally open and becomes closed in response to a particular calling
number or called number seen when capturing D-Channel data.
Selecting the Alarm option allows CONTACT OUTPUT latching to be
Enabled or Disabled. After being triggered by an event, latching
maintains CONTACT OUTPUT in the activated (open-circuit) state until
the COMM-WATCH II events are cleared, or until COMM-WATCH II
power is reset. If latching is Disabled, CONTACT OUTPUT is only
opened for one second, and then it is returned to the closed state.
Check to be sure that the COMM-WATCH II internal Time and Date
are correct. Select the Default button to have the Time and Date field
updated with the current PC time and date. Make any necessary changes.
When all of the information on this screen is correct, click on OK.
3.3.2
CALL OPERATION
The call operation settings can be accessed by selecting Call Operation
under Setup on the Menu Bar. The call operation settings specify the
destination of COMM-WATCH II alarm notifications. Two unique
destinations may be specified in the Call One and Call Two tabs in the
window that appears. The alarm notification setup, outlined in section
3.3.3, references these destinations. The call operation settings are only
applicable under the following conditions:
1. Either of the cellular SECONDARY interface options is installed
in the COMM-WATCH II (window appears as shown below).
In this case, the COMM-WATCH II sends a text message to the
specified Cell Phone Number in response to an alarm condition.
25
2. The RJ-11 MODEM SECONDARY interface option is installed
in the COMM-WATCH II (window appears as shown below).
In this case, the COMM-WATCH II sends a text message a
cellular phone at the specified Telephone Number via the
specified TAP Terminal Number.
The TAP Terminal
Number is determined by the service provider of the destination
cell phone. Some common numbers are given below. The
specified TAP and telephone numbers must be exactly 10 digits.
26
Provider
TAP Terminal
Number
Alltel (US)
8776543243
AT&T
8668837243
Cingular Wireless
8009094602
Sprint
8886561727
Verizon Wireless (US)
8668230501
Selecting the Default button will provide a list of TAP numbers
for common service providers (as in the table above). Select a
service provider from this list to enter the default TAP number
for that provider, as shown below.
3. Either of the Ethernet SECONDARY interface options is
installed in the COMM-WATCH II and the COMM-WATCH II
is configured to use the Electrodata server (window appears as
shown below). In this case, the Electrodata server sends an
alarm notification message to the specified E-mail Address.
27
If it is desired that the notification destination be a cellular
phone, enter the “email address” for the cellular phone as
follows:
1) Click the Default button and then select the cellular phone
service provider from the given list. If desired provider is
not given in the list, contact the service provider to
determine the appropriate text message email format.
2) Replace the “phonenumber” text with the 10-digit phone
number of the destination cellular phone (no hyphens or
other punctuation).
28
When finished with the Call Operation setup, click OK.
3.3.3
EVENTS
Next, we move on to Events (under Setup on the Menu Bar). Before we
go any further, let’s review the standard definitions of the statistics that
are tracked by the COMM-WATCH II.
Line Errors:
Bipolar Violations
BPV Errored Seconds
Number of Bipolar Violations
(excluding B8ZS and HDB3 codes)
Number of seconds containing one or
29
Severely Errored Seconds
Unavailable Seconds
Excess Zero Seconds
Path Errors:
Frame Errors
CRC Errors
Errored Seconds
Severely Errored Seconds
Unavailable Seconds
Excess Zero Seconds
Clock Slips
more Bipolar Violations (BPV’s)
Number of seconds with 1,544 or more
BPV’s
Number of seconds in which the line is
deemed “unavailable”. “Unavailability”
begins with 10 consecutive Severely
Errored Seconds
AMI: Number of seconds containing 15
or more consecutive zeros
B8ZS: Number of seconds containing 8
or more consecutive zeros
Number of bit errors in received frame
bit pattern (FS, FAS or MFAS framing
options)
Number of incidences where the
received CRC code does not match the
CRC code calculated from the received
data (ESF, FAS+CRC or MFAS+CRC
framing options)
SF: Number of seconds containing one
or more frame errors
ESF: Number of seconds containing one
or more CRC errors
SF: Number of seconds containing 8 or
more frame errors
ESF: Number of seconds containing 320
or more CRC errors
Number of seconds in which the line is
deemed “unavailable”. “Unavailability”
begins with 10 consecutive Severely
Errored Seconds
AMI: Number of seconds containing 15
or more consecutive zeros
B8ZS: Number of seconds containing 8
or more consecutive zeros
Difference in clock counts between the
site and the network
Status
Signal Loss
Indicates loss of signal
30
Frame Loss
Yellow Alarm
Blue Alarm
B8ZS Detect
Power Failure
Partial Period
Indicates loss of framing
synchronization
Indicates a failure in the outgoing signal
for T1 & J1. [When there is a failure in
the outgoing signal, the next intelligent
device will send back the yellow alarm
code.]
Indicates a failure in the incoming
signal. [A blue alarm is a continuous,
unframed all 1's signal that is
transmitted in the event of equipment
failure.]
Indicates B8ZS code has been detected
when line code is set to AMI in
Setup/Miscellaneous. Applicable to T1
and J1 circuits only.
Indicates loss of COMM-WATCH II
power at some point in the report period
Indicates that current statistics are for
less than the full period (ie: 15-minute
or hour)
Under Setup (on the Menu Bar), choose Events. You have three more
choices: Miscellaneous, Network, and Site. First: Miscellaneous.
When you select Miscellaneous under Events, you will see the screen
below. For each event, you are able to choose if and how you wish to be
notified. Under Notification, you have eight choices for each option:
None, Call One, Call Two, Both Calls, Relay Out, Call One and
Relay Out, Call Two and Relay Out, Both Calls and Relay Out. Call
One and Call Two refer to the Setup that you have specified under Call
Operation. Relay Out refers to activation (open condition) of the
CONTACT OUTPUT connection on the rear panel of the COMMWATCH II. These choices will only appear next to 15-Minute clock
slips and One-Hour clock slips if you have entered a number of clock
slips (event threshold) other than zero.
31
Also under Events/ Miscellaneous, are Network and Site. Both have the
same fields to be set; only the Site setup is shown here. There are three
tabs: Alarms, Thresholds - Line, and Thresholds - Path.
Under Alarms, you select the alarm conditions you want captured.
Choose among Signal Loss, Frame Loss, Yellow Alarm, Blue Alarm,
and B8ZS Detect. When you select each of these, you are then able to
choose a path of Notification: None, Call One, Call Two, Both Calls,
Relay Out, Call One and Relay Out, Call Two and Relay Out, Both
32
Calls and Relay Out.
The next tab is the Thresholds - Line tab. This tab allows the user to
define thresholds for line error events such as bipolar violation seconds.
Here, you set the thresholds of errors for each event that you want
recorded. Once you enter the number of errors per time period, you can
choose a Notification path.
Next is the Thresholds - Path tab. This tab allows the user to define
thresholds for path errors such as framing or CRC (with ESF framing)
errored seconds. It is set up in the same way as the Thresholds - Line
tab.
33
NOTE: The COMM-WATCH II will not perform any call
operations in response to an event while remote connection is
established with the COMM-WATCH II.
3.3.4
SECURITY
When using the CommWatch II software to connect to a COMMWATCH II device, a distinction is made between Local access (using the
PRIMARY jack) and Remote access (using the SECONDARY jack).
All remote access attempts require a valid password to establish
connection with the COMM-WATCH II. Local access of the COMMWATCH II can be configured to have an optional password to restrict
privileges. When local password protection is enabled, the correct
password is required to allow modification of the following COMMWATCH II features, although these features may still be viewed without
the password:
•
•
•
•
•
•
•
•
Miscellaneous events setup
Network events setup
Site events setup
Call operation setup
Miscellaneous settings
Password settings
Secondary interface settings
ISDN D-channel frames and B-channel audio capture
34
•
•
BER testing
Signaling capture
3.3.4.1 LOCAL SECURITY
To enable Local password protection:
1. Establish local connection with a COMM-WATCH II unit from
the CommWatch II software
2. Select the Setup/Security/Local Password Setup menu option
from the Menu Bar to open the Enable Local Password
Protection window.
3. Enter the desired password into both the Local Password and
Confirm text fields. There is a maximum length of 24
characters, but no content restrictions. The Confirm text field
will become available once a password has been entered into the
Password field.
4. Click the OK button to enable password protection with the
specified password. If the Local Password and Confirm fields
do not match, the OK button cannot be selected.
To locally access password-restricted features when local password
protection is enabled:
1. Establish local connection with a COMM-WATCH II unit from
the CommWatch II software
2. Select the Setup/Security/Local Password Login menu option
from the Menu Bar to open the Password window.
35
3. Enter the correct password into the Local Password text field.
4. Click the OK button. If an incorrect password was entered, a
window will appear stating “Login failed, invalid Local
Password.”
5. Password-restricted features are now enabled.
To change the local password, or to setup the password options:
1. Follow the steps to allow local access to password-restricted
features (outlined above).
2. Select the Setup/Security/Local Password Setup menu option
from the Menu Bar to open the Local Password Setup window.
3. Select Change Password, Disable Local Password Protection
or Enable Auto Login on this PC as desired.
4. Click OK to implement the selected changes.
5. If Change Password was selected, you will be prompted to
enter the new local password.
NOTE: If the local password is forgotten, please contact Electrodata
Inc. for help (see the end of this document).
36
3.3.4.2 REMOTE SECURITY
To change the Remote access password:
1. Establish local connection with a COMM-WATCH II unit from
the CommWatch II software
2. Select the Setup/Security/Remote Access Password menu
option from the Menu Bar to open the Remote Access Password
window.
3. Enter the desired password into both the Remote Password and
Confirm text fields. There is a maximum length of 24
characters, but no content restrictions. The Confirm text field
will become available once a password has been entered into the
Password field.
4. Use the check boxes to set the remote access privileges as
desired.
5. Click the OK button to enable password protection with the
specified password. If the Remote Password and Confirm
fields do not match, the OK button cannot be selected.
When attempting to access a COMM-WATCH II remotely, a remote
password entry window will be displayed, as shown below. Access to
the device is denied until a valid password is entered.
37
NOTE: Remote access password protection cannot be disabled. The
default password is commwatch.
3.3.5
SECONDARY INTERFACE
Depending on which secondary interface option is installed in your
particular COMM-WATCH II, there will be an additional item on the
Setup menu in the Menu Bar. If either the Wired Ethernet or Wi-Fi
Ethernet option is installed, this additional item is Ethernet Settings. If
the GSM cellular option is installed, the additional menu item is GPRS
Settings. The general purpose of this menu option is to allow
configuration of the secondary interface on the COMM-WATCH II. If
either the Bluetoot, RJ-11 MODEM, or CDMA cellular SECONDARY
interface option is installed, there are no additional setup options
available from the Setup menu.
3.3.5.1 ETHERNET SETTINGS
In the case that the wired Ethernet option is installed, the Ethernet
Settings on the Setup menu will display the following screen:
38
Select the Use Electrodata Server option if it is desired to establish
remote connection with the COMM-WATCH II through the Electrodata
server. This option must be selected prior to establishing remote
connection through the Electrodata server. Configure the COMMWATCH II IP settings either automatically by selecting Obtain an IP
address Automatically, or manually by selecting Use the following IP
Address. If configuring manually, enter the appropriate IP address,
Subnet Mask and Default gateway for the COMM-WATCH II.
Finally, enter the IP Port Number that the COMM-WATCH II should
use. When finished, select the OK button to assign the settings to the
COMM-WATCH II.
3.3.5.2 WI-FI SETTINGS
If the Wi-Fi Ethernet option is installed as the secondary interface in the
COMM-WATCH II, WIFI Settings on the Setup menu will display the
following screen.
39
Select the Use Electrodata Server option if it is desired to establish
remote connection with the COMM-WATCH II through the Electrodata
server. This option must be selected prior to establishing remote
connection through the Electrodata server. Enter the appropriate wireless
Network Name (SSID) to which the COMM-WATCH II should
connect, and the Network Key with which it should connect. Configure
the COMM-WATCH II IP settings either automatically by selecting
Obtain an IP address Automatically, or manually by selecting Use the
following IP Address. If configuring manually, enter the appropriate IP
address, Subnet Mask and Default gateway for the COMM-WATCH
II. Finally, enter the IP Port Number that the COMM-WATCH II
should use. The COMM-WATCH II MAC Address is provided for
convenience. When finished, select the OK button to assign the settings
to the COMM-WATCH II.
40
3.3.5.3 GSM CELLULAR SETTINGS
If the GSM cellular option is installed as the SECONDARY interface,
GPRS Settings will be accessible from the Setup menu on the Menu
Bar. Selecting this option will bring up the following screen.
Enter the appropriate APN or Gateway, and if required, a User Name
and Password required for MODEM connection. A list of default APN
or Gateway settings for common service providers is available by
clicking the Default button. This will display a list as shown below.
41
Select the appropriate service provider and connection type from the list.
The corresponding default text will then be entered into the APN or
Gateway field. When finished, click OK to program the COMMWATCH II non-volatile memory with these settings. The COMMWATCH II unit will use these settings when establishing remote
connection through the Electrodata server.
42
3.4
APPLICATIONS
The COMM-WATCH II has a number of additional monitoring features
accessible from the Applications menu on the Menu Bar. The menu
choices are Primary Rate D-Channel, 24/30 Channel Signaling, BER
Testing, 24/30 CH. Capture Signaling, Single Channel Capture
Signaling and Channel Scan.
3.4.1
PRIMARY RATE D-CHANNEL
The Primary Rate D-Channel option allows capturing of ISDN data
(D) and bearer (B) channels with filtering options. To use this feature,
select Primary Rate D-Channel from the Applications menu on the
Menu Bar—a window like the one shown below will appear.
Select the Time Slot of the ISDN D-channel (typically channel 24 for T1
43
& J1, 16 for E1) from the drop-down list. Then, in the Filters section,
select the desired filtering to be used for capturing D-channel frames. If
Layer 3 Only is selected, the additional filtering options—All, CRV,
Called Number, Calling Number—will be available. If Layer 3 Only
is selected, only D-channel layer 3 messages will be recorded. Selecting
this option allows further filtering with the options All, CRV, Called
Number and Calling. Selecting All will allow all layer 3 D-channel
messages to be captured. If CRV is selected, only D-channel messages
which pertain to the specified call reference value will be recorded. The
Called Number filter allows D-channel capture filtering based on the
specified called party number, and the Calling filter allows D-channel
capture filtering based on the specified calling party number. Selecting
the Capture to Flash option will record D-channel messages to the
external USB flash drive. If this option is used, and either the Called
Number or Calling filters are used, the B-channel data can be optionally
recorded to the external USB flash drive. When either the Called
Number or Calling Number filters are used, the B-Channel audio is
converted to an analog signal and made available through the AUDIO
OUT jack on the rear panel of the COMM-WATCH II. To begin
capturing data, press the Capture button. Capturing will continue even
if there is no remote connection, but is halted and not resumed if the
COMM-WATCH II undergoes a power cycle. Once pressed, the
Capture button becomes the Stop button (and vice versa), which can be
used to stop capturing. The captured data remain in the COMMWATCH II internal memory indefinitely, or until it is overwritten by
subsequent data capture.
To capture ISDN data:
1. Establish connection with the COMM-WATCH II unit using the
CommWatch II software.
2. Select Applications/Primary Rate D-Channel from the
CommWatch II software Menu Bar.
3. Set the Time Slot option to the DS0 corresponding to the ISDN
D-Channel (typically channel 24 for T1 & J1, 16 for E1)
4. Select the desired D-channel data filtering from the Filters
options. If you wish to capture B-channel audio to the external
flash drive or AUDIO OUT jack, you must select the Layer 3
Only option in conjunction with either the Calling Number or
Called Number filters.
5. If capturing to the COMM-WATCH II external flash drive,
44
select the Capture to Flash option.
6. Press the Capture button to begin capturing. Capturing will
continue regardless of remote connection with the COMMWATCH II.
7. Monitor the capture progress by viewing the Capture Memory
statistics at the bottom of the window.
8. When finished, press the Stop button.
NOTE: B-channel audio is captured to the external flash drive and made
available at the AUDIO OUT jack beginning with “CONNECT” Dchannel frames and ending with “DISCONNECT” frames. This
behavior continues for any number of “CONNECT” and
“DISCONNECT” frame sequences during a single capture session.
To view the captured frame data from the most recent capture session,
select the View button (this button will only be available if D-channel
frames were successfully captured). The following window will appear.
Selecting a frame in the Condensed list will provide both interpreted and
raw data in the Expanded view for the selected frame.
45
To print a hardcopy of the captured data, or to save the captured data to
file, click the Print button. From the Print list, select either PRI ISDN
Condensed or PRI ISDN Expanded, for the summary capture data or
complete capture data, respectively. To print a hardcopy, click the
Select… button to select the desired printer and then click OK. To print
the captured data to file, select the Print To File option and then click
OK.
46
To view D-channel frames and listen to B-channel audio that was
captured to the external flash drive on the COMM-WATCH II unit:
1. Insert the flash drive into the PC running the CommWatch II
software. You cannot access the flash drive data remotely.
2. Select File/Open on the Menu Bar. Set the file selection filter
option to CW II Primary Rate Data Files as shown below.
47
3. Navigate to the flash drive root directory and select the
CWA_xxxx.DAT file of interest and press the Open button.
4. The following window will appear. The media bar at the bottom
of the window will allow play-back of B-channel audio through
the PC audio configuration.
48
3.4.2
24 CHANNEL SIGNALING
The channel signaling feature allows real-time inspection of the ABCD
signaling bits on the NETWORK and SITE circuits. The Applications
menu option for this feature will change depending on the selection of
the circuit framing mode (accessible in Setup/Miscellaneous/Framing
Mode – see section 3.3.1). 24 Channel Signaling will be available if
Framing Mode was set to T1 or J1, and 30 Channel Signaling will be
available if it was set to E1. To use this feature, select either 24
Channel Signaling or 30 Channel Signaling from the Applications
menu on the Menu Bar. A window like the one shown below will appear
49
(shown for T1 or J1 24 channel signaling). A green circle indicates that
a particular signaling bit is a ‘1’ while a grey circle indicates that it is a
‘0’. The signaling data in this window are refreshed once per second.
3.4.3
BER (Bit Error Rate) TESTING
The BER Testing feature allows real-time monitoring of bit errors for
pre-defined test patterns, both on the NETWORK circuit and SITE
circuit. To use this feature, select BER Testing from the Applications
menu on the Menu Bar. The following window will appear.
50
Use the BERT Pattern drop-down list to select the desired test pattern
for the NETWORK and SITE circuits. Select the AUTO test pattern if
you would like the COMM-WATCH II to automatically detect which
test pattern is present on the circuit. Once the COMM-WATCH II unit
has reliably detected the selected test pattern, the Pattern Sync indicator
will change from grey to green. If there are any BIT Errors, the
Pattern Sync light will flash. Test pattern errors will only increment the
BIT Errors count if the Pattern Sync indicator is green. The In-Sync
Seconds count displays the number of cumulative seconds for which
there is synchronization with the circuit test pattern (Pattern Sync
indicator is green). The Reset button resets the BIT Error and In-Sync
Seconds counts to zero.
Bit error rate testing is performed continuously while the COMMWATCH II unit is powered, regardless of remote connection status.
Therefore, the Bit Error Rate Testing window serves only to view the
current bit errors and pattern synchronization seconds, to reset these
counts, and to change the test pattern. BER testing will begin
automatically on COMM-WATCH II power-up. The BIT errors and
In-Sync Seconds counts are lost when power is removed from the
COMM-WATCH II unit, and restart at zero when power is re-applied.
However, the test-pattern types for the NETWORK and SITE circuits are
retained through any COMM-WATCH II power cycles.
3.4.4
MULTIPLE CHANNEL CAPTURE SIGNALING
Simultaneous capture of signaling bits from multiple channels can be
initiated from the Applications menu. This feature is selectable as 24
Channel Capture Signaling when the framing mode is either T1 or J1, or
30 Channel Capture Signaling in the case that the framing mode is E1.
The 24/30 Channel Capture Signaling menu option will allow recording
of the AB or ABCD channel signaling bits on both the NETWORK and
SITE circuits. This feature captures the channel signaling data to the
external USB flash drive and is therefore only available if a USB flash
drive has been inserted into the COMM-WATCH II. Selecting 24/30
CH. Capture Signaling from the Applications menu on the Menu Bar
will bring up a window similar to the one shown below.
51
The Network Channel Enable frame and Site Channel Enable frame
contain check boxes that allow selection of the recorded signaling bits on
the NETWORK and SITE circuits, respectively. Selecting a particular
check box will allow recording of the signaling bits for that channel. If
unselected, the signaling bits for that channel will not be recorded. Use
the Select All or Clear All buttons to select or clear all of the check
boxes for either the Network or Site connections. To begin capturing,
select the Capture button. This button subsequently becomes a Stop
button that can be used to end the capture session. The signaling bits are
recorded when capturing is started, when any change in the signaling bits
occurs and when the capturing is stopped. The quantity of these
capturing events is displayed in the Captured Signal Events field. If
recording is not currently in progress, this field displays the number of
recording events for the previous capture session. Similarly, the Elapsed
Time field displays the duration of the capture session. When not
capturing, this field displays the duration of the previous capture session.
Once started, capturing will continue while the COMM-WATCH II
remains powered regardless of remote connection with the unit. Click
the Close button to close this window.
To view captured data:
1. Remove the external USB flash drive from the COMM-WATCH
II and insert in the user computer.
52
2. Select File / Open on the Menu Bar of the CommWatch II
software to display the open dialog window, as shown below.
3. Select CW II Captured Signaling Data Files from the filter
menu, and then select the desired capture file from the
navigation pane. When finished, click the Open button. A
window will appear displaying the signaling capture data, as
shown below.
53
The Site name of the COMM-WATCH II on which the signaling data
was captured is displayed at the top of the window. The signaling data
for the selected Channel Number is shown in the list box below. To
view other channel signaling data, simply use the Channel Number
selection box or the up and down arrow buttons. Each signaling event
has a timestamp (shown on the left) and the value of the ABCD signaling
bits for both the NETWORK and SITE circuits (depending on capture
filtering). To quickly determine the elapsed timed between any two
captured events for a specific channel, highlight the reference event and
then click the Mark button. This will place an asterisk on the selected
reference event. Then highlight a second event. The time difference
between the two events will be shown at the bottom of the window, as
follows:
54
When finished viewing the captured signaling data, click the Close
button.
3.4.5
SINGLE CHANNEL CAPTURE SIGNALING
The Single Channel Capture Signaling option records AB or
ABCD signaling bit changes to the COMM-WATCH II internal
non-volatile memory. Single channel signal capturing therefore
does not require an external flash drive on the COMM-WATCH II,
and is accessible remotely. To use this feature, select Single CH.
Capture Signaling from the Applications menu. A window will
be displayed as shown below.
55
The Channel Number drop-down list and up/down arrows allow
selection of the single DS0 on which the signaling bits will be
captured.
The information displayed within the Captured
Signaling frame relates to the currently active signaling capture or
the previously captured data. The Channel Number displayed
within the Captured Signaling frame is the DS0 from which the
signaling data was captured. The Elapsed Time indicates the time
duration of the signaling capture session in HH:MM:SS format.
The Captured Events is the number of signaling bit changes
recorded by the COMM-WATCH II. The list box within the
Captured Signaling frame displays the captured signaling bit
values currently in the COMM-WATCH II memory. Network and
Site signaling bit values are recorded and time-stamped when the
COMM-WATCH II detects a change in the signaling bits on either
the Network or Site circuits. These captured signaling events are
displayed in the list box within the Captured Signaling frame. To
capture signaling bit changes:
1. Select the desired DS0 from the Channel Number
56
drop-down list, or by using the adjacent arrow buttons.
Only the signaling bits on this channel will be captured.
2. Click the Capture button (which becomes a Stop
button) and monitor the capture results from the
Captured Signaling frame. This capture process will
continue as long as the COMM-WATCH II remains
powered, regardless of remote connection.
3. Click the Stop button to stop capturing the signaling.
The captured signaling will be displayed in the list box
within the Captured Signaling frame.
The time differential between any two signaling capture events can
be determined as follows:
1. Select the first signaling state from the list box within
the Captured Signaling frame.
2. Click the Mark button to set the signaling state as the
reference for the time differential.
3. Select a second signaling state from the list box. The
time differential is displayed below the list box in
seconds, as shown below.
57
To obtain the captured signaling from the COMM-WATCH II:
1. click the Print button. A window similar to the one
shown below will appear:
58
2. If printing a hardcopy to a printer, click the Select…
button to select a printing device. Use the window that
appears to select a printer and then click Print. This
will not initiate the printing process, it merely selects a
printing device.
3. If downloading the results to a file on the PC, select the
Print To File option.
4. Select Captured Signaling Results from the Print:
drop-down list.
5. Click OK.
6. If printing to a file, select a path and filename and then
click OK.
During signaling capture, Primary Rate D-Channel, 24/30 CH.
Signaling and Channel Scan will be unavailable from the
Applications menu.
3.4.6
CHANNEL SCAN
The Channel Scan feature allows audio monitoring in response to
an off-hook condition on one of the circuit channels. Upon
detection of an off-hook condition, the audio for that channel is
made available at the AUDIO OUT jack on the rear panel of the
COMM-WATCH II. If the Relay Output Mode is set for Control
(NO) in Setup / Miscellaneous, the CONTACT OUTPUT
terminals on the COMM-WATCH II will also active (close) in
response to detection of an off-hook condition. To use the Channel
Scan feature, select Channel Scan from the Applications menu.
This will display a window similar to the one shown below.
59
Selecting the Scan button will initiate a sequential scan of the
channels for off-hook conditions. Each channel number within the
Channel frame has an associated indicator which is grey when
inactive and red when active. During a scan operation, successive
channel numbers are activated. When an off-hook condition is
detected on an active channel, the scanning operation halts and the
active channel audio is made available at the AUDIO OUT jack.
This channel will remain the active channel for duration of the
selected Dwell Time, or until the Skip button is selected. Either of
these events will result in a return to scanning operation. The
Primary Rate D-Channel, 24/30 CH. Capture Signaling and
Single CH Capture Signaling are unavailable during a scan
operation. To stop a scan operation, select the Stop button. The
Dwell Time drop-down list allows selection of the time duration
for which a scan operation halts on a channel with an off-hook
condition. If Continuous is selected, a scan operation will halt on
a channel with an off-hook condition indefinitely. Once a scan
operation is started, it will continue until the Stop button is
selected or until power is removed from the COMM-WATCH II,
regardless of remote connection.
NOTE:
Off-hook: Signaling bit A = 1
On-hook: Signaling bit A = 0
60
3.5
VIEW
To select the set of results to be shown in the upper right section of the
Remote Access screen, go to View on the Menu Bar. You have a choice
of viewing the statistics from: the Current 15-minutes, the Current
Hour or the Running Total.
3.6
HISTORY
If you would like to see statistics for periods prior to the current 15minute or hour period, go to History on the Menu Bar. Choose either
Last 24 Hours or Last 7 Days, and you will see a screen similar to the
following:
You are able to choose the time period from the list on the left, and view
the statistics for that period on the right. An ‘*’ in the first column
indicates which periods have one or more errors or alarms present.
61
3.7
GRAPH
If you would like to see a graphical representation of the results, go to
Graph on the Menu Bar and select the time period you would like to
view. Choose between Last 24 Hours and Last 7 Days, and the
following screen will appear.
Choose which statistic you would like to see plotted, and click on Plot.
The software will generate a graph of that result category.
62
Placing the cursor over one of the bars will give you the time and date of
the period that bar represents, as well as the numeric value for both the
network and site. These statistics will be displayed in the baseline below
the graph (as shown above). If you double-click on a line, that period in
history will be displayed (as in Section 3.6).
3.8
FLASH DRIVE
The Flash Drive menu options will be available when a USB flash drive
is inserted into the USB jack on the rear panel of the COMM-WATCH
II. Flash Drive Space provides drive capacity information, and Remote
Data allows access to COMM-WATCH II files stored on the flash drive.
3.8.1
FLASH DRIVE SPACE
When the Flash Drive Space dialog is opened, the USB flash drive
connected to the COMM-WATCH II is analyzed to determine usage
statistics. The Total Capacity reports the storage size of the drive. The
Used Space statistic reports how much data is currently being stored on
the drive, regardless of whether the data pertains to the COMM-WATCH
II or not. Free Space reports the remaining usable size of the drive for
the COMM-WATCH II. The Volume Label is an identifier that can be
unique to a particular drive, in the case that the drive has only a single
volume. The Flash Drive Space window is depicted below.
63
3.8.2
REMOTE DATA
The Remote Data dialog, depicted below, allows access to the COMMWATCH II files stored on the flash drive. Using this window, COMMWATCH II files can be deleted to free up space on the drive, or the files
can be downloaded to the local machine. When the window is opened, a
list of COMM-WATCH II files currently stored on the drive will be
displayed in the Remote Files list. If a COMM-WATCH II capture
operation is in progress, it must first be halted before viewing the remote
data files.
64
A single file selection can be made by clicking on the file of interest. To
select multiple files in sequence, hold the shift key while making the
selection. To select multiple discrete files, hold the control (Ctrl) key
while making the selection. Selecting the Download… button will allow
the transfer of files from the USB flash drive on the COMM-WATCH II
to the local machine at the destination specified in the Local Download
Driectory. A confirmation message is first displayed with an estimate of
the time required for download, as shown below.
65
Selecting the Continue button will on this dialog will initiate the
file transfer and display a transfer progress dialog. To stop the
transfer at any time, press the Cancel button.
Selecting the Delete Files… button on the Remote Data Files
window will delete those files on the USB flash drive that are
selected in the Remote Files list.
There are two file filters that affect the types of COMM-WATCH
II files displayed in the Remote Files list. If checked, the Include
Audio Files check box on the right side of the Remote Data Files
window will display captured PRI bearer channel audio. If
unchecked, PRI bearer channel audio files will not be displayed in
the Remote Files list. Similarly, the Include Result Files check
box will display results files in the Remote Files list if checked. If
unchecked, these files will not be displayed.
66
3.9
HELP
Help/About COMM-WATCH II displays the software version of
CommWatch II software currently running. If remote connection is
established with a COMM-WATCH II, the Model, Serial Number,
Secondary Interface Option, Firmware number and firmware Revision
are displayed for that COMM-WATCH II unit.
Help/Support provides Electrodata contact information for your
convenience.
3.10
RESULTS
67
All of the information regarding the results and setup of the COMMWATCH II unit can either be saved to a file or printed directly from the
CommWatch II software. There are two methods of obtaining results
from the COMM-WATCH II:
• Remote access via the CommWatch II software. Once remote
access is established with a COMM-WATCH II unit, the results
and setup information may be obtained by selecting File / Print.
The following screen will appear.
If the information is to be printed, click the Select… button to
select a printer and adjust the settings. If the information is to be
saved to a file, select the Print To File option. Select the
desired information set from the Print list. Click OK to either
begin printing or save to a file. If printing to a file, clicking OK
will allow selection of the file location.
•
Automatic download to a flash drive. Whenever a USB flash
drive is inserted into the rear panel of a COMM-WATCH II unit,
all results and setup information are copied to the flash drive.
The ACTIVE indicator on the rear panel of the COMMWATCH II will remain lit during this process. The flash drive
may then be removed and inserted into a PC running the
CommWatch II software. To access the COMM-WATCH II
data on the flash drive, select File / Open to bring up the window
68
below:
Navigate to the flash drive directory and select CWII Saved
Results from the file filter list as shown above. Select a single
CWC_xxxx.DAT and click Open. The following window will
appear:
69
Select the desired Result to be viewed and then click the OK
button.
NOTE: THIS ACTION WILL NOT BE PERFORMED
UNLESS THE COMM-WATCH II SOFTWARE IS RUN
WITH PC ADMINISTRATOR PRIVALEGES.
This will cause the data to be displayed in the standard Windows
Notepad program, as shown below:
This data may be subsequently saved to a file by selecting File /
Save As… in the Notepad program, or printed by selecting File /
Print… in the Notepad program.
70
3.11
COMMUNICATIONS
Also on the Menu Bar is the Communications menu. This menu
contains controls for the PC-side communications. Its contents will
change based on the Options/Serial Port/Com Port selection, outlined
in section 3.2.1. If the said Local Com Port is set to one of the available
PC COM ports, the Communications menu will have the following
options: Terminal Active (will bring up an active terminal screen), Dial,
Hangup, Initialize Modem and Scan Daisy Chain. If Local Com Port
is set to TCP/IP, the Communications menu will have the following
options: Terminal Active, Connect, Disconnect and Scan Daisy Chain.
Terminal Active is used for manually communicating with equipment
on the communications link between the PC and the COMM-WATCH II
unit (ie: logging on to networks, entering password, etc.).
The Scan Daisy Chain option is applicable if the remote COMMWATCH II is in a daisy-chain configuration with other COMMWATCH II units.
Selecting this option will synchronize the
CommWatch II software with any changes that have been made to the
daisy-chain configuration.
If you choose Dial, a screen similar to the following will appear. To
71
enter sites for dial-up, click on New, enter a site Name and Address
(COMM-WATCH II telephone number, no dashes) and any Notes you
would like to associate with that site. Then click on Add, and you will
return to the screen shown below. To remove a site from the list of
Available Sites, highlight that site and click on Delete.
To dial one of the listed sites, just highlight it and click on Dial. This will
bring up a window indicating the status of the dialing process, as shown
below. Once connected, the window will disappear and the remote
access software features will become available. The Time Remaining
indicator shows the number of seconds remaining before a connection
timeout occurs.
To dial a number for a site that is not listed, click on Manual. In the
window that appears, enter the Address (telephone number of the
COMM-WATCH II) and then click OK.
72
Selecting Hangup from the Communications menu will disconnect the
remote connection between the PC and the COMM-WATCH II.
Initialize Modem will send the specified initialization string
(Options/Modem…/Modem Initialization – see section 3.3.2) to the
selected PC COM port (usually a PC MODEM).
The function of the Connect option on the Communications menu will
change based on the selection of the Connect Using Electrodata Server
option in the Communication Settings window (Options/Serial Port…
- see section 3.2.1). If the Connect Using Electrodata Server option is
not selected, the Connect option on the Communications menu will
attempt to establish remote connection with a COMM-WATCH II at the
specified Address and Port in the Communication Settings window. If
the Connect Using Electrodata Server option is selected, selecting
Communications/Connect will bring up the Site Selection window as
shown before. To configure a new site connection, select the New
button. Fill in a descriptive Name and any Notes that you wish to
associate with that site. Enter the appropriate Address of the COMMWATCH II unit as follows:
- If the destination COMM-WATCH II has either of the Ethernet
SECONDARY interface options installed, then the Address
should be the 5-digit serial number of the COMM-WATCH II.
The serial number may be determined by selecting Help / About
Comm-Watch II from the Menu Bar when remote connection is
established.
- If the destination COMM-WATCH II has either of the cellular
SECONDARY interface options installed, then the Address
should be the “email address” of the COMM-WATCH II. The
email address is formed as shown in the table below, where
phone number is the 10-digit phone number (no dashes) of the
COMM-WATCH II.
73
Provider
Alltel (US)
AT&T
Cingular Wireless
Sprint
T-Mobile
Verizon Wireless (US)
COMM-WATCH II Phone Number
phone [email protected]
phone [email protected]
phone [email protected]
phone [email protected]
phone [email protected]
phone [email protected]
When finished entering the site information, select the Add button to add
the newly created site to the Available Sites list. To remove a site from
the Available Sites list, highlight the desired site and then click the
Delete button.
To establish connection with an existing site, highlight the desired site
from the Available Sites list and click the Connect button. To establish
remote connection with a COMM-WATCH II without creating a new
site, select the Manual button. You will be prompted for the Address of
the COMM-WATCH II. Enter this number in the format described
above, and then click OK.
When connecting to a COMM-WATCH II, the following window will
appear. Once connection is established, the window will disappear and
remote access software features will become available. The Time
Remaining counter displays the seconds remaining before a connection
timeout will occur.
74
3.12
EXAMPLES
This section contains some examples describing how to use the COMMWATCH II unit to perform some helpful functions.
3.12.1 GENERAL ISOLATION OF CIRCUIT FAILURES
Suppose it is desired to isolate the location of a T1, E1 or J1 circuit
failure, or source of circuit data corruption. Let’s also suppose that the
COMM-WATCH II was installed between an NIU and a CSU, say,
between a cellular tower and a landline T1.
In such a setup, a COMM-WATCH II remote monitor would be installed
at the cellular tower site. The Network Interface Unit (NIU) would be
connected to the COMM-WATCH II NETWORK jack using a straightthrough cable, which may be obtained from Electrodata (See available
accessories in section 1.4). The CSU would be connected to the COMMWATCH II SITE jack using a standard cable—typically the original
cable between the NIU and Customer Service Unit (CSU). 12VDC
power is supplied to the COMM-WATCH II from standard 115VAC via
the Electrodata PS-6 power supply. The PRIMARY interface on the rear
panel of the COMM-WATCH II would not be used in this example
because the PRIMARY interface is used strictly for on-site interfacing
with the COMM-WATCH II. The SECONDARY interface on the
COMM-WATCH II is used for off-site monitoring, as will be
demonstrated in this example.
Suppose that the MODEM
SECONDARY interface option (option 06) is installed on the COMMWATCH II in which case the SECONDARY interface jack on the rear
panel is an RJ-11. This jack is connected to a standard phone service.
At the remote monitoring site, a PC with a MODEM connected to a
standard phone service now has the ability to communicate with the
COMM-WATCH II using the CommWatch II software.
The CommWatch II software running on the remote PC must be properly
configured before interfacing with the COMM-WATCH II unit. First,
select the COM Port to which the PC MODEM is configured from the
Communication Settings window (Options/Serial Port… on the Menu
Bar). Then ensure that the interface strings in the Modem Controls
window (Options/Modem… on the Menu Bar) are correct. Now the PC
MODEM can be initialized and then used to dial the COMM-WATCH II
unit (both accessible from the Communications menu on the Menu
75
Bar). See section 3.10 for more details on using the Site Selection
window. Once the connection has been established, the Remote Access
screen should appear like that shown in section 3.1. Now the
miscellaneous setup options should be adjusted from the
Setup/Miscellaneous option on the Menu Bar (see section 3.3.1). The
basic software setup is complete.
To detect the location of a complete circuit failure, no additional
software setup is needed. The following diagram illustrates the test
configuration and labels those points which can be monitored.
2
1
Test
Set
Central
Office
NIU
4
COMMWATCH
II
CSU
3
COMM-WATCH II Failure Isolation Configuration
A loop-up code should be sent from the remote location (point 1) to the
CSU at the cellular tower site. This can be accomplished with a number
of test sets available from Electrodata. If the loop-up code exists on the
NETWORK transmit circuit (point 2), the COMM-WATCH II will
record the “CSU loop-up detected” NETWORK event, and it will appear
in the remote access screen events log, as shown below. If the return
loop-up code is detected on the SITE transmit circuit (point 3), a
COMM-WATCH II SITE event will be generated. This can only occur
if the loop-up code continues to be transmitted after the CSU has been
looped up. The loop-up code can be finally verified at the receive side of
the test set (point 4).
76
If there are no failures in looping-up the CSU, bit error-rate (BER)
testing may be performed to isolate the problem by a “process of
elimination”. Remote connection should now be established between a
PC running CommWatch II software and the COMM-WATCH II at the
cellular tower site. The test set should be configured to transmit a useful
test pattern and monitor its return. BER testing can now be initialized
from the Applications menu on the CommWatch II software Menu Bar
(see section 3.4.3). Select the appropriate test pattern to match that of the
test set and then reset the NETWORK and SITE BER statistics. Any
data corruption between points 1 and 2 would result in test pattern errors
on the NETWORK side, and any corruption between points 2 and 3
would result in errors on the SITE side. Alternatively, if the COMMWATCH II BER testing results show zero bit errors and non-zero InSync Seconds but the test set indicates a faulted test pattern, the
corruption is then confirmed to be between points 3 and 4. In this way,
the general location of the circuit failure may be found.
3.12.2 ON-SITE AUDIO RECORDING
The COMM-WATCH II is capable of interfacing with other equipment
through the CONTACT INPUT and CONTACT OUTPUT terminals.
77
The following example explains how to use this feature for on-site audio
recording.
Suppose it is desired to record ISDN B-channel audio (i.e. telephone
conversations) to a device other than the COMM-WATCH II external
flash drive. This may be accomplished by connecting an audio recording
device to the AUDIO OUT jack on the COMM-WATCH II. The
CONTACT OUTPUT terminals can then be used to start and stop the
added audio recording equipment. The CONTACT INPUT terminals
can be used to indicate to the COMM-WATCH II the status of the
recording equipment—for instance, that the maximum storage capacity
has been utilized.
The COMM-WATCH II unit should be setup at the site as described in
the previous example (3.11.1).
The additional audio recording
equipment (with a high-impedance input) should be connected to the
COMM-WATCH II AUDIO OUT jack by using an appropriate 2.5mm
male tip-and-sleeve (mono) adapter. The use of the RELAY terminals to
interface with external equipment is application specific, and in certain
cases may require customizing the external equipment. For this example,
we will assume that the recording state of the audio recording equipment
can be controlled by an open or closed contact. In this case, the COMMWATCH II CONTACT OUTPUT terminals may be used to control the
audio recording equipment. It is imperative that RELAY terminal
specifications be strictly observed (section 1.5) under all applications!
For this example, we will also assume that the audio recording
equipment has an accessible signal which indicates that the recording
storage is full. This control signal may be connected to a contactor
(electromechanical relay) which in turn is connected to the COMMWATCH II CONTACT INPUT terminals, as shown in the figure below:
78
COMM-WATCH II
External
Audio
Recording
Equipment
Start/Stop
Control
CONTACT
OUTPUT
“Storage Full”
Control Signal
SENSE
CONTACT
INPUT
Contactor
COMM-WATCH II On-Site Audio Recording Setup
Remote connection must be established with the COMM-WATCH II
through either the PRIMARY or SECONDARY interface to properly
configure the COMM-WATCH II for audio capture. To perform on-site
configuration, connect an appropriate USB cable between the COMMWATCH II PRIMARY jack and a PC running the CommWatch II
software. Open the Communication Settings window (Options/Serial
Port… on the Menu Bar) and select the COM Port corresponding to the
USB connection. After clicking OK, connection with the COMMWATCH II should be established, displaying the Remote Access screen.
Under Setup/Miscellaneous, select the appropriate circuit settings as
described in section 3.3.1. The Relay Output Mode should be set to the
Control (NO) option. Select OK to confirm the configuration. Now
select Setup/Events/Miscellaneous and select the External Alarm In
Enable option. If desired, select a corresponding Notification for that
event.
For the final setup step, select Applications/Primary Rate D-Channel
from the Menu Bar. As described in section 3.4.1, set the appropriate Dchannel Time Slot according to the circuit configuration and set the Dchannel filtering as desired. To enable B-channel audio on the AUDIO
OUT jack, the Layer 3 Only option must be selected in conjunction with
either the Called Number or Calling Number filters. If the Called
Number filter is used, the AUDIO OUT jack will output B-channel
audio once a layer 3 “CONNECT” frame is detected with the specified
Called Number. If the Calling Number filter is used, B-channel audio
is made available upon detection of a layer 3 “CONNECT” frame from
the called party in response to a “SETUP” frame from the number
specified in the Calling Number filter.
The corresponding
“DISCONNECT” layer 3 frames will remove B-channel audio from the
AUDIO OUT jack. Because the Relay Output was configured for
79
Control operation, the CONTACT OUTPUT terminals will be closed
when B-channel audio is made available to the AUDIO OUT jack, and
opened when audio is no longer available.
The CommWatch II software may now be closed, removing the remote
connection. As long as the COMM-WATCH II unit remains powered,
the capture process will continue until the COMM-WATCH II internal
memory is filled with D-channel frames. Upon detection of D-channel
layer 3 “CONNECT” frames, the CONTACT OUTPUT terminals will
close, signaling the recording device to begin recording. When the
corresponding “DISCONNECT” frame is received, the CONTACT
OUTPUT terminals will open, informing the audio recording equipment
to stop recording. In this way, all audio associated with the Called
Number or Calling Number connection is assured to be recorded.
To view the status of the audio recording equipment, establish remote
connection with the COMM-WATCH II. If the audio recording
equipment has activated its control line to signify that its storage is full,
the contactor will open, causing an “External Alarm In Detected” event
to be recorded on the COMM-WATCH II. Alternatively, if the
Notification option for the External Alarm In event was specified, a
call operation will immediately be made in response to the external alarm
condition according to the Call Operation setup.
80
4
MAINTENANCE
4.1
SOFTWARE AND FIRMWARE UPGRADES
Note: Programs must be installed and run with PC administrator
privileges!
As software upgrades and firmware updates become available, you will
be able to download them to your PC from our internet site at
http://www.electrodata.com, or you can obtain new discs from
Electrodata.
To upgrade the COMM-WATCH II PC software:
1. Use an internet browser to navigate to the Electrodata homepage
at www.electrodata.com
2. Select the Software Updates button to navigate to the
Downloads page (www.electrodata.com/download.htm).
3. Locate the section titled “Latest COMM-WATCH Windows
Software”
4. Select the Download option for the appropriate version of the
COMM-WATCH II unit and save the installation file to disk.
5. When finished downloading, run the self-extracting installation
utility to install the PC software.
6. Follow the on-screen instructions to complete the installation.
To perform the PC OnCall update:
1. Use an internet browser to navigate to the Electrodata homepage
at www.electrodata.com
2. Select the Software Updates button to navigate to the
Downloads page (www.electrodata.com/download.htm).
3. Locate the section titled “Latest Instrument Firmware
Revisions”
4. Select the Download option for the appropriate version of the
COMM-WATCH II unit and save the installation file to disk.
5. When finished downloading, run the self-extracting installation
utility to install the PC software.
6. Follow the on-screen instructions to complete the installation.
7. Connect the COMM-WATCH II PRIMARY interface to the PC
using a USB cable.
81
8. Run the PC OnCall program and verify that your COMMWATCH II model is on the displayed list of applicable products.
9. Select the appropriate Com Port and BIT RATE or Remote
Server Address and Port, and then click Continue, as shown
below.
10. The updated firmware will be downloaded to the COMMWATCH II if the existing firmware is an older version.
82
4.2
WARRANTY
The COMM-WATCH II is guaranteed to be free of defects in material
and workmanship for a period of one year from the date of shipment to
the original purchaser. During the warranty period, Electrodata, Inc. will,
at its option, either repair or replace your COMM-WATCH II if it proves
to be defective due to material or workmanship.
Electrodata will pay domestic commercial transportation costs on
equipment being returned for warranty service, when a RETURN
MATERIAL AUTHORIZATION (RMA) number has been obtained in
advance from Electrodata, Inc., and shipped in accordance with
Electrodata’s instructions.
This warranty does not apply to defects resulting from misuse or abuse.
Electrodata shall not be liable for damages greater than the cost or
replacement value of the COMM-WATCH II.
Liability under this warranty is void if:
1.
The COMM-WATCH II has been altered or repaired without
written authorization of Electrodata, Inc.
2.
The COMM-WATCH II is installed or operated other than in
accordance with the instructions contained in this manual or
Electrodata literature.
IMPORTANT
Don’t forget to activate your warranty by filling out and returning the
WARRANTY REGISTRATION CARD included with this manual.
After expiration of the warranty, a COMM-WATCH II in need of repair
may be returned to the factory and repaired for a fee. Prior to returning
any equipment, return authorization and shipping instructions must be
obtained from the factory. The customer pays all transportation costs
plus the standard time and material rates in effect at the time of the
repair.
83
4.3
ADDITIONAL
ASSISTANCE
INFORMATION/
TECHNICAL
If you need additional information or technical assistance, please contact
us by:
Phone:
Fax:
E-mail:
216-663-3333 or 800-441-6336 (8 a.m. to 5 p.m. EST, M-F)
216-663-0507
[email protected]
84
5
COMM-WATCH II TROUBLESHOOTING
Problem:
POWER indicator is not lit.
Check:
Make sure that you are using an Electrodata PS-6
12VDC power supply between a live outlet (100240VAC 50-60Hz) and the POWER 12VDC circular
jack on the rear panel of the COMM-WATCH II unit.
Problem:
POWER indicator is flashing continuously.
Check:
Make sure that the appropriate SECONDARY interface
connection has been made. If either of the cellular
options is installed, make sure that the provided antenna
is attached and that the COMM-WATCH II is in a
suitable location for communication. Also, if the GSM
cellular modem is installed, ensure that that a valid SIM
card has been installed.
Problem:
NETWORK or SITE SIGNAL indicator is not lit.
Check:
Check the RJ-48 cables going to the CSU and NIU. If
the link was operational prior to installing the COMMWATCH II, make sure that the cable between the SITE
jack and the CSU is a standard (reversed) RJ-48 to RJ-48
cable and not straight through. Also, make sure that the
cable between the NIU and the NETWORK jack is
straight through, and not reversed.
Problem:
NETWORK or SITE ALERT indicator is lit.
Check:
When powering up the COMM-WATCH II, it is
standard to have events recorded and failure results
recorded for that period, even if the circuit is fully
operational. These bad results from power-up will cause
the ALERT indicators to remain lit. The results should
be cleared using the CommWatch II software.
Problem:
COMM-WATCH II software will not connect with
direct USB PC connection.
85
Check:
Make sure that the settings under Options/Serial Port
are correct. Ensure that the COM port you have chosen
corresponds to the COM port of the USB connection. If
you are unsure of which COM port this is, please
reference the “Ports” section within the Windows Device
Manager.
Problem:
The COM port corresponding to the USB connection is
not displayed in the COM Port list.
Check:
Power must be applied to the COMM-WATCH II and
the USB cable must be connected between the COMMWATCH II and the PC before the Communication
Settings window is brought up. Otherwise, the COM
port corresponding to the USB connection will not be
displayed.
Problem:
COMM-WATCH II stops sending Alarm Notifications.
Check:
The remaining events storage in the COMM-WATCH II
is indicated by the height and color of the vertical bar in
the lower left-hand corner of the CommWatch II main
screen. If this vertical bar is red, clear the Event
Memory by clicking on the Clear Events button.
86
APPENDIX A
CAPTURED EVENT MESSAGES
Power Failed
Power Up
Call Timeout
Call Retry Failure
Entering Maintenance Mode
Maintenance Mode Timeout
On-Call Update Complete
On-Call Update Failure
Power on Reset
All Results Cleared
(Path or Line) 15-min ES
Threshold
(Path or Line) One-hr ES
Threshold
(Path or Line) 15-min SES
Threshold
(Path or Line) One-hr SES
Threshold
(Path or Line) 15-min UAS
Threshold
(Path or Line) One-hr UAS
Threshold
Line 15-min EX0 Threshold
Line One-hr EX0 Threshold
Clock Slip 15-min Threshold
Clock Slip One-hr Threshold
Signal Loss Detected
Signal Loss Cleared
Frame Loss Detected
Frame Loss Cleared
Yellow Alarm Detected
Yellow Alarm Cleared
Blue Alarm Detected
Blue Alarm Cleared
B8ZS Code Detected
CSU Loop-Up Detected
CSU Loop-Down Detected
NIU Loop-Up Detected
NIU Loop-Down Detected
External Alarm In Detected
External Alarm In Cleared
Event Memory Full
Dummy Data Loaded
Event Memory Cleared
Page Network Timeout
Page Rejected
Test Message Sent
E-Mail Message Sent
E-Mail Message Operation Failed
Flash Drive Write Failure
Alarm Notification Sent
Cannot Initialize Phone
Cannot Connect to Server
Cannot Initialize WiFi
Cannot Connect to AP
Cannot Initialize Ethernet
Unidentified Event
87
APPENDIX B
DATA OVERVIEW
Data
Storage
Location
Storage Limits
Value
Limits
15 Minute
NETWORK/SITE
Statistics
1 Hour
NETWORK/SITE
Statistics
Continuous
NETWORK/SITE
Statistics
COMM-WATCH
II Non-Volatile
96 result sets
-999,999 to
+999,999
COMM-WATCH
II Non-Volatile
168 result sets
-999,999 to
+999,999
COMM-WATCH
II Non-Volatile
1 result set
-999,999 to
+999,999
Captured Events
COMM-WATCH
II Non-Volatile
200 events
COMM-WATCH II
Unit Setup
(Everything in Setup
menu)
COMM-WATCH
II Non-Volatile
Entire setup stored
CommWatch II
Software Options
(Everything in
Options menu)
PC Non-Volatile
Entire setup stored
PC Volatile
All options stored
PC Volatile
All options stored
COMM-WATCH
II Non-Volatile
OR External
Flash Drive
COMM-WATCH
II External Flash
Drive
COMM-WATCH
II Non-Volatile
COMM-WATCH
II Volatile
COMM-WATCH
II External Flash
Drive
COMM-WATCH
II Non-Volatile
≈10,000 frames (internal)
Circuit Statistics
Graphing Options
CommWatch II
Software Printing
Options
D-Channel Capture
Data
B-Channel Capture
Audio
BER Testing Setup
BER Test Results
Signaling Capture
Single Channel
Signaling Capture
88
See
Appendix A
Data: 0 to
+99999
Site Name:
24
characters
IP: 0 to 255
Port: 0 to
32726
MODEM: 32
characters
N/A (See
3.7)
N/A (See
3.8)
Flash drive bytes / 60 ≈
frames (external)
Specified
filters (See
3.4.1)
Flash drive bytes / 8000
≈ captured audio
[seconds]
No
limitations
Network & Site results
(1 pair)
N/A (See
3.4.3)
-999,999 to
+999,999
Flash drive bytes / 30 ≈ #
of signal bit changes
No
Limitations
13,056 signaling bit
changes
No
Limitations
Entire setup stored
APPENDIX C
COMM-WATCH II COMMUNICATION
SECONDARY
Interface Option
Option 01
(RJ-45 Ethernet)
Option 02
(WiFi Ethernet)
Option 03
(Bluetooth)
Option 04
(GSM Cellular)
Option 05
(CDMA Cellular)
Option 06
(RJ-11 MODEM)
PRIMARY
(USB)
Remote
Access
Remote Access
SECONDARY
via Electrodata
Remote Access
Server
Text
Message
Alarm
Response
Email
Alarm
Response
X
X1
X3
X2
X2,4
X
X1
X3
X2
X2,4
X
X
X
X5
X6
X
X5
X6
X
X
X
1 – Both remote computer and COMM-WATCH II must be on the same local network
2 – Only possible if Use Electrodata Server is specified in the Setup/Ethernet Settings or Setup/WIFI Settings
options.
3 – The COMM-WATCH II must have bi-directional communication with external (Internet) IP addresses.
4 – The COMM-WATCH II must have outbound communication with external (Internet) IP addresses.
5 – The cellular service must have both text messaging (SMS) and internet capabilities.
6 – The cellular service must have text messaging (SMS) service.
89
APPENDIX D
SPRINT CDMA MODEM ACTIVATION
Before establishing remote cellular connection with a COMM-WATCH
II having the CDMA cellular SECONDARY interface option, the
CDMA modem must be activated. Activation only needs to be
performed once. Before beginning the activation procedure, you must
obtain three numbers specific to the Sprint wireless data account:
1) 10-digit telephone number (MDN)
2) 10-digit modem identification number (MSID)
3) 6-digit service programming code (SPC or OTKSL)
The following activation instructions contain square brackets (example:
[type data here]) indicating that the instruction requires user-specific
data. The brackets should not be included when typing the instruction.
The <enter> portion of an instruction should be interpreted as an Enter
key press. Instructions are not case-sensitive. If at any point in the
procedure the COMM-WATCH II response is not as stated, simply close
the terminal window, cycle power to the COMM-WATCH II and then
repeat the procedure. To activate the CDMA modem:
1) Establish remote connection through the COMM-WATCH II
PRIMARY interface
2) Select Communications / Terminal Active to bring up the
terminal window
3) Press the escape key to bring up the prompt: >
4) Carefully type: DCNT <enter> You will not see the characters
that you type.
5) Carefully type: ATE1 <enter> The COMM-WATCH II will
respond with OK. You will not see the characters that you type
for this instruction, but you should see them for the next three
instructions
6) Type the following instructions. After each instruction, the
COMM-WATCH II should respond with OK
AT+WSPC=1,[6-digit service programming code]<enter>
AT+WMDN=[10-digit telephone number (MDN)]<enter>
AT+WCMT=1<enter>
90
7) The COMM-WATCH II will respond with three statements (two
+WIND statements and one +WROM statement) in
approximately 10 seconds. After the three statements, carefully
type: ATE1 <enter> The COMM-WATCH II will respond with
OK. You will not see the characters that you type for this
instruction, but you should see them for the next three
instructions
8) Type the following instructions. After each instruction, the
COMM-WATCH II should respond with OK
AT+WSPC=1,[6-digit service programming code]<enter>
AT+WIMI=31000[10-digit modem identification number (MSID)]<enter>
AT+WCMT=1<enter>
9) The COMM-WATCH II will respond with three statements (two
WIND statements and one WROM statement) in approximately
10 seconds. After the three statements, carefully type: ATE1
<enter> You will not see the characters that you type for this
instruction, but you should see them for the next two instructions
10) Ensure that the COMM-WATCH II has good cellular network
reception. Type the following instructions. After the first
instruction, the COMM-WATCH II should respond with OK.
After the second instruction, the COMM-WATCH II should
respond with +WOAP:“Preparing Data Services”
OK
AT+WIOTA=4 <enter>
AT+WIOTA=1<enter>
11) After some time (less than five minutes), the COMM-WATCH II
will respond with three statements (+WOAR:“Please Retry”
followed by two +WROM statements). These statements
indicate that the modem has been successfully activated
12) Close the terminal window and then remove power from the
COMM-WATCH II. Re-apply power to the COMM-WATCH II
An example terminal session is shown below:
91
92
APPENDIX E
VERIZON CDMA MODEM ACTIVATION
Before establishing remote cellular connection with a COMM-WATCH
II having the CDMA cellular SECONDARY interface option, the
CDMA modem must be activated. Activation only needs to be
performed once. Before beginning the activation procedure, you must
obtain one numbers specific to the Verizon wireless data account:
1) 10-digit telephone number (MDN)
The following activation instructions contain square brackets (example:
[type data here]) indicating that the instruction requires user-specific
data. The brackets should not be included when typing the instruction.
The <enter> portion of an instruction should be interpreted as an Enter
key press. Instructions are not case-sensitive. If at any point in the
procedure the COMM-WATCH II response is not as stated, simply close
the terminal window, cycle power to the COMM-WATCH II and then
repeat the procedure. To activate the CDMA modem:
1) Establish remote connection through the COMM-WATCH II
PRIMARY interface
2) Select Communications / Terminal Active to bring up the
terminal window
3) Press the escape key to bring up the prompt: >
4) Carefully type: DCNT <enter> You will not see the characters
that you type.
5) Carefully type: ATE1 <enter> The COMM-WATCH II will
respond with OK. You will not see the characters that you type
for this instruction, but you should see them for the next three
instructions
6) Type the following instructions. After each instruction, the
COMM-WATCH II should respond with OK
AT+WSPC=1,000000<enter>
AT+WMDN=[10-digit telephone number (MDN)]<enter>
AT+WCMT=1<enter>
7) The COMM-WATCH II will respond with four statements (two
+WIND statements, one +WERI statement and one +WROM
statement) in approximately 10 seconds. After the three
93
statements, carefully type: ATE1 <enter> The COMM-WATCH
II will respond with OK. You will not see the characters that
you type for this instruction, but you should see them for the
next instruction
8) Type the following instruction to which the COMM-WATCH II
should respond OK
ATD*22899; <enter>
9) After some time (less than five minutes), the COMM-WATCH II
will respond with eleven statements if successful:
+WORG:*22899
+WCNT:3
+WOT1:"Programming in Progress"
+WOTS:"SPL unlocked"
+WOTP:"PRL Download OK"
+WOTM:"MDM Download OK"
+WOTC:"Commit Successful"
+WOT2:"Programming Successful!"
+WEND:25
+WERI:64,1,0,0,0,2,"Verizon Wireless"
+WROM:1
It is important that the “Programming Successful” be present;
however, the remaining data may vary slightly
10) Close the terminal window and then remove power from the
COMM-WATCH II. Re-apply power to the COMM-WATCH II
An example terminal session is shown below:
94
95
APPENDIX F
GLOSSARY
Alarm:
Abnormal network condition on either the
NETWORK or SITE circuits. See section 3.3.3.
Call Operation:
Attempt by the COMM-WATCH II to notify
you of a problem. This could be a text message
to a destination telephone number or activation
of the output relay. Call operations are made in
response to events.
Event:
COMM-WATCH II internal status or network
error measurement that exceeds the
programmable thresholds. See section 3.3.3 and
Appendix A.
PRIMARY:
USB interface through which the CommWatch
II PC software communicates with the COMMWATCH II unit. Intended for on-site
connection.
Results:
Measurement of the statistics of the circuits
connected to the NETWORK and SITE jacks.
The measurements taken are described in section
3.3.3.
SECONDARY:
A communication interface through which the
CommWatch II PC software communicates with
the COMM-WATCH II unit. Intended for
connection from a remote location. Can be
either wired or wireless Ethernet, Bluetooth,
cellular or MODEM.
Threshold:
A number that acts like a reference level. A
network statistic above this number is
considered an event.
96
23020 Miles Road
Bedford Heights, OH 44128
(216) 663-3333 FAX: (216)663-0507
Toll Free: 800-441-6336
e-mail: [email protected]
http://www.electrodata.com
P/N 610069