1
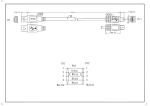
Operating Instructions
Patronic with
Selectron-MAS-Control
02.2009
ARM AG Weberei-Artikel-Fabrik, CH-3507 Biglen Switzerland
Tel. +41 (0)31 701 07 11 Fax +41 (0)31 071 07 14
www.arm-loom.ch
[email protected]
Contents
4. Functions of dobby
•
•
Page
1. Description of PATRONIC
3
2. Starting the loom PATRONIC
4
•
2.1 By delivery with assembled foot frame
4
•
2.2 By delivery with dismantled foot frame
5
3. Description of the Selectron-MAS-Control
6
•
3.1 Weave with software and computer
•
3.2 Weave with box of the Selectron display
7
8-9
4. Information
10
5. Functions of dobby
11
If you have questions concering the Patronic and the Selectron Control
which are not answered by this manual, please contact ARM AG.
2
•
In the closed shed, the programmed magnets are pulled during 5
seconds, operating the hooks.
The hooks, which are pushed down, hang on the lifting knife and
pull the shafts up accordingly.
The hooks, which are not pushed, hang on the lowering knife and
pull the shafts down.
Notice:
• In case the dobby blocks, while trying, the motions have to be
watched precisely.
• Take off the wooden top cover of the loom.
• Attention is given to the hooks, moved by magnet; while in action,
the lifting hook has to hang completely on the lifting knife.
• When the shed is closed, the right pedal, when pushed down,
should not touch the floor under any circumstances.
• Check again that the steel ropes from the pedals to the machine
drive lie correctly in the groove of the rollers.
11
4. Information
1. Description of PATRONIC
Addresses from the program of weave, which are communicating with the
Selectron-MAS Control (Verson ARM):
•
•
•
•
•
•
•
10
Weave Point
DB Weben
Pointcarré
WeaveMaster
Weave for Windows
ScotWeave
Pro Weave
www.weavepoint.com
www.brunoldsoftware.ch
www.pointcarre.com
www.kienbaum-webereitechnik.de
www.digitalweaving.no
www.scotweave.com
www.proweave.com
3
2. Starting the loom PATRONIC
•
Close: switch off the loom, the pattern is saved
•
Shafts forward or backwards::
- Mode Enter:
2.1 By delivery with assembled foot frame
4
•
Unpack the loom carefully: cut the packaging ribbons, take off the
top box, cut the fixing ribbons on the pallet.
•
Lift up the loom and place it in its proper palce. If the loom can not
be moved to its proper place, it is possible to lift it up from the foot
frame as follows:
- unscrew the 4 nuts of the side bars and take the screw off (see 4)
- the steel ropes can be unhooked above the pedals
- the steel ropes can be lifted out of the diversion rollers above
(see 5). To do this, unscrew the nuts (see 6) of the diversion
rollers a little bit, until the steel ropes can be taken off.
- Lift the loom off the foot frame and place it in its proper place.
- Assembling the foot frame and installing in the steel ropes
according to page 3+5
•
•
•
•
Take off packaging strings and foils
Mount the shuttle boxes on the lathe
Mount the second back bar
Hang up the Selectron box on the left side of the loom;
connect the machine cable with the loom (15 pin)
•
Connect the main cable into the mains 230 Volt
and switch on the power,
normal power input (control only)
9 Watt
Maximum power input
144 Watt
max. shaft lifting = 20 shafts
= forward
= backwards
•
Wefts forward or backwards:
- Mode Enter
F5 forward
backward
= Enter
= F4
It is possible to enter serveral patterns:
For example. Pattern 1: Weft 0 – 1 = Tabby
Pattern 2: Weft 10 – 11 = mat weave
• Enter for pattern 2 = 2 lifting, 2 lowering, and so on
• Close «Enter»: F5 (L1 + 4 light on)
• Back to weft 10: F4, then F5
• Weave: 2xEsc
• Rapport Start: F3 Weave 0010
F3
0010
• Press right pedal then
• Left pedal for the next weft
• The weft-position is indicate on the display
9
3. Description of the Selectron-MAS-Control
with serial port
•
•
•
The Selectron-MAS-Control and the Selectron display
with the box is a new generation.
The Control (40x20x7 cm) for 24 shafts is installed
in the loom.
Innovation of the Selectron-MAS-Control:
- Capacity of 999 weft
- Selectron display with box (20x11x5 cm)
in german, french and english
3.1 Weave with software and computer
• Data cable (9pin) connect on the computer
• Switch on the power (switch green)
• Delete the data: F1 F2 Enter (for weave direct+
indirect)
• Left pedal down
• Switch on the computer
• Load the pattern (design)
• With the corresponding configuration, the following
systems are possible:
1. Weave direct: the pattern is transmitted weft by weft from the computer
- press the right pedal
(wait about 2 seconds for the
noise of the magnets),
- then the left pedal for the next
weft
- close: Esc the pattern is
deleted close the programm in
the computer
1. Weave indirect: the pattern is loaded on the Selectron-MAS-Control
-
• Explication of the keys:
- Key:
F1 – F5 Esc Enter 4 arrow direction 2 red keys
- LED:
L1 – L4
- Indication: 4 lines =
line 1: Titel
line 2: Up-date position of the loom
line 3: F1:Enter F2:Language
line 4: Start.Rapport
• Two applications are possible with the Selectron-MAS-Control:
- Enter with software and computer
- Enter with box of the Selectron display
6
Weave 0000
F3
0000
press the right pedal then
left pedal for the next weft
( the weft-position is indicate on
the right side of the display)
- F4 = weft individual forward
- weave backwards: F5 (L4 light
on); with F4 = weft individual
backwards
- close: F1 F2 Enter the pattern is
deleted
7
3.2 Weave with box of the Selectron display
•
•
•
•
Switch on the power (switch green)
Erase the data: F1 F2 Enter (only for new enter)
Left pedal down
2.2 By delivery with dismantled foot frame
•
Unpack the loom carefully:
cut the packaging ribbons and strings, take off the top box
and unwrap the parts. The loom remains on the pallet.
•
Assembling the foot frame:
- Fit the right part of the foot frame onto the metalbar (see 1),
repeat the same with the left part on the foot; tighten the
nuts only by hand.
- Attach the pedals to the pedal axe (see 2) and tighten thespecial screws with the hexagonal wrench.
- Tighten the nuts of the metalbar (see 1).
- Mount the bar with the rope rollers (see 3) and tighten the nuts.
- Place the foot frame in its proper place.
- Unscrew the 4 nuts of the side bars and take the screws off
(see 4); place the loom on the foot frame and assemble the
sides with the side bars of the foot frame
Be careful: not tighten too hard the nuts.
•
Installing the steel ropes:
- Loosen the steel ropes, until they hang down from the top
rollers on both sides.
- Place the steel ropes on the diversion rollers, as shown in the
diagram on page 3. Take care, that the steel ropes are placed
correctly between the diversion rollers and the ropes lead.
- Hook the pedals on the steel ropes and tighten the 4 nuts
(see 6).
•
•
Mount the shuttle boxes on the lathe
Mount the second back bar
•
Hang up the Selectron box according to indication page 4.
Choose the language: F2
Enter a pattern (desgin): 2xF1 (L1 light on)
= lifting shaft
=1
= lowering shaft = 0
with keys
or red keys
Take the Selectron box with the display in the hand
•
•
•
•
•
•
•
•
•
8
For exemple tabby = 1 lifting, 1 lowering, and so on.
Close «Enter»: F5 (L1 + L4 light on)
Back to weft 0: F4, then F5
Weave: 2xEsc
Rapport Start: F3
Weave 0000
F3
0000
Press the right pedal, then
Left pedal for the next weft
The weft-position is indicate on the display
5