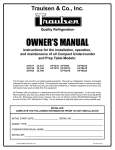
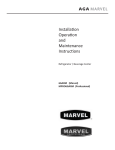
1
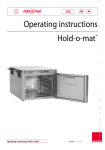
Operating instructions Hold-o-mat ® ase y, ple t e f a ur s e! For yo before us read NEW ding M Inclu at KT m o - Hold mat 2/3 -o- instructions Hold-o-mat® Operating - Hold mat large -o- Hold Seite1 Congratulations! By choosing the new Hold-o-mat, you now own the warming oven which has been developed from years of practical experience for professionals. Enjoy the unique advantages that only the Hold-o-mat can offer, such as precision temperature control of +/- 1°C, and efficient dehumidification. Great emphasis has been put on simple operation, so that you can put the unit into operation quickly and efficiently. However, if there are any unclear points, please contact your nearest specialist supplier. We hope you will enjoy using your product. Please study these instructions before using the unit and observe the safety notes. These instructions contain the information needed for the unit to be used correctly, operated safely, and maintained properly. As with all electrical appliances special care must be taken to avoid injuries, burns or damage to the unit. People who have not read the operating instructions should not use the unit. Manufacturer: Hugentobler Swiss cooking systems Grubenstrasse 107 CH-3322 Schönbühl Phone: +41 (0)848 400 900 +41 (0)31 858 17 15 Fax: Internet: www.hugentobler.com E-mail: [email protected] Operating instructions Hold-o-mat® page 2 Introduction: These operating instructions cannot take account of all possible applications. For further information, or if problems arise that are not sufficiently covered in these instructions, please consult your local specialist supplier or contact us directly. We will be pleased to help you. Contents: Valid for all Hold-o-mat models: – Safety precautions 4 – 5 – Placement requirements 6 – Setting up 7 – Controls 8 – Operation 8 – 9 – Practical tips 9 – 10 – Troubleshooting 11 – In case of technical problems 12 – Maintenance 13 – Overhaul, repair 13 – Guarantee 14 – Unit information 14 – Disposal 15 – Supplement 15 Additions - Additions to Hold-o-mat large 16 – Additions to Hold-o-mat 2/3 17 – Additions to Hold-o-mat KTM (with core temperature) – Package contents 6 Operating instructions Hold-o-mat® 18 - 24 page 3 Safety Precautions: General safety instruction Anyone who is involved in the setting up, use and maintenance of the Hold-o-mat warm holding cabinet must have read and understood all the operating instructions, especially the "Safety precautions" section. This warm holding cabinet has been manufactured and tested in accordance with the applicable standards. When using electrical equipment, a number of basic safety precautions must be taken in order to avoid possible injuries and damage. Please read these instructions carefully and store them in a safe place. We accept no liability for accidents and damage arising from failure to observe these operating instructions. Warning triangle All the safety notes in these operating instructions give users advance warning about possible dangers. These particular points of interest for users are indicated by a warning triangle. Such notes must be read and acted on by the user. ! ! Warning: magnetic field ! ! Do not allow magnetic data carriers such as diskettes, credit cards, cheque cards, ID cards with magnetic strips, magnetic tapes or watches to come within 0.5 m of the unit. Correct use and application The Hold-o-mat warm holding cabinet is designed solely for food preparation. Never use the unit to heat chemicals or other materials. This could lead to the buildup of poisonous or explosive gases. Never use the unit for drying textiles, paper or similar materials. There is a danger of melting or burning. Do not use the unit for storing crockery or cook books, either in or on the unit. The unit is designed for use in large kitchens such as in restaurants or hotels, as well as commercial premises such as bakeries and butchers. The unit is not designed for domestic use; it is not for use in areas where exceptional circumstances prevail such as corrosive or explosive atmosphe- Operating instructions Hold-o-mat® page 4 Notice to operators r res (dust, steam, gas); it is not for industrial use or for the mass production of food. People who are not familiar with the operating instructions such as children, must not use the unit, unless supervised by trained staff. Persons with active physical aids (such as heart pacemakers) are not permitted to operate the unit. The operator must ensure that all other persons with active physical aids (such as heart pacemakers) observe a safety distance of at least 0.5 m from the unit. Electrical supply, power cable Electricity can be lethal! Improper operation of the unit can cause fire. For your own safety and the safety of others, please follow the safety precautions precisely as outlined in these instructions. Never touch live components. This could cause an electric shock which can lead to serious injury or even death. Only connect the unit to alternating current of 230V/ 50/60Hz. The plug must have a minimum fuse rating of 10A. Never operate the unit with a defective power cable. Get a qualified elect- rician to replace damaged plugs and cables immediately. Do not run the power cable around corners or sharp edges and ensure that the power cable cannot be crushed. Never pull the unit by the power cable. Never pull the plug from the socket with wet hands. Protect the power cable from oil and never rest it on hot objects. The three-pin plug must not be replaced by a two-pin one. Location Before use Suitable containers Install the unit on a sturdy surface and make sure that all the unit‘s openings are always freely accessible to ensure adequate air circulation. Do not use if the unit is damaged or faulty. 1/1 trays and grills made of chrome nickel steel (CNS) 65mm 1/1 Gastronorm containers (3 pcs.) in conformity with EN 631 made of CNS 100mm 1/1 Gastronorm containers (2 pcs.) in conformity with EN 631 made of CNS Unsuitable containers Plastic, synthetic and other non-heat resistant containers. ! ! ! ! Maintenance Cleaning: Remove the plug and allow the unit to cool. Repairs: If faulty or defective, remove the plug from the socket immed iately. Never use a damaged unit. Please note that the outside of the unit must not be sprayed with excessive amounts of water or other liquids. Repairs must only be carried out by authorised specialist electricians or by our repair service. Operating instructions Hold-o-mat® page 5 Package contents: T he package contains: 1 unit, 2 side rails, 1 set of operating instructions, 2 power cables (1 x EU/1 x CH). Check the package contents. If parts are missing, return immediately to your supplier. The product has been supplied to you in cardboard packaging. Dispose of the packaging properly or return it to your supplier. Damage in transitCheck the unit for visible signs of damage. Do not use the unit if defective. Report the damage immediately to your supplier. Placement requirements: The Hold-o-mat can be used in many different parts of the kitchen, preferably in a central location, not in a remote corner. Thanks to its ease of installation (no water, drainage or air extraction connections), the unit can be placed anywhere. Ensure, however, that the power supply is 230V/ 50/60Hz. If the Hold-o-mat is built-in, sufficient cool air should be allowed to circulate. The Hold-o-mat does not have to be tied to one location. It can be used in a variety of places such as the kitchen, lounge, and for parties etc. If the unit is permanently installed in one place and cannot be disconn- ected from the mains by a switch, the plug on the power cable must remain accessible. ! ! – Place the unit on sturdy surface. – Ambient temperature + 10°C to + 40°C. Do not place the unit next to or on top of hot surfaces (radiators or hot plates): there is a danger of melting, fire or short circuit! – Never bring the unit into contact with water or other liquids as there is a danger of short-circuit! – To ensure adequate air circulation, all sides of the unit must be kept a minimum of 10 mm from walls and other objects. Operating instructions Hold-o-mat® page 6 Setting up: Customer service instructions Do not allow magnetic data carriers such as diskettes, credit cards, cheque cards, ID cards with magnetic strips, magnetic tapes or watches to come within 0.5 m of the unit. Warning: magnetic field Customer service staff with active physical aids (such as heart pacema kers) must observe a safety distance of at least 0.5 m from the unit. T he customer service operator must ensure that all other people with active physical aids (such as heart pacemakers) observe a safety distance of at least 0.5 m from the unit. ! ! Rehinging the doorThe door can be easily rehinged within 10 to 15 minutes. Because the unit casing has to be opened for this purpose, current-carrying parts will be exposed. The door may only be rehinged by specialist personnel (qualified electrician, service fitter, Hugentobler AG authorised sales person), and only in accordance with the customer service instruction provided for this purpose. Withdraw the mains plug from the socket. Withdraw the plug from the equipment socket of the unit controller. Store the power cable where it is inaccessible to other persons for the duration of the customer service work. Remove the two lower hinge screws and unhinge the door. Remove the screw on the opposite side which holds the casing in place at the bottom front. At the rear of the unit, remove the six screws attaching the housing to the rear wall. Slide the casing towards the rear and at the front of the unit press the main insulation slightly backwards in order to gain access to the two earth plates on which the four magnets are located. Dismantle the two earth plates and fit them on the opposite side. Slide the main insulation forwards again and slide the casing into the front panel. Securely tighten all six screws on the rear panel. Securely tighten the screw which holds the casing in position at the bottom front. Unscrew the upper hinge pins and fit them on the opposite side. On the side of the door on which the door hinge sleeves are fitted, remove the cover caps located on the inside of the door. Remove the cover caps on the narrow side of the door. Lever the door hinge sleeves out of the holes using a suitable slotted screwdriver and fit them on the opposite side. Refit the cover caps on the narrow side and the inside of the door. The door must not be fitted upside down, as in this case the dehumidification vent would no longer be in the optimum position. Therefore, the door handle must also be repositioned. To do this, dismantle the door handle and fit it on the opposite side. Rehinge the door on the upper door hinge pin and secure it by firmly tightening the lower door hinge. Power connection Connect the power cable to a socket with a 230V/ 50/60Hz supply. CleaningBefore using for the first time, it is imperative that the white protective film be removed. In addition, we recommend that the unit be dusted inside and out, with a damp cloth. Operating instructions Hold-o-mat® page 7 Controls: Temperature indicator Main switch – on/off Heat indicator Increase Temperature Lower Temperature Operation: ! Switching on ! Improper operation can cause fire! For your own and the safety of others, please follow the safety notices in these instructions precisely! Press the ! button. !! ! !! or buttons to set the desired temperature. OperatingUse the The indicator always shows the actual temperature. By pushing an arrow button once, the desired temperature is displayed for two seconds. Then the indicator returns to showing the actual temperature. By pressing the buttons again while the desired temperature is displayed, the desired tem perature can be increased or decreased. ! ! Pressing both buttons together automatically sets the the most important temperature of 68 degrees. Desired temperatureThe desired temperature is reached within 20 to 40 minutes, depending on what temperature has been chosen. The Hold-o-mat is designed to respond to this slowly, but this ensures that the desired temperature is maintained within a +/- 1°C tolerance. The warming-up time can be shortened by setting a higher temperature than actually required. Do not forget, however, to lower the temperature in time (about 6–10°C below the desired temperature), otherwise the unit will get too warm. Operating instructions Hold-o-mat® page 8 If the Hold-o-mat exceeds the desired temperature by 5°C or more, the indicator flashes to warn kitchen staff. To cool the unit slowly, leave the door open slightly longer. (Thanks to its excellent insulation, this takes somewhat longer than with other units.) The desired temperature can be set to the degree in a range from 50°C to 120°C. The PT 500 and excellent electronics, which approach the desired temperature slowly step by step (a timing pulse system), guarantee +/- 1°C accuracy. ! ! Switching offAfter use the button is used to switch the Hold-o-mat off. Please do not forget to clean the unit after use as outlined in the section on "Cleaning and care". Practical tips: General use a Thanks to very precise temperature control and the special dehumidific- Meat a The optimal temperature for keeping meat warm over a period of hours is a With every hour that the meat is kept warm in the Hold-o-mat it becomes a Ideally, meat should be inserted into the Hold-o-mat on grilles. Meat juices Cook & Hold aThanks to the 120°C setting, this cooking method is perfectly practicable with ation system, the Hold-o-mat can keep food warm, especially meat and bakery products, over long periods in prime condition while improving quality. Vegetables and other side dishes can also be kept warm. about 5–10 degrees above the desired core temperature (max. 5 hours). If different cuts of meat e.g. red and white, large sides and small off cuts are to be warmed together, set a temperature of between 68° to 72°C. more tender. Please note, however, that the meat should not be stored for too long, as this can adversely affect its taste. Best results are obtained by using relatively fresh meat kept warm for under five hours. can be collected in a tray on the interior floor. This way, precise regular temperature is guaranteed and the meat does not lie in its own juices as on a tray. The dried-on residue on the tray is easier to remove than if a tray is used on every level. the Hold-o-mat. Keep to the following rules and obtain further information from a specialist. Operating instructions Hold-o-mat® page 9 Searing Sear the meat on the grill, or in the pan. CookCook the meat at 120°C for at least 10 minutes in the pre-heated Hold-o-mat. Cook ThroughSet the temperature 20°C higher than the desired core temperature. HoldAfter reaching the desired core temperature, set the Hold-o-mat 5°C higher than the core temperature. The meat can now be kept for hours at the optimum holding temperature. a Dehumidifier The humidity level inside the unit can be regulated precisely and visibly by means of the 3-stage dehumidifier on the door. Normally the dehumidifier is closed for vegetables and cooking au gratin, and completely open for bakery products, deep-fried and breaded foods (min. 80°C). The half-open setting for other foods can be used as you see fit. Please direct all questions to your specialist. Temperature regulator a Please note that opening the door frequently can lower the effective actual If an over-warm product is put directly into the Hold-o-mat from a combi- a steamer, the actual temperature can rise dangerously depending on the temperature, and thus the temperature of the food. (Due to the in-built time lag, the indicator does not react so quickly). If this reaction is noticed, increase the desired temperature by a few degrees. product. (The indicator flashes, if the temperature is 5°C too high.) Please correct this normal occurrence by leaving the door open slightly longer, or preferably leave the meat to stand for a while outside the unit and put it in when it reaches the right temperature. Accessoires best to warm up the Hold-o-mat with the requisite grilles and dishes a Itto isavoid large changes in temperature. nly load the unit with warm foods using grilles or trays on the rails supa Oplied. Cold or frozen food a Loading with cold or frozen food can trigger off the heat cut out. the interior floor as a work surface can lead to the food overheating a Using (use the lowest level). Interior floor Temperature sensor food to touch the temperature sensor (set into the roof of the a Allowing interior) can lead to false air temperature readings. Remember that your Hold-o-mat distributor is always there to answer any questions that may arise. As a last resort, do not hesitate to consult the developer and manufacturer whose details you will find on the identification. Operating instructions Hold-o-mat® page 10 Troubleshooting: A few tips if the product does not turn out as desired: Problem Cause Possible solution The product over-cooks Desired temperature and becomes dry. too high above core temperature. Set correct desired temperature or allow meat that is too hot to cool outside the oven first. Desired temperature Although the product is too low below core good, it is not warm temperature. enough. Set the correct desired temperature or, if the door is opened frequently, deliberately adjust the desired temperature upwards. The moisture content in The product is too dry or too damp. the chamber is not correct. Use the dehumidifier on the door to adjust the humidity to suit the product. The taste, consistency or general quality of the product is not satisfactory. Contact your nearest specialist and look for possible answers. ? Basic problem in preparation or incorrect conception of finished product after warming up. Operating instructions Hold-o-mat® ! page 11 In case of technical problems: Problem Possible solution The unit does not switch on, or the indicator does not light. The power supply has been cut off. Please check the building‘s fusing, the fusing on the unit (below the power cable socket at the back of the unit) and both plugs on the power cable. The actual temperature keeps falling, although it should rise. A fault has occurred due to a power fluctuation and the control system is no longer sending signals to generate heat. Isolate the unit from the power supply for a few minutes and then switch on again. If after switching on again the heating indicator is not visible after one minute, repeat the whole procedure. The heating indicator lights but the actual temperature decreases or the unit remains cold. The overheating cut out has been triggered (the unit has been loaded with cold or frozen food or the control system is defective). Reset procedure: ? ! ? ! 1. Switch off the unit using the the power supply. ! button and! disconnect from 2. Remove the plug near the heat cut off sticker rear end of the unit. on the 3. Push the reset button on the cut off with a screwdriver. 4. Replace the plug in the rear end. 5. Connect to the power supply and switch on. 6. If the overheating cut out engages again, consult your nearest service centre. If none of these possible solutions has produced an improvement, consult your local service centre, electrician or specialist retailer! Operating instructions Hold-o-mat® page 12 Maintenance: ! ! Cleaning 1. Switch off the unit with the power supply. 2. Take the trays, grilles and dishes out of the Hold-o-mat and clean separately. 3. Also tilt the side rails downwards into the centre of the cooking area and pull out towards the front. 4. Clean the whole interior and exterior with a mild fat dissolver and leave to dry. Do not use irritating, abrasive or poisonous cleaning materials. 5. If required, clean the air inlet. If dirty, the dehumidifier built into the door can be removed by pulling it forwards, and washed separately. If necessary, the door seal can also be removed, cleaned and reattached. (Important: Never use the unit without the door seals.) 6. After every thorough clean-up, heat the unit quickly to 120°C. This 120°C setting allows the unit to be sterilised and any micro-organisms are killed off. Please ensure that the dehumidifier on the door is closed, as high humidity makes the sterilisation more effective. ! ! button and disconnect from the 7. Please note that the exterior of the unit must not be sprayed with water or other liquids. High-pressure cleaners or steam-cleaners may not be used. MaintenanceThe Hold-o-mat has no special regular service requirements. However, please ensure that it is functioning properly and contact the service centre promptly if any changes are noticed. Overhaul and repair: The technical side is problem-free, allowing any authorised electrician using original spare parts to carry out all repairs. Of course the specialist service centre is at your service. However, in some cases it may be more economical to have repairs carried out locally. Operating instructions Hold-o-mat® page 13 Guarantee: We guarantee the Hold-o-mat for one year. We do not accept responsibility for damage caused by: – incorrect operation – using the product for the wrong purposes – improper repairs – or if spare parts or accessories not supplied by the manufacturer are used or built in In all these cases, the guarantee is void. The guarantee is only valid if original spare parts are used. Unit information: Model: Hold-o-mat Product no.: 673 Power supply: 230V, 50/60Hz, 1050W Fuse: 10A Storage temperature: 0°C - + 50°C Ambient temperature: +10°C - + 40°C Temperature range: +20°C - +120°C Size: H 343 x W 415 x D 675 mm Weight: 24 kg Average power consumption: ca. 300 W/h Equivalent noise level: 70 dB(A) Safety gap from walls and other equipment at least 10 mm. Keep these instructions safely. Please make sure that other users also receive the instructions. Operating instructions Hold-o-mat® page 14 Disposal: At the end of its life the unit should be disposed of in accordance with national legislation. It is recommended that a specialist disposal company be contacted. Supplement: Circuit diagram: Thermal cut out: Power supply Thermal cut out Fuse: Heater 1050 W flat cable 2*10 pole Operating instructions Hold-o-mat® page 15 Additions Hold-o-mat large ® The operating instructions Hold-o-mat, page 1-15, are also valid for Hold-o-mat large. Please note the following additions: Page 5, keyword "Scope of supply" ... conformity with EN 631 1/1 65 mm (7pcs.) made of CNS ... conformity with EN 631 1/1 10o mm (4pcs.) made of CNS Page 6, keyword "Placement requirements" ... such as kitchen, restaurant, party service etc. Use the carrying handles only when the total weight (unit-weight 41 kg plus content weight) is less than 70 kg. Use all four handles equally and avoid jerky movements. Page 10, keyword "Dehumidifier" ... by means of the 3-stage dehumidifier on the doors. Page 10, keyword "Temperature regulator" Please note that opening of the doors ... Page 13, keyword "Cleaning" Important: Never use the unit without the door seals. Operating instructions Hold-o-mat® page 16 Page 14, keyword "Unit information" Model: Product no.: Power supply: Size: Weight: Average power consumption: Hold-o-mat large 673-G 230V, 50/60Hz, 1800W H 638 x W 415 x D 675 mm 38 kg ca. 500 W/h Additions Hold-o-mat 2/3 ® The operating instructions Hold-o-mat, page 1-15, are also valid for Hold-o-mat 2/3. Please note the following instructions: Page 5, keyword "Scope of supply" ... 2/3 made of chrome nickel steel (CNS) ... conformity with EN 631 2/3 65 mm (3pcs.) made of CNS ... conformity with EN 631 2/3 100 mm (2pcs.) made of CNS Page 14, keyword "Unit information" Model: Product no.: Size: Weight: Hold-o-mat 2/3 673-H H 343 x W 415 x D 515 mm 21 kg Operating instructions Hold-o-mat® page 17 Additions Hold-o-mat KTM ® The operating instructions Hold-o-mat, page 1-15, are also valid for Hold-o-mat KTM. Please note the following additions: Page 6, keyword "Scope of supply" The package contains: ... 1 core temperature sensor. Check ... Page 14, keyword "Device key data" Model: Article number: Hold-o-mat with core temperature 673-KTM Page 8, keyword "Functional description" 5. Core temperature or time display 4. Room temperature display Swiss Hold-o-mat 1. Main switch 7. Start (For Cook & Hold programmes only) 6. Function button: Cook & Hold or KTM 2. Down 3. Up Page 8, 9, 10, 11, keyword "Operation" "Hold" function By pressing button 1 (main switch), you can operate the device like a Hold-o-mat without core temperature. All details of operation are given in the operating instructions. Operating instructions Hold-o-mat® page 18 "Hold with core temperature information" function Display of core temperature and time "Cook & Hold with fully automatic cooking phases" function In the Hold function, you can switch the core temperature sensor on or off as an informative monitoring instrument by pressing button 6 (Cook & Hold or KTM function button) briefly. The displayed temperature corresponds to the measured value which the tip of the sensor measures (single-point sensor). If the sensor is stuck into meat, the existing core temperature is displayed, otherwise the room temperature, which however may differ by a few degrees from display 4 (room temperature display). If the sensor is defective or not plugged into the device, the information "dEF" appears in the display 5 (core temperature or time display). In this case, it is still possible to use the Hold-o-mat, but without the core temperature sensor. In the "Hold with core temperature information" function, the display 5 is used only for information. The core temperature sensor does not regulate the device, and there is no signal tone. By a long press (2 seconds) on button 6 (Cook & Hold or KTM function button), you change to Cook & Hold mode. Pr 1 appears on the displays. Using buttons 2 (Down) or 3 (Up), you can switch between programmes 1 to 10. Once you have selected the programme you want, you can start it by using button 7 (Start). From now on, you can no longer make changes. If you press button 2 or 3, the desired setpoint temperature is displayed for as long as the button is operated, after which the display switches back to the actual temperature. To leave this mode, you must switch the device on and off using the main switch (1). In the display 5, you see 3 dots, one of which is flashing, and this one tells you the current cooking phase. To change a programme, select your programme number. By pressing button 6 (Cook & Hold function button) briefly, you switch to changing or viewing mode. In all cases, the flashing display can be changed; the flashing dot informs you which phase you are in. By pressing button 6 again, you jump to the next setting. Operating instructions Hold-o-mat® page 19 After phase 3, you are back to the programme number. Either start the device now (button 7), change the programme again (button 6) or switch the device off (button 1), so that the next day your colleague can start the prepared programme. ! ! ! ! Programmes remain stored even if there is a fairly long power cut. If you press buttons 2 and 3 (Down and Up) simultaneously, the device gives you a reference value (default value), so that you do not have to begin each entry at zero. The exact default values are shown below. Optional programmes Programmes 1 to 5 are programmes which can be changed immediately, and give you the phase with which you want to work. Free programming Programmes 6 to 10 are free programmes, which you can assign as you wish. If you want to remove a phase, just go to a temperature value below 20° in the appropriate phase, and the phase is removed (in both displays, "- - -" appears). ! ! of programme End In the case of programmes 6 to 10, to prevent an unintended programme change being made on viewing, before the change a release must take place by the two buttons 2 and 3 (Down and Up) being pressed simultaneously. When a programme has ended, the buzzer sounds for one minute and then stops. The Hold-o-mat remains in the "hold position" in the last phase. If the core temperature overshoots, this is displayed from 1 degree higher, and the display with the core temperature begins to flash. Operating instructions Hold-o-mat® page 20 Default values Buzzer volume: 3 "Hold-o-mat with KTM" "Cook & Hold" function Programme 1 : "Hold" and "Hold with core temperature information" functions: 68°C Programme 2 : (e.g. roast beef overnight "American method") Phase 1 : 10 min. / 110°C Phase 2 : 53°C KTM / 65°C Programme 3 : (e.g. meat / sauce dishes overnight) Phase 1 : 10:00 hours / 80°C (put in when hot) Programme 4 : (e.g. low temperature cooking of roast beef without "Cook" phase) Phase 2 : 50°C KTM / 80°C Phase 3 : 53°C KTM / 65°C Programme 5 : (e.g. à la carte Hold with core temperature and warning horn) Phase 3 : 53°C KTM / 65°C Freely programmable, including phase removal, average values for quick data entry Programme 6 : Phase 1 : 10 min. / 110°C Phase 2 : 50°C KTM / 80°C Phase 3 : 55°C KTM / 68°C Programme 7 : Phase 1 : 10 min. / 110°C Phase 2 : 50°C KTM / 80°C Phase 3 : 55°C KTM / 68°C Programme 8 : Phase 1 : 10 min. / 110°C Phase 2 : 50°C KTM / 80°C Phase 3 : 55°C KTM / 68°C Programme 9 : Phase 1 : 10 min. / 110°C Phase 2 : 50°C KTM / 80°C Phase 3 : 55°C KTM / 68°C Programme 10: Phase 1 : 10 min. / 110°C Phase 2 : 50°C KTM / 80°C Phase 3 : 55°C KTM / 68°C (e.g. roast beef, low temperature) Phase 1 : 10 min. / 110°C Phase 2 : 50°C KTM / 80°C Phase 3 : 53°C KTM / 65°C Operating instructions Hold-o-mat® page 21 Setting the buzzer volume With the device switched off, you can press button 6 (Cook & Hold or KTM function button) for 2 seconds. In display 5, the indication "Vol" appears, and in display 4, a number between 0 and 5. With button 2 (Down) or 3 (Up), you can change the volume between stages 0 and 5 (0 = buzzer switched off, 1 = quiet, 5 = loud). The current volume sounds all the time. When you leave this setting mode again by pressing button 6, the newly selected volume is stored. When the sensor is not in use, put it away as shown in the photograph, so that it does not interfere with any dishes and the plug-and-socket connection remains tight. Sensor in pause Operating instructions Hold-o-mat® page 22 We use a single-point sensor with PT 500, which is placed in the tip of the sensor. Ensure that the tip of the sensor is always in the middle (not the edge) of the piece of meat. Before plunging into the piece of meat, the pointer must be somewhat cooled off with a wet piece of kitchen paper, to avoid a white edge in the meat. Some cooking instructions for the "Cook & Hold" method A preheated Hold-o-mat is required. Because the Hold-o-mat has a powersaving connected load of 1 kW, preheating to 110°C can take about 30 minutes. With small quantities, a 10-minute cooking phase (phase 1) is enough. With large quantities, it is better to enter 30 to 60 minutes, so that the Hold-o-mat can process the "cold mass". If the device is very full on 2 levels, temperature differences between the upper and lower floor can occur. The KTM sensor should therefore always be placed on the upper floor. When the programme finishes, the upper pieces of meat are perfect, and the lower ones catch up during an extended Hold phase. The time required depends on the piece size. For instance, for 10 kg of roast beef on 2 levels, about 4 to 5 hours are required. ! ! ! Ideally, a buffer time for the Hold phase should be calculated. First of all we are on the safe side for time, and secondly, the meat continues to mature and becomes more tender in the Hold phase. ! For a slow cooking phase of more than 8 hours, always use freshly slaughtered meat (max. 36 hours after slaughter). Good manufacturing practice is a requirement, and releases the manufacturer from legal steps. Ask the manufacturer of the Hold-o-mat (Hugentobler AG, Switzerland) for the HACCP documents, if you have not already received them from your specialist dealer. Operating instructions Hold-o-mat® page 23 Operating instructions Hold-o-mat® page 24 Additions to Hold-o-mat operating instructions for Hold-o-mat with core temperature Page 6, keyword "Scope of supply" The supply includes:.......1 core temperature sensor with plug. Check........ Page 14, keyword "Device key data" Type: Hold-o-mat with core temperature Article number: 673-KTM Functional description: (add to page 8) 5. Core temperature or time display 4. Room temperature display 1. Main switch 7. Start 6. Function button: (for Cook&Hold programmes only) Cook&Hold or KTM 2. Down 3. Up Operation: (add to pages 8 to 11) "Hold" function: - By pressing button 1 (main switch), you can operate the device like a Hold-o-mat without core temperature. All details of operation are given in the operating instructions. "Hold with core temperature information" function: - In the Hold function, you can switch the core temperature sensor on or off as an informative monitoring instrument by pressing button 6 (Cook&Hold or KTM function button) briefly. - The displayed temperature corresponds to the measured value which the tip of the sensor measures (single-point sensor). If the sensor is stuck into meat, the existing core temperature is displayed, otherwise the room temperature, which however may differ by a few degrees from display 4 (room temperature display). - If the sensor is defective or not plugged into the device, the information "dEF" appears in the display 5 (core temperature or time display). In this case, it is still possible to use the Hold-o-mat, but without the core temperature sensor. Thanks to the plug-and-socket connection, a defective sensor can be replaced without a service engineer. - In the "Hold with core temperature information" function, the display 5 is used only for information. The core temperature sensor does not regulate the device, and no signal tone sounds. V:\Produkte\Warmhaltegeraet\Holdomat\Bedienungsanleitungen\Englisch\Zusatzblatt_e_Hold_KTM.doc "Cook & Hold with fully automatic cooking phases" function: - By a long press (2 seconds) on button 6 (Cook&Hold or KTM function button), you change to Cook&Hold mode. Pr 1 appears on the displays. Using buttons 2 (Down) or 3 (Up), you can switch between programmes 1 to 10. - Once you have selected the programme you want, you can start it using button 7 (Start). From now on, you can no longer make changes. If you press button 2 or 3, the desired setpoint temperature is displayed for as long as the button is operated, after which the display switches back to the actual temperature. To leave this mode, you must switch the device on and off using the main switch (1). In the display 5, you see 3 dots, one of which is flashing, and this one tells you the current cooking phase. - - - To change a programme, select your programme number. By pressing button 6 (Cook&Hold function button) briefly, you switch to changing or viewing mode. In all cases, the flashing display can be changed; the flashing dot informs you which phase you are in. By pressing button 6 again, you jump to the next setting. After phase 3, you are back to the programme number. Either start the device now (button 7), change the programme again (button 6) or switch the device off (button 1), so that the next day your colleague can start the prepared programme. Important note: Important note: Programmes remain stored even if there is a fairly long power cut. If you press buttons 2 and 3 (Down and Up) simultaneously, the device gives you a reference value (default value), so that you do not have to begin each entry at zero. The exact default values are shown below. - Programmes 1 to 5 are programmes which can be changed immediately, and give you the phase with which you want to work. - Programmes 6 to 10 are free programmes, which you can programme as you wish. If you want to remove a phase, just go to a temperature value below 20° in the appropriate phase, and the phase is removed (in both displays, "- - -" appears). Important note: - In the case of programmes 6 to 10, to prevent an unintended programme change being made on viewing, before a change a release must take place by the two buttons 2 and 3 (Down and Up) being pressed simultaneously. When a programme has ended, the buzzer sounds for one minute and then stops. The Hold-o-mat remains in the "hold position" in the last phase. If the core temperature overshoots, this is displayed from 1 degree higher, and the display with the core temperature begins to flash. V:\Produkte\Warmhaltegeraet\Holdomat\Bedienungsanleitungen\Englisch\Zusatzblatt_e_Hold_KTM.doc "Default values": Hold-o-mat with KTM - Buzzer volume: 3 - "Hold" and "Hold with core temperature information" functions: - Cook & Hold function: o Programme 1 : (e.g. roast beef, low temperature) Phase 1 : 10 min. / 110°C Phase 2 : 50°C KTM / 80°C Phase 3 : 53°C KTM / 65°C 68°C o Programme 2 : (e.g. roast beef overnight, "American method") Phase 1 : 10 min. / 110°C Phase 2 : 53°C KTM / 65°C o Programme 3 : (e.g. meat/sauce dishes overnight) Phase 1 : 10:00 hours / 80°C (put in when hot) o Programme 4 : (e.g. low temperature cooking of roast beef without "Cook" phase) Phase 2 : 50°C KTM / 80°C Phase 3 : 53°C KTM / 65°C o Programme 5 : (e.g. à la carte Hold with core temperature and warning horn) Phase 3 : 53°C KTM / 65°C o Programme 6 : (freely programmable, including phase removal, average values for quick data entry) Phase 1 : 10 min. / 110°C Phase 2 : 50°C KTM / 80°C Phase 3 : 55°C KTM / 68°C o Programme 7 : (freely programmable, including phase removal, average values for quick data entry) Phase 1 : 10 min. / 110°C Phase 2 : 50°C KTM / 80°C Phase 3 : 55°C KTM / 68°C o Programme 8 : (freely programmable, including phase removal, average values for quick data entry) Phase 1 : 10 min. / 110°C Phase 2 : 50°C KTM / 80°C Phase 3 : 55°C KTM / 68°C o Programme 9 : (freely programmable, including phase removal, average values for quick data entry) Phase 1 : 10 min. / 110°C Phase 2 : 50°C KTM / 80°C Phase 3 : 55°C KTM / 68°C o Programme 10:(freely programmable, including phase removal, average values for quick data entry) Phase 1 : 10 min. / 110°C Phase 2 : 50°C KTM / 80°C Phase 3 : 55°C KTM / 68°C V:\Produkte\Warmhaltegeraet\Holdomat\Bedienungsanleitungen\Englisch\Zusatzblatt_e_Hold_KTM.doc Setting the buzzer volume: - With the device switched off, you can press button 6 (Cook&Hold or KTM function button) for 2 seconds. - In display 5, the indication "Vol" appears, and in display 4, a number between 0 and 5. - With button 2 (Down) or 3 (Up), you can change the volume between stages 0 and 5 (0 = buzzer switched off, 1 = quiet, 5 = loud). The current volume sounds all the time. - When you leave this setting mode again with button 6, the newly selected volume is stored. Important notes about the core temperature sensor: - For servicing reasons, the core temperature sensor is fixed to the rear wall of the Hold-o-mat by a special plug-and-socket connection. If the KTM sensor is plugged in, both plug and socket are protected from spray, steam and grease. - If grease, dirt or humidity get into this plug-and-socket connection, it can happen that the sensor no longer displays correct measured values. - For this reason, the core temperature sensor should be unplugged only to be replaced, not if it is not in use. When the sensor is not in use, put it away as shown in the photograph, so that it does not interfere with any dishes and the plug-and-socket connection remains tight. - If the KTM sensor is removed for any reason, the socket must be covered immediately with the enclosed silicon covering cap. If the KTM sensor is fitted again, care must be taken that no humidity, dirt or grease gets into the plug. - We use a single-point sensor with PT 500, which is placed in the tip of the sensor. Ensure that the tip of the sensor is always in the middle (not the edge) of the piece of meat. - Before being put into the piece of meat, the sensor must be somewhat cooled off with a wet piece of kitchen paper, so that it does not cause a white edge in the meat. Some cooking instructions for the Cook&Hold method: - A preheated Hold-o-mat is required. Because the Hold-o-mat has a power-saving connected load of 1 kW, preheating to 110°C can take about 30 minutes. - With small quantities, a 10-minute cooking phase (phase 1) is enough. With large quantities, it is better to enter 30 to 60 minutes, so that the Hold-o-mat can process the "cold mass". V:\Produkte\Warmhaltegeraet\Holdomat\Bedienungsanleitungen\Englisch\Zusatzblatt_e_Hold_KTM.doc - If the device is very full on 2 floors, temperature differences between the upper and lower floor can occur. The KTM sensor should therefore always be placed on the upper floor. When the programme finishes, the upper pieces of meat are perfect, and the lower ones catch up during a longish Hold phase. - The time requirement depends on the piece size. For instance, for 10 kg of roast beef on 2 floors, about 4 to 5 hours should be assumed. - Ideally, a reserve time for the Hold phase should be calculated so that it is always enough. On the one hand, we are on the safe side for time, and on the other hand, the meat continues to mature and become more tender in the Hold phase. - For very slow cooking over more than 8 hours, always use freshly slaughtered meat (max. 36 hours after slaughter). Good manufacturing practice is a requirement, and releases the manufacturer from legal steps. Ask the manufacturer of the Hold-o-mat (Hugentobler AG, Switzerland) for the HACCP documents, if you have not already received them from your specialist dealer. V:\Produkte\Warmhaltegeraet\Holdomat\Bedienungsanleitungen\Englisch\Zusatzblatt_e_Hold_KTM.doc