1
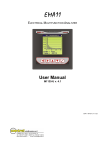
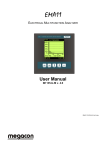
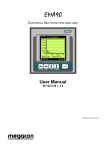
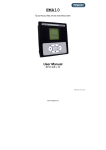
OLICORP PROFIBUS-DP technical user’s manual for PWR24 module. V1.7 (Firmware v1.3 and +, Hardware v10 or v11) Author(s) : S. CHABERT – OLICORP Technologies. Appendix A – “PWR24 Response according to Describes PWR24 behaviour for each Profibus master Profibus Master’s Request” request, according to bit1 and bit2 of Order byte and Multiplex byte. Version : Date : 1.7 5.05.2002 1.6 1.5 (Fw. 1.3) Author : Remarks – modifications : O.L Automation procedures. 25.01.2002 O.L Document revisited 28.11.2001 S. CHABERT Added : New default : “SectorDefault”, 1.4 (Fw. v1.2) 29.10.2001 S. CHABERT Added : new settings - Nominal power, - Srv Voltage, - CutOut, - OverHeat. Resistance are now 2 bytes long. New Example. 1.3 (Fw. v1.1) - S. CHABERT Example corrected. 1.0 (Fw. V1.1) - S. CHABERT - 1 OLICORP OVERVIEW The PWR power regulator from OLICORP is a PROFIBUS-DP slave which runs accordingly to the Profibus-DP specifications defined in the standards EN 50170 / DIN 19245 / Part 3. The Profibus-DP certification is pending. On this type of networks, the MASTER DEVICES control the data communication on the bus while the SLAVES DEVICES only answer the requests from the masters. The master may be : - A Programmable Logical controller (PLCs) - A PC with a Profibus-DP interface. The OLICORP PWR module is a Profibus slave which has been tested with several masters: Siemens PLCs “SIMATIC 400”, Siemens PLCs “SIMATIC 300”, SST profibus master card (PC solution) with a windows based user-interface Procedure to use a PWR regulator with a PLC : The GSD file provided by OLICORP contains a standardized description of the PWR regulator, which enables the automatic detection of the PWR regulator by the master. But, as the data transmitted by the PWR are multiplexed, it is necessary to complete this automated installation by the installation of a specific program to extract the regulation data from the datagrams. Specific examples and tools are available for the SIEMENS’s PLCs using the STEP7 language. Procedure to use a PWR regulator with a PC : There is no unique way to configure the communications between a PC and the Profibus Network. OLICORP has already tested a solution with a SST profibus Card. The control of the network is done through a dedicated API. OLICORP has developed several ActiveX to facilitate the use of this API. The latest versions of the http://www.olicorp.net/pub programs, GSD files, manuals, examples are available at : 2 OLICORP More information about PROFIBUS-DP: http://www.profibus.com ORGANISATION OF THIS DOCUMENT : (A) Installation : - Connecting the PWR24 to the profibus network. Configuring the Master to detect the PWR24 (example with a SIEMENS S315 PLC) Controlling the PWR24 using the OL_STEP7 module provided by OLICORP Controlling the PWR24 using the low level STEP7 blocs SFC14 and SFC15 Using non SIEMENS PLCs…. (B) Technical data : - The OLICORP multiplexing protocol Regulation commands and procedures 3 OLICORP (A) INSTALLATION : The quick mounting procedure is also described in the technical user’s manual. Connecting the hardware : (1) Mount the PWR onto the machine and secure it with 3 M5 bolts. (2) Open the front door, and Connect the 24 volts power supply (3) connect the 12 loads to the 12 connectors at the bottom (4) Connect the industrial power supply (5) Plug the Profibus-DP to the MPU card. Don’t forget to remove the straps if you plan to chain several slaves on the profibus. Data line B (Receive) Data line B (Transmit) The Jumpers are set – The bus is terminated Data line A (Receive) Data line A (Transmit) The Jumpers are not set – The bus is not terminated 4 OLICORP (6) Set the Profibus ID of the PWR using the two wheels on the left of the MPU Switch 2 Switch 1 The PROFIBUS_DP address is displayed in a hexadecimal format. PFBaddr = SW2value & SW1value (hex.) Example: PFBaddr = 1 & 5 = 15 (hex.) PFBaddr = 21 (dec.) The addresses between 4 and 122 are available for the slaves. (7) Close the front door MASTER CONFIGURATION WITH THE SIEMENS PLC : The configuration is made easier by using the GSD file provided by OLICORP and available from our Web site : (www.olicorp.net/pub) The procedure to load the GSD may depends on the PLC type. With the SIEMENS PLCs, one should load the GSD from the STEP7 programming interface by simply loading a new device and pointing to the gsd file when required. Loading the GSD will affect the following parameters : - Name of the slave : Set to IRPC12-60 Profibus Identification : 0x0594 Length of users datagrams : 5 bytes Length of data exchange datagrams : 6 bytes The name of the GSD file MUST be olic0594.gsd to work properly. When downloading the latest version of the GSD from our site, please rename the file to olic0594.gsd 5 OLICORP GSD CONTENT : olic0594.gsd #Profibus_DP GSD_Revision = 1 Vendor_Name = "OLICORP technologies Genève" Model_Name = "IRPC12-60" Revision = "1.3" Ident_Number = 0x0594 Protocol_Ident = 0 Station_Type = 0 FMS_supp = 0 Hardware_Release="V1.1" Software_Release = "V1.3" 9.6_supp = 1 19.2_supp = 1 31.25_supp = 1 45.45_supp = 1 93.75_supp = 1 187.5_supp = 1 500_supp = 1 1.5M_supp = 1 3M_supp = 1 6M_supp = 1 12M_supp = 1 MaxTsdr_9.6 = 60 MaxTsdr_19.2 = 60 MaxTsdr_31.25 = 60 MaxTsdr_45.45 = 60 MaxTsdr_93.75 = 60 MaxTsdr_187.5 = 60 MaxTsdr_500 = 100 MaxTsdr_1.5M = 150 MaxTsdr_3M = 250 MaxTsdr_6M = 450 MaxTsdr_12M = 800 Redundancy = 0 Repeater_Ctrl_Sig = 2 24V_Pins = 0 Implementation_Type="SPC3" ;Bitmap_Device = ? ;Bitmap_Diag = ? ;Bitmap_SF = ? Freeze_Mode_supp=0 Sync_Mode_supp=0 Auto_Baud_supp = 1 Set_Slave_Add_supp = 0 User_Prm_Data_Len=0x05 User_Prm_Data = 0x00,0x00,0x00,0x00,0x00 Min_Slave_Intervall=1 Modular_Station=0 Module="Chauffe" 0x95, 0xA5 0 EndModule Fail_Safe=0 Max_Diag_Data_Len=25 Slave_Family = 5@OLICORP At this point the Profibus-DP connexion between the Master and the PWR module should run correctly. The Profibus LED on the MPU card gives the status of the connexion. If it is green the connexion is ready. If it is off; then the connexion doesn’t work. 6 OLICORP Profibus LED At this point the Lower layers of the communication are running. It means that the datagrams are correctly exchanged between the master and the slave. USING THE OL_STEP7 MODULE TO CONTROL THE PWR24. : To start the dialog at the application level one has first to configure the PLC to interpret the data exchanged with the PWR regulator. The OL_STEP7 module may be used to simplify this task. The file http://www.olicorp.net/pub/chauffe/softs/step7_sample_mailbox_1_2.zip, contains a sample STEP7 project. The module may be included directly in your own STEP7 project. Basic structure of the STEP7 project. The OL_STEP7 is organized around a few STEP7 blocs : DB81 FB61 SFC14 SFC15 7 OLICORP The regulation parameters are stored in the DB81 data block. In this example we consider only one PWR24 module. If we want to use more PWR24 modules on the profibus network, it will then be necessary to add some additional data blocks to store the configuration of each PWR24. The FB61 function block is the core program that makes calls to the SFC14 and SFC15 modules. SFC14 and SFC15 modules include low level functions to control profibus communications. The FB61 does automatically MUX and DEMUX actions when necessary. The call to the FB61 is done in the OB1 organization block Symbols : 126, 126, 126, 126,BLKMOV 126,CutOut 126,CYCL_EXC 126,DB Multiplex IRPC12 60 12-60 126,DPRD_DAT 126,DPWR_DAT 126,Heater 1 126,Overheat 126,Overload 126,Polling_Default 126,Polling_Resistance 126,Power_Lamp_1 126,Power_Lamp_10 126,Power_Lamp_11 126,Power_Lamp_12 126,Power_Lamp_2 126,Power_Lamp_3 126,Power_Lamp_4 126,Power_Lamp_5 126,Power_Lamp_6 126,Power_Lamp_7 126,Power_Lamp_8 126,Power_Lamp_9 126,RACK_FLT 126,Resistance_Lamp_1 126,Resistance_Lamp_10 126,Resistance_Lamp_11 126,Resistance_Lamp_12 126,Resistance_Lamp_2 126,Resistance_Lamp_3 126,Resistance_Lamp_4 126,Resistance_Lamp_5 126,Resistance_Lamp_6 126,Resistance_Lamp_7 126,Resistance_Lamp_8 126,Resistance_Lamp_9 126,RMS_Load_Voltage 126,Running 126,Sector_Default 126,Set_Puissance 126,Set_PuissanceNominal 126,Set_TensionService 126,VAT_1 SFC M OB DB SFC SFC FB M M M M MW MW MW MW MW MW MW MW MW MW MW MW OB MW MW MW MW MW MW MW MW MW MW MW MW MD M M M M M VAT 20 SFC 1.1 BOOL 1 OB 61 UDT 14 15 61 1.2 1.0 0.4 0.3 110 200 210 220 120 130 140 150 160 170 180 190 86 112 202 212 222 122 132 142 152 162 172 182 192 80 2.0 1.3 0.0 0.2 0.1 1 SFC SFC FB BOOL BOOL BOOL BOOL WORD WORD WORD WORD WORD WORD WORD WORD WORD WORD WORD WORD OB WORD WORD WORD WORD WORD WORD WORD WORD WORD WORD WORD WORD DWORD BOOL BOOL BOOL BOOL BOOL 20 Copy Variables 1 Cycle Execution 60 Data Block for the Data Multiplex of IRPC 14 Read Consistent Data of a Standard DP Slave 15 Write Consistent Data to a Standard DP Slave 61 Interface with ASIC Olicorp 86 Loss of Rack Fault 8 OLICORP Call to the FB61 (Heater 1) in the OB1 : In this example, we have directly included the call to the FB61 in the OB1. The call to FB61 is done a each cycle. We suggest to control the call to FB61 to avoid unnecessary traffic on the fieldbus. 9 OLICORP Parameters used in the DB81 and FB61 : Variable Run enabled Set Power R/W W Set nominal power W Set voltage W Read enabled Resistance W Type Signification Boolean Start/Stop the regulation Boolean Specify that the transmitted data will serve to set the required power to the different loads. Boolean Specify that the transmitted data will serve to define the nominal power of the different loads Boolean Specify that the transmitted data will serve to define the nominal voltage for the different loads Boolean Start/Stop the pooling of the resistances measured by the PWR Alarm Overload R Alarm Overheat R Alarm Cut-out R Alarm Sector Default R Sector Voltage RMS R Int Measured voltage on the power supply (V) L1 Resistance R Int L2 Resistance R Int L3 Resistance R Int Resistance measured on the Load 1. (MilliOhms) 0xffff the load is broken 0 Short circuit Resistance measured on the Load 2. (MilliOhms) 0xffff the load is broken 0 Short circuit Resistance measured on the Load 3. (MilliOhms) 0xffff the load is broken 0 Short circuit … L12 Resistance R int Resistance measured on the Load 12. (MilliOhms) 0xffff the load is broken 0 Short circuit W Int Available Only if the Regulation is OFF W Int Available Only if the Regulation is OFF Load 1 nominal power (Watts). To be set before starting the regulation. L1 Nominal Power L2 Nominal Power Boolean True if the system has measured a current higher than 160 A on the input. This alarm stops the regulation. Boolean True is the temperature inside the PWR cabinet is higher than 60°c. Boolean True if the breaker inside the cabinet is opened Boolean True if the supply voltage is outside the range 200 VAC-550 VAC. Load 2 nominal power (Watts). To be set before starting the regulation. 10 OLICORP …. L12 Nominal Power … W Int Available Only if the Regulation is OFF …. Load 12 nominal power (Watts). To be set before starting the regulation. L1 Service Voltage W Int Available Only if the Regulation is OFF W Int Available Only if the Regulation is OFF Service voltage for load 1 (Volts) W Int Available Only if the Regulation is OFF Service voltage for load 12 (Volts) L1 Power R/W Int This parameter is used to set the power required on the load 1. The PWR regulator return the power effectively applied to the load. (Watts) L2 Power …. L12 Power R/W Int R/W Int L2 Service Voltage … L12 Service Voltage Service voltage for load 2 (Volts) Note : The PWR module uses the “Nominal Power” and the “Service Voltage” to calculate a theoretical resistance for each lamp: Rdft (U srv ) 2 Pnom This theoretical resistance is used when the regulation is started. 11 OLICORP Programming the PLC to control efficiently the PWR module : Machine start Set lamps voltage Resistance pooling must be stopped before setting powers because of our OLSTEP7 module architecture Set lamps nominal power Cycle start Stops Resistance pooling Start oven Done for each lamp successively to avoid any overload Set power for lamp 1 Send Powers for lamp 1to N to the PWR Machine cycle There is a change in the settings (operator) Every 250 ms Starts resistance pooling Read the resistance Check for dead lamps The lamps are warm… We can modify all the settings at the same time Set power for lamp 1 to N Send Powers for lamp 1to N to the PWR 12 L2 Resistance L3 Resistance 8007 Voltage 7956 Sector RMS Power Load 1 Set power Stop set power Start regulation Power load 2 Set power Stop Set power Power Load 1 -12 Set power Stop set power 400 400 400 400 400 400 400 400 400 400 Pooling Resistance Stop read resistance 400 396 Stop set nominal power Power On 400 0 Set nominal power 0 400 0 Nominal power 0 400 1 Stop set service voltage Alarm Cut-out 400 Alarm Overheat Set service voltage 0 Alarm Overload 400 0 Set Power Service voltage 0 Run enabled 400 0 Sector 400 Alarm Default 8012 0 Read Resistance enabled 0 Set nominal power Set voltage 0 Variable OLICORP Examples : The following table describes the different steps to configure and start the PWR regulator with the OL_STEP7 module : L1 Resistance 13 1212 1212 300 967 950 1500 967 502 967 967 967 967 350 1212 967 1212 400 356 400 400 400 400 400 400 400 400 400 400 400 967 400 400 400 400 400 400 400 400 400 400 400 400 400 400 400 400 L1 Power 967 512 1500 …. L12 Power 400 400 400 400 400 400 400 400 400 400 400 400 400 400 400 400 2000 2000 1500 1500 1500 1500 1500 1500 1500 1500 1500 1500 1500 1500 2000 2000 2000 2000 2000 2000 2000 2000 2000 2000 2000 2000 1500 1500 2000 …. 1500 Nominal 1212 L2 Power 400 L12 Service Voltage 400 … 400 L2 Service Voltage 400 L1 Service Voltage 400 L12 Power 400 1000 1000 1000 1000 1000 1000 1000 1000 1000 1000 1000 1000 1000 1000 1000 Nominal 400 L2 Power 400 Nominal 400 L1 Power 400 7650 0 Pooling Resistance Stop set power Set power Power Load 1 -12 Stop Set power Set power Power load 2 Start regulation Stop set power Set power Power Load 1 Stop set nominal po er Stop read resistance Set nominal power Stop set service olt ge Nominal power Set service voltage Service voltage Power On Variable OLICORP … L12 Resistance 14 OLICORP SUMMARY : Basic steps to start the regulation : - Set the Service voltage for every load. Set the nominal power for every load . Set the desired power for each load (when lamps are cold it is better to start them sequentially to avoid any over load) Start the regulation. Set the power for other lamps or modify the desired power. ATTENTION : The service voltage and the nominal power MUST BE SET for every channels, even if no load is connected………….. ATTENTION : when a desired power is set. It may take some time for the lamp to reach effectively this power, especially when it is cold. In the meanwhile the PWR regulator informs the PLC of the effective power. PROGRAM CONTROL USING LOW LEVEL FUNCTIONS : The following information is useful for whom may plan to implement protocol level communications between the slave and the master. We do recommend using the ready to use STEP7 module provided by OLICORP to avoid a complex programmatic phase. This section is useful for whom may use non-SIEMENS PLCs…. SIEMENS PLCs and STEP7 procedures : It is possible to work with the standard SFC14 and SFC15 STEP7 modules to mux/demux the profibus datagrams. The http://www.olicorp.net/pub/chauffe/softs/step7_sample_sfc1415_1_0.zip sample shows how to develop such a program. The file http://www.olicorp.net/pub/chauffe/docs/fb61.pdf contains the listing of the block which is used to call the SFC145 anf SFC15 to mux and demux the data in the OL_STEP7 module. SIEMENS PLC 15 OLICORP NON-SIEMENS PLCs : ALLEN BRADLEY SLC500 WITH SST Profibus module. When using non siemens PLCs, it is necessary to write a program that will interpret the data sent to and received from the PWR24. Datagrams : For a better efficiency, the data exchanged between the PWR module and the master are based on a specific format and are multiplexed. The Datagram is based on 6 bytes transmitted ‘from’ or ‘to’ the slave. Byte#1 Command Byte#2 Multiplex Byte#3 Data1 Byte#4 Data2 Byte#5 Data3 Byte#6 Data4 Bytes : Command: (byte #1). When read by the master, this byte contains the current state of the PWR module. When sent by the master, it tells the PWR regulator to switch into the different modes. Command EFFECTS 1 10 It operates in three modes: “Set-New-Settings”, “Request-Applied-Settings” and “Request-Expected-Settings”. 00 = Set-New-Settings 10 = Request-Applied-Settings (=polling) (The PWR module will send back information about its current status, depending on which information is requested – see Mux Byte) 11 = Request-Expected-Values (The PWR module will send back information about its current settings, depending on which information is requested – see Mux Byte) Please, refer to “Appendix A” for more details. 100 1000 (Read-only for master) 10000 100000 Reserved. 1 = Overload 0 = Normal state. 1 = Running (oven is ON), 0 = Stopped (oven is OFF). 1 = CutOut 16 OLICORP (Read-only for master) 1000000 (Read-only for master) 10000000 (Read-only for master) 0 = Normal state. 1 = OverHeat 0 = Normal State. 1 = SectorDefault 0 = Normal State. Mode “Set-New-Settings”: (Command bits1-2 = 0-0) - The master sends the settings to the PWR module. The slave processes the request and stores the settings in its memory. The slave sends a datagram to the master containing the targeted settings to confirm the operation. Mode “Request-Applied-Settings”: (Command bits1-2 = 1-0) - The master sends a datagram to the PWR module. This datagram is 6 bytes long but the multiplex byte is the only one which is processed. The slave processes the multiplex byte. The slave sends its current status to the master accordingly to the type of data requested (multiplex byte). Mode “Request-Expected-Settings”: (Command bits1-2 = 1-1) - The master sends a datagram to the PWR module. This datagram is 6 bytes long but the multiplex byte is the only one which is processed. The slave processes the multiplex byte. The slave sends its current settings to the master accordingly to the type of data requested (multiplex byte). Multiplex: (byte #2). This control byte defines the role of the last four bytes (Data#1 trough Data#4) accordingly to the following table : Multiplex 1 2 3 4 5 6 7 8 9 10 11 12 13 14 15 16 17 18 19 20 Data #1 Data #2 Data #3 Data #4 Power lamp #1 Power lamp #2 Power lamp #3 Power lamp #4 Power lamp #5 Power lamp #6 Power lamp #7 Power lamp #8 Power lamp #9 Power lamp #10 Power lamp #11 Power lamp #12 Reserved. Reserved Reserved. Reserved Reserved. Reserved RMS load Voltage (relative value). Resistance lamp #1 Resistance lamp #2 Resistance lamp #3 Resistance lamp #4 Resistance lamp #5 Resistance lamp #6 Resistance lamp #7 Resistance lamp #8 Resistance lamp #9 Resistance lamp #10 Resistance lamp #11 Resistance lamp #12 SrvVoltage lamp #1 SrvVoltage lamp #2 SrvVoltage lamp #3 SrvVoltage lamp #4 SrvVoltage lamp #5 SrvVoltage lamp #6 SrvVoltage lamp #7 SrvVoltage lamp #8 17 OLICORP 21 22 23 24 25 26 27 28 SrvVoltage lamp #9 SrvVoltage lamp #11 Nominal Power lamp #1 Nominal Power lamp #3 Nominal Power lamp #5 Nominal Power lamp #7 Nominal Power lamp #9 Nominal Power lamp #11 SrvVoltage lamp #10 SrvVoltage lamp #12 Nominal Power lamp #2 Nominal Power lamp #4 Nominal Power lamp #6 Nominal Power lamp #8 Nominal Power lamp #10 Nominal Power lamp #12 How to set Data1, Data2, Data3 and Data4 ? Data 1, Data 2 Data 3, Data 4 Lamp N Lamp N+1 The most significant byte is on the left : Lamp N = 4000 W 4000 = 00001111 10100000 Then : Data1 = 00001111 = 15 Data2 = 10100000 = 160 Notes: - The power is a short (2 bytes) in Watts. - The resistance is a short (2 bytes) in - The “RMS load Voltage” is a relative value of the real RMS load voltage. To get the correct value it is necessary to calculate it using : Vrms 1 Ohms. 100 RValue * MMVolts 2 ADCFullScale 2 With: Vrms: RValue: Real RMS load Voltage, Value Read from PWR module. ‘MMVolts’ and ‘ADCFullScale’ are two constant that depend of the hardware implementation of the PWR module. They are printed on the internal side of the cabinet’s front door. Hardware v10 and v11 : MMVolts = 817 ADCFullSclae = 0x4000(hex.) = 16384(dec.) 18 OLICORP Example: The following example shows how to configure and start the regulation by sending datagrams to the PWR regulator. Overview: 1) Set Nominal Power for each lamp, using “Set-New-Settings” mode, 2) Set Service Voltage for each lamp, using “Set-New-Settings” mode, 3) Set Default Power for each lamp, using “Set-New-Settings” mode (PWR module responds with power that it will try to reach), 4) Start regulation 5) Settings-Polling during regulation a. Check for defaults, b. Read Applied Power for each lamp, using “Request-Applied-Settings” mode c. Read Calculated Resistance for each lamp, using “Request-Applied-Settings” mode d. Read Calculated Vrms, using “Request-Applied-Settings” mode 6) Stop regulation Set nominal power: Action on Master side The Master sets a Nominal power of 4000W for lamp #1, and 4000W for lamp #2. Byte1 = 00000000 ||||| || ||||| || ||||| -> ||||| ||||----> |||-----> ||------> |-------> --------> Datagram exchanged (hexadecimal display) 0 17 0F A0 0F A0 Action on PWR module side COMMAND BYTE 00: Mode Set-New-Settings. 0: 0: 0: 0: 0: No sense Oven OFF No sense No sense No sense from Master (Overload). (Oven will be started later). from Master (CutOut). from Master (OverHeat). from Master (SectorDefault). Byte2 = 17(hex.) = 23(dec.) MUX BYTE ---------> Byte3 and Byte4 is a new nom. power for lamp #1 ---------> Byte5 and Byte6 is a new nom. power for lamp #2 Byte3 & Byte4 = 0F & A0 (hex.) SEETINGS LAMP N = 1111 & 10100000 (bin.) 00001111 10100000 = 4000(dec.) (Motorola). Byte5 & Byte6 = 0F & A0 (hex.) SETTINGS = 1111 & 10100000 (binary) 00001111 10100000 = 4000(dec.) (Motorola). LAMP N+1 19 OLICORP 0 17 0F A0 0F A0 Master sets a nominal power of 500W for lamp #3, and 4000W for lamp #4. 0 18 01 F4 0F A0 0 18 01 F4 0F A0 The PWR module sets the nominal powers for lamp 1 and 2: Lamp #1: 4000W, Lamp #2: 4000W. The PWR module acknowledges the values to the master. The PWR module sets the nominal powers for lamp 3 and 4: Lamp #3: 500W, Lamp #4: 4000W. PWR module acknowledges the values to the master. This exchange can be repeated for the whole set of lamps by changing the MULTIPLEX code. Set service Voltages : The commande byte is set to The Master sets a service voltage of 400V for lamp #1, and 400V for lamp #2. 0 11 01 90 01 90 0 11 01 90 01 90 The PWR module sets the service voltages for lamp 1 and 2: Lamp #1: 400V, Lamp #2: 400V. PWR module acknowledges the values to the master. Set default powers: 0 01 02 58 03 E8 Master sets a power of 600W for lamp #1, and 1000W for lamp #2. Byte1 = 00000000 ||||| || ||||| || ||||| -> ||||| ||||----> |||-----> ||------> |-------> --------> COMMAND 00: Mode Set-New-Settings. 0: 0: 0: 0: 0: No sense Oven OFF No sense No sense No sense from Master (Overload). (Oven will be start later). from Master (CutOut). from Master (OverHeat). from Master (SectorDefault 20 OLICORP Byte2 = 1 (hex.) MUX ---------> Byte3 and Byte4 is a new power for lamp #1 ---------> Byte5 and Byte6 is a new power for lamp #2 Byte3 & Byte4 = 02 & 58 (hex.) SETTINGS N = 10 & 01011000 (bin.) 00000010 01011000 = 600 (dec.) (Motorola). Byte5 & Byte6 = 03 & E8 (hex.) SETTINGS N+1 = 11 & 11101000 (bin.) 00000011 11101000 = 1000 (dec.) (Motorola). 0 01 02 58 03 E8 0 02 03 E8 03 E8 Master sets a power of 1000W for lamp #3, and 1000W for lamp #4. 0 02 01 F4 03 E8 PWR module sets the powers for lamp 1 and 2: Lamp #1: 600W, Lamp #2: 1000W. PWR module acknowledges the values to the master. PWR module sets the power for lamp 3 to 500W (because NomPower for lamp3 is 500W): Lamp #3: 500W, Lamp #4: 1000W. PWR module acknowledges the values to the master, with the values that it will try to reach. … Master sets a power for each lamp between #5 and #10 … o Start regulation: Master sets a power of 1000W for lamp #11, and 5000W for lamp #12 and starts oven. Byte1 = 00010000 ||||| || ||||| || ||||| -> ||||| ||||----> |||-----> ||------> |-------> --------> 10 06 03 E8 13 88 00: Mode Set-New-Settings. 0: 0: 0: 0: 0: COMMAND No sense from Master (Overload). Oven ON (PWR module will start the oven). No sense from Master (CutOut). No sense from Master (OverHeat). No sense from Master (SectorDefault). PWR module sets the power for lamp 11 : Lamp #11: 1000W, And corrects the power for lamp 12 (regards to nom. power set to 4000W) : 21 OLICORP 10 06 03 E8 0F A0 Byte1 = 00010011 ||||| || ||||| || ||||| -> ||||| ||||----> |||-----> ||------> |-------> --------> Lamp #12: 4000W. PWR module acknowledges the values to the master, and starts oven COMMAND 11: PWR24 responds with values that it will try to reach. 0: No Overload. 1: Oven ON (regulation is started). 0: No CutOut. 0: No OverHeat. 0: No SectorDefault. Byte5 & Byte6 = 0F & A0 (hex.) SETTINGS N+1 = 10100000 & 00001111 (bin.) 10100000 00001111 = 4000 (dec.) (Motorola). Oven is now eating-up; it will be functional in few seconds. Power during eating-up phase and resistances calculated by PWR module can be monitored during the process. o Read applied powers: Action on Master side Master requests powers applied on lamp#1 and lamp#2. Byte1 = 00010010 ||||| || ||||| || ||||| -> ||||| ||||----> |||-----> ||------> |-------> --------> Datagram exchanged (hexadecimal display) 12 01 XX XX XX XX Action on PWR module side COMMAND 10: Mode Request-Applied-Values (polling) 0: 0: 0: 0: 0: (No sense from Master). Oven ON (Not used by PWR module). (No sense from Master). (No sense from Master). (No sense from Master). Byte2 = 01 (hex.) MUX ---------> Master is requesting applied power for lamp#1 and lamp#2. Byte3, Byte4, Byte5 and Byte6: ---------> Not used. 12 01 02 58 03 09 PWR responds with the powers currently applied on lamp#1 and lamp#2. 22 OLICORP Byte1 = 00010010 ||||| || ||||| || ||||| -> ||||| ||||----> |||-----> ||------> |-------> --------> COMMAND 10: PWR module responds with currently applied values (Request-applied-Values). 0: No Overload. 0: Oven ON. 0: No CutOut. 0: No OverHeat. 0: No Sector default. Byte2 = 01 (hex.) MUX ---------> PWR module is responding applied power for lamp#1 and lamp#2. Byte3 & Byte4 = 02 & 58 (hex.) SETTINGS N = 10 & 01011000 (bin.) 00000010 01011000 = 600 (dec.) (Motorola). Lamp#1 has reached the requested power. Byte5 & Byte6 = 03 & 09 (hex.) SETTINGS N+1 = 11 & 1001 (bin.) 00000011 00001001 = 777 (dec.) (Motorola). Lamp#2 has not yet reached the requested power (1000W). Master requests powers applied on lamp#3 and lamp#4. 12 02 XX XX XX XX 12 02 03 09 03 09 PWR responds with the power currently applied on lamp#3 and lamp#4. … Master requests power for each lamp between #5 and #10 o Read the measured resistances: Master requests resistances for lamp#1 and lamp#2. 12 0B XX XX XX XX Byte2 = 0B (hex.) MUX ---------> Master is requesting resistance for lamp#1 and lamp#2. Byte3, Byte4, Byte5 and Byte6: ---------> Not used. 12 0B 25 48 25 51 PWR responds with the resistance read for lamp#1 and lamp#2. Byte2 = 11 MUX ---------> PWR module is responding resistance for lamp#1 and lamp#2. 23 OLICORP Byte3 & Byte4 = 25 & 48 (hex.) = 100101 & 1001000 (bin.) 00100101 01001000 = 9544 (dec.) (Motorola). = 95,44 . SETTINGS N Byte5 & Byte6 = 25 & 51 (hex.) = 100101 & 1010001 (bin.) 00100101 01010001 = 9553 (dec.) (Motorola). = 95,53 . SETTINGS N+1 12 0C XX XX XX XX Master requests resistance for lamp#3 and lamp#4. 12 0C 25 67 00 00 There is a short circuit on lamp#4, PWR responds with resistance = 0. Byte2 = 0C MUX ---------> PWR module is responding resistance for lamp#3 and lamp#4. Byte5 & Byte6 = 0 & 0 (dec.) = 0 & 0(bin.) 00000000 00000000 = 0 (dec.) (Motorola). = short circuit. SETTINGS 12 0D XX XX XX XX Master requests resistance read for lamp#5 and lamp#6. 12 0D 26 08 FF FF lamp#6 is dead, PWR responds with resistance = 0xffff = 655,35 Byte5 & Byte6 = FF & FF (dec.) = 11111111 & 11111111 (bin.) = 65535 (dec.) (Motorola). = lamp is dead. o Read the measured Vrms: 12 0A XX XX XX XX Master requests value to calculate RMS load voltage. 12 0A 03 D0 27 FD PWR module response. Byte3 & Byte4 & Byte5 & Byte6 = 03 & D0 & 27 & FD (hex.) = 00000011 11010000 00100111 11111101 = 6397 3373 (dec.) (Motorola). Vrms 63973373 * 816 2 16384 2 Vrms =398.35 V 24 OLICORP USING A PC TO CONTROL THE PWR24 See PWR24COM and PWR24pfb docs. 25 OLICORP Appendix A “PWR24 answer according to Profibus Master’s request” Data Type Power (Mx : 1-6) (dec.) Resistance (Mx : 11-16) (dec.) Vrms (Mx : 10) (dec.) SrvVoltage (Mx : 17-22) (dec.) NominalPower (Mx : 23-28) (dec.) Request from Profibus Master SET – Master sets new powers, APP – Master requests currently applied power, EXP – Master requests the power that PWR module tries to reach. SET – Nonsense, APP – Master requests calculated resistances, EXP – Master requests calculated resistances. SET – Nonsense, APP – Master requests calculated Vrms, EXP – Master requests calculated Vrms. SET – Master sets new service voltages, APP – Master requests currently applied service voltages, EXP – Master requests currently applied service voltages. SET – Master sets new nominal powers, APP – Master requests currently applied nominal powers, EXP – Master requests currently applied nominal powers. - PWR24 Response EXP – PWR24 responds with powers that it will try to reach, APP – PWR24 responds with powers currently applied, EXP – PWR24 Responds with power that it’s trying to reach. APP – PWR24 responds with calculated resistances, APP – PWR24 responds with calculated resistances, APP – PWR24 responds with calculated resistances. APP – PWR24 responds with calculated Vrms, APP – PWR24 responds with calculated Vrms, APP – PWR24 responds with calculated Vrms. APP – PWR24 responds with service voltages that it will use, APP – PWR24 responds with service voltages that it is currently using, APP – PWR24 responds with service voltages that it is currently using. APP – PWR24 responds with nominal powers that it will use, APP – PWR24 responds with nominal powers that it is currently using, APP – PWR24 responds with nominal powers that it is currently using. - Signification for bits 1 and 2 in command byte : SET APP EXP : 00 -> Mode “Set-New-Settings”, : 10 -> Mode “Request-Applied-Values”, : 11 -> Mode “Request-Expected-Values”. 26