1
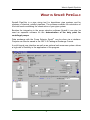
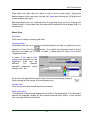
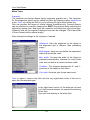
User Manual Spaix® PipeCalc 09/2001 Contents About This User Manual ...................................................................................1 Copyright ........................................................................................................1 Trademarks ....................................................................................................1 General Remarks ...........................................................................................1 What is Spaix® PipeCalc ..................................................................................3 How Does Spaix® PipeCalc Work? ................................................................ 4 Program Start .................................................................................................4 Menu File........................................................................................................4 Dialogues Save Project / Open Project......................................................5 Settings...........................................................................................................7 Directories..................................................................................................7 Data Sheets ............................................................................................... 7 Units...........................................................................................................7 Language...................................................................................................8 View: Calculate System ....................................................................................9 Specify The Pumped Fluid..............................................................................9 Rating Of Fluid - View And Change .........................................................10 Flow Rate Calculation...................................................................................11 Drainage Water Quantity Based On Storm Water Catchments ...............12 Domestic Water Supply ...........................................................................13 Waste Water Quantity Calculations .........................................................14 Domestic Waste Water From Population Size .........................................14 Waste Water Quantities From Sanitary Fittings .......................................15 Heating Installation ..................................................................................16 Head Calculation ..........................................................................................17 Terms.......................................................................................................17 Calculation Methods For The Friction Loss..............................................18 How To Work The Dialogue.....................................................................20 Dialogue Friction Head ............................................................................21 Pipe Friction Losses.................................................................................22 Elbows .....................................................................................................23 Transitions ............................................................................................... 23 Isolating Valves........................................................................................24 Non-return Valves....................................................................................24 Other Fittings ...........................................................................................24 Sundry Head Losses................................................................................24 Simplified Calculation...............................................................................25 Editing The Fittings Database ..................................................................25 View: Data Sheets ...........................................................................................29 Create And Change Data Sheets .................................................................29 The Menus............................................................................................... 30 General buttons .......................................................................................35 Toolbars...................................................................................................36 Index.................................................................................................................40 About This User Manual ABOUT THIS USER MANUAL The software described in this manual is placed at your disposal according to the conditions of a license agreement and may only be used under consideration of the following conditions. COPYRIGHT Publisher: VSX – VOGEL SOFTWARE GMBH This user manual as well as the program is subject to international copyright laws. All duplications will be criminally prosecuted. Warranty limitations: Even though this documentation has been created with the utmost care we are not liable for the correctness of the contents of this manual. The information contained is subject to alterations without prior notice. We are grateful for any suggestions regarding improvements as well as for any points that may be brought to our attention as well as constructive criticism. © Copyright VSX – VOGEL SOFTWARE GMBH, 1999 - 2001 All rights reserved. TRADEMARKS This documentation contains references to protected trademarks that are not explicitly identified within the text. When a trademark is not identified in the text, this does not mean that the rights of VSX or third parties are not protected. GENERAL REMARKS Conditions Of Use The use of the software is subject to our Standard Terms and Conditions: 1 About This User Manual a) Copyright law protects the programmes sold by us. Both the software and the included documentation may neither be copied nor otherwise reproduced without the explicit, written permission of VSX - VOGEL SOFTWARE GMBH. b) The license holder acquires the non-transferable and non-exclusive right to use the purchased programmes for the life span of the data medium. The license holder does not acquire legal title or copyright to the programmes or documentation. c) An individual license permits the license holder to use the software for a single workplace, which is connected to a sing le computer (i.e. with a CPU). The software may not be networked or used in any other way with more than one computer or at more than one workplace. The software may not be hired out or handed over to third persons through a leasing agreement. Separate terms of use apply for an in-house license and a companyadvertising license. d) It is not permissible to alter, disassemble or de-compile the software, neither through the license holder nor through third persons. e) The use of the training software is only permitted within the scope of education and training within officially recognised educational institutions of a non-commercial nature such as schools, universities and adult education facilities. The license holder agrees to use this software purely for noncommercial purposes and not to make it accessible to third persons. f) Our warranties only cover program or data medium defects. Claims for damages of the user, no matter the legal argument, because of defects of the software or violation of other liabilities, are excluded. This applies especially for incorrect designs of pumps and plants, wrong data, drawings, performance curves and prices. VSX is not liable for consequential damages and/or indirect damages. g) Possible failures are removed during regular program revisions, if the error is exactly described and given evidence for. The errors must be repeatable. There is no claim to direct and immediate correction. h) Should some terms of these conditions be legally ineffective, it won’t have any effect to the other terms. By using the programs the user acknowledges these conditions. 2 What is Spaix® PipeCalc WHAT IS SPAIX® PIPECALC Spaix® PipeCalc is a pipe sizing tool for branchless pipe systems and for systems of identical, parallel pipelines. The software enables the calculation of the total head considering the construction of your pipe system. Besides the integration in the pump selection software Spaix® it can also be used as separate software for the determination of the duty point for centrifugal pumps. ® Data exchange with the Pump Selector Spaix can be done via a interface. Projects can also be saved in the CEF 2.0 Catalogue Exchange Format. A multi-lingual user interface as well as an optional unit measures system allows a high rate of flexibility in the application of the program. 3 What is Spaix® PipeCalc HOW DOES SPAIX® PIPECALC WORK? By the mathematical-physical determination of the flow and head considering several technical conditions the user receives clearly arranged results on data sheets for the use as projects. He also can transfer the results straightaway to the pump selection software for further processing or save the project in the CEF 2.0 Catalogue Exchange Format. Based on known flow rates the total friction loss of the pipe system as well as the required head of the pump are determined as sum of all partial friction losses in straight pipe runs, valves, fittings and outlet losses. PROGRAM START The main menu contains two views – the respective buttons are located in the left of the screen under View. When starting the program the view Calculate system will be opened first. The other view, Data sheets, initially contains only blank data sheets that are going to be filled with calculation results when opening a project or after a calculation procedure. MENU FILE Via the menu File respectively via the taskbar projects can be started, opened, saved, imported, exported and printed. In this menu the program can also be terminated. New Opens a new project. (When starting the software a new blank project will be opened at first.) Open project Starts dialogue „Open project“ Save project Saves the current project. If the project is not named yet you will proceed as to function „Save as…“ 4 What is Spaix® PipeCalc Menu Save as... Starts dialogue „Save project" Within one project you may perform several friction loss and flow calculations enabling the comparison of different variants. The names of the calculations are displayed in the main window in the lower left of the screen. When marking one of the calculations the associated values are being shown. The buttons have the following meanings: Adds a blank calculation variant Deletes the selected variant Renames the marked calculation variant Undoes the marked calculation Copies the selected calculation variant Dialogues Save Project / Open Project The dialogues „Save project“ and „Open project“ are identical regarding their contents. Here you are able to edit the customer database and to delete or rename projects. Customer All customers that are gathered in your customer database are available here and therefore you can allocate your project to a specific customer. Choose from the customer database the addressee of the project. You can add new number. or change existing companies including their customer deletes customer. Existing projects In the middle part the already existing projects are displayed including their project information. Different filter functions support the search for the requested project. Following filters are possible: - All projects All projects of the company group All projects of the company Delete: After safety query the selected project can be removed by clicking the button. 5 What is Spaix® PipeCalc Rename: You can change with and the name of the editor. the existing name of the selected project An integrated sorting function enables an even clearer arrangement of the customers and projects by double clicking into the head of the columns in the tables. Current Project For the description of projects you may use the designated fields. Save: Define a project number and name for the project you want to save. Clicking OK saves the project. Open: Clicking the OK-button opens the selected project. In the menu File / Import you can import a project of CEF 2.0 Catalogue Exchange Format into the program. Vice versa you can export the current project files with File / Export. 6 What is Spaix® PipeCalc SETTINGS In the menu Settings respectively in the toolbar there are the following options to choose from: set of directories, edit of data sheets, change units and switch language. Directories You can start the directory dialog by selecting this button . Here you need to define the data-, project- and language directory of the database. In order to set the directories click the respective buttons . Following Access database files must be included: Data directory Project directory Language directory VSPIPECALC.MDB resp. VSSPAIX.MDB (possible with ® Spaix version 2.0 and higher) VSPROJECTS.MDB VSPROGRAM.MDB Data Sheets See chapter „Create and change data sheets“ at page 29. Units Here you can define your physical units. This dialogue is available by the button . The program system at hand allows working with either the US-American unit system as well as with the international (within the EEC) SI system that is prescribed by law for the international trade within the European Union. It is also possible to establish an individual user-defined measures system from the available units. 7 What is Spaix® PipeCalc When clicking OK all currencies in the database are going to be converted to the changed currency. Language By this button you can set the desired user language. The standard program is delivered in English and German. The program can be extended to other European languages. 8 View: Calculate System VIEW: CALCULATE SYSTEM SPECIFY THE PUMPED FLUID ® The first step when designing an installation with the aid of Spaix PipeCalc is to specify the handled fluid. The available selection comprises a number of standard fluids. Within the list box “Properties” the fluid can be specified more in detail. If you check “Others” as pumped fluid you will find under “properties” the complete list of available fluids. For the selected fluid the properties can be typed into the entry fields. The values that are highlighted in a colour result automatically from the data of the fluid database. If the needed medium is not available, you can type any fluid data into the white cells temporarily and with reference to the project. Type the appropriate names in the editing field and enter the fluid data. Those manually entered fluids will not be checked for admittance when running the software! Medium data can be imported and exported by using the buttons and . Only the CEF-Format (Catalogue Exchange Format) of the data set is possible. With the selected medium will be removed. The „Shift“ and „Ctrl“ keys enable multiple selections. 9 View: Calculate System Rating Of Fluid - View And Change By clicking the rating of fluid button you’ll get to the fluid selection. Select one of the fluids from the integrated fluid database. Here all available fluid values such as temperatures, densities, viscosities, concentrations and vapour pressures are displayed. Example - handled fluid „Others“: The displayed values can be changed. The viscosity has influence on the Pipe Friction Loss Calculations, the density is considered in the static head difference between inlet and outlet levels, while the vapour pressure is considered in NPSH calculations only. 10 View: Calculate System FLOW RATE CALCULATION The button for the flow rate calculation is available if storm water, drinking water, domestic wastewater or heating water has been selected as fluid otherwise this button is inactive. The required flow, if already a known factor, can be directly entered into the respective input field. If not known yet use the button next to the entry field to start the flow rate calculation according to DIN 1988 respectively EN 12056 or Heating Installation Act of the German Federal Republic HeizAnlV for domestic water supply, waste water disposal or heating water. These methods can of course not be combined. If you change the pumped fluid the entries on the other page will be set back and discarded. For sewage and wastewater disposal plants, heating installations and domestic water supply plants there are extensive calculation methods for the determination of the total flow rate available considering varied parameters. Domestic wastewater • Population size • Specific peak outflow • Outside Source factor • Type of the pipe system • Type of building • Sanitary fitting with corresponding port values Domestic water supply (drinking water) A number of different conversion curves, depending on the type of building and the total flow rate, are available to determine the peak flow value. Select: • Type of building • Water tap For Storm water • Statistic values for rainfall may be used by selecting a city • It can be chosen from a list of several drainage areas with corresponding flow coefficients • One can define the discharge area For Heating Water • It can be selected from different building types (specific heat demand) 11 View: Calculate System • • 2 The specific flow per effective surface in m can be determined by giving the temperature difference The heatable effective surface may be defined By clicking the pocket calculator button different dialogues for the calculation of the flow rate are being opened depending on the selected pumped fluid. All the dialogues have in common that in the upper part general settings can be defined. In the middle section always the list of the individual calculation items is displayed and in the lower part the results are shown. By the - button or hitting the ENTER key the currently selected values are being added to the flow rate calculation. The button removes a line from the calculation. The total estimated flow can be multiplied by an individual fa ctor (e.g. safety factor). Max. flow disregarding diversity factor: Flow shares that not depend on diversity considerations are being directly used as effective flows in the determination of the total flow. By OK the completed flow rate calculation is being transferred to the current project. Drainage Water Quantity Based On Storm Water Catchments EN 12056 governs the sizing of storm water drainpipes. The storm water outflow quantity is then directly related to the size of the connected catchments area, the outflow factor and the proportional storm water gain. The proportional storm water gain for storm water drainpipes in- and outside of buildings must account for at least 300 l/s ha. Deviations from this figure can be made according to differing local ruling standards. For this purpose the program offers a storm water chart containing time factor weighted rainwater gains. 12 View: Calculate System The outflow factors are based on the type and nature of the connected catchments areas. You can choose from a list: Domestic Water Supply In accordance to DIN 1988 Part 3, the total flow rate is determined as the sum of all reference flow values of the individual apparatuses and fixtures. A number of different conversion curves, depending on the type of building and the total flow rate, are available to determine the peak flow value. These conversion curves characterise the simultaneity of demand, as it is generally not likely that all fixtures are fully open in use at the same time. For the sizing of supply pipe work it is necessary to consider all outlet fittings with their attributed full flow quantities. Flow on continuous draw-off quantities are to be added to the peak flow to the other fixtures; any draw-off period exceeding 15 minutes is classified as continuous consumption. 13 View: Calculate System Waste Water Quantity Calculations Spaix® PipeCalc supports the calculation of sewage and drainage water quantities based on a number of different methods: population size and sanitary fitting. Please note: Coupling of calculation results of the different program parts is feasible; however, it is not possible to carry out any diversity reviews between the different calculating methods. Domestic Waste Water From Population Size In case that only the number of ”connected residents” is known the domestic waste water quantity is determined according to ATV A 118 based on the community size in conjunction with the specific peak waste water outflow. The domestic wastewater outflow depends on the water consumption of the population and the community density and thus is subject to large variations due to the different living habits, etc. Under German conditions, including some small, not intensive water consuming commercial operations, a specific peak outflow of 5 l/s 1000 residents can be assumed. The standard margin of storm water attribution is fixed on 100%. 14 View: Calculate System Waste Water Quantities From Sanitary Fittings The expected maximum outflow quantity can be determined according to EN 12056 from the sum of the weighted outflow values from these units under consideration of the diversity factors (simultaneity of use). Sizing of waste and soil drops, mains and underground runs to be capable to handle the expected total outflow can be based on unit quantities of specific nature (e.g. apartment, hotel room, etc.). 15 View: Calculate System The outflow reference factor k is determined depending on the type of building respectively the waste water system, that is the measure of the outflow characteristics under consideration of the simultaneity of use. The weighted outflow values DU are attributed to the type of residential unit. Heating Installation In accordance to the regulation “HeizAnlV” the pump capacity has to be determined from the heating load/pipe layout estimates or the design heating capacity rating of the installation. Based on the heating capacity rating the following is applicable: freestanding buildings with max. 2 residential units 100 W/m², for such with more than 2 apartments 70 W/m² and for low-energy buildings 40 W/m². The pumping head of auto-controlled pumps must be set to the estimate total head but under no circumstances higher than required for sufficient heat transport to all heat exchangers under any operational condition. For the flow rate calculation the program considers the following parameters: PA Specific heat demand per m² heatable effective surface in accordance with Heating Installation Act Of The German Federal Republic ∆T Temperature difference in Kelvin. Possible are temperature differences of 5, 10, 15, and 20 K QT Specific flow per effective surface and temperature difference (will be calculated) AN From the pump or thermostat valve heatable effective surface. 16 View: Calculate System HEAD CALCULATION Input fields are contained in the lower part of the dialogue for the entry of all values required for the calculation. This applies to the geodetic head Hgeo, inlet and outlet levels and head loss Hv. Next to the input fields for the respective friction heads is a button that starts the Pipe Friction Loss Calculations as sum of partial losses in straight pipe lengths, valves and fittings. If available (depending on the manufacturer) for individual units simplified pressure loss calculations - buttons provided. - are Terms Geodetic Head The geodetic head is that part of the total head that results from the different heads of the fluid levels on suction and pressure side. It forms together with the difference between inlet and outlet pressure the static part of the system curve. In closed systems (e.g. in heating circulation systems) the geodetic head always equals zero. Inlet Pressure The inlet pressure is the static overpressure at the inlet port of the system. The difference between the inlet and outlet pressure together with the geodetic head form the static part of the system curve. In drinking water supply plants the minimum supply pressure is used. In case of ventilated (open) containers the overpressure becomes zero at the suction port. In closed systems (e.g. heating circulation systems) the inlet and outlet pressures are equal. Outlet Pressure The outlet pressure is the static overpressure at the outlet port of the system. The difference between the inlet and outlet pressure together with the geodetic head form the static part of the system curve. In drinking water supply plants the minimum flow pressure of the tapping fitting is used. In closed systems (e.g. heating circulation systems) the inlet and outlet pressures are equal. 17 View: Calculate System Calculation Methods For The Friction Loss The calculation is performed according to the model of COLEBROOK or HAZEN WILLIAMS. COLEBROOK For the friction loss in a straight pipe applies: pV = U ⋅ L ρ ⋅ v2 ⋅ ⋅λ 4A Di with pV A U L ρ v λ Q Equation 1 = friction loss = passed gross section area = circumference related to A = pipe length = density of fluid = average flow velocity = friction factor = flow In case of a circular pipe applies: L ρ ⋅ v2 pV = ⋅ ⋅λ Di 2 Equation 2 By using the friction loss head instead of the pressure pV = HV ⋅ g ⋅ ρ Equation 3 with HV = friction loss head 2 2 g = gravitational constant (g ≈ 9.81 m/s ≈ 32,17 ft/s ) and the flow instead of the velocity (calculated for circular pipe) π 2 ⋅ Di 4 with Di = inner pipe diameter Q= v⋅A = v⋅ Equation 4 follows for the friction loss Q2 L HV = 16 ⋅ ⋅ 5 ⋅λ 2 2 ⋅ g ⋅ π Di Equation 5 18 View: Calculate System The friction factor λ depends on the nature of flow characterised by the REYNOLDS number Re that can be expressed by: Re = v ⋅ Di 4⋅Q = ν π ⋅ ν ⋅ Di Equation 6 For laminar flow (Re < 2320) the friction factor λ equals: 64 λ= Re Equation 7 For turbulent flow in a hydraulic plain pipe the friction factor is calculated according to the empirical equation of ECK as: 0.309 k for < 10 −8 Equation 8 λ= 2 D i Re lg 7 with k = absolute pipe roughness In the transient range between laminar and turbulent flow (2320 < Re < Re lim) the friction factor can be calculated by λ= 1 1.14 − 2.0 ⋅ lg k D i 2 with Relim = 200 k ⋅ λ Di Equation 9 For turbulent flows the friction factor is defined by the COLEBROOK equation: 1 k 2.51 Equation 10 = −2 ⋅ lg + λ 3.71 ⋅ Di Re⋅ λ The friction loss in fittings is defined by v2 HV = ζ ⋅ 2⋅g Equation 11 with ζ = friction loss coefficient For a circular pipe with consideration of equation 4: 16 ⋅ Q2 HV = ζ ⋅ 4 2 ⋅ g ⋅ π2 ⋅ Di 19 Equation 12 View: Calculate System HAZEN WILLIAMS Besides the COLEBROOK calculation the software supports the empirical equations according to HAZEN and W ILLIAMS. The greatest advantage of this calculation is the simple structure and application. At the other hand is the validity of this formula very limited (turbulent flow with water at 60 F, kinematical viscosity of 1.13 cSt), so that there is no real reason to use it. It is recommended to apply this method for comparison only. Q[gpm ] 100 HV [ft ]= 0.002083 ⋅ L[ft ]⋅ ⋅ 4.8655 Di [inch ] C with Hv [ft] = friction loss head L [ft] = pipe length C = Hazen-Williams friction factor Q [gpm] = flow Di [inch] = inner pipe diameter 1.85 1.85 Equation 13 NOTES: 1. These values must be inserted in the equation with the given unit, while the first section is based on a logical system of units (like S.I.). 2. Calculation of friction loss in fittings: If there is not given the equivalent length for HAZEN-WILLIAMS, then the acceptance is made that the equivalent length for HAZEN-WILLIAMS is equal to the equivalent length for COLEBROOK. This value can also be calculated from friction coefficient ζ or friction factor K v. How To Work The Dialogue The calculation is based on a database that is freely expandable by individual items. For the calculation of the pressure loss in fittings different settings might be required, e.g. ζ- or kv-values or functional dependences for ζ(v), Hv(v), ζ(Q), Hv(Q). If a friction loss value is being displayed equalling zero then the friction loss is being determined by functional dependences. The available pipe schemes depend on the selected fluid. Once you have decided for a pipe system (wet well installation, lifting station…) and you have set values and performed calculations by the other variants are not going to be displayed anymore. But in the left lower corner of the screen ion the section Calculated, there is always the option to add another calculation. 20 View: Calculate System Dialogue Friction Head opens this dialogue for the calculation of head losses Clicking this button from the individual components of each line consisting of varied pipe runs, valves, fittings, transitions, elbows etc. Immediately the resulting partial losses and the total loss of the respective lin e are calculated. For pipes may be separately defined application limits for every individual fluid: • Permissible diameter (absolute): only these may be selected • Permissible diameter: warning if undershooting or if exceeding • Permissible velocity: warning if undershooting or if exceeding 21 View: Calculate System The warnings appear as red-coloured values in the table in contrast to regularly black displays. By the button „Edit record“ changed at any time. under Operating limits the operating limits can be Example: If the absolute value of the min. permissible diameter is set to e.g. 75 mm, for all materials only diameters larger than DN80 are being offered. Smaller diameters are not available any more. The lower section of the dialogue features index cards that display the individual partial losses. Clicking adds the given item in the table head to the calculation. If later changing the volume flow the partial losses will be actualised automatically. removes a partial loss from the list. Pipe Friction Losses Pipe length The register card PIPING contains all friction losses in straight pipe runs. This requires first to determine total pipe lengths of equally sized pipe sections by referring to the piping diagram. You can add not listed pipes by the button database. - Pipe diameter On the basis of minimum and maximum permissible pipe diameters and flow rates a pipe diameter is recommended for the minimization of the pressure losses. This diameter is displayed on the top right of the dialog as well as the flow velocity resulting from it. Hint: The ruling standards for minimum and maximum flow velocities as well as the minimum required pipe size should be taken into consideration when determining the required pipe diameters. Conveying of sewage and wastewater in horizontal pipelines requires a minimum flow velocity of vmin = 0.7 m/s (2.3 ft/s) and in vertical pipelines a minimum flow velocity of v min = 1.0 m/s (3.3ft/s); it is normally recommended not to exceed vmax = 5.0 m/s (16.4ft/s). 22 View: Calculate System Systems with pumps without macerators require a minimum DN 80 (3”) pipe size, systems employing pumps with macerators a minimum DN 32 (1 1/4”) pipe size. If the desired minimum flow velocity cannot be achieved with the required minimum pipe size the pump has to be operated intermittently (intermittent displacement). The pipe system must then also be laid out to ensure the minimum required flow velocity. The program suggests such a pipe diameter that ensures a velocity as small as possible in the context of given operating limits to minimize the flow losses. In practical application this value has to be verified under consideration of e.g. economical aspects (depending on pipe length...). Interior surface roughness of pipes The pipe roughness value is given according to the selected pipe material. This value generally represents the upper limit for the specified material. A more exact calculation requires the value input according to the manufacturer’s references. If the exact value is however not known the standard values given for commercially available pipes will generally be sufficiently accurate for the friction loss calculation. The generally used roughness value for pipes used for drainage and wastewater disposal is 0.25 mm (ATV A 116, 3.6.2). Elbows The register card ELBOWS is used to obtain all frictional losses through pipe bends and elbows. The friction loss through pipe bends and elbows are generally viewed as the sum of straight frictional and deflection losses. The portion attributed to friction losses is determined as for straight pipe runs. The portion attributed to deflection losses depends on the deflecting angle, the radius of the bend, the interior surface roughness and additionally on the Reynolds number. Deflection losses can be determined for deflecting angles between 0° (straight pipe) and 180° (elbow). Transitions The register card TRANSITIONS is used to obtain all frictional losses through pipe reducing and enlarging pieces based on the friction loss coefficients stored in the fitting chart. Both, reducing and enlarging pieces are distinguished by two groups, such with conical and such with sudden transformations between t he two pipe sizes. Reference diameter is always the size at the entry to the transformation piece. 23 View: Calculate System Isolating Valves The register card ISOLATING VALVES is used to obtain friction losses through isolating devices based on the friction loss coefficients stored in the fitting chart. Non-return Valves The register card NON-RETURN VALVES is used to obtain all frictional losses through check valves and non-return devices based on the friction loss coefficients stored in the fitting chart. Other Fittings On the register card OTHER FITTINGS you can enter all items, which cannot be arranged in one of the other register cards, e.g. filters etc.. Sundry Head Losses The register card SUNDRY HEAD LOSSES can be used to make allowance in the calculation for outlet losses as well as losses originating from pipe joints. Please note that there are no outlet losses in closed circulating systems. In open displacement systems they can generally be neglected. Losses due to pipe joints take into account that the determination of friction loss coefficients for valves and fittings are based on laboratory tests where a much higher installation quality can be expected than that normally executed on site. Additions to loss coefficients due to the lower quality pipe joints are thus not taken into account. The number of possible disturbing sources (flange, socket and spigot joints as well as welded joints) can not only be attributed to number of applied fittings, valves and plant but also to pipe joints when using standard pipe lengths. Consideration to these losses is based on the assumption that disturbances of this kind have a downstream influence of approx. 4 diameter sizes. Under Sundry head losses additionally occurring losses may be considered and a brief description may be typed. 24 View: Calculate System Simplified Calculation Depending on the manufacturer for individual units simplified pressure loss calculations are provided. For drinking water this applies to the unit Drinking water plant. The pressure losses are being estimated (Formula HVD = Factor * Hgeo) for the discharge side. For heating water this applies for the unit Closed circulating system. In a closed circulation system only pipes are being considered, all other fittings are being disregarded. For those there is a surcharge factor that generally covers all parts and fittings (according to WILO-Brain Additional Factor=2,2 for fittings/thermostat valves or Additional Factor=2,6 for mixers/gravity brakes). By this calculation method results can be obtained easily and quickly. However a disadvantage is the inaccuracy . Editing The Fittings Database All fittings, valves and pipes used by the program are saved in a database. This database may be extended by the user. By the button changed. in each register card of the dialogue the database can be The Import/ Export is performed via the CEF-Format (Catalogue Exchange Format). The most items (pipes, fittings) are based on database entries. Exceptions are elbows and transitions that are being calculated by a formula. 25 View: Calculate System The button Edit record enables the editing of the actual item. It opens the dialogue for pipes or fittings. Important: The primary database fields are highlighted blue. These values have to uniquely define the data record. Changing black values results in an overwriting of the data record in the database. Changes of blue values create a new data record. The current status is being displayed in lower left section of the dialogue. In the dialogue for fittings the diverse opportunities for the calculation of the friction loss are distinct. 26 View: Calculate System The most detailed description of the pressure loss in fittings enables the setting of a fitting curve. By clicking the Performance curve button curves can be changed or created. 27 existing fitting View: Calculate System The diagram and curve limits can be directly entered. Use the button order to add the values for the curve. in Performance curves can be imported and exported by using the buttons and under Performance curve. When creating a new performance curve first define the manufacturer. Next, by using the Add-button type the name of the curve and set the physical properties for the diagram axes. 28 View: Data Sheets VIEW: DATA SHEETS Usually two data sheets are available (two index cards). The first one is for the flow calculation and the other one is for the determined friction loss. It is possible to create and change data sheets on one’s own. The option to change and to create data sheets is located in the menu Settings / Datasheets …./ File / Open or New. The widths of the columns can be changed by drawing with the mouse. In order to change the address in the data sheet click the menu Edit / Addressee in the main screen. Here you can create a customer database. In different dialogs you can go back on this customer database. Choose from the customer database the receiver resp. addressee of the project. You can add new change companies including customer number. a customer. or existing their deletes CREATE AND CHANGE DATA SHEETS This program feature can be opened in the selection program by selecting in the main menu Settings / Data sheets… . General: Every single data sheet basically consists of several pages. Each page is individually displayed on a separate index card. The pages again are composed 29 View: Data Sheets of several layers. The layers can be individually processed. They lay one on top of the other like transparent foils. Only one of the layers is active at a time and can be changed. The non-active layers are displayed faded out. The advantage of subdividing documents into layers is, that those layers can be linked to several documents without explicitly copying them. Therefore the layers are saved in a central layer pool in order to have them available for use by several data sheets. The Menus Menu File New: Creates a new data sheet. The preceding document is going to be saved after safety query. Open: Click here in order to open an existing document. Besides data sheets can be deleted. Before opening a new document the current data sheets will be closed after safety query. Save as: Here the document can be saved under a different name. Export ASCII-file: Here you can export the current data sheet as ASCII-file (CEF-format). Import ASCII-file: One can import a data sheet of CEF-format into the program. Page layout: In this dialogue the layout of every single page can be defined. First select a page (in our example page 1) and then define the desired formats. 30 View: Data Sheets The - button can remove a selected page from the document. If you click onto the - button a list of all available documents will be displayed. When choosing a file all the accompanying pages will be added to your current document. In order to add a new, blank page to your data sheet type the name of the new page into the cell Open (overwriting the current contents) and click OK. Print: Here you can print the entire document or only parts of it. Exit: Terminates the program part Data sheets. Menu Edit Undo: Cancel the last change. Cut / Copy / Insert / Delete: Analogue other standard programs Shift graphic to back / to front: This is a tool that enables the selection of graphics that lay one on top of the other. 31 View: Data Sheets For example three rectangles are overlapping: First only the outer rectangle can be marked. The inner rectangles are not available. Therefore we are now shifting the selected rectangle to back. As a result the second rectangle is accessible now, but not the third one. Now we are going to send back the second rectangle. Now the inner rectangle can be selected for e.g. changing the format. Analogously to the described procedure objects also can be shifted to front. Note: Graphics in the second level also can be selected by pressing the CONTROL-key when clicking the mouse. Add / save layer: Here one can activate or add a new layer. Remember: pages generally consist of one or more layers. In the cell Active layer you can select the layer that you want to activate. Only active layers can be processed. In the table underneath all layers that belong to the current page are listed. Non-active layers will be displayed pale if you set True in column Visible. When setting False the selected layer will be completely faded out in the page layout view. Moreover one can delete layers from the page, add more layers from the layer pool, create new layers and save them in the layer pool. When clicking Add all layers of the central layer pool will be listed: 32 View: Data Sheets Now select the layer that you want to add to your current page. Typing the desired name of the new layer into the cell Open and clicking the OK button will create a blank new layer. Selected layers can be removed from the general layer pool by clicking the Delete-button. At the same time this layer will be deleted from all pages that it is contained in. Menu View Grid lines: Click here in order to display grid lines. Alignment lines: Alignment lines set up a grid that inserted objects as texts or graphics can be aligned in. First click the button. As a result the alignment grid is active now but not visible yet. In order to make it visible select in menu View option “Alignment lines”. In menu Tools option Grid settings the properties of the alignment lines can be defined. For Graphic standard alignment we've chosen Left - top. As a result all objects that will be insert from now are always going to jump into the left top corner of the alignment box: Design view: Only in this view data sheets can be processed. Data sheet view: This actually is the preview (page layout view) of the data sheet. The document cannot be changed, except for the yellow-coloured entry fields. In this modus one can type into the entry fields. 33 View: Data Sheets Menu Tools Inspector: The inspector can format objects (texts, keywords, graphics etc.). The inspector for the respective object can be called up either by selecting option Inspector in menu Tools, by hitting the F11 key or by clicking the right-hand mouse key. One can process the layout of similar objects simultaneously. Several objects can be selected at a time by keeping the SHIFT-key pressed while selecting the objects by mouse click. Now open the inspector by clicking the right mouse key. Agreeing cells will be regularly displayed and can be changed. Cells that differ in their contents will be shown empty. Now change the settings in the inspector if desired. Alignment: Here the alignment of the object in the alignment grid is defined. (See preceding page). Multi-lingual: Here one can define the translation table that should be used. Min. width: For texts the width of the object is adjusted automatically. However for entry fields here one can define a certain minimum width. Positions: The program displays the X- and Ypositions of the object on the sheet. Font style: Here the type format can be set. Text: In order to insert a text click into the very right-hand corner of the cell to open the following dialogue: In the right-hand section of the dialogue at hand you’ll find several buttons for insertion and saving of text files. Type your text directly in the white field. 34 View: Data Sheets Alignment: Select the objects that you want to align (hold Shift-key for multiple selections). The object that you’ve selected first is going to be the reference object for the alignment. Either by selecting option Alignment in menu Tools or by hitting the F10 key the alignment buttons can be called up. The arrows indicate the direction of the alignment. Units: Here the units of measurement of values that will be inserted by the selection program can be defined. Language: One can choose the language of the program. Grid settings: Different layout settings as page layouts, settings for the grid lines and the type size can be defined. Under standard font style one can define the type layout for all text objects that will be created from now. General buttons Those general buttons are self-explaining. Here only some remarks about copying, ordering tabulators and inserting objects. In order to copy an object first select it and then click the the button. To insert it click button. If you want to remove objects first mark them and then click the scissors button. Hold Shift key for multiple selections. With you can define the order of editing in data sheets. The arrow button makes it possible to move the marked text part on the wished position. 35 View: Data Sheets Toolbars Here you’ll find all buttons that are required for the insertion of objects, values and data from the friction loss calculation program into the data sheet. By the - button you can load a calculation example (exported as CEF file) in order to fill the keywords of the data sheet with example values for a better illustration. To make the values visible check Display. Toolbar 1 Text: This button inserts a text into the document. In order to type the text click in the very right corner of the cell Text to open the input mask. Under Font style one can define the layout of the text. Or you can define the layout for all text keys generally when opening menu Tools – Grid settings. There click under Standard font style button Edit. Type the text into the white text field. Page number: Inserts a field for the automatic page numbering. Data field: Inserts the current date in the document. Circle: Inserts a circle. In the inspector one can define the usual layout options. Besides you can set the exact height and length of the object and its position on the data sheet as well. Poly-line: Inserts an object that can consist of any number of single lines. The points of the shape can be defined in the inspector line Points. 36 View: Data Sheets This is a closed poly-line: This is an open polyline: Rectangle: This button inserts a rectangle. Also here one can define the height and length of the object as well as the position on the data sheet . One can use rectangles in order to create position frames. That means one can firmly link texts or other objects to a rectangle. As a result when shifting the rectangle the linked text will be shifted, too. Picture / drawing: Here one can load drawings in DXF, WMF, BMP or JPEG-formats. Check box: Inserts a box for the checking of options. Like the entry fields the box can be edited also in the data sheet view. Open the inspector and click the line Text in order to type the term that you want to place next to the check box. For example: 37 View: Data Sheets Toolbar 2 Addressee keys: In the inspector of this object there are in cell Field all relevant customerrelated keys (e.g. names, addresses) listed. Sender keys: Here you’ll find all keys that relate to the pump manufacturer as name, addresses etc. Entry fields: This button inserts editable fields into the data sheet. These fields can be typed in the modus Data sheet view. Besides one can type entries into these fields directly in the selection program in the print preview. If desired you can define a Min. width and the option Sizing automatically in order to adjust the field size to the length of the entered text. Entry fields for decimals: This button inserts editing fields for decimals. Note the following cells of the inspector: Unit type: Here select the physical property you want to set this key for. Floating number digits: This defines the number of valid digits of the numerical value. For example: If you type „3“ and in the entry field will be inserted e.g. „43,19“ as a result the number will be reduced to three valid digits a s 43,2. If one enters e.g. 5434892 three floating digits are going to result in 5430000. Value: One can already type a value here. Entry fields for integer: This button inserts editing fields for integers. See explanation of the preceding button. Units field: This button inserts a key for a unit of measurement. First select under Unit type the physical property you want to display the unit for. In order to display an entry field together with the corresponding unit on the data sheet follow our example of an entry field for temperatures: First insert an entry field by the button. Open the inspector and select under Unit type option Temperature. Then click the -button and place the units field right next to the temperature field. Also select in the inspector in cell Units type option temperature. As a result the following term will be composed (example): 38 View: Data Sheets The displayed unit depends on the settings in menu Tools – Units. In our case there has been defined for temperature degrees Celsius. Both the keys can be aligned if you call up the alignment buttons by F10. Use also the options Text alignment of the inspectors of the keys. Text alignment left justified in the units’ key. Here text alignment right justified. Currency field: Different currency-related keys can be inserted in the data sheet. For example: We selected Conversion factor. In the cell Reference currency of the current inspector we selected EUR. As a result the created key will be filled by the expression: 1 DEM=1,95583 EUR. The international currency code is DEM and the national DM. When selecting option VAT in % the sales tax is displayed. Project text: This button inserts project-related information, e.g. contact and description and number of the project. Table for flow calculation: Inserts the table Flow calculation. The inspector can be called up to define the layout. Table for friction loss: Inserts the table Friction loss. 39 Index INDEX Flow 5, 13, 16, 17, 18, 19, 20, 21, 23, 24, 25, 28, 29, 36, 46 Flow Rate 13 Flow Rate Calculation 13 Fluid 11, 12, 13 Fluid data 11, 12 Formula 25 Friction Head 22, 29, 30 Friction Loss 5, 23, 24, 25, 26, 28, 29, 30, 31, 36, 43, 47 Geodätische Höhe 22 Grid 40, 42, 43 Grid lines 40 Grid settings 40, 42, 43 Head 4, 5, 8, 20, 22, 23, 26, 29, 30 Heating Installation 20 Height 43, 44 Hint 7, 28 Import 5, 8, 11, 33, 37 Inspector 41 Installation 13, 20 International currency code 46 Language 8, 10, 42 Language directory 8 License 1, 2 Make 2, 31, 40, 43 Material 29 Measures system 4, 9 Medium 11 Multiple selection 11, 42 NPSH 12 Open 5, 16, 31, 37, 41, 43, 44 Open project 5, 6 Operating limits 27 Other fittings 32 Page 9, 13, 37, 38, 39, 40, 41, 42, 43 Part 8, 22, 38, 43 Performance curves 2 PipeCalc 1, 4, 5, 11, 17 Points 1, 44 Pressure 12, 22, 23, 31 Print 5, 38, 45 Active layer 37, 39 Address 36 Addressee 7, 36, 45 Addressee keys 45 Alignment 40, 41, 42, 46 Alignment lines 40 Armatur 33 Arrow 43 ASCII 37 ASCII-file 37 Begriffe 22 Change data sheets 9, 36 Check box 44 Conversion factor 46 Copy 42 Copyright 1, 2 Currency 9, 46 Currency conversion 46 Customer 6, 7, 36, 45 Customer database 6, 7, 36 Data sheet 5, 8, 9, 36, 37, 38, 40, 43, 44, 45, 46 Data sheet view 40, 45 Database 33 Delete 6, 29, 39 Density 12, 18 Design 20 Dialogue 5, 6, 9 Diameter 28, 30, 31 Digit 45 Digits 45 DIN 1988 13, 16 Directories 8 Domestic Waste Water 18 Domestic Water Supply 16 Drawing 36, 44 Eintrittsdruck 22 Elbows 26, 30 EN 12056 13, 15, 19 Entry field 41, 44, 45 Export 5, 8, 11, 33, 37 Fittings 5, 16, 22, 25, 26, 29, 30, 31, 32 40 Index Project 4, 5, 6, 7, 8, 11, 36, 46 Project text 46 Quantity 15, 16, 17, 18, 19, 20, 21 Roughness 29, 30 Sanitary fitting 17, 19 Save 6, 7, 37 Save as 6, 37 Save project 6 Schalter 14, 33 Settings 8, 36, 37 Storm Water 15 Transitions 26 Units 8, 9, 19, 20, 22, 26, 31, 42, 45, 46 VSX 1 Waste Water 13, 18, 19, 28, 29 Width 41, 45 41