1
______________________________________________________________________________
Owners Manual
and Service booklet
UP Pico
1
______________________________________________________________________________
2
______________________________________________________________________________
Version 1.0
Valid from 2008
Stand: February 2008
3
______________________________________________________________________________
The data and statements contained within this manual may be changed without prior notice. No
part of these documents may be copied or transmitted for any purpose in any manner or by any
means, either electronic or mechanical, without explicit written permission from Ultralite Products
International.
© 1995-2008 by Ultralite Products International
4
______________________________________________________________________________
Table of contents
WELCOME IN OUR TEAM ........................................................................................... 8
SAFETY INSTRUCTIONS............................................................................................. 9
DEVELOPMENT OF PARAGLIDERS .......................................................................... 9
TECHNICAL DESCRIPTION ...................................................................................... 10
CERTIFICATION CLASS ................................................................................................. 10
Target group and recommended flying experience.............................................. 10
Necessary skills for normal flights........................................................................ 10
Necessary skills for dealing with disturbances..................................................... 11
Necessary skills for dealing with rapid descent methods..................................... 11
Suitability for training ........................................................................................... 11
RECOMMENDED WEIGHT RANGE ................................................................................... 11
TECHNICAL DATA UP PICO ..................................................................................... 12
CONSTRUCTION.......................................................................................................... 13
Lightweight construction ...................................................................................... 13
CANOPY MATERIAL ..................................................................................................... 13
LINE MATERIAL ........................................................................................................... 14
LINE SYSTEM .............................................................................................................. 14
UP Line Links ...................................................................................................... 15
RISERS...................................................................................................................... 16
Ultra Riser............................................................................................................ 16
Standard Risers ................................................................................................... 16
UP BACKPACK ........................................................................................................... 18
Adjustment of the backpack................................................................................. 19
Packing tips ......................................................................................................... 19
BEFORE THE FIRST FLIGHT .................................................................................... 20
ADJUSTMENTS ........................................................................................................... 20
Position of the brakes .......................................................................................... 20
Speed system ...................................................................................................... 22
SUITABLE HARNESSES................................................................................................. 22
RESCUE SYSTEM ........................................................................................................ 23
USE OF THE UP PICO ................................................................................................. 23
AEROBATICS .............................................................................................................. 23
MOTORISED PARAGLIDING ........................................................................................... 23
FLIGHT PRACTICE .................................................................................................... 24
PRE-FLIGHT CHECK ..................................................................................................... 24
LAUNCHING ................................................................................................................ 24
5
______________________________________________________________________________
SPEED CONTROL ........................................................................................................ 25
Using the brakes.................................................................................................. 25
Using the Speed System ..................................................................................... 25
TURNING ................................................................................................................... 25
LANDING .................................................................................................................... 26
WINCH TOWING .......................................................................................................... 26
Attaching the towline release system................................................................... 26
FLIGHT SAFETY ........................................................................................................ 28
THERMALS AND TURBULENCE ...................................................................................... 28
GETTING DOWN FAST .................................................................................................. 28
Steep Spiral Dive ................................................................................................. 29
B-Line Stalls ........................................................................................................ 29
Big Ears ............................................................................................................... 29
FLYING OUTSIDE THE NORMAL FLIGHT ENVELOPE ........................................... 31
BEHAVIOUR IN EXTREME SITUATIONS ............................................................................ 31
COLLAPSING THE PARAGLIDER ..................................................................................... 31
Asymmetric collapse............................................................................................ 31
Full frontal collapse.............................................................................................. 31
THE STALLS ............................................................................................................... 32
Deep Stall ............................................................................................................ 32
Full Stall............................................................................................................... 32
Spin ..................................................................................................................... 33
WINGOVERS .............................................................................................................. 33
EMERGENCY STEERING............................................................................................... 33
FURTHER REFERENCES ............................................................................................... 33
Rain-induced deep stall ....................................................................................... 33
Adhesive logos .................................................................................................... 34
Overloading ......................................................................................................... 34
Salt water............................................................................................................. 34
MAINTENANCE AND CLEANING.............................................................................. 35
TAKING CARE OF YOUR PARAGLIDER ............................................................................. 35
Packing your UP Pico .......................................................................................... 35
Paraglider fabric................................................................................................... 36
Paraglider lines .................................................................................................... 36
Storage and transport .......................................................................................... 37
CLEANING .................................................................................................................. 37
CHECKS AND REPAIRS............................................................................................ 38
MAINTENANCE............................................................................................................ 38
Airworthiness Check ............................................................................................ 38
UP Craftsmanship................................................................................................ 38
UP WARRANTY .......................................................................................................... 38
National warranty conditions................................................................................ 38
6
______________________________________________________________________________
International UP warranty .................................................................................... 38
CHECKING THE UP PICO ............................................................................................. 39
PACKING AND CHECKING OF THE RESCUE SYSTEM .......................................................... 39
SENDING THE UP GLIDER AND OTHER UP PRODUCTS ..................................................... 40
UP HOMEPAGE.......................................................................................................... 40
SOME FINAL WORDS................................................................................................ 41
Attachments............................................................................................................... 43
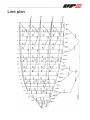
Line Layout Plan.......................................................................................................... 44
Luftsportgeräte-Kennblatt UP Pico XS-L ..................................................................... 45
Einweisungsblatt.......................................................................................................... 53
Service Booklet
Used by the UP Service centre in connection with periodic service ............................ 55
Product registration card.............................................................................................. 59
Important
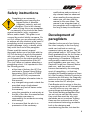
The following symbols are used to draw attention to particular sections:
WARNING!
Failing to comply with instructions given here may
lead to injury or death!
BEWARE!
Failing to comply with instructions given here may
cause undue wear to, or even damage, your new
wing.
NOTICE
This pictogram indicates a tip or some helpful extra
knowledge.
7
______________________________________________________________________________
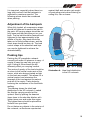
Welcome in our team
Congratulations on the purchase of your new UP Pico. UP International is renowned
across the globe for designing and building the finest paragliders available –
paragliders characterised by maximum safety, performance and quality in every
aspect.
Please take a little time to complete and send the reply card found in the back of this
manual. This way we can keep you informed of all new products and developments at
UP, as well as any technical information about the UP Pico.
We would also be delighted to hear any feedback you have concerning the glider. This
is only possible once we have received your product registration, either through
completing and sending the attached product registration card, or by doing the same
Online via www.up-paragliders.com>service>product registration. Your completed
product registration is also needed should any warranty issues arise.
If you have any questions regarding your paraglider or auxiliary equipment please ask
your local dealer or feel free to contact us here at UP directly.
Have fun with your new UP Pico!
Your UP International Team
8
______________________________________________________________________________
qualifications and provisions of
any relevant laws are observed
Safety instructions
Paragliding is an extremely
demanding sport requiring the
highest levels of attention,
judgment, maturity, and selfdiscipline. Due to the inherent
risks in flying this or any paraglider,
no warranty of any kind can be made
against accidents, injury, equipment
failure, and/or death. This glider is not
covered by product liability insurance. Do
not fly it unless you are personally willing
to assume all risks inherent in the sport of
paragliding and all responsibility for any
property damage, injury, or death, which
may result from use of this paraglider.
Please read this owner's manual
thoroughly before your first flight with the
UP Pico so that you are fully acquainted
with your new glider. This manual gives
you information on the entire specific and
general flying characteristics of the UP
Pico, but it does not replace attending a
paragliding school. It is important to note
the following points:
•
at the time of delivery the UP Pico
conforms to German Hang Gliding
Association (DHV) and/or AFNOR
(SHV and ACPUL) requirements
(see certification information later in
this manual)
•
any changes being made outside the
permitted range of adjustment
invalidate any and all claims under
the warranty
•
using this paraglider is exclusively at
the risk of the user; the manufacturer
or distributor assumes no
responsibility for accidents occurring
while using it.
•
it is assumed that the pilot is in
possession of the necessary
•
when reselling the wing please
make sure you also give this
manual to the new owner. The
manual is an integrated part of
the paraglider and is required for
the wing to keep its certification.
Development of
paragliders
Admitted; we're proud of our history.
No other company in the free flying
world can look back on such an
expansive history as we can. The UP
story started back in 1970 when Pete
Brock graduated from the Art Center, a
world famous school for design and
engineering in Pasadena, California,
and promptly created some of the
most legendary race cars ever – the
Daytona Coupe from General Motors
was one – and then went on to
become fascinated by the emerging
sport of hanggliding – at that time
probably the maddest pastime of them
all. After founding Ultralite Products he
introduces his first wing, the Dragonfly,
and soon the new company becomes
known under the UP acronym..
Pete Brocks spirit survives to this day
in everything we do at UP International
– we still have our very own way of
seeing things and designing things.
This entails building paragliders that
are not only as safe as they come,
they must also meet the very high
standards we set ourselves. Among
these are the continued use of the
most advanced technology available
both in the designing and
manufacturing process, but also the
9
______________________________________________________________________________
feel, the handling and the performance of
the finished product. All this because
we're addicted to building wings that will
fascinate you. A good paraglider is
comprised of a number of interacting
factors of which looks, feel, handling and
performance are but a few. Only when all
these come together in the final product
can we claim to have built a wing that is
homogenous and pleasurable to fly; and
only then we're happy, and ready to
introduce our new UP baby to the free
flying world.
Our gliders are developed using state-ofthe-art CAD software. Our programs allow
us to do the initial flight testing in a virtual
environment where we can simulate a
great many things before even assembling
the first prototypes.
Once we're happy with the new
prototypes' behaviour in the virtual
environment the program generates the
templates after which the glider is sewn.
When a new prototype arrives from our
proto-building experts everyone at UP is
excited about the prospects of trying it out
in real life. The practical tests may show
that further modifications are needed –
these may be carried out on the existing
wing, or a new prototype is built with the
mods already incorporated. In exceptional
cases this may continue through several
prototypes, for only when we're 100%
satisfied do we submit our new wing to
testing by the DHV. We owe it to our
customers, and to our own history, to be
particular about which products earn the
UP badge.
Technical description
The UP Pico was built to fulfil the
expectations to a modern, safe and fast
Performance Intermediate wing. The
launching is excellent and the
performance figures impressive.
As with all UP products, the materials
used have been carefully chosen for
their outstanding quality and strength,
to guarantee a long and trouble-free
service life.
Further construction details, including
line lengths, are included in the
certification specification sheets, which
form part of this manual. Any technical
changes will appear in the appendix.
Certification class
The UP Pico was tested by the
DHV/OeAeC. The final note „1“ is the
result of the lesser note assigned in
ANY of the tests. This means that no
test was rated higher than „1“.
Target group and
recommended flying
experience
The UP Pico is recommended for
pilots of all levels, from absolute
beginners to cross country pilots
looking for a wing with a high passive
safety margin. On a more general
note, pilots flying less than 15-20h /
year are always recommended to stay
within the DHV 1 category.
Necessary skills for
normal flights
Flying a wing in this class requires
insight into the basics of paragliding;
launching, steering, landing. For
thermal flying it is recommended that
the pilot knows and understands active
piloting.
10
______________________________________________________________________________
Necessary skills for dealing
with disturbances
The UP Pico reacts very benignly to
disturbances and requires no excess pilot
insight or reactionary speed for dealing
with these. A minimum of training and
practise in dealing with disturbances will
however increase the pilots’ enjoyment of
the flight, and make the whole undertaking
safer.
Necessary skills for dealing
with rapid descent methods
In order to perform rapid descents, like Big
Ears, spiral dives and B-line stalls special
skills are required. Should the pilot not
already have these skills we recommend
visiting an SIV training, preferably with a
school with previous UP Pico experience.
Suitability for training
The UP Pico is very well suited for
training.
Recommended weight
range
The UP Pico should be flown within the
stipulated takeoff weight limits, found in
the “Technical data” section of this
manual. The weights mentioned are total
launch values, including glider, pilot,
harness, all clothing etc. The easiest way
to find your own total launch weight is to
jump onto your scales with the complete
backpack containing all your kit on your
back. UP International manufactures the
Pico in 5 different sizes. If you find
yourself having to choose between two
not entirely ideal sizes we recommend you
let your choice be guided by your personal
preference for being either a little light
or a little heavy on a wing.
Due to the very high inherent stability
of the Pico design it was possible for
the UP R&D team to extend the weight
ranges a bit in comparison with other
UP designs – this means that each
size of Pico can be flown somewhat
heavier than its predecessors without
going outside the certification range.
As an example the Pico S has a
certified weight range of 70-95kgs,
where one can consider the upper five
kilos insignificantly overloaded. Flying
the Pico S with 95kgs will not
negatively influence climbing but it will
make the handling even more agile
and the speed is also a little higher.
If you prefer to have a more
standardised flight experience we thus
recommend choosing a size where
you won’t be in this slightly overloaded
range. This would make your Pico
flights even more relaxed.
The reasoning behind this sizing
choice is that we wish to occasionally
fly overweight without voiding the
certification. This is handy for
endeavours like mountaineering where
a pilot may often find himself needing
to take off with more kit than usual.
In addition to the standard sizes we
have built the two extreme sizes XXS
and XXXS. These wings will appeal to
pilot who are mainly using the wing as
a fat means of getting down from
mountain climbs, where weight and
portability is more important than
climbing performance.
11
______________________________________________________________________________
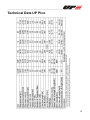
Technical Data UP Pico
12
______________________________________________________________________________
Construction
The Pico marks UP's entry into the paraalpinism market segment. Our goal was to
build a wing that could be used for almost
any kind of paragliding activity, and to
build it light so that it would be a pleasure
to carry no matter where and how high.
The result is a noble mix of an agile and
fun DHV1 wing built in a very strong yet
light way.
The result is a noble mix of an agile and
fun DHV1 wing built in a very strong yet
light way. Because we feel that a UP
paraglider should have a long and stressfree service life regardless of its appointed
use, we opted to steer clear of all the new
insufficiently tested materials used in
many of our competitors' products. The
UP Pico is a lightweight wing but it is
made with longevity in mind.
The cloth used is all between 36 and
40g/m (standard in the industry) yet the
total weight of the canopy has been kept
extraordinarily low. Same goes for the
risers – they are reassuringly built yet very
light, and retain the UP typical ease of use
which our pilots have come to expect. The
upper lines are manufactured using the
new unsheathed Dyneema race material
also used in the Trango 3 and the Summit
XC, whereas the lower lines are made
from the more traditional sheathed
Dyneema.
A pleasant bonus benefit of the line
material used is that the Pico has quite
impressive performance figures for its
class – you'll notice the difference right
away, both when gliding and when
thermalling. Lots of fun too, without ever
overburdening the pilot in any way.
Reduced drag is even more beneficial
once the pilot starts to apply speed bar,
something that the Pico is a fine example
of. The speed bar travel converts into
speed in a linear manner until the top
speed of 50km/h+ is reached, and the
sink rate remains sensible all the way
– the Pico simply offers more.
Lightweight construction
One of the tricks
for making the
Pico so light was
to incorporate the
UP ASS (Airfoil
Stabilising
System) into the Pico leading edge.
This means of LE reinforcement was
originally developed for the UP Edge,
the purpose on the Pico being to
eliminate the need for any Mylar
reinforcement in the leading edge at
all. The Pico ASS system uses thin
nylon battens along the stitching on all
cell walls to hold the air vents open
and reinforce the leading edge at
speed. Add to this the fact that these
nylon battens are unsusceptible to
bending and it follows that there is no
longer any need for accordion folding.
Regardless of how the Pico is packed
away it will retain its perfect launch
characteristics for years. And should
one nylon batten accidentally break (if
someone steps on the wing on launch
f.eks.) it may be replaced in no time
flat. And just to reiterate; there are no
catch 22's with the ASS system – the
DHV test protocol shows that even the
collapse behaviour is picture perfect in
spite of this new and very light LE
reinforcement system.
Canopy material
The UP Pico is constructed from
polyamide cloth, which is particularly
stretch-resistant and durable, and is
13
______________________________________________________________________________
specially treated for maximum UV
resistance.
After an extensive series of tests and
years of practical experience we have
found that the best material is a high
tenacity polyamide “New Sky-Tex”, from
Porcher Marine (France), with the
Designation 9017 E38A (top and bottom
surface front, cloth weight 40 g/m²), 9017
E68A (top and bottom surface rear, cloth
weight 36 g/m²), and 9017 E29A (ribs and
v-tapes, cloth weight 40 g/m²).
This material consistently exhibits
excellent air permeability and has a
remarkably good colourfastness with the
latest PU coating.
looped at both ends. The single line
levels are connected over a special
hoop technology ("handshake") to
prevent a weakening of the core and a
loss of strength. The lines and stitching
are subject to rigorous production
controls, to ensure high and consistent
manufacturing quality.
Line material
The brake lines are collected at one
main control line per side. This control
line runs through a pulley attached to
the D-Riser and is marked with a black
dot at the point where it should loop
around the D-ring. The brake is pre-set
so that the glider is at 0 degree brake
when the toggle is free. Please don’t
change the main brake lines without
checking the new length carefully at a
suitable training hill before flying!
The line bundles (A, B, C and D) are
colour coded for easy identification
and handling. All main lines of each
level are looped together and attached
to „UP Line Links“, which are
connected to the risers. The „UP Line
Links“ links have special line collectors
to prevent lines slipping. After
maintenance work the „UP Line Links“
must be closed according to the
description in the previous paragraph!
The lines in the in the UP Pico are a
completely new mix of unsheathed Liros
dyneema lines in the upper levels and
sheathed lines from Cousin Trestec for the
lower ones.
We use 0.8, 0.85 and 1.5 millimetre
diameter. These lines are constructed
using a special pre-stretched Dyneema
and have a significantly higher breaking
strength compared to the customary
Aramid-core lines. Furthermore they are
far less susceptible to weakening through
kinks than any of the Aramid lines we
have tested. And finally this new line
shows much less tendency towards
stretching than any other Dyneema lines.
This is of great importance in order to
avoid adversely influencing the flight
characteristics through uneven stretching
across the span of your new wing.
The lines of each wing section consist
of four groups and the brake lines:
A-Lines: A1-A3
B-Lines: B1-B3
C-Lines: C1-C3 / S1
D-Lines: D1-D2
Brake Lines: BRK
Line system
The entire line system is formed from
individual lines, which are sewn and
14
______________________________________________________________________________
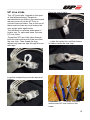
UP Line Links
The „UP Line-Links“ originate in the sport
of free fall/parachuting. Parachute
manufacturers use them in the exact same
manner as we do on the UP Pico; to
connect lines and risers. Due to the use of
these new line links we could reduce the
riser weight quite significantly.
The following is a precise description of
how to use, i.e. open and close, the new
UP Line Links
Thread the UP Line Links twice through
both the loops at the end of the lines and
the riser loop. Then thread the loop
without any sewn-on tape through the one
with tape.
Once the loop is tight...
…rotate the wohle link until the closure
is hidden inside the riser loop.
Loop the untaped loop over the tape and
tighten.
Illustration 1:
Correctly threaded
and secured UP Line Links on the
risers.
15
______________________________________________________________________________
Risers
Ultra Riser
The largest change in the angle of
attack is reached when the top pulley
touches the main karabiner.
The UP Pico is another UP product using
the so-called Ultra Risers. These are
basically high-strength Kevlar reinforced
webbing only 12mm wide. We have
developed the new UP Line Links
especially for these risers. In spite of the
low weight and with the Ultra Risers meet
all the criteria for easy to use and strong
paraglider risers.
The lines are grouped into four risers and
one control line on each side. The riser
ends are colour coded for easy
identification at take off as well as in flight
for B Stall.
Standard Risers
Those intending to use their Pico in a
more traditional environment have the
option to order the wing with standard
risers made from our usual 25mm riser
webbing. These then come with traditional
stainless steel line links and are the
obvious choice for a very wide range of
uses, from lightweight fanatics to school or
after-school use.
The Pico has been throughly tested both
in a mountain flying environment and on
the winch. We recommend that pilots
wishing to mainly launch via winch choose
the standard riser option, as these are
more suited for the extra loads involved
when towing.
During normal flight all risers are 450mm
in length. When applying the speed
system the A to C risers are shortened. A
reduction system between the risers
ensures that each riser gets the right
length and the angle of attack is reduced
correspondingly.
16
______________________________________________________________________________
Illustration 2:
UP Pico riser
17
______________________________________________________________________________
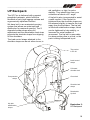
UP Backpack
The UP Pico is delivered with a special
paraglider backpack, which fulfils the
demands of very high luggage volume and
ergonomically optimised comfort.
We have built in an anatomical carrying
system that allows an optimised load
distribution for maximum comfort. The S
shaped shoulder straps allow full
adjustment and the detachable chest strap
prevents the shoulder straps from slipping
off the shoulders.
The load control straps attached to the
shoulder straps can be set either loose, to
aid ventilation, or tight, for extra
stability. They should rise from your
collarbone at about a 45° angle.
A hip belt is also incorporated to assist
overall comfort. If the hip belt is
tightened then the shoulder straps can
be released slightly to transfer the load
away from the shoulders. The hip belt
is fitted with stabilisation straps, which
can be tightened to help stability, or
loosened for extra freedom of
movement. The hip belt is removable
for when packing size is critical, or the
pack is being transported by air.
Top pocket
in the lid
Load control
straps
S-formed
shoulder belt
Compression
straps
Chest belt
Shoulder belt
straps
Detachable
hip belt
Hip belt
stabilization
straps
Illustration 3:
UP Backpack
18
______________________________________________________________________________
It is important, especially when there is a
long trek involved, that the backpack is
adjusted for maximum comfort. The
following advice should be considered
when packing.
against theft and can also get caught
on protruding points when entering or
exiting lifts, cars or buses.
Adjustment of the backpack
When fully loaded, all compression straps
should be tightened to secure the load in
the pack. All carrying straps should be set
fully loose and the pack then put on your
back. The hip belt should be fastened and
tightened to rest approximately in the
middle of the hip. Any slack should be
taken out of the shoulder straps, and the
chest strap should be done up. The load
control straps at the shoulders and hips
can now be tightened to achieve the
desired stability.
Packing tips
Packing the UP paraglider rucksack
correctly will make it a pleasure to carry. A
couple of easy tips can help you get it
right. Failing to follow these tips will
adversely affect you carrying comfort.
The centre of gravity of the load should be
as close to the vertical centre axis of the
carrier, while also being situated as high
on the back as possible. This allows for a
vertical posture and minimises the
leverage of the load against the natural
posture of the carrier. It also helps by
reducing the oscillations of the load while
walking.
The drawing shows the ideal load
distribution in the UP rucksack. Loaded
like this the carrying comfort will be
optimal. Start by placing the heaviest
items close to the shoulder blades, with
lighter items over and under this region.
The lightest items should be placed the
furthest from your back.
Do not fasten any objects to the exterior of
the rucksack, as these are unprotected
Illustration 4: Ideal load distribution
in the UP rucksack
19
______________________________________________________________________________
Before the first flight
The UP Pico is delivered with a speed
system, rucksack, compression bag and –
strap, repair materials and this manual.
The manual may also be downloaded from
the UP website. Every Pico delivered has
been minutely checked at the factory, and
corresponds exactly to the wing certified
by the DHV.
BEWARE! Before the first flight the
UP Pico must be inflated in the
wind on a flat surface. An
approved UP dealer should
carry out the first flight before
the wing is handed over to the end
customer.
Adjustments
The UP Pico has undergone an extensive
development program and series of flight
tests to ensure that the production model
exhibits the optimum characteristics with
regard to safety, handling and flight
performance.
As with all products from UP International,
the UP Pico is manufactured to the
highest quality and precision. The line
lengths of each glider are individually
checked and recorded before dispatch.
Under no circumstances should the
lengths of the lines or risers of the UP Pico
be altered in any way.
WARNING! Any changes to line
lengths or riser configuration will
invalidate certification!
The only change allowed is to
the length of the lower brake
line. This should only be done by
an experienced person.
Position of the brakes
The UP Pico is delivered from the
factory with what we feel is the best
brake position for most pilots. But tall
or short pilots, or those with a harness
with non-standard attachment points
might feel it necessary to change the
position of the brake handles.
If the brakes are to be shortened, it is
extremely important to avoid the
adjustment affecting the glider's trim
speed. There must always be some
slack in the brakes when they are fully
released. This can be checked with the
glider inflated above the pilot's head.
There should be a noticeable bow in
the brake lines, and the brakes should
be having no effect on the shape of the
trailing edge.
If the brake lines are to be lengthened,
it is important to ensure that the pilot
can still stall the canopy (i.e. during
extreme manoeuvres or landing)
without the need to take wraps.
If you do feel the need to change the
brake line lengths, do so a little (34cm) at a time, and preferably whilst at
an easy training slope. Check
especially that both lines are the same
length, as any asymmetry will lead to
tiring and possible dangerous flying
characteristics.
If you have any questions or concerns
with reference to the brake line lengths
then seek advice from either your UP
dealer or directly from UP
International.
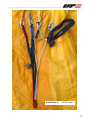
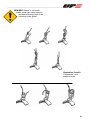
To tie the brake line onto the brake
handle use one of the following knots:
The simple fisherman's knot or the
Bowline as shown in illustration 5 and
6. These knots guarantee the least
amount of line weakening.
20
______________________________________________________________________________
BEWARE! Loose or incorrect
brake knots can cause serious
accidents through loss of the
steering of the glider!
Illustration 5 and 6:
Fishermans- and
bowline-knots
21
______________________________________________________________________________
Speed system
It is important that the speed system is
connected correctly, and the length
checked, to ensure smooth operation in
flight.
The link between the foot stirrup and the
risers consists of two cords and two
brummel hooks. The speed stirrup itself is
composed of a foot bar and webbing with
loops sewn on either end to attach the
cords. These cords should be run up
through the eyelets and pulleys on the
harness to connect with the pulley system
on the front of the risers (see Illustration).
This illustration refers to the UP harness,
but many harnesses are similar. If in any
doubt, please ask the harness
dealer/manufacturer.
The length of the cords should be set so
that, at full leg extension, the pulleys on
the risers are just touching each other.
Any shorter and the stirrup will be difficult
to reach; longer and the top of the speed
range will be unavailable.
During take off it is advisable to fix the
accelerator stirrup underneath the
harness to avoid any danger of tripping
over it.
Suitable harnesses
Any harness with hang points near
chest height is suitable for use with the
UP Pico. The lower the hang point of
the harness, the better the pilot can
steer by weight shift. A DHV or ACPUL
certified harness is recommended.
The harness design should also
guarantee that it’s possible to
accelerate the UP Pico up to the
maximum speed.
Note that the height of the hang point
also affects the brake line length. If
you have a question about your
UP harness, contact your dealer or
UP International.
Brummel hook for
combination between
foot bar and riser
Rope of speed system
Pulley roller
Foot bar with
2 steps
Illustration 7:
Components of the
foot accelerator
22
______________________________________________________________________________
Rescue system
It is strongly recommended that you have
a rescue system (reserve parachute) fitted
at all times. In some countries it is
mandatory, so check if you plan to travel.
Make sure that the reserve system you
have is the correct size, and that you are
fully conversant with it’s use.
For fitting the reserve system, follow the
instructions of the harness manufacturer.
UP International GmbH and with the
governing body for ultralight flying in
your area, to check on certification of
this configuration.
Use of the UP Pico
The UP Pico has been developed and
tested solely for foot launched and winch
launched paragliding flights. It is not
allowed and potentially dangerous to use
the glider for any other purpose.
Aerobatics
The UP Pico has not been developed,
constructed and/or tested for aerobatics
use.
WARNING! The glider has not been
certified for aerobatics.
Performing aerobatics with the
UP Pico or any other
paraglider can be very
dangerous. Doing aerobatics can
induce flying configurations well
beyond the tested flight envelope, and can
lead to total loss of control. Aerobatics can
also overload your glider and break it in
flight.
Motorised Paragliding
The UP Pico has not been tested for use
with any kind of engine.
If you wish to fly your UP Pico with a
motor please get in touch with the
manufacturer of the engine unit, with
23
______________________________________________________________________________
Flight practice
3.
Pre-flight check
Make sure whenever you get your UP
Pico back from somebody else to check
the glider very carefully if you are not the
only pilot flying it. Ask if there was
anything that could have damaged any
part of the glider, if the pilot has found any
part that needs to be replaced or if they
noticed any strange flight behaviour. Make
sure you do the same when you lend your
glider to somebody else.
A thorough pre-flight inspection
should be performed prior to each
flight. A careful pre-flight check
is a must for any and all
airplanes – also the UP Pico.
Please apply the same care and
attention before EVERY flight!
Before every launch you should carry out
the standard 5-point checking procedure.
It is a good idea to do the checks following
the same sequence every time to
minimize the risk of omitting something.
1.
2.
Unpack and arrange your glider in a
semi-circular manner. This shape
ensures that the centre cells inflate
before the tips. When unfolding your
glider, observe the wind direction
and arrange your glider so that it is
pointed directly into the wind.
The lines must be arranged so that
there are no tangles and the A-lines
are uppermost. Once the lines are
free and untangled, check to make
sure that they all go directly from the
riser to the glider without going over
the top of the wing. Launching with a
line over the wing is extremely
dangerous! It is also important that
the brake lines are free and not
tangled.
4.
5.
Next check that you have put the
harness on correctly, and ensure
that both leg straps and the chest
strap are closed and adjusted.
Also check the rescue system
pins and deployment handle.
Right before the launch you
should check the air space (also
behind you).
Once again check the wind
direction before take-off.
Launching
The take-off characteristics of the
UP Pico are extremely straightforward.
Only a gentle forward pressure on the
A risers is necessary and the glider will
inflate evenly and climb above your
head. The glider has no tendency to
hang back behind you or to overshoot
over your head.
With the A risers and the brakes in
your hands, have another look at your
unfolded glider. Make sure that you
are centrally positioned in the middle
of the wing, and that the wing is facing
into wind. The middle of the canopy is
marked by the UP logo at the leading
edge.
Inflate the glider with a steady run and
remember to position your arms so
that they are a continuation of the A
risers. As the glider comes above your
head, you should glance up to see that
the entire canopy is inflated and flying.
The UP Pico has a low surge
tendency, so there is usually no
necessity to brake to stop the glider
from over-flying you.
Directional control should only be
attempted when the glider is above
your head. Excessive braking will
cause the wing to drop back.
Only after checking that the wing is
properly inflated do you apply slight
24
______________________________________________________________________________
brake pressure and accelerate rapidly
down the hill. After a few steps you will
reach flying speed and become airborne.
Speed control
Using the brakes
The UP Pico has a wide useable speed
range, coupled with excellent stability at all
speeds. The speed can be set with the
brakes to optimise performance in any
situation.
Maximum glide speed is achieved with the
brakes released completely, whereas
minimum sink speed is with approximately
15-20cm of brake applied. Further braking
will not improve the sink rate, but the
brake pressure increases noticeably as
the glider reaches minimum speed.
BEWARE! Flying close to the stall
point is very dangerous and
should be avoided. At speeds
below minimum sink the
danger of entering an
unintentional stall or spin is
increased dramatically.
Using the Speed System
The UP Pico is supplied with a speed
system, which is activated by a foot
stirrup. Full application increases the
speed by approximately 12 to 14 km/h. In
certain circumstances the use of the
speed system is extremely effective, and it
should be an integral part of your flying.
The speed system should be used when
you are flying through sinking air, when
trying to achieve best glide in a headwind,
or trying to cover the ground as quickly as
possible. But it is important to remember
that the glider will be more susceptible to
collapses at high speeds, so the speed
system should not be used in extreme
turbulence. If, with the speed system
applied, a collapse occurs then it
should be released immediately. Some
warning of an imminent collapse is
afforded by the tension felt in the
speed system; should the tension
suddenly reduce then the stirrup
should be released and the glider
returned to normal trim speed.
BEWARE! All extreme flight
situations, such as collapses,
happen more dramatically
at increased speed.
Therefore the speed system
should not be operated near
the ground or in noticeable
turbulence.
Turning
The UP Pico has been developed to
meet the demands of intermediate
pilots. The brakes have been designed
so that the first 15 to 20 centimeter of
travel will cause a soft and direct
turning, whereas larger movements
will give the glider an agile and nimble
feel.
Brake input and amount of weight shift
induced will define the radius and bank
angle on the UP Pico, and will allow it
to be controlled with ease. Using
weight shift in combination with brake
input will result in flat turns with
minimum height loss and is in fact
always the most efficient control
method. The radius of the turn is then
controlled with the brake line whereas
the bank is controlled through weight
shift.
If needed the UP Pico will turn very
tight. To do this, apply some brake
input on both sides, then release the
outside brake whilst applying further
brake on the inside – this will reduce
turning radius to a minimum.
25
______________________________________________________________________________
When brake input is increased beyond
approximately 50% on one side, the UP
Pico begins a fast and steep turn, which
can be made into a steep spiral (refer to
chapter heading "steep spiral").
Landing
The UP Pico is easy to land. While
pointing into the wind, the pilot should fly
the wing fast until approximately one
meter above the ground, and then apply
both brakes completely. When landing in
stronger wind, less brake is required.
Landing from steep turns should be
avoided due to the risk of an uncontrolled
pendulum reaction.
Winch towing
UP International recommend that pilots
wishing to mainly launch via winch choose
the standard riser option, as these are
more suited for the extra loads involved
when towing.
The UP Pico tows easily. There are no
special techniques that need to be
employed, but consideration should be
given to the following points:
•
Especially when you are towing at an
unknown field, make sure that you are
fully aware of any local conditions and
peculiarities. Ask the local pilots if you
are at all unsure.
•
During the launch, ensure that the
glider is completely inflated and over
your head before giving the 'start
towing' signal. If the glider is not
central over your head do not
continue with the tow. Any corrections
attempted through the brakes during
this critical phase may result in the
canopy deflating again, or in the tow
progressing with a non-flying wing; if
tow tension is applied when the glider
is not correctly positioned then a
'lock out' or a stall could occur.
•
Try to avoid large brake inputs
until you are reasonably high.
Emphasize weight shift if any
course correction is necessary
close to the ground.
•
Do not try to climb steeply during
the first part of the tow. Good
airspeed is essential.
•
Do not use a towline tension
greater than 90 daN at any time
during the tow.
•
All persons involved with the
towing operation should be
suitably qualified and
experienced. All equipment used
should, where necessary, be
certified, and a tow permit should
be valid for the field being used.
Attaching the towline
release system
The optimal attachment point for the
towline release is always in the
systems’ centre of gravity. On a
paraglider that means the connection
point between the risers and the
harness, preferably right onto the
lower end of the risers. UP
International has developed special
tow-release connectors for the UP
Pico to ensure the optimal connection
between the pilot and the towline. For
safety reasons we suggest that you
always use these connectors when
towing the UP Pico.
When using towline release systems
incorporating distance-tubes between
the risers it is important to ensure that
the risers are not pulled together by
the system (use webbing loops
designed for climbing to increase the
length of your release system). It is
also very important to fit a bungee to
26
______________________________________________________________________________
the system that will keep it from hitting you
in the face in the event of a towline failure
BEWARE! If you are using a frontmounted reserve system it is very
important to verify the
unhindered deployment before
every flight. In case of doubt
please only tow using a textile
release system.
27
______________________________________________________________________________
Flight safety
The development of high performance
paragliders from square parachutes has
meant vast improvements in speed, sink
rate and handling. But, at the same time, it
has also led to a requirement on behalf of
the pilot for accurate, sensitive control and
an acute anticipation of possible flying
conditions. Any glider, whether beginner
or competition class, may collapse in
turbulent conditions and you must be able
to react accordingly.
Today you have a wide choice between
different gliders in the UP range. The main
difference between the gliders is in the
stability that each class offers. Beginner
wings react to turbulence less dramatically
and are more forgiving when compared to
top performance gliders, which have more
sensitive, but less forgiving handling.
Making the correct decision when
choosing a new glider is most important;
you should critically examine your flying
and your level of knowledge.
A safe and efficient way to get used to
your new paraglider is by practicing your
ground handling skills. We suggest
finding a suitable area, like a playing field,
and with light to medium wind it is quite
easy to practice inflating the glider and
feel the reaction to brake input, b-line stall,
collapses etc.
Before takeoff and whilst flying it is very
important to anticipate any likely
turbulence and fly accordingly. Look well
ahead, and as well as looking for areas
of likely lift, try and predict, and avoid,
areas of sink and rough air. If you do
find yourself in turbulence then look for the
cause, and adjust your flight plan to avoid
other similar places.
Thermals and
Turbulence
In turbulent air, the UP Pico should be
flown with a little brake to increase the
angle of attack and provide greater
stability. While flying in strong or
broken thermals, it is important that
you concentrate on keeping the wing
centrally above your head. Do this by
allowing the glider to fly faster while
entering a thermal, and by dampening
the surge of the canopy while exiting
the thermal by braking gently.
Flying fast is useful for getting through
sink or when flying into a headwind.
The UP Pico possesses a high
inherent stability due to its construction
and design, however an active flying
style in turbulence will help increase
safety by preventing unnecessary
collapses and deformation of the
canopy.
Getting down fast
All rapid descent manoeuvres should
be practiced initially in smooth
conditions with plenty of altitude before
you need to use them 'for real'. It is
important to distinguish between the
three techniques, and to know the
merits of each.
WARNING! All other
manoeuvres, such as full stalls
and spins, should be
avoided as fast descent
techniques. They are not
very efficient, and incorrect
recovery can have dangerous
consequences (as with any
paraglider)!
28
______________________________________________________________________________
Steep Spiral Dive
A maximum sink rate of over 15 meters
per second can be achieved in a steep
spiral dive, but it is advisable to build up
gradually to these sink rates when you first
practice spiralling.
Getting the UP Pico into a spiral dive is
very simple and has already been
described in the chapter regarding turning.
When entering the spiral it is essential to
induce the turn gradually; if you apply the
brake too quickly you may enter a spin. If
this happens, release the brake
immediately and let the glider recover
before trying again. Keep a steady tension
on the inside brake and observe the
increased angle of bank and sink rate. A
little brake on the outer wing will help
stabilize the glider at a high sink rate.
To recover from a spiral, simply release
the inside brake. Do this gradually to
prevent an uncontrolled steep climb
caused by the excess energy built up
during the dive. Be prepared for the glider
to climb a little and to damp out the
subsequent dive. Be warned that steep
spiral dives are equal to high G loading on
both you and your glider!
WARNING! Never pull Big Ears
in a spiral dive, as it's relatively
easy to overload the
paraglider, pilot and
equipment.
B-Line Stalls
To induce a B-line stall, start from normal,
un-accelerated flight. Reach up and take
hold of both B risers, still with your hands
in the brake loops, and pull down
simultaneously by approximately 10 to 15
centimetre. The first few centimetres of
travel will be quite hard, but as the glider
settles into the stall so the effort becomes
less.
The glider will drop back a little as it
stalls, and then centralize over your
head. With 15 centimetre or so of pull
a sink rate of up to 6 meters per
second can be achieved. With less pull
you will get a decrease in sink rate.
The B-risers should not be pulled
beyond this point, as it may result in
the canopy entering an unstable phase
or going into a frontal rosette. Should
you inadvertently have pulled too far
down on the B-risers, simply release
them a little again until the wing is
again stable above you, showing the
characteristic deep crease along the
B-level and being fully stretched out
spanwise.
To recover from a B-line stall, let up
both B risers simultaneously and
quickly. The UP Pico will dive forwards
slightly as it regains forward speed, so
be ready to dampen this out. If you
release the B risers slowly there is a
danger that the glider might enter a
deep stall. The glider will almost
always recover with no pilot input from
a deep stall, but refer to the 'Deep
Stall' section for correct recovery.
Big Ears
To pull the ears in, reach up and get
hold of the outermost A line on both
front risers and pull them down,
simultaneously, by about 20-30cm until
the tips collapse. Keep these two lines
in your hands, to prevent the wing reinflating.
We suggest keeping the brake toggles
in your hands while inducing Big Ears.
The glider will remain fully steer-able
through weight shifting during the
manoeuvre. The sink rates will be
around 2 to 3 meters per second.
Releasing the two A-lines will normally
have the tips re-inflating on their own,
otherwise light braking will assist the
re-inflation.
29
______________________________________________________________________________
Do not perform other manoeuvres whilst
using Big Ears, as the structure of the
canopy could become overloaded.
Inducing large Big Ears on the UP Pico
when flying near its lower weight limit
requires great caution on the amount of
brake input used, as it may deep stall in
extreme cases. Should this happen use
the recovery technique described in the
‘Deep Stall’ section.
30
______________________________________________________________________________
Flying outside the
normal flight
envelope
Behaviour in extreme
situations
The UP Pico is designed to be very
aerodynamically stable. However as with
all paragliders extreme turbulence or
piloting error may induce unwanted
behaviour from the canopy. To ensure that
you are able to handle these situations
correctly we strongly recommend that you
attend a safety-training (SIV) clinic, where
you can learn to master your wing outside
the normal flying envelope under
professional guidance.
Safety training manoeuvres should only
be practiced in calm air with sufficient
altitude, and under the instruction of
qualified instructors. We would like to use
this occasion to once again remind you to
never fly without a reserve parachute!
The manoeuvres and possible flight
configurations described in the following
may occur following a conscious effort on
the part of the pilot, through turbulence or
through pilot input error. Any pilot flying in
turbulent air or making piloting mistakes
may end up experiencing these flight
configurations and therefore find
themselves in danger, particularly if they
are not adequately trained to master them.
WARNING! Mistakes during the
execution of the following
manoeuvres may seriously
compromise the safety of
pilot.
Collapsing the
paraglider
Asymmetric collapse
The UP Pico belongs to the new
generation of paragliders that, as well
as having very good performance, also
exhibit a high degree of stability. Wing
tip collapses can almost always be
prevented through active flying.
Should an asymmetric collapse occur,
it is best to stop the turn by opposite
weight shift and counter steering. If
you let the glider turn then it is possible
that, although the collapse will clear
quickly, the other wing might suffer a
small closure. Any closure will
normally reopen independently, but it
is a good idea to help it with a good
long pump (not short hectic pumps)
with the brake on the affected side,
whilst maintaining course with the
other brake.
With large asymmetric collapses it is
important to counter steer carefully to
avoid stalling the open side. This can
lead to the canopy entering a stall
before it fully reopens.
Finally it is possible, although highly
unlikely, that a wingtip gets caught in
the lines following a collapse. Should
this happen the pilot should attempt to
maintain heading by weightshifting to
the opposite side and carefully braking
that same side. A big earnest pump
with the brake on the afflicted side
should clear the “cravatte”. If this fails
all UP wings have a separate stabilo
line going from the C riser to the
stabile – a pull on this line will clear
even stubborn cravattes.
Full frontal collapse
A negative angle of attack occurring
through turbulence or from
31
______________________________________________________________________________
simultaneously pulling down both A-risers
results in a full frontal collapse of the
leading edge of the canopy. The UP Pico
will normally reinflate quickly on its own,
but can be assisted through the
application of a light double-sided
symmetrical brake input.
The stalls
When a paraglider flies through the air a
laminar and a turbulent airflow forms
around the surface of the wing. When the
laminar airflow along the top surface is
interrupted, dangerous flight
configurations follow – we say that the
wing stalls. This is most often the
consequence of attempting to fly with too
high angle of attack.
In more detail we differ between three
different forms of stall.
BEWARE! Spin and full stall are
both dangerous and somewhat
unpredictable manoeuvres. Do
not stall or spin your paraglider
on purpose. However it is very
important to learn how to recognize
the symptoms of a glider about to
stall or spin so that you can take correct
action to avoid it happening.
Deep Stall
The UP Pico has no inherent tendency
towards deep stall. It will recover from a
deep stall brought about by over braking,
by pulling on the rear risers, or by
releasing the B-risers too slowly after a Bstall, on its own without any pilot input as
soon as the brakes or the risers are
released.
Should you however find yourself in a
deep stall (as described above this could
happen through flying too light on the wing
and pulling big ears) the situation can be
rectified by simultaneously pushing both
A-risers forward until the glider
resumes normal flight. Avoid applying
brake to one side if you think that you
are in a deep stall as this could lead to
a spin.
Always remember that practicing
manoeuvres where you fly close to
minimum airspeed must only be
carried out under professional
supervision and with plenty of altitude.
Full Stall
Full stalling the glider is only really
sensible and useful during the landing.
When landing the pilot consciously
stalls the wing by applying both brakes
100% just before touching down. The
canopy falls behind the pilot and
empties itself.
When the glider is tested before the
release it is put through the same
motions, but at greater altitude. First it
is slowed down to minimum airspeed,
then the airflow along the top of the
wing breaks away and the wing falls
back, pulling the pilot with it. It is
important to not release the brakes
again at this moment, as this will have
the canopy violently shooting forwards
and diving down in front of the pilot. In
extreme cases it can dive below the
pilot, who could then fall into the sail.
After dropping back into full stall the
canopy will form a horseshoe where
the tips flutter about quite violently.
These movements are transferred to
the pilot’s arms through the brake
lines. Holding the wing in a full stall
requires considerable strength!
Before releasing the brakes and
allowing the wing to resume level flight
it is important to stabilize the stalled
wing. This is done by releasing the
brakes slowly until the entire wing is
almost completely re-inflated. In this
phase the wing will be pitching
32
______________________________________________________________________________
somewhat over the cross axis. The pilot
waits until the wing is in front of him and
releases the remaining part of the brake
travel. When timed correctly the wing will
then resume level flight by surging slightly
forward whilst accelerating to normal trim
speed. However you must be prepared to
dampen the surge and deal with any
subsequent collapses occurring because
the wing surges too far or doesn’t come
out of the full stall completely
symmetrically.
Test pilots also carry out tests where they
release one brake before the other while
in full stall. This manoeuvre only serves to
test the wings behaviour and should not
be flown purposely as this is a situation
where all paragliders react very
dynamically. It is often followed by very
large, dynamic asymmetric collapses that
must be dealt with correctly to avoid
dangerous situations.
Spin
The negative spin occurs when one side
of the wing is stalled whilst the other is still
flying. This can happen when, if flying very
slowly, one brake is pulled quickly to
below the seat. When the glider starts to
spin, it will turn quickly around the vertical
axis, with the stalled side flying
backwards. To recover from a spin, simply
release the brake on the stalled side. The
glider will immediately speed up and, most
likely, suffer an asymmetric collapse.
Recover as described above.
If you suspect that a spin is imminent then
immediately release the inside brake. The
glider will accelerate smoothly and resume
normal flight with little altitude loss.
Wingovers
Wingovers are induced by flying
alternating turns; each time letting the
pendulum effect increase the bank
angle.
BEWARE! The UP Pico is a
agile glider, and it is quite
easy to get to an
excessively high angle of
bank in just a few turns.
Practice wingovers gently at
first, as there is a chance of quite
large collapses at high bank angles.
Also notice that a wingover flown with
more than 90 degrees bank angle is
classified as illegal aerobatics in some
countries!
Emergency Steering
If for some reason the UP Pico cannot
be controlled with the brakes, for
example if the brake handle has come
off the main brake line, it can be
steered and landed with the rear
risers. Be aware that, when rear riser
steering, the glider is a great deal
more responsive to pilot input, and the
stall happens very suddenly.
Further references
Rain-induced deep stall
There are two reasons why flying with
a wet wing increases the risk of deep
stalling:
First reason is that the canopy cloth
may absorb water, making it much
heavier and moving the centre of
gravity around in unpredictable ways,
increasing the risk of a stall/deep stall.
The more water a wing can absorb the
higher the risk, which means that older
33
______________________________________________________________________________
wings with damaged coating are more
prone to these deep stalls than new
wings. It should also be noted that a wing
already flying close to the edge due to line
shrinkage or other factors will deep stall
sooner due to water absorption.
Second reason has to do with the actual
rain drops on the top surface – if enough
large rain drops form that the entire top
surface is covered, but they don’t join
together to either flow off or become a
homogenous mass, the surface will
become so rugged that the airflow
separates and the wing stalls.
This phenomenon has been observed on
hang gliders and gliders for years but
only recently have we discovered that
paragliders may also be affected. It is
more likely to happen with new wings
where the cloth is still highly hydrophobic
and the drops thus do not penetrate but
remain on the surface.
We know from computer simulations and
practical tests that this is physically
possible but we also suspect that it occurs
very seldom in real life flying.
In both cases the brakeline travel
becomes very short and even small input
may suddenly induce an airflow
separation; in some cases even a gust or
a sudden thermal may change the angle
of incidence enough to cause the deep
stall.
If you find yourself flying in unavoidable
rain we strongly recommend that you
avoid any sudden movements or radical
brakeline input, that you do not pull
BigEars or B-stall, and that you steer clear
of turbulence and avoid a deep flare on
landing.
radically increased risk of deep stall!
Adhesive logos
Always make sure that your intended
logo will not in any way influence the
glider behaviour. If in doubt we
suggest avoiding the attachment of
advertising logos on the wing. UP
cannot be held responsible for any
mishaps caused by intentional aftersales changes done to the wing.
BEWARE! Attaching heavy
adhesive logos made out of
unsuited material to the
wing may result in the
revocation of the glider
certification.
Overloading
The UP Pico is a very strong
paraglider, and flying all the usual SIV
and acro manoeuvres will not normally
pose a structural problem. However,
frequent acro training does accelerate
the ageing process dramatically, and
UP recommends having wings that are
often used for acro or SIV-type
manoeuvres subjected to checkups at
shorter intervals than normally
stipulated.
Salt water
If you do most of your flying near the
sea, where the air is humid and salty,
the wing may age faster. In this case
we suggest you have it checked more
often than prescribed in this manual.
WARNING! Avoid flying in very
humid air or in rain. A wet
canopy may have very
unpredictable flying
characteristics, one of which is a
34
______________________________________________________________________________
Maintenance and
cleaning
Taking care of your
paraglider
The wear and tear that your paraglider
suffers depends on a number of factors;
how frequently it’s flown, whereabouts in
the world you fly it, how much UV it gets
and how well you look after it. Bear in
mind the following maintenance points.
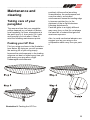
Packing your UP Pico
positively influence the launching
characteristics, the performance and
even the safety, as wrinkled
reinforcements cause the leading edge
to become wrinkled too, to the
detriment of the in-flight behaviour
following disturbances.
Pack the glider in a slightly different
way every time, so that it’s not always
the same bit of material that gets the
maximum exposure.
Also, to avoid mechanical abrasion we
suggest you lay your wing on the
compression sack every time you pack
it.
Fold your wing as shown in the illustration
here below. By doing so you will increase
the working life of your wing simply
because the reinforcements in the leading
edge are not bent or folded every time you
pack away your wing after a flight.
Undamaged reinforcements
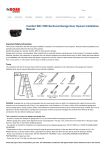
Illustration 8: Packing the UP Pico
35
______________________________________________________________________________
Paraglider fabric
We use a top grade polyamide cloth to
build our paragliders, which has a special
protective coating against UV radiation
and air permeability. The cloth will suffer
though; if it’s exposed to large amounts of
UV (i.e. bright sunlight). Do not leave your
glider lying in the sun for any longer than
is absolutely necessary, only unpack and
rig right before launching and do yourself
the favour of repacking right after landing.
Modern paraglider textiles have improved
much in terms of UV durability but UV
exposure remains the deciding factor of a
paragliders' life expectancy. First the
colours start to fade, then the coating and
the structural integrity of the synthetic
fibres begins to deteriorate.
On UP gliders the coated side of the cloth
is facing inwards. This means that the
coating is subjected to less mechanical
abrasion while the porosity-limiting
capabilities remain the same
When choosing an area to lay out the
glider before launching, try to find
somewhere that is relatively free of stones
and sharp rocks. Pay particular attention
to the top surface, where it lies on the
ground.
Never step on your glider – stepping on it
will weaken the cloth, especially if the
surface beneath it is hard or contains
sharp objects. We recommend keeping an
eye on spectators on launch. Many,
especially children, do not fully appreciate
the fragility of the lines and cloth. It is
usually easy to explain this to spectators
and parents.
When folding your wing please make sure
that there are no insects caught inside.
Many insect species contain acids that
could damage the cloth. Grasshoppers
may use their sharp mandibles to attempt
to gnaw their way out of a folded canopy,
making it full of holes in the process.
Beside they exude a dark and strong
colorant that will stain the cloth if
grasshoppers are packed inside. Shoo
them off before packing. Note that,
contrary to popular belief these
particular insects are not attracted to
any particular colours.
If the glider gets wet, then dry it as
soon as possible, but not in direct
sunlight! If you pack you wing away
wet it may grow mildewy and, if also
subjected to heat, the fabric fibres may
begin to decompose.
A new wing straight off the shelves is
often compressed hard. The
compression serves to reduce
shipping costs but should note be
repeated once the wing has been
unpacked and flown for the first time.
Also note that, in spite of it being a
comfortable seat, the glider bag should
not be used as such.
Should you accidentally put your UP
Pico into seawater rinse it out
thoroughly with fresh water and dry it
slowly in the shade (see Chapter
Cleaning).
Paraglider lines
The lines used on the UP Pico are
®
high grade Dyneema lines from
Cousin Trestec. Keep the following
points in mind:
•
The lines should be checked
regularly for damage.
•
Please take care to avoid
abrasion and damage to the lines'
protective sheeting
•
The lines should not be knotted or
bent unnecessarily.
•
The main brake line at the handle
should not have too many knots.
Each knot weakens the line.
•
After any line over-stressing (tree
landings, water landings and other
36
______________________________________________________________________________
•
extreme situations) all lines must be
checked for condition and length and
should be replaced where necessary.
If any change in flying characteristics
is noticed then the lines should be
checked possibly exchanged.
Immediately send your wing to
UP International or to a UP certified
checking facility if you feel that
something is wrong!
Storage and transport
A paraglider should always be dry when
packed, but this is particularly important
after the last flight of the season. But even
a completely dry wing should still be
stored open in a dry, clean and dark
place. If you do not have room for such
winter storage we recommend you open
all compression straps on the bag as
much as possible and leave the bag lid off
so that air can circulate around the packed
canopy. Make sure no mice or cats make
their sleeping quarters in you wing, and
keep it well distant from solvents and
acids. Petrol and other petrochemicals is
especially abrasive for nylon and will
dissolve the cloth if allowed near.
The storage temperature should be
between 10 and 25 degrees Celsius, and
the relative humidity between 50 and 75%.
Do not expose your UP Pico to extreme
heat (storing it the boot of a car parked in
the sun). The heat may cause moisture to
be pressed through the fabric, thereby
damaging the coating. High temperatures
in combination with moisture are a
particularly volatile mix that will accelerate
the hydrolysis process where the fibres
and the coating are decomposed.
stains can be cleaned with a weak
soap solution, and rinsed thoroughly.
Then leave it to dry in a shady but
well-ventilated area.
BEWARE! Never use
chemical cleaning agents,
brushes or hard sponges
on the material, as these
destroy the coating and
affect the strength of the
cloth.
The canopy will become porous and
will loose structural strength. Never
attempt to clean your paraglider in a
washing machine. Even without using
detergents the simple mechanical
abrasion will quickly finish the canopy
and render it useless. Also avoid
dipping it in a swimming pool; the
chlorine will damage the cloth. If you
MUST rinse the parachute, f.ex.
following a sea water landing, do so
with a gentle spray with fresh water.
Frequent spraying will accelerate the
ageing process.
Cleaning
If you feel it necessary to clean your UP
Pico at any time then use lots of lukewarm
water and a soft sponge. More stubborn
37
______________________________________________________________________________
Checks and repairs
Paragliding is a wonderful sport;
flying as free as a bird in the air,
enjoying the peace and
tranquillity. But the air is an
alien environment that
commands respect and a
responsible attitude from the pilot. At
UP we don’t just put our knowledge and
experience into the development of
paragliders, but also into their
maintenance, service and repairs to
ensure that you can fly safely at all times.
Repairs or inspections must only be
carried out by UP International or a UP
approved repair/checking facility.
Maintenance
All care and maintenance must be carried
out in accordance with UP
recommendations. To ensure that this
happens we strongly advise you to only let
UP recognised service centres touch your
wing – this is also a prerequisite for the
UP Warranty to be valid. So there’s a lot
speaking for letting UP, or a UP affiliate,
look after your Pico!
Airworthiness Check
In Germany and Austria all paragliders
must be checked according to the
following time schedule:
Germany/Austria. Contact your local
dealer for information about the
nearest UP approved checking facility.
We will happily service the glider more
often, if you feel that it is necessary.
UP Craftsmanship
In order to ensure that your UP Pico
maintains its very high inherent
performance and safety we highly
recommend that you employ UP, or a
UP affiliate, with any repairs or
maintenance. Our service staff is
trained and skilled, and knows the UP
wings better than anyone.
UP Warranty
Conditions and extent of the UP
International Warranty can be found in
the following pages. For further
information please ask UP
International directly, or you local
representative. The UP importer in
your country is always delighted to
clear any questions with you.
National warranty
conditions
In some countries the local laws
stipulate different warranty rules than
those outlined here. Please note that
these local rules only apply in the
country where you have purchased
your wing. Information about local
rules and conditions are available from
your local dealer.
•
2 years after purchase
•
Every two years after that, or sooner if
prescribed by the UP checking facility
during the last check
•
After 150 hours, or
International UP warranty
•
After 100 Flights
Warranty conditions:
The international UP warranty covers
material- and workmanship faults and
is valid for 24 months from the delivery
date. It can be extended for a further
These limits have been set by the German
Free Flight Federation (DHV) and make
no less sense for wings flown outside of
38
______________________________________________________________________________
12 months by letting UP do all service and
maintenance, including the two-years
compulsory check. Outside of Germany
and Austria UP-approved service centres
may perform these checks.
The UP warranty covers the cost of
materials and workmanship on gliders
accepted by UP to fall under the warranty.
The UP warranty does not cover damage
caused by accidents, or by changes made
to the glider. Likewise, parts that are
damaged due to normal wear and tear are
exempt from warranty coverage. Fabric
colour changes that do not influence the
behaviour or safety of the wing are not
covered by the warranty, and neither are
faults caused by the exposure to solvents
or salt water, or plain incorrect handling of
the wing.
For any warranty claim to be accepted
the following conditions must be
adhered to:
•
The paraglider was used under
normal circumstances and was
maintained according to the
instructions given by UP International.
Note that these include instruction for
the correct packing, storing and
cleaning
•
The paraglider was only used in
accordance with its DHV certification
•
A complete logbook showing all
flights, with duration and location,
must be presented upon request
•
Only original UP spares have been
used, and only UP, or a UP affiliate
service centre, has performed repairs
or service jobs on the paraglider
•
A complete, correct registration card
has been filled in and sent to UP within
14 days of the purchase. Note that you
may also register your paraglider with
UP via the UP homepage
www.up-paragliders.com
>service >UP Product registration
UP reserves the right to refuse any
claims not honouring one or several of
these conditions. However, in some
cases an “ex gratia” settlement may be
offered.
Checking the UP Pico
According to German and Austrian
aeronautical legislation (§ 14 Abs. 5
LuftGerP) the owner of a glider can
check the airworthiness by his own, or
authorise a third person (for example
manufacturer/importer) to do this.
To perform your own airworthiness
check, UP International must give you
a briefing. This briefing could be done
after an agreement with UP
International and is only valid for the
UP Pico. The owner gets the so-called
"Nachprüfanweisung" after completing
a successful checking at UP
International.
Should the owner decide to check the
rd
wing by himself, or employ a 3 party
to do so they must make sure that
UP’s guidelines are adhered to. Failing
to do so will void the certification.
DHV and UP International highly
recommend that you let the
manufacturer/importer or a DHV
accepted service company do the
check of airworthiness.
Packing and checking
of the rescue system
Only by regularly having your rescue
parachute repacked can you
guarantee its flawless operation! As
with the glider, the rescue parachute
should be examined every 2 years by
either the manufacturer or an
Authorised Service Centre. We offer a
certified service for re-packing,
39
______________________________________________________________________________
checking and installing the parachute into
your harness. We will also carry out any
repairs necessary, all fully guaranteed.
Sending the UP glider
and other UP products
Beside paragliders, harnesses and
flying equipment you will also find the
new “Skywear” collection with the
latest flying garments and the “News”
section, which will keep you updated
with all activities around UP.
www.up-paragliders.com
The best way to send your paraglider,
rescue parachute, harness etc. to our
service team is in a stable box via post or
UPS. Enclose a note of what requires
doing (2 Year Check, repair, repack etc.)
and also your daytime contact details. We
will return your equipment either by post or
UPS. Please indicate preferred method of
payment (either bank cheque or C o d)/
Should you require any further information
about the services we offer, please
contact us at the address and phone
number below. We are also able to give
you information about your nearest
Authorised Service Centre, as well as
other manufacturers who are authorised to
check and repair UP gliders and
equipment.
UP International GmbH
-Abteilung ServiceKreuzeckbahnstraße 7
D-82467 Garmisch-Partenkirchen
Email: [email protected]
Telefon: +49 (0) 88 21-7 30 99-19
Fax: +49 (0) 88 51-92 92 60-16
UP Homepage
The UP Homepage gives you information
about the latest news and products from
UP. You will find any technical information
and accessories for your UP Pico, as well
as many useful things that are necessary
for flying.
40
______________________________________________________________________________
Some final words
With paragliding a fundamental new air
sport has emerged; one that makes
independent flight possible for almost
everybody. The technical simplicity, the
mobility of the wing and the ease of
learning the basic flight techniques have
all combined to make paragliding appear
simple and straightforward.
As long as you fly with the necessary
respect for the demands and dangers,
then these ideals of paragliding will be
fulfilled. You should decide for yourself
whether conditions are suitable before you
proceed with the flight. You should always
be aware that any kind of air sport is
potentially dangerous if you overstep the
natural and physical laws, whether from
ignorance or unreasonableness.
“Probably there are only a few sports
where success requires, besides
physical fitness, understanding the
processes in nature to such a high
degree - a fact which distinguishes
paragliding as sport especially.”* The
charm of flying lies in “understanding
the processes in nature”, because you
have to try again and again to fathom
the logic and fly with regard to the
decisions you make.
If you want to realise the dream of
flying, the dream of free movement in
the air, fly not to impress others - fly for
the sheer joy of it.
We at UP wish you delightful, beautiful
and accident free flying with your UP
Pico.
SEE YOU UP IN THE SKY –
UP International
* from Helmut Reichmann from the book
"Streckensegelflug"
41
______________________________________________________________________________
______________________________________________________________________________
Attachments
Line Layout Plan ..................................................................................44
DHV „Luftsportgeräte-Kennblatt“ UP Pico XS-L ..................................45
Pre-flight check sheet ..........................................................................53
Service Booklet
Used by the UP Service centre in connection with periodic service ....55
Product registration card......................................................................59
______________________________________________________________________________
Line plan
Deutscher Hängegleiterverband e.V. im DAeC
DHV/OeAeC-Technikreferat
LBA-anerkannte Prüfstelle für Hängegleiter und Gleitsegel
Beauftragter der österreichischen Luftfahrtbehörde
Herstellerangaben zum Luftsportgeräte-Kennblatt
Gleitsegel
I.
Musterprüfung
1. Gerätemuster:
UP Pico XS
2. Hersteller:
UP International Sportartikel GmbH
II. Merkmale und Betriebsgrenzen
1. Gerätemasse(kg):
4,2
2. Zulässiges Startmasse minimal (kg):
60
3. Anzahl der Sitze:
maximal (kg):
85
1
4. Klasse:
1 GH
5. Gurtzeugbeschränkung:
ja GH / GX
6. Fußbeschleuniger:
ja
7. Trimmer:
nein
8. Projizierte Fläche (m²):
21,13
9. Windenschlepp:
ja
10. Tragegurtlängen (mm):
Tragegurt A:
Tragegurt B:
Tragegurt C:
Tragegurt D:
normal: 450
normal: 450
normal: 450
normal: 450
beschleunigt: 295
beschleunigt: 330
beschleunigt: 490
beschleunigt: 450
11. Leinenlängen (mm), von der Kappenmitte beginnend:
A
B
C
D
E
Bremse
1
2
3
5
6
8
9
11
12
14
15
17
18
19
20
21
1
3
5
7
9
11
13
15
17
19
21
12. Sonstige Besonderheiten:
III. Betriebsanweisung in der Fassung vom: 01.01.08
Ort, Datum, Stempel und Unterschrift des Herstellers:
Bearbeitungsvermerk DHV:
Kennblatt geprüft
am:
von:
Deutscher Hängegleiterverband e.V. im DAeC
DHV/OeAeC-Technikreferat
LBA-anerkannte Prüfstelle für Hängegleiter und Gleitsegel
Beauftragter der österreichischen Luftfahrtbehörde
Herstellerangaben zum Luftsportgeräte-Kennblatt
Gleitsegel
I.
Musterprüfung
1. Gerätemuster:
UP Pico S
2. Hersteller:
UP International Sportartikel GmbH
II. Merkmale und Betriebsgrenzen
1. Gerätemasse(kg):
4,5
2. Zulässiges Startmasse minimal (kg):
70
3. Anzahl der Sitze:
maximal (kg):
95
1
4. Klasse:
1 GH
5. Gurtzeugbeschränkung:
ja GH / GX
6. Fußbeschleuniger:
ja
7. Trimmer:
nein
8. Projizierte Fläche (m²):
23,08
9. Windenschlepp:
ja
10. Tragegurtlängen (mm):
Tragegurt A:
Tragegurt B:
Tragegurt C:
Tragegurt D:
normal: 450
normal: 450
normal: 450
normal: 450
beschleunigt: 295
beschleunigt: 330
beschleunigt: 490
beschleunigt: 450
11. Leinenlängen (mm), von der Kappenmitte beginnend:
1
2
3
5
6
8
9
11
12
14
15
17
18
19
20
21
A
6935
6850
6855
6855
6890
6835
6805
6775
6785
6690
6635
6565
6530
6510
6290
6105
B
6840
6745
6755
6750
6795
6760
6725
6705
6715
6610
6565
6500
6475
C
6870
6780
6785
6780
6825
6785
6755
6725
6720
6615
6570
6495
6470
6235
6230
6125
D
6990
6910
6910
6910
6945
6905
6870
6815
6810
6730
6660
6570
6520
E
Bremse
7900
7585
7395
7285
7160
7060
7025
7020
6940
6810
6790
12. Sonstige Besonderheiten:
III. Betriebsanweisung in der Fassung vom: 01.01.2008
Ort, Datum, Stempel und Unterschrift des Herstellers:
Kochel, den 06.12.2007
Bearbeitungsvermerk DHV:
Kennblatt geprüft
am:
von:
1
3
5
7
9
11
13
15
17
19
21
Deutscher Hängegleiterverband e.V. im DAeC
DHV/OeAeC-Technikreferat
LBA-anerkannte Prüfstelle für Hängegleiter und Gleitsegel
Beauftragter der österreichischen Luftfahrtbehörde
Herstellerangaben zum Luftsportgeräte-Kennblatt
Gleitsegel
I.
Musterprüfung
1. Gerätemuster:
UP Pico M
2. Hersteller:
UP International Sportartikel GmbH
II. Merkmale und Betriebsgrenzen
1. Gerätemasse(kg):
4,8
2. Zulässiges Startmasse minimal (kg):
80
3. Anzahl der Sitze:
maximal (kg):
110
1
4. Klasse:
1GH
5. Gurtzeugbeschränkung:
ja GH / GX
6. Fußbeschleuniger:
ja
7. Trimmer:
nein
8. Projizierte Fläche (m²):
24,99
9. Windenschlepp:
ja
10. Tragegurtlängen (mm):
Tragegurt A:
Tragegurt B:
Tragegurt C:
Tragegurt D:
normal: 450
normal: 450
normal: 450
normal: 450
beschleunigt: 295
beschleunigt: 330
beschleunigt: 490
beschleunigt: 450
11. Leinenlängen (mm), von der Kappenmitte beginnend:
A
B
C
D
E
Bremse
S1
S2
S3
1
2
3
4
5
6
7
8
9
10
11
12
13
14
15
16
17
18
19
20
21
22
23
24
25
26
27
28
29
30
1
2
3
4
5
6
7
8
9
10
11
12
13
14
15
16
17
18
19
20
21
22
23
24
25
26
27
28
29
30
12. Sonstige Besonderheiten:
III. Betriebsanweisung in der Fassung vom: 01.01.08
Ort, Datum, Stempel und Unterschrift des Herstellers:
Bearbeitungsvermerk DHV:
Kennblatt geprüft
am:
von:
Deutscher Hängegleiterverband e.V. im DAeC
DHV/OeAeC-Technikreferat
LBA-anerkannte Prüfstelle für Hängegleiter und Gleitsegel
Beauftragter der österreichischen Luftfahrtbehörde
Herstellerangaben zum Luftsportgeräte-Kennblatt
Gleitsegel
I.
Musterprüfung
1. Gerätemuster:
UP Pico L
2. Hersteller:
UP International Sportartikel GmbH
II. Merkmale und Betriebsgrenzen
1. Gerätemasse(kg):
5,1
2. Zulässiges Startmasse minimal (kg):
100
3. Anzahl der Sitze:
maximal (kg):
130
1
4. Klasse:
1 GH
5. Gurtzeugbeschränkung:
ja GH / GX
6. Fußbeschleuniger:
ja
7. Trimmer:
nein
8. Projizierte Fläche (m²):
27,06
9. Windenschlepp:
ja
10. Tragegurtlängen (mm):
Tragegurt A:
Tragegurt B:
Tragegurt C:
Tragegurt D:
normal: 450
normal: 450
normal: 450
normal: 450
beschleunigt: 295
beschleunigt: 330
beschleunigt: 490
beschleunigt: 450
11. Leinenlängen (mm), von der Kappenmitte beginnend:
A
B
C
D
E
Bremse
2
3
6
7
10
11
14
15
18
19
22
23
26
27
29
30
31
2
4,5
7
9,10
12
14,15
17
19,20
22
25
28
31
12. Sonstige Besonderheiten:
III. Betriebsanweisung in der Fassung vom: 01.01.08
Ort, Datum, Stempel und Unterschrift des Herstellers:
Bearbeitungsvermerk DHV:
Kennblatt geprüft
am:
von:
Standard Einweisungskontrollblatt für neu gekaufte UP
Gleitschirme
Käufer Name/Vorname: ____________________________________________________
Adresse: ________________________________________________________________
Befähigungsnachweis Nr. : ___________ neuer Gleitschirm, Typ:____________________
Bisherige Anzahl Flüge: _____________ Seriennummer des Schirms:________________
Folgende Übungen sollten am Übungshang unter Aufsicht absolviert werden:
Auslegen und Sortieren der Leinen
Aufziehtechnik vorwärts und rückwärts
Aufziehen mit schlecht ausgelegtem Schirm
Durchführen mehrerer Starts
Laufen mit gebremstem Schirm
Slalomlaufen
Das Beherrschen der oben angeführten Manöver ist die Grundlage, um die Reaktionen
des neuen Gleitschirmes kennenzulernen. Zugleich werden wichtige Reflexe eintrainiert,
um den Schirm in turbulenter Luft angemessen handhaben zu können. Ungewollte
Klapper und andere extreme Flugzustände können dadurch reduziert bzw. wesentlich
besser beherrscht werden.
Folgende Manöver sollten während Höhenflügen unter Aufsicht mit Funk mit dem neuen
Gleitschirm absolviert werden:
Übungen:
Einweisungen:
Schnelle Kurvenwechsel
Enge Vollkreise in beide Richtungen
Einweisung in das Beschleunigungssystem
Seitliches Einklappen mit Kurs halten
Steilspirale
B-Leinen Stall
Ohren anlegen
Eventuellen Sackflug richtig ausleiten
Diese Übungen dürfen nur mit einem Rettungsgerät erfolgen. In Thermik und Turbulenzen
können alle diese Flugzustände plötzlich auftreten und es dient der eigenen Sicherheit,
diese mit jedem Schirm neu zu erfliegen.
Diese Übungen ersetzen nicht ein Sicherheitstraining, dessen Besuch wir jedem Piloten
im Interesse seiner eigenen Sicherheit empfehlen. Deine Flugschule kann Dir dies sicher
bestätigen.
Wir bestätigen, dass oben genannter Gleitschirm von uns testgeflogen wurde, und die
aufgeführten Manöver vom Käufer beherrscht werden:
Unterschrift Fluglehrer: _____________________________________________________
Unterschrift Käufer:________________________________________________________
Ort / Datum: _____________________________________________________________
___________________________________________________________________________
Service booklet
___________________________________________________________________________
Glider- and pilot data
Model:
Pico
Size:
XXXS XXS XS
S
M L
Serial number:
Colour: _________________________________________________
Date of purchase:_________________________________________
First flight date: __________________________________________
Dealer stamp and signature
Pilot (1. owner)
Name: _________________________________________________
Family name: ____________________________________________
Street: _________________________________________________
Town: __________________________________________________
Postal code: _____________________________________________
Country: ________________________________________________
Telephone: ______________________________________________
Fax: ___________________________________________________
Email: __________________________________________________
___________________________________________________________________________
Pilot (2. owner)
Name: _________________________________________________
Family name: ____________________________________________
Street: _________________________________________________
Town: __________________________________________________
Postal code: _____________________________________________
Country: ________________________________________________
Telephone: ______________________________________________
Fax: ___________________________________________________
Email: __________________________________________________
Pilot (3. owner)
Name: _________________________________________________
Family name: ____________________________________________
Street: _________________________________________________
Town: __________________________________________________
Postal code: _____________________________________________
Country: ________________________________________________
Telephone: ______________________________________________
Fax: ___________________________________________________
Email: __________________________________________________
___________________________________________________________________________
Please verify that your UP Service Centre has correctly filled in the form!
1st Service
Performed date: _______________________________
Assignment Nr.
Stamp
Service jobs undertaken:
2nd Service
Performed date: _______________________________
Assignment Nr.
Stamp
Service jobs undertaken:
3rd Service
Performed date: _______________________________
Service jobs undertaken:
Assignment Nr.
Stamp
___________________________________________________________________________
Please verify that your UP Service Centre has correctly filled in the form!
4th Service
Performed date: _______________________________
Assignment Nr.
Stamp
Service jobs undertaken:
5th Service
Performed date: _______________________________
Assignment Nr.
Stamp
Service jobs undertaken:
6th Service
Performed date: _______________________________
Service jobs undertaken:
Assignment Nr.
Stamp
Product registration card
Model:
Pico
Size:
XXXS XXS XS
S
M L
Serial number: ____________________________________
Date of purchase: __________________________________
First flight: ________________________________________
Preflown by: ______________________________________
Owner
Name: ___________________________________________
Family name: _____________________________________
Address: _________________________________________
________________________________________________
________________________________________________
Telephone: _______________________________________
Fax:_____________________________________________
Email: ___________________________________________
Dealer stamp and signature
Cut out this card and mail it to UP within 14 days of purchase, or register
your new UP Pico via www.up-paragliders.com>Service>UP>Product
Registration
Ultralite Products
International GmbH
Kreuzeckbahnstrasse 7
82467 Garmisch-Partenkirchen
GERMANY
UP International GmbH Kreuzeckbahnstrasse 7
82467 Garmisch-Partenkirchen
Tel. +49 (0) 88 21-73099 0 [email protected]
Fax: +49 (0) 88 21 73099 16 www.up-paragliders.com