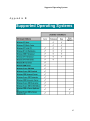
1
User Manual Undelete® for Windows® Up-to-the-minute Data Protection® for Windows systems and networks October 2003 This document describes the installation and operation of the Undelete file recovery solutions. It applies to the Server, Professional and Home Editions of Undelete and is intended for Windows users and system managers. Revision/Update Information: This is a new manual Software Versions: Undelete 4.0 Server Edition Undelete 4.0 Professional Edition Undelete 4.0 Home Edition Operating Systems: Windows Server 2003 Windows XP Windows 2000 Windows NT 4.0 Executive Software International, Inc., Burbank, California ________________________ October 2003 _________ © 2000—2003 by Executive Software International, Inc. The Software described in this document is owned by Executive Software International, Inc. and is protected by United States copyright laws and international treaty provisions. Therefore, you must treat the Software like any other copyrighted material (e.g. a book or musical recording) except that you may either (a) make one copy of the Software solely for backup or archival purposes, or (b) transfer the Software to a single hard disk provided you keep the original solely for backup or archival purposes. You may not copy the user documentation provided with the Software, except for your own authorized use. RESTRICTED RIGHTS LEGEND The software and documentation are provided with RESTRICTED RIGHTS. Use, duplication, or disclosure by the Government is subject to restrictions as set forth in subparagraph (c)(1)(ii) of the Rights in Technical Data and Computer Software clause at DFARS 252.227-7013 or subparagraphs (c)(1) and (2) of the Commercial Computer Software-Restricted Rights at 48 CFR 52.227-19 as applicable. Manufacturer is Executive Software International, Inc., 7590 North Glenoaks Boulevard, Burbank, California 91504, USA. Undelete, Diskeeper, Sitekeeper, Executive Software, PushInstall, Set It and Forget It, Up-to-the-minute Data Protection, and Emergency Undelete are trademarks or registered trademarks owned by Executive Software International, Inc. in the U.S. and other countries. Microsoft, Windows, Windows Server and Windows NT are trademarks or registered trademarks owned by Microsoft Corporation in the U.S. and/or other countries. All other trademarks are the property of their respective owners Contents Contents GETTING STARTED OVERVIEW OF UNDELETE RECOVERY BIN UNDELETE FROM DISK EMERGENCY UNDELETE UNDELETE EDITIONS IMPORTANT POINTS ABOUT UNDELETE ABOUT EXECUTIVE SOFTWARE OTHER IMPORTANT PRODUCTS VIII VIII IX X X X XI XI XII INSTALLING UNDELETE 1 BEFORE THE INSTALLATION WINDOWS VERSIONS SUPPORTED FILE SYSTEMS SUPPORTED DISKS SUPPORTED RESOURCE REQUIREMENTS INSTALLATION OVERVIEW INSTALLATION PROCEDURE INSTALLING UNDELETE FROM CD-ROM INSTALLING UNDELETE FROM A DOWNLOADED FILE AFTER THE INSTALLATION CHECK FOR UPDATE REGISTERING UNDELETE A NOTE ABOUT REPAIRING YOUR WINDOWS SYSTEM ABOUT THE UNDELETE SERVICE UNINSTALLING UNDELETE 1 1 2 2 3 3 4 4 4 4 5 5 5 5 6 USING UNDELETE 7 OPENING THE UNDELETE INTERFACE TREE VIEW PANE FILE INFORMATION PANE TOOLBAR MENUS STATUS BAR 7 8 9 10 11 13 iii Contents USING THE RECOVERY BIN RECOVERING FILES IMPORTANT POINTS ABOUT THE RECOVERY BIN SEARCHING THE RECOVERY BIN RECOVERABLE FILES SECTION SEARCHING BY DATE SEARCHING BY OWNER/DELETED BY UNDELETE FROM DISK IMPORTANT POINTS ABOUT THE UNDELETE FROM DISK FEATURE USING THE UNDELETE FROM DISK INTERFACE SETTING THE RECOVERY BIN PROPERTIES PROPERTIES DIALOG BOX COMMON BIN TAB INDIVIDUAL DISK VOLUME TABS CONNECT TO NETWORK FOLDER DISCONNECT FROM A NETWORK FOLDER CONNECT TO REMOTE COMPUTER RECOVERY BIN EXCLUSION EXCLUSION LIST DIALOG BOX TOOLBAR OPTIONS USING THE COMMAND LINE INTERFACE THE RECLAIM COMMAND PARAMETERS EXAMPLES THE UNDELETE COMMAND PARAMETERS EXAMPLES 13 14 15 16 17 20 22 23 23 25 30 30 35 37 39 40 40 41 42 45 49 49 49 50 51 51 51 EMERGENCY UNDELETE™ 53 IMPORTANT POINTS FOR USING EMERGENCY UNDELETE KNOWN RESTRICTIONS AND LIMITATIONS REQUIRED PRIVILEGES RUNNING EMERGENCY UNDELETE 53 54 54 54 USING PUSHINSTALL 57 ABOUT PUSHINSTALL RUNNING PUSHINSTALL 57 58 FREQUENTLY ASKED QUESTIONS 61 iv Contents SUPPORTED OPERATING SYSTEMS 63 TECHNICAL SUPPORT 65 INDEX 67 v Preface Preface What This Book is About Welcome to the Undelete for Windows User Manual. Although software manuals are often one of the least-favorite pieces of reading material around, we intend to make this one as painless as possible. This book will help you get Undelete quickly installed and running, and it describes the various Undelete features and how to use them. Structure of This Book Chapter 1 describes how to install Undelete. Chapter 2 describes how to operate Undelete and explains the various features. Chapter 3 describes the installation and operation of Emergency Undelete. Chapter 4 describes using the PushInstall feature to install Undelete across your network. Appendix A shows where to get answers to frequently asked questions. Appendix B has a table showing the operating systems supported by the different Undelete editions. Appendix C explains how to contact your Executive Software Customer Service Representative for Support Services. vii Preface Getting Started The Undelete Server, Professional and Home Editions are unique file recovery solutions for Windows NT, Windows 2000, Windows XP and Windows Server 2003. For simplicity, this User Manual will refer to all the editions collectively as Undelete. Any differences between the different editions will be clearly noted. Undelete incorporates cutting-edge technology developed by Executive Software—the same folks who developed Diskeeper®, the world’s most popular disk defragmenter. Undelete allows you to recover files that have been deleted—even after you’ve really deleted them by emptying your Recycle Bin, or by deleting files from Windows Explorer or other applications, or even from the Windows command prompt. Overview of Undelete Undelete is available in several editions—Server and Professional Editions for professional use, and a Home Edition for home users. On a Windows network, the combination of Undelete Server Edition and Undelete Professional Edition provides valuable protection against accidentallydeleted files. Installed on file servers and desktop systems, the Undelete system empowers network users to recover deleted files themselves, instead of relying on the System Administrator or Help Desk staff to do it for them. For home users, Undelete Home Edition provides a more robust and configurable file recovery solution than the Windows Recycle Bin, even allowing recovery of files after the Recycle Bin has been emptied. All three editions of Undelete are made up of these major components: Recovery Bin Undelete From Disk Emergency Undelete These components are described in the following sections. viii Preface Recovery Bin The Recovery Bin feature is similar to the Windows Recycle Bin. Deleted files aren’t really deleted—they’re simply moved to the bin and held there until the bin is “emptied” or purged. This allows you to recover files easily after they have been deleted. However, the Recovery Bin differs from the standard Windows Recycle Bin in several important ways: It allows you to recover files deleted by any method, including Windows Explorer and other applications—even files deleted from the Windows command prompt! You can have a Recovery Bin for any individual disk volumes on your computer, or use a single, “common” Recovery Bin for all your disk volumes. When files are “deleted” and moved into the Recovery Bin, they are displayed in a manner very similar to Windows Explorer. You (or your users) can see and recover the deleted files and the folders as easily as browsing for “normal” files. The Server and Professional editions of Undelete allow you to see the contents of the Recovery Bins on remote computers running Undelete Server Edition, allowing you or your users to recover “deleted” files across your network (typically from network file servers). This feature alone is a “life saver” for many System Administrators and Help Desk technicians. It’s no longer necessary to search backup tapes when a network user accidentally deletes a file from the file server. With the Undelete system in place, network users can recover their own files in seconds, instead of relying on the IT staff to find and recover the files for them. There are actually two different ways you can recover deleted files from remote Recovery Bins: Mapped share access and node-to-node access. Computers running Undelete Server or Professional edition can access deleted files from mapped network shares (if the computers where the shares reside are running Undelete Server Edition). Users see their mapped shares displayed in a familiar form, and can recover files they have deleted from these shares. Computers running Undelete Server have the added capability of being able to access the full Recovery Bin on remote computers running either Undelete Professional Edition or Undelete Server Edition. ix Preface Undelete From Disk The Undelete From Disk feature, as its name implies, allows you to recover files that have really been deleted, such as files purged from the Recovery Bin, or files that were deleted when the Recovery Bin was not enabled. The Undelete From Disk feature can also be used to recover files from volumes or directory folders that have been excluded from Recovery Bin processing. Both the Recovery Bin and the Undelete From Disk features can be accessed from either the Undelete graphical user interface, or from the Windows command prompt. Note that encrypted files cannot be recovered with the Undelete From Disk feature. See Chapter 2 for more information about the Recovery Bin and the Undelete From Disk feature. Emergency Undelete Emergency Undelete is a separate utility used to recover accidentally deleted files before installing the full Undelete product. Since installing software on a computer can overwrite deleted files and make them unrecoverable, Emergency Undelete runs directly from a CD-ROM or floppy disk without any installation. See Chapter 3 for more information about Emergency Undelete. Undelete Editions Here is a brief description of the different Undelete editions. The tables in Appendix B show additional details. Undelete Server Edition Undelete Server Edition enables you to find and recover files deleted on the server where Undelete is installed as well as mapped shares on remote computers on your network (if they also have Undelete Server Edition installed). Undelete Server Edition can also connect directly to remote machines running Undelete Server or Professional, allowing you to access Undelete on the remote computer as if you were sitting in front of the machine. x Preface Undelete Professional Edition Like Undelete Server Edition, the Professional Edition can recover files from the computer where it is installed, and it can also recover files from computers that have Undelete Server Edition installed. Undelete Home Edition Undelete Home Edition can undelete and recover files deleted from your local computer, but it does not support the Undelete networking features. Important Points about Undelete Here are several important points about using Undelete: When you install Undelete, it will take the place of any other file recovery utilities currently installed on your computer. This includes the Windows Recycle Bin as well as third party products that perform similar functions. Where security is of concern, the Recovery Bin Properties can be set to completely erase files that are deleted from the Recovery Bin, using the SecureDelete option. Long filenames might be shortened to the DOS 8.3 file naming convention when files are deleted from the Windows command prompt and recovered with Undelete. Undelete Server Edition cannot recover files on computers running the Home Edition of Undelete. It can, however, recover files on computers running Undelete Professional or Undelete Server. About Executive Software Executive Software, founded by its Chairman and CEO Craig Jensen, was incorporated in 1981. In 1986, Executive Software’s flagship product, Diskeeper for VAX/VMS was introduced, establishing Executive Software as the leader in defragmentation products for the corporate marketplace. Since then, the company has become established as a leader in OpenVMS and Windows performance and system management solutions. Part of our company’s corporate purpose is to help Data Center Managers solve performance and system management problems. Superior technical capability coupled with meticulous market research fueled rapid growth for Executive Software, and resulted in a high degree of customer satisfaction. xi Preface Executive Software has grown from five people in 1986 to more than a hundred today, with headquarters in California and a worldwide distribution network. The expansion of the company and the popularity of its products demonstrate a successful implementation of the company’s purpose and the degree of technical and administrative capability that backs it up. Other Important Products Executive Software is known throughout the computer industry for its focused development of system management tools. If you are running any current Windows operating system (Windows 95 through Windows Server 2003), you should also have: Diskeeper automatic disk defragmenter for Windows Diskeeper is the most recommended network defragmenter in the world and independent lab tests confirm that it maximizes performance, lowers operating costs, and raises system productivity. Modern operating systems fragment files as they are written to the disk, resulting in degraded performance. Diskeeper completely handles the problem without adding to a system administrator’s workload. That’s why Diskeeper is considered an absolute necessity by top IT professionals worldwide. Get the system performance you deserve with Diskeeper, available from your local reseller or directly from Executive Software. Sitekeeper® System Management Software Get at-a-glance updates on every software version, build, update and patch. Also see detailed hardware information including processor speed, RAM, hard drive size, logical free space and asset management tags from the BIOS and motherboard. Install/uninstall programs with a few clicks of the mouse, using Executive Software’s PushInstall feature. You can visit the Executive Software website at: www.executive.com. xii Installation Chapter 1 Installing Undelete This chapter explains how to install Undelete and provides important information you should know after the installation. Before the Installation Windows Versions Supported Undelete is supported on the Intel x86 platform (including Pentium and compatible CPUs from other manufacturers), running the Windows NT 4.0, Windows 2000, Windows XP and Windows Server 2003 operating systems. The different editions of Undelete support the following operating systems: Undelete Edition Supported Operating System Windows NT 4.0 Server Windows NT 4.0 Workstation Windows 2000 Server Windows 2000 Professional Undelete Server Edition Windows XP Professional Windows XP Tablet PC Windows XP 64-Bit Edition Windows Server 2003 (all editions) 1 Installation Undelete Edition Supported Operating System Windows NT 4.0 Workstation Windows 2000 Professional Undelete Professional Edition Windows XP Professional Windows XP Media Center Windows XP Home Edition1 Windows XP 64-Bit Edition Windows NT 4.0 Workstation Windows 2000 Professional Undelete Home Edition Windows XP Professional Windows XP Media Center Windows XP Home Edition Note that Service Pack 6 or higher is required on Windows NT 4.0 File Systems Supported Undelete supports the NTFS and 16 and 32-bit FAT file systems, but the 12-bit FAT file system is not supported. (The 12-bit FAT file system is used on FAT volumes smaller than 16 megabytes in size, such as 1.4-MB floppy diskettes.) Disks Supported Undelete supports a wide range of SCSI and IDE disks, including: 1 2 Primary Partitions Extended Partitions Logical Drives Volume Sets Mirror Sets RAID arrays Removable disks (such as ZIP drives and many memory cards) Networking features are not available when running Undelete Professional Edition on Windows XP Home Edition. Installation Resource Requirements The disk space requirements for Undelete Professional Edition and Undelete Home Edition are about 4 megabytes or less. Undelete Server Edition requires up to 35 megabytes of disk space. After Undelete is installed, a Recovery Bin is created by default on each disk volume detected on your computer. Although these Recovery Bins initially use no disk space, they will eventually grow as files are deleted. The default size limit for these Recovery Bins is 20% of the disk volume, but this can be changed easily with the Recovery Bin Properties option on the Tools menu. Installation Overview Undelete is installed from a CD-ROM or from a downloaded file. The Undelete installation program: Confirms that you have Administrator privileges. Determines which version of Windows you are running. Checks for sufficient space on the disk for the installation. Recognizes and will install over previous versions of Undelete. Copies the Undelete files to the destination directories. Updates the Windows registry. Replaces the Windows Recycle Bin icon on your desktop with the Recovery Bin Icon, but leaves the Recycle Bin and its contents in the directory structure on your computer. Initializes the Undelete service. Note: To complete the installation, it is necessary to restart your computer. This starts the Undelete driver, which intercepts file deletion requests and redirects the deletion operations, causing “deleted” files to be placed in the Undelete Recovery Bin. 3 Installation Installation Procedure The Undelete package includes two separate programs—Undelete and Emergency Undelete. The full Undelete product includes both the Recovery Bin feature and the Undelete from Disk feature. Emergency Undelete is a compact version of Undelete from Disk, intended to run as a separate program in situations where any write activity on a disk could endanger the recovery of previously deleted files. Emergency Undelete requires no installation. It is run directly from a floppy disk or CD-ROM. Installing Undelete from CD-ROM To install Undelete from CD-ROM, follow these steps while logged on to an account that is a member of the Administrators Group: 1. 2. Insert the Undelete CD-ROM into the appropriate drive on your computer. The Windows AutoPlay feature automatically starts the installation. Just follow the directions displayed on your screen. If you have disabled the AutoPlay feature, use Windows Explorer to locate and double-click the Setup.exe file in the root-level folder on the CD-ROM and follow the directions displayed. Installing Undelete from a Downloaded File To install Undelete from a downloaded file, follow these steps while logged on to an account that is a member of the Administrators Group: 1. 2. 3. After downloading the Undelete package to a temporary location on your computer, double-click the self-extracting executable file you downloaded. You will be prompted for a temporary location to extract the Undelete files into. You can accept the default location shown or click Browse to select another location. Follow the instructions displayed to install Undelete or to create an Emergency Undelete floppy disk. After the Installation After installing Undelete, there are still several steps to consider. They are discussed in the following sections: 4 Installation Check for Update The first time you run Undelete, it automatically checks to see if a more recent version of Undelete is available. If so, you are given the option to download and install the newer version. When the download screen is displayed, click Run this program from its current location to begin installing the update. Or, click Save this program to disk to save the Undelete update installation package on your computer for later installation. (To install an update stored on your computer in this manner, simply double-click the file you downloaded and follow the instructions displayed.) You can check for Undelete updates any time you want. Use the Check for update option in the Help menu to see if a newer version of Undelete is available. Registering Undelete After the Undelete installation is complete, you may be given the option to register your purchase. You can also register Undelete at the Executive Software Web site at www.execsoft.com/register, or fax the registration card included in the Undelete package to Executive Software. Both methods provide a fast, efficient way to register Undelete. Be sure to register your Undelete purchase to receive the free 90 days of telephone support included with Undelete. A Note About Repairing Your Windows System Performing an emergency repair or reinstallation of a Windows system can possibly change or disable certain system information or services. For this reason, it may be necessary to reinstall Undelete after repairing your Windows system. About the Undelete Service Undelete is primarily designed as a “Set It and Forget It”® file recovery system. In order to accomplish this goal, it creates a Windows service. The service allows Undelete to run in the background while other applications are running. After installation, the Undelete service starts automatically each time your Windows system is started. The Undelete service runs all the time, whether or not Undelete is in use. This service consumes negligible system resources. It 5 Installation must be running for Undelete to save deleted files in the Recovery Bin and for the Undelete user interface to operate correctly. Uninstalling Undelete Follow these steps to remove Undelete from your computer: 1. 2. 3. 4. From Control Panel, double-click Add/Remove Programs. Click the Install/Uninstall tab. Highlight Undelete. Click the Add/Remove button. This removes the Undelete service, files, Program Group, and registry entries from your computer. 5. Restart your computer. Undelete will not be removed completely until you restart. 6. As a final step, manually delete the Undelete installation directory if it exists. Important Note: It may be necessary to reboot your computer after uninstalling Undelete in order to fully restore the native Windows Recycle Bin function. 6 Operation Chapter 2 Using Undelete This chapter describes the various features offered by Undelete and explains their operation. Opening the Undelete Interface To open the Undelete interface and access its various features, double-click the Recovery Bin icon on your desktop. Here is an example of the Recovery Bin display, which is the main view of Undelete: Menus Toolbar Tree View Pane Status Bar File Information Pane 7 Operation The Recovery Bin interface contains pull-down menus and a toolbar. Many of the functions offered are the same on the menus and toolbar. A tree view of available disk volumes and folders is also displayed, plus a list of files that were removed from the selected volume or folder, but have been saved in the Recovery Bin. Here are descriptions of the various parts of the Recovery Bin interface: Tree View Pane This section of the Recovery Bin display shows a tree view of the available disk volumes and folders. Click on the icon of a disk volume to view a list of the files in the Recovery Bin that were “deleted” from the root directory of that volume, or click on one of the folder icons to view the “deleted” files from that folder. As with Windows Explorer, click on a “+” symbol next to the icon to expand a tree (show subfolders), or click the “-” symbol to collapse it (hide subfolders). Undelete Server Edition and Undelete Professional Edition can also display mapped drives on remote computers, if the remote machine is also running Undelete Server. This icon indicates mapped file shares on computers that are running Undelete 4.0 Server Edition. You can view the files deleted from these shares by double-clicking the icon and navigating to the deleted files. This icon indicates mapped file shares on computers that are not running Undelete 4.0 Server Edition, or the computer is currently unavailable. You can hide shares displaying this icon by using the Disconnect Network Folder option in the Undelete toolbar or by right-clicking the icon and selecting Disconnect. In some cases, neither of these icons are displayed. If so, use the Connect and enter login credentials Network Folder option on the Undelete toolbar as prompted to connect to your network shares. You can also use this option to connect to a shared folder that you have not already mapped in Windows Explorer. If you do not know from what folder a file was deleted, you can search for it, using the Search Recovery Bin feature. This feature can be accessed from the toolbar or from the File menu. 8 Operation File Information Pane The file information pane shows information about the files in the Recovery Bin. It is also where you select specific files you want to recover. To select more than one file, hold the <Ctrl> key while clicking on the names of the files you want to recover. Or, you can hold the <Shift> key to select a continuous list of files. Here is the information shown in the file information pane: Name This column of the display shows the original filename and extension of each file saved in the various \RecoveryBin\ directory folders on your computer. Right-click a filename as a shortcut to Recover or Delete it. Click on the title bar at the top of this column to sort the files by name in forward or reverse alphabetical order. Size This column of the display shows the size of the files either stored in the Recovery Bin or detected by the Undelete From Disk feature. Click on the title bar at the top of this column to sort the files by size in forward or reverse order. Date Deleted This column of the Recovery Bin display shows the date a file was “deleted” and moved to the Recovery Bin. Click on the title bar at the top of this column to sort the files by the date they were deleted, shown alternately in forward or reverse date order. Date Created This column of the Recovery Bin display shows the date a file was created. Click on the title bar at the top of this column to sort the files by the date they were created, shown alternately in forward or reverse date order. Deleted By This column of the Recovery Bin display shows the names of the accounts used to delete files. 9 Operation Note that the name reported in the "Deleted by" column is the name of the account that was used to authorize the file deletion. In the case of a local file delete, this is the account under which you logged in, shown as the name of the local machine, followed by the name of the account used on that machine. If you are logged on using a domain account, the name shown will be the name of the domain followed by the domain account name. When files are deleted from a remote machine via a mapped share, things are a bit more complicated. In this case, the account that is used to authorize the deletion is the account that authorized the mapping of the share on the machine to which the disk is directly attached. Thus, if you log onto LOCAL1\YourName, map a share on SERVER1 using your DOMAIN1\YourName account, and delete a file on the share, the "Deleted by" name is "DOMAIN1\YourName" in the Recovery Bin on SERVER1. This is because SERVER1 does not “know” anything about the LOCAL1\YourName local account—it only knows about, and can get information for, the DOMAIN1\YourName account. Owned By This section of the Recovery Bin display shows who, if anyone, owned the deleted file. Note that files on FAT volumes display “No Owner” in this column, because the FAT file system does not track file ownership. Toolbar The Undelete toolbar has icons for the most common Undelete tasks. Each of these icons and tasks is described in its respective section later in this chapter. Note that the selection of icons in the toolbar varies with the edition of Undelete. Undelete Server Edition displays all the icons shown here, but Undelete Professional and Home editions do not. 10 Operation These options are available from the Undelete toolbar: —Recover selected file(s) —Delete selected file(s) —Empty Recovery Bin —Search Recovery Bin for file(s) —Find files on disk —Recovery Bin Exclusion List —Recovery Bin Properties —Connect to a network folder —Disconnect from a network folder —Connect to a remote computer —Help Topics See Toolbar Options on page 45 for a full description of the toolbar options. Menus The Undelete menus have these options, which are all described later in this chapter: 11 Operation File Menu Recover files…—Retrieve deleted files from the Recovery Bin Delete from bin—Remove selected files from the Recovery Bin Empty Recovery Bin—Remove all the files from the Recovery Bin Find files in Recovery Bin—Locate files in the Recovery Bin Find files on disk…—Recover files that have really been deleted Close—Close the Recovery Bin View Menu Refresh—Update the Recovery Bin display to show any changes since the Recovery Bin was opened Tools Menu Exclusion List…—Specify which files you don’t want to be saved in the Recovery Bin Recovery Bin Properties…—Change a variety of Recovery Bin settings Connect to Remote Computer…—Connect to the Recovery Bin on a remote computer (Undelete Server Edition only) Connect Network Folder…—Display Recovery Bins from remote computers in the Tree View pane (Not available in Undelete Home Edition) Disconnect Network Folder …—Remove Recovery Bins from remote computers from the Tree View pane (Not available in Undelete Home Edition) Help Menu Help Topics—View the Undelete Help system About Undelete—Show the version number and other information about Undelete 12 Operation Check for update—Open a browser window and automatically check the Executive Software website to see if an update is available for the version of Undelete installed. Status Bar This section of the Recovery Bin display shows information about the Recovery Bin. When no files are selected, the Status Bar shows the number of files in the File Information pane, the total size of the files in the local Recovery Bin, and the percentage of the Recovery Bin size used. Note that the percentage of the Recovery Bin in use figure indicates the total Recovery Bin space, which can include more than one Recovery Bin if you have specified Recovery Bins on more than one disk volume. For this reason, there is a possibility that a small Recovery Bin on one volume could be full while a large Recovery Bin on another volume could be nearly empty, and the percentage of the total Recovery Bin size used could be as low as 1 or 2 percent. When one or more files are selected, the Status Bar shows the number of files selected and their total size. Using the Recovery Bin With Undelete, deleted files aren’t really deleted—the deletion request is intercepted by Undelete and the deleted files are actually stored in another location, called the Recovery Bin—so recovering these deleted files is only a few mouse clicks away. To view the Recovery Bin display, double-click the Recovery Bin icon on your desktop. The files shown in the Recovery Bin display are files that have been deleted by any of a variety of methods, including Windows Explorer, File Manager, or any other application capable of deleting files. It also includes files deleted via the Windows command prompt. You can have more than one Recovery Bin on your computer. By using the Recovery Bin Properties option, you can specify individual Recovery Bins for each disk volume, or choose a single location to where “deleted” files are moved (known as a “Common Recovery Bin”). Undelete Server Edition creates Recovery Bins on your on your file servers, and your users can access and recover their own deleted files from these networked servers using Undelete Professional Edition. 13 Operation Note: Using a Common Recovery Bin on a network server will cause all the deleted files on the server to be copied into a single location. If a large number of deletions take place on the network, this can add considerable I/O overhead. This overhead is apparent not only on the disk where the Common Recovery Bin is located, but also on the disk from where the files are being copied. For this reason, a Common Recovery Bin is not recommended on a busy server. Instead, enable the Recovery Bin individually on each drive. (This is the default setting.) Recovering Files Use the Recover button or the Recover Files… option on the File menu to recover one or more selected files from the Recovery Bin. When you use this option, this dialog box is displayed: Click OK to restore the selected files to the location from which they were originally “deleted.” If the directory folder in which the selected files were stored has also been “deleted,” the folder is also recovered. Note: You must have adequate permissions and ownership of a file in order to recover it from the Recovery Bin. To restore the selected files to a different location, click Browse and navigate to the disk and directory folder where you want to save the restored file. You can also click Cancel to close the dialog without recovering the files, and return to the main Recovery Bin display. 14 Operation Important Points about the Recovery Bin Here are some important points to remember about the Recovery Bin: In keeping with NTFS file security, you must have sufficient file permissions and ownership to recover a file from the Recovery Bin. You can adjust the size of the Recovery Bin by using the Recovery Bin Properties option. You can “drag and drop” files from your desktop or from Windows Explorer into the Recovery Bin icon on your desktop, but not into the main Recovery Bin interface. By default, when the Recovery Bin reaches the size you have specified, it is automatically partially purged to make room for newly deleted files. For this reason, files that were once stored in the Recovery Bin can become no longer available from the Recovery Bin. (Although they still may be recoverable with the Undelete From Disk feature). This default can be changed with the Recovery Bin Properties option by selecting Disable Recovery Bin when Max size is reached, but selecting this option can cause the Recovery Bin to fill completely, and additional file “deletions” will not be moved to the Recovery Bin. If a file of the same name exists in the “deleted” file’s previous location, the “deleted” file cannot be recovered. Undelete will not overwrite an existing file while recovering a “deleted” file. In such a case, rename the existing file before recovering the "deleted" file. You can set the Recovery Bin properties by right-clicking the Recovery Bin icon on your desktop. You can right-click selected files in the Recovery Bin to recover or delete them from the Recovery Bin. You can also right-click individual files in the Recovery Bin to add them to the Recovery Bin Exclusion List. (Note that the Recovery Bin Exclusion List only applies to local files. You cannot right-click to exclude files from Recovery Bins on shared network folders.) You can add the file to the Exclusion List in one of three ways: a) By filename—all the files on the system with that name and extension will be excluded. 15 Operation b) By file type—all the files of that type on the system with that file extension will be excluded. c) By directory—all the files in that directory folder on the volume will be excluded. Searching the Recovery Bin If you do not know the folder where a particular deleted file was located, the Search Recovery Bin feature can come in handy. You can search for deleted files by name and location, by date created or deleted, and by owner. These search methods can be combined, if desired. Searching by Name and Location Click Search recovery bin for file(s) or click the File menu and select Find files in Recovery Bin… to open the Recovery Bin Search dialog. Click the Name & Location tab, then click Browse to see a display similar to this: The various controls and components of this dialog box are described below: 16 Operation Name Use this section of the Recovery Bin Search display to specify the name of the deleted file you want to find. You can use wildcard characters (* and ?) in this section of the display, but by default all file names and types are searched for. Location Use this section of the Recovery Bin Search display to specify the disk volume and directory folder of the file you want to undelete. Use the Browse button to navigate to different drives and folders on your computer to speed up your search for the correct path. Browse Click this button to navigate to the path of the disk volume and directory folder where the file you want to undelete resided immediately before it was deleted. Include subfolders in search When this option is enabled, any subfolders below the specified directory folder will be searched for files that match the specified search pattern. Search Click this button to find any previously deleted files that match the file name (with optional wildcards) in the Name box and the location specified in the Location box. After a deleted file has been found, it can be recovered, removed from the Recovery Bin, or added to the Exclusion List by right-clicking on the filename and selecting the appropriate menu item. (Note that the Recovery Bin Exclusion List only applies to local files. You cannot right-click to exclude files from Recovery Bins on shared network folders.) Stop Click this button to stop an ongoing file search. Close Click this button to close the Search Recovery Bin display and return to the main Recovery Bin display. Recoverable Files Section This section of the Recovery Bin Search dialog shows information about any files found during the search: 17 Operation Name This section of the display shows the original filename and extension of the detected files. In the case of the Recovery Bin, this section shows the names of the files stored in the various \RecoveryBin\ directory folders on your computer. Right-click the filename as a shortcut to Recover or Delete the selected file. Click on the title bar in this section to sort the files by name in forward or reverse alphabetical order. Size This section of the Search Recovery Bin display shows the size of the deleted files stored in the Recovery Bin. Click on the title bar in this section to sort the files by size in forward or reverse order. Date Deleted This section of the Search Recovery Bin display shows the date a file was “deleted” and moved to the Recovery Bin. Click on the title bar in this section to sort the files by the date they were deleted, shown alternately in forward or reverse date order. Date Created This section of the Recovery Bin display shows the date a file was created. Click on the title bar in this section to sort the files by the date they were created, shown alternately in forward or reverse date order. Deleted By This section of the Recovery Bin display shows the names of the accounts used to delete files. Note that the name reported in the “Deleted by” column is the name of the account that was used to authorize the file deletion. In the case of a local file delete, this is the account under which you logged in, shown as the name of the local machine, followed by the name of the account used on that machine. If you are logged on using a domain account, the name shown will be the name of the domain followed by the domain account name. When files are deleted from a remote machine via a mapped share, things are a bit more complicated. In this case, the account shown is the account that 18 Operation authorized the mapping of the share on the machine to which the disk is directly attached. Thus, if you log onto LOCAL1\YourName, map a share on SERVER1 using your DOMAIN1\YourName account, and delete a file on the share, the "Deleted by" name is "DOMAIN1\YourName" in the Recovery Bin on SERVER1. This is because SERVER1 does not “know” anything about the LOCAL1\YourName local account—it only knows about, and can get information for, the DOMAIN1\YourName account. Owned By This section of the Recovery Bin display shows who, if anyone, owned the deleted file. Note that files on FAT volumes display “No Owner” in this column, because the FAT file system does not track file ownership. Original Location This section of the Search Recovery Bin display shows the disk volume and directory folder where a file was originally located. When you recover a file, it will be placed in its original location. Click on the title bar in this section to sort the files by original location in forward or reverse alphabetical order. Status Bar This section of the Search Recovery Bin display shows information about the Recovery Bin. When no files are selected, the Status Bar shows the number of files in the File Information pane, the total size of the files in the local Recovery Bin, and the percentage of the Recovery Bin size used. Note that the percentage of the Recovery Bin in use figure indicates the total Recovery Bin space, which can include more than one Recovery Bin if you have specified Recovery Bins on more than one disk volume. For this reason, there is a possibility that a small Recovery Bin on one volume could be full while a large Recovery Bin on another volume could be nearly empty, and the percentage of the total Recovery Bin size used could be as low as 1 or 2 percent. When one or more files are selected, the Status Bar shows the number of files selected and their total size. 19 Operation Searching by Date Click Search recovery bin for file(s) or click the File menu and select Find files in Recovery Bin… to open the Recovery Bin Search dialog. Click the Date tab, then click Browse to see a display similar to this: Follow these steps to search the Recovery Bin by date: 1. Click the Date tab. 2. Select the Include the date… check box. 3. In your deleted file search, you can specify either the date the files were created or when they were deleted. Make your selection accordingly in the top drop-down menu box. 4. You can specify a date range two different ways, depending on whether you click on in the last or on between: 20 By specifying how many days ago the file may have been created or deleted, or By specifying a starting and ending date. Operation 5. After entering the date range, click Find Now. This starts the search for the deleted file(s). 6. After a deleted file has been found, it can be recovered, removed from the Recovery Bin, or added to the Exclusion List by right-clicking on the filename and selecting the appropriate menu item. (Note that the Recovery Bin Exclusion List only applies to local files. You cannot right-click to exclude files from Recovery Bins on shared network folders.) 7. Click Close to close the Search Recovery Bin dialog box and to return to the main Undelete display. The various controls and components of the Search by Date dialog box are described below: Date Check Box Select the Date check box if you want to search the Recovery Bin for files by date. Date Created or Deleted Select files Created if you want to specify when the files you are searching for were created, or select files Deleted if you want to specify when the files were deleted. In the last ‘N’ days Enter how many days you want to go back in your search for deleted files. For example, you could search for files that were deleted (or created) in the last 5 days. Type the number of days directly into the box, or use the up or down arrow at the side of the box to increase or decrease the number shown. Between … And To search the Recovery Bin for files created or deleted within a given date range, enter the starting date in the top box and the ending date in the bottom box. Enter both dates in the correct date format for your system. Instead of typing in the date, you can click the down arrow symbol at the side of the box and a calendar will display, where you can browse to the desired date and click on it. (You can also change the displayed year or month by clicking on it and then making your selection.) 21 Operation Searching by Owner/Deleted By Click Search recovery bin for file(s) or click the File menu and select Find files in Recovery Bin… to open the Recovery Bin Search dialog. Click the Owner/Deleted by tab, then click Browse to see a display similar to this: Note that file ownership only applies to NTFS volumes. The owner of a file is the user account, or the group account that is registered with NTFS as having ownership of the file. Follow these steps to search the Recovery Bin by owner: 1. Click the Owner/Deleted by tab. 2. Enable the Owned by option and enter the username of the person who last owned the deleted file you are looking for, and/or: 3. Enable the Deleted by option and enter the username of the person who deleted the file you are looking for. 4. Click Find Now. This starts the search for the deleted file(s). 5. After a deleted file has been found, it can be recovered, removed from the Recovery Bin, or added to the Exclusion List by right-clicking on the 22 Operation filename and selecting the appropriate menu item. (Note that the Recovery Bin Exclusion List only applies to local files. You cannot right-click to exclude files from Recovery Bins on shared network folders.) 6. Click Close to close the Search Recovery Bin dialog box and to return to the main Undelete display. Undelete From Disk Click Find files on disk or the Find files on disk… option in the File menu to recover files that have really been deleted. When you delete a file in Windows, the system does not remove it from the disk, but instead marks the space the file occupies as free space. When you recover a file with Undelete From Disk, a new file is created and the old file data is then copied into the new file. We recommend that you recover the file to a volume other than the one from which the file was deleted. This prevents the old file data from being overwritten by the new file, which would render it unrecoverable. The Undelete From Disk feature allows you to recover files that really have been deleted, such as files purged from the Recovery Bin, or files that were deleted when the Recovery Bin was not enabled. Undelete From Disk can also be used to recover files from volumes or directory folders that have been excluded from Recovery Bin processing. Note that this operation can only succeed if the space occupied by the file that is to be undeleted has not been overwritten during the time it was marked as free space. Important Points about the Undelete From Disk Feature Here are some important points about using the Undelete From Disk feature: In keeping with NTFS file security, you must be a member of the Administrators group and have sufficient file permissions and ownership to recover a file directly from the disk. Note: A file that is recovered with the Undelete From Disk feature will default to the security attributes of the user (Administrator) doing the file recovery. 23 Operation 2 The Undelete From Disk feature can recover files that have been purged from the Recovery Bin (using the Empty Recovery Bin button or menu option), files deleted from directory folders that have been excluded from Recovery Bin processing (using the Recovery Bin Exclusion button or menu option), or files deleted from drives on which Recovery Bin processing is disabled (using the Recovery Bin Properties option). The Undelete From Disk feature can even undelete files that were deleted before you installed Undelete! Note, however, that simply installing an application (including Undelete) can overwrite the same files you want to recover. For this reason, Emergency Undelete is the recommended tool for recovering files that have been accidentally deleted before you install Undelete. For best results in recovering files that have really been deleted, use the Undelete From Disk feature as soon as possible after deleting the file. This increases the chances that your file recovery will be successful. When a file is really deleted, the space it occupied on the volume is marked as available free space, but the file data still remains on the volume until the space is used to store another file. Therefore, there are cases where the Undelete From Disk feature may not be able to recover the deleted file, or may only be able to recover a portion of the file. As a general rule, the more disk activity that occurs after a file is deleted, the higher the chances are that new or modified files will overwrite the file information. When a deleted file has been partially overwritten with new data, there is a possibility that the Undelete From Disk feature may report successfully undeleting the file, when in fact a portion of the file has been overwritten and is thus corrupt. On NTFS volumes, only Small and Large file types2 are eligible for being undeleted directly from the disk. When undeleting fragmented files on FAT volumes, the Undelete From Disk feature may only be able to undelete the first contiguous portion of the In the NTFS file system, four file types exist. Small files are contained entirely within a single record in the Master File Table (MFT). Large files are stored elsewhere on the disk, but the index information pertaining to the file, including the locations of the various fragments of the file, is contained within a single record in the MFT. Huge files are similar to Large files, but they have enough additional file record information (such as additional file security information, or a large number of file fragment locations) to require two or more file records within the MFT. Extremely Huge files are files that contain so much additional file information (again, either file security information or the locations of a very large number of file fragments) that more than two file records are necessary within the MFT, plus space on the disk outside the MFT is used for storing additional file record information. 24 Operation file. A partial recovery of a text file can be better than none, but the partial recovery of an executable file will not be of much help. For this reason, it is important to keep your files defragmented (particularly files on FAT volumes). Of course, Executive Software has the answer for file fragmentation—Diskeeper! Files that have been removed from the Recovery Bin have a unique file identification number added to the original filename. (This prevents undeleted files of the same name from overwriting each other.) If these files are later recovered with the Undelete From Disk feature, their filenames may be shortened, since the file identification is removed when the file is recovered from the disk. If the name part of the filename is longer than 32 characters, it is truncated to the first 32 characters when the file is renamed in the Recovery Bin. Similarly, if the file extension is longer than 12 characters, it is truncated after the first 12 characters. Files that have been removed from the Recovery Bin will be listed with the Recovery Bin location as their “Original Location”, since that is where they resided before they were really deleted. . This is a directory folder named \RecoveryBin\ on the volume(s) where you have specified Recovery Bins should reside on your system. Note that when files are deleted from the Recovery Bin when the “SecureDelete” feature is enabled in the Recovery Bin properties, the deleted files will not be recoverable with the Undelete From Disk feature. Using the Undelete From Disk Interface The interface for the Undelete From Disk feature offers a limited set of the Recovery Bin menu options, and the toolbar is disabled, with the exception of the Help button. After you specify a filename and disk volume location to search for, the display also shows a listing of the files matching the search criteria that have really been deleted from your disk volume. 25 Operation Here is an example of the Undelete From Disk interface: Follow these steps to recover a file with the Undelete From Disk feature: 1. Enter the name of the file you want to undelete in the Name: field of the Undelete From Disk display. You can use wildcard characters (such as *.doc or *.*) if you don’t recall the name of the file. 2. Enter the letter of the drive you want to search in the Location: field of the Undelete From Disk display. You can optionally enter a directory folder name (such as D:\My Documents). Use the Browse button to see the drives and folders on your computer. 3. Click Find Deleted Files. This starts the search for deleted files. 4. Once the search is complete, highlight the name of the file (or files) you want to undelete. 5. Click Undelete File(s). This causes a new dialog box to be displayed. 6. Enter the drive letter and directory folder name of the location where you want the undeleted file to be written in the Path: field. You can use the Browse button to navigate to the desired location. 26 Operation If you have more than one disk volume, be sure to specify a volume other than the one where the file was originally located. This prevents the new, recovered file from overwriting portions of the old, deleted file. 7. Click OK. The file(s) you have selected will be recovered if possible, and written to the location you have specified. The various components of the Undelete From Disk interface are described in the following section: Name Use this section of the Undelete From Disk feature display to specify the name of the file you want to undelete. You can use wildcard characters (* and ?) in this section of the display. You must provide a filename or wildcard sequence (such as *.doc) as a search pattern to use for finding files to undelete. Note that if you are undeleting a file that has been purged from the Recovery Bin, the filenames may have been shortened. If the name part of the filename is longer than 32 characters, it is truncated to the first 32 characters when the file is recovered and placed back into the Bin. Likewise, if the file extension is longer than 12 characters, it is truncated after the first 12 characters. Location Use this section of the Undelete From Disk feature display to specify the disk volume and directory folder of the file you want to undelete. You can use the Browse button to speed up your search for the correct path. Note that with Undelete Server Edition, you can also specify disk volumes and folders on remote computers! Simply use the Connect Remote Computer option in the Tools menu to connect to the remote computer first. Browse Click this button to search for the path of the disk volume and directory folder where the file you want to undelete resided immediately before it was deleted. Note that if you are undeleting a file that has been purged from the Recovery Bin, the disk volume and directory folder will be the location you have specified for the Recovery Bin to reside. This is one or more folders named \RecoveryBin\ on the individual volumes where you have enabled Recovery Bin processing. 27 Operation Include Subfolders When this option is enabled, any subfolders below the specified directory folder will be searched for files that match the specified search pattern. Find Deleted Files Click this button to start the search for the specified files. All detected files matching the search criteria will be displayed in the file listing. Undelete Files Click this button to undelete any files whose names have been highlighted in the Name column of the Undelete display. You can select more than one file at a time to undelete. To select more than one file to undelete, hold the <Ctrl> key while clicking on the filenames listed in the Name section that you want to undelete. Or, you can hold the <Shift> key to select a continuous list of files in the Name section. When you use the Undelete Files button, a dialog box is displayed, prompting you to specify a disk volume and directory folder into which the selected files should be undeleted. Note: If at all possible, you should undelete files to a volume other than where they originally resided. Writing a file (which includes recovering it with the Undelete From Disk feature) to the same disk volume where it originally resided can potentially overwrite the very file you are trying to undelete. Some other points to consider when undeleting files that have been previously purged from the Recovery Bin: Files that have been removed from the Undelete Recovery Bin have a unique file identification number added to the original filename. (This prevents undeleted files of the same name from overwriting each other.) If these files are later recovered with the Undelete From Disk feature, their filenames may be shortened, since the file identification is removed when the file is recovered from the disk. If the name part of the filename is longer than 32 characters, it is truncated to the first 32 characters when the file is renamed in the Recovery Bin. Similarly, if the file extension is longer than 12 characters, it is truncated after the first 12 characters. Regardless of where a file was originally "deleted" from (and moved into the Recovery Bin), a file that has been purged from the Recovery Bin will be listed in the Undelete display as having the \RecoveryBin\ folder as its Original Location. This is because the \RecoveryBin\ folder was the location from which it was truly deleted. 28 Operation Stop Click this button to stop an ongoing Undelete From Disk activity, such as searching the disk volume for deleted files. Close Click this button to close the Undelete From Disk feature display and return to the Recovery Bin display. Name This section of the Undelete From Disk feature display shows the original filename and extension of the deleted files. Click on the title bar in this section to sort the files by name in forward or reverse alphabetical order. Size This section of the Undelete From Disk feature display shows the size of the deleted files stored in the Recovery Bin. Click on the title bar in this section to sort the files by size in forward or reverse order. Date Modified This section of the Undelete From Disk feature display shows the date a deleted file was last modified. Click on the title bar in this section to sort the files by date in forward or reverse order. Original Location This section of the Undelete From Disk feature display shows the disk volume and directory folder where a deleted file was originally located. When you recover a file, you should recover it to a different disk volume, to prevent the file data from being overwritten. Click on the title bar in this section to sort the files by original location in forward or reverse alphabetical order. File ID This section of the Undelete From Disk feature display shows the unique file identification used internally by the Undelete From Disk feature to speed the recovery of a deleted file from the disk. 29 Operation Setting the Recovery Bin Properties Use the Recovery Bin Properties button or the Recovery Bin Properties… option on the Tools menu to establish rules for where the Recovery Bin files are stored on your disk(s) and the percentage of disk space they will be allowed to use. You can also right-click the Recovery Bin icon on your desktop to open the Recovery Bin Properties dialog box. You can either set “global” rules for all the disk volumes detected on your computer, or set different rules for each of your volumes. You can also set properties for how often files are purged from the Recovery Bin. Properties Dialog Box Here is an example of the Recovery Bin Properties dialog box: 30 Operation Property Box Tabs Use the Global Settings tab to set properties for all the drives on your system, and the individual drive letter tabs to set properties for individual drives. Note that, depending on which other options have been set in the Global Settings tab display, options shown within the individual drive letter tabs may or may not be available. Click the other tabs to select the Common Bin display, or the individual drives for which you want to set Undelete Recovery Bin properties. Use the Common Bin tab to set properties for a common Recovery Bin. The options on the Common Bin tab only apply if you have selected the Use one Recovery Bin for all drives option. Each drive has its own Recovery Bin When this option is enabled, each drive on which the Recovery Bin is activated has a location specified where the Recovery Bin files reside. Use one Recovery Bin for all drives When this option is enabled, all files placed in the Recovery Bin are located in a single, common directory folder. You can specify the location and name of this folder from within the Common Bin tab display. Note that when you specify a single, common Recovery Bin for all your volumes, files that have previously been moved to the local Recovery Bins (the folders named \RecoveryBin\) will not be automatically moved to the common Recovery Bin. Note: Using a Common Recovery Bin on a network server will cause the deleted files on the server to be copied into a single location. If a large number of deletions take place on the network, this can add considerable I/O overhead. This overhead is apparent not only on the disk where the Common Recovery Bin is located, but also on the disk from where the files are being copied. For this reason, a Common Recovery Bin is not recommended on a busy server. Instead, enable the Recovery Bin individually on each drive. Enable Recovery Bin on all drives When this option is enabled, the Recovery Bin is activated on all the drives on your system. When the Recovery Bin is enabled for all drives, files that are moved to the Recovery Bin are stored in directory folders named \RecoveryBin\ on each of the drives (or single drive if using a Common Bin). 31 Operation Enable/Disable Recovery Bin individually on each drive When this option is enabled, you can activate the Recovery Bin on individual drives. This option is useful in cases where you do not want all of your disk volumes to be enabled for Recovery Bin processing. After setting this option, use the individual drive letter tabs in the Recovery Bin Properties display to enable and disable Recovery Bin processing on each drive and to specify the size of the Recovery Bin for each enabled drive. Turn off Recovery Bin on all drives When this option is enabled, deleted files are not moved into the Recovery Bin. Instead, they are fully deleted. (Of course, depending on the disk activity after they are deleted, you may be able to recover even fully-deleted files with the Undelete From Disk feature.) Disable Recovery Bin when Max Size is reached When this option is enabled, files are no longer moved to the Recovery Bin after it reaches the maximum size you have specified. Any additional file “deletions” will not move files into the Recovery Bin—instead, the files will truly be deleted. (They can, however, still often be recovered with the Undelete From Disk feature.) Auto Purge when Bin becomes full When this option is enabled, the Recovery Bin is partially purged automatically whenever it fills to the size you have specified as its maximum. When a file “deletion” causes the Recovery Bin to fill to 100% of its maximum size, just enough files will be purged from the Recovery Bin to make room for the new file. Files are purged from the Recovery Bin on a first-in, first-out basis. The files that have been in the Recovery Bin for the longest time will be the first files purged from it. Note that you can also purge files from the Recovery Bin based on how long the files have been in the Recovery Bin. You can specify how many days files should be left in the Recovery Bin before being purged. This “date-based” purge feature is available from the individual drive tabs and the Common Bin tab. As an option, date-based purging can be used together with the Auto Purge function. Display Recovery Bin Full warnings When this option is enabled, a message is displayed prompting you to empty the Recovery Bin when it reaches the size you have specified. When the warning 32 Operation message is displayed, you should remove files from the Recovery Bin by either selecting files to remove or by emptying the Recovery Bin. When this option is disabled, no message is displayed when the Recovery Bin reaches the specified size. This option is only available when you have also enabled the Disable Recovery Bin when Max Size is Reached option. When the Recovery Bin is disabled in this way, any additional file “deletions” will not move files into the Recovery Bin—instead, the files will truly be deleted. (They can, however, still often be recovered with the Undelete From Disk feature.) Do not save zero-length files When this option is enabled, zero-length files are not moved to the Recovery Bin when they are “deleted”. A zero-length file is actually a file record, which contains no data, so there is little chance you would need to recover it. Also, the filenames of zero-length files can needlessly clutter up the Recovery Bin file listing. When this option is disabled, zero-length files are moved to the Recovery Bin. Enable Recovery Bin Virus Protection Some viruses do their damage by forcing the length of a user’s file to zero, which renders that file unusable. Selecting the Enable Recovery Bin Virus Protection option provides some added protection against these viruses by preventing any files in the Recovery Bins or Common Bin from being made zero length. Note, however, this option is no substitute for the use of virus protection software. Enable Recovery Bin SecureDelete When enabled, this security feature will permanently erase any file that is deleted from the Recovery Bin. This is done by overwriting it three times with bit patterns specified for this purpose by the National Security Agency (NSA) for the Department of Defense (DOD). Finally, after the file has been overwritten, it is deleted. The SecureDelete procedure makes it virtually impossible for anyone to access sensitive file data from a disk after it has been deleted from the Recovery Bin. Note: Because Undelete From Disk will be ineffective on files deleted from the Recovery Bin with SecureDelete enabled and because of increased disk traffic, SecureDelete should be enabled only when security reasons require it. 33 Operation Confirm each delete from Recovery Bin When this option is enabled, a message is displayed each time you request that one or more files be deleted from the Recovery Bin. OK Click OK to accept any changes you have made to the Recovery Bin properties and to close the dialog box. Cancel Click Cancel to close the Recovery Bin Properties dialog box without making any changes. Apply Click Apply to cause any changes you have made to the Recovery Bin properties to take effect, without closing the Properties dialog box. 34 Operation Common Bin Tab The Common Bin display is enabled when the Use one Recovery Bin location for all drives option has been enabled under the Global Settings tab of the Recovery Bin Properties dialog box. Here is an example: Drive Use this section of the Recovery Bin Properties display to specify the drive where you want the Common Recovery Bin to be located. Note that this option is only available when the One Recovery Bin Location for All Drives option has been enabled 35 Operation Drive space to use Use the slider control to specify the maximum size of the Recovery Bin, based on a percentage of the total disk space. Depending on the other Recovery Bin Properties options you choose, one of two things will happen when the Recovery Bin reaches the size set with this option. If you have selected the Disable Recovery Bin when Max Size is reached option, any file “deletions” done after the Recovery Bin becomes full will not move files into the Recovery Bin—instead, the files will truly be deleted. (They can, however, still often be recovered with the Undelete From Disk feature.) If you have selected the Auto Purge when Bin becomes full option, files are purged from the Recovery Bin as needed to create space for newlydeleted files. Files are purged on a first-in, first-out basis. The files that have been in the Recovery Bin for the longest time will be the first files purged from it. Recovery Bin Size This section of the Recovery Bin Properties dialog box shows the size of the Recovery Bin, in megabytes. The size of the Recovery Bin is changed with the slider control. Purge Files Older Than ‘N’ Days With this option enabled, if a file has been in the Recovery Bin for more than the specified number of days, it will be purged from the Recovery Bin. Use the spin buttons to change the number of days to a figure that will work well for you. Note that this option works independently of other purge options that can be found under the Global Settings tab. Save files deleted from Macintosh shares Using Windows Services for Macintosh (SFM) it is possible to make one or more shared folders or disks visible to Macintosh computers on your network. Special actions are required by Undelete to save files deleted from these Macintosh shares. The actions needed to copy these files into the Undelete Recovery Bin involve more work and time than a normal file deletion, and thus Macintosh file deletions from SFM served shares may take more time. There is no impact to local files deleted from the Macintosh or to files on non-SFM shares on the server. 36 Operation Enable this option to cause files deleted from SFM shares to be saved in the Recovery Bin (as long as the file is not on the Undelete exclusion list). When this option is not enabled, files deleted from SFM shares are not saved in the Recovery Bin. This option is enabled by default. We recommend leaving it enabled unless deletion performance on SFM shares is critical to your operation. Individual Disk Volume Tabs These are enabled when the Each drive has its own Recovery Bin option has been selected under the Global Settings tab of the Recovery Bin Properties dialog box. Here is an example: Enable Recovery Bin on this Drive This option is available if the Enable Recovery Bin individually on each drive option was selected under the Global Settings tab. 37 Operation Select this option if you want to be able to recover deleted files on the drive specified by the currently selected tab. If this option is cleared, any files deleted on this drive will not be saved at all. Note that if One Recovery Bin location for all drives was selected under the Global Settings tab, the deleted files will be saved to the Common Bin, which is likely to be on a different drive. Drive Space to Use and Recovery Bin Size This section of the Recovery Bin Properties dialog box shows the size of the Recovery Bin, in megabytes. The size of the Recovery Bin is changed with the slider control. Purge Files Older Than ‘N’ Days With this option enabled, if a file has been in the Recovery Bin for more than the specified number of days, it will be purged from the Recovery Bin. Use the spin buttons to change the number of days to a figure that will work well for you. Note that this option works independently of other purge options that can be found under the Global Settings tab. Save files deleted from Macintosh volumes Using Windows Services for Macintosh (SFM) it is possible to make one or more shared folders or disks visible to Macintosh computers on your network. Special actions are required by Undelete to save files deleted from these Macintosh shares. The actions needed to copy these files into the Undelete Recovery Bin involve more work and time than a normal file deletion, and thus Macintosh file deletions from SFM served shares may take more time. There is no impact to local files deleted from the Macintosh or to files on non-SFM shares on the server. Enable this option to cause files deleted from SFM shares to be saved in the Recovery Bin (as long as the file is not on the Undelete exclusion list). When this option is not enabled, files deleted from SFM shares are not saved in the Recovery Bin. This option is enabled by default. We recommend leaving it enabled unless deletion performance on SFM shares is critical to your operation. 38 Operation Connect to Network Folder Note: This option is not available in Undelete Home Edition. or the Connect Network Use the Connect to a network folder button Folder… option in the Tools menu to connect to a folder in a Recovery Bin on a remote computer. When you use this option, this dialog box is displayed: Use the Display as: field to enter a name you want displayed next to the folder in the Recovery Bin tree view pane. In the Path: field, enter the network path of the folder to which you want to connect, or click the Browse... button to navigate to the folder. If you need to enter different login credentials to access the network folder, click Connect As... to enter the appropriate login information. Click OK to accept your selection and connect to the remote folder, or click Cancel to cancel the operation. 39 Operation Disconnect from a Network Folder Note: This option is not available in Undelete Home Edition. or the Disconnect Use the Disconnect from a network folder button Network Folder…option in the Tools menu to disconnect from a folder in a Recovery Bin on a remote computer. When you use this option, a listing of the connected remote folders is displayed. Select the appropriate folders and click OK. Connect to Remote Computer Note: This option is only available with the Server Edition of Undelete. or the Connect to Use the Connect to a remote computer button Remote Computer… option in the Tools menu to recover files from the Recovery Bins on remote network computers. You can also change the Recovery Bin properties and Exclusion Lists on remote computers. Note that Undelete 4.0 (or higher) Server or Professional must also be running on the remote computer. When this option is used, a dialog box like this is displayed listing the domains, workgroups, and computers detected on your network: 40 Operation Double-click a computer name to connect to that computer, or double-click a domain or workgroup name to expand the list of computers within that group. Once the list is expanded, double-click the name of the individual computer on which you want to access the Recovery Bin. After connecting to the remote computer, you can recover files from the Recovery Bin on the remote computer, as well as change the Recovery Bin properties or Exclusion List. Recovery Bin Exclusion Use the Recovery Bin Exclusion List button or the Exclusion List option in the Tools menu to create a list of files and directory folders that you want excluded from being processed by the Undelete Recovery Bin. When a deleted file (or the folder where it is stored) is excluded from the Recovery Bin, it really is deleted from the disk—not moved to another location on the disk (as other files normally are) when Undelete is running. One example of files you would likely exclude from Recovery Bin processing is temporary files that you really do want to delete. These are often files with a .tmp file extension, but many other extensions are also used, depending on the applications you are running. A number of common temporary file types are excluded from Recovery Bin processing by default. 41 Operation Typically, when you install an application, a number of temporary files are created, and then eventually deleted by the installation program. Also, compilers and Web browsers often create a large number of temporary files. There is little chance you will ever need to recover these temporary files, so by excluding them from being processed by the Recovery Bin, the program really will delete them, and they don’t take up Recovery Bin space unnecessarily. The Recovery Bin Exclusion List supports wildcard file specifications (like *.tmp), making it easy to specify a particular type of file to exclude. Note, however, that to exclude entire volumes from Recovery Bin processing, you must use the Recovery Bin Properties option. Exclusion List Dialog Box Here is an example of the Recovery Bin Exclusion List dialog box: 42 Operation Select drive Use this section of the Exclusion List dialog box to choose the disk volume from which you want to exclude files or directory folders. Select folder Use this section of the Exclusion List dialog box to choose specific directory folders to be excluded from Recovery Bin processing. Select a directory by highlighting it, and then click Add Folder to List to add the directory to the Exclusion List. Selected folder This section of the display shows the full path name of any folders you select. When a directory folder is added to the Exclusion List, select the Also exclude subfolders… check box to add files in any subdirectories below the highlighted directory to the Exclusion List as well. Add Folder to List Click Add Folder to List to add the selected directory folder to the Exclusion List. Also exclude subfolders of selected folder Select the Also exclude subfolders… check box to add files in any subdirectories below the selected directory folder to the Exclusion List. Clear this check box to allow files in subdirectories below the selected directory in the Selected folder display to be processed by the Recovery Bin. Select files Use this section of the Exclusion List dialog box to choose specific files (by name) to be excluded from Recovery Bin processing. Choose the name of the file to be excluded, and then click Add Files to List to add the file to the Exclusion List. Selected files This section of the display shows the full filename of any files you select. Add Files to List Click Exclude Files to add the selected file(s) to the Exclusion List. 43 Operation Apply exclusion of the selected folder or files to all drives When this option is enabled, any directory path or file specification added to the Exclusion list will be excluded from Recovery Bin processing, regardless of the disk volume where it is found. For example, by enabling this option when a file named “MyDocument.doc” is specified to be added to the Exclusion List, each occurrence of this file name will be excluded from Recovery Bin processing. This would include C:\MyDocument.doc, as well as E:\User Files\Cassandra\MyDocument.doc. The same can be done for directory folder paths—enabling this option when the directory folder path “C:\Dump” is specified to be added to the Exclusion List will also cause D:\Dump, E:\Dump, and any other \Dump folder on your system to be excluded from Recovery Bin processing. Exclusion List This box shows the files and directories that will be excluded from Recovery Bin processing. Remove from List Click Remove from List to remove specific files or directory folders from the Exclusion List. To remove an item from the list, highlight the item by clicking on it in the Exclusion List Box and click Remove from List. OK Click OK to close the Exclusion List dialog box and save any changes you have made. Cancel Click Cancel to close the Exclusion List dialog box without saving any changes you have made. 44 Operation Toolbar Options The Undelete toolbar has these buttons. They provide quick access to the main Undelete features: —Recover selected file(s) —Delete selected file(s) —Empty Recovery Bin —Search Recovery Bin for file(s) — Find files on disk —Recovery Bin Exclusion List —Recovery Bin Properties —Connect to a network folder —Disconnect from a network folder —Connect to a remote computer —Help Topics 45 Operation Recover Selected File(s) Button Use the Recover selected file(s) button or the Recover files… option on the File menu to recover one or more selected files from the Recovery Bin. When you use this option, the selected files are normally written back to the location from which they were “deleted”. If the directory folder in which the selected files were stored has also been “deleted”, the folder is also recovered. You also have the option to recover the files to another location of your choice. Delete Selected File(s) Button Use the Delete selected file(s) button or the Delete from bin option on the File menu to really delete one or more selected file(s) from the Recovery Bin. When you use this option, the disk space where the previously deleted files were stored is marked as available for storage of new or modified files. Still, Undelete allows you to recover files that have been deleted from the Recovery Bin, by using the Undelete From Disk option. Keep in mind, though, that once the space where a file is stored is marked as available, there is a possibility the space will be overwritten with new data as files are created or modified on the disk. Empty Recovery Bin Button Use the Empty Recovery Bin button or the Empty Recovery Bin option in the File menu to remove all the files from the Recovery Bin. After the Recovery Bin is emptied, the disk space where the deleted files were stored is marked as available for storage of new or modified files. Still, Undelete allows you to recover files that have been emptied (or removed) from the Recovery Bin, by using the Undelete From Disk option. Keep in mind, though, that once the space where a file is stored is marked as available, there is a possibility the space will be overwritten with new data as files are created or modified on the disk. 46 Operation Search Recovery Bin for File(s) Button Use the Search Recovery Bin for file(s) button or the Find files in Recovery Bin… option in the File menu to search for deleted files whose original location is unknown. You can use wildcard characters (* and ?), as in *.doc for example, as a search pattern to use for finding files. After a deleted file has been found, it can be recovered, removed from the Recovery Bin, or added to the Exclusion List by right-clicking on the filename and selecting the appropriate menu item. (Note that the Recovery Bin Exclusion List only applies to local files. You cannot right-click to exclude files from Recovery Bins on shared network folders.) Find Files on Disk Button Use the Find files on disk button or the Find files on disk… option in the File menu to recover files that have really been deleted. Note: In keeping with NTFS file security requirements, you must be a member of the Administrators group to undelete files directly from the disk. Recovery Bin Exclusion List Button Use the Recovery Bin Exclusion List button or the Exclusion List option in the Tools menu to create a list of files and directory folders that you want excluded from being processed by the Undelete Recovery Bin. When a deleted file (or the folder where it is stored) is excluded from the Recovery Bin, it really is deleted from the disk—not moved to another location on the disk (as other files normally are) when Undelete is running. Recovery Bin Properties Button Use the Recovery Bin Properties button or the Recovery Bin Properties… option on the Tools menu to establish rules for where the Recovery Bin files are stored on your disk(s) and the percentage of disk space 47 Operation they will be allowed to use. You can also right-click the Recovery Bin icon on your desktop to open the Recovery Bin Properties dialog box. You can either set “global” rules for all the disk volumes detected on your computer, or set different rules for each of your volumes. See page 30 for more information about Recovery Bin properties. Connect to a Network Folder Button Use the Connect to a network folder button or the Connect Network Folder… option in the Tools menu to connect to a folder in a Recovery Bin on a remote computer. (This option is not available in Undelete Home Edition.) Disconnect from a Network Folder Button Use the Disconnect from a network folder button or the Disconnect Network Folder… option in the Tools menu to disconnect from a folder in a Recovery Bin on a remote computer. (This option is not available in Undelete Home Edition.) Connect to a Remote Computer Button Use the Connect to a remote computer button or the Connect to Remote Computer… option in the Tools menu to recover files from the Recovery Bins on remote network computers. You can also change the Recovery Bin properties or the Undelete Exclusion List on remote computers. Note that Undelete 4.0 (or higher) Server or Professional must also be running on the remote computer. When this option is used, a dialog box is displayed listing the domains, workgroups, and computers detected on your network. Double-click a computer name to connect to that computer, or double-click a domain or workgroup name to expand the list of computers within that group. Once the list is expanded, double-click the name of the individual computer on which you want to access the Recovery Bin. 48 Operation After connecting to the remote computer, you can recover files from the Recovery Bin on the remote computer, as well as change the Recovery Bin properties or Exclusion List. (This option is only available with the Server Edition of Undelete.) Help Topics Button Use the Help Topics button or the Help Topics option in the Help menu to display the Undelete Help system. Using the Command Line Interface In addition to its Graphical User Interface (GUI), Undelete supports commands from the Windows command prompt. Both the Recovery Bin and the Undelete From Disk feature can be controlled from the command prompt. Two commands are available from the command prompt, reclaim and undelete, which are described on the following pages. Both commands support several optional command qualifiers. To use either command, follow these steps: 1. Open the Windows command prompt window. 2. Type either reclaim or undelete at the command prompt, followed by any of the optional command parameters. The RECLAIM Command The reclaim command manages files in the Undelete Recovery Bin. Use the command in this form: reclaim [Search_Pattern] [/i] [/r] [/d] [/?] Parameters [Search_Pattern] Specifies a search pattern of files to search for in the Recovery Bin. This pattern can include the following: [Drive Letter] 49 Operation [Pathname] [Filename] If no Search_Pattern is specified, all files in the Recovery Bin will be listed. Wildcard characters (* and ?) are permitted in the filename. /i(nclude) Causes the files, which match the other, specified search pattern criteria in all underlying subdirectories to be listed. /r(ecover) Causes the listed files to be recovered from the Recovery Bin. When /r is used, you will be prompted to confirm the recovery of the files. /d(elete) Causes the listed files to be removed from the Recovery Bin. When /d is used, you will be prompted to confirm the removal of the files. /? Displays the command prompt Help text. Examples reclaim /i Lists all the files in the Recovery Bin, from all volumes. reclaim C:\ /i Lists all the Recovery Bin files from drive C: and all its underlying subfolders. reclaim C:\Christina\Doc\Report.doc /i Lists all the Recovery Bin files named Report.doc in the C:\Christina\Doc folder, and any other underlying subfolders. reclaim C:\Ann\ /i Lists all the Recovery Bin files in the C:\Ann folder and any other underlying subfolders. reclaim \Julie\*.doc /i Lists all the Recovery Bin files with the .doc file extension in the \Julie folder and any other underlying subfolders on all volumes. 50 Operation reclaim \Julie\*.doc /i /r Similar to the command above, but after the Recovery Bin files are listed, you are given the option to recover the listed files from the Recovery Bin. reclaim \Julie\*.doc /i /d Again similar to the command above, but after the Recovery Bin files are listed, you are given the option to remove (delete) the listed files from the Recovery Bin. The UNDELETE Command The undelete command lists and recovers deleted files directly from the disk. Use the command in this form: undelete Search_Pattern [/d=destination_path] [/i] [/?] Parameters Search_Pattern Specifies which drive letter, and/or path and filename to search for deleted files. The search pattern is a required parameter. Wildcard characters (* and ?) are permitted in the filename. /d(estination) Specifies the destination of the files to be undeleted. If this parameter is not used, the files matching the search pattern that are candidates to be undeleted will be listed, but not recovered. To recover the files, you must specify a valid drive letter and directory folder for the destination. /i(nclude) Causes the files, which match the other, specified search pattern criteria in all underlying subdirectories to be listed. /? Displays the command prompt Help text. Examples undelete C:\ Lists all deleted files on the C: drive. 51 Operation undelete C:\Kian\ Lists all deleted files in the C:\Kian folder. undelete C:\*.doc /i Lists all deleted *.doc files on the C: drive. undelete C:\*.doc /d=C:\TEMP /i Lists all deleted *.doc files on the C: drive and prompts you to undelete any candidate files found to the C:\TEMP folder. 52 Emergency Undelete Chapter 3 Emergency Undelete™ This chapter describes how to run Emergency Undelete, and provides important additional information. The CD-ROM and downloadable versions of Undelete include Emergency Undelete, a unique tool used to recover accidentally deleted files and directory folders before you've installed the full Undelete product. Since the installation of any software can overwrite accidentally deleted files, Emergency Undelete runs directly off your CD-ROM or floppy disk drive, installing no files at all onto your disk drive. Important Points for Using Emergency Undelete Once a file is deleted, the chances of fully recovering that file decrease considerably when other activity occurs on the same disk volume. To improve the possibility of a complete recovery of a file that has been accidentally deleted, Executive Software recommends the following steps: 1. Stop all activity on the disk volume where the accidentally deleted file resided. Do not save any files that are currently open, since this causes a write operation on the disk. 2. If the computer is on a network, disconnect the network cable if possible. This prevents disk activity caused by remote users from writing over the file you want to recover. (Keep the network cable connected if you want to recover the file to a disk volume on a remote computer.) 3. After Emergency Undelete has located the file, recover the file to a local or remote disk volume other than the volume from which the file was recovered. This prevents the deleted file from accidentally being written over by the write operation of the recovery process. Note: On FAT volumes, files with short names (8.3 format) that have really been deleted will have the first character of the filename replaced by a tilde (~). 53 Emergency Undelete For example, a file named test.txt, when deleted, will be renamed to ~est.txt and will be displayed that way in the Emergency Undelete windows. Known Restrictions and Limitations 1. When you undelete a file, you must first specify the filename and directory path before finding the deleted files. Wildcard statements (such as * and ?) are supported for specifying the filename. 2. On NTFS volumes, only Small and Large file types3 are eligible for being undeleted directly from the disk. Required Privileges You must be a member of the Administrators group to operate Emergency Undelete. This is necessary in order to conform to NTFS file security. Running Emergency Undelete The operation of Emergency Undelete is similar to running the Undelete From Disk feature in either the Server, Professional or Home edition of Undelete. Of course, you must have the Undelete CD-ROM (or the Emergency Undelete floppy disk) in the appropriate drive on your computer. Follow these steps to recover a file with Emergency Undelete: 1. 3 Locate the EmergUnd.exe file on the CD-ROM or floppy disk and doubleclick it. In the NTFS file system, four file types exist. Small files are contained entirely within a single record in the Master File Table (MFT). Large files are stored elsewhere on the disk, but the index information pertaining to the file, including the locations of the various fragments of the file, is contained within a single record in the MFT. Huge files are similar to Large files, but they have enough additional file record information (such as additional file security information, or a large number of file fragment locations) to require two or more file records within the MFT. Extremely Huge files are files that contain so much additional file information (again, either file security information or the locations of a very large number of file fragments) that more than two file records are necessary within the MFT, plus space on the disk outside the MFT is used for storing additional file record information. 54 Emergency Undelete 2. Enter the name of the file you want to undelete in the Name: field of the Emergency Undelete display. You can use wildcard characters (such as *.doc or *.*) if you don’t recall the name of the file. 3. Enter the letter of the drive you want to search in the Location: field of the Undelete display. You can optionally enter a directory folder name (such as D:\My Documents). Use the Browse button to see the drives and folders on your computer. 4. Click Search. This starts the search for deleted files. 5. Once the search is complete, highlight the name of the file (or files) you want to undelete. 6. Click Undelete Files…. This causes a new dialog box to be displayed. 7. Enter the drive letter and directory folder name of the location where you want the undeleted file to be written in the Path: field. You can use the Browse button to navigate to the desired location. If you have more than one disk volume, be sure to specify a volume other than the one where the file was originally located. This prevents the new, recovered file from overwriting portions of the old, deleted file. 8. Click OK. The file(s) you have selected will be recovered if possible, and written to the location you have specified. 55 Using PushInstall Chapter 4 Using PushInstall This chapter explains how to use the PushInstall feature to install Undelete on computers throughout your network. Note: The PushInstall feature is only available in Undelete Server Edition. About PushInstall Use the Undelete PushInstall feature to install or uninstall Professional Edition or Server Edition on selected computers throughout your network. Note that you must have valid Undelete licenses for the machines on which you intend to install Undelete. You must have Administrator access on all the selected computers to PushInstall Undelete to Windows NT, Windows 2000, Windows XP and Windows Server 2003 systems. If necessary, the PushInstall program will prompt you to enter login credentials for the machine(s) to which you are PushInstalling. The PushInstall feature establishes a network connection with the selected machines, then installs the selected Undelete edition to those computers. It relies on having the installable Undelete package(s) available to be installed. The first time you use the PushInstall feature, the program attempts to detect the installable files. If they cannot be found, you will see a dialog box prompting you for the location of the installation package. You can use either a CD-ROM or downloaded installation package. Once you choose the Setup.exe file, the installation package is copied to a storage area used by the PushInstall program. If you try to PushInstall an Undelete version that is not compatible with the target machine, a message explaining the situation is displayed. Messages are also displayed to let you know the status of the installations. Before the PushInstall operation begins, you will see a message asking you to confirm the version and build numbers of the installable package. 57 Using PushInstall Running PushInstall Follow these steps to install Undelete Professional or Server editions to remote computers on your network. The same steps apply for remote uninstallation as well: 1. From the Windows Start menu, select Programs, then Undelete PushInstall. 2. A welcome screen is displayed. Click Next to continue. You will see a screen similar to this: 1. Select the machine(s) to which you want to PushInstall Undelete 2. Select a product to install, or select Uninstall to remove any edition 3. Click Next 58 Using PushInstall 3. If necessary, the PushInstall program will prompt you to enter login credentials for the machine(s) to which you are PushInstalling. In this case, you will see a message similar to this: Enter a username and password for an account that is a member of the Administrators (or Domain Administrators) group for the domain on which you are installing or uninstalling Undelete. 4. Once the PushInstall process has started, messages are displayed showing you the status of the operation. 59 Frequently Asked Questions Appendix A Frequently Asked Questions Executive Software maintains an up-to-date list of the most frequently asked questions (FAQs) about Undelete on their Web site. This list is updated as often as necessary to ensure most common questions are answered. Quite often, you can find answers to your questions and solutions to any problems you may have regarding Undelete by checking the Executive Software Web site. The Undelete FAQs are at: www.executive.com/undelete 61 Supported Operating Systems Appendix B Supported Operating Systems 63 Technical Support Appendix C Technical Support U.S. Support Services Registered users are entitled to 90 days of free telephone support, as well as special upgrade pricing, from Executive Software. Our free technical support is available Monday through Friday during the first 90 days from 7:00 A.M. to 5:30 P.M. Pacific time. If you have not yet registered your Undelete purchase, use the registration card in your Undelete box and do so now. Or, register your purchase online via our Web site at: http://www.executive.com Most technical support questions can be answered from the Technical Support section of our Web site at the address shown above. You may also contact our technical support team via the Internet at: [email protected] or via FAX at: 818-252-5509 If you are within your 90-day free support period, or have purchased telephone support, you can call: 818-771-1600 When your 90-day free support period has expired, you may purchase the support plan which best suits your needs. Executive Software offers 24-hour, 7day support plans. Contact Executive Software to find out which support options are best for you. Executive Software’s address is: Executive Software 7590 North Glenoaks Boulevard Burbank, California, USA 91504 65 Technical Support European Support Services Registered users are entitled to 90 days of free telephone support, as well as special upgrade pricing, from Executive Software. Our free technical support is available Monday through Friday during the first 90 days from 8:30 to 17:30 GMT. If you have not yet registered your Undelete purchase, use the registration card in your Undelete box and do so now. Or, register your purchase online via our Web site at: http://www.execsoft.co.uk Most technical support questions can be answered from the Technical Support section of our Web site at the address shown above. You may also contact our technical support team via the Internet at: [email protected] or via FAX at: +44 (0) 1342-327390 If you are within your 90-day free support period, or have purchased telephone support, you can call: +44 (0) 1342-327477 When your 90-day free support period has expired, you may purchase the support plan which best suits your needs. Executive Software offers 24-hour, 7day support plans. Contact Executive Software to find out which support options are best for you. Executive Software’s address is: Executive Software UK Inc. Kings House, Cantelupe Road East Grinstead, West Sussex RH19 3BE England 66 Index Index A About Executive Software .................xi Add Files to List ............................... 43 Add Folder to List............................. 43 After the Installation ........................... 4 Apply ................................................ 34 Apply exclusion of selected folder or files to all drives ........................... 44 Auto Purge when Bin becomes full .. 32 B Before the Installation......................... 1 Between … And................................ 21 Browse ........................................ 17, 27 Buttons, Toolbar ............................... 45 C Cancel ......................................... 34, 44 Check for updates ............................... 5 Close ........................................... 17, 29 Common Bin Tab.............................. 35 Common Recovery Bin drive ........... 35 Confirm each delete from Recovery Bin................................................ 34 Connect to a Network Folder Button 48 Connect to Network Folder............... 39 Connect to Remote Computer........... 40 Connect to Remote Computer Button48 D Date Created ................................. 9, 18 Date Created or Deleted.................... 21 Date Deleted ................................. 9, 18 Date Modified ................................... 29 Delete Selected File(s)Button ........... 46 Deleted By .................................... 9, 18 Disable Recovery Bin ....................... 32 Disconnect from a Network Folder... 40 Disconnect from a Network Folder Button........................................... 48 Diskeeper ..........................................xii Disks Supported.................................. 2 Display Recovery Bin Full warnings 32 Do not save zero-length files ............ 33 Drag and drop ................................... 15 Drive space to use ....................... 36, 38 E Emergency Undelete..................... x, 53 running ......................................... 54 Empty Recovery Bin Button ............. 46 Enable Recovery Bin individually on each drive ............ 32 on all drives .................................. 31 On this Drive ................................ 37 SecureDelete................................. 33 Virus Protection............................ 33 Exclusion List ............................. 42, 44 F Features supported ............................ 63 File ID............................................... 29 File Information Pane ......................... 9 File Systems Supported....................... 2 Find Deleted Files ............................. 28 Find Files on Disk............................. 47 67 Index Frequently Asked Questions ............. 61 H Help Topics Button........................... 49 I Important Points about the Recovery Bin ................ 15 about Undelete...............................xi about Undelete From Disk Feature ................................................. 23 Emergency Undelete .................... 53 In the last ‘N’ days............................ 21 Include Subfolders ...................... 28, 43 Include subfolders in search.............. 17 Individual Disk Volume Tabs ........... 37 Installation Overview.......................... 3 Installation Procedure ......................... 4 Installing from CD-ROM ............................... 4 from Downloaded File.................... 4 L Location ...................................... 17, 27 M Menus ............................................... 11 N Name........................... 9, 17, 18, 27, 29 Network Folder Connect to .................................... 39 Disconnect from ........................... 40 68 O OK .............................................. 34, 44 Operating Systems supported............ 63 Original Location ........................ 19, 29 Overview of Undelete ......................viii Owned By ................................... 10, 19 P Properties Dialog Box....................... 30 Property Box Tabs ............................ 31 Purge Files Older Than ‘N’ Days 36, 38 PushInstall about............................................. 57 running ......................................... 58 using ............................................. 57 R RECLAIM Command ....................... 49 Recover Selected File(s) Button........ 46 Recoverable Files section.................. 17 Recovering Files ............................... 14 Recovery Bin .....................................ix Exclusion................................ 41, 42 Exclusion List............................... 47 on each drive ................................ 31 one for all drives........................... 31 searching....................................... 16 Setting Properties.......................... 30 Size......................................... 36, 38 using the ....................................... 13 Recovery Bin Properties Button........ 47 Registering Undelete........................... 5 Remote Computer Connect to .................................... 40 Remove from List ............................. 44 Repairing Windows ............................ 5 Resource Requirements ...................... 3 Running Emergency Undelete .......... 54 Index S Save files deleted from Macintosh shares............................................ 36 Search button .................................... 17 Search Recovery Bin................... 16, 47 Searching by Date............................. 20 Searching by Owner/Deleted By....... 22 SecureDelete ..................................... 33 Select drive ....................................... 43 Select files......................................... 43 Select folder ...................................... 43 Selected files..................................... 43 Selected folder .................................. 43 Sitekeeper .........................................xii Size ......................................... 9, 18, 29 Status Bar.................................... 13, 19 Stop............................................. 17, 29 Support Services Europe .......................................... 66 U.S................................................ 65 Supported operating systems ......................... 63 T Technical Support ............................. 65 Toolbar.............................................. 10 Toolbar Options ................................ 45 Tree View Pane................................... 8 Turn off Recovery Bin on all drives.. 32 U UNDELETE Command .................... 51 Undelete Files ................................... 28 Undelete From Disk................ x, 23, 25 Undelete Service ................................. 5 Uninstalling Undelete ......................... 6 Updates checking for.................................... 5 Using the Command Line Interface .. 49 Using Undelete From Disk ............... 25 V Virus Protection ................................ 33 W Windows Repairing ........................................ 5 Versions Supported ........................ 1 69