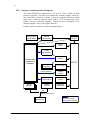
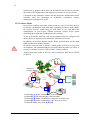
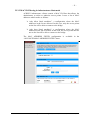
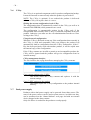
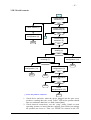
1
SERIAL TO Wi-Fi GATEWAYS USER’S GUIDE FOR 802.11A/B/G/H DEVICES -2Wi-Fi PORT SERVERS USER GUIDE COPYRIGHT (©) ACKSYS 2010 This document contains information protected by Copyright. The present document may not be wholly or partially reproduced, transcribed, stored in any computer or other system whatsoever, or translated into any language or computer language whatsoever without prior written consent from ACKSYS Communications & Systems - ZA Val Joyeux – 10, rue des Entrepreneurs - 78450 VILLEPREUX - FRANCE. REGISTERED TRADEMARKS ® ACKSYS is a registered trademark of ACKSYS. Windows is a registered trademark of MICROSOFT. WireShark is a registered trademark of the Wireshark Foundation DISCLAIMERS ACKSYS ® gives no guarantee as to the content of the present document and takes no responsibility for the profitability or the suitability of the equipment for the requirements of the user. ACKSYS ® will in no case be held responsible for any errors that may be contained in this document, nor for any damage, no matter how substantial, occasioned by the provision, operation or use of the equipment. ACKSYS ® reserves the right to revise this document periodically or change its contents without notice. REGULATORY INFORMATION AND DISCLAIMERS Installation and use of this Wireless LAN device must be in strict accordance with local regulation laws and with the instructions included in the user documentation provided with the product. Any changes or modifications (including the antennas) to this device not expressly approved by the manufacturer may void the user’s authority to operate the equipment. The manufacturer is not responsible for any radio or television interference caused by unauthorized modification of this device, or the substitution of the connecting cables and equipment other than manufacturer specified. It is the responsibility of the user to correct any interference caused by such unauthorized modification, substitution or attachment. Manufacturer and any authorized resellers or distributors will assume no liability for any damage or violation of government regulations arising from failing to comply with these guidelines. 10, rue des Entrepreneurs Z.A. Val Joyeux 78450 VILLEPREUX - France Phone: Fax: Web site: Hotline: Sales: +33 (0)1 30 56 46 46 +33 (0)1 30 56 12 95 www.acksys.fr [email protected] [email protected] 54 Mb Wi-Fi port servers user guide (DTUS062 DTUS062) Release A.2, December 14, 2010 -3- TABLE OF CONTENTS I. INTRODUCTION..............................................................................................................................................5 II. GLOSSARY & ACRONYMS..........................................................................................................................6 III. PRODUCTS LINE OVERVIEW...................................................................................................................7 III.1 PRODUCTS GOALS.............................................................................................................................................7 III.2 HARDWARE ARCHITECTURE BLOCK DIAGRAM........................................................................................................7 III.3 SOFTWARE ARCHITECTURE BLOCK DIAGRAM.........................................................................................................8 IV. PRODUCTS COMMON FEATURES...........................................................................................................9 IV.1 IV.2 IV.3 IV.4 IV.5 SERIAL SERVICES.............................................................................................................................................9 WIRELESS COMMUNICATION.............................................................................................................................11 WIRELESS SECURITY: WEP, WPA/WPA2 AND MAC FILTERS.........................................................................16 ROAMING.....................................................................................................................................................22 LONG DISTANCE WI-FI...................................................................................................................................27 V. PRODUCTS DISTINCTIVE FEATURES...................................................................................................31 V.1 V.2 V.3 V.4 V.5 V.6 V.7 V.8 DISTINCTIVE FEATURES AVAILABILITY TABLE.......................................................................................................31 DUAL ANTENNA PLUGS.....................................................................................................................................31 HIGH POWER RADIO OPTION..............................................................................................................................31 RS422/RS485 PORT......................................................................................................................................32 ALARM..........................................................................................................................................................37 C-KEY..........................................................................................................................................................38 DUAL POWER SUPPLY.......................................................................................................................................38 WLG-DONGLE-OEM INTEGRATION DATA.....................................................................................................39 VI. ADMINISTRATION.....................................................................................................................................43 VI.1 VI.2 VI.3 VI.4 CONFIGURATION OVERVIEW.............................................................................................................................43 RESET BUTTON...........................................................................................................................................44 ADMINISTRATION THROUGH THE SERIAL PORT.....................................................................................................44 ADMINISTRATION THROUGH THE NETWORK.........................................................................................................45 VII. FIRMWARE UPGRADES..........................................................................................................................47 VII.1 VII.2 VII.3 VII.4 STANDARD UPGRADE (WEB BROWSER OR ACKSYS NDM).................................................................................47 UPGRADING WHILE IN SERIAL ADMINISTRATION MODE.........................................................................................48 EMERGENCY UPGRADE...................................................................................................................................49 FALLBACK AFTER AN INTERRUPTED UPGRADE OPERATION....................................................................................49 VIII. TROUBLESHOOTING.............................................................................................................................51 VIII.1 VIII.2 VIII.3 VIII.4 BASIC CHECKS............................................................................................................................................51 SERIAL IS SLAVE.........................................................................................................................................53 SERIAL IS MASTER.......................................................................................................................................55 DIAGRAM “A”: NETWORK CONNECTIVITY.......................................................................................................57 IX. APPENDIX – RADIO CHANNELS LIST..................................................................................................58 IX.1 802.11B/G (2.4GHZ)...................................................................................................................................58 IX.2 802.11A/H (5 GHZ).....................................................................................................................................59 54 Mb Wi-Fi port servers user guide (DTUS062 DTUS062) Release A.2, December 14, 2010 -4- PAGE INTENTIONALLY LEFT BLANK 54 Mb Wi-Fi port servers user guide (DTUS062 DTUS062) Release A.2, December 14, 2010 -5- I. INTRODUCTION This reference guide applies to the following products: WLg-DONGLE; WLg-DONGLE-OEM and derived products; WLg-IDA/S; WLg-xROAD/S. It covers a product architecture overview, installation, administration, usage and firmware upgrade information. Further information is available in several places: The quick installation guide specific to each product. This document provides detailed specifications for the product. All recommendations for equipment installation, such as power supplies, antennas and connection cables are also documented there. The manual specific to each serial service. The online help provided by the web administration pages. This reference guide describes the latest version of the product firmware. Please read the change log (which can be downloaded from ACKSYS web site) to check firmware features changes. 54 Mb Wi-Fi port servers user guide (DTUS062 DTUS062) Release A.2, December 14, 2010 -6- II. GLOSSARY & ACRONYMS Active scan Finding access point by sending a probe requesting an answer AES A cryptographic method which WPA and WPA2 can use AP Access Point Beacon frame broadcast periodically by access points signaling their existence and parameters (SSID…) CLI Command Line Interface, a configuration system where you type commands using a console or console emulator C-Key A removable memory component for configuration backup, available on the WLg-IDA/S and other ACKSYS products DHCP Dynamic Host Configuration Protocol, a system to obtain an IP address automatically by asking to a preinstalled DHCP server RC4 A cryptographic method which WEP, WPA and WPA2 can use RSSI Received Signal Strength Indication Passive scan Finding access points by listening to the beacons they send Probe frame broadcast by stations requesting identifying answers WLAN Wireless Local Area Network WEP Wireless Equivalent Privacy (weak cryptographic method) Wi-Fi Friendly name for the IEEE 802.11 standard WN Wireless node, any Wi-Fi capable station WPA Wi-Fi protected Access (stronger than WEP) WPA2 Wi-Fi protected Access version 2 (stronger than WPA) 54 Mb Wi-Fi port servers user guide (DTUS062 DTUS062) Release A.2, December 14, 2010 -7- III. PRODUCTS LINE OVERVIEW III.1 Products goals This line of products provides Wi-Fi connectivity for serial devices. These products establish a bi-directional gateway between the asynchronous, byteoriented, serial port and the frame-oriented Wi-Fi network. Configuration Net to serial Wi-Fi access Serial port Serial to net The configuration process sets serial port parameters, Wi-Fi network parameters, and defines which high-level network protocol is used to communicate with the remote system. (TCP, UDP, MODBUS/TCP) and how serial data is encapsulated into frames. Depending on the product, extra features are available (see section IV.5). III.2 Hardware architecture block diagram Product-specific modules are shown in dotted squares. Power supply WLg-IDA/S dual 9-36V WLgxROAD/S 9-50V WLgDONGLE 5V WLgDONGLE-OEM 3.3V/5V 3.3V Firmware Flash EPROM CPU RAM Reset Admin mode P C I Wi-Fi C-Key (WLg-IDA/S) Function LEDs Alarm (WLg-IDA/S) RS422/RS485 (WLg-IDA/S, WLg-xROAD/S) RS232 Switchable resistors net Tx pair Rx/Tx pair Rx, Tx, control signals 54 Mb Wi-Fi port servers user guide (DTUS062 DTUS062) Release A.2, December 14, 2010 -8- III.3 Software architecture block diagram The Flash EPROM is organized in two areas to allow reliable in-field firmware upgrades. The first area contains the normal (regular) firmware, the second area contains a so-called “emergency upgrade” firmware which starts up if a firmware upgrade failed (due to, say, an unexpected power failure). See the “firmware upgrade” section for more information. The following applies only to the regular firmware. Product-specific modules are shown in dotted squares. Dual power Alarms (WLg-IDA/S) (WLg-IDA/S) Wi-Fi interface DHCP client C-Key (WLg-IDA/S) Configuration parameters database HTTP web server TCP/IP Firmware upgrades Factory settings CLI (Command TFTP client Reset button line interface) TELNET server Serial console Discovery answerer Serial services ON Admin mode switch Serial port 54 Mb Wi-Fi port servers user guide (DTUS062 DTUS062) Release A.2, December 14, 2010 Blue arrows show configuration methods -9- IV. PRODUCTS COMMON FEATURES IV.1 Serial services IV.1.1 Understanding serial services The serial port can be set to provide six different kinds of services. Virtual COM port (SERVERCOM module, RFC2217 mode). This is mainly used to provide a virtual COM port on a Windows operating system, using the VIP software. A remote application software may also use the TCP Sockets API to implement a TELNET/RFC2217 compatible protocol. Though this is a lot of work, the application gains dynamic control on the product. MODBUS slave (MODBUS module, slave mode). When the serial port is connected to a MODBUS bus of slave devices, the port server product becomes a proxy slave device. On the Wi-Fi side it will act as a MODBUS/TCP slave. MODBUS master (MODBUS module, master mode). When the serial port is connected to a MODBUS bus where there is a bus master, the port server product becomes a proxy master for the MODBUS/TCP slaves that reside on the Wi-Fi side. Raw TCP server (SERVERCOM module, RAW mode). A remote application software may use the TCP Sockets API to send and receive data to the port server. The product configuration is set once during installation, the application software does not need to handle dynamic configuration, it is thus much easier to design. Raw TCP client (TCPCLIENT module). A remote application software may use the TCP Sockets API to implement a TCP server and handle several client products. The product calls in the application server when it powers up or when it detects a change on the serial interface. It can call alternate servers to provide additional redundancy. Raw UDP client/server (MULTIPOINT module). With this service, data exchange can take place to and from other products as well as with customer applications. The protocol is easy to implement, it handles unicast and broadcast addressing. However data may be lost during network transfers since no controls are done. Serial services are further grouped into modules depending on the network protocols used. Each of them is described in its own reference manual. SERVERCOM module: TCP server (raw or RFC2217-compatible). See SERVERCOM UserGuide (DTUS043).pdf MODBUS module: handles MODBUS/TCP. See MODBUS-TCP UserGuide (DTUS041).pdf TCPCLIENT module: raw TCP client. See TCPCLIENT UserGuide (DTUS045).pdf MULTIPOINT module: UDP datagrams, unconnected exchanges. See MULTIPOINT UserGuide (DTUS056).pdf 54 Mb Wi-Fi port servers user guide (DTUS062 DTUS062) Release A.2, December 14, 2010 - 10 - IV.1.2 Selecting the right serial service If you want to access a remote serial device in the same manner as a local port (including control signals): • usually the “Virtual COM (VIP)” service on the device side and a COM port redirector like VIP on the computer will do that. If your devices use the MODBUS protocol: MODBUS devices types Products / Configuration Master Slave • One product in MODBUS slave mode, Serial Serial connected to the slave (Ascii, RTU) (Ascii, RTU) • One product in MODBUS master mode, connected to the master Serial • One product in MODBUS slave mode, Modbus/TCP (Ascii, RTU) connected to the slave Modbus/TCP Serial • One product in MODBUS master mode, (Ascii, RTU) connected to the master If you want to exchange serial data (no control signals) between two or more devices through the network: • use the ”UDP raw port server” service on all the serial attachments involved; • if you have only two devices, and not losing data is more important than speed and network bandwidth, you must use “raw TCP server” on one side, “raw TCP client” on the other side. Beware that data transfers may incur retransmission delays. If you want to write a SOCKET application to access remote devices: • use “Virtual COM (VIP)” if you must configure control signals remotely; • use “raw TCP server” to handle unrelated devices; • use “UDP raw port server” to broadcast to several devices at the same time. If you want a remote serial device to call into your application: • use “raw TCP client”. 54 Mb Wi-Fi port servers user guide (DTUS062 DTUS062) Release A.2, December 14, 2010 - 11 - IV.2 Wireless communication IV.2.1 Infrastructure Mode In an infrastructure network there are 2 kinds of devices: The access point Client Wi-Fi devices (client stations) that connect to the access point to gain access to other Wi-Fi devices or LAN devices. A Other Wi-Fi device Obstacles or large distance Access Point Serial device B C Serial port server, infrastructure mode Local network Automation equipments Products A, B, C can communicate with each other. Product B relays data between A and C. Product B relays data between the LAN and products A, C Infrastructure wireless mode supports central connection points for WLAN clients and the AP may also bridge them to a wired Ethernet network. A wireless access point (AP) is required for infrastructure wireless mode networking. To join the WLAN, the AP and all wireless stations must be configured to use the same SSID. The AP is then cabled to the wired network to allow wireless clients access, for example, to Internet 54 Mb Wi-Fi port servers user guide (DTUS062 DTUS062) Release A.2, December 14, 2010 - 12 connections or printers. More APs can be added to the WLAN to increase the reach of the infrastructure and support any number of wireless clients. Compared to the alternative ad-hoc wireless networks, infrastructure mode networks offer the advantage of scalability, centralized security management and improved reach. IV.2.2 Ad-hoc Mode On wireless computer networks, ad-hoc mode is a way for wireless devices to directly communicate with each other. Operating in ad-hoc mode allows all wireless devices, within range of each other, to see each other and communicate in peer-to-peer without involving central access points (including those built into broadband wireless routers). To set up an ad-hoc network, each wireless adapter must be configured for ad-hoc mode (as opposed to the alternative infrastructure mode). In addition, all wireless adapters on the ad-hoc network must use the same SSID and the same channel number. An ad-hoc network tends to feature a small group of devices in very close environment. All communicating devices must share the same cell. There is no way to establish a route in order to link 2 remote products. Ad-hoc mode only works in 802.11b, with or without a WEP key (no WPA or WPA2) Wi-Fi Cell 1 Obstacles or large distance A Wi-Fi Cell 2 B C Ethernet D Products A, C, D can communicate with each other. Products B, C can communicate with each other. Products A, B cannot communicate, obstacles are on the way. Products B, D cannot communicate, they are too far away. Product C cannot relay from A, D to B. 54 Mb Wi-Fi port servers user guide (DTUS062 DTUS062) Release A.2, December 14, 2010 - 13 - IV.2.3 Wireless Network Name This name is also referred to as the SSID and serves as a subnetwork identifier. A service set identifier, or SSID, is a name used to identify the specific 802.11 wireless LANs to which a user wishes to be connected. A client device will receive broadcast messages from all access points within range, advertising their SSIDs, and can choose one to connect to based on preconfiguration, or by displaying a list of SSIDs in range and asking the user to select one. Devices participating in a Wi-Fi communication must all use the same SSID. When you are browsing for available wireless networks, this name will appear in the list. For security purposes we highly recommend changing the pre-configured network name. IV.2.4 802.11 mode There are 3 kinds of wireless networks available: 802.11b, 802.11g and 802.11a. 802.11b Op. Frequency Typical throughput Bit Rate (Max) Range (Indoor) Range (Outside) 2.4 GHz 4.5 Mbit/s 11 Mbit/s ~35 m ~150 m 802.11b has a maximum raw data rate of 11 Mbit/s and uses the same media access method defined in the original standard. 802.11b devices suffer interference from other products operating in the 2.4 GHz band. Devices operating in the 2.4 GHz range include: microwave ovens, Bluetooth devices, baby monitors and old cordless telephones. 802.11g Op. Frequency Typical throughput Bit Rate (Max) Range (Indoor) Range (Outside) 2.4 GHz 20 Mbit/s 54 Mbit/s ~30 m ~75 m This works in the 2.4 GHz band (like 802.11b) but operates at a maximum raw data rate of 54 Mbit/s, or about 19 Mbit/s mean throughput. 802.11g hardware is fully backward compatible with 802.11b hardware. Like 802.11b, 802.11g devices suffer interference from other products operating in the 2.4 GHz band. Devices operating in the 2.4 GHz range include: microwave ovens, Bluetooth devices, baby monitors and old cordless telephones. 54 Mb Wi-Fi port servers user guide (DTUS062 DTUS062) Release A.2, December 14, 2010 - 14 802.11a Op. Frequency Typical throughput Bit Rate (Max) Range (Indoor) Range (Outside) 5 GHz 20Mbit/s 54 Mbit/s ~10 m ~50 m The 802.11a operates in 5 GHz band with a maximum raw data rate of 54 Mbit/s, which yields a realistic mean throughput in the mid-20 Mbit/s. Since the 2.4 GHz band is often saturated, using the relatively unused 5 GHz band gives 802.11a provides a significant advantage. However, this high carrier frequency also brings a slight disadvantage: The effective overall range of 802.11a is slightly less than that of 802.11b/g; 802.11a signals cannot penetrate as far as those for 802.11b because they are absorbed more easily by walls and other solid objects in their path. IV.2.5 Super AG™ Mode Super AG™ Mode includes performance-enhancing features such as Packet Bursting, FastFrames and Compression. Can be used only between compatible devices (equipped with compatible Atheros™ radio cards). Super AG can be used: Without turbo With Dynamic turbo: the network automatically selects if a turbo should be enabled With Static turbo: the turbo is always enabled The available rates with these options are: 108 Mbps, 96 Mbps, 72 Mbps, 54 Mbps, 48 Mbps, 36 Mbps, 24 Mbps, 18 Mbps, 12 Mbps and 6 Mbps. The allowed channels list is limited in this mode. IV.2.6 Region, country and channels selection A wireless network uses specific channels on the 2.4 GHz or 5 GHz radio spectrum to handle communication between stations. Some channels in your area may suffer from interference from other electronic devices. Choose the clearest channel to help optimise the performance and coverage of your wireless network. See appendix for further details about radio channels. Depending on the location of the product is situated (indoor/outside), not all wireless channels are available. Refer to local regulation (that are constantly liable to change). Region/country Channels availability varies by countries, constrained in part by how each country allocates radio spectrum to various services. Broadly speaking, the world is divided into the 3 main regions: Europe, regulated by the ETSI (European Telecommunications Standards Institute) US, regulated by the FCC (Federal Communications Commission) Asia, regulated by the MKK/TELEC Depending on the 802.11 and super AG modes, available channels are modified when you change the “region/country” selection box. 54 Mb Wi-Fi port servers user guide (DTUS062 DTUS062) Release A.2, December 14, 2010 - 15 - Auto channel selection When in infrastructure topology only (see “wireless mode”), the product can scan all the allowed channels in the region for reachable access points with the indicated SSID. Otherwise it will scan only the selected channel(s). 802.11d When the “802.11d” option is enabled in the “Advanced/wireless” menu, the product is further constrained by the allowed channels list sent by the access point. Overlapping radio channels The radio channel is only an indication of the central frequency in use. Modulation enlarges the channel to a 25 MHz band. This must be taken into account when several Wi-Fi cells are near to each other, otherwise the effective performance will decrease due to interferences. This point is especially important when you try to cover a geographic area with several access points. 1 Channel 2 3 4 5 MHz 5 6 8 7 11 12 13 14 9 3 13 8 7 2 2399,5 MHz 10 10 5 4 1 9 12 11 6 25 MHz 25 MHz 25 MHz 2412 MHz 2437 MHz 2462 MHz 2484,5 MHz Frequency Although the use of "non-overlapping" channels 1, 6, and 11 has limits when products are too close, the 1–6–11 guideline has merit. If transmitter channels are chosen closer than channels 1, 6, and 11 (for example, 1, 4, 7, and 10), overlap between the channels may cause unacceptable degradation of signal quality and throughput. 54 Mb Wi-Fi port servers user guide (DTUS062 DTUS062) Release A.2, December 14, 2010 - 16 - IV.2.7 Antenna On products providing a secondary (AUX) antenna plug, you can direct communication to that antenna. When two antennas are connected the “diversity” choice enhances reception. With one (MAIN) antenna only, use the “main” or “diversity” setting. IV.2.8 Transmission Rate By default, the fastest possible transmission rate will be selected. If necessary, you may modify the speed. This setting acts on sent frames only (reception depends on the remote decision). When transmission failures occur, retransmissions are automatically done at gradually lower rates. IV.3 Wireless security: WEP, WPA/WPA2 and MAC filters There are many technologies available to counteract wireless network intrusion, but currently no method is absolutely secure. The best strategy may be to combine a number of security measures. Possible steps towards securing a wireless network include: 1. All wireless LAN devices need to be secured 2. All users of the wireless network need to be trained in wireless network security 3. All wireless networks need to be actively monitored for weaknesses and breaches Available wireless security protections are: Not broadcasting the SSID (access point only feature) MAC ID filtering WEP encryption WPA or WPA2 – PSK (“Pre-Shared Key”) WPA or WPA2 – Enterprise, also known as 802.1x or RADIUS. WEP encryption vs. WPA and WPA2 encryption The encryption depends on the wireless topology. In ad-hoc mode, only WEP encryption is available, because WPA requires a point-to-point link in order to establish the cryptographic keys. In infrastructure mode, there is a point-to-point link between each station and its associated Access Point, and you can use WEP or WPA/WPA2. These security parameters are configurable in the BASIC\WIRELESS menu. 54 Mb Wi-Fi port servers user guide (DTUS062 DTUS062) Release A.2, December 14, 2010 - 17 - IV.3.1 WEP encryption WEP is a method of encrypting data for wireless communication and is intended to provide the same level of privacy as a wired network. However, WEP is not as secure as WPA encryption. To gain access to a WEP network you must know the key. The key is a string of characters that you create. When using WEP you will need to determine the level of encryption. The type of encryption determines the key length. 128-bit encryption requires a longer key than 64-bit encryption. Keys are defined by entering a string in HEX (hexadecimal - using characters 0-9, A-F) or ASCII (American Standard Code for Information Interchange - alphanumeric characters) format. ASCII format is provided so that you can enter a string that is easier to remember. The ASCII string is converted into HEX for use over the network. Four keys can be defined so that you can change keys easily. A default key is selected for use on the network. Authentication Two methods of authentication can be used with WEP: Open System authentication and Shared Key authentication. In Open System authentication, the WLAN client need not provide its credentials to the Access Point during authentication. Thus, any client, regardless of its WEP keys, can authenticate itself with the Access Point and then attempt to associate. In effect, no authentication (in the true sense of the term) occurs. After the authentication and association, WEP can be used for encrypting the data frames. At this point, the client needs to have the right keys. In Shared Key authentication, WEP is used for authentication. A four-way challenge-response handshake is used: I) The client station sends an authentication request to the Access Point. II) The Access Point sends back a clear-text challenge. 54 Mb Wi-Fi port servers user guide (DTUS062 DTUS062) Release A.2, December 14, 2010 - 18 III) The client has to encrypt the challenge text using the configured WEP key and send it back in another authentication request. IV) The Access Point decrypts the information and compares it with the clear-text it had sent. Depending on the result of this comparison, the Access Point sends back a positive or negative response. After the authentication and association, WEP can be used for encrypting the data frames. At first glance, it might seem as though Shared Key authentication is more secure than Open System authentication, since the latter offers no real authentication. However, it is quite the reverse. It is possible to derive the static WEP key by capturing the four handshake frames in Shared Key authentication. Hence, it is advisable to use Open System authentication for WEP authentication, rather than Shared Key authentication. (Note that both authentication mechanisms are weak). IV.3.2 WPA/WPA2 encryption WPA greatly increases the level of over-the-air data protection and access control on existing and future Wi-Fi networks. It addresses all known weaknesses of Wired Equivalent Privacy (WEP), the original native security mechanism in the 802.11 standard. WPA not only provides strong data encryption to correct the weaknesses of WEP, it adds user authentication that was largely missing in WEP. WPA is designed to secure all versions of 802.11 devices, including 802.11b, 802.11a, and 802.11g, multi-band and multi-mode. WPA is the older standard; select this option if the Access Point only supports the older standard. WPA2 is the newer implementation of the stronger IEEE 802.11i security standard. The cipher type is the encryption algorithm used to secure the data communication. TKIP (Temporal Key Integrity Protocol) provides perpacket key generation and is based on WEP. AES (Advanced Encryption Standard) is a very secure block based encryption. You can choose from 4 security options: WPA Mode Cipher Type WPA TKIP (default) WPA AES WPA2 TKIP WPA2 AES (default) 54 Mb Wi-Fi port servers user guide (DTUS062 DTUS062) Release A.2, December 14, 2010 Security solution RC4-TKIP RC4-CCMP AES-TKIP AES-CCMP - 19 Security in pre-shared key mode (PSK) In Pre-Shared Key mode (PSK, also known as personal mode), each Access Point client must provide a password to access the network. The password may be from 8 to 63 printable ASCII characters. Most operating systems allow the password to be stored to avoid re-typing. The password must also remain stored in the Wi-Fi access point. All Wi-Fi devices on your Wi-Fi cell must have the same Pre-Shared Key. Overview of security in WPA/WPA2-Enterprise mode WPA/WPA2-Enterprise, or 802.1x, provides authentication to devices trying to attach to a private network through a boundary Access Point, establishing the access point as the gateway to LAN resources, or preventing access from that device if authentication fails. The authentication process is organized around several agents: - User, also called supplicant or Wireless Node (WN), - Wireless access point or authenticator, - Authentication server, most often a RADIUS (Remote Authentication Dial-In User Service) server, - Authentication modus operandi. When a wireless node (WN) requests access to a LAN resource, the first step is the physical association between the client and the access point, defining a so-called “access port” (number 1 on the diagram). The access point (AP) asks for the WN's identity. Then it establishes a point-to-point EAP tunnel between the WN and the authentication server (number 2 on the diagram). No other traffic other than EAP is allowed until the WN is authenticated (the "port" is closed). Until authenticated the client cannot access the LAN. Once the authentication server informs the authenticator that the WN is authenticated, the traffic to the LAN is allowed (number 3 on the diagram): the “port” is open. Otherwise the “port” stays closed. Note : 802.1x also offers a system to exchange keys which will be used to encrypt communications and to check integrity. 54 Mb Wi-Fi port servers user guide (DTUS062 DTUS062) Release A.2, December 14, 2010 - 20 - Authentication modus operandi 802.1x uses one of the EAP (Extensible Authentication Protocol) methods. The most commonly used ones are: - EAP-PEAP EAP-MD5 EAP-TLS EAP-TTLS The EAP method used is transparent to the access point. On another hand the access point clients, like bridges, must be aware of the authentication method. The choice of method must take into account the capabilities of the server/supplicant couple as well as the level of security needed. For example, a Windows XP SP2 supplicant allows: - PEAP authentication with login and password (called MSCHAP V2) - Use of certificates The ACKSYS “serial-to-Wi-Fi” products can use the MSCHAP Version 2 when the unit works as SUPPLICANT. 802.1x configuration (WPA/WPA2-Enterprise) To access the “802.1x Configuration” menu, select the “WPA/WPA2” radio button in the “Wireless security” menu : This menu configures the station as a supplicant requiring authentication with a RADIUS server. Only one EAP method is available here : the EAP-PEAP with authentication by login and password (MS-CHAP V2) . Username: This field contains a valid username registered on your RADIUS server. Password: This field contains the password associated with the above username. 54 Mb Wi-Fi port servers user guide (DTUS062 DTUS062) Release A.2, December 14, 2010 - 21 - IV.3.3 MAC ID Filtering in infrastructure client mode ACKSYS infrastructure clients contain a MAC ID filter that allows the administrator to refuse or authorize access points. It uses a list of MAC addresses which works as follows: “only allow listed machines”: a configuration where the MAC addresses in the list are allowed. In this case, only the access points on the list will be able to connect to the bridge. “only deny listed machines”: a configuration where the MAC addresses in the list are denied. In this case, the access points that are not on the list will be able to connect to the bridge. The MAC ADDRESS FILTER configuration is available in the “ADVANCED/MAC ADDRESS FILTER” menu. SERIAL 54 Mb Wi-Fi port servers user guide (DTUS062 DTUS062) Release A.2, December 14, 2010 - 22 - IV.4 Roaming IV.4.1 Overview The “roaming” ability allows a wireless mobile station (the infrastructure client mode in the ACKSYS products) to switch from an access point to another without losing the network connection. Without this ability, a Wi-Fi client station will not connect to another access point until connection has been lost with the current Access Point. This process can take several seconds during which no data can be exchanged with the Wi-Fi network. The roaming time (the time necessary for the station to switch from one access point to another that is already available) depends on many factors that must be mastered to obtain a roaming time as short and constant as possible. An important parameter is the quality of the radio link between the station and the access point. The RSSI is the measure of this quality. IV.4.2 Understanding the roaming process Two distinct cases require roaming. Loss of the access point In this case the AP is lost abruptly without prior decrease of the RSSI. This happens if there are shadowed areas in the radio coverage, or if the current AP experiences a power failure. Obstacle preventing radio communication (Wall, vegetation…) station Station trip A AP1 radiation cone AP1 B C AP2 AP2 radiation cone - Position A: the communication with AP1 is excellent. - Position B: Communication with AP1 ceases abruptly when the obstacle is passed. The station must find AP2 and associate with it. - Position C: the station associates with AP2 and communication resumes. 54 Mb Wi-Fi port servers user guide (DTUS062 DTUS062) Release A.2, December 14, 2010 - 23 Better access point found This more common case happens when several APs cover the same area. Roaming threshold station Station trip A AP1 radiation cone B C DE F AP1 G AP2 AP2 radiation cone In this example the RSSI that the mobile station measures evolves as shown in the following table. Position RSSI with AP1 RSSI with AP2 A 100% 0% B 50% 0% C 40% 10% D 30% 20% E 20% 30% F 10% 40% G 0% 100% In the illustration above, assuming the following threshold parameters: Scan threshold: 50% of maximum RSSI Roaming threshold: 45% of the maximum RSSI - Position A: the communication with AP1 is excellent. Since the current RSSI (100%) is greater than the scan threshold (50%), there will be no scan. - Position B: RSSI with AP1 is under 50% so the scan process for another AP is engaged. - Position C: the station enters AP2 radio coverage. - Position D: the station reaches the roaming threshold (45%) but did not yet find a better access point than AP1. - Position E: AP2 RSSI is better than AP1 RSSI so the station will roam to AP2 and disconnect from AP1. - Position F: The scan process still runs because the new RSSI (with AP2) is under the scan threshold. - Position G: The station stops scanning because the current RSSI (with AP2) is higher than the scan threshold. In order to always find quickly an AP in both cases, the station must: - Scan the configured channels to maintain a list of APs with which the station could associate should one of the two cases arise; Monitor the continuity of the exchanges with the current AP Watch the RSSI of the current AP to detect when a better one is available. 54 Mb Wi-Fi port servers user guide (DTUS062 DTUS062) Release A.2, December 14, 2010 - 24 But there are difficulties inherent to the radio media: - Scanning many radio channels inevitably causes a performance loss. In fact, when the mobile station listen to a channel other than that of the current AP, it cannot communicate with the AP. - Detecting the loss of the AP is slow because the mobile station must wait for the loss of several management frames from the AP before concluding to a loss. In the meanwhile the data frames are still sent to the AP. Since they are not acknowledged they will be retransmitted many times and then lost. - A data frame sent must be acknowledged by the AP. Else, it is first retransmitted several times at the current bit rate, then several times at a lower bit rate, and so on, until the AP acknowledges or the lowest bit rate fails as well. The lower the bit rate, the longer the time taken to transmit frames. IV.4.3 Configuring The ACKSYS roaming solution allows configuring the various aspects discussed above. The roaming configuration parameters are found in two pages of the web interface: - BASICWireless: Roaming enable and disable, basic parameters. After setting these, roaming will work in usual cases. - ADVANCEDWireless: Fine tuning, to make roaming mach the expected performance of your system. Some parameters not directly related to roaming also have an impact: - Number of retransmissions for each data rate. - Number of channels in the AP cell (see AP configuration) - Beacon transmission frequency (see AP configuration). Basic Wireless menu The roaming mode can be activated using the following option: In order to enable the roaming mode, the « Auto channel select » option must first be cleared, and one or more channels must be selected. When “Enable” is set, the “Basic Roaming Settings” will appear, and an extra “Advanced roaming settings” section will become available in the “ADVANCEDWireless” page. When roaming mode is disabled, the station will not search an AP until it loses connectivity with its current AP. Once the channels are selected, the station will only see the access points using the same channels. To achieve high performance it is advisable to select only one channel. 54 Mb Wi-Fi port servers user guide (DTUS062 DTUS062) Release A.2, December 14, 2010 - 25 - The roaming configuration menu is shown below: This menu will allow you to set the roaming threshold. It can be entered in percent or in dBm. The station will roam from AP1 to AP2 if: (RSSI(AP1) < RSSI(AP2)) AND (RSSI(AP1) < threshold) So, it is impossible to roam to an access point that would offer a worse signal quality than the current one (lower throughput). Advanced Wireless menu The scan process may be fine-tuned with the following “Advanced roaming settings” window. Beware, these parameters must be changed with care because wrong values can cause a loss of bandwidth or even disconnections. “Threshold unit”: This field sets the unit for the “RSSI scan threshold” value (dBm or percent). It is available in multichannel mode only. “RSSI scan threshold”: This field sets the threshold, below which the scan may begin. It is available in multichannel mode only. The default scan threshold is 0% (or –95 dBm). 54 Mb Wi-Fi port servers user guide (DTUS062 DTUS062) Release A.2, December 14, 2010 - 26 “Scan Period”: This field sets the scan process period. This value must be chosen according to the moving speed of the station. This field is always available regardless of the number of selected channels. - In multichannel mode, the scan process is both active and passive. In monochannel mode, the scan is active (passive scan is permanent) The default scan interval is 5 seconds. “Scan duration”: This field sets the amount of time spent searching new access points on a given channel. It is available in multichannel mode only. If it is too short, access points may not be found. The default scan duration value is 100ms. “AP loss detection”: This field sets the AP loss time-out in units of beacon intervals. APs periodically broadcast “beacon” frames to advertise their availability. The loss of so many beacons indicates that the AP was abruptly lost and roaming is required. To lower the AP loss time-out you can: - Lower this field. Set the beacon period in your AP to a lower value. The default count for AP loss detection is 5 beacons. Multi-channel scan timing diagram The station listens to channel 6 and receives beacons from AP2. Data from AP1 is lost. The station communicates on channel 1 with its associated AP. Station 1 2 3 AP 1 channel 1 associated 1 2 3 The station listens to channel 6 and receives the beacons from AP2. The station is back on channel 1 to listen and communicate. 4 4 5 6 4 5 6 7 7 7 AP 2 channel 6 Beacon Interval Beacon from AP 1 Scan duration Scan period Beacon from AP 2 1 Data transmission Warning: Since the radio channel scan disrupts the current connection (the current connection on channel X will be temporarily stopped to allow the station to scan channel Y), it is advisable to use only one channel when roaming is enabled (also called mono-channel mode). In this case, the station will continually check for better access points by listening to the 54 Mb Wi-Fi port servers user guide (DTUS062 DTUS062) Release A.2, December 14, 2010 - 27 beacons sent by the APs around; this mode is called “passive mode scan”. It will also periodically broadcast “probe requests” to find AP that were not seen during the passive mode scan; this is the “active mode scan”. The period can be specified by the user and is called scan period. However, when two or more channels are used (multichannel mode), it is impossible to keep scanning all channels. So, some new options are available in this mode: RSSI scan threshold: the scan is activated when the RSSI drops below this level (it doesn’t make sense to scan other channels while the connection with the access point is excellent). Obviously this threshold must be higher than the roaming threshold. Scan duration: During this whole time, both passive and active mode are used to scan the radio channel. In the multi-channel mode, one different radio channel is scanned at each scan period. Warning: the shorter the scan period or the longer the scan duration, the more the current connection bandwidth is affected. The access point discovery will take more time, as more channels must be scanned. IV.5 Long distance Wi-Fi You can establish Wi-Fi links over several miles but it requires some caution: Use directional antennas, to concentrate the radio power towards the receiver. Antennas must be in “line of sight” of each other. This means that NO obstacle may exist between the two communicating endpoints. Trees (even without leaves), mounds, walls (even with an open window) are obstacles. See below. You must increase the EIRP of the products (but you must keep it in the local regulations range). Put antennas above any obstacle. The link RSSI must be high enough, else when climatic conditions change (rain, wind) the link might break. To increase the EIRP you can Use a antenna with a larger gain And / or Use a product with a larger radio output power. 54 Mb Wi-Fi port servers user guide (DTUS062 DTUS062) Release A.2, December 14, 2010 - 28 Line of sight concept Product in line of sight (We can see the top of the mast where it is installed) Product not in line of sight (the other product is nowhere to be seen clearly) Configuring the distance The Wi-Fi standard parameters allow communication up to 1 km (0.620 miles). For larger distances, the propagation delay between the two endpoints (say, the access point and the station) will trigger retransmission timeouts and the throughput will decrease. The ACKSYS products can be used over 1 km, up to 5 km, by configuring the “distance” parameter in the web interface, page “AdvancedAdvanced Wireless”. 54 Mb Wi-Fi port servers user guide (DTUS062 DTUS062) Release A.2, December 14, 2010 - 29 Check the “Enable long distance” box, the distance configuration parameters will appear. Type the distance from one product to the other in the “Distance between Antennas” input box. Do not change the other parameters (Slot Time, Ack Time out, CTS time) unless you completely understand the impact on the Wi-Fi protocol. They are automatically computed from the “distance” parameter. Changing the “distance” parameter does not change the radio output power. Only Wi-Fi timing parameters are changed. 54 Mb Wi-Fi port servers user guide (DTUS062 DTUS062) Release A.2, December 14, 2010 - 30 - PAGE INTENTIONALLY LEFT BLANK 54 Mb Wi-Fi port servers user guide (DTUS062 DTUS062) Release A.2, December 14, 2010 - 31 - V. PRODUCTS DISTINCTIVE FEATURES V.1 Distinctive features availability table Some features are available on some products of the products line. We will learn which product supports which feature, and then we will discuss each feature separately. This section focuses on the features that involve specific software configuration. Other distinctive characteristics are covered in the quick installation guide of each product. Feature RS232 port WLgWLgDONGLE DONGLE-OEM X RS422/RS485 port TTL serial port V.2 WLgIDA/S WLgxROAD/S X X X X X C-Key X Alarm X Dual power supply X Dual antenna plugs X X High power option X X Dual antenna plugs Some products provide two antenna connectors “MAIN” and “AUX”. All other products only use a “MAIN” antenna. The radio card may be set to three modes: “main”, “aux” and “diversity”. Use the “main” setting with one antenna connected to “MAIN” Use the “aux” setting with one antenna connected to “AUX” Use the “diversity” setting either with one antenna connected to “MAIN” or with two antennas. This mode tries to use the AUX antenna to improve reception. V.3 High power radio option Some products can be ordered with a “high power radio” option. This will show up in the web administration interface, page “StatusDevice info”. On these products the radio card will transmit with a higher radio power. See the product quick start for the figures. High power allows to reach a farther range of stations, and to get through a noisy radio environment. It may be used in conjunction with the “long distance” configuration parameters. Please check against local regulations rules that such high power is allowed. 54 Mb Wi-Fi port servers user guide (DTUS062 DTUS062) Release A.2, December 14, 2010 - 32 - V.4 RS422/RS485 port This section only applies to products that provide RS422/RS485 connectivity. The normalized identifiers for RS422/RS485 differential cables are A, B, A’, B’. We will use these names to avoid the misleading non-standard names “+” and “–” used by some manufacturers. Software configuration: The electrical interface must be specified in the software configuration. The default configuration is set to RS232 mode. Check the administration section for more information. RS422 mode cabling: Identify A, A’, B & B’ signals on the equipment side. Some equipments document these signals with other names as follows: A = Tx+ A’ = Rx+ B = Tx– B’ = Rx– The points A, B, A’ and B’ are as defined in the EIA-422 and V11 recommendations, such that: VA < VB and VA’ < VB’ when idle (state also called MARK or OFF: transmission/reception of stop bits). Connect signal A of the product to signal A’ of the equipment. Connect signal B of the product to signal B’ of the equipment. Connect signal A’ of the product to signal A of the equipment. Connect signal B’ of the product to signal B of the equipment. 54 Mb Wi-Fi port servers user guide (DTUS062 DTUS062) Release A.2, December 14, 2010 - 33 RS485 mode cabling: Identify AA’& BB’ signals on the equipment side. The points AA’ and BB’ are as defined in the EIA-485 and V11 recommendations, such that: VAA’ < VBB’ when idle (state also called MARK or OFF: transmission/reception of stop bits). Connect signal AA’ of the product to signal AA’ of the equipment. Connect signal BB’ of the product to signal BB’ of the equipment. Line polarization Line polarization is needed for stability in RS485 mode and RS422 mode in multidrop Master / Slave set-up (also called RS485 4 wires). Line polarization is integrated in the product and can be switched on (refer to the quick installation guide). Only one single polarization pair (+/–) must be set on the bus. Terminating resistor: The terminating resistor for the RS422/RS485 line reduces reflections created by long lines at high speeds. It is not required in noise-free environment and if the distance and the rate are within 1000 meters at 9600 bps or 100 meters at 115200 bps. Terminating resistor is integrated in the product and can be switched on (refer to the quick installation guide). Cable length: 54 Mb Wi-Fi port servers user guide (DTUS062 DTUS062) Release A.2, December 14, 2010 - 34 - V.4.1 RS422 Cabling example RS422 FULL-DUPLEX POINT TO POINT CABLING RS422 INTERFACE FOR POINT TO POINT LINK D R A B A' B' RT 1 DB9 Pin TWISTED PAIRS RS422 INTERFACE FOR POINT TO POINT LINK D A B A' R B' 3 RT 2 54 Mb Wi-Fi port servers user guide (DTUS062 DTUS062) Release A.2, December 14, 2010 - 35 - RS422 FULL-DUPLEX MULTIDROP CABLING RS422 INTERFACE FOR MASTER-TYPE MULTIDROP LINK (POLLING SELECTING) D R A B A' RP RT B' RP VCC 1 RS422 INTERFACE FOR INTERMEDIATE SLAVETYPE MULTIDROP LINK D R A B TWISTED PAIRS A' B' 2 RS422 INTERFACE FOR TERMINAL SLAVE-TYPE MULTIDROP LINK D R A B A' RT B' 10 54 Mb Wi-Fi port servers user guide (DTUS062 DTUS062) Release A.2, December 14, 2010 - 36 - V.4.2 RS485 cabling example RS485 HALF-DUPLEX MULTIDROP CABLING INTERFACE RS485 FOR MASTERTYPE MULTIDROP LINK (POLLING-SELECTING) RP A-A' D RT R B-B' DE/REB RP VCC 1 RS485 INTERFACE FOR INTERMEDIATE SLAVE-TYPE MULTIDROP LINKS (POLLING-SELECTING) D A-A' R B-B' GND DE/REB 2 RS485 INTERFACE FOR TERMINAL SLAVE-TYPE MULTIDROP LINKS (POLLING-SELECTING) D A-A' RT R B-B' DE/REB 32 54 Mb Wi-Fi port servers user guide (DTUS062 DTUS062) Release A.2, December 14, 2010 TWISTED PAIRS - 37 - V.5 Alarm On the products equipped with an alarm contact, several alarm sources are available: Loss of power supply #1. Loss of power supply #2. Loss of link with the Access Point (in infrastructure station mode). Configuring the alarm sources Each source may be managed in two ways: Automatic reset: The alarm source is active during the fault. Manual reset: The alarm source stays active after the fault has disappeared. A user action is required on the “statusalarm” page in order to quiet the alarm source. Each source may be Individually enabled or disabled. Set to automatic or manual reset. Using the alarm contact The web interface has a page that allows managing the C-Key contents. The alarm contact is closed in the following cases: Product is booting. Product is out of order. At least one of the alarm sources is active. The alarm contact is open in the following cases: Product is operational and no alarm source is active. Alarm management interface The web interface has a page that allows managing the alarms, and a page to display alarm sources status and to clear them. Enable alarm Enables or disables the alarm source. Enable automatic reset When checked, the corresponding source will be set to automatic reset mode. When unchecked, the corresponding source will be set to manual reset mode. Ack alarm Clears the alarm source. 54 Mb Wi-Fi port servers user guide (DTUS062 DTUS062) Release A.2, December 14, 2010 - 38 - V.6 C-Key The C-Key is an optional component used for product configuration backup. It must be inserted or removed only when the product is powered off. NOTE: The C-Key is optional; if not ordered the product is delivered without a C-Key. In its place there is a cover. Writing the current configuration in the C-Key The configuration data is automatically written in the C-Key (as well as in internal Flash EPROM) while parameters are saved. The configuration is automatically written in the C-Key only if the configuration data currently in the C-Key is valid and compatible with your product. Otherwise you must use the web administration interface to force writing to the C-Key. Using the stored configuration When the C-Key is detected at start-up, if the configuration data currently in the C-Key is valid and compatible with your product, the product will automatically load its configuration from the C-Key. Furthermore, if the CKey has been previously used with another product, it will be copied onto the internal copy of the configuration. If the C-Key contents are invalid or pertain to an incompatible product, the C-Key will be ignored and the product will get its configuration from its internal memory. C-Key management interface The web interface has a page that allows managing the C-Key contents. Copy current settings to the C-KEY This action erases the C-Key contents and replaces it with the current settings. Copy C-KEY settings to the product This button copies the C-Key configuration to the product internal memory. V.7 Dual power supply Products with a dual power supply can be powered from either source. The state of the power sources can be used as alarm sources, in which case they can be monitored on the “StatusAlarm” web page and with an external device plugged to the alarm contact. Only one source is needed for the product to work properly. 54 Mb Wi-Fi port servers user guide (DTUS062 DTUS062) Release A.2, December 14, 2010 - 39 - V.8 WLg-DONGLE-OEM integration data The WLg-DONGLE-OEM-TTL is a module aimed to add Wi-Fi connectivity to existing PCBs equipped with an asynchronous serial port. A HE10 connector conveys the power supply, the serial control and the serial data signals between the PCB and the product. The signals are LVTTL (3.3V TTL) compatible. The WLg-DONGLE-OEM-232 is similar but with an integrated DB9 connector, supporting the RS232 compatible serial port. The HE10 serial inputs must not be connected on this model. In order to evaluate these products, ACKSYS provides an evaluation module called WLg-DONGLE-OEM-EVAL, which is equivalent to a WLgDONGLE without its housing and with a WLg-DONGLE-OEM compatible HE10 connector. V.8.1 Electrical protection The HE10 connector is directly connected to the CPU pins. Applying ESD or overvoltages to the HE10 connector may destroy the module. V.8.2 Dimensions 54 Mb Wi-Fi port servers user guide (DTUS062 DTUS062) Release A.2, December 14, 2010 - 40 - 54 Mb Wi-Fi port servers user guide (DTUS062 DTUS062) Release A.2, December 14, 2010 - 41 - V.8.3 Connector WLg-DONGLE-OEM-232 and WLg-DONGLE-OEM-EVAL models: refer to the WLg-DONGLE documentation for the DB9 connector. Female HE10 reference: Nicomatic 3y-20-131-16-1 HE10 (J3) Pin Signal Electrical Description Pin 2 (3.3V) or Pin 15 (5V): Power supply. If the module is powered at 3.3V VCC=5V through pin 15, pin 2 is a 3.3V output and must not be (3.5Wmax) connected. If the module is powered at VCC=3.3V through pin 2, pin 15 must not be connected. 2 Power supply 15 Alternate power supply 16 GND 3 RI (active low) Input (1) RING serial port input, inverted 7 RX (active low) Input (1) RxD (data in) serial port input, 0 for space state, 3.3V-5V for mark state 8 DCD (active low) Input (1) DCD serial port input, inverted 9 DSR (active low) Input (1) DSR serial port input, inverted 13 CTS (active low) Input (1) CTS serial port input, inverted 14 Serial port admin mode (active low) 5V (5Wmax) Pin 2 (3.3V) or Pin 15 (5V): Power supply. If the module is powered at VCC=5V through pin 15, pin 2 is a 3.3V output and must not be connected. If the module is powered at VCC=3.3V through pin 2, pin 15 must not be connected. Reference ground Input (1) Pin 14 (Administration): The module can be put by hardware in “administration mode” so that I may be configured through its serial interface. To enter administration mode, pin 14 must be driven to 0V. The serial port then changes to 1200 bauds, 8 bits, no parity, 1 stop bit and sends a banner and a prompt. See the firmwares manuals for a list of available commands. Pin 14 set to 0 V: administration mode. Pin 14 set to 3.3V.5V: exploitation mode. 6 TX (active low) Output (2) TxD (data out) serial port output, 0 for space state, 3.3V for mark state 5 RTS (active low) Output (2) RTS serial port output, inverted 12 DTR (active low) Output (2) DTR serial port output, inverted 1 RS485 turnaround (active high) Pin 1 (RS485 turnaround): This pin allows using a two-wires RS485 Output (2) bus. External RS485 drivers. It provides a transmit-enable signal useful to turn the RS485 transmitter on and off. 4 Wi-Fi activity (active low LED driver) Output (2) Active low signal to show Wi-Fi activity 10 Serial TX/RX activity (active high LED driver) Output (2) Active high signal to show serial activity 11 Diagnostic (active high LED driver) Output (2) Active high signal to show errors/diags (1) Input signals electrical characteristics Vmax = 5.5V (nominal 3.3V) Vih = 2.0Vmin Vil = 0.8Vmax (2) Output signals electrical characteristics: Vmax = 3.3V Voh = 2.4Vmin Vol = 0.4Vmax 24 mA available 54 Mb Wi-Fi port servers user guide (DTUS062 DTUS062) Release A.2, December 14, 2010 - 42 - V.8.4 Application note Administration mode driven by a switch or any kind of I/O pin from a remote CPU Warning, the Attention, le produit productne doit pas must notêtre be powered alimenté simultanément from the two power depuis les 2 sources(3.3V sources d’alimentation and 5V) 5V & 3.3V. simultaneously Connect to the DE pin of a RS485 line driver UART, CPU-embedded UART, RS232 / 422 / 485 transceivers… May also serve as a start / stop signal between two line drivers The HE10 connector to use on your board to plug the module into, is the Nicomatic reference 3y-20-131-16-1. Attention: If the module is to be used in an environment with vibrations, it is strongly advisable to solder the radio card on its slot after integration. The two 5V and 3.3V power inputs must never be used together. 54 Mb Wi-Fi port servers user guide (DTUS062 DTUS062) Release A.2, December 14, 2010 - 43 - VI. ADMINISTRATION VI.1 Configuration overview The configuration data is kept in an area of the Flash EPROM. During firmware startup, the configuration data is loaded into RAM and immediately used to set up the operational parameters. Changes made to the configuration act on the RAM copy, which is saved to EPROM afterwards. Most changes will then be taken into account at the next startup. There are a few exceptions for operational parameters like the logging level, or the MAC addresses filter table. There are five means to change the configuration data. In the browser and pushbutton cases, the changes are saved automatically to Flash EPROM. Acksys NDM Browser NDM interface Web interface Console terminal TELNET CLI Configuration data Long push Reset button Factory default settings Backup configuration on C-Key Some products have an optional external backup memory named “C-Key”. When a C-Key containing valid configuration data is mounted on the product, the configuration stored in internal EPROM is ignored and the CKey configuration is used instead. Configuration changes are saved both to the internal memory and to the C-Key. When a C-Key prepared on a product is plugged in another compatible product, the C-Key is copied to the internal EPROM upon next reboot. The radio card MAC address is used to determine whether the C-Key was moved from one product to another. The Web administration provides tools to clear copy to and from the C-Key. VI.1.1 Factory default Wi-Fi configuration The default configuration may be reset with the reset pushbutton. Usually it will allow direct access to the product from a computer equipped with a WiFi card. In other cases you will need to set up a Wi-Fi/Ethernet bridge device in ad-hoc mode. Network defaults are as follows: Mode: ad-hoc SSID: “acksys” Channel: 6, mode 802.11B No key protection (neither WEP nor WPA, WPA2) IP address: 192.168.1.253 If you have no means to connect to the product with the defaults, you can change the configuration through the serial port (see CLI administration). 54 Mb Wi-Fi port servers user guide (DTUS062 DTUS062) Release A.2, December 14, 2010 - 44 - VI.2 RESET button Anyone having physical access to the product can reset it to factory settings without any password protection. He/she could replace it by another preconfigured product anyway, so there is no point protecting that. VI.3 Administration through the serial port You can configure the product through the serial port. In this mode you do not need a password. You will be prompted to type in textual commands terminated by “Enter” (or newline, CR, LF… depending on your terminal). VI.3.1 Select Administrator mode Push the Admin switch towards the “ON” position. The red (DIAG) light will start to blink twice per second, unevenly. VI.3.2 Connect to the serial port of a PC You can use the provided null modem cable and plug it directly into a standard DB9 male connector such as a PC COM port. VI.3.3 Run a terminal emulator Below we describe how to work with a PC with Windows, a COM port and the ATTY emulator. Other terminal emulators (HyperTerminal, PUTTY…), devices (ANSI console...) or operating systems (Linux with “minicom” or “cu”...) can be used, but this is beyond the scope of this manual. On the CD-ROM go to the Wi-Fi ports servers page, and follow the “Miscellaneous tools for diagnostic and maintenance” link at the top of the page. Start ATTY. Select the PC port where you plugged the cable, and the following port parameters: 2400 bauds (bits/second), 8 bits, parity none, 1 stop bit, no flow control. ATTY now displays a blank window. Hit the « ENTER » key to display the admin prompt (You can resize the font if you need to). Refer to the manual of the firmware you plan to use, to learn about available commands. 54 Mb Wi-Fi port servers user guide (DTUS062 DTUS062) Release A.2, December 14, 2010 - 45 - VI.4 Administration through the network NOTE: Wi-Fi configuration in admin mode When the “Admin” switch is ON, besides using the serial port for administration, the product will also try to communicate on the Wi-Fi side using the factory defaults. It will try to get an IP address with DHCP, and will also use its default IP address as a fallback. VI.4.1 Establish network connectivity You first need to establish a network path from your computer to the product. This involves properly setting IP addresses, the Wi-Fi link, and optionally an intermediate Ethernet connection. Only one new product can be used on the LAN at a given time, until you have assigned a different IP address on each one. Otherwise IP address conflicts will result. If you use several products with the same IP in succession, do not forget to clear the ARP cache of your computer. Here are some typical cases. PC with a Wi-Fi card Product with the Admin switch turned ON, or with factory settings Peer-to-peer (ad-hoc) Wireless network 802.11b, channel 6 SSID ‘acksys’ Wireless connection with IP address 192.168.1.xxx IP address: 192.168.1.253 PC with Ethernet access only Product with the Admin switch turned ON, or with factory settings Ethernet/Wi-Fi bridge Ethernet connection with IP address 192.168.1.xxx Peer-to-peer (ad-hoc) Wireless network 802.11b, channel 6 SSID ‘acksys’ Wi-Fi ad-hoc mode IP address: 192.168.1.253 54 Mb Wi-Fi port servers user guide (DTUS062 DTUS062) Release A.2, December 14, 2010 - 46 Product previously configured for the customer’s infrastructure Routine management after installation Access point infrastructure Wireless network Custom channel & SSID Infrastructure mode Custom channel, SSID, IP VI.4.2 Acksys NDM Acksys NDM is a “Network Device Manager” for ACKSYS products. It can be used to display the state of all the products on the LAN, change their IP addressing data, upgrade their firmware, plan and execute bulk configuration changes over groups of products. VI.4.3 Browser The Web administration interface handles two users: the username “admin” that can change parameters, and the username “user” that can only display configuration and current status. Passwords may be added to these users. The factory configuration passwords are empty. VI.4.4 TELNET You can configure the product through the network with a TELNET session (TELNET, Hyperterminal, PUTTY…) Run Telnet C:\> telnet 192.168.1.253 Telnet displays a banner and a prompt from the product. COMETH service version x.y.z, Administration mode ready You can use display commands. In order to change and save the configuration you must log in. Type: > login admin Password : none (type “enter”), or the admin password if you set one. For backward compatibility the name “root” is allowed instead of “admin”. For further compatibility when the name is “root” the password “root” is accepted even when no password is configured (this was the default on previous products). > login root Password : root OK root> 54 Mb Wi-Fi port servers user guide (DTUS062 DTUS062) Release A.2, December 14, 2010 - 47 - VII. FIRMWARE UPGRADES VII.1 Standard upgrade (Web browser or Acksys NDM) VII.1.1 Web interface Uploading a new version of the firmware is easily done from the web interface page “TOOLSfirmware”. All previous configuration changes will be left unchanged. 54 Mb Wi-Fi port servers user guide (DTUS062 DTUS062) Release A.2, December 14, 2010 - 48 - VII.1.2 Acksys NDM Select in the list the products you wish to upgrade and click the “Upgrade” button. Select the file to upload then click on “Upgrade”. If you wish to upgrade several products at once select them in the list and click “Upgrade All”. Remark: Upgrading several products together requires that they all have the same password for the “admin” user. All previous configuration changes will be left unchanged. VII.2 Upgrading while in serial administration mode You can still use the web interface but remind that the Wi-Fi and network parameters are the factory default ones. Set up a network link accordingly. 54 Mb Wi-Fi port servers user guide (DTUS062 DTUS062) Release A.2, December 14, 2010 - 49 - VII.3 Emergency upgrade Continually pressing the “reset” button during product start-up will enter a special failover mode called “Emergency upgrade”. The product will then execute a restricted web service allowing only firmware uploads. This failover mode displays by the DIAG LED blinking quickly. Remind that it is off in normal working mode. In this mode the network and Wi-Fi settings are as follows: Station type: access point SSID: “emergency-upgrade” Channel: automatic (least noisy in the 2.4 GHz range) 802.11 mode: mixed B/G No key protection (neither WEP nor WPA, WPA2) IP address: 192.168.1.253 DHCP server provides an address in the 192.168.1.249..254 range To use this mode, establish the Wi-Fi link from a computer, and type the IP address “192.168.1.253” in the URL address input bar of your web browser. Just re-enter the firmware file name in the “file to upload” field and click “Upload”. Once the firmware is correctly uploaded you can check the firmware version in the “TOOLSfirmware” menu. All configuration parameters are kept except if the Flash EPROM area containing the configuration settings was corrupted during the failure. In this case the default settings are reinstated. The “Emergency upgrade” page also allows to restore factory settings with the “Reset settings” button. VII.4 Fallback after an interrupted upgrade operation If the upgrade process fails due (for example) to an unexpected power supply failure during Flash EPROM programming, the product will automatically switch to failover mode. At its next reboot the product will find out that the firmware is incomplete and the “Emergency upgrade” mode will start automatically. 54 Mb Wi-Fi port servers user guide (DTUS062 DTUS062) Release A.2, December 14, 2010 - 50 - PAGE INTENTIONALLY LEFT BLANK 54 Mb Wi-Fi port servers user guide (DTUS062 DTUS062) Release A.2, December 14, 2010 - 51 - VIII. TROUBLESHOOTING This section gives indications on the checks to perform when things do not work as expected after configuration. A network sniffer may prove very helpful when debugging network connections. We recommend WireShark, a free sniffer working on Windows and Linux. VIII.1 Basic checks Basic checks Check power supply LED Check Diag LED (infrastructure station only) Check Wi-Fi association Determine application type Thorough checks Application type: “Serial is slave” Thorough checks Application type: “Serial is master” Check power supply LED If the power supply LED is OFF, check that the power supply is correctly plugged at both ends; check that the delivered current and voltage is in the acceptable range. Products with dual power supply can work with only one source provided. Check Diag LED The Diag LED should go OFF a few seconds after power up. If it remains permanently fixed, the product is out of order. If it is blinking, the blink rate indicates one of several conditions. Occasionally flashing: serial port data errors Blinking twice per second unevenly: admin switch is turned ON Blinking in alternatively with the blue WLAN LED: searching an access point Blinking very quickly: Emergency upgrade mode Flashing once per second: Searching a DHCP server Blinking 3 times/second: “raw TCP client” service searching a server 54 Mb Wi-Fi port servers user guide (DTUS062 DTUS062) Release A.2, December 14, 2010 - 52 Check Diag + WLAN LEDs If the product is set for infrastructure station mode, it will try to connect to an access point with corresponding configuration (channel, protocol, keys and SSID). During the search the Diag (red) and WLAN (blue) LEDS will blink alternately. Insure that the access point is in range Insure that the access point Wi-Fi and security parameters match the product Wi-Fi and security parameters. “Serial is slave” application type This means that the device connected to the serial port of the product never sends data on its own, it must be requested to do so by a command sent to its the serial port. Examples are: MODBUS slaves Request/response oriented slave devices Serial printers Call-only modems This type of application requires checking the network side before the serial port side. “Serial is master” application type This means that the device connected to the serial port will issue data to the serial port on its own. Examples are: MODBUS masters Automatic answering modems Serial keyboards / consoles / mice Permanent flows of data (video, sound) This type of application requires checking the serial port side before the network side. 54 Mb Wi-Fi port servers user guide (DTUS062 DTUS062) Release A.2, December 14, 2010 - 53 - VIII.2 Serial is slave slave Check network connectivity (1) No OK? Yes A Check product emission* (2) No data OK? Data out Check serial configuration (3) Was bad Check device emission (5) OK? No Was OK done Check application configuration (4) OK? Yes done Check encapsulation (6) OK? done Yes done Check destination* (7) OK? Yes Check application configuration (8) (*) from the product viewpoint done done 1. Check network connectivity: run the “ping” utility, found on most operating systems, to insure that the computer hosting the application software can access the serial port server. If the product does not answer to PING commands proceed to the “A” diagram. 2. Check serial emission: Unplug the serial device from the port server. Start the remote application software. The “serial Tx/Rx” LED should turn on (continuous data flow) or flash (framed data). Special case: if you have configured hardware flow control, leave the serial device plugged to the product. PLUG BACK THE DEVICE when done with this check. 3. Check that no flow control would prevent data going out the serial port, and that the relevant serial service is selected (it must match the remote application needs and configuration). Some services need to know the authorized remote computer address and application port. Correct as needed. 54 Mb Wi-Fi port servers user guide (DTUS062 DTUS062) Release A.2, December 14, 2010 - 54 4. Check that the remote application uses the correct destination IP address and TCP/UDP port. Use a network sniffer if in doubt. Check firewalls in the remote computer or in intermediary routers. When using the Virtual COM service, check that the application does not require an unsatisfied flow control. 5. Connect to the web administration statusstatistics page and see if the received serial data figure is increasing. If yes, this check passes. If no, there can be several causes: The device does not receive data because it is sent with a wrong format. Check the baud rate, number of bits and parity. With the “Virtual COM” service check it in the remote application; with other serial services check this in the product. The device does not receive data because the cable is wrong. Insure that the Tx and Rx signals need not be crossed. In RS422/RS485, insure that A and B need not be crossed, check A’ and B’ as well. The device receives data but does not recognize valid frames because there are idling delays (time where not data is transmitted) inside frames; this happens with “Virtual COM”, “raw TCP client” and “raw TCP server” services. Usually this is a problem from the remote application, especially when the remote application is another port server. Configure the remote to correctly packetize the data frames. The device receives data but is misconfigured and does not answer (bad device address, flow control blocking the answer…) 6. If data is received, it will store up in a buffer and go to the network depending on several conditions. If these conditions are not met data will not be sent. With a slave MODBUS/TCP the condition is that the remote MODBUS/TCP master is keeping the connection open until it gets the reply from its request. Check the serial timeout setting in the product and the reply timeout setting in the remote master. With other serial services the condition is configurable in the web page “BASICserial port” in the “send triggers” section or with the “set sendtrigger” command of the CLI. 7. With “UDP raw port server” and “TCP raw port client”, check in the web page “BASICserial port” that the product sends back to the correct remote computer and application port. Use a network sniffer if in doubt. 8. Check for firewalls in the remote computer or in intermediary routers. Firewalls may be asymmetric; checks done in one direction may be different from checks done in the other. With “UDP raw port server”, check that the remote application is listening. 54 Mb Wi-Fi port servers user guide (DTUS062 DTUS062) Release A.2, December 14, 2010 - 55 - VIII.3 Serial is master master Check device emission (1) No data OK? Data in Check cables (3) Check your device configuration (4) Check network connectivity (2) No OK? Yes A Check serial emission* (5) done Data out OK? No data Check remote is sending (6) No net data OK? Net data out Check remote is receiving (7) Yes OK? Check remote configuration (11) Check remote configuration (11) No Check remote configuration (8) done OK? done Yes done Check destination (9) OK? Yes done (*) from the product viewpoint Check encapsulation (10) done 1. Check device emission: when the device plugged into the port server product is sending data, the “serial Tx/Rx” LED on the product should turn on (continuous data flow) or flash (framed data). 2. Check network connectivity: run the “ping” utility, found on most operating systems, to insure that the computer from which you manage the product can access it. Then, use TELNET to connect to the CLI 54 Mb Wi-Fi port servers user guide (DTUS062 DTUS062) Release A.2, December 14, 2010 - 56 interface of the product, log in and use the PING command towards the remote application. If the remote does not answer to PING commands proceed to the “A” diagram. 3. Check the cabling. Insure that the Tx and Rx signals need not be crossed. In RS422/RS485, insure that A and B need not be crossed, check A’ and B’ as well. 4. Check the configuration of your device. 5. Check serial port emission: connect to the web administration page “STATUSstatistics” and check that the serial transmit counter is increasing. If yes, proceed to step 3. Else check for local serial flow control (page “BASICserial port”) or, if the service is “Virtual COM server”, check for remote flow control set by the remote device. 6. Check the remote is sending. This depends on the diagnostic capabilities of the remote device. In case of doubt use a network sniffer (i.e. WireShark). If this test is unfeasible proceed to step 7. 7. Check the remote is receiving. This should at least make some kind of LED blink on the receiver, synchronously with the “Serial Tx/Rx” LED of the sender. Other diagnostic means may exist on the remote receiver (like network interface counters). 8. Check for firewalls in the remote computer or in intermediary routers. Firewalls may be asymmetric; checks done in one direction may be different from checks done in the other. Especially with “UDP raw port server”, check that the remote application is listening on the right port and not filtering out the IP address of the sender. 9. With “UDP raw port server”, “TCP raw port client” and “MODBUS/TCP master”, check in the web page “BASICserial port” that the product sends back to the correct remote computer and application port. Use a network sniffer if in doubt. 10. Data received from the serial port of the product will store up in a buffer and go to the network depending on several conditions. If these conditions are not met data will not be sent. With a master MODBUS/TCP the condition is that the remote MODBUS/TCP slave is listening. Check the transaction timeout setting in the product. With other serial services the condition is configurable in the web page “BASICserial port” in the “send triggers” section or with the “set sendtrigger” command of the CLI. 11. Check that the remote application accepts the IP address and TCP/UDP port configured in the product. Use a network sniffer if in doubt. When using the Virtual COM service, check that the application does not require an unsatisfied flow control. 54 Mb Wi-Fi port servers user guide (DTUS062 DTUS062) Release A.2, December 14, 2010 - 57 - VIII.4 Diagram “A”: network connectivity A Check IP addresses (1) Check security parameters (2) Check Wi-Fi parameters (3) done 1. Check IP addresses: the following assumes that all network devices are in the same LAN (the computer used for the tests, the product, the remote device): All network devices must be in the same IP subnet (see RFC 950). For example 192.168.1.253 and 192.168.1.10 are in the same subnet, but 192.168.1.253 and 128.1.1.10 are not (assuming a netmask of 255.255.255.0) All network devices must have the same netmask When changing the IP address of one device, the others keep the old address for several minutes in the ARP cache: clear it with “arp –d” (Windows O.S.) or by powering off the caching devices Windows (or other) firewalls may prevent communication. The CLI has a command “ping ipaddress” which pings 4 times the given ipaddress destination and indicates answer or timeout. 2. Check security parameters: when installing, always disable all security parameters until everything else work correctly. Add security parameters at the end, when you are sure about the whole configuration parameters. Security parameters include Keys (WEP, WPA, WPA2) Filters (MAC address filters) 3. Check Wi-Fi parameters: all the communicating devices must have matching Wi-Fi parameters. Check the SSID, the channel, the 802.11 mode (a, b, g or mixed b/g), the topology (infrastructure or ad-hoc). If in doubt, set the same given fixed channel on all communicating devices. The CLI has a command “show net wlan” which shows surrounding access points while in serial administration mode. 54 Mb Wi-Fi port servers user guide (DTUS062 DTUS062) Release A.2, December 14, 2010 - 58 - IX. APPENDIX – RADIO CHANNELS LIST IX.1 802.11b/g (2.4GHz) These networks use the ISM (Industrial Scientific and Medical) radio band on the [2.3995-2.4965] spectrum. Channel Central frequency (25 MHz) (GHz) 1 2,412 2 2,417 3 2,422 4 2,427 5 2,432 6 2,437 7 2,442 8 2,447 9 2,452 10 2,457 11 2,462 12 2,467 13 2,472 14 2,484 Allowed by Asia MKK, Europe ETSI, US FCC Asia MKK, Europe ETSI, US FCC Asia MKK, Europe ETSI, US FCC Asia MKK, Europe ETSI, US FCC Asia MKK, Europe ETSI, US FCC Asia MKK, Europe ETSI, US FCC Asia MKK, Europe ETSI, US FCC Asia MKK, Europe ETSI, US FCC Asia MKK, Europe ETSI, US FCC Asia MKK, Europe ETSI, US FCC Asia MKK, Europe ETSI, US FCC Asia MKK, Europe ETSI Asia MKK, Europe ETSI Asia MKK Besides specifying the center frequency of each channel, 802.11 also specifies (in Clause 17) a spectral mask defining the permitted distribution of power across each channel. The mask requires that the signal be attenuated by at least 30 dB from its peak energy at ± 11 MHz from the center frequency, the sense in which channels are effectively 22 MHz wide. One consequence is that stations can only use every fourth or fifth channel without overlap, typically 1, 6 and 11 in the Americas, 1-13 in Europe, etc. Another is that channels 1-13 effectively require the band 2401-2483 MHz, the actual allocations being for example 2400-2483.5 in the UK, 24022483.5 in the US, etc. Since the spectral mask only defines power output restrictions up to ± 22 MHz from the center frequency to be attenuated by 50 dB, it is often assumed that the energy of the channel extends no further than these limits. It is more correct to say that, given the separation between channels 1, 6, and 11, the signal on any channel should be sufficiently attenuated to minimally interfere with a transmitter on any other channel. Due to the nearfar problem, a transmitter can impact a receiver on a "non-overlapping" channel, but only if it is close to the victim receiver (within a meter) or operating above allowed power levels. 54 Mb Wi-Fi port servers user guide (DTUS062 DTUS062) Release A.2, December 14, 2010 - 59 - IX.2 802.11a/h (5 GHz) These networks use the 5 GHz radio band UN-II (Unlicensed-National Information Infrastructure). Channel Central frequency (GHz) 34 5,170 36 5,180 38 5,190 40 5,200 42 5,210 44 5,220 46 5,230 48 5,240 40 mW (FCC), 200 mW (ETSI) 52 5,260 250 mW (FCC), 200 mW (ETSI) Europe ETSI, US FCC 56 5,280 250 mW (FCC), 200 mW (ETSI) Europe ETSI, US FCC 60 5,300 250 mW (FCC), 200 mW (ETSI) Europe ETSI, US FCC 64 5,320 250 mW (FCC), 200 mW (ETSI) Europe ETSI, US FCC 100 5,500 1W Europe ETSI 104 5,520 1W Europe ETSI 108 5,540 1W Europe ETSI 112 5,560 1W Europe ETSI 116 5,580 1W Europe ETSI 120 5,600 1W Europe ETSI 124 5,620 1W Europe ETSI 128 5,640 1W Europe ETSI 132 5,660 1W Europe ETSI 136 5,680 1W Europe ETSI 140 5,700 1W Europe ETSI 149 5,745 1W US FCC 153 5,765 1W US FCC 157 5,785 1W US FCC 161 5,805 1W US FCC 165 5,825 1W US FCC Power Allowed by Japan TELEC 40 mW (FCC), 200 mW (ETSI) Europe ETSI, US FCC Japan TELEC 40 mW (FCC), 200 mW (ETSI) Europe ETSI, US FCC Japan TELEC 40 mW (FCC), 200 mW (ETSI) Europe ETSI, US FCC Japan TELEC Europe ETSI, US FCC Summary: US and Canada (FCC): 13 channels [5.150 to 5.250 GHz] (Called U-NII I) [5.250 to 5.350 GHz] (Called U-NII II) [5.725 to 5,825] (Called U-NII III) Europe (ETSI): 19 channels [5.150 to 5.350 GHz] [5.5 to 5,725] Japan (TELEC): 4 channels [5.150 to 5,250] 54 Mb Wi-Fi port servers user guide (DTUS062 DTUS062) Release A.2, December 14, 2010