1
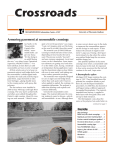
Operating instructions for
Sweeping-/ Suctionmachine
Tandem KSV
Operating Instructions for the
Sweeping and Suction Machine
Tandem 900 KSV
! Please read this before operating the sweeping
machine!
Contents:
Page
1. Safety Information
2
2. Technical Data
3
3. Unpacking and Assembling
4
4. Starting Up/Operating
4
5. Service Work / Troubleshooting
6
6. The EU Declaration of Conformity
8
7. Spare Parts List
9
Indications in the operating instructions:
Notice! Danger!
Caution!
Warning: electrical voltage
Absolutely important
01/98
Page 1
1. Safety Information:
Application:
Before use, check that the unit and operating equipment are in perfect condition
and are safe to operate. Do not use the unit if it is not in perfect condition.
This sweeping and suction machine is intended exclusively for operation on solid,
level, and dry surfaces with an inclination not exceeding 2%.
Do not sweep up/draw in burning or glowing objects.
This unit must not be used for removing dust which is hazardous to your health
unless specifically indicated on the unit. Comply with the safety information in the
operating instructions!
This unit is only suitable for use on surfaces indicated in the operating instructions.
The machine may only be used on surfaces approved by the company or its representatives.
It is not permitted to remain in a dangerous area. It is forbidden to operate the unit
in potentially explosive locations.
Operation:
The operator must use the unit in accordance with the regulations. He/she must
take the local conditions into account during operation and be aware of other
people, especially children, when operating the unit.
The unit may only be used by authorised persons who have received training or
have demonstrated their ability to operate the unit.
The unit must not be operated by children or minors.
The unit must never be left unsupervised while the motor is running. The operator
may only leave the unit when the motor has been switched off, the unit has been
secured against unintentional movement and, if required, the parking brake has
been actuated and the ignition key removed.
Do not reach into or under the machine under any circumstances when the motor
is running.
The hood latch should remain secured in the closed position except when performing maintenance work.
Transport:
Switch off the motor and secure the unit before transporting.
Maintenance:
Switch off the motor and if necessary remove the ignition key prior to cleaning and
maintenance work, replacing components or changing over to another function.
Pull off the spark plug connectors in the case of machines with gasoline engines.
Do not spray clean the unit.
Repairs may only be carried out by authorized customer service centers or by specialists in this fields who are familiar with all of the relevant safety regulations.
Commercial units which may be used in different locations are subject to a safety
check according to VDE 0701.
Page 2
Accessories and spare parts:
Only use accessories and spare parts which have been approved by the manufacturer. Original accessories and spare parts guarantee that the unit can be operated safely and without any breakdowns.
Machines operated with gasoline engines:
The operating instructions of the motor manufacturer are to absolutely be followed.
Only use lead-free fuel.
Absolutely adhere to the oil-change intervals!!!
This machine is designed for operation in dry areas only.
2. Technical Data:
Sweeping width: 2 side brushes
1 side brush
without side brushes
Working speed:
Surface cleaning capacity with 2 side brooms
Volume flow:
Vacuum
Filter surface:
Absorptive capacity of the sweeping vessel:
Allowable inclination:
Length x width x height:
Displacement:
Set speed:
Power at set speed (HP/kW):
Gas tank contents:
Weight:
Sound level:
900 mm
700 mm
500 mm
up to 4.0 km/h
3,600 m²/h
200 m³/h
7 pa
1.3 m³
60 l
2%
1,000 780 x 460 mm
(without steering handle)
31 cc
5200 r.p.m.
(Do not adjust speed)
1.18 / 0.87
Approx. 1.0 l
52 kg
69 dB(A)
Page 3
3. Unpacking and Assembling
Let the box stand on the pallet. Cut the front side open and let the machine roll
over the side of the box which has been folded down (see Figure) so that the running wheels are still standing on the pallet.
In this position, clip the side brushes which are on the dirt container under the side
brush plate (in the front exterior portion of the machine) (see Figure). Apply light
pressure to twist the brushes upwards until you can feel them lock into place. Note:
do not tip over the machine in this process: there is the danger of battery acid
running out.
First roll the machine from the box and from the pallet.
Afterwards, put the steering handle in the upright position, pull it downwards into
the two tappets completely (see Figure) and tighten it with the two thumb screws.
Afterwards, open the tank nozzle located in the front part of the machine.
Top up approx. 1 litre unleaded regular fuel.
Please note that the engine was already filled with approx. 100 ccm universal lubricant – 15W40 at the factory.
4. Starting Up/Operating
After the machine has been assembled, it is immediately ready for operation.
First of all, the two lateral brushes should be lowered. For this purpose, push the
thumb washer forward (see Figure) with your foot until the brushes just touch the
floor.
It is possible to adjust the height of the main sweeping brush using the adjustment
handle on the left side of the machine (under the dirt collector) (see Figure). Please
ensure that the brush tips only touch the floor lightly. If the brushes are adjust too
low, this increases the wear on the brushes and the gear components as well as the
power consumption. Position 1 - the highest brush position (for new, unworn rollers), position 5 - the lowest brush position (for worn brushes or very uneven floors
for a short period of time).
Page 4
A
C
B
Put the cold starter (A) into the upper position.
After this, keep pressing in the gasoline pump (C) until the resistance has noticeably increased. Subsequent to this, rapidly pull the reversing starter (B) to the end
stop. If the motor does not immediately start up, put the cold starter back into the
original position and pull the reversing starter again to the end stop.
As soon as the motor is running “true”, put the cold starter (A) back into the lower
position if this has not already taken place.
If necessary, e.g. in the case of extreme cold, repeat the procedure as described
above until the motor starts.
Steering drive:
The machine starts moving when you carefully pull the steering handle towards
you. Check the behaviour of the steering drive especially when it is used for the first
time so that the machine remains under control. We recommend that you loosen
your grip on the steering handle slightly when going around curves to lower the
speed in the curve. You will quickly notice that it is easy to operate and move the
machine with or without using the steering drive. If there is more dirt, you should
push the machine over the dirty place more slowly to achieve the optimum cleaning effect.
In order to move it backwards, loosen the steering handle and pull the machine in
the desired direction.
Cleaning filters:
There is a handle in the area of the handle of the dirt container. This should be
operated a number of times (see Figure) every time before you empty the dirt collector with the motor shut off. This sets a mechanism into motion so that the loose
dirt which is sitting between the lamellas falls directly into the dirt container. If there
is stubborn dirt, clean the filter with a brush or remove the filter and tap slightly.
Emptying the dirt collector:
Always take the dirt container in both hands (see Figure). You should put one hand
in the front handle area in the middle of the machine. Put the other hand on the
upper edge from behind.
Lift the container upwards from behind.
It is easiest to empty it into a rubbish bin over the side edge (see Figure).
Switching off the motor:
A red short-circuit push button (illustration) is located on the console of the traversing handle. To shut off the machine, this button has to be pushed until the motor
comes to a complete standstill.
Page 5
After use:
When you have finished sweeping, shut off the machine. In order to alleviate the
load on the lateral brushes, the side brushes have to be put up using the thumb
washers every time after it is used (see Figure).
Attention: Check the oil level regularly and adhere to the oil-change intervals!!!
Follow the enclosed notices of the motor manufacturer for this. Unscrew the motor
in which the oil is to be changed on the frame attachment (2 screws) and tip the
motor until the oil has completely run out. Follow the disposal notices. In the
beginning, the motor uses approx. 2 -3 cc of oil per operating hour.
Absolutely take note of the following:
The motor has fixed settings for optimum sweeping performance. Do not, therefore, change the speed setting under any circumstances (set speed: 5200 r.p.m.).
If a reduction in the speed has been noticed, this can be due to high belt tension
or jamming rotary brushes. To remedy this: cf. Chapter 5.
5. Service Work / Troubleshooting
Service Schedule for Tandem KSV 900:
Attention: Absolutely follow the enclosed maintenance instructions of the motor
manufacturer (page 16 of the operating instructions)!!!
Daily
sweeping brush
check the height adjustment and if there
are possibly stuck or rolled up objects
Vacuum: brush on top
clean / check for damage
Monthly
Battery
check level of liquid and refill if necessary
Belt
check for defects and voltage
sweeping roller and side brush
check for wear
Page 6
Troubleshooting:
A.) the motor doesn't start
possible reason
1.) Gas tank empty
2.) Air filter or spark plugs are dirty
potential solution:
Fill up gasoline.
Take out spark plugs or air filter and
clean (see the operating instructions of
the motor manufacturer).
3.) No fuel in the carburetor
Actuate gasoline pump (see Chap. 4).
4.) Cold starter still in upper position
Put the cold starter in the lower position
and repeat the starting procedure.
B.) the results of sweeping are not satisfactory
possible reason
potential solution:
1.) the dirt container is overfilled
empty the dirt container
2.) sweepings are caught in the sweep- take out the dirt container and remove
ing brush
the object
3.) Speed of the motor is too low
Check the belt tension, loosen if necessary.
C.) the brushes do not rotate
possible reason
potential solution:
1.) the belt of the power transmission check all of the belts on the machine (7
unit is defective / has slipped off
pieces)
2.) sweepings are caught in the sweep- see B. 2
ing roller
D.) the steering drive is not functioning / not properly
possible reason
potential solution:
1.) the tooth belt is defective / has see D.1
slipped off
2.) the friction clutch is not engaging
adjust the setting mechanism on the
handle console (part 95)
E.) too much dust develops
possible reason
potential solution:
1.) the dust filter is clogged
tap out the filter; remove and replace if
necessary
2.) the container is improperly inserted
put the container properly in place
Page 7
6. EU Declaration of Conformity
in accordance with the EU Machinery Directive
89/392/EU, Appendix II A
We
Stolzenberg GmbH & Co. KG
Reinigungsgeräte
D-49124 Georgsmarienhütte
Sweeping suction machine
Tandem KSV
Serial Number:__________________________________
(see data plate; to be entered by customer)
Applicable EU Directives:
•
•
•
EC standard machines 89-392-EWG of June 14, 1989 (Journal No. L 183 of
06/29/1989 and Journal No. L 198 of 07/12/1991)
EC standard on electromagnetic compatibility 89-336-EWG and 92-31-EWG
(revisions) (Journal No. L 139 of 05/23/1989 and Journal No. L 126 of
05/12/1992)
EC low voltage standard 73-23-EWG (Journal No. L 77/29 of 03/26/1973)
Harmonised standards applied:
•
DIN EN 292 T1 und T2
National standards applied:
•
•
•
•
•
VDE 700 Part 1
VDE 700 Part 67
VDE 700 Part 72
VDE 700 Part 205
DIN 31000/3.79
(equivalent to DIN EN 60335-1)
(equivalent to DIN EN 60335-2-67)
(equivalent to DIN EN 60335-2-72)
(equivalent to DIN EN 60335-2-205)
It is ensured through internal measures that series-production
units conform at all times to the requirements of current EU Directives and relevant standards.
GM-Hütte, den 01.05.1998
___________________________________
Dipl.-Wirtsch.-Ing K. Stolzenberg
(company management)
Page 8