1
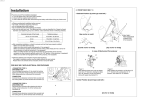
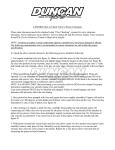
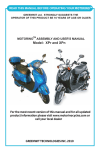
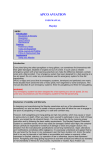
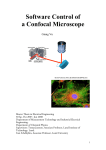
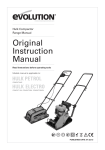
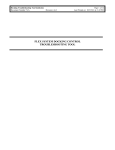
STOLZENBERG
Kehrmaschinen
Operating instructions Matrix,
the battery-operated manual sweeper
·MATRIX MTX-900-V/-B/-VB TRS · 20122006
MATRIX MTX-900- V TRS
MATRIX MTX-900- B TRS
MATRIX MTX-900-VB TRS
GB
STOLZENBERG
Kehrmaschinen
Introduction
About these Operating Instructions.
These Operating Instructions pertain to the operation of the Matrix MTX-900-x TRS.
Our products are subject to continuous improvement;constructive changes that have been
made after the printing of these operating instructions could not be taken into account. If you
have any questions, feel free to contactour service department.
The Operating Instructions must be read and observed by anybody using or operating the
manual sweeper Matrix MTX-900-x TRS.
Besides applying the Operating Instructions, the operator isreminded to observe the
legislator's accident prevention regulations as well as general rules of professional and safe
working methods.
Safety Information
The manual sweeper Matrix MTX-900-x TRS is designed and built in accordance with
state of the art know-how and standard safety regulations. In spite of this, physical danger
to the operator or third parties or the impairment of the manual sweeper or other valuable
objects may arise during operation.
Always use the manual sweeper in a flawless condition and in a way that accords with
general rules of operational and personal safety, and always observe these
Operating Instructions! Eliminate malfunctions that may impair operational safety
immediately!
Keep Operating Instructions ready at hand wherever the manual sweeper is used!
In addition to the Operating Instructions, observe the generally applicable legal or other
binding guidelines for accident prevention and environmental protection!
Do not modify, expand, or reconstruct the manual sweeper in any way without explicit
approval by the manufacturer.
Replacement parts must comply with the specifications defined by the manufacturer. This
will always be the case if only original replacement parts are applied.
Observe the prescribed maintenance intervals and those stated in these Operating
Instructions!
Be sure to dispose of operational and auxiliary materials as well as replacement parts in a
safe and environmentally sound way!
Correct Application
The manual sweeper is intended exclusively for cleaning hard surfaces of dry
sweepings. e. g. : parking lots, industrial buildings, warehouses, sidewalks.
Never use this machine to sweep inflammable or toxic or explosive substances.
Any application different from or exceeding this definition is incorrect.
The manufacturer is not to be held responsible for any damage arising from such
applications.
Any risk is to be assumed by the operator.
The manual sweeper is not suitable for taking up cords, strings, wires or similar
materials.
STOLZENBERG
-2-
Kehrmaschinen
·MATRIX MTX-900-V/-B/-VB TRS ·20122006
Correct application includes the observation of Operating Instructions as well as inspection
and maintenance intervals.
Sweeper description
Technical Data
Dimension and Weight
Length:
Width:
Height:
Weight:
1091 mm
760 mm
460 mm
22 - 50 kg
Sweeping Width:
- Main sweeping roller
- with one side brush
- with two side brushes
500 mm
700 mm
900 mm
Dust Container Volume
Battery voltage
(Battery) capacity
50 ltr
12 V
28 Ah bzw.
The battery-operated sweeper has been equipped with two side brushes and two
counter-rotating brush rollers.
The sweeping mechanism features two side brushes which convey the refuse to the
two brush rollers that are mounted parallel to the direction of motion.
The brushes throw the refuse overhead in the rear dirt collector.
A chain drives the brush rollers, and a V-belt drives the side brushes through the
forward motion of the running wheel.
The top model of the Matrix series is the Matrix MTX-900-VB TRS, which has been
equipped with a dust extraction unit (V) and a brush roller drive (B).
The modular design of the Matrix series allows for retrofitting the Matrix MTX-900-V
TRS
with a brush roller drive (standard model features a dust extraction unit) and the
Matrix MTX-900-B TRS with a dust extraction unit (standard model features a brush
roller drive).
The electronic system provides for a soft start feature, which ensures that the drive
does
not run at full power all of a sudden.
The Matrix MTX-900-x TRS sweeper is driven by manual power only, in other words,
by
driving hoop
handle
Control panel
control panel
3
2
ard
v
dri
e
dustbin
w
for
hood
Height adjustment
for side brush
Steerable rear wheel
1
-1- Start/Stop button of the brush roller
drive (applies to B and VB models)
-2- Start/Stop button of the suction system
-3- Battery status display
running wheel
ard
orw
dri
f
ve
side brushes
Initial start-up
·MATRIX MTX-900-V/-B/-VB TRS · 20122006
Unpacking and assembly
•Open the packaging and carefully lift the machine off the pallet.
Caution! Danger of injury!
Reach under the frame of the machinery to lift it. There is a risk of injury if you
attempt to lift the machinery at the hood, the side brush retainer, or the dustbin.
• Remove the star knobs from the driving hoop retainers and remove the square necked
bolts.
• Place the driving hoop on the retainers.
• Slide the square necked bolts through the bore holes in the driving hoop and the retainer.
• Use the star knobs to secure the square necked bolts.
• Set the side brush arms to the top position.
• Position the side brushes under the side brush retainers.
• Turn the side brushes until the bore holes of the side brush disc line up with the pins of
the side brush retainer.
• Push the side brushes into the side brush retainers until you feel the side brushes lock
into place.
• Set the side brush arms in their bottom position.
• Connect the battery. See technical data - switching diagram.
The sweeper is ready for operation.
STOLZENBERG
Kehrmaschinen
-3-
Operation
Safety Information
The Sweeping & Suction Machine may only be operated by dependable persons..
Only deploy trained and instructed staff. The areas or responsibility of staff must be clearly
defined Examine the Sweeping & Suction Machine before starting and check serviceability
and technical safety. Do not use the machine in case of malfunctions of any kind.
Only drive on specifically assigned pathways and lots.
It is prohibited to use the sweeper to transport loads. Try to avoid sweeping up
packing band, wires, or similar items.
Such objects may wind around the moving parts of the machinery and result in reducing the
sweeping performance (tie up bristles) or they may clog the sweeper.
After you've finished sweeping, always park the sweeper on level ground and make sure it
is secured from rolling away by accident.
Height adjustment of the side brushes
The side brush arms are located on the front side of the sweeper.
The height adjustment fixtures for the side brushes are located on the side brush arms.
You can lower or raise both or just one side brush as needed.
To lower a side brush:
• Push the lever of the side brush adjustment fixture to the front.
To raise a side brush:
• Pull the lever to the rear.
Sweeping
• Lower the side brushes.
• To turn on the desired sweeping function, select and push the button for the desired
function on the control panel.
Control panel
e
3
2
ard
iv
dr
w
for
1
-1- Start/Stop button of the brush roller
drive (applies to B and VB models)
-2- Start/Stop button of the suction system
-3- Battery status display
Caution!
• Always use the button on the right first, regardless of the model.
(Models B and VB: Turn on the brush roller drive/Model V: Make ready for operation)
• Only then push the button on the left on the V and VB models.
(Dust extraction unit on)
No function has been assigned to the button on the left on the Matrix MTX-900-B TRS.
• Push the sweeper across the area to be swept at a normal pace.
Since the sweeping performance depends on the speed of the brush rollers, you
should neither walk to slowly nor too quickly. (e.g. run)
The side brushes remove dirt from corners and edges.
The sweeping mechanism will only work if the sweeper is pushed forward as it has
been fitted with a free-wheel coupling to avoid whirling up dust unnecessarily.
.
After sweeping
• Push the respective button on the control panel to turn off all the actuators and park the
sweeper in a safe location.
• Empty the dustbin in a suitable container.
Make sure the container is appropriate for this type of refuse.
• Insert the dustbin back into the sweeper.
• Set the side brushes to their top position.
Unless the side brushes are set to their top position, the bristles of the side brushes
will be put under permanent load in their off-position and consequently will wear
prematurely when used.
Emptying the dustbin
STOLZENBERG
-4-
Kehrmaschinen
·MATRIX MTX-900-V/-B/-VB TRS · 20122006
In order to ensure proper sweeping performance, the dustbin has to be emptied at
regular intervals.
A handle is located on the top of the dustbin.
• Hold on to the handle and lift the dustbin out of the sweeper's frame.
• Empty the dustbin in a suitable container.
• Insert the dustbin back into the sweeper.
Do not park the sweeper with a full dustbin. Always empty the dustbin once you've
finished sweeping.
Service and Maintenance
Safety information
Only complete the type of maintenance work described in the following chapter. The
authorised dealer or the manufacturer is responsible for performing any other maintenance
work.
Closely follow the steps listed in the maintenance instructions. The improper completion of
maintenance tasks may result in malfunctions when using the sweeper and may possibly
render the warranty granted null and void.
To complete any work on the sweeper, it will have to be secured from rolling away by
accident.
The sweeper will have to be turned off.
The electric motors must not be running when performing any maintenance work on or
troubleshooting the electric motors.
Use only flawless and appropriate tools to complete maintenance work.
Replacement parts have to meet manufacturer specifications.
This is always ensured by using genuine replacement parts.
If covers and/or safety devices were removed during maintenance work/repairs, they will
have to be re-attached prior to starting the sweeper.
Battery
Explanations of the LED displays
on the control panel
Safety Information for Battery Handling
When servicing the batteries, please absolutely observe the following warning information
and safety regulations:
Avoid spark formation while handling cables and electrical devices.
Never short-circuit battery poles. Danger of injury by highly charged sparks.
Always keep batteries in a clean and dry place to avoid leak current.
Only charge batteries in well ventilated rooms. Don't smoke and keep away open flames
and electric sparks, because the charging process produces a highly explosive combustive
mixture.
In order to prevent health impairment do not smoke,eat, or drink in the vicinity of the battery
charging device.
forward drive
1
2
3
-1- ready/battery charge ok
-2- ready/battery charge low
-3- ready/battery charge not ok
Charging the battery.
The machine has an on-board-charger.
23
0V
Position the machine on an approprate surface close to a socket.
Switch the machine completely of.
Make sure the machine is blocked against possible movement
Open the cover.
Connect plug 1 of the charger using the cable delivered with the machine and connect plug
2 to the 230 V socket.
Only the original charging-cable is to be used: the use of a different cable makes
you lose warranty on the machine and might cause damage.
When charging is finished, the green LED on the charger will on.
(Meaning of the LED: see appendix: operators manual of the charger).
The machine can only be operated if disconnected after charging.
2
1
·MATRIX MTX-900-V/-B/-VB TRS · 20122006
Make sure the machine is charged before use. The charger contains an electronic device
that keeps current of the battery on a constant level so the machine can be kept on the
charger for a longer period without causing any damage.
The machine contains a deep-discharge protection and automatically switches of if such
level is reached to protect battery from damage.
STOLZENBERG
Kehrmaschinen
-5-
Readjusting the brush rollers
The height of the brush rollers can be adjusted to obtain the best possible cleaning results of
the area to be swept and to effectively exploit the efficiency of the brush rollers.
The brush rollers need to be lowered once the sweeping performance starts to wane due to
wear and tear of the brush rollers, or if the area to be swept is not level (bumpy).
If pushing the sweeper seems to become harder and you can hear the brush rollers
scratching the ground, you will have to raise the brush rollers to ensure you use the sweeper
ergonomically and to prevent the brush rollers from wearing prematurely.
On principle, the brush rollers should be set to ensure that they touches the ground at slight
pressure.
Setting the brush rollers
• Park the sweeper on level ground that has been designated (assigned) for this purpose.
• Make sure the sweeper has been secured from rolling away by accident.
• Open the hood.
The rear trim panel of the frame reveals the height adjustment bracket to adjust the height of
the brushes.
To lower the brush rollers
1
2
3
• Undo wing nut -2- on the height adjustment bracket -1-.
• Push down the rocker arm -3- in the direction of motion.
The brush rollers are lowered.
• Tighten wing nut -2- on the height adjustment bracket -1-.
• Test the sweeper.
Readjust if necessary
To raise the brush rollers
• Undo wing nut -2- on the height adjustment bracket -1-.
• Push down the rocker arm -3- in the direction of the dustbin.
The brush rollers are raised.
• Tighten wing nut -2- on the height adjustment bracket -1-.
• Test the sweeper.
Readjust if necessary
Brush roller replacement
Removing the brush rollers
Every brush roller consists of two split shells with brushes.
Screws join the split shells.
• Park the sweeper on level ground that has been designated (assigned) for this purpose.
• Make sure the sweeper has been secured from rolling away by accident.
• Remove the dustbin.
• Turn the sweeper on its side.
Make sure the running wheels can move freely.
• Turn the top running wheel until you can see the screwed connections on the brush roller.
• Undo the screwed connections.
• Lift the split shells with the brush rollers off the shaft.
• If needed clean the running gear box and the shaft.
Installing the brush rollers
STOLZENBERG
-6-
Kehrmaschinen
·MATRIX MTX-900-V/-B/-VB TRS · 20122006
The split shells have square recesses, which retain the brush roller shaft.
• Position the first split shell under the square shaft of the brush roller.
Make sure the shaft fits flush into the recess of the split shell..
• Position the second split shell on top of the square shaft of the brush roller.
• To tighten use three screws for each set of brushes. Tighten until you can no longer see a
gap between the split shells.
Side brush replacement
Removing the side brushes
• Park the sweeper on level ground that has been designated (assigned) for this purpose.
• Make sure the sweeper has been secured from rolling away by accident.
• Lift the side brushes.
• Reach under the side brushes.
• With your fingers squeeze together the snap-in fixtures in the centre of the side brush
retainer.
• With a downward motion, pull off the side brushes.
• Replace the side brushes.
Mounting the side brushes
• Position the side brushes under the side brush retainers.
• Turn the side brushes until the bore holes of the side brush disk line up with the pins of the
side brush retainer.
• Push the side brushes into the side brush retainers until you feel the side brushes lock
into place.
Changing the chain
De-tentioning or tentioning of the chain is proceeded by turning/ moving the DC-motor or the
sprocket-support.
Position the machine on a appropriate surface.
Make sure the machine is blocked against possible movement
Open the cover.
Loosen the screws of the DC-motor or the sprocket-support to move the support by rotating
it around the front/ first screw.
By lowering the DC-motor or the sprocket-support, the chain is de-tentioned e.g. for
changing the chain.
Moving up the DC-motor or the sprocket-support tentiones the chain.
Tighten the screws before operating the machine.
The tention of the chain is supported by the automatic chain-tentioner.
Cleaning the sweeper
Do not clean the sweeper with a pressure washer. Just use a dry broom to brush off the
sweeper. Remove dirt, strings, etc. from the brush rollers, side brushes, and shafts.
The Sweeping & Suction Machine is a machine with
electrical system components.
Please observe!
Humidity will damage the electronics and the mechanics of the machine.
Moisture may lead to leak current and short-circuits.
Do not use high-pressure cleaning devices.
·MATRIX MTX-900-V/-B/-VB TRS · 20122006
The Sweeping & Suction Machine may only be dry-cleaned.
STOLZENBERG
Kehrmaschinen
-7-
In addition, the following applies to MTX-900-V TRS and MTX-900-VB TRS
Filter cleaning
2
1
3
1
To consistently attain the best possible cleaning results, you must always clean the
lamellar filter prior to emptying the dust bin.
Likewise, you should also clean the filter if particularly dusty areas are swept, or if
dust is whirled up during sweeping.
The sweeper has been equipped with a mechanically operated vibrating device to
clean the lamellar filter.
• Turn off the sweeper (all actuators).
• Make sure the sweeper has been secured from rolling away by accident.
• Open the hood.
• On the top of the ejector's trim panel -3- two slides -1- are located.
• Swiftly slide these slides back and forth.
These slides initiate a vibrating mechanism, which works loose the dust from the lamellar
filter. The worked off dust drops directly into the dustbin.
To remove stubborn dirt, you should use a brush to clean off the filter or take out the
filter and gently knock off the dirt.
2
Removing the filter
6
4
5
6
The sweeper has to be off if you're planning to take out the filter.
(all actuators off)
• Turn off the sweeper (all actuators).
• Make sure the sweeper has been secured from rolling away by accident.
• Remove the dustbin.
• Open the hood.
Two wing nuts -2- are located on the trim panel of the ejector -3-.
• Remove these wing nuts.
• Pull out the filter frame -4- with the filter -5- from the trim panel of the ejector -2- in the
direction of the dustbin retainer
Installing the filter
The sweeper has to be off if you're planning to install the filter.
(all actuators off)
• Set the filter -5- in the filter frame -4-.
Make sure the filter fits correctly.
• Insert the filter frame -4- with the filter -5- from the side of the dustbin retainer into the trim
panel of the ejector -3- in such a way as to ensure the cup square neck bolt -6- of the filter
frame will fit through the bore holes of the trim panel of the ejector.
Make sure the bolts fit correctly. The square of the bolt has to fit into the square recess of
the filter frame.
• Firmly push the filter with its filter frame against the trim panel of the ejector.
• Screw tight the two wing nuts -2- on the threads of the cup square neck bolts of the filter
frame.
Disposal
Disposal of defective parts, specifically electric component parts, batteries and plastic
elements in compliance with legislator's waste disposal regulations.
Kehrmaschinen
·MATRIX MTX-900-V/-B/-VB TRS · 20122006
STOLZENBERG
-8-
Maintenance Chart
Daily maintenance
-
Charge battery.
Check if machine is damaged or impaired in any way.
Empty dust container.
Search brush - roller tunnel for jammed particles and seized up dirt that may narrow the brush tunnel and
obstruct free roller brush movement.
In addition, the following applies to MTX-900-V TRS and MTX-900-VB TRS
- Check condition of dust filter and clean if necessary.
After each 50 operating hours also
-
Check if sweeping rollers are worn or cluttered. Replace if required.
Check sweeping contour, readjust if required.
Check if side brush adjustment is worn, if required readjust or replace.
After each 100 operating hours also
- Check cable isolation, replace cables if required.
- Search suction for obstacles, clean.
- Check if roller drive chain is elongated or loosened.
- Check all bearings for wear.
- Check if seals are damaged or dislocated.
In addition, the following applies to MTX-900-V TRS and MTX-900-VB TRS
- Check if cable connections are tight.
- Clean dust filter, replace if necessary.
Disturbances - Disturbance Display and Remedy
Disturbance
No operation of one of
the electrical consumers:
Sweeping result
unsatisfactory:
Possible Cause
Remedy
Fault in electrical wiring
Check plug connections
Battery empty
Charge battery
Side brush(es) or main sweeping rollers
not lowered
Side brush(es) or main sweeping
rollers worn
Trajectory clogged by dirt
Sweeping roller(s) do not operat
Lower
Brush rollers are jammed by dirt,
cords, strings or the like
Dismount brush rollers and clean them
Check side brushes and remove obstacles
Drive wheels obstructed
Jack up the Sweeping & Suction Machine
check wheels and free running
Adjust
Check if roller trim panel is impaired by jammed
debris. Correctly fitted?
if required switch off side brushes
·MATRIX MTX-900-V/-B/-VB TRS · 20122006
In addition, the following applies to MTX-900-V TRS and MTX-900-VB TRS
Filter heavily polluted
Filter not correctly fitted
Leakage and subsequent aspiration of
false air in the filter chamber mer
Open the ventilation flap
Clean filter
check for tight fit
check if false air is sucked in
Ator does not move freely
Check ventilator wheel and remove any obstruction
STOLZENBERG
Kehrmaschinen
-9-
EG Declaration of Conformity
in compliance with EG-Guidelinie 89/392/EWG
The manufacturer:
Stolzenberg Maschinenfabrik GmbH & Co.KG
Hamburger Straße 15 - 17
D-49124 Georgsmarienhütte
declares as solely responsible party, that
he product
battery-operated manual sweeper
MATRIX MTX-900-V TRS, MATRIX MTX-900-B TRS, MATRIX MTX-900-VB
TRS
athis declaration refers to, observes
the EG-Guidelinie 89/392/EWG
and correspondes to it regarding all relevant safety and health requirements.
The Standards and/or technical specifications
DIN EN ISO 12100
EN 294
DIN EN 60335-2-29
DIN EN 60335-2-67
DIN EN 60335-2-72
DIN EN 61000-6-4
DIN EN 60335-2-72
EMV Richtlinie 2004/108/EG
Niederspannungsrichtlinie 2006/95/EG
Geräusch-Richtlinie 2000/14/EG
have been applied in a way that ensures the appropriate implementation of
safety and health regulations cited in the EG Guideline.
Georgsmarienhütte,01.01.2006
...................................................
Kai Stolzenberg
(Dipl. Wirtsch. Ing.,