1
pleasant as possible. An internal bag, intended to protect the HOOK 2 from
possible damage, during storage is also supplied.
The glider strap allows you to fold the wing as small as possible. Furthermore
you will find the accelerator bar, which completes the acceleration gear of
the wing, a small fabric repair kit made of self-adhesive ripstop and a user’s
manual with the answers all our questions about our new HOOK 2.
2.UNPACKING AND ASSEMBLY
2.1 CHOOSE AN APPROPRIATE LOCATION
We recommend that you unpack and assemble your wing on a school slope
or a flat clear area without too much wind and free of all obstacles. These
conditions will allow you to carry out all the steps required for you to check
and inflate the HOOK 2.
We recommend that an instructor or a retailer supervise the entire procedure,
as only they are qualified to resolve any questions or concerns in a safe and
professional way.
2.2 PROCEDURE
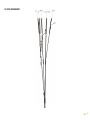
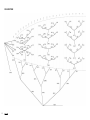
Take the paraglider out of the rucksack, open it and spread it open with the
lines on top of the underside and position the wing as if you were about to inflate
it. Check the condition of the fabric and the lines, making sure there are no
abnormalities. Check the maillons that attach the lines to the risers are properly
closed and locked. Identify in order the A, B, C, D and brake lines and ensure
they fit to the corresponding risers. Make sure that there are no ties or knots.
2.4 TYPE OF HARNESS
The HOOK 2 can be flown with many types of harness, school or competition
without any problems. During development and testing we have calculated
that a distance of 42 to 50cm between the harnesses karabiners (depending
on the design and size of your harness) should offer the best compromise for
safety, handling and feedback.
NB. Incorrect adjustment can seriously affect the piloting of the glider.
A distance, which is too wide between the karabiners, may provide more
feedback but could affect the overall stability of the glider. A distance,
which is too narrow between the karabiners, would provide less feedback
but also increase any risk of developing a twist in during a large collapse.
2.5ASSEMBLY OF THE ACCELERATOR
The acceleration mechanism of the HOOK 2 works when you push with your
feet on the accelerator bar, this is supplied with the equipment. On delivery
the accelerator bar has not yet been installed and it is recommended that it
be correctly fit before your first flight. Most harnesses are equipped with a
pre-installed acceleration system. When fitting any accelerator system ensure
that all preinstalled items within the harness, such as roller pulleys are used
correctly. After fitting, take into account that you will have to adjust the length
of the accelerator lines for correct use. This will vary according to the length
of the pilot’s legs!
We recommend that you carry out the fitting of the acceleration system,
whilst suspended and sat in the harness, most paragliding schools have this
sort of specialised equipment.
2.3 ASSEMBLY OF HARNESS
2.6 INSPECTIONS AND WING INFLATION ON THE GROUND
Correctly place the risers on the harness karabiners. The risers and lines
should not have any twists and they should be in the right order. Check that
the harness buckles are correctly locked.
Once you have checked all the equipment and made sure that the wind
conditions are suitable, inflate your HOOK 2 as many times as necessary in
order to become acquainted with the wing’s behaviour. The HOOK 2 inflates
5