1
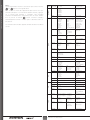
If the external flexible cable or cord of this luminaire is damaged,
it shall be exclusively replaced by the manufacturer or his service
agent or a similar qualified person in order to avoid a hazard.
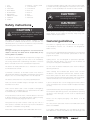
CAUTION !
Never touch the device during operation !
The housing may heat up.
CAUTION !
Safety instructions
Never look directly into the light source, as
sensitive persons may suffer an epileptic shock.
CAUTION !
Please be aware that damages caused by manual modifications
to the device are not subject to warranty. Keep away from
children and non-professionals.
Be careful with your operations. With a dangerous
voltage you can suffer a dangerous electric shock
when touching wires.
General guidelines
This device has left the factory in perfect condition. In order
to maintain this condition and to ensure a safe operation, it is
absolutely necessary for the user to follow the safety instructions
and warning notes written in this user manual.
This device is a lighting effect for professional use on stages,
in discotheques, theatres, etc., the device was designed for
indoor use only.
Important :
Damages caused by the disregard of this user manual are not
subject to warranty. The dealer will not accept liability for any
resulting defects or problems.
This fixture is only allowed to be operated with the max alternating
current which stated in the technical specifications in the last
page of this manual.
If the device has been exposed to temperature changes due
to environmental changes, do not switch it on immediately.
The arising condensation could damage the device. Leave the
device switched off until it has reached room temperature.
Lighting effects are not designed for permanent operation.
Consistent operation breaks may ensure that the device will
serve you for a long time without defects.
This device falls under protection-class I. Therefore it is essential
that the device be earthed.
Do not shake the device.Avoid brute force when installing or
operating the device.
If protection screen,lens or ultraviolet screen in the fixture is
apparently damaged or is damaged to exceed their own effective
degree, such as cracked and gashed, it must be replaced.
While choosing the installation-spot, please make sure that
the device is not exposed to extreme heat, moisture or dust.
Please don’t project the beam onto combustible substances.
The minimum distance between light-output from the projector
and the illuminated surface must be more than 0.5 meter.
The electric connection must carry out by qualified person.
If you use the quick lock cam in hanging up the fixture, please
make sure the quick lock fasteners turned in the quick lock holes
correctly.
Make sure that the available voltage is not higher than stated at
the end of this manual.
Make sure the power cord is never crimped or damaged by
sharp edges. If this would be the case, replacement of the cable
must be done by an authorized dealer.
Operate the device only after having familiarized with its functions.
Do not permit operation by persons not qualified for operating
the device. Most damages are the result of unprofessional
operation.
Always disconnect from the mains, when the device is not in use
or before cleaning it. Only handle the power cord by the plug.
Never pull out the plug by tugging the power cord.
Please use the original packaging if the device is to be
transported.
During initial start-up some smoke or smell may arise. This is a
normal process and does not necessarily mean that the device
is defective, it should decrease gradually.
For safety reasons, please be aware that all modifications on the
device are forbidden.
Please don’t project the beam onto combustible substances.
If this device will be operated in any way different to the one
described in this manual, the product may suffer damages and
USER MANUAL
5
| ENGLISH
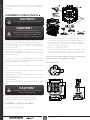
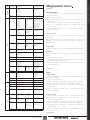
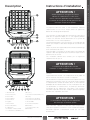
10. Antenna – Wireless DMX
11. 5-Pin DMX out
12. 5-Pin DMX in
13. RJ45 out
14. RJ45 in
15. Fuse
16. Power in
17. Power out
SAFETY INSTRUCTIONS | GENERAL GUIDELINES
1. Lens
2. Display
3. Left-button
4. Down-button
5. ENTER-button
6. Right-button
7. Mode/Esc-button
8. Up-button
9. Handle