1
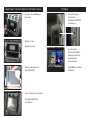
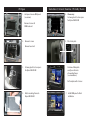
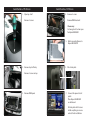
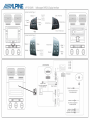
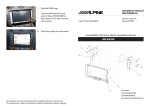
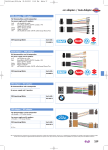
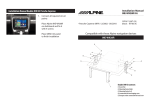
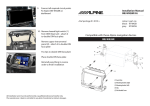
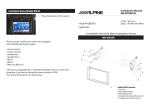
Installation Manual
INE-W928R Kit
• Seat Alhambra (6N)
• Škoda Fabia II
• Škoda Octavia II
• Škoda Roomster
• VW Caddy
• VW Sharan
• VW Tiguan
• VW Touran
colour: black
part-no.:
KIT-8VWT
KIT-8VWTD
Compatible with these Alpine navigation devices
INE-W928R
4
3
1
2
• (1) facia plate
• (2) mounting bracket right
• (3) mounting bracket left
• (4) recessed countersunk flat head screw
All installation work must be performed by a qualified professional installer only.
The manufacturer / dealer is not liable for any kind of incidential or indirect damages.
Škoda Fabia II / Octavia II / Roomster / VW Caddy / Touran
1. Unclip and remove OEM panel (see arrows)
VW Tiguan
5.
Connect all requred
circuit points
Place Alpine INE-W928R
on dashboard
Place facia plate
Put dome of facia plate
exactly over the holes of
mounting frames
(see arrow above)
Install OEM panel to finish
installation
2. Remove 4 screws
Remove head unit
3. Attach mounting frames to
Alpine INE-W928R
4. Connect all requred circuit points
Place Alpine INE-W928R
on dashboard
VW Tiguan
1. Unclip and remove OEM panel (see arrows)
Remove 4 screws of
OEM head unit
2. Remove 4 screws
Škoda Fabia II / Octavia II / Roomster / VW Caddy / Touran
5. If necessary:
Cut away plastic to clear space
for Alpine INE-W928R
6. Place facia plate
Remove head unit
3. Cut away plastic to clear space
for Alpine INE-W928R
4. Attach mounting frames to
Alpine INE-W928R
Put dome of facia plate
exactly over the holes
of mounting frames
(see arrow above)
Fix facia plate with 4 screws
7. Install OEM panel to finish
installation
Seat Alhambra / VW Sharan
Seat Alhambra / VW Sharan
1. Open top shelf
4. Remove 4 screws
Remove OEM head unit
If necessary:
Cut away plastic to clear space
for Alpine INE-W928R
Remove 2 screws
5. Attach mounting frames to
Alpine INE-W928R
2. Remove top shelf inlay
Remove 2 screws on top
6. Place facia plate
3. Remove OEM panel
7.
Connect all requred circuit points
Place Alpine INE-W928R
on dashboard
Fix facia plate with 4 screws
Install everything in reverse order to finish installation