1
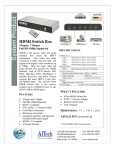
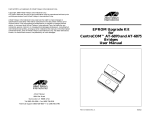
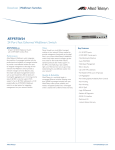
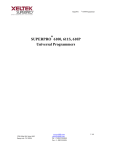
AT-RKMT2 Installation Manual
This manual will assist you in installation of your Rack Mount 2. When opening this Allied Telesyn product,
make sure the package you have received is complete and in good condition. This package should include:
• 2 handles (A)
• 3 flathead screws (C) (M3-6 flathead Phillips)
• bracket (B)
• 4 flathead screws (E) (M4-6 flathead Phillips)
• short-chassis adapter (D)
The Rack Mount 2 will assist you in installing the following units in a standard 19 inch rack.
• AT-3004
• AT-3026
• AT-3008
• AT-3027
• AT-3022
• AT-3028
• AT-3023
• AT-6870
• AT-3024
• AT-6875
• AT-3025
Installing your Allied Telesyn Rack Mount 2 is simple and quick (only requiring a Phillips screwdriver), as
seen in Figure 1 below:
D
C
A
B
E
E
E
Figure 1: Installation
1. Attach handles A to bracket B with flathead screws C.
2. (Optional) Attach adapter D to bracket B with flathead screws E.
3. Attach the assembled rack-mount unit to device (see list above).
4. Attach the single unit in a standard 19 inch rack.
PN 613-10563-00 Rev. A
For specific dimensions, please see Figure 2. These dimensions are subject to change without further notice
from ATI.
D
C
A
B
E
E
E
Figure 2: Dimensions
Allied Telesyn International
950 Kifer Road
Sunnyvale, CA 94086
U.S. & Canada Tel: 800/424-4284
International Tel: 408/730-0950
Technical Support Tel: 800/428-4835
This document produced using
Recycled Materials