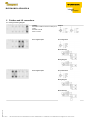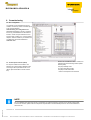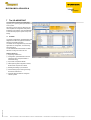
1
User manual
BLCDN-8M12L-8DI-N-8DI-N
BLCDN-8M12L-8DI-N-8DI-N
Edition: 2011-3-15
All brand and product names are trademarks or registered trade marks of the owner concerned.
Edition • 2011-3-15
© Hans Turck GmbH, Mülheim an der Ruhr All rights reserved, including those of the translation. No part of this manual may be reproduced
in any form or processed, duplicated or distributed by means of electronic systems without written permission of Hans Turck GmbH & Co. KG,
Mülheim an der Ruhr. Subject to alterations without notice.
2 / 32011
Hans Turck GmbH & Co.KG ñ D-45472 Mülheim an der Ruhr ñ Witzlebenstraße 7 ñ Tel. 0208 4952-0 ñ Fax 0208 4952-264 ñ [email protected] ñ www.turck.com
BLCDN-8M12L-8DI-N-8DI-N
1 General safety notes ............................................................................................................... 4
1.1
Before the installation........................................................................................................................................................4
2 General information.................................................................................................................. 5
2.1
2.2
2.3
Description of symbols Used............................................................................................................................................5
Prescribed Use....................................................................................................................................................................5
Notes Concerning Planning /Installation of this Product...............................................................................................5
3 Introduction................................................................................................................................ 6
3.1
BL compact – High signal variety in a compact design................................................................................................ 6
4 Technical data............................................................................................................................7
5 Fieldbus and I/O connections..................................................................................................8
5.1
Pinning and wiring diagram.............................................................................................................................................. 8
6 Commissioning.......................................................................................................................... 9
6.1
6.2
6.3
6.4
6.5
6.6
Address setting...................................................................................................................................................................9
Setting the transmission rate............................................................................................................................................9
Field bus termination......................................................................................................................................................... 9
Service interface................................................................................................................................................................. 9
PLC configuration.............................................................................................................................................................10
Vendor Specifc Classes (VSCs)...................................................................................................................................... 10
7 The I/O-ASSISTANT................................................................................................................. 11
7.1
FDT/DTM.............................................................................................................................................................................11
8 LED description....................................................................................................................... 12
8.1
8.2
8.3
Stations LED Status......................................................................................................................................................... 12
I/O LED Status Slot 1....................................................................................................................................................... 12
I/O LED Status Slot 2....................................................................................................................................................... 12
9 Mapping and diagnostics....................................................................................................... 13
9.1
9.2
I/O and Diagnostic Data mapping...................................................................................................................................13
8DI-P - Diagnostic messages .........................................................................................................................................13
10 Parameters............................................................................................................................. 14
Edition • 2011-3-15
10.1
10.2
3 / 32011
DeviceNet™-Parameters................................................................................................................................................ 14
8DI - Parameters............................................................................................................................................................. 14
Hans Turck GmbH & Co.KG ñ D-45472 Mülheim an der Ruhr ñ Witzlebenstraße 7 ñ Tel. 0208 4952-0 ñ Fax 0208 4952-264 ñ [email protected] ñ www.turck.com
BLCDN-8M12L-8DI-N-8DI-N
1 General safety notes
1.1 Before the installation
■
Disconnect the power supply of the device.
■
Ensure that devices cannot be accidentally restarted.
■
Verify isolation from the supply.
■
Earth and short circuit.
■
Cover or enclose neighboring units that are live.
■
■
Before installation and before touching the device ensure that you are free of electrostatic charge.
■
The functional earth (FE) must be connected to the protective earth (PE) or to the potential equalisation.
■
The system installer is responsible for implementing this connection.
■
Connecting cables and signal lines should be installed so that inductive or capacitive interference do not impair the automation functions.
■
Install automation devices and related operating elements in such a way that they are well protected against unintentional operation.
■
■
■
■
■
■
■
■
■
■
Edition • 2011-3-15
Follow the engineering instructions of the device concerned.Only suitably qualified personnel in accordance with EN 50 110-1/-2 (VDE 0 105
Part 100) may work on this device/system.
4 / 32011
Suitable safety hardware and software measures should be implemented for the I/O interface so that a line or wire breakage on the signal
side does not result in undefined states in the automation devices.
Ensure a reliable electrical isolation of the Ensure a reliable electrical isolation of the low low voltage for the 24 volt supply. Only use power
supply units complying with IEC 60 364-4-41 (VDE 0 100 Part 410) or HD 384.4.41 S2.
Deviations of the mains voltage from the rated value must not exceed the tolerance limits given in the specifications, otherwise this may
cause malfunction and dangerous operation.
Emergency stop devices complying with IEC/EN 60 204-1 must be effective in all operating modes of the automation devices. Unlatching the
emergency-stop devices must not cause restart.
Devices that are designed for mounting in housings or control cabinets must only be operated and controlled after they have been installed
with the housing closed. Desktop or portable units must only be operated and controlled in enclosed housings.
Measures should be taken to ensure the proper restart of programs interrupted after a voltage dip or failure. This should not cause dangerous operating states even for a short time. If necessary, emergency-stop devices should be implemented.
Wherever faults in the automation system may cause damage to persons or property, external measures must be implemented to ensure a
safe operating state in the event of a fault or malfunction (for example, by means of separate limit switches, mechanical interlocks etc.).
The electrical installation must be carried out in accordance with the relevant regulations (e. g. with regard to cable cross sections, fuses,
PE).
All work relating to transport, installation, commissioning and maintenance must only be carried out by qualified personnel. (IEC 60 364 and
HD 384 and national work safety regulations).
All shrouds and doors must be kept closed during operation.
Hans Turck GmbH & Co.KG ñ D-45472 Mülheim an der Ruhr ñ Witzlebenstraße 7 ñ Tel. 0208 4952-0 ñ Fax 0208 4952-264 ñ [email protected] ñ www.turck.com
BLCDN-8M12L-8DI-N-8DI-N
2 General information
This manual includes all information necessary for the prescribed product. It has been specially conceived for personnel with the necessary
qualifications.
ATTENTION
Please read this section carefully. Safety aspects cannot be left to chance when dealing with electrical equipment.
2.1 Description of symbols Used
WARNING
This sign can be found next to all notes that indicate a source of hazards. This can refer to danger to personnel or damage to the
system (hardware and software) and to the facility.This sign means for the operator: work with extreme caution.
ATTENTION
This sign can be found next to all notes that indicate a potential hazard.This can refer to possible danger to personnel and damages to the system (hardware and software) and to the facility.
NOTE
This sign can be found next to all general notes that supply important information about one or more operating steps. These specific notes are intended to make operation easier and avoid unnecessary work due to incorrect operation.
2.2 Prescribed Use
Appropriate transport, storage, deployment and mounting as well as careful operating and thorough maintenance guarantee the trouble-free and
safe operation of these devices.
WARNING
The devices described in this manual must be used only in applications prescribed in this manual or in the respective technical
descriptions, and only with certified components and devices from third party manufacturers.
2.3 Notes Concerning Planning /Installation of this Product
WARNING
Edition • 2011-3-15
All respective safety measures and accident protection guidelines must be considered carefully and without exception.
5 / 32011
Hans Turck GmbH & Co.KG ñ D-45472 Mülheim an der Ruhr ñ Witzlebenstraße 7 ñ Tel. 0208 4952-0 ñ Fax 0208 4952-264 ñ [email protected] ñ www.turck.com
BLCDN-8M12L-8DI-N-8DI-N
3 Introduction
3.1 BL compact – High signal variety in a compact design
For the first time, BL compact provides a product family of IP67 fieldbus devices that can meet any requirement in the I/O level in terms of signal
type and connectivity. Until now, compact fieldbus stations were applied to process only digital fieldbus signals. BL compact now allows a wide
range of I/O tasks to be implemented outside of the control cabinet in a compact design with virtually any signal combination.
The basic concept
With the modular concept of the BL67 system by TURCK a fieldbus node can be installed outside the control cabinet using any signal combination. For this purpose, passive base and active electronic modules are connected to fieldbus gateways which fulfill application specific I/O tasks.
Such a fieldbus node can take one gateway with up to 32 extension modules (max. 512 I/O points). For applications with low signal density and
limited mounting space, BL compact is an efficient alternative because basically all BL67 I/O signals are also available in BL compact.
The modular principle
The BL compact devices provide three basic functions in a single housing: Fieldbus connection, I/O signal and connector. Depending on the
housing style, one or two I/O modules can be housed. The smaller versions (e.g. M12S and M12MT) can link any BL67 electronic module each
to PROFIBUS-DP or DeviceNet™. The bigger versions (e.g. M12LT) have space for two BL67 electronic modules, making the possibilities of
signal combination nearly infinite.
NOTE
Edition • 2011-3-15
The I/O-system BL compact does not require mounting in an extra housing. It was specially designed for the harsh industrial environment and for direct mounting on the machine and in the process. The system is extremely robust and protected against dirt,
dust and the most liquids through its high degree of protection. However, it is not suited for the following applications: high pressure jet cleaning, 100 % humidity, out-door installation or permanent operation in liquids.
6 / 32011
Hans Turck GmbH & Co.KG ñ D-45472 Mülheim an der Ruhr ñ Witzlebenstraße 7 ñ Tel. 0208 4952-0 ñ Fax 0208 4952-264 ñ [email protected] ñ www.turck.com
BLCDN-8M12L-8DI-N-8DI-N
4 Technical data
Type
Ident-No.
BLCDN-8M12L-8DI-N-8DI-N
6811026
Supply voltage
Admissible range
System power supply
Nominal voltage Vi
24 VDC
11...30 VDC
via DeviceNet cable
24 VDC
Nominal voltage Vo
24 VDC
Max. sensor supply Isens
4A
Max. load current Io
4A
Fieldbus transmission rate
Adjustment transmission rate
Fieldbus addressing range
Fieldbus addressing
Service interface
Fieldbus connection technology
Fieldbus termination
125…500 kbps
auto detection
0...63 64…80 (Programmable MACID) 81…99
(Vendor Specific)
2 decimally coded rotary switches
RS232 interface
2 x M12, 5-pin
external
Digital inputs
Input type
Type of input diagnostics
Sensor supply
Low level signal voltage
High level signal voltage
Active level (IC) signal current
Signal voltage inactive level
Input delay
npn
group diagnostics
24 VDC
> 7 VDC
< 5 VDC
< 2.5 mA
> 3.0 mA
0.25 ms ms
Edition • 2011-3-15
Operating temperature
Storage temperature
Extended vibartion resistance
- up to 20 g (at 10 to 150 Hz)
Protection class
housing material
7 / 32011
-40...+70 °C
-40...+85 °C
firm mounting on base plate or machine
IP69K
Glass-filled nylon, nickel plated brass connectors
Hans Turck GmbH & Co.KG ñ D-45472 Mülheim an der Ruhr ñ Witzlebenstraße 7 ñ Tel. 0208 4952-0 ñ Fax 0208 4952-264 ñ [email protected] ñ www.turck.com
BLCDN-8M12L-8DI-N-8DI-N
5 Fieldbus and I/O connections
5.1 Pinning and wiring diagram
Fieldbus
Fieldbus
DeviceNet™ fieldbus connection cable (for example):
RSC RKC 572-2M
Ident no. U0323
Slot 1: digital inputs
Pin configuration
Wiring diagram
Wiring diagram
Slot 2: digital inputs
Pin configuration
Wiring diagram
Edition • 2011-3-15
Wiring diagram
8 / 32011
Hans Turck GmbH & Co.KG ñ D-45472 Mülheim an der Ruhr ñ Witzlebenstraße 7 ñ Tel. 0208 4952-0 ñ Fax 0208 4952-264 ñ [email protected] ñ www.turck.com
BLCDN-8M12L-8DI-N-8DI-N
6 Commissioning
6.1 Address setting
The DeviceNet™ address setting at the module is done via the two decimal rotary coding switches under the protective cover. DeviceNet™ allows a maximum of 64 (00 to 63)
addresses (MAC IDs) to be assigned. Each address may be allocated only once in the entire
bus structure.
All new settings become valid only after a
module restart!
6.2 Setting the transmission rate
The module provides automatic transmission
rate detection.
The bit rate can be changed via the standard
ODVA DeviceNet Class™ (Class 0x03, Instance 0x01, Attribute 0xx02).
6.3 Field bus termination
If the module is used as the first or the last station in the bus communication, the fieldbus line
has to be terminated using a terminating resistor.
The module offers no internal bus terminating
resistor. The termination has to be done externally.
Terminating resistor (female),
RKE57-TR2, Ident-no.: 6602629
Terminating resistor (male),
RSE57-TR2, Ident-no.: 6602308
6.4 Service interface
Edition • 2011-3-15
In order to connect the service interface on the
module with a PC and the I/O-ASSISTANT software (project planning and diagnostics software), a cable with a pin assignment, different
from the PS2 standard pin assignment, has to
be used.
9 / 32011
Hans Turck GmbH & Co.KG ñ D-45472 Mülheim an der Ruhr ñ Witzlebenstraße 7 ñ Tel. 0208 4952-0 ñ Fax 0208 4952-264 ñ [email protected] ñ www.turck.com
BLCDN-8M12L-8DI-N-8DI-N
6 Commissioning
6.5 PLC configuration
The modules can be integrated into the DeviceNet™ structure by means of module specific BL compact EDS files.
Commissioning in a configuration tool
Registrate the EDS-files in the PLC configuration tool eg. in RSNetWorX from Rockwell Automation. The BL compact modules can now
be found under “TURCK, Inc.> Communication
Adapter“. Add the modules to your fieldbus line.
The EDS-files can be downloaded from
www.turck.com.
6.6 Vendor Specifc Classes (VSCs)
BL compact modules for DeviceNet™ are
based on the communications adapter profile
according to ODVA specifications Rel. V2.0
(ODVA: Open DeviceNet™ Vendor Association).
Besides the standard DeviceNet™ classes, this
module supports the following Vendor Specific
Classes (VSC):
100 (64h) Gateway Class
101 (65h) Terminal Slot Class
102 (66h) Process Data Class
+ VSCs for the respective I/O channels.
NOTE
Edition • 2011-3-15
For more detailed information about the PLC-configuration of TURCK DeviceNet™-products or the Vendor Specific Classes of the I/O-channels, please read for example the respective BL67 manual D300528.pdf which can be downloaded from
www.turck.com.
10 / 32011
Hans Turck GmbH & Co.KG ñ D-45472 Mülheim an der Ruhr ñ Witzlebenstraße 7 ñ Tel. 0208 4952-0 ñ Fax 0208 4952-264 ñ [email protected] ñ www.turck.com
BLCDN-8M12L-8DI-N-8DI-N
7 The I/O-ASSISTANT
The configuration software I/O-ASSISTANT
supports you in planning and implementation of
an I/O system.
No matter if you are online or offline, the software simplifies the configuration and parameterizsation of the modules. The I/O-ASSISTANT
is also extremely helpful in system set-up and
testing.
7.1 FDT/DTM
The system configuration, parameterization and
diagnostics are done via graphical interfaces
based on FDT/DTM technology.
The DTMs can be integrated in any FDT frame
application for configuration, commissioning
and maintenance.
The I/O-ASSISTANT and the DTMs are available free of charge on www.turck.com.
Software functions
■ Supporting software tool
■
■
■
■
■
Edition • 2011-3-15
■
11 / 32011
Configuration, parameterization and commissioning of BL Compact modules via DTM-technology
Import of BL Compact DTM-files
Offline planning and configuration of BL67,
BL20 and BL compact I/O modules
Reading and setting of process data
Commissioning help for testing the wiring
and sensors without PLC
Automatic documentation of configured
TURCK-systems
Hans Turck GmbH & Co.KG ñ D-45472 Mülheim an der Ruhr ñ Witzlebenstraße 7 ñ Tel. 0208 4952-0 ñ Fax 0208 4952-264 ñ [email protected] ñ www.turck.com
BLCDN-8M12L-8DI-N-8DI-N
8 LED description
8.1 Stations LED Status
LED
Colour
Status
Description
RED
RED
RED
GREEN
GREEN
OFF
ON
FLASHING (1 Hz)
FLASHING (4 Hz)
ON
FLASHING
No power
Low power or station error
I/O module configuration error
No I/O module bus communication
Station ok
Force mode active
GREEN
GREEN
RED
RED
OFF
ON
FLASHING (1 Hz)
ON
FLASHING
No connection
Connection established
No connection established, device OK
Duplicate MAC-ID
Connection time out
GREEN
GREEN
RED
RED
ON
FLASHING (1 Hz)
ON
FLASHING
I/O active
One or more I/O idle
One or more I/O error
One or more I/O faulted
Colour
Status
Description
RED
RED
OFF
ON
FLASHING (0.5Hz)
No diagnostics active
Station error/ module bus communication failure
Any diagnostics active
Colour
Status
Description
RED
RED
OFF
ON
FLASHING (0.5Hz)
No diagnostics active
Station error/ module bus communication failure
Any diagnostics active
IOs
MNS
IO
8.2 I/O LED Status Slot 1
LED
D1 *
* D1 LED also reports gateway diagnostics
8.3 I/O LED Status Slot 2
LED
D2 *
Edition • 2011-3-15
* D2 LED also reports gateway diagnostics
12 / 32011
Hans Turck GmbH & Co.KG ñ D-45472 Mülheim an der Ruhr ñ Witzlebenstraße 7 ñ Tel. 0208 4952-0 ñ Fax 0208 4952-264 ñ [email protected] ñ www.turck.com
BLCDN-8M12L-8DI-N-8DI-N
9 Mapping and diagnostics
9.1 I/O and Diagnostic Data mapping
INPUT
BYTE
Bit 7
Bit 6
Bit 5
Bit 4
Bit 3
Bit 2
Bit 1
0
DI 17
DI 16
DI 15
DI 14
DI 13
DI 12
DI 11
DI 10
1
DI 27
DI 26
DI 25
DI 24
DI 23
DI 22
DI 21
DI 20
Bit 0
* The scheduled diagnostic information changes every 125 ms between slot 1 and 2, if both slots send active diagnostics.
9.2 8DI-P - Diagnostic messages
Edition • 2011-3-15
No diagnostics.
13 / 32011
Hans Turck GmbH & Co.KG ñ D-45472 Mülheim an der Ruhr ñ Witzlebenstraße 7 ñ Tel. 0208 4952-0 ñ Fax 0208 4952-264 ñ [email protected] ñ www.turck.com
BLCDN-8M12L-8DI-N-8DI-N
10 Parameters
10.1 DeviceNet™-Parameters
Gateway parameters (fieldbus communication)
The module provides the following parameters to configure the DeviceNet™-communication.
The parameters are described in module-specific EDS-files which allow text-based parameterization in EDS-interpreting configuration tools like
RSNetworx from Rockwell Automation, for example.
For a parameterization via Class Instance Attribute (C - I - A), please find the necessary information in brackets (hexadecimal format).
Parameter
MAC-ID (03 - 01 - 01)
Baud rate
(03 - 01 - 02)
AutoBaud
(03 - 01 - 64)
on I/O cntcn timeout
(64 - 02 - 73)
BUS OFF irtp
(03 - 01 - 03)
* default setting
Description
0 to 63
0 = 125 kbps *
1 = 250 kbps
2 = 500 kbps
0 = disable
1 = enable *
Defines the output behavior in case of I/O connection timeout:
0 = switch outputs faulted *
1 = switch outputs off
2 = hold outputs
0 = holf CAN chip in BUS OFF state *
1 = reset CAN chip
10.2 8DI - Parameters
Edition • 2011-3-15
This slot has no parameter data available.
14 / 32011
Hans Turck GmbH & Co.KG ñ D-45472 Mülheim an der Ruhr ñ Witzlebenstraße 7 ñ Tel. 0208 4952-0 ñ Fax 0208 4952-264 ñ [email protected] ñ www.turck.com