1
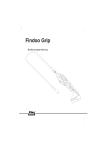
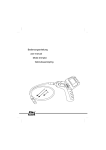
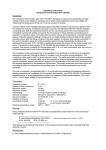
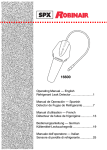
Bedienungsanleitung
User manual
Video-Endoskop
Video Borescope
[ FVE 100 ] und [ FVE 150 ]
DS
Artikel-Nr.: P 340 100
DS
Artikel-Nr.: P 340 150
[ FVE 100 ]
x106244x @ http://www.ds-messwerkzeuge.de/bedienungsanleitungen/fve.pdf
LIEFERUMFANG
KIT CONSISTS OF
Video-Endoskop, Schwanenhalssonde 100 cm,
TV-Kabel, USB-Kabel, Li-Ion-Akku, Ladegerät,
Magnet, Haken, Spiegel, Koffer, Bedienungsanleitung
Video-Borescope, gooseneck probe 100 cm,
video cable, USB cable, Li-Ion batteries, charger, magnet tip, hook tip, mirror tip, hard case,
user manual
WARN- UND SICHERHEITSHINWEISE
SAFETY INSTRUCTIONS
Bitte richten Sie sich nach den Anweisungen
der Bedienungsanleitung.
Anleitung vor Benutzung des Gerätes sorgfältig
lesen.
Niemals das Gehäuse öffnen.
Reparaturen nur vom autorisierten Fachhändler
durchführen lassen.
Keine Warn- oder Sicherheitshinweise entfernen.
Kamera und Sonde sind wasserdicht, jedoch
nicht das Gerät. Video-Endoskop nicht in Wasser tauchen. Gerät nicht in feuchter / nasser
Umgebung (Regen) betreiben.
Doppelte Isolierung nach CE-Standards.
Sonde sorgfältig an das Gerät anschrauben, um
Elektrounfälle zu vermeiden.
Das Gerät nicht direkter Sonnenstrahlung, starken Lichtquellen oder Reflektoren aussetzen.
Please follow up instructions given in user
manual.
Carefully read the instructions before using the
instrument.
Do not open instrument housing.
Repairs should be carried out by authorized
workshops only. Please contact your local dealer.
Do not remove warning labels or safety instructions.
The camera is waterproof, but not the instrument. Do not use the instrument under water.
Do not use the instrument in humid / wet condition (rain).
Carefully screw the probe onto the instrument
in order to avoid electro shocks.
Do not use the instrument in direct sun light,
in bright illumination and with reflectors.
BESTIMMUNGSGEMÄßE VERWENDUNG
INTENDED USE OF INSRUMENT
Für optische Kontrolle / Überwachung von unzugänglichen Stellen per Video-Endoskop, z. B.
Sanitär-, Elektro-, Baubranche.
Optical check / survey of unaccessible places
via borescope, i. e. sanitary installations, electrical industry, construction.
2
3
UMGANG UND PFLEGE
CARE AND CLEANING
Messinstrumente generell bitte sorgsam behandeln.
Nach Benutzung mit weichem Tuch reinigen
(ggfs. Tuch in etwas Wasser tränken).
Wenn das Gerät feucht war, sorgsam trocknen.
Erst in den Koffer oder die Tasche packen,
wenn es absolut trocken ist.
Transport nur in Originalbehälter oder -tasche.
Please handle measuring instruments with care.
Clean with soft cloth only after any use. If
necessary damp cloth with some water.
If instrument is wet clean and dry it carefully.
Pack it up only if it is perfectly dry.
Transport in original container / case only.
FUNKTIONEN
FUNCTIONS
Für optische Einblicke in das Innenleben von
Maschinen zur Wartung und Instandhaltung.
Beobachtung und Kontrolle von Objekten unter
Wasser (Drainagearbeiten). - Nur die Sonde mit
Kamera unter Wasser tauchen - auf keinen Fall
das Gerät!
Optical check of machine interior for service
and repair.
Survey and check of objects under water (drainage works). - Please only put camera with
probe under water - not the instrument!
TV-Ausgang
LED-Beleuchtung für Arbeiten in dunkler Umgebung
2000mAh Li-Ion-Akku wird über Mini-USBAnschluss geladen
Kontrast, Helligkeit und Farben einstellbar
Bild auf Display um 180° drehbar
Standby-Funktion
TV output
LED illumination for working in dark surroundings
USB charging of 2000mAh Li-Ion battery
Adjustment of contrast, illumination and colours
Image rotation of 180°
Standby function
TECHNISCHE DATEN
TECHNICAL DATA
Kamerakopf
Blickfeld
Brennweite
Sichtbarer Abstand
Kameradurchmesser
Lichtquelle
0° und 180°
6 - 7 cm
5 - 15 cm
17 mm
LED
Display
Displaygröße
Auflösung
Bildübertragung zu LCD
CMOS Bildsensor
Videoausgang (zu TV)
3“
960 x 240 Pixel
Schwanenhalssonde
300.000 Pixel
PAL / NTSC
Verschiedenes
Sondenlänge
Biegeradius
Schutzklasse Sonde und
Kamera
Stromversorgung
Betriebsdauer
Temperaturbereich
Feuchtigkeitsbereich
Abmessungen
Gewicht mit Sonde
100 cm
6 cm
IP 67
3,7V/2000mAh Li-Ion
4h
-10 - + 50°C
15 - 85 % RH
240 x 160 x 100 mm
0,584 kg
Camera head
Viewable angle
Focal length
Viewable distance
Diameter of camera
Light source
Display
Display size
Resolution
Image transmisstion
to LCD
CMOS image sensor
Video output (to TV)
Various
Probe length
Bend radius of probe
Protection class probe
and camera
Power supply
Operating time
Temperature range
Humidity range
Dimensions
Weight with probe
0° and 180°
6 - 7 cm
5 - 15 cm
17 mm
LED
3“
960 x 240 pixels
Gooseneck tube
300.000 pixels
PAL / NTSC
100 cm
6 cm
IP 67
3,7V/2000mAh Li-Ion
4h
-10 - + 50°C
15 - 85 % RH
240 x 160 x 100 mm
0,584 kg
4
5
BEDIENELEMENTE
FEATURES
1)
2)
3)
4)
5)
6)
7)
8)
9)
10
11)
12)
1)
2
3)
4)
5)
6)
7)
8)
9)
10
11)
12)
Schwanenhals
Display
Einstellung Kontrast, Helligkeit (-)
Einstellung Kontrast, Helligkeit (+)
An-/Aus-Schalter
Auswahl-Modus
TV-Ausgang
USB-Ladeanschluss
Reset-Taste
Li-Ion-Akku
Kamera
Kameraanschluss
Gooseneck
Display
Adjustment contrast, illumination (-)
Adjustment contrast, illumination (+)
On/Off button
Mode button
TV output
USB charge port
Reset button
Li-Ion battery
Camera
Camera connection
BEDIENUNG
OPERATION
Taste 6 drücken, um das Gerät einzuschalten.
Taste erneut drücken, um es wieder auszuschalten.
Press button 6 to switch on the borescope.
Press button again to switch it off.
Wenn das Gerät ausgeschaltet ist und mit dem
Mini-USB-Ladeanschluss verbunden wird, startet
automatisch der Ladevorgang, und das Display
schaltet sich ein.
Das Gerät fordert die Bestätigung oder den Abbruch des Ladevorganges:
Auswahl „+“ = ja, „-“ = nein.
Bestätigung der Auswahl mit der MODE-Taste.
Wenn der Ladevorgang bestätigt wurde, werden
alle Programme geschlossen, und das Gerät lädt
im Standby-Modus. Wenn der Ladevorgang ababgebrochen wurde, beginnt die normale Menüführung.
If instrument is off and if it is then connected
with mini USB charging cable charging process
starts automatically and display switches on.
In this status you can continue charging process
by pressing „+“ and confirm by pressing MODE.
Then the instrument closes all programs and
remains in stand by mode.
If you interrupt charging process by pressing
„-“ and confirming with MODE the instrument
enters into its main menu.
Batteriezustandsanzeige
Battery status indicator
6
7
BATTERIEZUSTANDSANZEIGE
BATTERY STATUS INDICATOR
Voll geladen
Fully loaded
Leer
Empty
Wird geladen
Being charged
BILDROTATION UND BILDEINSTELLUNG
IMAGE ROTATION AND IMAGE SETTING
1) Bildrotation
1) Image rotation
Bei eingeschaltetem Gerät MODE-Taste kurz
drücken; das Bild schwenkt um 90°.
When instrument is switched on shortly press
MODE button. Now the image rotates by 90°.
2) Bildeinstellung
2) Image setting
Bei eingeschaltetem Gerät MODE-Taste lang
drücken; nun ist das Gerät im Modus Bildeinstellung. Hier können z. B. folgende Parameter
eingestellt werden: Helligkeit, Kontrast, Auflösung, Farbe etc.
When instrument is switched on press MODE
button long to enter into image setting mode.
Now you can regulate i. e. brightness, contrast,
definition, colour etc.
Mit den Tasten „+“ und „-“ können Sie den
Cursor zum gewünschten Menüpunkt bewegen.
Den ausgewählten Menüpunkt mit der MODETaste bestätigen. Hier nun mit den Tasten „+“
und „-“ die gewüschte Einstellung festlegen
und mit der MODE-Taste bestätigen.
Move the cursor to the selected menu by
pressing buttons „+“ and „-“. Confirm the
menu chosen by pressing MODE. With the
buttons „+“ and „-“ you can now fix the
image setting requested. Confirm the value
chosen by pressing MODE.
Wenn alle Einstellungen erfolgt sind, mit dem
Cursor Menüpunkt EXIT wählen und mit der
MODE-Taste bestätigen, um die Bildeinstellung
zu beenden.
After having made all settings move the cursor
to EXIT and confirm with MODE. Now this
menu is closed.
8
9
AUTOMATISCHE BILDFORMATERKENNUNG
(PAL / NTSC)
AUTOMATIC IMAGE FORMAT CONVERSION
(PAL / NTSC)
Das Gerät erkennt beim ersten Einschalten automatisch das Bildformat (PAL oder NTSC) und
befindet sich dann sofort im entsprechenden
Standardmodus.
BEACHTE: Dies geschieht nur beim ersten Einschalten des Gerätes.
Die Werkseinstellung ist PAL.
The instrument automatically recognizes the
image format when switched on for the fist
time and enters into the corresponding standard
mode.
ATTENTION: This recognition only works when
the instrument is switched on for the first time.
The standard setting is PAL.
EINSTELLUNG DER BILDHELLIGKEIT
SETTING IMAGE ILLUMINATION
Die Werkseinstellung der Bildhelligkeit ist 3.
The standard illumination is 3.
Mit den Tasten „+“ und „-“ können Sie die
Helligkeit verändern. Die niedrigste Einstellung
ist 0 (bei dieser Einstellung leuchtet die LED
nicht mehr), die maximale 5.
With the buttons „+“ and „-“ you can adjust
the image illumination. The lowest illumination
is 0 (= LED does not light anymore), the maximum illumination is 5.
ANZEIGE DER GEWÄHLTEN BILDHELLIGKEIT
ILLUMINATON INDICATOR ON / OFF
Tasten „+“ und „-“ gleichzeitig drücken, um
die Anzeige der Bildhelligkeit ein- oder auszuschalten.
Press buttons „+“ and „-“ together to switch
illumination indicator on or off.
Werkseinstellung:
Die Anzeige der Bildhelligkeit ist „an“.
The standard setting is „on“.
TV-AUSGANG
TV OUTPUT
TV-Kabel (im Lieferumfang) mit Monitor verbinden; dabei das schwarze Ende an das Gerät und
das gelbe Ende an den Monitor anschließen. Im
Hauptmenü TV-AUSGANG wählen und mit OK
bestätigen. Aus dem Auswahlmenü zutreffenden Parameter auswählen und mit OK bestätigen. Danach sind Sie automatisch wieder im
Hauptmenü.
Connect TV cable (supplied with) with monitor;
plug the black end into the instrument and the
yellow into the monitor. Choose TV OUT in the
main menu and confirm with OK. Choose the
correct parameter with the cursor and confirm
with OK. Thereafter, you automatically return
to the main menu.
10
CE-KONFORMITÄT
CE-CONFORMITY
Das Gerät ist gemäß den gültigen CE-Normen
zertifiziert.
Instrument is certified as per required CE regulations.
ELEKTROMAGNETISCHE VERTRÄGLICHKEIT
ELECTROMAGNETIC ACCEPTABILITY (EMC)
• Es kann nicht generell ausgeschlossen werden,
dass das Gerät andere Geräte stört (z.B. Navigationseinrichtungen);
• durch andere Geräte gestört wird (z.B. elektromagnetische Strahlung bei erhöhter Feldstärke
z.B. in der unmittelbaren Nähe von Industrieanlagen oder Rundfunksendern).
• It cannot be completely excluded that this instrument will disturb other instruments (e.g.
navigation systems);
• will be disturbed by other instruments (e.g.
intensive electromagnetic radiation nearby
industrial facilities or radio transmitters).
GARANTIE
WARRANTY
Die Garantiezeit beträgt zwei (2) Jahre, beginnend mit dem Verkaufsdatum.
Die Garantie erstreckt sich nur auf Mängel wie
Material- oder Herstellungsfehler, sowie die
Nichterfüllung zugesicherter Eigenschaften.
Ein Garantieanspruch besteht nur bei bestimmungsgemäßer Verwendung. Mechanischer
Verschleiß und äußerliche Zerstörung durch
Gewaltanwendung und Sturz unterliegen nicht
der Garantie. Der Garantieanspruch erlischt,
wenn das Gehäuse geöffnet wurde. Der Hersteller behält sich vor, im Garantiefall die
schadhaften Teile instand zusetzen bzw. das
Gerät gegen ein gleiches oder ähnliches (mit
gleichen technischen Daten) auszutauschen.
Ebenso gilt das Auslaufen der Batterie nicht als
Garantiefall.
This product is warranted by the manufacturer
to the original purchaser to be free from defects
in material and workmanship under normal use
for a period of two (2) years from the date of
purchase.
During the warranty period, and upon proof of
purchase, the product will be repaired or replaced (with the same or similar model at manufacturers option), without charge for either parts
or labour.
In case of a defect please contact the dealer
where you originally purchased this product.
The warranty will not apply to this product if
it has been misused, abused or altered. Without limiting the foregoing, leakage of the battery, bending or dropping the unit are presumed
to be defects resulting from misuse or abuse.
11
HAFTUNGSAUSSCHLUSS
EXCEPTIONS FROM RESPONSIBILITY
Der Benutzer dieses Produktes ist angehalten,
sich exakt an die Anweisungen der Bedienungsanleitung zu halten. Alle Geräte sind vor der
Auslieferung genauestens überprüft worden.
Der Anwender sollte sich trotzdem vor jeder
Anwendung von der Genauigkeit des Gerätes
überzeugen.
Der Hersteller und sein Vertreter haften nicht
für fehlerhafte oder absichtlich falsche Verwendung sowie daraus eventuell resultierende Folgeschäden und entgangenen Gewinn.
Der Hersteller und sein Vertreter haften nicht
für Folgeschäden und entgangenen Gewinn
durch Naturkatastrophen wie z.B. Erdbeben,
Sturm, Flut, usw. sowie Feuer, Unfall, Eingriffe
durch Dritte oder einer Verwendung außerhalb
der üblichen Einsatzbereiche.
Der Hersteller und sein Vertreter haften nicht
für Schäden und entgangenen Gewinn durch
geänderte oder verlorene Daten, Unterbrechung
des Geschäftsbetriebes usw., die durch das
Produkt oder die nicht mögliche Verwendung
des Produktes verursacht wurden.
Der Hersteller und sein Vertreter haften nicht
für Schäden und entgangenen Gewinn resultierend aus einer nicht anleitungsgemäßen Bedienung.
Der Hersteller und sein Vertreter haften nicht
für Schäden, die durch unsachgemäße Verwendung oder in Verbindung mit Produkten anderer
Hersteller verursacht wurden.
The user of this product is expected to follow
the instructions given in operators’ manual.
Although all instruments left our warehouse
in perfect condition and adjustment the user is
expected to carry out periodic checks of the
product’s accuracy and general performance.
The manufacturer, or its representatives,
assumes no responsibility of results of a faulty or intentional usage or misuse including any
direct, indirect, consequential damage, and loss
of profits.
The manufacturer, or its representatives,
assumes no responsibility for consequential
damage, and loss of profits by any disaster
(earthquake, storm, flood etc.), fire, accident,
or an act of a third party and/or a usage in
other than usual conditions.
The manufacturer, or its representatives,
assumes no responsibility for any damage, and
loss of profits due to a change of data, loss of
data and interruption of business etc., caused
by using the product or an unusable product.
The manufacturer, or its representatives,
assumes no responsibility for any damage, and
loss of profits caused by usage other than explained in the users‘ manual.
The manufacturer, or its representatives,
assumes no responsibility for damage caused
by wrong movement or action due to connecting with other products.
DS-Messwerkzeuge
Goethestrasse 5
D-65604 ELZ b/Limburg
Tel. +49 (0) 6431-9779-0
Fax +49 (0) 6431-9779-29
[email protected]
www.ds-messwerkzeuge.de
Technische Änderungen vorbehalten.
All instruments subject to technical changes.
01/2010
Bedienungsanleitung
User manual
Video-Endoskop
Video Borescope
FVE 150
[ FVE 150 ]
LIEFERUMFANG
KIT CONSISTS OF
Video-Endoskop, Schwanenhalssonde 100 cm,
TV-Kabel, USB-Kabel, Li-Ion-Akku, Ladegerät,
Magnet, Haken, Spiegel, Koffer, 2 GB SDKarte, Bedienungsanleitung
Video-Borescope, gooseneck probe 100 cm,
video cable, USB cable, Li-Ion batteries, charger, magnet tip, hook tip, mirror tip, hard case,
2 GB SD-card, user manual
WARN- UND SICHERHEITSHINWEISE
SAFETY INSTRUCTIONS
Bitte richten Sie sich nach den Anweisungen
der Bedienungsanleitung.
Anleitung vor Benutzung des Gerätes sorgfältig
lesen.
Niemals das Gehäuse öffnen.
Reparaturen nur vom autorisierten Fachhändler
durchführen lassen.
Keine Warn- oder Sicherheitshinweise entfernen.
Kamera und Sonde sind wasserdicht, jedoch
nicht das Gerät. Video-Endoskop nicht in Wasser tauchen. Gerät nicht in feuchter / nasser
Umgebung (Regen) betreiben.
Doppelte Isolierung nach CE-Standards.
Sonde sorgfältig an das Gerät anschrauben, um
Elektrounfälle zu vermeiden.
Das Gerät nicht direkter Sonnenstrahlung, starken Lichtquellen oder Reflektoren aussetzen.
Please follow up instructions given in user
manual.
Carefully read the instructions before using the
instrument.
Do not open instrument housing.
Repairs should be carried out by authorized
workshops only. Please contact your local dealer.
Do not remove warning labels or safety instructions.
The camera is waterproof, but not the instrument. Do not use the instrument under water.
Do not use the instrument in humid / wet condition (rain).
Carefully screw the probe onto the instrument
in order to avoid electro shocks.
Do not use the instrument in direct sun light,
in bright illumination and with reflectors.
BESTIMMUNGSGEMÄßE VERWENDUNG
INTENDED USE OF INSRUMENT
Für optische Kontrolle / Überwachung von unzugänglichen Stellen per Video-Endoskop, z. B.
Sanitär-, Elektro-, Baubranche.
Optical check / survey of unaccessible places
via borescop, i. e. sanitary installations, electrical industry, construction.
2
3
UMGANG UND PFLEGE
CARE AND CLEANING
Messinstrumente generell bitte sorgsam behandeln.
Nach Benutzung mit weichem Tuch reinigen
(ggfs. Tuch in etwas Wasser tränken).
Wenn das Gerät feucht war, sorgsam trocknen.
Erst in den Koffer oder die Tasche packen,
wenn es absolut trocken ist.
Transport nur in Originalbehälter oder -tasche.
Please handle measuring instruments with care.
Clean with soft cloth only after any use. If
necessary damp cloth with some water.
If instrument is wet clean and dry it carefully.
Pack it up only if it is perfectly dry.
Transport in original container / case only.
EIGENSCHAFTEN
FEATURES
Für optische Einblicke in das Innenleben von
Maschinen zur Wartung und Instandhaltung
Beobachtung und Kontrolle von Objekten unter
Wasser (Drainagearbeiten). - Nur die Sonde mit
Kamera unter Wasser tauchen - auf keinen Fall
das Gerät!
Optical check of machine interior for service
and repair.
Survey and check of objects under water (drainage works). - Please only put camera with
probe under water - not the instrument!
Speicherfunktion
Bildrotation
Datums- und Zeitanzeige im Display
Audio- und Videoaufnahme
SD-Karte (2 GB; unterstützt bis 8 GB optional)
Integrierter 70 MB Flash-Speicher
TV-Ausgang
Umwandlung in jpg- und bmp-Format
Sprachwahl: Deutsch, Englisch, Französisch,
Spanisch
LED-Beleuchtung für Arbeiten in dunkler Umgebung
2000mAh Li-Ion-Akku wird über Mini-USBAnschluss geladen
Stromsparmodus
Memory function
Image rotation
Display indication of date and time
Audio and video recording
SD-card (2 GB; support up to 8 GB optional)
Built-in 70 MB flash memory
TV output
Conversion into jpg and bmp formate
Languages: German, English, French, Spanish
LED illumination for working in dark surroundings
Adjustment of contrast, illumination and colours
USB charging of 2000mAH Li-Ion battery
Saving power mode
TECHNISCHE DATEN
Kamerakopf
Blickfeld
Brennweite
Sichtbarer Abstand
Kameradurchmesser
Lichtquelle
Display
Displaygröße
Auflösung
Bildübertragung zu LCD
CMOS Bildsensor
Videoausgang (zu TV)
Bild-/Videoformat
Auflösung Bilder / Video
Interner Speicher
Weitere Speichermöglichkeit
Bediensprachen
Verschiedenes
Sondenlänge
Biegeradius
Schutzklasse Sonde und
Kamera
Stromversorgung
Betriebsdauer
Temperaturbereich
Feuchtigkeitsbereich
Abmessungen
Gewicht mit Sonde
TECHNICAL DATA
0° und 180°
6 - 7 cm
5 - 15 cm
17 mm
LED
3,2“
320 x 240 Pixel
Schwanenhalssonde
300.000 Pixel
PAL / NTSC
JPG / 3 GP
320 x 240 Pixel
70 MB
2 GB SD-Karte
unterstützt bis 8 GB
(optional)
Deutsch, Englisch,
Französisch, Spanisch
100 cm
6 cm
IP 67
3,7V/2000mAh Li-Ion
4h
-10 - + 50°C
15 - 85 % RH
240 x 160 x 100 mm
0,584 kg
Camera head
Viewable angle
Focal length
Viewable distance
Diameter of camera
Light source
Display
Display size
Resolution
Image transmisstion
to LCD
CMOS image sensor
Video output (to TV)
Picture / video formate
Resolution picture / video
Internal memory
Further memory
Operation languages
Various
Probe length
Bend radius of probe
Protection class probe
and camera
Power supply
Operating time
Temperature range
Humidity range
Dimensions
Weight with probe
0° and 180°
6 - 7 cm
5 - 15 cm
17 mm
LED
3,2“
320 x 240 pixels
Gooseneck tube
300.000 pixels
PAL / NTSC
JPG / 3 GP
320 x 240 pixel
70 MB
2 GB SD-card
support up to 8 GB
(optional)
German, Englisch,
French, Spanish
100 cm
6 cm
IP 67
3,7V/2000mAh Li-Ion
3h
-10 - + 50°C
15 - 85 % RH
240 x 160 x 100 mm
0,584 kg
4
BEDIENELEMENTE
FEATURES
1
2
9
3
8
7
5
4
6
1)
2)
3)
4)
5)
6)
7)
8)
9)
5
Display
OK-Taste
An-/Aus-Taste
Cursor auf
Exit (ESC)
Griff mit Li-Ion-Batterie
Cursor ab
Displaybeleuchtung dunkler
Displaybeleuchtung heller
1)
2
3)
4)
5)
6)
7)
8)
9)
Display
OK-button
ON / OFF button
Cursor up
EXIT button (ESC)
Handle with Li-Ion battery
Cursor down
Display illumination down
Display illumination up
10
13
14
11
17
12
15
16
21
20
18
10)
11)
12)
13)
14)
15)
16)
17)
18)
19)
20
21)
19
Kameraanschluss
Schwanenhals
Kamera
TV-Ausgang
USB-/Ladeanschluss
RESET-Taste
SD-Karte
Integrierte Abdeckkappe
Foto-Taste (SNAP)
Video-Taste (RECORD)
Anschluss Hauptplatine
Kameraanschluss
10)
11
12)
13)
14)
15)
16)
17)
18)
19
20)
21)
Camera adapter
Gooseneck
Camera
TV output
USB charging adapter
RESET button
SD card
Built-in socket cover
Foto button (SNAP)
Video button (RECORD)
Mainboard socket
Camera adapter
6
BEDIENUNG
OPERATION
GERÄT EINSCHALTEN
SWITCH INSTRUMENT ON
Mit Taste 3 Gerät einschalten. Das Gerät ist nun
im Videomodus. Um das Gerät wieder auszuschalten, erneut Taste 3 drücken.
Switch instrument on with button 3. To switch
insturment off press button 3 again.
Anzeige Displaybeleuchtung an/aus
Indication of display illumination on/off
Anzeige aktuelles Datum mit Uhrzeit
Indication of current date and time
Bildanzeige
Picture display
Speicheranzeige
Current memory display
EINSTELLUNG DER BILDHELLIGKEIT
SETTING IMAGE ILLUMINATION
Mit den Tasten „Bright +“ und „Bright -“ können Sie die Helligkeit verändern. Die niedrigste
Einstellung ist 0 (bei dieser Einstellung leuchtet
die LED nicht mehr), die maximale 10.
With the buttons „Bright +“ and „Bright -“ you
can adjust the image illumination. The lowest
illumination is 0 (= LED does not light anymore), the maximum illumination is 10.
BILDROTATION
Mit den Tasten 4 und 7 können Sie die Displayanzeige um 180° drehen.
7
IMAGE ROTATION
With buttons 4 and 7 you can rotate the display
by 180°.
AUFNAHMEN SPEICHERN
SAVE PHOTOS
Wenn das Gerät eingeschaltet ist, können Sie
mit der SNAP-Taste auf der Geräterückseite Bilder speichern. Dazu Taste kurz gedrückt halten.
Datum und Uhrzeit werden auf dem Bild angezeigt. Die Bilder können dann im Explorer aufgerufen werden.
When the instrument is switched on press
SNAP button on the reverse side to save photos.
For this press button shortly. Date and time will
be displayed on the photos. Photos can be
browsed in the explorer.
VIDEOAUFNAHMEN
SAVE VIDEOS
Wenn das Gerät eingeschaltet ist, können Sie
mit der RECORD-Taste auf der Geräterückseite
Videos speichern. Dazu RECORD-Taste 3 Sek.
gedrückt halten. Das Gerät ist nun im Videomodus, und das Videosymbol erscheint im Display. Links unten im Display wird der verfügbare Speicherplatz angezeigt. RECORD-Taste
gedrückt halten, um die Aufnahmen zu speichern. Die Aufnahmen können dann im Explorer
aufgerufen werden.
When the instrument is switched on press
RECORD-button on the reverse side for 3 sec.
to save videos. The video symbol is displayed
and on the left down side of the display and
the free memory space is shown. Hold on pressing RECORD-button to save the video. The
videos can be browsed in the explorer.
MENÜFÜRHUNG
MAIN MENU
Gerät einschalten und OK drücken. Dann erscheint folgendes Dialogfeld:
Switch instrument on and press OK. Then
following dialogue box is displayed:
8
Gehen Sie mit dem Cursor auf JA, und drücken
Sie OK. Nun sind Sie im Hauptmenü und können mit den Cursortasten den gewünschten
Menüpunkt auswählen und mit OK bestätigen.
Choose YES with the cursor and confirm with
OK. Now you are in the main menu and can
choose menu icon required. Confirm chosen
menu with OK.
Aktuelle Zeit
Current time
Hauptmenu
Main menu
Cursoranzeige
State of cursor
9
SPRACHE WÄHLEN
SET LANGUAGE
Gehen Sie mit dem Cursor auf SPRACHE, und
bestätigen Sie mit OK. Nun können Sie die gewünschte Sprache auswählen und mit OK bestätigen.
Choose LANGUAGE with the cursor and confirm
with OK. Now you can choose the language
requested and confirm with OK.
UHRZEIT EINSTELLEN
SET TIME
Gehen Sie mit dem Cursor auf ZEIT, und bestätigen Sie mit OK. Mit dem Cursor können Sie
den gewünschten Parameter wählen. Den Parameter, unter dem jeweils der gelbe Pfeil steht,
können Sie verändern. Dazu drücken Sie die
Tasten SNAP (= auf) oder RECORD (= ab).
Eingestellte Werte mit OK bestätigen. Danach
sind Sie automatisch wieder im Hauptmenü.
Choose TIME with the cursor and confirm with
OK. With the cursor you can now choose the
parameter requested. The yellow arrow shows
which parameter you have chosen. With the
buttons SNAP (= up) and RECORD (= down)
you can set the parameter. Confirm with OK.
Thereafter, you automatically return to the
main menu.
AUTOMATISCHE ABSCHALTUNG
AUTOMATIC SHUT-DOWN
Gehen Sie mit dem Cursor auf AUTO AUS, und
bestätigen Sie mit OK. Wählen Sie nun aus dem
Auswahlmenü den gewünschten Parameter,
und bestätigen Sie mit OK. Danach sind Sie
automatisch wieder im Hauptmenü
Choose AUTO OFF with the cursor and confirm
with OK. With the cursor you can now choose
the parameter requested. Confirm with OK.
Thereafter, you automatically return to the
main menu.
10
TV-AUSGANG
TV OUTPUT
TV-Kabel (im Lieferumfang) mit Monitor verbinden; dabei das schwarze Ende an das Gerät und
das gelbe Ende an den Monitor anschließen. Im
Hauptmenü TV-AUSGANG wählen und mit OK
bestätigen. Aus dem Auswahlmenü zutreffenden Parameter auswählen und mit OK bestätigen. Danach sind Sie automatisch wieder im
Hauptmenü.
Connect TV cable (supplied with) with monitor;
plug the black end into the instrument and the
yellow into the monitor. Choose TV OUT in the
main menu and confirm with OK. Choose the
correct parameter with the cursor and confirm
with OK. Thereafter, you automatically return
to the main menu.
SPEICHERFUNKTION
MEMORY FUNCTION
Gehen Sie mit dem Cursor auf SPEICHER, und
bestätigen Sie mit OK.Wählen Sie mit SNAP
oder RECORD das gewünschte Speichermedium
(Flash oder SD), und bestätigen Sie mit OK.
Danach gelangen Sie mit ZURÜCK wieder ins
Hauptmenü.
Choose MEMORY with the cursor and confirm
with OK. Choose the required format with buttons SNAP and RECORD and confirm with OK.
With BACK you return to the main menu.
11
BILD UND VIDEO-EXPLORER
PICTURE AND VIDEO EXPLORER
Wählen Sie mit dem Cursor EXPLORER, und bestätigen Sie mit OK. Wählen Sie VIDEO PLAYER
oder BILDERANSICHT und bestätigen Sie mit
OK.
Choose EXPLORER with the cursor and confirm
with OK. Choose VIDEO PLAYER or PICTURE
VIEW and confirm with OK.
Zum Löschen wählen Sie das gewünschte Bild /
Video, und löschen Sie mit BRIGHT+.
For deletion choose the picture / video required
with BRIGHT +.
Explorer
Video Player
Picture View
12
EINSTELLUNGEN
SET
Wählen Sie mit dem Cursor EINSTELLUNGEN,
und bestätigen Sie mit OK. Nun können Sie mit
dem Cursor den gewünschten Parameter Helligkeit, Kontrast, Farbe, und Sättigung wählen und
mit den Tasten SNAP und RECORD einstellen.
Wenn Sie die Werte mit OK bestätigen, gelangen sie automatisch wieder ins Hauptmenü.
Choose SET with the cursor and confirm with
OK. Now you can choose the requested parameter with the cursor such as brightness, contrast, hue and saturation. Set the paramater
with buttons SNAP and RECORD and confirm
with OK. Thereafter, you automatically return
to the main menu.
STROMSPARMODUS
SAVING POWER
Wählen Sie mit dem Cursor STROMSPARMODUS, und bestätigen Sie mit OK. Hier stellen
Sie ein, ob und nach welcher Zeit bei dem Gerät der Stormsparmodus einsetzt. Mit OK bestätigen; danach befindet sich das Gerät automatisch wieder im Hauptmenü. Im Stromsparmodus geht der Bildschirm nach der eingestellgen Zeit aus; das Gerät ist jedoch noch an.
Einfach eine Taste betätigen, und das Display
ist wieder aktiv.
Choose SAVING POWER and confirm with OK.
Now set if and when saving power mode starts
and confirm with OK. Thereafter, the instrument
automatically returns to the main menu. After
the time chosen the display will shut down but
the system is still working. Press any button to
open display again.
13
GERÄT AUSSCHALTEN
EXIT MODE
Jedes Menü können Sie mit ESC verlassen.
Dann befinden Sie sich im Videomodus und
können das Gerät ausschalten.
You can leave any menu by pressing ESC.
Then you are in the video mode and can
switch off the intrument.
HINWEISE:
NOTICE:
Schwanenhals nicht stärker als 90° biegen.
Bei längerem Nichtgebrauch Batterien aus
dem Gerät nehmen.
Kamera vor Benutzung reinigen.
Nur Original-Akku verwenden.
Do not bend gooseneck more than 90°.
Take out the battery if you do not use the
instrument for a long time.
Clean camera before using.
Please only use original battery pack.
CE-KONFORMITÄT
CE-CONFORMITY
Das Gerät ist gemäß den gültigen CE-Normen
zertifiziert.
Instrument is certified as per required CE regulations.
ELEKTROMAGNETISCHE VERTRÄGLICHKEIT
ELECTROMAGNETIC ACCEPTABILITY (EMC)
• Es kann nicht generell ausgeschlossen werden,
dass das Gerät andere Geräte stört (z.B. Navigationseinrichtungen);
• durch andere Geräte gestört wird (z.B. elektromagnetische Strahlung bei erhöhter Feldstärke
z.B. in der unmittelbaren Nähe von Industrieanlagen oder Rundfunksendern).
• It cannot be completely excluded that this instrument will disturb other instruments (e.g.
navigation systems);
• will be disturbed by other instruments (e.g.
intensive electromagnetic radiation nearby
industrial facilities or radio transmitters).
14
GARANTIE
WARRANTY
Die Garantiezeit beträgt zwei (2) Jahre, beginnend mit dem Verkaufsdatum.
Die Garantie erstreckt sich nur auf Mängel wie
Material- oder Herstellungsfehler, sowie die
Nichterfüllung zugesicherter Eigenschaften.
Ein Garantieanspruch besteht nur bei bestimmungsgemäßer Verwendung. Mechanischer
Verschleiß und äußerliche Zerstörung durch
Gewaltanwendung und Sturz unterliegen nicht
der Garantie. Der Garantieanspruch erlischt,
wenn das Gehäuse geöffnet wurde. Der Hersteller behält sich vor, im Garantiefall die
schadhaften Teile instand zusetzen bzw. das
Gerät gegen ein gleiches oder ähnliches (mit
gleichen technischen Daten) auszutauschen.
Ebenso gilt das Auslaufen der Batterie nicht als
Garantiefall.
This product is warranted by the manufacturer
to the original purchaser to be free from defects
in material and workmanship under normal use
for a period of two (2) years from the date of
purchase.
During the warranty period, and upon proof of
purchase, the product will be repaired or replaced (with the same or similar model at manufacturers option), without charge for either parts
or labour.
In case of a defect please contact the dealer
where you originally purchased this product.
The warranty will not apply to this product if
it has been misused, abused or altered. Without limiting the foregoing, leakage of the battery, bending or dropping the unit are presumed
to be defects resulting from misuse or abuse.
15
HAFTUNGSAUSSCHLUSS
EXCEPTIONS FROM RESPONSIBILITY
Der Benutzer dieses Produktes ist angehalten,
sich exakt an die Anweisungen der Bedienungsanleitung zu halten. Alle Geräte sind vor der
Auslieferung genauestens überprüft worden.
Der Anwender sollte sich trotzdem vor jeder
Anwendung von der Genauigkeit des Gerätes
überzeugen.
Der Hersteller und sein Vertreter haften nicht
für fehlerhafte oder absichtlich falsche Verwendung sowie daraus eventuell resultierende Folgeschäden und entgangenen Gewinn.
Der Hersteller und sein Vertreter haften nicht
für Folgeschäden und entgangenen Gewinn
durch Naturkatastrophen wie z.B. Erdbeben,
Sturm, Flut, usw. sowie Feuer, Unfall, Eingriffe
durch Dritte oder einer Verwendung außerhalb
der üblichen Einsatzbereiche.
Der Hersteller und sein Vertreter haften nicht
für Schäden und entgangenen Gewinn durch
geänderte oder verlorene Daten, Unterbrechung
des Geschäftsbetriebes usw., die durch das
Produkt oder die nicht mögliche Verwendung
des Produktes verursacht wurden.
Der Hersteller und sein Vertreter haften nicht
für Schäden und entgangenen Gewinn resultierend aus einer nicht anleitungsgemäßen Bedienung.
Der Hersteller und sein Vertreter haften nicht
für Schäden, die durch unsachgemäße Verwendung oder in Verbindung mit Produkten anderer
Hersteller verursacht wurden.
The user of this product is expected to follow
the instructions given in operators’ manual.
Although all instruments left our warehouse
in perfect condition and adjustment the user is
expected to carry out periodic checks of the
product’s accuracy and general performance.
The manufacturer, or its representatives,
assumes no responsibility of results of a faulty or intentional usage or misuse including any
direct, indirect, consequential damage, and loss
of profits.
The manufacturer, or its representatives,
assumes no responsibility for consequential
damage, and loss of profits by any disaster
(earthquake, storm, flood etc.), fire, accident,
or an act of a third party and/or a usage in
other than usual conditions.
The manufacturer, or its representatives,
assumes no responsibility for any damage, and
loss of profits due to a change of data, loss of
data and interruption of business etc., caused
by using the product or an unusable product.
The manufacturer, or its representatives,
assumes no responsibility for any damage, and
loss of profits caused by usage other than explained in the users‘ manual.
The manufacturer, or its representatives,
assumes no responsibility for damage caused
by wrong movement or action due to connecting with other products.
DS-Messwerkzeuge
Goethestrasse 5
D-65604 ELZ b/Limburg
Tel. +49 (0) 6431-9779-0
Fax +49 (0) 6431-9779-29
[email protected]
www.ds-messwerkzeuge.de
Technische Änderungen vorbehalten.
All instruments subject to technical changes.
01/2010
x106244x @ http://www.ds-messwerkzeuge.de/bedienungsanleitungen/fve.pdf