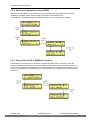
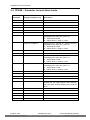
1
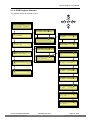
OPSAB Optical Communications Mainframe Optical Protection Switch Product User Manual Offices: China, Beijing : tel. +86-10-5791-0655 Americas, Florida : tel. +1-703-579-6777 AsiaPac, Melbourne : tel. +61-3-9780-5100 Australia, Melbourne : tel. +61-3-9780-5100 EMEA, Netherlands : tel. +31-36-536-8011 [email protected] www.pbnglobal.com © 2011 Pacific Broadband Networks. All rights reserved. Downloaded 12.10.2011 by [email protected]. Reproduction without consent is prohibited. OPSAB Product User Manual OPSAB Optical Communications Mainframe Optical Protection Switch Product User Manual Last update 28 September 2011 Document version 3a Document reference PBN.OPSAB - Manual V3a - Released 28 Sep 11 Document status Released Prepared by Pacific Broadband Networks Prepared for Product Users Page 2 of 28 28 September 2011 Pacific Broadband Networks Downloaded 12.10.2011 by [email protected]. Reproduction without consent is prohibited. OPSAB Product User Manual Contents 1 Precautions ...................................................................................................................................... 4 2 Introduction ....................................................................................................................................... 5 3 4 5 2.1 Overview .................................................................................................................................. 5 2.2 Features ................................................................................................................................... 5 2.3 Models and Options ................................................................................................................. 6 Installation ........................................................................................................................................ 7 3.1 Equipment Inventory ................................................................................................................ 7 3.2 Packaging and Transportation................................................................................................. 7 3.3 Power and Cooling Requirements ........................................................................................... 7 3.4 Front Panel .............................................................................................................................. 8 3.5 Rear Panel ............................................................................................................................... 9 3.6 Status Input............................................................................................................................ 10 3.7 Module Installation and Adjustment ...................................................................................... 11 Technical Description ..................................................................................................................... 12 4.1 Overview ................................................................................................................................ 12 4.2 Physical Description .............................................................................................................. 12 4.3 OPSAB - Basic Model ........................................................................................................... 13 4.4 OPSAB - Optical Sensing Model ........................................................................................... 13 Software Description ...................................................................................................................... 14 5.1 OPSAB and OCM Program Structure ................................................................................... 14 5.1.1 Software ............................................................................................................................. 14 5.1.2 Release History ................................................................................................................. 14 5.1.3 Factory Defaults / EEPROM Settings ................................................................................ 14 5.1.4 OCM Program Structure .................................................................................................... 15 5.2 OCM User Interface Lock for Control Variable Access ......................................................... 16 5.2.1 Unlock access to CONTROL variables ............................................................................. 16 5.2.2 Lock access to CONTROL variables ................................................................................. 16 5.3 Programming Sequence for OPSAB ..................................................................................... 17 5.3.1 Select the module within the OCM for monitoring and controlling .................................... 17 5.3.2 Check all 32 parameters in the OPSAB ............................................................................ 18 5.3.3 Select either AUTO or MANUAL switching ....................................................................... 18 5.3.4 Define the optical range for channel A and channel B ...................................................... 19 5.3.5 Select either internal or external sensing .......................................................................... 20 5.3.6 Select automatic switching mode ...................................................................................... 21 5.4 OPSAB – Parameter List and Alarm Limits ........................................................................... 22 6 Specifications ................................................................................................................................. 24 7 Product Warranty ........................................................................................................................... 25 8 Declaration of Conformity ............................................................................................................... 26 Pacific Broadband Networks 28 September 2011 Downloaded 12.10.2011 by [email protected]. Reproduction without consent is prohibited. Page 3 of 28 OPSAB Product User Manual 1 Precautions WARNING! This equipment is intended for indoor applications. To prevent fire or electrical shock, or damage to the equipment, do not expose units to water or moisture. Ensure adequate cooling and ventilation as specified. The installation and operation manual should be read and understood before units are put into use. Always replace protective caps on optical connectors when not in use. The typical connectors fitted are SC/APC 8°. Note: 8° angle polished connectors must be used. Do not operate unit without all covers and panels properly installed. Cleaning Use only a damp cloth for cleaning front panel. Use a soft dry cloth to clean top of unit. Do not use spray cleaner of any kind. Overloading Overloading wall outlets and extension cords can result in a risk of fire or electric shock. Use approved electrical cords. Damage requiring service Unplug unit and refer servicing to Pacific Broadband Networks qualified service personnel only. Servicing Do not attempt to service this unit yourself. Refer all servicing to Pacific Broadband Networks qualified service personnel only. WARNING! Exposure to class 1M laser radiation is possible. Access should be restricted to trained personnel only. Page 4 of 28 28 September 2011 Pacific Broadband Networks Downloaded 12.10.2011 by [email protected]. Reproduction without consent is prohibited. OPSAB Product User Manual 2 Introduction 2.1 Overview The optical protection switch OPSAB can be used for laser protection or for fibre-line protection. The OPSAB maintains optical output in the event of failure of an optical input. The unit includes an electrically-operated optical switch. The switch can be activated both manually and automatically. The OPSAB, in normal operation mode, allows the output from input A to be switched to a common output. In the event of a laser failure or optical line failure the OPSAB switches to input B. The OPSAB is available in two distinct versions. The basic version operates on external voltage reference levels as provided by our range of LTM13 and LTM15 DFB laser transmitters. There is an option for integrated optical sensing on the input ports. Automatic switching has three modes of operation: peer-to-peer for equal priority between inputs, master A for priority to input A, or master B for priority to input B. Both versions offer a manual override setting, which is accessed via our OCM management system. 2.2 Features Plug-and-play OCM module. Laser protection or fibre-line protection. Three modes of operation: manual, peer-to-peer and master/slave. Dual 1310 nm and 1550 nm operation. 40 ms switching speed. Low optical-insertion loss. SC/APC, E2000/APC or FC/APC connectors. High reliability and compact design. High optical isolation. Comprehensive computer-controlled status monitoring via CPM and LED. Optical sensing option available. Suitable for fibre-line protection in CATV networks or in Data networks. Pacific Broadband Networks 28 September 2011 Downloaded 12.10.2011 by [email protected]. Reproduction without consent is prohibited. Page 5 of 28 OPSAB Product User Manual 2.3 Models and Options OPSAB-[Y]-[Z] Optical protection switch Options: Y SC SC/APC optical connector E E2000/APC optical connector FC FC/APC tight fit optical connector (Seikoh Giken compatible) Z - External sensor inputs OSS Optical sensing of both optical inputs, range 0 dBm to +14 dBm OSL Optical sensing of both optical inputs, range -10 dBm to +4 dBm OSH Optical sensing of both optical inputs, range +7 dBm to +22 dBm OVL Optical sensing of both optical inputs, range -30 dBm to -15 dBm Example: OPSAB-SC-OSS Optical protection switch AB module, with optical sensing range 0 dBm to +14 dBm and SC/APC connectors. Page 6 of 28 28 September 2011 Pacific Broadband Networks Downloaded 12.10.2011 by [email protected]. Reproduction without consent is prohibited. OPSAB Product User Manual 3 Installation 3.1 Equipment Inventory On receiving your new OPSAB, you should carefully unpack and examine the contents for loss or damage that may have occurred during shipping. Refer to warranty registration if loss or damage has occurred. The OPSAB should consist of the following: Qty Description 1 OPSAB unit 1 OPSAB status loom (OPSAB-[Y] and OPSAB-[Y]-OSS options only) 1 Product user manual (includes individual test sheet) 1 Warranty registration certificate 3.2 Packaging and Transportation Keep all packing boxes and packaging of the OPSAB for future transport. Use only the original packaging of the OPSAB when transporting. This packaging has been specifically designed to protect the equipment. 3.3 Power and Cooling Requirements The OPSAB is powered by the power supply module of the OCM system. The OPSAB should be located in an environment not exceeding a temperature range from 0 °C to 45 °C with the OCM fans running. The internal module temperature (parameter P06) should never exceed 60 ºC. If the temperature exceeds the above limits, the OPSAB should be relocated in the equipment rack where the ambient temperature will be less than 45 °C. The OCM chassis should have adequate ventilation clearance as required. See the product user manual for your OCM chassis. Pacific Broadband Networks 28 September 2011 Downloaded 12.10.2011 by [email protected]. Reproduction without consent is prohibited. Page 7 of 28 OPSAB Product User Manual 3.4 Front Panel Item Description 1 SCREW Front panel screws to fix OPSAB to the OCM 2 POWER LED Power supply indicator GREEN 3 4 5 6 A / B INPUT LEDs Indicates which input is being switched to the output OUTPUT LED GREEN Input is being switched AMBER Input is not being switched Indicates output status ALARM LED GREEN Switch output has valid input AMBER Switch output does not have valid input Indicates current alarm status AUTO LED GREEN No current alarms AMBER Non-urgent alarm detected RED Urgent alarm detected Indicates switching status GREEN OPSAB is in AUTO mode AMBER OPSAB is in MANUAL mode 7 OPTICAL OUTPUT PORT 8 OPTICAL INPUT PORTS Page 8 of 28 Power ON, supply OK A and B 28 September 2011 Pacific Broadband Networks Downloaded 12.10.2011 by [email protected]. Reproduction without consent is prohibited. OPSAB Product User Manual 3.5 Rear Panel Item Description 1 STATUS Status input from transmitters 2 POWER / DATA BUS DC power input and bi-directional communication port Pacific Broadband Networks 28 September 2011 Downloaded 12.10.2011 by [email protected]. Reproduction without consent is prohibited. Page 9 of 28 OPSAB Product User Manual 3.6 Status Input Pin Description 1 TRANSMITTER A -TTL input for remote laser shut down 2 TRANSMITTER A +TTL input for remote laser shut down 3 TRANSMITTER B Laser Power (0 … 5 Vdc) 4 TRANSMITTER B Not used 5 TRANSMITTER B Earth 6 TRANSMITTER A Not used 7 TRANSMITTER A Laser Power (0 … 5 Vdc) 8 TRANSMITTER A +TTL input for remote laser shut down 9 TRANSMITTER A -TTL input for remote laser shut down Page 10 of 28 28 September 2011 Pacific Broadband Networks Downloaded 12.10.2011 by [email protected]. Reproduction without consent is prohibited. OPSAB Product User Manual 3.7 Module Installation and Adjustment 1. Hold the module upright and aligned to the OCM slide rails and carefully insert into the chassis. No excessive force should be used. Tip: When inserting the module into the guide rails, vertically twist the module slightly to check that the guides are properly seated on the rails. 2. Screw in the two front panel screws to secure the module to the chassis. 3. Always place protective dust caps on all optical connectors when not in use. 4. Connect to the desired optical common / output ports. 5. Verify, via the OCM user interface, that the module is recognised as part of the OCM system. Note: The module can be plugged in or out of the OCM chassis while power is on. Pacific Broadband Networks 28 September 2011 Downloaded 12.10.2011 by [email protected]. Reproduction without consent is prohibited. Page 11 of 28 OPSAB Product User Manual 4 Technical Description 4.1 Overview The OPSAB is available in two distinct versions. The basic version employs external reference levels for the decision making of its switching between inputs. The more sophisticated version offers true optical sensing for operation at either the transmitter side or receiver side of the optical network. Other than the difference employed in monitoring the optical levels, both versions operate in the same way. In automatic switch mode, the OPSAB has three modes of operation to suit the different switching characteristics as required by the operator. These modes are: Mode 0: Peer-to-Peer Mode 1: Master A – Slave B Mode 2: Slave A – Master B These modes set the priority of input channels as desired by the operator. An in-built CPU provides the control and monitoring functions for the OPSAB. The processor monitors the optical levels (either internal or external) and determines which optical input to switch to the output. 4.2 Physical Description The OPSAB unit is designed to occupy one slot of the OCM chassis. The format is in line with the other products that make up the OCM system family. The front panel allows the user to easily identify any alarm status, switch state, and optical input status. Page 12 of 28 28 September 2011 Pacific Broadband Networks Downloaded 12.10.2011 by [email protected]. Reproduction without consent is prohibited. OPSAB Product User Manual 4.3 OPSAB - Basic Model The OPSAB basic model is designed to operate at the optical transmitter side of the network. This module comprises two circuit blocks. The first is the optical path from the two optical inputs A and B, through an optical switch to the optical output. This switching decision is based on external reference levels from any of PBN’s range of transmitters, excluding the LTE150 series. These levels are related to the optical power of each connecting transmitter. The switching action is either automatic or manual. 4.4 OPSAB - Optical Sensing Model The OPSAB optical sensing model is designed to operate at either the transmitter side or the receiver side of the network. Since this switching operation is based on true optical sensing, the switch will operate with most optical transmitters. The switching action is either automatic or manual. Pacific Broadband Networks 28 September 2011 Downloaded 12.10.2011 by [email protected]. Reproduction without consent is prohibited. Page 13 of 28 OPSAB Product User Manual 5 Software Description 5.1 OPSAB and OCM Program Structure The basic program structure is similar to all OCM plug-in modules. The OPSAB software is fully automatic and constantly monitors parameters as outlined in Section 5.4. These parameters are stored in the modules EEPROM and/or micro-controller. Some may be changed via external communications. As with all modules in the OCM product range, the OPSAB is designed for local and remote monitoring and control, without NMS3 software packages. 5.1.1 Software The OPSAB will operate correctly only with OCM software version V3.0 or later. 5.1.2 Release History Version 3.82 is the first version released. 5.1.3 Factory Defaults / EEPROM Settings The OPSAB has been factory set with the following settings: MODE: AUTO/SET Set-up range Option–OVL Option–OSL Option–OSS Option–OSH OVL OSL OSS* OSH A_MAX -15 dBm +4 dBm +14 dBm +22 dBm A_MIN -29.5 dBm -10 dBm 0 dBm +7 dBm B_MAX -15 dBm +4 dBm +14 dBm +22 dBm B_MIN -29.5 dBm -10 dBm 0 dBm +7 dBm * These are the defaults for the standard (non-optical sensing) OPSAB. OPT_SEN: 0 – external sensing options OPT_SEN: 1 – internal sensing options OP_MODE: 0 Page 14 of 28 28 September 2011 Pacific Broadband Networks Downloaded 12.10.2011 by [email protected]. Reproduction without consent is prohibited. OPSAB Product User Manual 5.1.4 OCM Program Structure The example shows the OPSAB in slot 9. ENTER PBN STATUS NO URGENT ALARMS ALARMS M9 P01 xxxxxxxxxxxxxxxx ALARMS M9 P00 NO ALARMS MODULES OPSAB M9 P01 Z ALARMS M9 P32 xxxxxxxxxxxxxxxx MODULES M9 P01 OPSAB-OSS Z MODULES M9 P32 NOT USED Z CONTROL1 M9 T MODE AUTO/SET O CONTROL1 M9 T MODE AUTO/SET O CONTROL2 M9 OK CONTROL1 M9 MODE MANUAL CONTROL2 M9 OK T CONTROL3 M9 OK T T O T O CONTROL2 M9 T A_MAX +10.0dBm O O CONTROL2 M9 T A_MIN +1.0dBm O Z CONTROL2 M9 T B_MAX +10.5dBm O CONTROL2 M9 T B_MIN +1.5dBm O Pacific Broadband Networks CONTROL2 M9 OPT_SEN 1 T CONTROL2 M9 OP_MODE 1 T 28 September 2011 Downloaded 12.10.2011 by [email protected]. Reproduction without consent is prohibited. Z Z Page 15 of 28 OPSAB Product User Manual 5.2 OCM User Interface Lock for Control Variable Access OCM software version 4.0 and above has a keypad lock and unlock feature for accessing the control variables. This is so that only the trained technician has the ability to change any of the CONTROL variables, restricts an unauthorised person from modifying the control variables, and prevents tampering. The OCM user interface will require the keypad unlock sequence to be input by the user if they intend to access any of the CONTROL variables for any given module. This includes the LCD’s CONTRAST level. With the keypad locked, the user has access to the following menu items only: PBN STATUS, ALARMS and MODULES. When the keypad is unlocked, access to CONTROL1, CONTROL2 and CONTROL3 becomes available. 5.2.1 Unlock access to CONTROL variables 1. Ensure that the display is at the home screen with PBN STATUS displayed. If you are not sure of your location in the menu, press ENTER twice to go to the home screen. 2. Press the right arrow key four times. 3. Press ENTER once. You now have full access to the CONTROL menu items. The interface is in its unlocked condition. The user has access to six menu items. They are: PBN STATUS, ALARMS, MODULES, CONTROL1, CONTROL2 and CONTROL3. 5.2.2 Lock access to CONTROL variables There are three ways to lock access to CONTROL variables: Resetting the power Automatic time-out Manual operation By resetting the power, the interface will start up in the locked condition by default. Automatic time-out happens when there has been no activity (key pressing) for 15 minutes. This will also bring the display back to the PBN STATUS menu. Manual Operation 1. Ensure that the display is at the home screen with PBN STATUS displayed. If you are not sure of your location in the menu, press ENTER twice to go to the home screen. 2. Press the left arrow key once. 3. Press ENTER once. You have now locked access to the CONTROL menu items. Page 16 of 28 28 September 2011 Pacific Broadband Networks Downloaded 12.10.2011 by [email protected]. Reproduction without consent is prohibited. OPSAB Product User Manual 5.3 Programming Sequence for OPSAB The user has the ability to perform the following functions on the OPSAB via the OCM user interface. Select the module within the OCM for monitoring and montrolling. Check all 32 parameters in the OPSAB. Select either AUTO or MANUAL switching. Define the optical range for channel A and channel B. Select either internal or external sensing. Select automatic switching mode. 5.3.1 Select the module within the OCM for monitoring and controlling To change the module displayed on the OCM user interface, move the flashing cursor right using the right key. Then select the required module using the up and down keys, for example: Pacific Broadband Networks 28 September 2011 Downloaded 12.10.2011 by [email protected]. Reproduction without consent is prohibited. Page 17 of 28 OPSAB Product User Manual 5.3.2 Check all 32 parameters in the OPSAB Other than the LED display on the front panel, the OPSAB also provides diagnostic information regarding the OPSAB. These include optical input powers and temperature etc. This information is displayed under the “MODULES” sub-menu on the OCM user interface. 5.3.3 Select either AUTO or MANUAL switching The OPSAB can operate in either automatic or manual switching mode. In automatic mode, the OPSAB makes a decision (based on the user’s settings) as to which state the switch should be in. In this state the OPSAB can automatically switch from a state with an invalid input (for example if a fibre is cut), to a valid input (the redundant fibre). In manual mode, the user determines the state that the switch is in. Page 18 of 28 28 September 2011 Pacific Broadband Networks Downloaded 12.10.2011 by [email protected]. Reproduction without consent is prohibited. OPSAB Product User Manual 5.3.4 Define the optical range for channel A and channel B The OPSAB requires the user to specify a minimum and maximum optical level for each channel (A and B). If the actual optical level is within the specified minimum and maximum, the optical input is deemed valid. If the actual optical level is less than the specified minimum or greater than the specified maximum then the optical input is deemed invalid. For example: With a minimum specified as +3 dBm, and a maximum specified as +6 dBm, an optical input of +5 dBm is valid whilst an optical input of +2 dBm is invalid. The four parameters that specify the minimum and maximum levels are A_MIN, A_MAX, B_MIN, and B_MAX which are the specified minimum for channel A, maximum for channel A, minimum for channel B and maximum for channel B respectively. Note: To alter the limits CONTROL1 must be in “AUTO/SET” mode. To change the levels see below. The example shows how to set the minimum level for channel A (A_MIN) to +3 dBm. Pacific Broadband Networks 28 September 2011 Downloaded 12.10.2011 by [email protected]. Reproduction without consent is prohibited. Page 19 of 28 OPSAB Product User Manual 5.3.5 Select either internal or external sensing There are two distinct OPSAB versions, a basic model that uses voltage levels from PBN’s range of laser transmitters and an optical sensing model that monitors the optical level internally. The optical sensing version has four optical power sensing ranges, for a variety of different applications, OVL, OSL, OSS and OSH. One of the OPSAB parameters is OPT_SEN. This is used to specify whether to use internal or external optical sensing. A “0” specifies external sensing, whilst a “1” specifies internal sensing Depending on the OPSAB model, there are different options for external or internal sensing. The basic version (non-optical sensing) has OPT_SEN set to “0”, and this cannot change as it does not have the capability to use internal sensing. The very low power model ( – OVL) has OPT_SEN set to “1”, and this cannot change as it does not have the capability to use external sensing. The table below shows all the possibilities: OPT_SEN “0” (external sensing) OPT_SEN “1” (internal sensing) OPSAB-[Y] YES NO OPSAB-[Y]-OVL NO YES OPSAB-[Y]-OSL NO YES OPSAB-[Y]-OSS YES YES OPSAB-[Y]-OSH YES YES To change the optical sensing from external to internal: Page 20 of 28 28 September 2011 Pacific Broadband Networks Downloaded 12.10.2011 by [email protected]. Reproduction without consent is prohibited. OPSAB Product User Manual 5.3.6 Select automatic switching mode The user can define which mode of operation to run when set to automatic switching. There are three options: OP_MODE 0: peer-to-peer mode. This sets both channels with the same priority. The switch will stay in the current state (assuming it is valid) and only switch if the current state fails. For example, in the case of failure to the current optical channel, the OPSAB will switch to the other channel (assuming it is valid). When the failed optical channel returns to a valid state, the switch will remain on the current channel. Operator intervention is required to switch the unit back to the original channel. OP_MODE 1: Channel A is master and channel B is slave. This sets channel A as the priority channel. The switch will always switch to channel A if it is valid. For example, in case of failure of optical channel A, the OPSAB will switch to channel B (provided channel B is valid). When channel A returns to a valid state, the switch will automatically switch back to channel A. Operator intervention is not required to switch the unit back to channel A. OP_MODE 2: Channel B is master and channel A is slave. This sets channel B as the priority channel. The switch will always switch to channel B if it is valid. For example, in case of failure of optical channel B, the OPSAB will switch to channel A (provided channel A is valid). When channel B returns to a valid state, the switch will automatically switch back to channel B. Operator intervention is not required to switch the unit back to channel B. To change the mode of operation from MODE 0 (peer to peer) to MODE 1 (A master, B slave): Pacific Broadband Networks 28 September 2011 Downloaded 12.10.2011 by [email protected]. Reproduction without consent is prohibited. Page 21 of 28 OPSAB Product User Manual 5.4 OPSAB – Parameter List and Alarm Limits Parameter Display (examples only) Description 01 OPSAB-OSS Module number of the unit. 02 S/N 1234567 Unique serial number of the unit. 03 C00296 V3.8 Firmware reference and version number. 04 A00806 PBN’s part number for the unit. 05 SLOT_NUM 4 Module position in the OCM. 06 MODTEMP 28C 07 CHA_EXT 7.0dBm O Optical level on channel “A”, external sensing, (will display only when OPT_SEN = 0) O – Optical level is valid N – Optical level is < MIN or > MAX 08 CHB_EXT 7.5dBm O Optical level on channel “B”, external sensing, (will display only when OPT_SEN = 0) O – Optical level is valid N – Optical level is < MIN or > MAX 09 NOT USED Z 10 NOT USED Z 11 CHA_IN +7.0dBm O Optical level on channel “A”, internal sensing, (will display only when OPT_SEN = 1) O – Optical level is valid N – Optical level is < MIN or > MAX 12 CHB_IN +7.5dBm O Optical level on channel “B”, internal sensing, (will display only when OPT_SEN = 1) O – Optical level is valid N – Optical level is < MIN or > MAX 13 NOT USED Z 14 NOT USED Z 15 ALM_LED_R OFF Z State of red ALARM LED 16 ALM-LED_G ON Z State of green ALARM LED 17 OPSAB_ALMC OK Z Status of the modules common alarm. If the OPSAB has any urgent alarms, this parameter will read “ALM”, and the display on the LCD will flash. 18 NOT USED 19 MODE AUTO/SET Mode setting either Auto or Manual. 20 OP_MODE Used internally. 21 NOT USED 22 SW_STATE Page 22 of 28 O Temperature inside the module. Z Z CHA State of switch. 28 September 2011 Pacific Broadband Networks Downloaded 12.10.2011 by [email protected]. Reproduction without consent is prohibited. OPSAB Product User Manual Parameter Display (examples only) Description 23 OP_MODE Used internally. 24 CHA_MAX +10.0dBm O Maximum valid input level for channel “A” 25 CHA_MIN +1.0dBm O Minimum valid input level for channel “A” 26 CHB_MAX +10.5dBm O Maximum valid input level for channel “B” 27 CHB_MIN +1.5dBm O Minimum valid input level for channel “B” 28 OPT_SEN 1 Optical sensing: 0 – External sensing. 1 – Internal sensing. 29 OP_MODE 0 Operation mode: 0 – peer to peer. 1 – “A” master, “B” slave. 2 – “A” slave, “B” master. 30 OP_LEVEL_ALM Z Optical level alarm: O – No alarm. N – Non-urgent alarm. “A” or “B” invalid level U – Urgent alarm. “A” and “B” invalid level 31 NOT USED Z 32 NOT USED Z Note: The above values displayed are for monitoring purposes only and may vary in accuracy up to 10%. Status character definitions O indicates Normal N indicates Non-Urgent Alarm U indicates Urgent Alarm Z indicates No Alarm State Pacific Broadband Networks 28 September 2011 Downloaded 12.10.2011 by [email protected]. Reproduction without consent is prohibited. Page 23 of 28 OPSAB Product User Manual 6 Specifications Optical Performance Optical wavelengths: 1310 nm to 1550 nm Optical isolation A to B: > 60 dB Insertion loss (From input A or B to common output) OPSAB-Y: < 1 dB OPSAB-Y-OS/S/L/H: < 2 dB Optical connectors: SC/APC, E2000/APC, FC/APC Switch Performance Basis of automatic switching decision (model dependent) OPSAB-[X]: External reference voltage levels from Tx OPSAB-[X]-OSS: OPSAB-[X]-OSL: OPSAB-[X]-OSH: OPSAB-[X]-OVL: Modes of automatic switching (user programmable) Mode 0: Optical sense, 0 dBm to +14 dBm Optical sense, -10 dBm to +4 dBm Optical sense, +7 dBm to +22 dBm Optical sense, -30 dBm to -15 dBm Peer-to-peer Mode 1: Master A – slave B Mode 2: Master B – slave A Manual operation: Local override A-B selection via CPM Alarm warning output: Alarms to system via OCMC back-plane, LED indicators on front panel 40 ms (typical) Switching speed after detection: General Power: Powered by OCM chassis Operating temperature: 0 C to 45 C Dimensions (H x W x D): 160 x 44 x 360 mm Ship size (H x W x D): 280 x 70 x 570 mm Weight: 1.0 kg Ship weight: 1.5 kg Page 24 of 28 28 September 2011 Pacific Broadband Networks Downloaded 12.10.2011 by [email protected]. Reproduction without consent is prohibited. OPSAB Product User Manual 7 Product Warranty Pacific Broadband Networks warrants its equipment to be free of manufacturing defects in material and workmanship for a period of one year from date of shipment, provided it is installed and operated in accordance with factory recommendations. The liability of Pacific Broadband Networks under this warranty is solely limited to repairing; replacing or issuing credit provided that: 1. The warranty registration has been completed and received by Pacific Broadband Networks. 2. Pacific Broadband Networks’ helpdesk is promptly notified in writing or by telephone that a failure or defect has occurred. 3. A return authorisation number is obtained from Pacific Broadband Networks’ helpdesk and clearly marked on the outside of the shipping container and all documents. 4. Customer is responsible for all shipping and handling charges. C.O.D. and freight collect will not be accepted without prior approval from Pacific Broadband Networks’ helpdesk. 5. The equipment (in PBN’s sole discretion) has not been abused, misused or operated under conditions outside manufacturer’s specifications. The warranty does not cover the following: 1. Products purchased from someone other than an authorised Pacific Broadband Networks dealer. 2. Damage caused by accident, negligence, misuse, abuse, improper operation or failure to operate the equipment within the manufacturer’s specifications. 3. Damage caused by fluctuation in electrical current, lightning, power surges, etc. 4. Damage resulting from overhaul, repair or attempt to repair caused by someone other than Pacific Broadband Networks’ qualified service personnel. 5. Any product, in which the serial number has been defaced, modified or removed. 6. Any product that has been opened or modified without prior written permission from PBN. 7. Replacement of parts necessitated by normal wear and tear. 8. Any consequential or implied damages. Pacific Broadband Networks 28 September 2011 Downloaded 12.10.2011 by [email protected]. Reproduction without consent is prohibited. Page 25 of 28 OPSAB Product User Manual 8 Declaration of Conformity According to ISO/IEC Guide 22 and EN45014 Manufacturer's Name: Pacific Broadband Networks Manufacturer’s Address: 8-10 Keith Campbell Court, Scoresby, Victoria 3179, Australia Declares, that the product Product Name: OPSAB – Optical protection switch Conforms to the following standards: Safety: EN 80083-1, EN 60950, IEC 950, AS/NZS 3260:1993, EN-60825-1, IEC 825-1, AS/NZS 2211.1 Laser Safety EMC: EN 50083-2, EN-55022:1994, IEC/CISPR 22:1993, AS/NZS CISPR 22:2006 CATV/HFC: EN-50083 Supplementary Information: CE This is a class A product. In a domestic environment, this product may cause radio interference in which case the user may be required to take adequate measures. The product herewith complies with the requirements of the following directives and carries the CE-marking accordingly: The EMC Directive 89/336/EEC The Low Voltage Directive 73/23/EEC The product was tested in a typical configuration with Pacific Broadband Networks. FCC WARNING This equipment has been tested and found to comply with the limits for class A device, pursuant to Part 15 of FCC rules. These limits are designed to provide reasonable protection against harmful interference in a commercial installation. This equipment generates uses and can radiate radio frequency and, if not installed in and used in accordance with the instructions, may cause harmful interference to radio communication. Operation of this equipment in a residential area is likely to cause harmful interference, in which case, the user will be required to correct the interference at the user’s own expense. For Compliance Information ONLY, contact: Australia: Pacific Broadband Networks 8-10 Keith Campbell Court, Scoresby, Victoria 3179, Australia Phone:+61-3-9780-5100, Fax +61-3-9763-5522 Email: [email protected] Europe: Pacific Broadband Networks Phone: +31-36-536-8011, Fax: +31-36-536-4367 Email: [email protected] China: Pacific Broadband Networks Phone: +86-10-5791-0655, Fax: +86-10-5791-0855 Email: [email protected] Americas: Pacific Broadband Networks Americas LLC Phone: +1-703-579-6777 x 567, Fax: +1-703-935-4506 Email: [email protected] Page 26 of 28 28 September 2011 Pacific Broadband Networks Downloaded 12.10.2011 by [email protected]. Reproduction without consent is prohibited. OPSAB Product User Manual This page intentionally left blank. Pacific Broadband Networks 28 September 2011 Downloaded 12.10.2011 by [email protected]. Reproduction without consent is prohibited. Page 27 of 28 Offices: China, Beijing : tel. +86-10-5791-0655 Americas, Florida : tel. +1-703-579-6777 AsiaPac, Melbourne : tel. +61-3-9780-5100 Australia, Melbourne : tel. +61-3-9780-5100 EMEA, Netherlands : tel. +31-36-536-8011 [email protected] www.pbnglobal.com © 2011 Pacific Broadband Networks. All rights reserved. Downloaded 12.10.2011 by [email protected]. Reproduction without consent is prohibited.