1
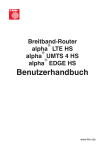
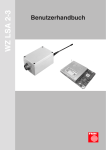
alpha DFM 5/868
®
User Manual
�����
���
��������
���������
�
�
Table of contents
Table of contents ........................................................................................................................................................................... 2
Safety precautions ........................................................................................................................................................................ 3
General product description ........................................................................................................................................................ 4
Possible applications .................................................................................................................................................................... 5
Functional elements...................................................................................................................................................................... 5
Interfaces........................................................................................................................................................................................ 6
Putting into operation ................................................................................................................................................................... 7
Delivery status.............................................................................................................................................................................. 7
Putting the radio module into operation ...................................................................................................................................... 7
Possible settings in command mode .......................................................................................................................................... 8
Modes of the radio module........................................................................................................................................................... 8
Commands in command mode .................................................................................................................................................... 9
Usable frequencies .................................................................................................................................................................... 10
Setting the interfaces ................................................................................................................................................................. 11
Setting the RS232 interface or settings at the terminal program........................................................................................... 11
Setting the USB interface........................................................................................................................................................... 13
Automatic USB driver installation......................................................................................................................................... 13
Manual USB driver installation ............................................................................................................................................. 15
Checking the USB driver settings ........................................................................................................................................ 18
Antennas ...................................................................................................................................................................................... 19
Technical data.............................................................................................................................................................................. 20
Data rates of the radio module .................................................................................................................................................. 20
Conformity ................................................................................................................................................................................... 21
Information regarding the used trademarks
Microsoft® and Windows® are registered trademarks of the Microsoft Corporation. All other trade and product
names are trademarks or registered trademarks of the respective companies.
2
Safety precautions
Safety precautions
Attention!
l The relevant regulations for installation and operation of electrical installations have to be observed
(e. g. RL 1999/92/EG, RL94/9EG, ElexV, IEC/EN 60 079-14 and VDE 0100).
l The operator of an electrical installation in an explosion-endangered environment has to keep the
equipment in proper condition, duly operate it, control it and carry out maintenance as well as repair
works (ElexV and EN 60 079-14).
l The detailed knowledge and the technically correct realization of the installation guidelines, safety
precautions and functions described in this user manual are essential to the safety of the operation.
l The safety of the product requires an appropriate transport, an appropriate storage, installation and
operation.
l Intervention in the product may only be made by qualified personnel that is familiar with the user
manual.
l When observing the handling instructions and the safety-related instructions, no dangers regarding
damages to properties and to persons come from the product in normal case.
l Only use the unit for the allowed application. Mind the EC-type examination certificate.
l Faulty or improper use as well as the noncompliance with the instructions of this user manual exclude a
warranty by the manufacturer.
ESD protection measures
Comply with the ESD protection measures according to DIN EN 61340-5-1/2 when opening the unit
(potential equalization between body and ground of the unit as well as ground of the casing via highvalue resistance (approx. 1 MOhm) e. g. by means of a usual wrist band).
The following regulations have to be observed:
l
l
l
l
l
l
l
national safety regulations
national rules for the prevention of accidents
national regulations for mounting and installation
generally approved rules of the technique
safety precautions of this user manual
characteristic values and measuring operating conditions of the type and data plates
additional signboards on the unit
Avoid to touch conductive parts of the unit.
Do not open the unit, only permit repairs by the manufacturer.
Mind the valid legal provisions for the protection of persons in electromagnetic fields when installing the
antenna.
Read the user manual carefully to be able to use the wealth of features of your new alpha DFM 5/868.
You can also find further information on our website http://www.fmncom.com.
3
General product description
General product description
By means of two radio modems alpha DFM 5/868, a transparent RS232 track (half-duplex) can be set up. Therefore, a very simple cable replacement can be realized. Within the first 60 seconds after connection of the power
supply, the configuration mode can be activated in which different parameters of the unit can be set by means of a
terminal program.
The following picture shows an example:
�����������
���������������
�����������
���
���
Advantages:
l high data rate up to 50 kbits/s 1)
l high range up to approx. 400 m 1)
l very simple operation and configuration
l point-to-point and point-to-multipoint connection (addressing)
l secured or unsecured transmission
l possibility to connect an external antenna
l interface RS232, USB (optional LAN)
1)
4
higher data rates or higher range on request
General product description
Possible applications
l Cable replacement for the serial interface (RS232), USB (Host to Host) and optional LAN (virtual COM-Port
driver)
l M2M Machine to Machine (data communication of machines, vehicles, containers, automatic machines or
other objects with a central control point)
l Traffic management systems (bus stop information)
l Transmission of measured values
Functional elements
The radio module is an interface between a radio channel and an RS232 or USB connection. This connection can
e. g. be realized at a PC, an SPS or other objects with a central control point or at external units. Connections over
RS232 and USB are available for this.
There are two LEDs at every radio module. The green LED indicates the operation of the module (glowing when the
module is active) and the red LED indicates correctly transmitted and received packets of data.
Status LED (red) glowing for approx. 50 ms:
Status LED (red) glowing for approx. 500 ms:
packet of data transmitted correctly
packet of data received correctly
��������������
���
Fig.1: Functional elements FM LED and antenna sockets
PIN
Designation
Function
X.1
Interior contact
signal
X.2
External contact
ground
Table 1: Assignment of the antenna socket
LED
Colour
Function
red
status
green
operation
Table 2: Assignment of the LEDs
5
General product description
Interfaces
The power supply is possible via the USB interface. Alternatively, the power supply can also be realized over a
power supply unit.
����������������������������
����������
������������
Fig. 2: Functional elements RS232 socket, USB socket and socket for power supply unit
PIN
Designation
Function
X.1
N.C.
not connected
X.2
RXD
received data
X.3
TXD
transmission data
X.4
N.C.
not connected
X.5
GND
ground
X.6
N.C.
not connected
X.7
RTS
transmitting request data
X.8
CTS
receiving readiness data
X.9
N.C.
not connected
Table 3: PIN assignment of the RS232 socket
PIN
Designation
Function
X.1
VCC
X.2
D-
data
X.3
D+
data
X.4
GND
+5 V supply voltage
ground
Table 4: PIN assignment of the USB socket
PIN
Designation
Function
X.1
Interior contact
positive supply voltage
X.2
External contact
ground
Table 5: PIN assignment of the power supply unit socket
6
Putting into operation
Putting into operation
Delivery status
The parameters of the radio module alpha DFM 5/868 are set to the following values ex works:
l data rate:
115.200 baud, 8 data bits, no parity bit, 1 stop bit and protocol RTS / CTS Handshake
(see chapter “Setting the RS232 interface or settings at the terminal program”)
l myaddr:
0
l destaddr:
Broadcast operation (unconfirmed transmission)
l paclen:
245
l freq:
6
l retry:
15
By means of the command “restoredefault”, this delivery status can be restored.
Putting the radio module into operation
In order to be able to transmit data for first testing purposes by means of a terminal program (e. g. Hyperterminal),
just the above mentioned interface parameters have to be set at the computer. Further configurations are not
necessary in normal case.
Basically, you have to differentiate between pure data operation (Transparent mode) and command operation
(Command Mode). In data operation, the data exchange is realized between the single radio sets. In command
operation, for example the frequency of the radio set, the addressing and the interface parameters can be
programmed.
The unit is in data mode immediately after connection of the operating voltage. This means, data can be
transmitted immediately. But within the first 60 seconds after connection of the power supply, you can also switch
to command operation for configuration purposes.
In command mode, the interface parameters can be set. In this mode, no data transmission is possible. By means
of the Exit command, the command mode is left and data may be transmitted immediately.
To be able to make settings at the alpha DFM radio modem via a terminal program, the following settings of the
interface (default values) have to be selected:
115200 - 8 - N - 1 RTS / CTS-Handshake.
For RS232 operation, no software settings are necessary.
To be able to use the USB interface (virtual Com-Port), the provided driver has to be installed.
(see chapter “Setting the USB interface”)
Modi:
Command Mode
Transparent Mode
—>
—>
setting all device parameters (see possible settings)
transparent data transmission by radio with data protocol,
confirmed or unconfirmed transmission (CRC & Ack)
7
Possible settings
Possible settings in command mode
RS232 parameters:
Data bits 7 or 8
Stop bits 1 or 2
Parity NO, ODD, EVEN
Baud rate 1200, 2400, 4800, 9600, 14400, 19200, 38400, 57600, 76800 and 115200
Protocol HW or NO
User data length:
from 1 byte up to max. 245 byte
Destination address:
Address range from 1 up to 65023 for point-to-point connections (confirmed, secured transmission)
Broadcast (unconfirmed, secured transmission “BR=ON”, see chapter “Commands in Command Mode”)
Own address:
Address range from 1 up to 65023
Frequency:
Channel 1 up to 6
Max. number of packet repetitions:
1 up to 15 or unlimited
Modes of the radio module
Only within the first 60 seconds after connection of the power supply, it is possible for the user to change to
command mode. Within this period, the user has to – before other data can be transmitted – press the keys
“Control” “C” or to send the control character 0x03, then the radio module switches to Command Mode. In the
terminal program, the device message (version and serial number) as well as an input prompt then appear.
Now, all important parameters can be read out and be configured newly, if necessary (see in the following chapter
“Commands in Command Mode”).
By entering “exit”<CR>, the radio module changes to Transparent Mode and is now ready to transmit and
receive.
At the same time, all changed parameters are saved and afterwards taken over and executed.
8
Possible settings
Commands in command mode
Command
Meaning
Possibilities
Config <CR>
Currently set parameters are displayed
Listing of the following parameters:
Baudrate
Databits
Stopbits
Parity
Protocol
Myaddr
Destaddr
Paclen
Freq
Baudrate=<Baudrate><CR>
Setting baud rate
e. g. Baudrate=38400<CR>
adjustable baud rates are:
1200, 2400, 4800, 9600, 14400, 19200,
38400, 57600, 76800 or 115200
Databits=<Databits><CR>
Setting data bits
e. g. Databits=8<CR>
7 or 8 data bits adjustable
Stopbits=<Stopbits><CR>
Setting stop bits
Parity=<Parity><CR>
Setting parity
e. g. Stopbits=1<CR>
1 or 2 stop bits adjustable
e. g. Parity=NO<CR>
NO, ODD or EVEN
Protocol=<X><CR>
Handshake of the RS232 interface
X=HW (hardware / RTS-CTS)
Myaddr=<X><CR>
Setting own address for the connection oriented operation
e. g. Myaddr=1<CR>
Destaddr=<destination address><CR>
Setting destination address
e. g. Destaddr=65023<CR>
X=NO (no handshake)
possible destination addresses can be
1 to 65023
Paclen=<user data length><CR>
Indication of the user data lenght
(Payload) in byte
e. g. Paclen=245<CR>
Freq=<channel number><CR>
Setting the der transmitting and
receiving frequency
e. g. Freq=6<CR>
Exit<CR>
Saving the current configuration and
leaving the Command Mode
Ends the command mode and changes
to transparent mode, it is only possible
to send and to receive data in this mode
Retry=<W><CR>
Max. number of packet repetitions in
connection-oriented operation
W=1 ... 15
Broadcast operation on / off
X=ON: Broadcast operation on
Br=<X><CR>
1 up to max. 245 byte
user data length adjustable
channel 1 to 6 selectable
W=NO LIMIT: unlimited
(no confirmation)
X=OFF: connection oriented operation
(P2P, confirmed transmission)
Restoredefault<CR>
Restoring default settings
Table 6: Command syntax and semantics
9
Possible settings
Usable frequencies
Channel number
Frequenzy range in MHz
1
868.150
2
868.450
3
868.825
4
869.075
5
869.525
6
869.850
Table 7: Adjustable operating frequencies of the radio modules
10
Setting the interfaces
Setting the interfaces
Setting the RS232 interface or settings at the terminal program
In case your computer has a free COM-Port (9-pole), you can use this connection for the connection with the radio
module. Then it will not be necessary to install additional drivers.
The parametrisation can be done with any terminal program.
The manufacturer recommends to use the program Hyperterminal from Microsoft Windows.
��
����� ��� ��������� ������������� ����
����� � ��������� � ������� �
������������� � �������������
����� � ���� ��� ��� ���������� ���� �� �� ��
����������� �����
���� �� �� ������������ ����� ��������
��
������ ��� ������������� �� ��� ���������
�� ����� ��� ������ ��� ����� ������
����������
��
����� ��� ��� ��������� ��������
��������� ����� ������
������ �����
��������� ����� ������
� ���
������� ���������
����� ������
��������� ������ ������
� ���
�������������� ����� ��������� ��������
11
Setting the interfaces
��
������ ��� ���� ���� ���������������
������������ ����� ������� �������
��
������ ��� ���� ��������������� ����������
��� ����� �� ��� ������
��������������������� ������ ���������������
��
�� ��� ������ �������������������
������ ��������������� ���� ��� ���������
���������
�������������
� ����������� ������� �����
� ������������������ � ��
� ������������������� � ��
�������������
� ��������� ������ �� ��������������� ���������
After confirming the options, the terminal program is ready to send and to receive.
When using another terminal program, the settings have to be carried out like explained in the example of the
Hyperterminal program.
12
Setting the USB interface
Setting the USB interface
In case your PC is equipped with an USB interface, you can use this connection for the connection with the radio
module. Install the supplied USB driver as described following.
Automatic USB driver installation
1. Connect the radio module alpha DFM 5/868 with the computer by means of an USB cable. A message about
newly found hardware is displayed. If this is not the case, please read the chapter “Manual USB driver installation”.
Fig. 3: New hardware found
2. Click on “Weiter” (Next) in the next window.
Fig. 4: Assistant for searching new hardware
3. Click on “Weiter” (Next) in the next window.
Fig. 5: Assistant for searching new hardware, install driver
4. Click on “Weiter” (Next) in the next window.
13
Setting the USB interface
Fig. 6: Select driver source
The driver is now searched on the supplied CD and installed.
5. Click on “Weiter” (Next) in the next window.
Fig. 7: Driver files found
6. Click on “Fertig stellen” (Finish) in the next window.
Fig. 8: Finish driver installation
With this step, the driver installation is finished.
14
Setting the USB interface
Manual USB driver installation
In case you see the following symbol down right in the corner of the screen after connecting the radio module
alpha DFM 5/868 and the dialogue for installing the USB driver does not appear, the USB hardware of the radio
module was not detected automatically.
Fig 9: USB hardware that was not detected
You can install the required driver manually with the following steps:
1. Open the device manager with:
START à Einstellungen à Systemsteuerung à System à Hardware à Geräte-Manager.
Fig. 10: Open device manager
2. Open the properties dialogue of the unit "CP2101 USB to UART Bridge Controller" by a double-click. This is
marked by a yellow exclamation mark.
Fig 11: Open properties dialogue
3. Click on "Treiber erneut installieren…" (Install driver again...) in the properties dialogue.
15
Setting the USB interface
Fig.12: Properties dialogue, install driver again
4. Click on “Weiter” (Next) in the next window.
Fig. 13: Assistant for updating device drivers
5. Click on “Weiter” (Next) in the next window.
Fig.14: Assistant for searching new drivers
6. Insert the supplied CD into the CD-ROM drive.
16
Setting the USB interface
Select "CD-ROM-Laufwerke" (CD-ROM drives) as source for the driver search.
Click on "Weiter" (Next).
Fig. 15: Select the source for the driver
7. Finish the installation with "Fertigstellen" (Finish).
Fig. 16: Finish the manual driver installation
If you can still see a yellow exclamation mark in the device manager, please carry out the instructions of this
chapter a second time.
17
Setting the USB interface
Checking the USB driver settings
To check the correct installation of the USB driver, please proceed as follows and open:
1. Start à Einstellungen à Systemsteuerung à System à Hardware à Gerätemanager
2. Click on the "+" in front of "Anschlüsse (COM und LPT)" (Connections (COM and LPT))
Fig.17: Device manager
3. Twice click on the entry: "CP2101 USB to UART Bridge Controller (COMx)".
A new COM-Port (COMx) should be entered here now. The "x" stands for the respective COM-Port that has to be
set, e. g. COM2.
4. Then select the button "Anschlusseinstellungen".
5. Check the following settings:
bits per second: 115200
data bits:
8
parity:
none
stop bits:
1
flow control:
hardware (CTS / RTS)
6. Close the window and terminate the device manager.
If all installations are correct, a new COM-Port for the communication with the radio module is available now.
18
Antennas
Antennas
When visibility is clear, ranges of up to 400 m are possible by means of standard antennas between the modules.
By means of a gain antenna, receiving and transmitting
properties of the wireless measurement system can be improved.
All antennas for the ISM band 868 MHz can be used in principle. Omnidirectional antennas with an antenna gain
> 0 dBi are recommended. When purchasing an antenna, mind the required SMA plug at the connection cable.
The antenna radiator may in no case touch conductive parts (e. g. plates, heaters, cable, PC housings, etc.) or be
shielded by these.
If possible, there should be a visual contact to the opposite station.
Mind that all antennas of the modules are operated in the same operating position (e. g. all antennas are standing
vertically).
Electrical devices like computers etc. can generate interference fields that reduce the range.
If not given otherwise, the limits of the ETSI EN 300 220 and ETSI EN 301 489 will apply.
19
Technical data
Technical data
If not given otherwise, the limits of the ETSI EN 300 220 and ETSI EN 301 489 will apply.
Properties
Value / description
Dimensions L x W x H approx.
98 mm x 72 mm x 47 mm
Weight
approx. 270 g
Classification
SRD class 2, ISM band
Typ of modulation
GMSK
Frequency range
868 MHz
Receiver sensitivity
- 100 dBm @ BER 10 -3
Transmitting power
7 dBm
Range
approx. 400 m in the free field
Operating temperature
- 15 °C to + 55 °C
Supply voltage
7 ... 12 V / 500 mA
Power supply socket
−
Protection class housing version
IP20
Fuse
0,5 - 1 A
Antenna connection
SMA socket
Temperature range storage
- 40 °C ... + 85 °C
Interfaces
RS232: max. data rate 115.2 kbits/s
USB: max. data rate 115.2 kbits/s
+, outside Ø 3.5 mm, inside Ø 1.35 mm
Table 8: General properties
Data rates of the radio module
User data length
(Payload) in byte
Confirmed connection
with Acknowledge P2P 2)
Unconfirmed connection
Broadcast P2M 3)
1 (min.)
900 bit/s
1.4 kbit/s
16
11 kbit/s
16 kbit/s
64
25 kbit/s
33 kbit/s
245 (max.)
38 kbit/s
44 kbit/s
Table 9: Typical data rates (net) RS232
2)
3)
point-to-point connection
point-to-multipoint connectio
The measured values determined in table 9 are typical data rates over the RS232 interface.
20
Conformity
Declaration of conformity
Herewith, the FMN communications GmbH declares that the wireless measurement system complies with
the essential requirements and the other relevant provisions of the directive 1999/5/EG (R&TTE directive).
The complete declarations of conformity can be found in the Internet under http://www.fmncom.com.
21
Notes
22
Copyright
All rights reserved. Duplication of these instructions for use or parts thereof by any reproduction method
whatsoever is not permitted without prior permission of the manufacturer.
Amendments may be published without prior notification. Notwithstanding the above declaration, the
manufacturer accepts no liability for errors in these instructions or their consequences.
23
For the protection of the environment!
Printed on paper bleached without chlorine with a max. waste paper content of 50 %.
FMN communications GmbH
Grimmelallee 4
99734 Nordhausen / Germany
P. O. Box 10 04 65
99724 Nordhausen / Germany
Phone
Fax
Email
Internet
+49 (36 31) 56-34 41
+49 (36 31) 56-32 24
[email protected]
www.fmncom.com
Subject to change.
alpha DFM 5/868
Edition: No. 12/07 (1112-0942)