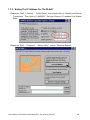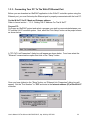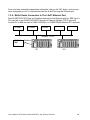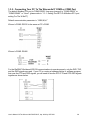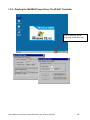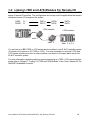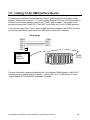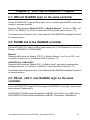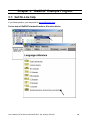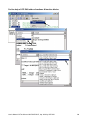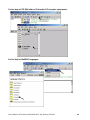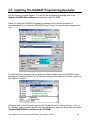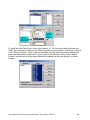
1
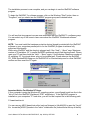
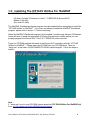
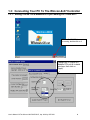
User’s Manual Of The Wincon-8037/8837/8737
Legal Liability
ICP DAS CO., LTD. assumes no liability for any and all damages that may be incurred by the
user as a consequence of this product. ICP DAS CO., LTD. reserves the right to change this
manual at any time without notice.
ICP DAS CO., LTD. constantly strives to provide our customers with the most reliable and
accurate information possible regarding our products. However, ICP DAS CO., LTD. assumes
no responsibility for its use, or for any infringements of patents or other rights of third parties
resulting from its use.
Trademark & Copyright Notice
The names of products are used for identification purposes only, and are the registered
trademarks of their respective owners or companies.
Copyright Mar. 2004, by ICP DAS CO., LTD. All Rights Reserved.
User’s Manual Of The Wincon-8037/8337/8837, Apr. 2004 by ICP DAS
1
Table of Contents
USER’S MANUAL OF THE WINCON-8037/8837/8737.................................................................................................... 1
Legal Liability ................................................................................................................................................................. 1
Trademark & Copyright Notice ...................................................................................................................................... 1
TABLE OF CONTENTS ....................................................................................................................................................... 2
REFERENCE GUIDE............................................................................................................................................................ 3
1. User’s Manual Of The ISaGRAF Embedded Controllers : ......................................................................................... 3
2. VB.net demo program to link to the ISaGRAF program:............................................................................................ 3
3. Upgrade isawincon.exe to higher version:.................................................................................................................. 3
CHAPTER 1: SOFTWARE & HARDWARE INSTALLATION ..................................................................................... 4
1.1: INSTALLING THE ISAGRAF WORKBENCH SOFTWARE PROGRAM ................................................................................. 4
1.2: INSTALLING THE ICP DAS UTILITIES FOR ISAGRAF.................................................................................................. 8
1.3: CONNECTING YOUR PC TO THE WINCON-8X37 CONTROLLER .................................................................................... 9
1.3.1: Setting The NET-ID & Modbus RTU port setting For The W-8x37..................................................................... 9
1.3.2: Setting The IP Address For The W-8x37............................................................................................................ 10
1.3.3: Connecting Your PC To The W-8x37 Ethernet Port .......................................................................................... 11
1.3.4: Multi-Clients Connection to The I-8x37 Ethernet Port...................................................................................... 12
1.3.5: Connecting Your PC To The Wincon-8x37 COM2 or COM3 Port.................................................................... 13
1.3.6: Deleting the ISaGRAF Project From The W-8x37 Controller........................................................................... 14
1.4: LINKING I-7000 AND I-87K MODULES FOR REMOTE I/O ........................................................................................... 15
1.5: LINKING TO AN HMI INTERFACE DEVICE .................................................................................................................. 16
CHAPTER 2: LINK HMI TO ISAGRAF PROGRAM ................................................................................................... 17
2.1: HMI AND ISAGRAF LOGIC ON THE SAME CONTROLLER ............................................................................................. 17
2.2: PC/HMI LINK TO THE ISAGRAF CONTROLLER ........................................................................................................... 17
2.3: VB.NET , EVC++ AND ISAGRAF LOGIC ON THE SAME CONTROLLER ......................................................................... 17
CHAPTER 3: ISAGRAF EXAMPLE PROGRAM.......................................................................................................... 18
3.1:
3.2:
3.3:
3.4:
3.5:
GET ON-LINE HELP ..................................................................................................................................................... 18
INSTALLING THE ISAGRAF PROGRAMMING EXAMPLES ............................................................................................ 21
R/W FLOAT VALUE FROM/TO COMPACT FLASH .......................................................................................................... 23
R/W LONG INTEGER VALUE FROM/TO COMPACT FLASH ............................................................................................. 23
TO OUTPUT SOMETHING AT A TIME INTERVAL ............................................................................................................ 23
APPENDIX A: SOME SOFTWARE DIFFERENCE BETWEEN W-8037/8337/8737 & I-8417/8817/8437/8837..... 24
User’s Manual Of The Wincon-8037/8337/8837, Apr. 2004 by ICP DAS
2
Reference Guide
1. User’s Manual Of The ISaGRAF Embedded Controllers :
Please refer to
WINCON8000 CD-ROM: \napdos\isagraf\wincon\english_manu\user_manual_i_8xx7.pdf or
I-8000 CD-ROM: \napdos\isagraf\8000\english_manu\ "user_manual_i_8xx7.pdf"
2. VB.net demo program to link to the ISaGRAF program:
Please refer to
WINCON8000 CD-ROM: \napdos\isagraf\wincon\VB.NET_Demo\VB.net_link_w8337.pdf &
WINCON8000 CD-ROM: \napdos\isagraf\wincon\VB.NET_Demo\demo_xx\ReadMe.txt
3. Upgrade isawincon.exe to higher version:
Please refer to
WINCON8000 CD-ROM: \napdos\isagraf\wincon\driver\Upgrade_w8337.pdf
User’s Manual Of The Wincon-8037/8337/8837, Apr. 2004 by ICP DAS
3
Chapter 1: Software & Hardware Installation
1.1: Installing The ISaGRAF Workbench Software Program
Before you can start programming the Wincon-8037/8337/8737 embedded controller system
with the ISaGRAF software program, you must first install the ISaGRAF Workbench software
program on a target PC.
Hardware Requirements
•
A Personal Computer With At Least A Pentium, 133 MHz Or Faster Processor
•
32 Mbytes Memory (Preferably 64 Mbytes RAM)
•
A Hard Drive With At Least 128 Mbytes Of Storage Space (Preferably Larger)
•
At Least One RS-232 Serial Port
Software Requirements
One of the following computer operating systems must be installed on the target computer
system before you can install the ISaGRAF Workbench software program.
•
Windows 95
•
Windows 98
•
Windows NT Version 3.51 or Windows NT Version 4.0
•
Windows 2000 Or Windows XP
Steps To Installing The ISaGRAF Workbench Program
Insert the ISaGRAF Workbench CD into your CD-ROM drive. Normally the auto-start program
will activate the "install.bat" file automatically. If your computer does not have the auto-start
feature active, use the Windows Explorer and go to the CD-ROM drive where the Workbench
CD is installed, then double-click on the "install.bat" file listed on the ISaGRAF CD. If the
"install.bat" file is not found on your ISaGRAF CD, then double-click on the "ISaGRAF.exe" file
to start the installation process.
Once you have started the "install.bat" file, a dialog box will appear as shown on the next page.
Select the language version of the ISaGRAF software program you would like to use. The
English version is used on all subjects and examples throughout this manual.
User’s Manual Of The Wincon-8037/8337/8837, Apr. 2004 by ICP DAS
4
Once you have selected to install the ISaGRAF Workbench program and selected the desired
language, just press the "Install" button, and follow the step-by-step directions of each dialog
box as they appear to complete the installation process.
The first dialog box to appear allows the user to define what drive and subdirectory the
ISaGRAF program will install into.
The next dialog box asks the user how much of the ISaGRAF program to you wish to install. By
default, it is best to allow all of the ISaGRAF programs to install.
Once you have selected which programs and applications are to be installed, the installation
process begins, and an installation progress dialog box will appear showing the installation
progress.
Once the ISaGRAF Workbench software installation process has been completed, a Windows
Explorer window will appear showing the installed programs.
User’s Manual Of The Wincon-8037/8337/8837, Apr. 2004 by ICP DAS
5
The installation process is now complete, and you can begin to use the ISaGRAF software
program.
To begin the ISaGRAF 3.x software program, click on the Windows "Start" button, then on
"Programs", and you should see the ISaGRAF program group as illustrated below.
You will see that six program icons are now associated with the ISaGRAF 3.x software group.
You can select any of the icons to learn more about the ISaGRAF Workbench software
program.
NOTE: You must install the hardware protection device (dongle) provided with the ISaGRAF
software on your computers parallel port to for the ISaGRAF program to achieve fully
authorized functionality.
While using ISaGRAF and the dongle is plugged well, if the “Help” – “About” says “Maximum
number of IO variables: 32”, it means ISaGRAF workbench cannot find the dongle well. Please
reset your PC and then check the “Help” – “About” again. If it still displays “Maximum number of
IO variables: 32”, the dongle driver may not be installed well. Please execute the ISaGRAF
CD_ROM \Sentinel5382\setup.exe for ISaGRAF-80 or \Sentinel\setup.exe for other ISaGRAF
version and then reset the PC again.
Important Notice For Window NT Users
If your computer is using the Windows NT operating system, you will need to add one line to the
"isa.ini" file in the ISaGRAF Workbench "EXE" subdirectory. If the ISaGRAF program is
installed on your computers "C" hard drive, you will find the required file in the following path:
C:\isawin\exe\isa.ini
You can use any ASCII based text editor (such as Notepad or UltraEdit32) to open the "isa.ini"
file. Locate the [WS001] header in the "isa.ini" initialization file (it should be at the top of the file).
User’s Manual Of The Wincon-8037/8337/8837, Apr. 2004 by ICP DAS
6
Anywhere within the [WS001] header portion of the "isa.ini" initialization file, add the entry
shown below within the [WS001] header:
[WS001]
NT=1
Isa=C:\ISAWIN
IsaExe=C:\ISAWIN\EXE
Group=Samples
IsaApl=c:\isawin\smp
IsaTmp=C:\ISAWIN\TMP
The [WS001] header should now look like the above example. The NT=1 entry addition is
absolutely required for the RS-232 communications to operate properly in the Windows NT
operating environment.
User’s Manual Of The Wincon-8037/8337/8837, Apr. 2004 by ICP DAS
7
1.2: Installing The ICP DAS Utilities For ISaGRAF
The “ICP DAS Utilities For ISaGRAF” consists of 3 major items.
I/O library (Include I/O libraries of I-8xx7, I-7188EG/XG & Wincon-8x37)
Modem_Link utility
Auto-scan I/O utility
The ISaGRAF Workbench software program must be installed before attempting to install the
“ICP DAS Utilities for ISaGRAF”. If you have not already installed the ISaGRAF Workbench
program, please refer to section 1.1 before continuing.
When the ISaGRAF Workbench program is first installed, it contains only the basic I/O libraries.
Users will have to install the appropriate I/O library files and some utilities before you can
properly program the Wincon-8x37, I-8xx7 & I-7188EG/XG series controller.
There is a CD-ROM supplied with each of the Wincon-8x37 controllers with the “ICP DAS
Utilities for ISaGRAF”. Please insert the CD-ROM into your CD-ROM drive. Then run
“setup.exe” in the folder of WINCON8000 CD-ROM: \napdos\isagraf\ . Follow the steps to
install it.
Note:
If “setup.exe” is not in your CD-ROM, please download “ICP DAS Utilities For ISaGRAF.zip”
from ftp://ftp.icpdas.com/pub/cd/8000cd/napdos/isagraf/ .
User’s Manual Of The Wincon-8037/8337/8837, Apr. 2004 by ICP DAS
8
1.3: Connecting Your PC To The Wincon-8x37 Controller
1.3.1: Setting The NET-ID & Modbus RTU port setting For The W-8x37
Wincon ISaGRAF Driver
is running, double click on it
Change Net-ID (Salve No) ,
Modbus RTU port & its baud
rate here, then click on
“Apply”
User’s Manual Of The Wincon-8037/8337/8837, Apr. 2004 by ICP DAS
9
1.3.2: Setting The IP Address For The W-8x37
Please run “Start” – “Setting” – “Control Panel”, then double click on “Network and Dial-up
Connections”. Then click on “LAN90001”. Set your Wincon’s IP address & its Subnet
Mask.
Please run “Start” – “Programs” – “Wincon Utility”, click on “Save and Reboot”
User’s Manual Of The Wincon-8037/8337/8837, Apr. 2004 by ICP DAS
10
1.3.3: Connecting Your PC To The W-8x37 Ethernet Port
Before you can download an ISaGRAF application to the W-8x37 controller system using the
Ethernet port, you must first setup the Ethernet port to properly communicate with the host PC.
On the W-8x37, Set IP, Mask and Gateway address:
Refer to former section – “1.3.2: Setting The IP Address For The W-8x37”
On your PC:
First open an ISaGRAF project and select a program you wish to communicate between your
PC and the I-8x37 controller system. Next, select the "Link Setup" button on the project screen
as shown below.
A "PC-PLC Link Parameters" dialog box will appear as shown below. From here select the
"Ethernet" communications option and click on the "Setup" button.
Once you have clicked on the "Setup" button, an "Ethernet Link Parameters" dialog box will
appear. Set the "Port Number" to "502" and enter in the Internet address (IP) of the W-8x37
controller.
User’s Manual Of The Wincon-8037/8337/8837, Apr. 2004 by ICP DAS
11
Once you have entered the appropriate information, click on the "OK" button, and now you
have configured your PC to communicate with the W-8x37 through the Ethernet port.
1.3.4: Multi-Clients Connection to The I-8x37 Ethernet Port
Each W-8037/8337/8737 has an IP address and with a fixed Ethernet port No. 502. Up to 8
PCs can link to one W-8037/8337/8737 throughout Ethernet (Modbus TCP/IP protocol).
Another PC or MMI can link to COM2: RS232 port or COM3:RS485 (Modbus RTU protocol).
PC/HMI
PC/HMI
PC/HMI
…
…
Modbus TCP/IP
PC/HMI
MMI
Modbus
IP1
User’s Manual Of The Wincon-8037/8337/8837, Apr. 2004 by ICP DAS
IP2
12
1.3.5: Connecting Your PC To The Wincon-8x37 COM2 or COM3 Port
The default Modbus RTU port is COM2:RS232. User may change it to “COM2:RS232” or
“COM3:RS485” or “None”. (please refer to “1.3.1: Setting The NET-ID & Modbus RTU port
setting For The W-8x37”)
Default communication parameter is “19200,8,N,1”
Wincon’s COM2: RS232 is the same as PC’s COM1
Wincon’s COM3: RS485
For the ISaGRAF Workbench RS-232 communications to operate properly, only the RXD, TXD,
and the GND signals are used. If your PC is running a hardware device or software program
that uses the CTS and DSR signals, you will need to wire the RTS-CTS and DTR-DSR signals
together as shown below.
User’s Manual Of The Wincon-8037/8337/8837, Apr. 2004 by ICP DAS
13
1.3.6: Deleting the ISaGRAF Project From The W-8x37 Controller
Wincon ISaGRAF Driver
is running, double click on it
User’s Manual Of The Wincon-8037/8337/8837, Apr. 2004 by ICP DAS
14
1.4: Linking I-7000 and I-87K Modules For Remote I/O
The W-8x37 controller system can use its COM3 port to link to ICP DAS's "I-7000" and “I-87K”
series of remote I/O modules. This configuration can be very useful in applications that require
distributed remote I/O throughout the system.
COM3
RS485
D+
D-
DATA+
DATA-
DATA+
DATA-
DATA+
DATA-
7000 modules
I-87K modules
Addr : 2
Addr : 3, 4, 5, 6
Addr : 1
You can link up to 255 I-7000 or I-87K series remote modules to one W-8x37 controller system
(It is better not to link up to 40 I-7000 or I-87K). You must remember to set each I-7000 and
I-87K remote module must have a unique address, and be set to the same baud rate as the
W-8x37 controller system.
For more information regarding setting up and programming an I-7000 / I-87K remote module,
please refer to Chapter 6 - "Linking To I-7000 and I-87K Modules" of the “User’s Manual Of The
ISaGRAF Embedded Controller” .
User’s Manual Of The Wincon-8037/8337/8837, Apr. 2004 by ICP DAS
15
1.5: Linking To An HMI Interface Device
The COM2 (RS-232) and COM3 (RS-485) ports of the W-8x37 controller system can be used
to interface with additional Human Machine Interface (HMI) devices such as touch screen
displays. Please refer to section 1.3.1 first for setting Modbus RTU port. ICP DAS provides a
full line of touch screen displays, such as the "Touch" series screens. The models in the
product line include the Touch 200, Touch 250, Touch 506s, and Touch 510 MMI products.
If you are using any of the “Touch” series of MMI devices to connect to an W-8x37 controller,
you can only interface the devices to the COM2 port on the W-8x37 controller.
Cable wiring
RS232
TXD 2
RXD 3
GND 5
CTS 7
RTS 8
COM2
RXD 2
TXD 3
GND 5
Touch
200/250
506s/510
COM2:
RS232
W-8037/8337/8737
For more information regarding interfacing the Touch series of MMI devices to the W-8x37
controller system, please refer to Chapter 4- "Linking The I-8xx7 To HMI Devices" of the
“User’s Manual Of The ISaGRAF Embedded Controller” ..
User’s Manual Of The Wincon-8037/8337/8837, Apr. 2004 by ICP DAS
16
Chapter 2: Link HMI to ISaGRAF Program
2.1: HMI and ISaGRAF logic on the same controller
Wincon-8037/8837/8737 supports HMI program (For ex. Indusoft) and ISaGRAF control logic
running on the same controller.
Please set HMI’s driver as “Modbus TCP/IP” or “Modbus Ethernet” , port No. as “502” , and
PLC’s IP as “127.0.0.1” (local host IP) and correct Net-ID (please refer to section 1.3.1)
Then please refer to Chapter 4 of the “User’s Manual Of The ISaGRAF Embedded Controllers”
for more information.
2.2: PC/HMI link to the ISaGRAF controller
Wincon-8037/8837/8737 supports HMI program running on PC (Or HMI devices) to link to it via
Ethernet , COM2:RS232 or COM3:RS485.
Ethernet:
Please set HMI’s driver as “Modbus TCP/IP” or “Modbus Ethernet” , port No. as “502” , and
correct PLC’s IP(section 1.3.2) and correct Net-ID (section 1.3.1)
COM2:RS232 or COM3:RS485:
Please set HMI’s driver as “Modbus RTU” or “Modbus Serial”, and correct communication
parameters (section 1.3.5, default is “19200,8,N,1”) and correct Net-ID (section 1.3.1)
Then please refer to Chapter 4 of the “User’s Manual Of The ISaGRAF Embedded Controllers”
for more information.
2.3: VB.net , eVC++ and ISaGRAF logic on the same
controller
Wincon-8037/8837/8737 supports VB.net program and ISaGRAF control logic running on the
same controller. Please refer to
WINCON8000 CD-ROM: \napdos\isagraf\wincon\VB.NET_Demo\VB.net_link_w8337.pdf &
WINCON8000 CD-ROM: \napdos\isagraf\wincon\VB.NET_Demo\demo_xx\ReadMe.txt
User’s Manual Of The Wincon-8037/8337/8837, Apr. 2004 by ICP DAS
17
Chapter 3: ISaGRAF Example Program
3.1: Get On-Line help
If you have question, you may email to [email protected].
On-line help of ISaGRAF standard functions & function blocks:
User’s Manual Of The Wincon-8037/8337/8837, Apr. 2004 by ICP DAS
18
On-line help of ICP DAS add-on functions & function blocks:
User’s Manual Of The Wincon-8037/8337/8837, Apr. 2004 by ICP DAS
19
On-line help of ICP DAS add-on I/O boards & I/O complex equipments:
On-line help of ISaGRAF languages:
User’s Manual Of The Wincon-8037/8337/8837, Apr. 2004 by ICP DAS
20
3.2: Installing The ISaGRAF Programming Examples
The ISaGRAF programming examples are installed on the same CD-ROM that you receive
with the Wincon controller system. You will find the programming example files in the
\Napdos\ISaGRAF\Wincon\Demo\ sub-directory on the CD-ROM.
When you install the ISaGRAF programming example for the Wincon controller it is
recommended that you create an "ISaGRAF Project Group" to install the demo program files
into.
To install the demo programs into the project you have created open the "ISaGRAF Project
Management" window to select "Tools" from the menu bar, then select the "Archive" option and
then click on "Projects".
When you click on the "Projects" selection the "Archive Projects" window will open. Click on
the "Browse" button to select the drive and the sub-directory where the demo files are located
(\Napdos\ISaGRAF\Wincon\Demo\ on the CD-ROM) .
User’s Manual Of The Wincon-8037/8337/8837, Apr. 2004 by ICP DAS
21
To install all of the Demo files, click on the "wdemo_01" file, then press and hold down the
"Shift" key, continue to hold down the "Shift" key and use your mouse to scroll down to last file
in the "Archive" window. Click on the last file name from the demo file location and that will
select the entire group of demo files. Lastly, click on the "Restore" button in the "Archive
Projects" window and all of the demo files will be installed into the sub-directory you have
created.
User’s Manual Of The Wincon-8037/8337/8837, Apr. 2004 by ICP DAS
22
3.3: R/W float value from/to Compact Flash
Please refer to CD-ROM: \napdos\isagraf\wincon\demo\ “wdemo_01.pia”
3.4: R/W long integer value from/to Compact Flash
Please refer to CD-ROM: \napdos\isagraf\wincon\demo\ “wdemo_02.pia”
3.5: To output something at a time interval
Please refer to CD-ROM: \napdos\isagraf\wincon\demo\ “wdemo_03.pia”
User’s Manual Of The Wincon-8037/8337/8837, Apr. 2004 by ICP DAS
23
Appendix A: Some Software Difference between
W-8037/8337/8737 & I-8417/8817/8437/8837
1. Modbus communication port
The default Modbus communication port of the W-8037/8337/8737 are
Ethernet port with Modbus TCP/IP protocol (slave), port No. 502
COM2:RS232 with Modbus RTU protocol (slave)
The Modbus RTU protocol can be modified to apply on
COM2(RS232) or
COM3(RS485) or
None
2. Slot No.
The slot No. of the I-8417/8817/8837/8837 is ranging from 0 to 7, while ranging from 1 to 7 for
the Wincon-8037/8337/8737
Please refer to Section 3.1 – “Linking I/O Boards To An ISaGRAF Project”.
3. Modbus network address
The available Modbus Network Address of the I-8417/8817/8837/8837 is ranging from 1 to
4095, while ranging from 1 to 8191 for the Wincon-8037/8337/8737.
Please refer to Section 4.1 – “Declaring Variable Address For Network Acess”.
4. Modbus data type
PC/HMI can request and set the following data type via Modbus.
Wincon-8037/8337/8737:
Boolean,
Signed short integer (16-bit signed Word),
Signed long integer (32-bit signed DWord),
Real (32-bit standard float),
Timer (16-bit or 32-bit integer, unit is ms)
Message (Max. length is 240 Char.)
I-8417/8817/8837/8837 doesn’t support transfer “Message” via Modbus.
User’s Manual Of The Wincon-8037/8337/8837, Apr. 2004 by ICP DAS
24
5. Max. code size
The code size limitation (the TIC code generated by ISaGRAF compiler ) is 64K bytes for the
I-8417/8817/8837/8837, while 512K bytes for the Wincon-8037/8337/8737.
Please refer to Section 9.2 – “Uploading An ISaGRAF Project”.
6. Array_r & Array_w - R/W one byte from/to a byte array
The first parameter “NUM_” of the “Array_r” & “Array_w” function is ranging from 1 to 24 for the
I-8417/8817/8837/8837, while ranging from 1 to 48 for the Wincon-8037/8337/8737.
The second parameter “ADR_” of the “Array_r” & “Array_w” function is ranging from 1 to 256 for
the I-8417/8817/8837/8837, while ranging from 1 to 512 for the Wincon-8037/8337/8737.
Please refer to Appendix A.4.
7. Ary_n_r & Ary_n_w - R/W one long integer from/to an integer array
The first parameter “NUM_” of the “Ary_n_r” & “Ary_n_w” function is ranging from 1 to 6 for the
I-8417/8817/8837/8837, while ranging from 1 to 18 for the Wincon-8037/8337/8737.
Please refer to Appendix A.4.
8. Ary_w_r & Ary_w_w - R/W one short integer from/to an integer array
The first parameter “NUM_” of the “Ary_w_r” & “Ary_w_w” function is ranging from 1 to 12 for
the I-8417/8817/8837/8837, while ranging from 1 to 36 for the Wincon-8037/8337/8737.
Please refer to Appendix A.4.
9. Modbus network address No. for long & short Integer array
I-8417/8817/8837/8837: 5,001 to 8072
Wincon-8037/8337/8737: 10,001 to 19,216
Please refer to Section 4.5 – “Access to Word & Integer Array Via Modbus”
10. I/O board – “Push4Key” & “Show3Led”
The Wincon-8037/8337/8737 doesn’t support “push4Key” & “show3Led”.
Please refer to Section 3.3 – “Linking Push4Key & Show3Led”.
User’s Manual Of The Wincon-8037/8337/8837, Apr. 2004 by ICP DAS
25
11. Message array
The Wincon-8037/8337/8737supports c functions – “MSGARY_R” & “MSGARY_W”, while the
I-8417/8817/8837/8837 doesn’t support them.
Max. 1000 message can be stored in the RAM, each up to 255 bytes
12. File operation
The Wincon-8037/8337/8737 supports standard ISaGRAF functions – “F_CLOSE” , “F_EOF” ,
“F_ROPEN” , “F_WOPEN” , “FA_READ” , “FA_WRITE” , “FM_READ” , “FM_WRITE” , while
the I-8417/8817/8837/8837 doesn’t support them.
Please refer to Appendix A.1 – “Standard ISaGRAF Function Blocks”.
The Wincon-8037/8337/8737 supports c functions – “F_CREAT” , “F_READ_B” ,
“F_READ_W” , “F_READ_F” , “F_WRIT_B” , “F_WRIT_W” , “F_WRIT_F” & “F_SEEK”, while
the I-8417/8817/8837/8837 doesn’t support them.
13. Ary_f_r & Ary_f_w - R/W one float value from/to an float array
The Wincon-8037/8337/8737 supports c functions – “Ary_f_r” & “Ary_f_w” , while the I8417/8817/8837/8837 doesn’t support them.
User’s Manual Of The Wincon-8037/8337/8837, Apr. 2004 by ICP DAS
26