1
Leader Light s.r.o.
M.Gorkeho 33
SK-052 01 Spisska Nova Ves
Slovakia
www.leaderlight.eu
01
SAFETY INFORMATION
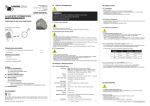
02.2 Data and Power connections
Power OUT
PowerCon
USER MANUAL
Power IN
PowerCon
WARNING!!!
Carefully read before installing, powering or servicing.
Nothing to do if anything misunderstand!
Only for professional use!
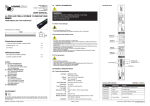
LL PRO LED GRAPHIC PANEL RGB/RGBAW
LL50 450 LL50 455
COMPLIMENTS ON YOUR PURCHASE!
DMX OUT
XLR-5PIN
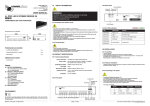
01.1 Risk of eyes damage
All dimensions are in milimeters
DMX IN
XLR-5PIN
129,5
588
- Do not look directly into LED lamps.
- Do not look into light beam from a distance of less than 40 cm (16 inches)!
01.2 Protection from electric shock
588
02.3 Top panel
Following items are included:
- LL PRO LED GRAPHIC PANEL RGB/RGBAW
1 pc.
- PowerCon type “A“ + “B“
1 pc.
- User manual
1 pc.
Control LEDs
- Shut down power before installation or maintenance.
- Luminaries and recommended power supply must be installed by a qualified professional in
accordance with relevant local codes.
Only acceptable source of AC power and frequency that complies with local buidling and electrical
codes to use.
- Do not use or do not connect the products if the power cable, power plug or fixtures are any way
damaged, wet, or if they are overheating.
- Do not modify, alter, or attempt to service the LeaderLight appliance.
Doing so will void the warranty.
- Before removing or installing any cover or part of appliance disconnect it from AC power.
- Appliance allways connect to earth (eltech.).
POWER
DATA
MODE & ADDRESS
Dip options “100“ “10“ “1“
Rotating DIP address 000÷511
01.3 Fire prevention
Additional items needed:
- Data cables with XLR 5PIN Female/Male
1 pc.
- Controller compatible with DMX
1 pc.
Content:
01 SAFETY INFORMATION
01.1 Risk of eyes damage
01.2 Protection from electric shock
01.3 Fire prevention
02 PRODUCT SPECIFICATION
02.1 Technical Specification
02.2 Data and Power connections
02.3 Top panel
03 INSTALLATION
03.1 Unpacking
03.2 Physical installation
03.3 Connecting to AC power
03.4 Control data connecting
03.5 DMX channels
04 MAINTENANCE
ENVIRONMENT
-
Follow all safety consideration.
Thermostatic switches or fuses never to bypass.
Device never shield – minimum distance around fitting must be 100mm (4 in.).
LEDs never direct cover with filters or other materials.
Allowing max. ambient temperature is 40°C (104°F).
02 PRODUCT SPECIFICATION
02.1 Technical Specification
Lamp type:
Lifetime:
Control data Input:
Input power:
Power Connection:
Net weight:
Dimensions LxWxH:
IP:
Ambient temp. (Ta):
Coolong:
Do not throw away the appliance with the normal household waste at the end of its life,
but hand it in at an official collection point for recycling. By doing this, you help to preserve
the environment.
©MMVIII - Leader Light – All right reserved
Materials and finish:
Installation:
RGB:144 x RGB TOP LED
(Red, Green and Blue)
RGBAW:432 x RGBAW TOP LED
(Red, Green, Blue, Amber and White)
Control LEDs Indication
POWER
LED
INDICATION
STATUS
POWER (Red)
blinking – 2Hz
OK - inside fixture is everything correct
DATA (Green)
light off
NO DMX512 signal
DATA (Green)
blinking – 4Hz
OK- income correct DMX512 signal
DATA (Green)
fast blinking
NON correct digital signal
alternate blinking
Autotest function
DATA
POWER (Red)
DATA (Green)
Long 100 000 hrs 60% degradation
DMX512 In/Out with XLR 5PIN
RGB: max.60W
RGBAW: max.100W
100-260V AC In/Out PowerCon
6kg
588mm x 588mm x 129,5mm
IP20
Maximum 40° C
Conventional
Housing: anodized aluminium black
Cover: plexiglass with special diffuse foile
Surface, recesed or semi-recesed mounting
Edition: A - 2008
03 INSTALLATION
03.1 Unpacking
- Unpack carefully.
- This is electronic equipment and should be handled carefully.
- Damaged delivered package or if are any mechanical parts broken – it must be claim
immediately by the transport company.
Photo pictures as evidence are valuable for future claim.
03.2 Physical installation
- Loading capacity of bearing area has to be at least 10 times the weight of all device clusters
(luminaries, clamps, cables, ...).
- Heigrbreadth from combustible materials is 0,5m.
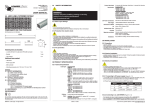
- The LL PRO LED GRAPHIC PANEL is designed for use in a 600mm grid suspended
ceiling with T profile (Figure Nr. 1.1).
If you have any question please, contact [email protected]
03.3 Connecting to AC power
- To tackle all Safety Information- 01!
- For protection from electric shock, the device must be grounded (earthed)!
- It is not necessary to open the fixture before power supply.
Power supply is sovled simple with Neutrik PowerCon connectors.
- The fixture is equipped with auto-switching power supply that automatically adjusts
to any 50-60 Hz AC power source from 100-260 Volts
- Cord plug connections:
Symbol
Pin
Wire Colour
insert into suspended
ceiling with T profile
Control data In/Out XLR 5PIN
Screw (US)
L
live
brown/black
black
N
neutral
light blue
white
ground (earth)
yellow/green
green
100-260V AC
In/Out Power Con
03.4 Control data connecting
- Control data cable length is specified by Norm IEC929 Annex E4
- It is not necessary to open the fixture before connecting of DMX512 control signal.
Interconnections are realized by Neutrik XLR 5 PIN IN/OUT connectors.
03.5 DMX channels
- Custom made solution is on separate document
1.1
04 MAINTENANCE
- To tackle all Safety Information- 01!
- Damage caused by inadequate cleaning or maintenance is not coverd by warranty.
- Regular cleaning is demand (dust, dirt, ...)
Maintenance policy:
- Unplug mains befor maintenance and at least 10 minutes cool off
- Cleanup dust from scuttle, diffuser and lens.
- Use vacuum or dampy duster (warm watter)
- Before reinstalling to check failure-free state – no wet parts!
If you have any question please, contact [email protected]