1
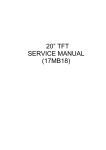
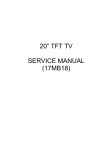
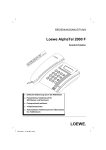
User Manual PG-Smarteam
1 Kernel-GUI
Abbildung 1: GUI to control the simulation.
red: With play, pause and stop buttons the simulation can start, pause and
continue. The user can informed on textfield above the buttons .
blue: With this slider you can change speed of simulation.
gelb: Here you can start the measurement frame work.
2 Measurement-GUI
Abbildung 2: Measurement-GUI with different charts types.
1. To start measurement frame work click on button in Kernel-GUI.
red: To display relevant data, choose a robot in the tree, then set data right
on the table, which should be displayed.
2. With checkboxes in the table you can add and remove charts (tabbeds).
yellow: Overview of robot types in simulation. This option can be selected at
any time, prior choose a robot is not necessary.
The charts provide some (mostly futile) features (color & title change, store as
picture, etc.), to try out all options click with right mousebutton on chart, it
appears is a dialog, try all options, it’s not much.
3 EditorGUI
Die Benutzeroberfl¨
ache (Abbildung 3)wurde so konzipiert, dass damit der Benutzer problemlos verschieden komplexe Karten erstellen kann. Die grafische
¨
Ubersicht
zeigt die bedeutenderen Programmkomponenten. Auf den folgenden
Seiten werden die Bestandteile und Funktionen jeder dieser Komponenten im
Detail erl¨
autert.
Abbildung 3: Buenutzeroberfl¨ache
3.1 Die Bigmap
Die Bigmap ist die Zeichenfl¨
ache in der man mit Hilfe der Mouse verschieden
gro¨se Hindernisse einzeichnen, Sch¨atze sowie die Homebase platzieren kann. Die
Bigmap an sich zeigt einen Ausschnitt der Karte. Die Gr¨o¨se des Ausschnittes
h¨angt dabei von dem Zoomfaktor ab. Je gr¨o¨ser der Zoomfaktor, desto mehr
wird in die Karte hinein gezoomt. Mit Hilfe der Schieberegler, die sich rechts
und unten befinden l¨
asst sich der Ausschnitt der Karte verschieben.
3.2 Die Minimap
Die Minimap dient dazu die gesamte Karte auf einen Blick zu zeigen. Der Bereich der gr¨
un umrandet ist, zeigt den Ausschnitt, der im Moment in der Bigmap
angezeigt wird. Durch das Klicken mit der Mouse in der Minimap l¨asst sich der
betrachtet Ausschnitt der Bigmap an die entsprechende Position verschieben.
3.3 Die Optionspalette
Die Optionspalette ist eines der wichtigsten Komponenten, siehe Abbildung 4.
Sie enth¨
alt verschiedene Kn¨
opfe mit denen man den Zeichenmodus einstellen
kann. Alle Kn¨
opfe die grau sind, sind aktiviert und ergeben so den Modus in
dem man sich befindet.
Abbildung 4: Optionspalette
3.3.1 Current mode
Der Current mode“zeigt den aktuellen Zeichenmodus an in dem sich der Be”
nutzer befindet. Es gibt insgesamt 10 verschiedene Zeichenmodi.
1. Drawing slowly small obstacles: Es werden einzelne kleine rechteckige
Hindernisse gezeichnet.
2. Deleting slowly small obstacles: Es werden einzelne kleine rechteckige
Hindernisse gel¨
oscht.
3. Drawing big obstacles: Es werden gro¨se rechteckige Hindernisse gezeichnet. Dabei wird beim ziehen der Mouse mit gedr¨
uckter Mousetaste
die Gr¨
o¨se des zu zeichnenden Hindernisses festgelegt
4. Deleting big obstacles: Es werden gro¨se rechteckige Hindernisse gel¨oscht.
Dabei wird beim ziehen der Mouse mit gedr¨
uckter Mousetaste die Gr¨o¨se
des zu l¨
oschenden Bereichs definiert.
5. Drawing treasures: Es werden Sch¨atze platziert.
6. Deleting treasures: Es werden Sch¨atze entfernt.
7. Setting the homebase: Die Homebase wird platziert.
8. Deleting the homebase: Die Homebase wird entfernt.
9. Drawing fast small obstacles: Es werden viele kleine Hindernisse bei
gedr¨
uckter Mousetaste hintereinander gezeichnet, vergleichbar mit einem
Stift.
10. Deleting fast small obstacles: Es werden viele kleine Hindernisse bei
gedr¨
uckter Mousetaste hintereinander gel¨oscht, vergleichbar mit einem
Radiergummi.
Folgende Kn¨
opfe sind auf der Optionspalette enthalten:
• Draw: Zeichenmodus aktivieren um Hindernisse zu zeichnen oder Sch¨atze
oder die Homebase zu setzen.
• Delete: L¨
oschmodus aktiveren um Hindernisse zu l¨oschen oder Sch¨atze
oder die Hombase zu entfernen.
• Fast: Schnellmodus aktivieren, um kleine rechteckige Hindernisse bei gedr¨
uckter Mousetaste entlang des Mousepfades zu zeichnen oder zu l¨oschen.
• Normal: Normalmodus aktivieren bei dem jeweils nur ein Hindernis, ein
Schatz oder die Homebase gesetzt bzw. gel¨oscht werden kann.
• Big rectangle: Zeichnen bzw. l¨oschen von gro¨sen rechteckigen Hindernissen.
• Small rectangle: Zeichnen bzw. l¨oschen von kleinen rechteckigen Hindernissen.
• Homebase: Setzen bzw. entfernen der Homebase. Es kann nur eine Homebase gesetzt werden. Beim setzen einer weiteren Homebase wird die
erste Homebase an die neue Position verschoben.
• Treasure: Platzieren bzw. entfernen von Sch¨atzen.
• Treasure amount: Die Gr¨o¨se des Schatzes angeben, bevor man den
Schatz auf der Karte platziert. Der Standardwert ist 100.
3.4 Die Statuszeile
Die Statuszeile zeigt zu einem die Position der Mouse in der Bigmap an, zum
anderen den Zoomfaktor um den die Ansicht der Karte vergr¨o¨sert/verkleinert
wurde. Ein negativer Zoomfaktor entspricht dabei
1/ |Zoomf aktor|
. Des weiteren wird noch die Kartengr¨o¨se mit angezeigt.
3.5 Das Men¨
u
Das Men¨
u besteht aus vier Untermen¨
us: Dem Filemen¨
u, dem Editmen¨
u, dem
Extrasmen¨
u und dem Helpmen¨
u.
3.5.1 Das Filemen¨
u
Das Filemen¨
u enth¨
alt alle Befehle, die Sie f¨
ur die Erstellung einer neuen Karte
ben¨otigen, siehe dazu Abbildung 5. In diesem Men¨
u k¨onnen Sie wahlweise eine
neue Karte erstellen, eine existierende ¨offnen, die Karte speichern sowie Sch¨atze
laden und speichern.
Abbildung 5: Das Filemen¨
u
• New terrain Es wird eine neue leere Karte erstellt. Zuvor muss jedoch
noch angegeben werden wie gro¨s die Karte werden soll, siehe hierzu die
Abbildung 6. Der Maximalwert liegt bei
217 m2
.
Abbildung 6: Kartengr¨o¨se angeben
¨
• Load terrain: Offnet
ein Dialogfeld in dem man eine bereits vorhandene
Karte ausw¨
ahlen kann und diese in den Editor laden. Es k¨onnen nur
*.xml-Dateien geladen werden.
¨
• Load treasure objects: Offnet
ein Dialogfeld in dem man eine Datei
ausw¨
ahlen kann, die Sch¨
atze enth¨alt, und diese in den Editor laden. Es
k¨
onnen nur *.xml-Dateien geladen werden.
¨
• Save terrain: Offnet
einen Dialogfeld in dem man die erstellte Karte
unter einem eigenem Namen speichern kann. Die Datei kann nur als *.xmlDatei gespeichert werden.
¨
• Save treasure objects: Offnet
einen Dialogfeld in dem man die erstellten
Sch¨
atze unter einem eigenem Namen speichern kann. Die Datei kann nur
als *.xml-Datei gespeichert werden.
• Save all: Die Sch¨
atze und die Hindernisse werden jeweils in einer eigenen .xml-Datei gespeichert. Siehe dazu Save terrain“und Save treasure
”
”
objects“.
¨
• Exit: Beendet das Programm. Falls Anderungen
vorgenommen worden
¨
sind, die noch nicht gespeichert wurden. Wird abgefragt, ob die Anderungen
gespeichert werden sollen.
3.5.2 Das Editmen¨
u
Das Editmen¨
u enth¨
alt Befehle f¨
ur das Bearbeiten einer Karte, siehe dazu die
Abbildung 7. In diesem Men¨
u k¨onnen Sie wahlweise alle Hindernisse auf der
Karte l¨
oschen, alle Sch¨
atze entfernen oder beides und Sie k¨onnen den Zoomfaktor einstellen.
Abbildung 7: Das Editmen¨
u
• Cleare terrain: Alle Hindernisse auf der Karte werden entfernt. Zuvor
wird aber nochmal nachgefragt, ob alle Hindernisse entfernt werden sollen
• Cleare treasure objects: Alle Sch¨atze werden von der Karte entfernt.
Zuvor wird aber nochmal nachgefragt, ob alle Sch¨atze entfernt werden
sollen.
• Cleare all: Alle Hindernisse und Sch¨atze werden von der Karte entfernt.
Zuvor wird aber nochmal nachgefragt, ob die Operation durchgef¨
uhrt werden soll.
• Zoomfactor Es ¨
offnet sich ein Dialogfeld (Abbildung 8)in dem der Zoomfaktor, sprich der Vergr¨
o¨serungsfaktor, mit dem die Ansicht in der Bigmap skaliert wird, eingestellt werden kann. Den Wert in dem Spinner einstellen und anschlie¨send auf den Knopf Zoom“klicken um den Wert zu
”
u
¨bernehmen, ansonsten auf Cancle“wenn die Aktion abgebrochen wer”
den soll. Der Maximalwert liegt bei 10 und der Minimalwert bei -10.
3.5.3 Das Extramen¨
u
Das Extramen¨
u enth¨
alt Befehle mit denen Sie einen Generator starten, die
Sch¨atze verwalten und eine Roboterkonfiguration erstellen k¨onnen (Abbildung
9).
Abbildung 8: Die EinstellungsGUI f¨
ur den Zoomfaktor
Abbildung 9: Dialogfeld zur Einstellung des Zoomfaktors
• Generator: Startet den Generator. Weitere Informationen zum Generator siehe im Benutzerhandbuch zum Generator.
¨
• Manage treasure amount: Offnet
ein neues Fenster mit einer Liste aller
Sch¨
atze, in der die Gr¨
o¨se der Sch¨atze bearbeitet werden kann. Weitere
Informationen unter Schatzgr¨o¨se bearbeiten“.
”
¨
• Robot configuration: Offnet
ein neues Dialogfenster in der die Roboterkonfiguration erstellt werden kann. Das Fenster wird aber erst dann
ge¨
offnet, wenn die Homebase gesetzt ist, ansonsten wird mitgeteilt, dass
die Homebase zuerst gesetzt werden muss, bevor die Roboterkonfiguration erstellt werden kann. Weitere Informationen unter Roboterkonfigu”
raiton“.
3.5.4 Das Helpmen¨
u
Das Helpmen¨
uo
¨ffnet dieses Benuzterhanbuch.
3.6 Sch¨
atze verwalten
Mit Hilfe dieses Dialogfelds (Abbildung 10) l¨asst sich nachtr¨aglich die Gr¨o¨se
jedes einzelnen Schatzes ¨
andern. Jeder Schatz wird mit seiner Position und
seiner Gr¨
o¨se in der Liste angegeben.
Um Die Gr¨
o¨se eines Schatzes zu ¨andern einfach in die entsprechende Zelle in
der die Gr¨
o¨se steht klicken und die neue Gr¨o¨se eintragen. Um die neuen Werte
zu u
¨bernehmen auf Save“klicken. Falls die Aktion abgebrochen werden soll auf
”
Cancel“klicken.
”
Abbildung 10: Dialogfeld f¨
ur die Schatzverwaltung
3.7 Roboterkonfiguration
Mit diesem Dialogfeld, siehe Abbildung 11, l¨asst sich eine Roboterkonfiguration
erstellen. Bevor das Dialogfeld aber ge¨offnet wird, muss zuerst die Homebase auf
der Karte platziert werden. W¨
ahrend der Bearbeitung der Roboterkonfiguration
kann die Position der Homebase nicht mehr ver¨andert werden.
Das Dialogfeld ist in drei Bereiche unterteilt. Im oberen Bereich befinden sich
Buttons mit dennen Dateien geladen/gespeichert werden k¨onnen.
• New: Mit dem Knopf New“wird eine neue Tabelle erstellt, die lediglich
”
die Homebase mit ihren Defaulteigenschaften enth¨alt.
• Add: Mit dem Knopf Add“kann eine bereits vorhandene Roboterkonfi”
guration zu der aktuellen Roboterkonfiguration hinzugef¨
ugt werden. Dabei beliebt die Position der akutellen Homebase erhalten, sowie ihre Eigenschaften
• Load: Mit dem Knopf Load“wird eine bereits vorhandene Roboterkon”
figuartion geladen, die aktuelle Roboterkonfiguartion wird dabei gel¨oscht.
Lediglich die Position der Homebase wird behalten. Damit wird versichert,
dass die Homebase auf keinenm Hindernis steht.
Abbildung 11: Die RoboterkonfigurationsGUI
• Save: Mit dem Knopf Save“l¨asst sich die Roboterkonfiguration als eine
”
.xml-Datei speichern.
Im unteren Bereich bdefinden sich ebenfalls Buttons, mit diesen lassen sich neue
Robotertypen erstellen.
• Explorer: Der Knopf Explorer“f¨
ugt eine neue Zeile in die Tabelle ein.
”
Diese Zeile enth¨
alt alle Eigenschaften eines Explorers, die ge¨andert werden
k¨
onnen.
• Worker: Der Knopf Worker“f¨
ugt eine neue Zeile in die Tabelle ein.
”
Diese Zeile enth¨
alt alle Eigenschaften eines Workers, die ge¨andert werden
k¨
onnen.
• Transporter: Der Knopf Transporter“f¨
ugt eine neue Zeile in die Tabelle
”
ein. Diese Zeile enth¨
alt alle Eigenschaften eines Transporters, die ge¨andert
werden k¨
onnen.
• Multiroboter: Der Knopf Multiroboter“f¨
ugt eine neue Zeile in die Ta”
belle ein. Diese Zeile enth¨alt alle Eigenschaften eines Multiroboters, die
ge¨
andert werden k¨
onnen.
• Realy: Der Knopf Realy“f¨
ugt eine neue Zeile in die Tabelle ein. Diese
”
Zeile enth¨
alt alle Eigenschaften eines Realy, die ge¨andert werden k¨onnen.
• Delete: Der Knopf Delete“wird die selektierte Zeile gel¨oscht. Gel¨oscht
”
werden k¨
onne alle Zeilen, sprich Robotertypen, bis auf die erste Zeile, die
Zeile der Homebase.
3.7.1 Die Tabelle
Die Zellen der Tabelle beinhalten verschiedene Eigenschaften eines Roboters.
Zellen die grau sind k¨
onnen nicht bearbeitet werden.
1. Robotertype: Gibt den Robotertyp an. Es gibt nur sechs verschiedene
Robotertypen(Homebase, Explorer, Worker, Transporter, Multiroboter,
Realy). Der Robotertyp wird sofort beim Einf¨
ugen einer neuen Zeile gesetzt und kann im nach hinein nicht nicht mehr ver¨andert werden.
2. Roboternumber: In dieser Spalte l¨asst sich die Roboteranzahl einstellen.
Bis auf die Homabase, die nur einmal vorhanden ist und die Anzahl nicht
ver¨
andert werden kann, kann es von den anderen Robotertypen beliebig
viele geben.
3. Viewradius: In dieser Spalte l¨asst sich der Sichtradius eines Roboters
einstellen. Der Sichtradius muss gr¨o¨ser als das Doppelte der Geschwindigkeit des Roboters sein und kleiner als der Kommunikationsradius.
4. Communicationradius: In dieser Spalte l¨asst sich der Kommunikationsradius eines Roboters einstellen. Der Kommunikationsradius darf nicht
kleiner als der Sichtradius werden.
5. Flagsnumber: In dieser Spalte l¨asst sich die Anzahl der mitgef¨
uhrten
Flags einstellen. Die Anzahl der Flags darf die Gr¨o¨se des Containers nicht
u
¨berschreiten.
6. Load Energy: Zu Beginn hat der Roboter einen Energiewert von 100 %.
W¨
ahrend seiner Aktion verliert er Energie. Die Energie kann der Roboter
an der Homebase wieder auftanken. In der Spalte Load Energy“l¨asst sich
”
einstellen, wie viel Prozent der Roboter w¨ahrend einer Runde auftanken
kann.
7. Energy Consumption: Zu Beginn hat der Roboter einen Energiewert
von 100 %. W¨
ahrend seiner Aktion verliert er Energie. Die Energie kann
der Roboter an der Homebase wieder auftanken. In der Spalte Energy
”
Consumption“l¨
asst sich einstellen, wie viel Prozent der Roboter w¨ahrend
einer Runde verbraucht.
8. Max. Speed: In dieser Spalte l¨asst sich die maximale Geschwindigkeit
eines Roboters einstellen, bis auf die der Homebase, diese darf sich nicht
bewegen, deshalb hat sie auch eine Geschwindigkeit von 0. Die Geschwindigkeit darf zudem nicht gr¨o¨ser als die H¨alfte des Sichtradius sein.
9. Container Capacity: In dieser Spalte l¨asst sich die Containergr¨o¨se eines
Roboters einstellen. Die Homebase hat die maximale Containergr¨o¨se, die
sich aber auch nicht ver¨
andern l¨asst.
10. Toolsize: In dieser Spalte gibt man die Gr¨o¨se des Werkzeugs an mit der
der Roboter einen Schatz bearbeitet. Bis auf den Worker und Multiroboter
haben die anderen Robotertypen kein Werkzeug.
11. Bucketgrabsize: In dieser Spalte gibt man die Gr¨o¨se der Schaufel an,
die einen Schatz aufl¨
adt. Der Transporter und der Multiroboter enthalten
jeweils eine Schaufel zum Aufladen. Die Gr¨o¨se der Schaufel darf die Gr¨o¨se
des Containers nicht u
¨berschreiten. Es wird zwischen der Schaufel zum
Aufladen und der Schaufel zum Abladen unterschieden.
12. Bucketputsize: In dieser Spalte gibt man die Gr¨o¨se der Schaufel an,
die einen Schatz abl¨
adt. Der Transporter und der Multiroboter enthalten
jeweils eine Schaufel zu Abladen. Die Gr¨o¨se der Schaufel darf die Gr¨o¨se
des Containers nicht u
¨berschreiten. Es wird zwischen der Schaufel zum
Aufladen und der Schaufel zum Abladen unterschieden.
13. Strategy: In den letzten beiden Spalte l¨asst sich die Strategie ausw¨ahlen
nach der jeder Roboter agiert. Die Zellen der letzten Spalte enthalten
jeweils einen Button. Nach Bet¨atigung dieses ¨offnet sich ein Auswahldialog
in dem die Strategie ausgew¨ahlt werden kann. Der Pfad der Strategie wird
dann in dem Textfeld angezeigt. Es aber auch m¨oglich den Pfad per Hand
in das Textfeld einzutragen.
4 How to Build a Strategy
A strategy controls the behavior of a robot in its environment. Since the robot’s knowledge about the environment continually changes, the strategy has
to plan the robot’s actions round by round. That is, it has to analyze its current
knowledge and to compute the action to be executed next every round.
So here is what you have to do when building a strategy, in short: Create a class MyStrategy extends Strategy (Strategy belongs to the package
robot.strategy) and implement the abstract method void compute(). In this
method, you have to set the next action by putting it into the robot’s action
list if you want to make the robot do something. The different existing elementary actions as well as the mentioned action list are explained in the package
robot.strategy of the API.
However, to gain a deeper insight into how to implement a strategy and which
given structures you can make use of, please read the following chapters.
4.1 The superclass
Every concrete strategy extends the abstract class Strategy in the package
robot.strategy. This superclass includes three methods to be implemented in
every child class, namely boolean isApplicableTo(RobotType robotType),
void compute() and void initDataManagement(IDataParameters params).
These methods are described in section 4.3.
Besides, a bunch of getters (given in the following list) allows you to access
the data module of the robot. You can find detailed information about all the
provided interfaces in the API in the package robot.strategy.dataaccess.
• IStaticMapData getStaticMap() returns access to information about
the robot’s position, the exploration progress of the map, obstacles in the
robot’s view radius, the path planning algorithm and so on.
• IDynamicMapData getDynamicMap() returns access to information about
dynamic objects in the robot’s view radius and communication radius (i.e.
other robots, treasures and flags).
• IMessageData getMessageData() enables the robot to get received messages and to send messages to other robots.
• IContainerData getContainerData() can be used to access the container of the robot and
• IRobotFeatures getRobotFeatures() returns access to the skills of the
robot, simulation settings (size of map, number of robots...) and so on.
In contrast to the other interfaces, IRobotFeatures can be found in the
package robot itself.
At last, there are four further methods: ActionList getActionList() returns
the action list of the robot which is important for every strategy. The next section (4.2) deals with this list. TacticManager getTacticManger() returns access
to the tactics of the robots and using String getNameOfPerformingTactic()
and void setNameOfPerformingTactic(String name), you can set the name
of the robot’s current tactic for output purposes. See section 4.5 for the use of
tactics.
4.2 Actions and the Action List
A robot can perform one so-called elementary action per round. Only a limited
set of such actions exists: the robot can move, it can excavate, load or unload
ground objects (i.e. treasures or flags) and it can reload its energy at its start
position (of course, it may also do nothing). The available elementary actions
can be found in the package robot.strategy of the API. To perform an action, a robot must insert this action into its action list (class ActionList in
robot.strategy). After the robot has finished its computations, the first action in the list is automatically executed and deleted from the list. Note that
the robot’s physical unit checks if that action leads to incorrect behavior afterwards and prevents the robot from doing something wrong (e.g. to load an
object which is not at the robot’s position).
The following code example shows a usual way to have the robot execute a
certain action, here the robot shall unload five treasures at its current position.
Since the robot does not distinguish between the treasures carried by itself, any
treasure ID is correct for the unload action.
GroundObjectID treasureID = new TreasureID();
ElementaryAction action = new ElementaryActionUnloadGroundObject(treasureID, 5);
getActionList().appendAction(action);
In the given example, you see one first operation of the robot’s action list.
appendAction(ElementaryAction action) appends an action to the end of
the list. This makes sense since the robot may already have decided to perform
other actions before. In fact, the reason for equipping the robot with such a
list is to make it possible to compute whatever numbers of actions beforehand
if needed. If you want to ensure that an action is directly executed, use int
insertAction(action, 0) instead which puts the action at the beginning of
the list (index 0) and returns the new index of the first shifted action.
However, to support the developer in planning the robot’s next actions, the action list provides much more functionalities. All these are described in the API,
so here is only one example demonstrating a motion operation. Maybe you
have a list of positions and the robot is supposed to move on the path represented thereby as fast as possible. The corresponding actions are automatically
computed and appended to the list as follows:
List<Position> path;
// ...compute positions of path...
getActionList().move(path, getRobotFeatures.getMaximumSpeed());
By the way, the class Position and the class TreasureID in the previous example are two of the Kernel’s classes you can use (see section 4.4 for such classes).
Moreover, this example shows how to access the robot’s skills (in this case, its
maximum speed). One last thing to mention is that you can even store actions
for sending messages in the action list. Though messages do not refer to the
action concept, it may be useful to plan to send messages. That is why there
is an elementary action ElementaryActionSendMessage. If such an action at
the beginning of the list, the contained messages are sent and the next action
in the list is executed in the same round.
4.3 Methods to be implemented
All computations of any strategy begin and end in the method void compute().
So, in this method, the robot has to evaluate its current knowledge via the
above-mentioned interfaces, it has to compute which messages to send to whom
and it has to set the next action to be executed if not set before. You are free
to call any external algorithms from this method and you may also use further
data structures of your own.
Strategies need not be useful for every type of robot. To define the applicability
of a strategy, the method boolean isApplicableTo(RobotType robotType)
has to be implemented. It must return true if and only if the given strategy shall
work for the type robotType. You can find the possible concrete robot types in
the package robot.control of the API. Six robot types with different restrictions exist, represented by their corresponding classes: Explorer, Transporter,
Worker, Relay, MultiRobot and the HomeBase (note that the home base has a
predefined and unmodifiable strategy though).
void initDataManagement(IDataParameters params) is the last abstract method of the class Strategy. Via the interface IDataParameters of the package
robot.strategy.dataaccess, you can set here (and only here) what sorts
of data the robot shall determine and store anyway. For instance, if a robot
does not use communication at all, initDataManagement(IDataParameters
params) should include the following lines:
params.saveRobotsInCommunicationRadius(false);
params.saveMessages(false);
The benefit of doing this is immense since it decreases both the running time
and the needed space. However, for the sake of avoiding collisions physically,
every robot must know about the robots and obstacles in its view radius. Thus,
the determination of these data cannot be turned off.
4.4 Access to Kernel classes
To be able to control a robot in its environment, the use of certain Kernel
classes can be necessary. Position (in the package kernel) and TreasureID
(in kernel.ids) were already metioned, but there are others: further IDs (e.g.
RobotID or RobotIDExplorer in the package kernel.ids) help you to handle
robots and objects while MessageInformation (in kernel) is needed for sending messages and so on.
Since all these classes are declared as public, you can import them into your
concrete strategy. That means, if you want to make use of certain classes simply
browse the different Kernel packages in the API to find out what you need.
4.5 Tactics
Tactics may be considered as local strategies or sub-strategies being encapsulated in at least one separated class. There is a whole framework for around
this concept, making the tactics modularized and standardized through clearly
defined interfaces and abstract classes.
At first, we will describe the necessary steps to implement a new and examplary tactic ExampleTactic. A tactic always needs to be embedded in a
TacticProvider, providing the actual methods used by the tactic. The rationality behind it is that once you write a tactic, the methods from the
TacticProvider can be reused by other tactics embedded there. Therefore,
the acutal tactic is realized as an inner class of a derived TacticProvider. The
following steps have to be done for all tactics.
1. Either search for classes that are derived from TacticProvider or derive
one yourself (e.g. ExampleProvider) and implement the abstract methods
(see Javadoc).
2. Create an inner class ExampleProvider that implements one of the specific interfaces derived from ITactic, for instance IMovementTactic.
3. Implement all the methods by preserving the following semantic scheme:
a) The method update() obtains all data necessary to determine whether the tactic is able to perform an action or not. This is done via the
derived variables from TacticProvider pointing to all the interfaces
a strategy has also access to. For example, the ActionList may be accessed with this.host.getActionList(). Particulary, the interface
ITacticHost provides access to certain methods of the Strategy.
b) With hasAction() it is afterwards possible to ask the tactic whether
an action is available or not.
c) The method performAction() may then be called to finally execute
the action. The execution is performed via the derived interfaces
mentioned before.
4. The tactic need a unique name, e.g. ExampleTactic, and needs to be incorporated in the corresponding methods of ExampleProvider.
5. The name of the tactic finally needs to be written in the XML file TacitLookupTable.xml which is located in the directory resources.
After implementing the functionality of the tactic it may then be used by
a strategy. In the constructor of a concrete strategy it is now possible to
load and initialize the tactic by simply calling, for instance, this.myTactic
= this.tacticManager.useMovementTactic(¨
ExampleTactic"). In this case,
the member variable myTactic must be of type IMovementTactic. The successive application is quite easy. The abstract class Strategy calls the update()
method of all its registered tactics at the beginning of its computeNextStep()
methods. So the usage of a tactic basically reduces to check if a tactic has an action available to perfom by calling this.myTactic.hasAction(). If so, the tactic may decide to execute this action with this.myTactic.performAction().
For the different sub-interfaces of ITactic there are some additional methods
available to help the strategy in deciding whether to execute a particular tactic
or not. For instance, the method getTargetPosition() in IMovementTactic
allows to check which destination is targeted by the tactic even before calling
the performAction() method.
5 Visualization
The visualization basically consists of the four parts: menu bar, main view, mini
map and detail view. It is shown in figure 12.
1
5
3
2
5
6
4
7
6
7
menu bar (1), main view (2), mini map (3), detail view (4), totally explored
map (5), by single robot explored map (6), recorded paths of a robot (7)
Abbildung 12: The visualization
5.1 Menu Bar
A connection to the kernel can be established via the connect-button. In the
following dialog the host can be selected by its IP or name. If the kernel is not
running on its default port (shown by a missing “default” in the “port”-entry
of the kernel-GUI), the port has to be attached to the IP or name with a colon
“:”.
The following buttons are only available if connected to a kernel: the pingbutton makes it possible to test whether the kernel is still alive and working.
Play-/pause/stop-buttons and the speed bar have the same functionality as in
the kernel. The “Show explored terrain”-button activates a mode in the 2Dview darkening the terrain that has not yet been explored by any robot (see (5)
in figure 12).
It is possible to let the visualization automatically connect to a kernel when
starting. This can be set via command line option:
-Dde.upb.smartteam.visu.autoconnect=hostname
5.2 2D View (main view or mini map)
Here anything is shown in 2d bird’s eye view. The explored terrain of one ore
more robots can be displayed, as well as the ways single robots have run (see
(5), (6) and (7) in figure 12). In the mini map one also can see and manipulate
the section shown in main view.
left mouse button (mini map: “remote control main view”)
• click/drag: set/drag shown sector in main view
left mouse button (main view: “select”):
• click/drag: select robots/treasures (discard old selection)
• additionally hold shift button: add new selection to old one
• additionally hold ctrl button: remove new selection from old one
middle mouse button (“navigation”):
• drag: move shown terrain
• wheel: zoom
• double click: show all robots (main view)
show whole terrain (mini map)
5.3 3D View
Here anything is shown in 2d from an arbitrary perspective. The presentation
of explored terrain or visited paths is not possible.
left mouse button (“select”):
• click/drag: select robots/treasures (discard old selection)
• additionally hold shift button: add new selection to old one
• additionally hold ctrl button: remove new selection from old one
middle mouse button (“navigation”):
• drag: move shown terrain1
• wheel: zoom
• click: follow robots on/off
right mouse button (“look around”)
• click: look around with the mouse (permanently on/off)
• drag: look around with the mouse (as long as mouse button is pressed)
keyboard (“walkthrough”):
• arrow keys, page up/down (alternatively: W,A,S,D,E,C): forward, left,
backward, right, up, down
• hold shift: move faster
• hold ctrl: move slower
keyboard (“rendering”):
• X: toggle automatic frame rate control (image quality) on/off
• +/–: change image quality manually (shift/ctrl: faster/slower)
• Y: show information about rendering on command line
It is possible to (de)activate the loading of the 3d-map permanently or to be
asked each time. This can be controlled with the following command line option:
• -Dde.upb.smartteam.visu.load3D=yes: always load 3d-map
• -Dde.upb.smartteam.visu.load3D=no: never load 3d-map
• no command line option: always ask whether to load or not
5.4 Detail View
If robots/treasures/flags are selected further information can be seen in the
detail view. With the option “Show explored terrain” (see (6) in figure 12) can
be displayed, what parts of the map are known to the specific robot (because of
exploration by himself or map exchange with another robot). With the option
“Record visited paths” (see (7) in figure 12) the recording of the route a robot
runs is activated.
1
because of technical problems the displayed section will not be moved until the mouse
button is released
5.5 Typical Error Messages
• “no kernel found”: probably no kernel is started. The visualization cannot
connect to a kernel until the kernel-GUI (the window with play-button)
is displayed.
• “Terrain2D could not be loaded”: probably the relevant “v2d”-file does
not exist. In the subfolder “resources/xml Files/topology/” of the current
working directory a file has to exist that is called exactly like the XML-file
selected in the kernel but ending with “v2d” instead of “xml”.
• “3D terrain not found”: analogue with “v3d” instead of “v2d”.