1
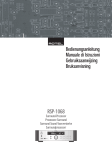
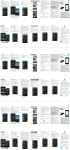
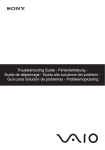
NL
DATEQ SPL5 Software handleiding
Introductie
3
Introductie
SPL 5
Power
LIMITER
µP Controlled Audio Level Guard
TimeSlot
1
2
3
Audio present
Audio reduction
Overload
RS232
Reduction
SPL5
Sanction
De SPL5 is een geluidsdrukbegrenzer die de mogelijkheid heeft om de geluidsdrukgegevens op te
slaan voor een periode van twee maanden. Met behulp van de bijgeleverde PC software kunnen
de gegevens worden weergegeven.
Alle instelling van de limiter kunnen met behulp van de PC worden aangepast.
Om apparaat-instellingen te kunnen wijzigen is een wachtwoord nodig. Door deze
wachtwoordbeveiliging kunnen onbevoegde gebruikers geen aanpassingen maken.
Tevens wordt door het apparaat een logboek bijgehouden met de laatste wijzigingen. Hierin is snel
terug te vinden welke instellingen zijn aangepast, op welk tijdstip en door wie.
De bijgeleverde PC-software bestaat uit twee delen:
C SPL5 configuratie programma:
Dit is het hoofdprogramma waarin de instellingen kunnen worden uitgelezen en eventueel
aangepast. Dit programma is op naam geregistreerd. Als aanpassingen in de limiter worden
gemaakt zullen de gegevens van de gebruiker in het interne geheugen van de limiter worden
bewaard, zodat achteraf kan worden gezien door wie en wanneer de aanpassingen zijn
gemaakt.
Dit programma maakt verbinding met de communicatie module.
C Communicatie module:
Dit programma onderhoud de communicatie met de limiter. Op dit server programma kan het
SPL5 configuratie programma inloggen.
In de praktijk moeten de twee programma's niet op dezelfde computer worden uitgevoerd. Zolang
de computers waarop de twee afzonderlijke programma's draaien met elkaar in verbinding staan
via een netwerk (een lokaal netwerk, of het internet) is communicatie met de limiter mogelijk.
Dit maakt het dus mogelijk om op afstand de limiters uit te lezen of te controleren, zolang de
limiter is aangesloten op een computer die verbinding heeft met internet is communicatie mogelijk!
4
Installatie
DATEQ SPL5 Software handleiding
NL
Installatie
De SPL5 software is getest met de volgende Microsoft Windows versies:
C Microsoft Windows 98
C Microsoft Windows 2000
C Microsoft Windows XP
C Microsoft Windows server 2003
Communicatie programma
Het communicatie programma wordt geïnstalleerd op de computer die verbinding heeft met de
limiter. De limiter wordt op de computer aangesloten via de RS232 poort. Als uw computer niet
standaard is uitgerust met een RS232 poort kan ook een USB naar RS232 verloopkabeltje worden
gebruikt. Dit soort kabels is bij de betere computerwinkel te koop, of kan via DATEQ worden
besteld.
Configuratie programma
Het configuratie programma wordt geïnstalleerd op de computer waarmee de limiter wordt
uitgelezen, of geconfigureerd.
Dit kan dezelfde computer zijn waarop ook het communicatie programma is geïnstalleerd.
Netwerk protocollen
Het is belangrijk dat het TCP/IP protocol is geïnstalleerd op uw computer, omdat de programma's
deze protocollen gebruiken om met elkaar te communiceren. Als u met uw computer pagina's op
het internet kunt opvragen, dan zijn deze protocollen geïnstalleerd.
Als u (nog) geen internet-aansluiting op uw computer heeft kunt u op de
volgende manier controleren of de protocollen zijn geïnstalleerd:
C Ga naar het start menu,
C Open het configuratiescherm,
C Open het scherm 'netwerkverbindingen',
C Selecteer uw netwerk adapter,
C Klik op 'eigenschappen'
C In dit scherm (figuur 1) zijn de geïnstalleerde protocollen te zien.
Figuur 1:
Netwerkprotocollen
weergeven
Netwerk configuratie
Als de twee computers op een lokaal (bedrijfs-)netwerk draaien kunnen de
computers meestal zonder problemen met elkaar communiceren. Als op de computers een firewall
is geïnstalleerd zal deze toegang tot het netwerk moeten verlenen aan de twee programma's. Het
communicatie programma is een server programma. Dit betekent dat het inkomende verbindingen
vanaf het netwerk moet accepteren. Als er een firewall actief is zal deze een dergelijke vraag
stellen.
Het communicatieprogramma heeft ook verbindingen met het netwerk nodig. Sommige firewalls
zullen ook hiervoor een vraag stellen.
Hieronder staat een voorbeeld instelling voor de firewall van het besturingssysteem Windows XP.
Als de limiter vanaf het internet benaderd moet worden zal ook de router in het netwerk zodanig
ingesteld moeten worden dat aanvragen vanaf het internet worden gerouteerd naar de computer
waarop de communicatie server actief is. De exacte instellingen zijn afhankelijk van het merk en
type router dat u heeft. Hieronder staat een voorbeeld instelling voor een DrayTek router (type
Vigor 2200).
NL
DATEQ SPL5 Handleiding
Installatie
Voorbeeld instellingen voor de Microsoft Windows XP Firewall
Om de firewall instellingen van Windows XP aan te passen voer u de volgende stappen uit:
C Ga naar het start menu,
C Open het configuratiescherm,
C Open het scherm 'netwerkverbindingen',
C Selecteer uw netwerk adapter,
C Klik op 'eigenschappen',
C Selecteer het tab-blad 'geavanceerd',
C Als het vinkje 'Mijn computer en netwerk
beveiligen...' is aangevinkt staat de
Figuur 3: Service aan de
firewall aan. In dit geval zult u bij de
firewall toevoegen
server een instelling moeten wijzigen.
Figuur 2: De firewall in XP is
Druk in dat geval op 'Instellingen' (zie
actief
figuur 2),
C Druk op 'Toevoegen', (zie figuur 4) nu
kunt u een nieuwe service aan de computer toevoegen (zie figuur 3),
C Geef eerst een naam aan de service (bijvoorbeeld 'SPL5 server')
C Voer nu het IP-adres van uw computer in. U kunt hier volstaan
met de tekst '127.0.0.1'
C Als nummer van de interne en de externe poort kiest u 10001
C In het vakje TCP moet een bolletje staan
C Druk op OK. De firewall laat nu inkomende verbinden naar de SPL5
server toe. Zie figuur 4.
Om het communicatieprogramma verbinding met de server te laten
maken zijn geen speciale handelingen nodig.
Figuur 4: SPL5 server is
actief
5
6
Installatie
DATEQ SPL5 Software handleiding
NL
Voorbeeld instellingen voor toegang vanaf het internet
De volgende figuren geven aan hoe een router zodanig wordt ingesteld dat verbindingen vanaf
internet worden doorgestuurd naar de computer waarop de SPL5 server actief is. De exacte
instellingen zijn afhankelijk van merk en type router.
Meestal wordt het extern (op internet) beschikbaar maken van een server uit het lokale netwerk
aangegeven met 'Virtual servers', 'Port forwarding' of 'Port redirection'.
Figuur 6: Port redirection
Figuur 5: NAT setup
Figuur 7: Port en adres instellingen
C
C
C
C
Open het configuratiescherm van uw router
Kies hier het menu 'NAT setup' (figuur 5)
Kies vervolgens het menu 'Port redirection' (figuur 6)
In het volgende scherm (figuur 7) kunt u het adres van de lokale computer, het externe
poortnummer en het interne poortnummer instellen. Voor de SPL5 server moet u altijd poort
10001 gebruiken.
Belangrijk:
C Vraag altijd toestemming van de systeembeheerder voordat u dit soort wijzigingen aanbrengt.
Als u twijfelt, of niet bekend met de netwerkinstellingen, is het verstandig om
netwerkaanpassingen over te laten aan een netwerkbeheerder!
C Bij sommige internetaanbieders is het niet toegestaan om servers op internet aan te bieden.
Kijk dit na in uw contract, of raadpleeg de helpdesk van uw provider.
C Om de SPL5 server op internet beschikbaar te maken is het handig dat uw aansluiting altijd
hetzelfde externe IP-adres heeft (een zogenaamd vast IP adres). Er zijn aansluitingen met een
dynamisch IP adres. Dit houdt in dat het adres kan wisselen. Als het adres tussentijds wisselt is
het onmogelijk geworden om contact te leggen met de server.
C Het op internet bereikbaar maken van een poort op de computer kan beveiligingsproblemen
opleveren. Controleer daarom regelmatig of er updates beschikbaar zijn.
NL
DATEQ SPL5 Software handleiding
Communicatie server
7
De communicatie server
Dit programma is de koppeling tussen het netwerk en de SPL5. De SPL5 wordt met behulp van
een RS232 verbinding aangesloten op de computer. Als uw computer geen (vrije) RS232 poort
heeft dan kan ook een USB naar RS232 adapter
worden gebruikt.
Zodra het programma wordt gestart zal de
verbinding met de limiter automatisch worden
gemaakt. Hiervoor worden alle COM-poorten één Figuur 8: De communicatie server
voor één geprobeerd. Zodra de verbinding actief is verschijnt de tekst 'Connected to SPL' gevolgd
door het compoort nummer.
In het kader 'Server status' is te zien of de communicatie server op dit moment 'on-line' is. Als de
server off-line is wil dit zeggen dat het niet mogelijk is om verbindingen aan te gaan.
Netwerk adressen instellen
Voordat de server on-line kan gaan moet eerst worden aangegeven op welke adressen
verbindingen gemaakt mogen worden. Klik hiervoor met de rechter muisknop op het
serverscherm, kies in het menu 'Server settings' en daarna 'Bind server to IP-adresses'.
In dit scherm (figuur 9) kan worden ingesteld op welke IPadressen een verbinding met de server mag worden gemaakt. De
IP adressen hebben de volgende betekenis:
C 127.0.0.1:
Verbindingen met de lokale computer. Selecteer dit vinkje als
er zowel de server als het configuratie programma op dezelfde
computer draaien.
C 192.168.66.52:
Figuur 9: IP adressen instellen
Dit is het adres van de computer in het lokale netwerk. Dit
nummer is afhankelijk van uw netwerkconfiguratie, en kan dus een andere waarde hebben
(bijvoorbeeld 192.168.0.2 of 10.0.0.2 oid.)
C 192.168.66.53:
In dit voorbeeld heeft de computer twee netwerkkaarten (1x bedraad, 1x draadloos). Er kan dus
worden gekozen om de verbinding alleen via het vaste netwerk toe te staan.
Het is ook mogelijk om meerdere vinkjes in te schakelen.
Als dit scherm wordt afgesloten zullen de instellingen worden bewaard, en eventueel geactiveerd.
Indien er instellingen zijn veranderd zal een scherm komen waarin wordt gevraagd of u de
instellingen direct wilt activeren. Als u op 'Ja' klikt zullen actieve netwerkverbindingen worden
afgesloten. De server zal na het afsluiten van het scherm on-line gaan.
Wachtwoorden instellen
Voordat een externe computer verbinding kan maken met de communicatie server zal eerst een
wachtwoord moeten worden ingevoerd.
Er zijn twee soorten wachtwoorden:
C Wachtwoorden waarmee alleen leesrechten worden verkregen
C Wachtwoorden waarmee zowel lees als schrijfrechten worden
verkregen
Om de wachtwoorden in te voeren selecteert u het menu 'Server
Figuur 10: Wachtwoorden
settings', 'Set password'. Het scherm uit figuur 10 zal openen. Hierin
instellen
kunnen de verschillende wachtwoorden worden aangemaakt.
Als het scherm wordt afgesloten zullen de nieuwe wachtwoorden worden bewaard.
Computers die via de lokale verbinding inloggen (via adres 127.0.0.1) hoeven geen wachtwoord in
te voeren.
8
Communicatie server
DATEQ SPL5 Software handleiding
NL
Communicatie en netwerk monitor
Met behulp van deze twee schermen kunnen de actieve verbindingen worden bekeken. Alle
communicatie is hier zichtbaar te maken.
Communication monitor
De communicatie monitor geeft de data tussen de SPL5 en het server programma weer. Met
behulp van de schuif-regelaar onderin kan het niveau worden aangepast: helemaal linksom geeft
de minste meldingen; helemaal rechtsom de meeste.
Network monitor
Met behulp van de netwerk monitor kan worden gecontroleerd welke andere computers verbinding
(proberen te) maken met de server. Met behulp van de schuif-regelaar onderin kan het niveau
worden aangepast: helemaal linksom geeft de minste meldingen; helemaal rechtsom de meeste.
Logfiles bewaren
Het is mogelijk om de communicatie server de logfiles van de netwerkverbindingen te laten
bewaren op een zogenaamde syslog server. In Unix en Linux omgevingen zit een dergelijk
programma standaard geïnstalleerd. Voor Windows is een gratis syslog programma te
downloaden via www.kiwisyslog.com
Bij een Linux server moet de syslog server zodanig
worden ingesteld dat het loggen van externe
bronnen mogelijk wordt. Hiervoor moet in het
bestand /etc/services de service worden
toegevoegd: syslog 514/udp. Verder moet de
Figuur 11: De Kiwi syslog daemon
syslog daemon worden ingesteld om externe
logging toe te staan. Open het bestand /etc/init.d/syslog en zorg ervoor dat de daemon
wordt gestart met de optie syslogd -r. Sla het bestand op, en herstart de daemon. Pas indien
nodig de firewall instellingen aan.
Automatische updates
Als een vaste internetverbinding aanwezig is kan de communicatieserver automatisch zo nu en
dan controleren of er updates beschikbaar zijn. Deze optie is in te schakelen door in het menu te
klikken op 'Updates' en dan een vinkje te plaatsen voor 'Enable auto update'.
Er verschijnt een melding zodra software of firmware updates beschikbaar zijn.
Hints en tips
Extern IP adres opvragen
Als u de communicatie server zodanig heeft ingesteld om toegang via het internet te krijgen moet
u uw externe IP-adres weten om verbinding te kunnen maken. Dit kunt u achterhalen door in het
menu te klikken op 'Options' en dan 'What is my IP adres?'. Er verschijnt nu een melding waarin
uw IP adres wordt weergegeven. U heeft dit later nodig om het configuratie programma goed in te
kunnen stellen.
Serverprogramma verkleinen
Door in het menu 'Send to tray' aan te klikken zal het programma uit de taakbalk verdwijnen, en
alleen nog maar zichtbaar zijn in het systeemvak (naast de klok). Het DATEQ-logo zal zichtbaar
worden. Wanneer er iemand op de server is ingelogd zal een rood uitroepteken in het DATEQ
kader knipperen.
Door op het logo te klikken verschijnt het programma weer op de normale
Figuur 12: Het
manier.
systeemvak
NL
DATEQ SPL5 Software handleiding
Configuratie programma
9
Configuratie programma
Het configuratie programma is het deel van de software dat in de praktijk het meeste gebruikt zal
worden. Met behulp van dit programma kunnen alle
instellingen van de limiter worden uitgelezen en
bewaard.
Pas nadat het programma is geregistreerd wordt het
mogelijk om aanpassingen in de limiter te maken. Door Figuur 13: SPL5 configuratie programma
de softwareregistratie kan achterhaald door wie de limiter is geïnstalleerd.
Voordat een gebruiker aanpassingen in de limiter kan aanbrengen moet een wachtwoord worden
ingevoerd.
Via het internet zijn de laatste updates van de software te downloaden. Ook voor de eindgebruiker
is deze software beschikbaar. Doordat die software niet is geregistreerd zal het niet mogelijk zijn
om aanpassingen in de limiter te maken.
Verbinding maken met de communicatie server
Voordat er een verbinding met de communicatie server kan worden gemaakt moet eerst het
netwerk-adres van de server worden opgegeven. Druk hiervoor op 'Opties' en daarna
'Communicatie'.
Er zijn drie mogelijkheden:
1. De server draait op dezelfde computer als het configuratie programma. Selecteer in dit geval de
optie 'Verbonden met deze computer',
2. De computer is actief binnen het lokale (bedrijfs-) netwerk. Als het IP-adres bekend is kan de
optie 'Verbonden over het netwerk' worden geselecteerd, waarna het IP-adres in het tekstvak
eronder wordt ingevoerd. Indien het adres niet bekend is kan de knop 'Automatisch zoeken'
worden ingedrukt. Het programma zal op het lokale netwerk zoeken naar een SPL5 server. Alle
servers zullen worden gemeld, en het adres wordt automatisch ingevuld.
3. De computer is ergens op het internet actief. Kies nu ook de optie 'Verbonden over het
netwerk', de knop automatisch zoeken zal hier niet werken. Het IP-adres moet bekend zijn. Vul
het adres in het tekstvak in.
Druk op de knop 'Test'. Als de verbinding kan worden gemaakt verschijnt er een melding. Het
scherm kan nu worden afgesloten.
Maak de verbinding door in het menu 'Verbinding' de optie 'Verbinden' te kiezen. Als de server
over het netwerk wordt benaderd zal een wachtwoord moeten worden ingevoerd. Er zijn twee
soorten wachtwoorden: alleen lezen, en lezen+schrijven.
Als de server op de lokale computer wordt benaderd is het invoeren van een wachtwoord niet
nodig.
Mogelijke problemen
C De knop 'Automatisch zoeken' werkt niet. Als ik het adres invoer en op 'Test' druk heb ik wel
verbinding
C Automatisch zoeken werkt alleen binnen een lokaal netwerk (subnet). Bevindt de server zich
buiten het lokale netwerk of achter een router binnen het lokale netwerk?
C Worden de aanvragen door een firewall geblokkeerd? Er wordt gebruik gemaakt van het
UDP protocol; poort 10001.
C De server is actief op een computer in het lokale netwerk; de firewall is uitgeschakeld, maar ik
krijg toch geen verbinding
C Is de SPL-server wel actief op het netwerk? In figuur 9 kan worden aangegeven op welke
adressen de server te benaderen moet zijn. Als alleen '127.0.0.1' geselecteerd is zal de
server niet over het netwerk te benaderen zijn, maar alleen op de lokale computer.
10
Configuratie programma
DATEQ SPL5 Software handleiding
NL
Instellingen van de limiter uitlezen
Alle instellingen en de geluidsdruk informatie kan door elke gebruiker worden uitgelezen, zolang
ze een toegangs wachtwoord tot de server hebben.
Uitlezen systeeminstellingen
Selecteer uit het menu de optie 'Lees systeeminstellingen' (zie
figuur 14).De informatie zal worden opgehaald uit de SPL, en in
het scherm getoond.
Hieronder wordt de betekenis van de verschillende velden
uitgelegd:
Figuur 14: Systeeminstellingen lezen
Naam
Omschrijving
Maximaal niveau
Dit is de maximaal toegestane geluidsdruk,
gemeten in dBA
Uitgangsniveau
Geeft aan hoeveel dB de uitgang standaard
verzwakt wordt om bij normaal gebruik de
maximale geluidsdruk te behalen
Microfoon correctie
De correctiefactor van de microfoon ten opzichte
van het geijkte meetpunt
Maximale verzwakking
Het aantal dB's dat de limiter maximaal mag
bijregelen
Tijdsduur sanctie
Aantal seconden dat een sanctie actief blijft
Tijdsduur tot sanctie
Indicatie hoe snel de limiter tot een sanctie
overgaat
Inschakelvertraging
Aantal seconden dat de uitgangen afgeschakeld
blijven als het apparaat wordt ingeschakeld
Configuratie geldig
Als tijdens het uploaden van de configuratie iets
mis gaat wordt de configuratie ongeldig gemaakt.
Het geluid wordt sterk verzwakt
Figuur 15: Systeeminstellingen
Figuur 16: Eigenaars informatie
Als op de knop 'Eigenaars informatie' wordt gedrukt zal de eigenaar van het apparaat zichtbaar
worden. Dit kan door de installateur worden ingesteld. Deze gegevens worden ook op afdrukken
zichtbaar gemaakt.
Tijdsloten
In dit scherm kunnen de verschillende tijdsloten worden
uitgelezen. De tijdsloten geven aan hoeveel dB het maximale
geluidsdrukniveau wordt verzwakt. Op deze manier is het
mogelijk per dag van de week drie verschillende maximale
niveau's in te stellen.
In het voorbeeld van figuur 17 gaat tijdslot één in op zondag om
7 uur in de ochtend. Voor die tijd zal tijdslot drie van zaterdag Figuur 17: Tijdsloten uitlezen
actief zijn.
Zomertijd tabel
De klok van de SPL5 zal zich automatisch aanpassen aan
zomer,- en wintertijd. De tabel voor zomer,- en wintertijd is
standaard al in de limiter voorgeprogrammeerd.
Figuur 18: Zomertijd tabel
Klok uitlezen
Er wordt een scherm weergegeven waarin de huidige systeemtijd van de
SPL5 wordt getoond.
Keuringsdatum uitlezen
In dit scherm is af te lezen voor welke datum de limiter opnieuw gekeurd
dient te worden. Als het vakje 'geen keuringsdatum' is aangevinkt dan is
Figuur 19: Keuringsdatum
NL
DATEQ SPL5 Software handleiding
Configuratie programma
11
deze optie niet ingeschakeld.
Gegevens opslaan in bestand
Alle instellingen van de limiter kunnen worden bewaard in een bestand, zodat deze later makkelijk
kunnen worden teruggeplaatst. Selecteer in het menu de optie 'Opslaan in bestand', geef een
bestandsnaam en het bestand wordt aangemaakt.
Algemene programma informatie
Door in het hoofdmenu de keuze 'Informatie' te
selecteren wordt een scherm geopend waarin informatie
over de software-registratie en, als er verbinding met een
limiter is, informatie over de limiter te vinden is.
Geluidsdruk gegevens opvragen
Klik in het menu 'SPL' de optie 'Lees geluidsdruk
Figuur 20: Algemene informatie
gegevens'. Het scherm uit figuur 21 zal worden geopend. In de
selectielijst zijn alle beschikbare data te vinden die in het
geheugen van de limiter zijn opgeslagen. Door een selectie uit
de lijst te maken zullen de gegevens van die dag worden
gedownload.
In deze lijst kunnen de volgende meldingen voorkomen:
Melding
Betekenis
Ingeschakeld
De SPL5 is aangezet
Deksel geopend
Het deksel wordt geopend
Sanctie
De geluidsdruk in de ruimte was te hoog, en een sanctie is
actief geworden. Tevens wordt aangegeven of het geluid
door de limiter, of door een live-band werd geproduceerd
SPL Actief
De SPL geeft ieder uur een melding om aan te geven dat
het apparaat aan stond
Figuur 21: Geluidsdruk gegevens opvragen
Foutmeldingen:
SPL in orde
SPL is hersteld van een eerdere fout
Voedingsprobleem De voeding van de SPL voldoet niet. Dit kan door onder,- of
overspanning komen, of door een defect aan het apparaat.
Het is mogelijk dat andere functies van de SPL nu ook niet
goed werken.
Microfoon fout
De meetmicrofoon is defect, of niet goed aangesloten
Hardware
probleem
Tijdens een zelftest is een fout in de hardware van de SPL
gevonden. Laat het apparaat controleren bij uw dealer
Deksel open
Het deksel van de SPL is geopend (of geopend geweest).
Gebruikt de sleutel om de limiter weer te activeren
Geheugen vol
Het geheugen van de limiter is (voor deze dag) volledig
gevuld. Er worden geen melding meer opgeslagen. Er
kunnen 96 meldingen per dag worden bewaard
Config. ongeldig
Tijdens het uploaden van de limiter is iets mis gegaan,
waardoor de configuratie mogelijk niet goed is bewaard
Niet afgeregeld
De keuringsdatum van de limiter is overschreden, of de
limiter is nog niet afgeregeld
Figuur 22: Gegevens van 1 dag
Door op de knop 'Gebeurtenissen afdrukken' te drukken wordt de huidige dag afgedrukt.
12
Configuratie programma
DATEQ SPL5 Software handleiding
NL
Van de geselecteerde dag kan ook een grafische weergave van de geluidsdruk worden gegeven.
Druk hiervoor op de knop 'Toon grafiek'.
In de grafiek is de volgende informatie af te lezen:
C Rood/ blauw gestreepte lijn
Dit geeft de maximale geluidsdruk weer. De
stappen in de maximale geluidsdruk worden
veroorzaakt door de TimeSlot instellingen.
C Rode lijn
Figuur 23: Grafische weergave geluidsdruk
Maximale geluidsdruk (gemeten in dB)
C Lichtblauwe lijn
Meetwaarden van de geluidsdruk (gemeten in dBA)
C Donkerblauwe lijn
Gemiddelde geluidsdruk over 15 minuten
Het is mogelijk in de grafiek in te zoomen door met de muis een kader te slepen op de plaats waar
ingezoomd dient te worden. Als er geen gegevens in de grafiek staan (zoals in figuur 23 na 14:30)
dan heeft het apparaat op dat moment niet aangestaan. De gegevens kunnen worden
geëxporteerd naar een bestand, zodat deze later in een spreadsheet kunnen worden bewerkt.
Systeem informatie
In het menu 'Systeem informatie' kan worden opgevraagd
wanneer er aanpassingen aan het systeem zijn gemaakt. Druk
op 'Upload geschiedenis'. In dit scherm is af te lezen door
welke installateur het systeem is aangepast, en welke
aanpassingen zijn gemaakt.
Figuur 24: Installatie geschiedenis
Systeem status
Het scherm systeem status geeft de huidige geluidsdruk weer. Dit kan handig zijn om op afstand
uit te lezen hoe hard er gespeeld wordt.
Algemene programma opties
De SPL5 software is in verschillende talen in te stellen. Selecteer in het menu 'Opties',
'Programmataal' uw gewenste taal.
C De SPL5 software kan automatisch op internet controleren of er updates beschikbaar zijn. Door
deze optie aan te zetten wordt u gewaarschuwd als er nieuwe versies beschikbaar zijn. Nieuwe
firmware kan eenvoudig in de limiter worden geladen. Bij PC software updates kan het oude
programma worden overschreven; de registratie gegevens staan in een los bestand.
C
NL
DATEQ SPL5 Software handleiding
Configuratie programma
13
Instellingen aanpassen
Voordat instellingen aangepast kunnen worden moet een wachtwoord worden ingevoerd. Als op
afstand op de server wordt ingelogd is ook een lees/ schrijf toegangswachtwoord voor de server
nodig. Zie pagina 9.
Nadat is ingelogd op de server moet het wachtwoord worden ingevoerd dat bij de software
registratie hoort. Doe dit door het menu 'SPL' te kiezen, en daarna 'Voer wachtwoord in'. Als dit
wachtwoord goed is ingevoerd wordt in het 'SPL' menu de keuze 'Instellingen aanpassen'
beschikbaar.
Het scherm waarin de instellingen aangepast
kunnen worden heeft dezelfde structuur als het
uitlezen van de instellingen. Het is nu echter
mogelijk geworden om alle waardes aan te passen. Figuur 25: Systeem instellingen aanpassen
Door op de knoppen te drukken zullen de waardes
aangepast worden. Om de instellingen te bewaren kan het scherm worden afgesloten. Er zal een
scherm verschijnen waarin wordt gevraagd of de nieuwe instellingen moeten worden bewaard.
Hierna zal de vraag worden gesteld of de nieuwe instellingen direct moeten worden geactiveerd.
Klok gelijkzetten
Door het menu 'Instellingen aanpassen', 'Klok gelijkzetten' te kiezen zal de SPL5 systeemklok
worden gelijkgezet met de tijd van de computer. Let er dus op dat de PC klok goed staat voordat
de tijd naar de limiter wordt verzonden. Als u een internetverbinding heeft kunt u de PC-klok over
het internet laten gelijkzetten.
Keuringsdatum aanpassen
Het is mogelijk dat de limiter om gezette tijden, bijvoorbeeld
ieder jaar, opnieuw gecontroleerd dient te worden. Om na een
bepaalde tijd de keuringsdatum te laten verlopen dient het
vakje 'Geen keuringsdatum' uitgeschakeld te worden. In de
rechter kalender kan de datum ingesteld worden waarop de
goedkeuring verloopt. Na deze datum zal een waarschuwing in
beeld verschijnen en het geluid wordt 18dB verzwakt.
Figuur 26: Keuringsdatum instellen
Automatische installatie
De limiter kan zichzelf volledig automatisch afregelen. Hiervoor moet de audio-installatie volledig
aangesloten staan. Kies bij de automatische installatie een geluidsbron met weinig dynamiek.
Hierdoor wordt het afregelproces makkelijker gemaakt. Kies het menu-item 'Automatische
installatie'. In het scherm zullen alle stappen één voor één worden uitgelegd:
C Stel het uitgangsniveau van de mengtafel op 'nominaal' in. Dat wil zeggen: VU meters volledig
in het groen, en af en toe een aantal rode LED's,
C Draai de eindversterkers naar vol vermogen,
C Voer de gewenste maximale geluidsdruk in,
C De limiter zal nu langzaam het uitgangsniveau aanpassen, totdat de gewenste geluidsdruk
wordt gehaald. Lees ondertussen op de geijkte geluidsdrukmeter de waarde in de zaal af,
C Als de niveau regeling klaar is zal de gemeten geluidsdruk worden gevraagd. Hiermee wordt de
gemeten microfoonwaarde gecompenseerd.
De limiter is nu afgeregeld. Controleer de instellingen door de mengtafel (iets) te oversturen. De
limiter zal nu ingrijpen; het niveau wordt automatisch aangepast. Eventueel kunnen de
automatische instellingen achteraf handmatig worden bijgesteld.
SPL5_040825_V1.0
EN
DATEQ SPL5 Software manual
Introduction
3
Introduction
SPL 5
Power
LIMITER
µP Controlled Audio Level Guard
TimeSlot
1
2
3
Audio present
Audio reduction
Overload
RS232
Reduction
SPL5
Sanction
The SPL5 is a limiter that allows you to store the sound pressure level data for a period of two
months. This data can be read by means of the computer software. The software also allows to
change all the limiters' settings. To adjust the settings a password is needed. The use of
passwords prevents unauthorised people to change the settings.
The limiter keeps a logging of the last configuration changes; this allows to quickly overview which
settings have been changed, when and by whom.
The software consists of two parts:
C SPL5 configuration program:
This is the main program. Here the settings can be read out, and if needed adjusted. This
program is registered. When alterations in the limiters' settings are made, the username, date
and the parts of the configuration that were changed will be stored into the internal logfile.
This program connects with the communication module.
C Communication module:
This program maintains the communication with the limiter. The SPL5 Configuration program
can connect to this server program.
Practically the two programs don't have to be run on the same computer. As long as the
computers on which the two separate programs are running are connected to each other by a
network (an internal network or internet) communication with the limiter is possible. This allows
you to remotely read out or check the limiter, as long as it is connected to a computer that is
connected with the internet.
4
Installation
DATEQ SPL5 Software manual
EN
Installation
The SPL5 software is tested with the following Microsoft Windows versions :
C Microsoft Windows 98
C Microsoft Windows 2000
C Microsoft Windows XP
C Microsoft Windows server 2003
Communication program
The communication program has to be installed on the computer that is connected to the limiter.
The limiter is connected to the computer by means of a RS232 port. If your computer does not
have a RS232 port, it is possible to use a USB to RS232 cable. This cable is available at the more
equipped computer stores or can be supplied by DATEQ.
Configuration program
The configuration program is to be installed on the computer which is used to read out the limiter.
This can be the same computer on which the communication program is installed.
Network protocols
It is important that the TCP/IP protocol is installed on your computer, because the programs use
these protocol to communicate with each other. If you can view pages on the internet with your
computer these protocols are already installed. If you don't have internet
access on your computer you can check if the protocols needed are installed
on your computer with the following procedure:
C Go to start,
C Open the configuration panel,
C Open the network screen,
C Select your network adapter,
C Click on 'properties'
C This screen (figure 1) shows the installed protocols.
Figure 1: Installed
Network configuration
protocols
If the two computers are connected to a local network they usually
communicate without any problems. If a firewall is installed on the computer, it has to allow
network access to both programs. The communication program is a server program. This means
that it should allow incoming data traffic from the network. If a firewall is active it could ask if this is
allowed. The communication program also needs connections with the network. Some firewalls will
also question about this. Below is an example of settings for the firewall supplied with Windows
XP.
When the limiter has to be accessed from the internet, the network router has to be instructed to
forward incoming data to the appropriate computer. The exact settings varies from the type and
brand of the router. Below is an example for a Draytek router (type Vigor 2200).
EN
DATEQ SPL5 manual
Installation
5
Example settings for the Microsoft Windows XP Firewall
To configure the firewall settings for Windows XP follow the next steps:
C Go to start menu,
C Open the configuration panel,
C Open the network screen,
C Select your adaptor,
C Click 'properties',
C Select the tab 'advanced',
C When the checkbox 'Protect my computer
with a firewall...' is checked, the firewall is
activated. In this case you will have to
alter a setting in the firewall. Click on
Figure 2: XP firewall is
'settings'. See figure 2,
activated
C Click 'add', (figure 4) now you can add a
new service to the computer (figure 3),
C First, give a name to the service (For example 'SPL5 server')
C Now fill out the IP-address of your computer. '127.0.0.1' is
enough,
C The number for the internal and external port is 10001.
C The box 'TCP' should be checked,
C Click OK. The firewall will now allow incoming connections to the
SPL5 server. See figure 4.
No special actions are needed to allow the communication program to
connect with the server.
Figure 3: Add a service to
the firewall
Figure 4: SPL5 service is
activated
6
Installation
DATEQ SPL5 Software manual
EN
Example settings for internet access to the SPL5
The following images show how a router is set to redirect the connections from the internet to the
computer on which the SPL5 server is active. The exact settings depend on the brand and type of
the router.
Allowing external access from the internet is often called as 'Virtual servers', 'Port forwarding' or
'Port redirection'.
Figure 6: Port redirection
Figure 5: NAT setup
Figure 7: Port and address settings
C
C
C
C
Open your routers' configuration screen
Select the menu 'NAT setup' (figure 5)
Now select 'Port redirection' (figure 6)
In the following window (figure 7) the address and port numbers of the local computer can be
entered. The SPL5 server uses port number 10001.
Important:
Always ask your system administrators' permission to make these type of adjustments. If you
doubt, or are not familiar with network settings, ask your network administrator for assistance!
C Some internet service providers do not allow their clients to add servers to the internet. Please
check your contract or inform with your ISP.
C Your connection to the internet needs to have a static IP-address to make the SPL server
available over the internet. Some providers use dynamic IP-addresses. This means your IPaddress can change after some time. This makes it impossible to connect to the server.
C Opening a port to the internet is always a security risk, therefore check for updates regularly,
and do not make the limiter available on the internet is not really needed.
C
EN
DATEQ SPL5 Software manual
Communication server
7
The communication server
This program is the interconnection between the network and the SPL5. The SPL5 has to be
connected to the computer with a RS232 connection. A USB to RS232 adaptor can also be used if
your computer does not have a (free) RS232 port.
A connection with the limiter will automatically be
established as soon as the program is started. The
program tries all COM-ports one by one. As soon as
the connection is made the text 'Connected to SPL' Figure 8: The communication server
followed by the COM port number appears.
The screen 'Server status' shows whether the communication server is on-line or not. If the server
is off-line it means no connections are possible at the moment.
Configure network addresses
Before the server can go on-line you will have to configure which network addresses the server will
bind to. Right click your mouse on the server screen and select 'Server settings' in the menu and
'Bind server to IP-addresses'.
In this screen (figure 9) which IP-addresses will be used for the
server. The addresses mean the following:
C 127.0.0.1:
Connections with the local computer. Select this check box if
both the server program and the configuration program are
running on the same computer.
C 192.168.66.52:
This is the address of the computer in the local network. This
number depends on your network configuration and may have Figure 9: selecting IP
addresses
another value. (for example 192.168.0.2 or 10.0.0.2 or
something like that).
C 192.168.66.53:
In this example the computer has two network adaptors (1x wired, 1x wireless). One can, for
example, choose to allow only connections over the wired network.
It is also possible to check more than one box.
If the screen is closed the settings will be saved and, if needed, activated. If settings have been
altered a pop up screen will appear asking you to activate the changes. If you click on yes the
active network connections will be shut down. The server will go on-line after closing he screen.
Setting passwords
Before an external computer can connect to the communication server a password is required.
There are two types of passwords:
C Read-only passwords
C Full access (read and write) passwords
Select from the menu 'Server settings', 'Set password' to set the
passwords. The screen as shown in figure 10 will open. This allows the
setting of the passwords. After closing the screen the new passwords
are saved. Computers which log in over the local connection (IPaddress 127.0.0.1) do not need to enter a password.
Figure 10: Adding passwords
8
Communication server
DATEQ SPL5 Software manual EN
Communication and network monitor
With help of these two windows the active connections can be monitored. All communication can
be made visible here.
Communication monitor
The communication monitor shows the data traffic between the SPL5 and the server program. The
slider at the bottom can be used to change level of logging. Fully to the left gives the least
messages, and fully to the right most.
Network monitor
With help of the network monitor you can overview which other computers are connecting. With
help of the slider the logging level can be adjusted. Fully to the left gives the least messages, and
fully to the right most.
Saving logfiles
It is possible to save the communication log files to a so called syslog server. Linux and Unix
operating systems have such a program installed. For a windows computer you can download one
at www.kiwisyslog.com.
When using a Linux server you'll have to adjust the
syslog server in such a way that external logging is
possible. To do so, the file /etc/services has to
be changed. Add the following service: syslog
514/udp. Furthermore the syslog daemon must
allow external messages from being logged. Open Figure 11: The Kiwi syslog daemon
the file /etc/init.d/syslog and change the start process in a way that the daemon will be
loaded with the option -r: syslogd -r. Save the file, and restart the daemon. Adjust your firewall
settings if needed.
Automatic updates
If the computer that runs the communication program is connected to the internet, the
communication server can check for updates at regular intervals. This option is available by
checking the box 'Enable auto update' in the menu 'Updates'.
A message appears as soon as new software or firmware updates are available.
Hints and tips
Request your external IP-address
If the communication server accepts connections from the internet you will need to know your
external IP-address to be able to connect to the server. You can find your external IP-address by
clicking 'Options' in the menu, and then 'What is my IP address?'. A message will appear with your
IP-address. You will need this at a later moment when using the configuration program.
Minimising the server program
The program will disappear from the task bar by clicking 'Send to tray' in the menu, but it remains
visible in the system tray (next to the clock). The DATEQ logo will appear. When someone logs on
to the server a red exclamation sign will blink in the DATEQ box.
By clicking on the logo the program will return to its previous size.
Figure 12: The system
tray
EN
DATEQ SPL5 Software manual
Configuration program
9
Configuration program
The configuration program is the part of the software that will be used most frequently. With help
of this program all settings can be read out and saved.
After registering the program it is possible to alter
settings in the limiter. Due to the registration it is
possible to recall who installed the limiter.
Before a user can make alterations in the limiter a
password needs to be entered.
figure 13: SPL5 configuration program
The latest updates of the software can be downloaded from the internet. This software is also
available to the end-user. Because this software is not registered it will not be possible to make
any changes in the limiter.
Connecting to the communication server
The network address of the server needs to be set before a connection with the communication
server can be established. Click 'Options' and 'Communication' to do so.
There are three options:
1. The server is running on the same computer as the configuration program. In this case select
'connected to this computer',
2. The computer is active within the local (company) network. If the IP-address is known, the
option 'Connected over the network' can be selected, after which the IP-address is entered in
the text box below. If the IP-address is unknown click the button 'Auto search'. The program will
search the local network for a SPL5 server. All servers will be shown and the address can be
entered automatically,
3. The computer is active somewhere on the internet. Select the option 'Connected over the
network' as well. The 'Auto search' button will not work here; the IP-address has to be known.
Enter the IP-address in the text box.
Click the 'Test' button. A message appears if the connection can be established. The window can
be closed now.
Establish the connection by selecting the option 'Connect' in the 'Connections' menu. A password
needs to be entered if the server is accessed over the network. There are two types of passwords:
read only and read/ write passwords. A password is not needed if the server is contacted on the
local computer.
Possible problems
C The button 'Auto search' does not work, however when I enter the IP address and click test
everything is OK
C Auto search only works on the local network. Is the server placed behind a firewall or a
router within the local network?
C Are requests blocked by a firewall? The UDP protocol is used at port 10001.
C The server is active on a computer in the local network, the firewall is disabled, but I still can
not connect.
C Is the SPL server active in the network? In figure 9 is shown on which addresses the SPL
server should be reachable. If only '127.0.0.1' is selected the server can not be accessed
over the network, just on the local computer.
10
Configuration program
DATEQ SPL5 Software manual
EN
Reading the limiter settings
All settings and sound pressure level information can be read out by any user with a password to
the server.
Read out system settings
Select the option 'Read system settings' from the menu (figure 14).The information will be
downloaded from the limiter and shown on the screen. Below all the possible messages are
explained:
Name
Description
Threshold
This is the maximum allowed sound pressure level
measured in dBA
Output level
Indicates the amount of initial attenuation (dB)
applied. This is done to reach the maximum
sound level at nominal use
Microphone correction
The microphone correction to match the exact
soundpressure level at a given point in the room
Maximum attenuation
The maximum amount of attenuation (dB) when
the limiter is reducing the audio level
Sanction duration
Number of seconds a sanction lasts
Time before a sanction
Indication of the time needed to enter the sanction
mode
Power up mute
Number of seconds the outputs will be muted at
power up
Configuration valid
When there is a communication problem during a
write process the configuration will be set to
'invalid'. The audio level will be attenuated
Figure 14: Reading system settings
Figure 15: System settings
Figure 16: Owner information
By clicking the button 'Owner info' the system owner will be displayed. The installer can adjust this
information. This information will be printed on the printouts.
TimeSlots
All the timeslots can be showed here. The timeslots show the
amount of additional attenuation that is applied above the
maximum threshold. This makes it possible to have three
different sound levels per day. In the example of figure 17
timeslot 1 will become active on Sunday at 7 am. Before 7 am.
timeslot 3 of Saturday will be active.
Figure 17: Reading timeslots
Daylight Saving Table
The SPL5 will automatically adjust the clock to the daylight
saving time. This table is correctly programmed by default.
Clock
A window is showed with the SPL5 system-time information.
Figure 18: DST table
Graduation date
This window shows the expiration of the system graduation. When the
checkbox 'disable graduation' is checked this option is not activated.
Figure 19: Graduation date
EN
DATEQ SPL5 Software manual
Configuration program
11
Store data to file
All the system settings will be saved to a file. This makes it possible to make a backup of the
system. Select 'Store data to file', enter a filename, and the file will be created.
General information
When clicking 'about' in the main-menu a window is
opened with some general program information,
registration information and, if connected, limiter
information.
Reading sound-sample data
Select in the 'SPL'-menu the option 'Read sound-sample Figure 20: Common information
data'. See figure 21. In the drop-down listbox all the available data will be showed. After making a
selection all the information of that date will be downloaded from the limiter.
The following message could appear:
Message
Information
Powered-up
The SPL5 is switched on
Cover opened
The SPL5-cover is removed
Sanction
The maximum soundlevel was exceeded, and a sanction
was given. When the limiter was in live-mode the audio was
generated by another source than the main-amplifiers (e.g.
A live-band)
SPL Active
Every hour a message is written, indicating activity of the
system
Errors:
SPL OK
SPL is recovered from an earlier error
Power supply
failure
The SPL power supply is not functioning properly. This can
be caused by over,- or under voltages in the mains supply,
or a failure of the hardware. It is possible that the SPL is not
operating correctly
Microphone failed
The measuring microphone is defective, or not (properly)
connected
Hardware failure
During a self-test a malfunction is encountered. It is
advisable to send the limiter to your dealer to perform a
system check
Cover open
The SPL5 cover is or was removed. Use the key to activate
the limiter again
Memory full
The limiters' memory is full (for this day). Any messages will
be rejected. A maximum of 96 messages per day can be
stored
Config. invalid
Something went wrong wile uploading the limiter. Please
upload the limiter again
Not graduated
The graduation date is expired, or the limiter is never
graduated
Figure 21: Reading the information
Figure 22: Events of the selected day
By clicking the button 'Print events' all the events of the selected day will be printed.
12
Configuration program
DATEQ SPL5 Software manual
EN
A graphical readout of the selected day can be showed. To do so click 'Show graph'.
The following information is available:
C Red/ blue dotted line
This is the maximum allowed soundlevel. The
steps in the line are caused by the timeslots.
C Red line
Maximum soundlevel (measured in dB)
C Light-blue line
Figure 23: Graphical readout of the audio-level
Measured soundlevel (measured in dBA)
C Dark-blue line
Average soundlevel over a period of 15 minutes
It is possible to zoom-in at the graph by dragging a box over the graph at the place you want to
view. When no data is plotted in the graph (like after 14:30 in figure 23) the SPL was switched off.
All the data can be saved to a file, so that the samples can be opened in a spread-sheet.
System information
The menu 'System information' gives access to a window
(figure 24) that shows when, and what changes are made to
the system. The installers' name is also shown.
System status
This window shows the current soundlevel. This can be useful
to remotely monitor the sound-level.
Figure 24: Installation history
Common program options
The SPL5 software can be switched to different languages. Select 'Options', 'Program
language' to select a different language.
C The SPL5 software can monitor the internet for software updates. When enabled you will be
notified when updates are available. The latest version can be uploaded into the limiter with the
SPL5 server program. PC software updates can be installed without losing the registration
information. All the registration settings are stored in a separate file.
C
EN
DATEQ SPL5 Software manual
Configuration program
13
Changing settings
Before any changes can be made a password has to be entered. When connecting the server
over the network also a read/ write password to access the server is needed. See page 9.
After making contact to the server the software registration password has to be entered. Select
'SPL' and then 'Enter password' from the menu. When the correct password is given the menuitem 'Adjust settings' becomes available.
Adjusting the system settings uses the same
window layout as the readout window. The main
differences are the buttons to adjust the values.
After making all the adjustments you can close the
window to upload the new settings. A window will Figure 25: Adjusting the system settings
appear to confirm uploading all the settings.
After the uploading process you will be asked if you want to update the settings immediately.
Setting the clock
When selecting the menu-item 'Adjust clock' the SPL5 system clock will be synchronised to the
computers' clock. Keep in mind to check the computers' clock before synchronising the SPL5.
When you are connected to the internet it is possible to use an internet server to adjust the system
clock.
Adjust graduation date
When the limiter has to be checked at yearly intervals it is
possible to set the graduation-date. After this date the audiolevel will be attenuated with 18dB. Select the graduation date in
the right calender. If this function is not required select the
checkbox 'Disable graduation'.
Auto installation
The limiter can be installed fully automatically. The audio
Figure 26: Adjusting the graduation date
system has to be completely installed. It is best to use an
audio-source with less dynamics to perform the installation; this makes it easier for the computer
to calculate the levels. Select the menu-item 'Automatic install'. The software will perform a stepby-step installation:
C Set the output-level to nominal. This means that all the green LEDs on the VU-meter light up,
and every now and then some red light will blink,
C Set the output level of the amplifiers to the maximum,
C Enter the threshold,
C The limiter will adjust the output-volume, until the requested soundlevel is acquired. In the
meantime read the soundlevel at the level-meter in the room,
C After some time the actual audio-level in the room will be asked. This is to compensate the
microphone offset value.
The limiter is now calibrated. Check the settings by raising the volume of the mixer. The limiter will
automatically lower the volume.
All the settings can be changed manually, if necessary.
SPL5_040825_V1.0