1
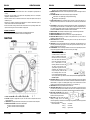
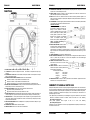
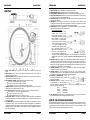
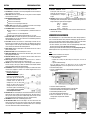
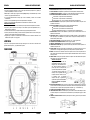
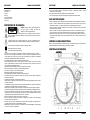
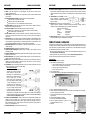
ENGLISH OPERATION MANUAL ENGLISH OPERATION MANUAL 1. START / STOP BUTTON: Press this button to start or stop the platter. 2. PLATTER: The platter is equipped with a slip mat. This makes it easier to manipulate the record for scratch performances. 3. TARGET LIGHT: Target light used to locate the exact place on your record when used in a dark place. 4. SPEED SELECT BUTTONS: Used to select the desired speed. Press the “33” button to select the 33rpm speed. Press the “45” button to select the 45rpm speed. Press “33” and “45” buttons simultaneously to select the 78rpm speed. 5. REVERSE BUTTON: Press this button to reverse the platter rotation, press this button again to end the reverse mode. 6. PITCH RANGE BUTTON: Press this button to adjust the range of the pitch slider. Press ones for +/-10% speed range. (normally used for beat mixing) Press again for +/-20% speed range. 7. QUARTZ LOCK BUTTON: When the QUARTZ Button is pressed, the exact center speed (0%) is enforced, even when the pitch slider is not in the middle. The led in the center of the pitch slider will be lit. 8. PITCH SLIDER: Use the pitch slider to change the actual speed of the platter. The Range depends on the Pitch Range button. When the slider is in its middle position, the led next to the pitch slider will turn on to indicate that the turntable is locked to the exact center speed. When the slider is not in the middle the led turns off. Attention: take care that the Quartz lock button is switched off. 9. SINGLE ADAPTER: Place this adapter on the platter for playing 7” records with large center holes. 10. POWER ON/OFF SWITCH: Used to turn the turntable on / off. 11. POWER CORD CONNECTOR: Used to connect to the mains, using the supplied power cord. 12. PHONO/LINE SWITCH: Depending on the position of the phono/line switch, you can connect the turntable to any phono or line level input. 13. PHONO/LINE OUTPUT: Connect the turntable to any phono or line level input. Be sure to put the phono/line switch in the correct position. 14. TONE ARM: This is a fully manual S-shaped tone arm. To start playback, gently place the stylus on the record using the head shell finger support. Do not drop the stylus onto the record as this may cause damage to the diamond tip and to the record. 15. COUNTERWEIGHT: Use the counterweight to balance the tone arm and to adjust the stylus pressure. For the correct stylus pressure, please refer to the user manual of your cartridge. Setting up the stylus pressure: Make sure the cartridge is well fitted and its needle protector is removed. Put a record on the platter and make sure the anti-skate is set to zero. Put the tone arm lever in “down” position. Take the tone arm and turn the counter- weight until the tone arm is in perfect balance It floats horizontally above the record surface, see “OK” picture at the right. Now set the “stylus pressure ring” (front section of the counterweight with markings) to zero by turning the ring while you take care that the counterweight doesn’t move. Next, turn the complete counterweight clockwise until the “stylus pressure ring” indicates the correct needle pressure. Don’t forget to put the antiskate back in place. 16. ANTI-SKATE KNOB: When a record is playing, side forces are generated, pushing the stylus towards the center or the outside of the record. You can use the anti-skate knob to offset this force and keep the needle centered in the groove. For standard playback simply turn the anti-skate knob to the same number as the stylus pressure reads in grams. (Stylus pressure = 3gr. anti-skate = 3) 17. TONE ARM LIFT: Controls the up and down action of the tone arm. 18. TONE ARM CLAMP & REST: Use this rest for the tone arm while changing a record. Attach the tone arm to the rest using the clamp when the turntable is not used or when it is transported. This prevents the tone arm from accidentally turning towards the platter and damaging the needle of the cartridge. 19. HEAD SHELL LOCKING NUT: Attach the head shell by inserting it into the front end of the tone arm and then turn the locking nut clockwise. 20. HEAD SHELL: Install the cartridge here. When installing a cartridge, refer to the installation instructions supplied by the manufacturer of that cartridge. During installation, attach the stylus protector to guard the stylus tip from damage. Attach wires as follows: White (L+) Left channel + Blue (L-) Left channel Red (R+) Right channel + JB SYSTEMS® JB SYSTEMS® INSTALLATION GUIDELINES: Install the turntable in a well-ventilated location where it will not be exposed to high temperatures or humidity. Placing and using the turntable for long periods near heat-generating sources such as amplifiers, spotlights, etc. will affect its performance. When the turntable is used in a loud-sound environment, for example near speakers, sound skip and feedback may occur. Install the unit on a perfectly horizontal and very stable surface. A concrete or marble surface is perfect. A wooden surface is a bad choice while it amplifies vibrations. Be sure the turntable, including its audio and mains cords, does not touch any vibrating materials. Take special care when using the unit while it is installed in a carrying case. CLEANING THE TURNTABLE: Clean by wiping with a cloth slightly dipped with water. Avoid getting water inside the unit. Do not use volatile liquids such as benzene or thinner which will damage the unit. FUNCTIONS 3/44 Q3-USB 4/44 Q3-USB