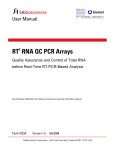
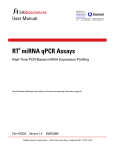
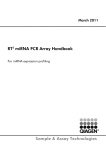
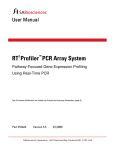
1
User Manual BIOMOL GmbH Waidmannstr. 35 22769 Hamburg [email protected] www.biomol.de Phone: +49-40-8532600 or Fax: +49-40-85326022 or 0800-2466651 (D) 0800-2466652 (D) Part # 1018A GEArray® Express System Adhesion Molecules Microarray THE HIGH-THROUGHPUT PATHWAY-SPECIFIC GENE EXPRESSION PROFILING SYSTEM See Purchaser Notification for limited use license and warranty information (page 3). GEArray® Express User Manual Version 1.0 8/5/2005 2 GEArray® Express Catalog Numbers EHS, EMM, and ERN The High-Throughput Pathway-Specific Gene Expression Profiling System USER MANUAL ORDERING INFORMATION AND TECHNICAL SERVICE • • • • TEL: FAX: ON-LINE ORDER: E-MAIL: 0800-2466651 (D); +49-40-8532600 (international) 0800-2466652 (D); +49-40-853260-22 (international www.biomol.de [email protected] (to place an order) [email protected] (for technical support) You may place orders by phone, fax, e-mail or from our website. Each order should include the following information: • • • • • Your contact information (name, phone, email address) Product name, catalog number and quantity Purchase order number or credit card information (MasterCard) Shipping address Billing address For more information, visit us at http://www.superarray.com or http://www.biomol.de SuperArray Bioscience Corp. 7320 Executive Way, Suite 101 Frederick, MD 21704 USA Technical Support 0800-2466651(D)/+49-40-853260-23,-27,-37 [email protected] www.SuperArray.com GEArray® Express User Manual Version 1.0 8/5/2005 3 CONTENTS I. Introduction 4 II. Materials Provided 7 III. Additional Materials Required 7 IV. GEArray® Express Process A. RNA Preparation and Quality Control B. TrueLabeling-AMP™ 2.0 cRNA Synthesis and Labeling C. GEArray Express Hybridization Protocol D. Image and Data Acquisition and Expression Analysis 8 8 10 10 15 V. Troubleshooting Guide 18 ® LIMITED PRODUCT WARRANTY FOR GEARRAY PRODUCTS This product is intended for research purposes only and is not intended for diagnostic purposes or for human use. This warranty limits our liability to replace this product in the event the product fails to perform due to a physical manufacturing defect but not due to an inability to validate by an independent method any results obtained using this product. SuperArray Bioscience Corporation makes no other warranties of any kind, expressed or implied, including without limitation, warranties of merchantability or fitness for a particular purpose. SuperArray Bioscience Corporation shall not be liable for any direct, indirect, consequential or incidental damages arising out of the use, the results of use or the inability to use this product. Warranties are subject to change at any time without notice. NOTICE TO PURCHASER THE PURCHASE OF GEARRAY PRODUCTS INCLUDES A LIMITED, NONEXCLUSIVE LICENSE TO USE THE MEMBRANES FOR RESEARCH USE ONLY. THIS LICENSE DOES NOT GRANT RIGHTS TO USE THE MEMBRANES FOR REPRODUCTION OF GEARRAY FILTERS, TO MODIFY GEARRAY FILTERS FOR RESALE OR TO USE GEARRAY TO MANUFACTURE COMMERCIAL PRODUCTS WITHOUT WRITTEN APPROVAL OF SUPERARRAY BIOSCIENCE CORPORATION. NO OTHER LICENSE, EXPRESSED, IMPLIED OR BY ESTOPPEL, IS GRANTED. U.S. PATENTS MAY COVER CERTAIN ISOLATED DNA SEQUENCES INCLUDED ON THE GEARRAY. PRESENTLY, IT IS NOT CLEAR UNDER U.S. LAWS WHETHER COMMERCIAL USERS MUST OBTAIN LICENSES FROM THE OWNERS OF THE RIGHTS TO THESE U.S. PATENTS BEFORE USING GEARRAY. Technical Support 0800-2466651(D)/+49-40-853260-23,-27,-37 [email protected] www.SuperArray.com GEArray® Express User Manual Version 1.0 8/5/2005 4 I. INTRODUCTION The advancement of nucleic acid array technology has made it possible to analyze the expression of multiple genes in a single experiment. However, most commercial gene expression array products, designed to include as many genes as possible, produce a vast amount of data that is overwhelming and difficult to interpret. In addition, the cost of detection equipment and bioinformatics software is often prohibitive. Based on SuperArray’s cDNA GEArray® Q and S Series microarrays (our popular second generation of pathway-specific gene expression arrays), our Oligo GEArrays® allow researchers to characterize gene expression associated with a specific biological pathway in a more comprehensive and cost-effective manner. All of the 60-mer oligonucleotides are insured to be gene-specific using a proprietary computer alogrithm. The Oligo GEArrays® are the result of combining superior array design with state-of-theart arraying and detection technologies. They are easy to use, sensitive, economical and accessible for routine use in every research laboratory. SuperArray’s new GEArray® Express System takes our Oligo GEArray® to new levels by offering a substantially faster and easier handling method for obtaining GEArray® expression analysis data. Combined with the TrueLabeling-AMP™ 2.0 cRNA labeling kit and SuperArray’s new GEArray® Express Thermoshaker and Multi-Chamber HybPlate, it is now possible to go from total RNA sample to GEArray image within a single day! The GEArray® Express microarray contains from 96 to 440 oligonucleotide probes representing genes associated with a specific biological pathway. The probes are printed on a 2.5 x 3.8 cm nylon membrane with an advanced non-contact printing technology in rows of 8, 12, or 16 columns. A unique bar-coded serial number is printed on each membrane for easy tracking and documentation. The GEArrays® are designed for one-time use only. Each array membrane is packaged, stored and used its own disposable hybridization tube. Arrays can be purchased in any quantity, allowing for a parallel and comparative study of multiple samples. Finally, our web-based completely integrated image and data analysis software, the GEArray Expression Analysis Suite, is designed to help easily and rapidly interpret the microarray results. GEArray Express Benefits: Pathway Focused Design: The content includes the most relevant pathway or disease specific genes. Reliable and Reproducible: Minimizes sample-to-sample and day-to-day variation. Speed and Simplicity: Easy-to-handle one-day protocol processes up to 32 arrays in one day. Sensitive: Requires as little as 100 ng total RNA, and detects over 3 logs linear dynamic range. Cost Effective: Priced from € 58,33 per array. Technical Support 0800-2466651(D)/+49-40-853260-23,-27,-37 [email protected] www.SuperArray.com GEArray® Express User Manual Version 1.0 8/5/2005 5 Figure 1: Overview of the GEArray® Express System procedure: 888.503.3187 301.682.9200 Technical Support [email protected] www.SuperArray.com GEArray® Express User Manual Version 1.0 8/5/2005 6 Figure 2: Appearance of the GEArray® Express Microarrays The dry nylon membrane arrays for GEArray® Express are shipped and stored in an ExpressPak box. The printed array spots, in rows of 8, 12, or 16, are initially visible as red dots. These dots fade by the end of the procedure, when this side of the membrane then appears blank. This side of the membrane should always face up inside the multiwell hybridization chamber, and should face your film or CCD camera during image acquisition. Every array also has a unique bar coded serial number to allow tracking of the array during the course of your experiment. Before starting your experiment, always record each array serial number next to the identity of the sample processed on that array. GEArray® Express Microarray Printing Format: Printed Array Spots and Bar Coded Serial Number appear on the SAME side. Technical Support 0800-2466651(D)/+49-40-853260-23,-27,-37 [email protected] www.SuperArray.com GEArray® Express User Manual Version 1.0 8/5/2005 7 II. MATERIALS PROVIDED: GEArray® Express membranes in an ExpressPak box III. ADDITIONAL MATERIALS REQUIRED: A. Oligo GEArray® Trial Kit OR Oligo GEArray® Reagent Kit (GA-029 or GA-034) Contain enough reagent kits to process up to four or twelve microarrays, respectively, including the TrueLabeling-AMP™ 2.0 Kit (GA-030), the ArrayGrade™ cRNA Cleanup Kit (GA-012), GEAhyb Hybridization Solution (H-01), and the Chemiluminescent Detection Kit (D-01). B. Total RNA Isolation Kit Recommendations: See the RNA Preparation section of the Protocol for details. For cultured cells, ArrayGrade™ Total RNA Isolation Kit (SuperArray, GA-013) For animal tissues, TRIzol® from Invitrogen (Catalog # 15596-026) followed by the ArrayGrade™ Total RNA Isolation Kit (GA-013) C. Biotin-UTP Required from another manufacturer for labeled target synthesis (See the TrueLabeling-AMP™ 2.0 Kit User Manual for more details.) D. Stock Buffers: 1. 20X SSC: Dissolve 175.3 g NaCl and 88.2 g sodium citrate dihydrate into 900 ml ddH2O. Adjust pH to 7.0 with 1M HCl. Dilute to 1 L with ddH2O. Store at room temperature. 2. 20% SDS: Dissolve 200 g sodium dodecyl sulfate in 1 L ddH2O. Heat to 65 °C if necessary to dissolve. Store at room temperature. E. Laboratory Equipment: GEArray Express Thermoshaker Catalog Number GXE-TS2 for 16 arrays (2 HybPlate model) or GXE-TS4 for 32 arrays (4 HybPlate model) GEArray Multi-Chamber HybPlates and seals (GA-035) Thermal cycler or several incubators CCD Camera Imaging Station (Alpha-Innotech, Syngene, Kodak, UVP, etc) or alternative high sensitivity chemiluminescent detection system (e.g. X-ray film) Water bath or constant temperature oven at 60ºC RNase-free tubes and pipets F. Image and Data Analysis Software: GEArray Expression Analysis Suite: (GA-021 for 3 months, GA-022 for one year) The GEASuite is a web-based application run from a different address than our company’s web site and requires a separate log in ID and password obtainable upon ordering a subscription to the software. If you haven’t already, please be sure to place an order for the software with a Customer Service representative. Trizol is a registered trademark of Molecular Research Center, Inc. Technical Support 0800-2466651(D)/+49-40-853260-23,-27,-37 [email protected] www.SuperArray.com GEArray® Express User Manual IV. Version 1.0 8/5/2005 8 GEArray® Express Process Please read through this entire protocol before beginning your experiment. RNA samples and cRNA target are very sensitive to RNase digestion; therefore, wear gloves and maintain an RNase-free work area while performing this protocol. A. RNA Preparation and Quality Control: High quality sample RNA is ESSENTIAL for obtaining good microarray results. The most important prerequisite for any gene expression analysis experiment is consistent, high-quality RNA from every experimental sample before starting the labeling process. Therefore, the sample handling and RNA isolation procedures are critical to the success of the experiment. Residual traces of proteins, salts or other contaminants will either degrade the RNA or decrease the efficiency of (if not block completely) the enzyme activities necessary to produce amplified and labeled cRNA of consistent quality for microarray analysis. 1. Recommended RNA Preparation Methods: High quality total RNA for your microarray experiment must be prepared using one of the following methods, each specific for your biological sample: Cultured Cells: Use our ArrayGrade™ Total RNA Isolation kit (SuperArray, Catalog # GA-013). Tissue Samples: Use a two-step protocol. First, extract RNA from the tissue using the TRIzol® protocol (Invitrogen, Catalog # 15596-026). Be sure to use a sufficient amount of TRIzol® reagent. During homogenization, add a volume of reagent at least ten times greater than the tissue volume. Then after the ethanol precipitation step, further clean up the RNA using our ArrayGrade™ Total RNA Isolation Kit (SuperArray, Catalog # GA-013). Whole Blood Samples: Before RNA preparation, red blood cells (RBC) must be removed from whole blood samples using a density gradient centrifugation medium (for example, Lymphoprep, Greiner Bio-One, Catalog # 1031966). The white blood cell fraction is then used for RNA isolation with our ArrayGrade™ Total RNA Isolation Kit (SuperArray, Catalog # GA-013). Alternatively, the PAXgene Blood RNA Kit (Qiagen, Catalog # 762134) can also be used to prepare total RNA from whole blood samples. Total RNA Isolated Using a Phenol-Based Method: If you have already prepared total RNA from any biological source material using a phenol-based method (such as TRIzol, RNAzol, etc.), you must clean up the RNA with our ArrayGrade™ Total RNA Isolation Kit (SuperArray, Catalog # GA-013) to insure good target synthesis and good GEArray results. For Other Biological Samples: Refer to existing literature to find isolation protocols for high-quality RNA from other biological samples. Technical Support 0800-2466651(D)/+49-40-853260-23,-27,-37 [email protected] www.SuperArray.com GEArray® Express User Manual Version 1.0 8/5/2005 9 2. RNA Quality Control: For best results from this kit, all RNA samples should be suspended in RNase-free water (not DEPC-treated water) or RNase-free 10 mM Tris buffer pH 8.0. All RNA samples must also meet all of the following criteria before proceeding with this protocol: a. RNA Concentration and Purity by UV Spectrophotometry Measured in RNase-free 10 mM Tris, pH 8.0 buffer i) Concentration by A260 should be greater than 11 ng/µl total RNA ii) A260:A280 ratio should be greater than 2.0. iii) A260:A230 ratio should be greater than 1.7. b. Ribosomal RNA band integrity Electrophorese a fraction of each RNA sample on a denaturing agarose gel or on an Agilent BioAnalyzer® using an RNA 6000 Nano LabChip® and verify that there is a sharp distinction at the small side of both the 18S and 28S ribosomal RNA (rRNA) bands or peaks. Any smearing or shoulder to the rRNA bands or peaks indicates that degradation has occurred in the RNA sample. A 18S 28S B MW RNA Figure 3: Good Ribosomal RNA Band Integrity Is Important for Best Results from TrueLabeling-AMP 2.0. Panel A displays an Agilent BioAnalyzer® electropherogram of a highquality total RNA preparation showing sharp peaks without shoulders (especially to the left of each peak) for the 18S and 28S ribosomal RNA (left to right). Panel B, right-hand lane, displays an analysis of the same high-quality total RNA preparation by agarose gel electrophoresis demonstrating sharp bands (especially at the bottom of each band) for the 28S and 18S ribosomal RNA (top to bottom). Because some contaminants are difficult to detect by simply looking at RNA integrity and can be missed by UV spectrophotometry, it is essential to choose the proper RNA isolation method for your biological sample as described above. Technical Support 0800-2466651(D)/+49-40-853260-23,-27,-37 [email protected] www.SuperArray.com GEArray® Express User Manual Version 1.0 8/5/2005 10 3. Amount Considerations: GEArray Express, combined with its companion labeling method, TrueLabeling-AMP 2.0, may be used at maximum speed and convenience when at least 1.0 µg of total RNA is available at a concentration greater than 0.2 mg/ml for every sample. Under these conditions, the labeling method produces enough labeled cRNA target in 3 hours for the GEArray Express analysis (approximately 2.0 µg). Alternatively, when only as little as 100 ng of total RNA is available, the TrueLabeling-AMP 2.0 protocol may be modified to include an overnight step in order to increase the yield to a level sufficient to obtain enough cRNA to perform the GEArray® Express analysis. However, the RNA may need to be concentrated by ethanol precipitation (to at least 11 ng/µl) before use in the following protocol. See the TrueLabeling-AMP 2.0 Kit User Manual for more details. B. TrueLabeling-AMP™ 2.0 cRNA Synthesis and labeling: Conversion of experimental RNA to labeled cRNA target See the TrueLabeling-AMP™ 2.0 Kit (GA-030) User Manual for this part of the GEArray® Express protocol. C. GEArray® Express Hybridization Protocol 1. Handling Considerations a. Uniformity of handling conditions from sample preparation to image analysis variable selection are required to produce consistent microarray results. Investigators should strive to perform all technical manipulations within this protocol accurately and uniformly. b. Using the GEArray® Express Thermoshaker i. The GEArray® Express Thermoshaker is required for the hybridization and detection phases of the GEArray® Express System. ii. The GEArray® Multi-Chamber HybPlate with GEArrays in it should always be kept on the heated platform except when actually being manipulated. iii. Temperature control settings 1. The thermoshaker should be plugged in and initially set to 60ºC. 2. The heated lid should be kept closed except during HybPlate manipulation steps and cooling the thermoshaker to 37ºC. 3. During the temperature transition between the hybridization and detection phases, the temperature setting should be changed from 60ºC to 37ºC and the lid left open while the GEArrays® continue to shake on the HybPlate platform. Once the thermoshaker temperature reaches 37ºC the lid should be closed again. iv. Shaking speed settings 1. GEArray® Express microarrays require small displacement, rapid agitation for optimal performance. Technical Support 0800-2466651(D)/+49-40-853260-23,-27,-37 [email protected] www.SuperArray.com GEArray® Express User Manual Version 1.0 8/5/2005 11 2. The GEArray Express Thermoshaker should be set for 1200 rpm for all incubation steps. v. Securing Multi-Chamber HybPlates to the shaker platform 1. HybPlates MUST be firmly clamped into the thermoshaker platform to avoid loss of samples and inconsistent processing. 2. The clamp screw knob does not need to be completely unscrewed to place or remove HybPlates from the platform. It is only necessary to loosen the knob until the clamp band can be rotated 90º and off the covers of the HybPlates. c. Using the GEArray® Multi-Chamber HybPlate and seal GEArray Multi-Chamber HybPlates are single use hybridization vessels. i. Positioning of GEArrays® within HybPlate 1. GEArrays® should only be handled with smooth flat forceps which should only touch the edges. NEVER TOUCH THE PROBE SPOTS! 2. A separator paper has been placed between each GEArray® and should be discarded when the GEArray is transferred into the HybPlate. 3. DO NOT place the plastic lid onto the tray until the GEArrays have been pre-moistened with water because static interactions may cause the dry arrays to jump up and cling to the lid. 4. Fewer than 8 GEArrays can be hybridized in a GEArray MultiChamber HybPlate however the HybPlate can only be used for one cycle of hybridization and detection. 5. After the detection phase, GEArrays can be photographed directly in the HybPlate. Therefore when a CCD camera is to be used for the image acquisition phase, the position of the GEArrays within the HybPlate should kept as compact as possible in order to provide as many pixels as possible for each GEArray® image. See Figure 4 for details. This consideration in not required for X-ray film or scanning as the GEArrays must be removed from the HybPlate for accurate imaging. ii. HybPlate cover and GEArray Multi-Chamber Seal 1. The clear plastic cover for the HybPlate provides protection to the GEArrays during processing. It must be placed on the HybPlate before securing the HybPlate onto the thermoshaker even when the Multi-Chamber Seal is applied. 2. The Multi-Chamber Seal is a self-adhesive foil designed to adhere to the top edges of the HybPlate providing a liquid tight barrier between adjacent hybridization chambers. This is necessary to avoid any cross contamination of Target Hybridization Mix. 3. Because the adhesive covers only a limited portion of the foil surface, the protective paper covering the adhesive should peeled off slowly to avoid folding the seal back onto itself. 4. Additionally, because of the shape of the adhesive on the foil, care should be taken to accurately align the Multi-Chamber Seal over the top edges of the HybPlate (with the plastic cover removed) before pressing the seal into place. 5. To ensure complete contact along all the HybPlate edges and the Seal, a soft cover book or catalog should be used to firmly press the Technical Support 0800-2466651(D)/+49-40-853260-23,-27,-37 [email protected] www.SuperArray.com GEArray® Express User Manual Version 1.0 8/5/2005 12 entire Seal against the HybPlate. This should be done before placing the plastic cover on the HybPlate. A. B. Figure 4: Proper positioning 4 Oligo GEArrays® in the GEArray Multi-Chamber HybPlate for CCD camera photography of the microarrays. Panel A displays one example of compactly positioned GEArrays that will allow optimal photographic framing. Panel B shows a configuration that would create a large empty space (pixels that are not displaying microarray probe intensities) within the image when framed to photograph all the arrays in one image. iii. Multi-Chamber HybPlate buffer removal techniques Two different methods are employed to remove solutions from the hybridization chambers in the HybPlate. Aspiration is used when it is important to keep the solution from contaminating adjacent chambers (hybridization) or to keep the edges of the HybPlate dry for good sealing to the Multi-Chamber Seal (wetting and prehybridization). Pouring is used for quick, easy removal of buffers when cross chamber contamination is not important (washing and detection steps) 1. Aspiration can be performed using any standard laboratory aspiration system such as a Pasteur pipet attached to a vacuum pump and liquid trap or a water vacuum system or even a serological pipet and Pipet-Aid. During the aspiration of buffers, the tip of the pipet should be placed into one corner of the HybPlate chamber. It is important to use low level vacuum to minimize the risk of the tip of the pipet “grabbing” the microarray membrane which can created artifacts on the final microarray image. Avoid touching the aspirator tip to the probe spotted region of the GEArray! 2. Pouring off buffers should be done so that the buffer flows slowly out of one of the HybPlate corners and care should be taken to avoid pouring the array off with the buffer. After the HybPlate is empty, it is then inverted and gently tapped on 2 or 3 paper towels to absorb any residual drops left on the hybridization chamber walls. The surface tension of the buffer keeps the GEArray® “stuck” to the bottom of the hybridization chamber. d. Procedural timing and mid-protocol break points i. The GEArray® Express System is designed to offer either 1-day processing or it can be broken down into two major operations, cRNA preparation and GEArray® hybridization which can be performed on different days at the user’s convenience. However, once the Technical Support 0800-2466651(D)/+49-40-853260-23,-27,-37 [email protected] www.SuperArray.com GEArray® Express User Manual Version 1.0 8/5/2005 13 hybridization process is initiated the entire protocol must be completed on schedule in order to produce consistent microarray data. Variations in hybridization or wash times can alter the probe signal pattern affecting the final expression profile analysis. ii. When labeling and hybridizing in one day the only step that may be extended with risk of significantly affecting the GEArray® results is the prehybridization step which may be performed for longer than 30 minutes. Doing so allows the GEArray® wetting and prehybridization steps to be performed during the TrueLabeling-AMP™ 2.0 cRNA synthesis incubation. The prehybridization then takes place simultaneously with the cRNA purification and quantification phases allowing the hybridization to start immediately after the cRNA QC assessment. 2. Preparation Phase a. Wash buffer preparation i. Wash Solution 1: 2X SSC, 1 % SDS Mix 10 ml 20X SSC, 5 ml 20 % SDS, and 85 ml ddH2O ii. Wash Solution 2: 0.1X SSC, 0.5 % SDS Wash Solution 2 is a high stringency wash buffer. Its salt concentration is very critical for good GEArray results. Prepare it with extra care. Mix 0.5 ml 20X SSC, 2.5 ml 20% SDS, and 97 ml ddH2O This should be split to two separate containers as it will be needed at 2 different temperatures 60ºC and 37ºC iii. These Wash Solutions may be stored at room temperature for up to six months. b. 1x Buffer F dilution i. 5X Buffer F may cloud during storage at 4 °C so warm the solution to 37°C and invert the bottles several times to allow any precipitate to completely dissolve. ii. Dilute 5X Buffer F with ddH2O five-fold to prepare enough 1X Buffer F for at least one Plate. You need 8 ml of 1X Buffer F for washing each GEArray therefore at least 70 ml should be prepared. c. Warming buffers i. GEAhyb, Wash Solution 1 and one container of Wash Solution 2 should stored at room temperature but should be placed in a 60ºC water bath or oven well ahead of starting the hybridization protocol. Invert the containers several times to promote complete dissolution of the buffer components. These solutions must be at 60ºC when applied the GEArray for consistent processing. ii. Buffer Q may cloud during storage at 4°C so warm the solution to 37°C and invert the bottles several times to allow any precipitate to completely dissolve. Remove this buffer from 4°C at least an hour before use to insure that it has time to cool to room temperature before being applied to the GEArray. iii. CDP-Star is stored in the dark at 4°C and should be allowed to warm to room temperature for at least 30 minutes before using. NOTE: CDP-Star stock solution is very susceptible to degradation by bacteria contamination. Use sterile pipettor tips when dispensing. Technical Support 0800-2466651(D)/+49-40-853260-23,-27,-37 [email protected] www.SuperArray.com GEArray® Express User Manual Version 1.0 8/5/2005 12 entire Seal against the HybPlate. This should be done before placing the plastic cover on the HybPlate. A. B. Figure 4: Proper positioning 4 Oligo GEArrays® in the GEArray Multi-Chamber HybPlate for CCD camera photography of the microarrays. Panel A displays one example of compactly positioned GEArrays that will allow optimal photographic framing. Panel B shows a configuration that would create a large empty space (pixels that are not displaying microarray probe intensities) within the image when framed to photograph all the arrays in one image. iii. Multi-Chamber HybPlate buffer removal techniques Two different methods are employed to remove solutions from the hybridization chambers in the HybPlate. Aspiration is used when it is important to keep the solution from contaminating adjacent chambers (hybridization) or to keep the edges of the HybPlate dry for good sealing to the Multi-Chamber Seal (wetting and prehybridization). Pouring is used for quick, easy removal of buffers when cross chamber contamination is not important (washing and detection steps) 1. Aspiration can be performed using any standard laboratory aspiration system such as a Pasteur pipet attached to a vacuum pump and liquid trap or a water vacuum system or even a serological pipet and Pipet-Aid. During the aspiration of buffers, the tip of the pipet should be placed into one corner of the HybPlate chamber. It is important to use low level vacuum to minimize the risk of the tip of the pipet “grabbing” the microarray membrane which can created artifacts on the final microarray image. Avoid touching the aspirator tip to the probe spotted region of the GEArray! 2. Pouring off buffers should be done so that the buffer flows slowly out of one of the HybPlate corners and care should be taken to avoid pouring the array off with the buffer. After the HybPlate is empty, it is then inverted and gently tapped on 2 or 3 paper towels to absorb any residual drops left on the hybridization chamber walls. The surface tension of the buffer keeps the GEArray® “stuck” to the bottom of the hybridization chamber. d. Procedural timing and mid-protocol break points i. The GEArray® Express System is designed to offer either 1-day processing or it can be broken down into two major operations, cRNA preparation and GEArray® hybridization which can be performed on different days at the user’s convenience. However, once the Technical Support 0800-2466651(D)/+49-40-853260-23,-27,-37 [email protected] www.SuperArray.com GEArray® Express User Manual Version 1.0 8/5/2005 15 Keeping the wash conditions and times consistent among all arrays being processed at the same time is essential for consistent array image quality and results. i. Add 4 ml pre-warmed Wash Solution 1 to each GEArray® and aspirate the buffer from wells then invert and tap the HybPlate on paper towels. Do not shake during this step but keep the HybPlate on the 60 ºC platform. ii. Add 2 ml pre-warmed Wash Solution 1 and incubate for 5’ shaking at 60ºC then pour off the buffer and tap the HybPlate on paper towels. iii. Add 2 ml pre-warmed Wash Solution 2 and incubate for 2’ shaking at 60ºC. Wash Solution 2 is a high stringency wash. Excessive washing of the membrane with Wash Solution 2 will result in a loss of probe signal intensity. 4. Detection Phase The following steps utilize the Chemiluminescent Detection Kit (D-01) a. HybPlate cooling i. Leaving the HybPlate shaking in the GEArray® Express Thermoshaker, turn the temperature setting down to 37º. Open the thermoshaker lid and keep it open until the unit cools to 37º during one of the steps below at which time it should be closed again. Proceed directly to the next steps which are part of the cooling process. ii. Pour off the Wash Solution 2 and tap the HybPlate on paper towels. iii. Add 2 ml room temperature Wash Solution 2 to every chamber in the HybPlate and incubate for 10’ with shaking. Even when hybridizing fewer than 8 arrays every chamber must be filled for uniform cooling. iv. Dilute an aliquot of the AP-Streptavidin stock 1:8000 in GEAblocking Solution Q (2µl into 16 ml) at room temperature. This step should be performed just before the second Wash 2 incubation is completed. v. Make sure the thermoshaker has cooled below 45ºC before proceeding with the next step. If the thermoshaker has not reached 45ºC by this time, continue the Wash Solution 2 incubation until the it does. vi. Pour off the Wash Solution 2 and tap the HybPlate on paper towels. b. AP-Streptavidin incubation and washes i. Add 2 ml dilute AP-Streptavidin to each GEArray® and incubate for 10’ shaking at 37ºC then pour off as above. ii. Wash with 2 ml room temperature 1X Buffer F shaking at 37ºC for 5’ and pour off as above. iii. Repeat the above step 3 more times. c. Enzyme buffer equilibration and CDP-Star® incubation i. Add 2 ml room temperature Buffer G and incubate for ~1 minute. If running more than 1 HybPlate AND using a CCD camera system, remove the HybPlates to room temperature and hold at this step. Proceed with the next step one plate at a time. ii. Pour off Buffer G as above, add 1.0 ml CDP-Star® and incubate shaking at 37ºC for 5 minutes then acquire the GEArray® chemiluminescent image using one of the following methods: 1. Pour off the CDP-Star®, tap the inverted tray on paper towels and photograph the arrays in the HybPlate, without the lid, using a highquality, cooled CCD camera system. No more than 8 GEArrays Technical Support 0800-2466651(D)/+49-40-853260-23,-27,-37 [email protected] www.SuperArray.com GEArray® Express User Manual Version 1.0 8/5/2005 16 should be photographed at one time in a 1.4 mega-pixel image field to allow sufficient resolution for accurate digital image analysis of the GEArrays. It is not necessary to remove the arrays from the HybPlate for CCD camera photography! OR 2. Remove the GEArray from the hyb chamber, blot off the excess CDP-Star by touching a corner of the array to a clean absorbent tissue and place it in an imaging sheet to scan or expose to X-ray film. As many GEArrays as the user is comfortable handling, and the physical size of the X-ray file or scanner can accommodate, may be imaged at the same time. CDP-Star is a registered trademark of Applera Corporation or its subsidiaries in the US and certain other countries. D. Image and Data Acquisition and Analysis: 1. Image Acquisition NOTE: Hold the membrane as shown on the left of Figure 2B with the bar code facing you on your right. This side of the array should face your film or CCD camera in this orientation. a. Capture Medium: After the CDP-Star incubation, the GEArray is now ready for image acquisition. The chemiluminescent array image can be captured by a number of means. Imaging stations with a high quality, cooled CCD camera work the best. Their advantages include lower image backgrounds and good dynamic ranges. In addition a CCD camera eliminates requirement for direct handling of GEArrays for image acquisition. A number of different vendors provide suitable image stations (e.g. Alpha-Innotech, Syngene, Kodak, and UVP). In the absence of a CCD camera image station, certain types of phosphor imagers also detect the chemiluminescent array image (e.g. Typhoon by GE Healthcare). Alternatively, the array image can also be recorded using X-ray film and a flatbed desktop scanner but with a much narrower dynamic range. b. Exposure Time: Overall array image intensity varies from day to day and from person to person making an initial prediction of the exposure time difficult. As a general rule, the exposure time for capturing the array image (when using either a CCD camera or a X-ray film) should produce the largest possible dynamic range in the individual signals. In other words, the exposure should obtain the maximal difference between the blank spots with no array signal and the brightest spots with maximal array signal that can be achieved using the medium of your choice. For the first time users, we recommend starting with an initial exposure of 1-2 min on X-ray film or 20 min exposure using a CCD camera system. Adjust the exposure time after and based on the initial recording. We recommend collecting exposures of the chemiluminescent signals within 15 minutes of the CDP-Star treatment to minimize the intensity of the non-specific background. Technical Support 0800-2466651(D)/+49-40-853260-23,-27,-37 [email protected] www.SuperArray.com GEArray® Express User Manual Version 1.0 8/5/2005 17 c. Saving your microarrays: After obtaining your exposures, allow the damp membranes to completely dry in the HybPlate or imaging sheet and store at room temperature. If you find that you need to obtain additional exposures at a later date, re-wet the membrane with water, and then repeat the Buffer G rinse and CDP-Star incubation from the above protocol. New exposures can then be obtained although they will have a slightly higher non-specific background. 2. Image Analysis and Data Acquisition & Analysis No matter which medium you choose to capture the image, save all images as electronic files in a grayscale, 8 or 16 bit TIFF (or alternatively in JPEG) file format. CCD cameras and phosphor imagers usually acquire their images in this format or a proprietary modification of this format. If using X-ray film, be sure to use the software for your flatbed desktop scanner to convert the image of the film into this format. NOTE: Appearance of Array Image: Description of Control Features All Oligo GEArrays contain a pre-biotinylated oligonucleotide with an artificial sequence (BAS2C in your gene table and lightly circled in Figure 5) in the lower right-hand corner of the membrane if oriented as described above. Spots immediately to the left of the corner contain smaller amounts of the same oligonucleotide. These spots are detection controls. If the detection steps were performed properly, these spots should always appear in this pattern. All Oligo GEArrays also contain a specific set of housekeeping genes (darkly circled in Figure 5), which usually have a relatively high level of basal expression. All of these spots can be used as landmarks to insure that the array image has been placed in the correct orientation for data analysis. Figure 5: Sample raw images from low density (left, catalog numbers 001-400), intermediate density (middle, catalog numbers 401-800), and high density (catalog numbers 801-900) Oligo GEArrays® are displayed. The housekeeping gene landmarks are darkly circled, and the biotinylated artificial sequence landmarks in the lower right-hand corners are lightly circled. These orientations, with gene table position number one in the upper left-hand corner, are optimal for data acquisition and analysis with the GEArray Expression Analysis Suite software. Use our specially designed web-based and completely integrated GEArray Expression Analysis Suite to complete your data analysis. Refer to the software’s User Guide for Technical Support 0800-2466651(D)/+49-40-853260-23,-27,-37 [email protected] www.SuperArray.com GEArray® Express User Manual Version 1.0 8/5/2005 18 more information and further instructions. The software is a web-based application run from a different address than our company’s web site and requires a separate log in ID and password obtainable upon ordering a subscription to the software. If you haven’t already, please be sure to place an order for the software with a Customer Service representative. V. TROUBLESHOOTING GUIDE AND FREQUENTLY ASKED QUESTIONS: A. WEAK OR NO SIGNALS Low signal intensity is an indication of poor RNA starting material quality. RNA quality is crucial to the success of the array. Double-check the method of RNA isolation used as well as the quality and integrity of your experimental RNA as described. If the RNA has been prepared improperly or if there is any evidence of poor RNA quality, perform your RNA preparation again before repeating the array analysis. Other than RNA sample quality, the following factors may also impair your results. 1. Low RNA sample concentration. If the RNA sample is too dilute, it may not perform well in the assay. Concentrate your total RNA (to at least 11 ng/µl or up to 0.5 mg/ml) using a standard ammonium acetate ethanol precipitation based method. 2. Inhibited cRNA Target Synthesis. a. Total RNA should be dissolved in RNase-free dH2O or RNase-free 10 mM Tris buffer pH 8.0. Do not use DEPC-treated water. b. If CsCl, LiCl, guanidinium, or organic extractions were used in the process of your total RNA purification, trace amounts of these contaminants will inhibit cRNA target synthesis. Clean up the RNA with our ArrayGrade™ Total RNA Isolation Kit (SuperArray, Catalog # GA-013) to insure good target synthesis and good GEArray results. 3. Improper washing in 0.1X SSC solution. Excessive washing of the membrane in the high stringency buffer (Wash Solution 2) will strip off the hybridized probes. Decrease the washing time. 4. Improper hybridization temperature. Check the actual temperature inside your hybridization oven with a thermometer. The digital temperature reading on your hybridization oven could be several degrees off calibration. As the temperature goes higher than 60ºC the amount of specifically hybridized target will decrease until all targets and probes are denatured. 5. Underexposure. Try multiple exposures for various longer times. B. HIGH BACKGROUND Other than RNA quality, the following factors may cause high background: 1. Pre-hybridization step incomplete. Needs at least 30 minutes. 2. Inaccurate AP-streptavidin dilution. Since the AP-streptavidin is dissolved in a glycerol containing solution, special caution should be taken when pipeting the small volume of AP-streptavidin. We suggest diluting no less than 2 µl of AP-streptavidin into 16 ml of Buffer Q (a 1:8,000 dilution). Draw up the needed volume, and carefully Technical Support 0800-2466651(D)/+49-40-853260-23,-27,-37 [email protected] www.SuperArray.com GEArray® Express User Manual Version 1.0 8/5/2005 19 wipe the outside of the pipet tip with a laboratory wipe before dispensing the volume. The final working AP-streptavidin dilution can also be increased up to 1:12,000. 3. Improper incubation time with AP-streptavidin. The incubation should be no longer than 10 minutes, but it may also be reduced. 4. Improper washing temperature conditions. Be sure to use 2.0 ml Wash Solution 2 during the high-stringency washing step at 60ºC. 5. Biotin contamination in containers or buffers. Milk contains a high amount of biotin. Never use any lab ware that has been used for Western blotting. 7. Overexposure. Try multiple exposures for various shorter times. 8. Too much total RNA or labeled cRNA target. Reduce the amount of total RNA or used for cRNA Target Synthesis and Labeling or reduce the amount of labeled cRNA used for hybridization. C. I have performed the pre-hybridization of the array, but my cRNA synthesis efficiency is poor. Can I save the membrane until I try the assay again? Yes. Rinse the GEArray with RNase-free water and allow to dry at room temperature. Once you define and correct the problem and repeat the RNA isolation and / or cRNA synthesis reaction, repeat the pre-hybridization of the array with fresh GEAprehyb pre-warmed to 60 °C. E. Can I strip and re-probe the membranes? The Oligo GEArray® is designed for one-time use only. Stripping and re-probing is not recommended. We found that stripping results by individual users varies widely, and even under the best conditions, 80 percent of the original signal is lost despite the UV-crosslinking of the oligonucleotides to the nylon membrane. Stripping and reprobing may be attempted under extreme circumstances or for troubleshooting purposes, but the subsequent results will not be publication quality. Strip the membranes using a procedure similar to stripping blots used for Northern or Southern hybridization: Boil for 5 to 10 minutes in 0.5 % SDS, cool for 10 minutes, and rinse twice with 2X SSC. Store the damp membrane at -20 °C in its original plastic tube if needed. If you have additional questions, please check our website (www.superarray.com) for a more complete listing of Frequently Asked Questions (FAQs), or call our technical support representatives at 0800-2466651 (D) or +49-40-853260-23,-27,-37. Technical Support 0800-2466651(D)/+49-40-853260-23,-27,-37 [email protected] www.SuperArray.com GEArray® Express User Manual Version 1.0 8/5/2005 20 GEArray® Express System BIOMOL GmbH Waidmannstr. 35 22769 Hamburg [email protected] www.biomol.de Phone: +49-40-8532600 or Fax: +49-40-85326022 or Technical Support 0800-2466651(D)/+49-40-853260-23,-27,-37 [email protected] 0800-2466651 (D) 0800-2466652 (D) www.SuperArray.com