1
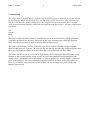
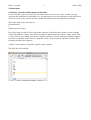
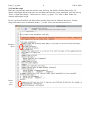
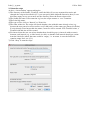
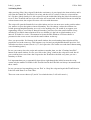
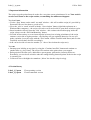
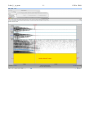
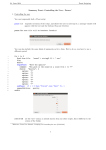
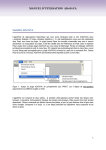
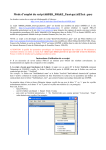
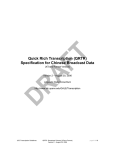
Label_1_6.praat
1
13 Nov 2009
User manual for the PRAAT script “Label_1_6.praat”
0. Quick start
a)
Make a raw test file (.txt) with the sequence of labels that you want to set, one item per line.
b)
Put this ‘label file’ and the script in the same directory (usually same as the sound file).
c)
Start the script.
d)
In the window that appears, give the names of the sound directory (if different from the present
one), sound file, and label file and select whether you want to set ‘Points’ or ‘Intervals’. If you
want to label intervals, select whether you want to set them with gaps between items (e.g. if you
want to label words in a longer recording) or strictly consecutively (e.g. label every segment,
pause, etc.).
Note, that ‘Gaps’ expect the first (and third, fifth, seventh,...) interval has no name, whereas for
‘No Gaps’, even the first interval (starting at 0.0 second) has to have a name. (See below for a
more complex structure, like labeling syllables.)
e)
When the ‘Edit’ window appears, move the cursor to the first point/boundary and press the right
button (‘Set Point/Boundary’) of the small window that appeared. Do not use the ‘Set Boundary/
Set Mark’ function of the Edit window (keys ‘Ctrl 1/F1’ on a PC, ‘Apple 1/F1’ on a Mac). (Put
the small above the Edit-window to ease access.)
f)
The script will end when all marks are set, or you can interrupt your labeling with the ‘Continue
later/Exit’ button in the small window.
g)
You can alter the names of the labels if you want (e.g. to mark a mispronunciation). You can
move around, enlarge, open/close spectrum/pitch/intensity tracks in the ‘Edit’ window, until you
have found the right position for the cursor. But all labels must be set left-to-right, and no
additional interval/points may be set in the same tier.
Label_1_6.praat
2
13 Nov 2009
1. Introduction
The script ‘label_1_6.praat’ tries to assist the user in labeling points or intervals in one tier in Praat
by providing the names for the labels to be set. The names of the labels have to be stored line-byline in a ‘raw’ text file, usually ending in .txt; the script will not work with .doc, .docx, or other
word processor specific formats. A label-file will typically look like (see §2.1 for more complicated
structures):
first
second
third
The script assumes that the sound and TextGrid files are in the same directory, and the label and
script files are also in one directory (which can be the same containing the sound and TextGrid
files). (See §2.2 if you want to have all files in different directories.)
The script will check the existence of all files, open them, and provides then subsequently the
names for the intervals or points. The user can stop the labeling and leave the script at any time and
the script will continue with the next label when the script is restarted (e.g. days later).
The labels can only be set in a strict left-to-right manner and no additional intervals/points can be
inserted by the user because the script ‘counts’ the labels and additional labels/intervals/points
would lead to a mismatch between the number of label in the label file and the number of interval/
point in the TextGrid. The user can though change the name of the labels in the edit-window of
Praat (e.g. to mark a mispronunciation) and the user can also add new tiers (with a higher tiernumber) interactively.
Label_1_6.praat
3
13 Nov 2009
2. Instructions
2.1 Prepare a text file with the names of the labels
Create a text file (‘raw’ text, usually its file name ends in .txt, not .doc, .docx, or alike; you can
create the file with Word or OpenOffice etc., but the file has to be saved/exported as raw/ASCII text
(Unicode can be used)), where each line contains the label for the interval/pointer. Example:
This is the name of the first interval
Second interval
x
another interval’s name
Every line (empty or not) will be used in this sequence to label the intervals the user sets with the
script. Note that also ‘empty’ lines will be assigned to intervals/points (with an ‘empty’ name. This
is very useful if, for example, you want to label the syllables of words spoken in isolation. Imagine,
you have recorded the words “house, caterpillar, coffee” and you want to label the syllables. Your
recording will have the sequence:
<pause> house <pause> caterpillar <pause> coffee <pause>
The label file will look like:
Label_1_6.praat
4
13 Nov 2009
2.2 Load the script
Place the script and the label file into the same directory and double-click the Praat-script. (If
double-clicking the Praat-script does not start Praat and open the script, start Praat, go to the left top
‘Praat -> Open Praat Script...’ and browse to ‘Label_1_6.praat’. Use ‘Run -> Run’ in the new
window showing the script.
In case you keep TextGrid- and Sound-files (and the Label-file) in different directories, edit the
Script and remove two exclamation marks (‘!’) in the ‘form’ part and add two below it:
Remove
these
Insert
two
here
Label_1_6.praat
5
13 Nov 2009
2.3 Start the script
At first, a ‘form window’ appears asking for:
1)
The directory of the Sound-, TextGrid-, and Label-files.(If you use separate directories and
changed the script as described in §2.2, you can specify three different directories here.) Leave
this entry empty in case you want to use the directory where the Praat-script resides.
2)
The Sound-file name. If no extension is given, the script assumes a ‘.wav’ extension.
3)
The Label-file name.
4)
The type of Tier, click on ‘Interval’ or ‘Point’ tier.
5)
The name of the tier. The script will check whether a tier with this name already exists (e.g.
because the user paused a session earlier, see §2.4##) and is of the same type (Interval or Point).
If a tier already exists but not this tier-name, a new tier will be created. If no TextGrid exists, a
TextGrid with this tier will be created.
6)
For interval tiers the user can select whether there should be gaps (= intervals with no name)
between each interval (e.g. to label words in a file) or whether each interval should get a name
from the Label-file (where the name could be ‘empty’, i.e. no name, in case the Label-file
contains empty lines, see §2.1).
7)
Click ‘Okay’ to start the script.
Label_1_6.praat
6
13 Nov 2009
2.4 Setting labels
After pressing ‘Okay’ the script will check the consistency of your input in the form window, and it
will open the Sound-file, TextGrid (if it exists) and the tier (if it exists). If the tier exists and has,
let’s say three labels already in it, the script will use the fourth label from the Label-file and ask you
to set it. If no TextGrid and tier exists, the script will create both, if the TextGrid but no tier with the
selected name exists, the script will create a new tier with that name.
The script will open the Sound-file in en edit window and you can now move to the position where
you want to set your first point or interval boundary. You can enlarge, reduce the window size,
switch spectrogram/pitch/intensity on or off, or do anything else you would do to support your
segmenting. Only to set a Point or Interval boundary, you have to use the small window on top,
which tells you which interval/point will be set, whether it is the left or right boundary of an
interval. To make live easier, I recommend to locate the Edit-Window a bit lower than it is
presented on the screen to not conceal the small window on the top.
Once you pressed the ‘Set’ button of the small window, the next boundary/interval/point will be
prepared to set in the same way. This happens very fast and you might think that the previous ‘Set’
action has not been executed, but it is (i.e., don’t press the ‘Set’ button a second time without setting
a new boundary/point!).
In case you want to leave the script and continue at another time, use the “Continue later/Exit”
button in the small window. In case you click on the “Stop” window, the script will crash, but all
your work has been saved since the script writes the TextGrid to the disk every time you set a
boundary or Point.
It is important that you go sequentially from left-to-right through the labels because the script
counts only the number of Labels in the TextGrid and in the Label-file and always increments both
these counts.
In case you messed up something you can ‘Exit’ or ‘Stop’ the script and repair the TextGrid an/or
Label-file with Praat or an Text editor.
There are some screen shots at §5 (and if I ever find the time, I will add a movie.)
Label_1_6.praat
7
13 Nov 2009
3. Important information
The script saves the points/intervals to the disc every time a new point/interval is set. Your work is
saved even if Praat or the script crashes, or something else unforeseen happens.
You should not:
•
Use the ‘Stop’ button on the small ‘set mark’ window – this will crash the script (it’s provided by
Praat and I have no idea how to get rid off it).
•
Close the ‘edit’ or ‘mark’ window with the ‘close window’ button (right/left top button on a
Windows/Mac computer) – the script will crash or will not be able to open these windows again.
•
Insert boundaries directly from the ‘edit’ window – this confuses the book-keeping inside the
script; always use the ‘Set Point/Boundary’ button.
•
Go back in time and try to set an interval/point in front of an existing point/interval; the script
assumes a strict left-to-right operation – the labeling will get confused otherwise. In case you
made a mistake, leave the script with the ‘Exit’ button, edit the TextGrid with Praat (and save the
TextGrid) and edit the Label-file accordingly.
•
Add a new tier with a lower tier number (i.e. ‘above’ the tier that the script uses).
You can:
•
Interrupt your labeling at any time by using the ‘Continue later/Exit’ button and continue at
another time (e.g. days later). The script will continue at the point where you stopped.
•
Enlarge/reduce the time scale, add/remove spectrograms, pitch tracks, intensity tracks etc.
Essentially, you can do all activities other the setting/deleting intervals/points in the tier the script
is operating on.
•
Create new tiers with higher tier numbers (‘below’ the tier the script is using).
4. Version history
Label_1_5.praat
Label_1_6.praat
First operating version
First documented version
Label_1_6.praat
5. Screen shots
8
13 Nov 2009
Label_1_6.praat
9
13 Nov 2009
Label_1_6.praat
10
13 Nov 2009
Label_1_6.praat
11
13 Nov 2009