1
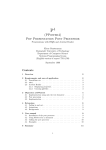
User manual for kluwer.cls, version 1998/02/11 Instructions for authors Prepress Deparment ([email protected])∗ Wolters Kluwer Academic Publishers, Achterom 119, 3311 KB Dordrecht, The Netherlands 1998/02/11 Abstract. This is the user manual for the kluwer.cls class file for the preparation of articles to be submitted to journals, spin-offs of journals or edited volumes to be published by Kluwer Academic Publishers. The kluwer.cls is a generic class, which allows us to use a trivial conversion to different layouts. The kluwer.cls class file functions similar to the article class file of LATEX 2ε , but it has some extra fields in the preamble and some extended commands for the body text. Keywords: LATEX 2ε , (electronic) submission, user manual, class file, Kluwer Abbreviations: KAP – Kluwer Academic Publishers; compuscript – Electronically submitted article Table of Contents 1 Introduction 2 Getting started 3 The ‘opening’ environment 4 Mathematical constructs 5 Sectioning commands 6 Section 7 Lists and displayed text 8 Footnotes and endnotes 9 Floats 10 References 11 Special options and extra information References Index 2 2 3 8 11 11 11 14 15 19 21 24 24 ∗ This e-mail address is available for all problems and questions. © 1999 Kluwer Academic Publishers. Printed in the Netherlands. usrman.tex; 19/08/1999; 12:52; p.1 2 Kluwer Academic Publishers \documentclass{kluwer} preamble \begin{document} document \begin{frontmatter} frontmatter \end{frontmatter} \begin{article} \begin{opening} article opening \end{opening} body of article \end{article} \begin{article} \begin{opening} article opening \end{opening} body of article \end{article} \end{document} Figure 1. Overall structure for input files. Optional parts are displayed in grey (with dotted lines) on the left side. 1. Introduction The kluwer class file is the general style file that should be used when submitting an article in LATEX 2ε for publication in one of the journals of Wolters Kluwer Academic Publishers. The layout generated by the kluwer class file will deviate from the style of the journal in which your article will be published. The article will be formatted in the appropriate journal style by Kluwer after acceptance. In that stage, the copyright information will be added, the running heads will be adapted if necessary and the article will be typeset in the Times Roman font. 2. Getting started The overall structure of an input file is given in figure 1. usrman.tex; 19/08/1999; 12:52; p.2 User Manual 3 2.1. T HE B EGINNINGS The kluwer class file is addressed by using the command: \documentclass{kluwer}. The file kluwer.cls and its subfiles should be accessible to LATEX 2ε . The class file defines some options that can be inserted between angle brackets. These options will be introduced as we go along. (Quickstart: insert either numreferences or namedreferences to set the style for citations and bibliographic lists) The date for this version of the class file is 1998/02/11. Amongst other things, the class file has already loaded the packages amssym and wasysym on startup. Support for ‘Here’ style floats, rotated floats and endnotes is built in. 2.2. T HE PREAMBLE In general, you should use standard LATEX commands as much as possible. If you create your own macros always put them in the preamble, and use LATEX syntax instead of \def whenever possible. Take extra care to make sure that we receive and/or can obtain all included package files used by your submission. As a rule of thumb, we can find only what’s in a relatively recent “standard LATEX distribution”; anything else should be sent to us, together with your submission.1 3. The ‘opening’ environment The title, subtitle, author names & affiliations and the submission dates for the article are handled by the opening environment. In Figure 2 you will find a list of the chain of commands that should be used only within the opening environment. Most of these commands will produce an error if used somewhere else in your document. The subsequent paragraphs will deal with the commands in detail. The order of commands you find in the figure is not fixed, all commands are executed by \end{opening}, without regard to their location within the opening environment (with an exception for the author block, please see below for details). Anything that is not within a command will end up being typeset before the ‘real’ contents of the environment, so be careful to only use the commands given here. 1 This also includes outdated versions of currently available macro packages. For instance, if you use an old version of the amstex package, you should send those files as well, since we usually only have the latest versions of any package. usrman.tex; 19/08/1999; 12:52; p.3 4 Kluwer Academic Publishers \begin{document} \begin{article} \begin{opening} % Title block: \title{...} \subtitle{...} % Author block [repeatable]: \author{...\surname{...}\email{...}} \author{...\surname{...}\email{...}} \institute{...} % Extra information: \dedication{...} \translation{...} \runningtitle{...} \runningauthor{...} \begin{ao} .... \end{ao} \begin{motto} .... \end{motto} % Abstracts & keywords: \begin{abstract} ... \end{abstract} \keywords{...} \abbreviations{\abbrev{...}{...}; \abbrev{...}{...}} \nomenclature{\nomen{...}{...}; \nomen{...}{...}} \classification{...}{...} \end{opening} Figure 2. Commands to be used within the opening environment Now let us explain the commands in more detail. 3.1. T ITLE AND S UBTITLE The title and, if necessary, subtitle should be typed in one of the following two styles of capitalisation: usrman.tex; 19/08/1999; 12:52; p.4 5 User Manual \title{This is my title} \title{This Is My Title} One initial capital Initial capitals This has to be done according to the style of the journal in which your article is to be published. Uppercasing will be done by the stylefile if necessary. A missing \title command generates an error message. You can split the typeset title and subtitle over multiple lines by putting two backslashes at an appropriate place, and you can specify footnotes to the title by use of the \thanks command. The specified text will be placed at the bottom of the page as a footnote. An example of a title block could look like this: \title{The ‘KLUWER’ LaTeX Style File:\\ Instructions for Authors\thanks{Donald Knuth}} \subtitle{Basic Instructions} 3.2. AUTHOR BLOCK The author block consists of one or more authors followed by an institute. This construction may be used more than one time. A typical ‘large’ author block would look like this: \author{A. \surname{Thor1}\email{[email protected]}} \author{B. \surname{Thor2}\thanks{Partially support...}} \institute{KAP} \author{C. \surname{Thor3}} \institute{} As you can see, the surname of the author is given within a separate command, \surname. The point of this is that this makes it easier to extract information from the LATEX file. It has no influence on the way the author’s name is typeset. You can specify support acknowledgements etc. by use of the \thanks command. If the author has an email address that looks like it will last for at least the time between submission and publication, you can give the address in the \email command either after the surname of the author or in the \institute command. It will be typeset in small typewriter font within brackets. The specification for the author block is a bit more complicated than the rest of the opening environment. Please take note of the following restrictions: usrman.tex; 19/08/1999; 12:52; p.5 6 Kluwer Academic Publishers 1. Order is important for all \author & \institute commands. They will be typeset in the same ordering as found in your input file. 2. \thanks can only be used as the very last item in the \author command. If you make a mistake, you will get a quite incomprehensible TEX error message. 3. The list of authors has to end with an institute. If there are authors that are not part of any institute, give an empty command as demonstrated above. If you don’t, that author’s name will not be typeset. 4. Sometimes the class file may fail to find a good place to break a line containing multiple authors. If this happens, you can insert two backslashes (\\) yourself to force a line break after an author’s name or email address (It will not work if the two backslashes are the first characters within \author. In this case there will be a LATEX error ‘No line to end’). 3.3. E XTRA INFORMATION These commands give some extra information about the article. 3.3.1. Dedicated and translated articles You can use the commands \dedication and \translation to give extra information about your article. The commands help by inserting the correct amount of space above and below your text. 3.3.2. Running heads You can create a running title (used on odd pages) by using the \runningtitle{} command, where you put the (maybe shortened) title between the curly braces, and you can create a running author line (used on even pages) using the analogous \runningauthor command. Both of these commands may be used in strange ways by LATEX, so try to keep the information short enough to fit in the headline, and try to use only plain text. For instance, don’t try to force line breaks in the running title, and don’t insert \labels 3.3.3. Address for correspondence The environment ao can be used to give an address for correspondence or offprints. The contents of this environment will be typeset at the end of the article environment (an example is given in this document on page 26). The exact phrasing of the leading text depends on the stylefile, so it may change later here at Kluwer. usrman.tex; 19/08/1999; 12:52; p.6 User Manual 7 3.4. A BSTRACTS AND KEYWORDS The abstract environment is used to give a short description of the article. The \keywords command gives a list of keywords. These should be separated with commas. The \abbreviations command allows to give a list of abbreviations used. It defines a sub-command \abbrev with two arguments, of which the first is the abbreviation and the second the meaning. The exact layout will once again depend on the used stylefile. Here is the example from the beginning of this document: \abbreviations{\abbrev{KAP}{Kluwer Academic Publishers}; \abbrev{compuscript}{Electronically submitted article}} The command \nomenclature is closely related to \abbreviations. It takes one argument subdivided into \nomen parts. The above example gives the correct syntax. For both environments it is legal to have text outside of \abbrev respectively \nomen, in which case it will just be typeset as flushed text, and you have to provide additional formatting yourself. This is discouraged. The command \classification takes two arguments, the first describing the type of the classification, the second the classification proper. An example might be: \classification{JEL codes}{D24, L60, 047} 3.5. DATE By using the \date command, it is possible to specify reception and acception dates. Since this is something that the journal’s editor fills in, the default value when no \date command is given is to insert a template line that allows easy fill-in of this information. As a result, you are advised not to use this command. 3.6. M OTTO When you want to specify a piece of poetry / a quotation to specify a motto to your article, you can use the motto environment. You can differentiate between prose and poetry. If you are using prose, give an extra option to the environment: [prose] Here is an example: \begin{motto}[prose] The only thing that never looks right is a rule. usrman.tex; 19/08/1999; 12:52; p.7 8 Kluwer Academic Publishers There is not in existence a page with a rule on it that cannot be instantly and obviously improved by taking the rule out. \rightline{George Bernard Shaw, In {\it The Dolphin} (1940)} \end{motto} Here ends the description of the opening environment. 4. Mathematical constructs This section gives an overview of the mathematical constructs that are supported by the class file. 4.1. S YMBOLS As already stated above, the class file includes both amssymb and wasysym on startup. That is, provided these can be found. There will be no error if they are not available. All of the commands for symbols from these packages will of course be available. Additionally, there are some commands defined in the klumac.sty. A short overview is given in Table I.2 Please see the documentation for amssymb and wasysym for the additional symbols these packages provide (most of amssymb is also given in (Goossens et al., 1994)). 4.2. VAREQUATION ENVIRONMENT Since it can be quite hard to live with the automatic numbering of equations that LATEX implements, there is an extra environment defined to handle ‘special’ equation numbers. The varequation environment allows you to give a ‘number’ to displayed equations, but without incrementing any LATEX counters. If you intend to use mathematical symbols inside the argument (as demonstrated below), be sure to use \ensuremath, or otherwise your input may fail under some internal stylefiles (i.e. those that use equation numbers on the left side of the page). \begin{varequation}{\ensuremath{3\alpha}} E = mc^2 \end{varequation} 2 Some of these commands actually use the AMS fonts. This means that if you do not have these fonts, the commands will fail with a ‘missing font..’ error. usrman.tex; 19/08/1999; 12:52; p.8 9 User Manual Table I. Additional math symbols made available through kluwer.cls I Res $\I$ $\Res{a}$ a $\bigo{a}$ $\concat$ $\dC$ $\dE$ $\dF$ $\dL$ $\dN$ $\dP$ $\dQ$ $\dR$ $\dZ$ $\depth$ $\diamond$ $\dom$ |`| a _ | C IE IF IL IN IP | Q IR ZZ depth ♦ dom $\down{a}$ $\dres$ a < > > ∼ I lh > < < ∼ ya a −→ ≡ / ∗ range |` |\ $\forces$ $\grlo$ $\gsim$ $\iduaal$ $\lh$ $\logr$ $\lsim$ $\mapdown{a}$ $\mapright{a}$ $\nequiv$ $\oast$ $\range$ $\res$ $\restrict$ And the resulting formula: E = mc2 (3α) 4.3. S UBEQUATION ENVIRONMENT A subequation environment is available to create equations with sub-numbering of the equation counter. It takes one (optional) argument, that specifies the way that the added counter should be typeset. \begin{subequation}[options] \begin{equation} ... \end{equation} \end{subequation} Possible options are: alph (1a) This is the default. Alph (1A) Uppercase arabic (1.1) Arabic numbers. usrman.tex; 19/08/1999; 12:52; p.9 10 Kluwer Academic Publishers 4.4. D ISPLAYED SENTENCES : THEOREMS AND SUCH The kluwer class file contains a pre-defined lay-out for theorems, corollaries, etc. These environments have to be defined with the help of LATEX’s \newtheorem command. Here is an example: \newtheorem{theoremdemo}{Theorem} \begin{theoremdemo} This is a \verb!\newtheorem!. \end{theoremdemo} Results in: THEOREM 1. This is a \newtheorem. The class file also defines a \newdisplay command, which is identical to \newtheorem in usage, but will give a different layout. Here is an example: \newdisplay{displaydemo}{Theorem} \begin{displaydemo} This is a \verb!\newdisplay!. \end{displaydemo} Results in: Theorem 1. This is a \newdisplay. For more information on the use of the \newtheorem command, please refer to the LATEX manual. Also, the class defines an extra command, \newproof, that can be used for displayed text of a lower level. The major differences are that this command does not define a counter to go with the environment, nor does it have an option to specify such a counter. \newproof{rem}{Remark} is almost identical to3 \newenvironment{rem}{\par\bigskip \bf Remark: \it} {\par\bigskip} 3 There are some more commands involved of course, but this is a reasonable approxima- tion. usrman.tex; 19/08/1999; 12:52; p.10 User Manual 11 4.5. P ROOFS For proofs, you can use the pf environment. This will generate the heading ‘Proof.’ If you wish to create your own heading, you can use pf* and give the \begin{pf*} command your alternative heading as an extra argument. Thus, \begin{pf*}{Proof (of Lemma 3)} will generate the heading ‘Proof (of Lemma 3).’ 5. Sectioning commands This section gives an example of the sectioning commands. 6. Section Here is a section 6.1. S UBSECTION Here is a subsection 6.1.1. Subsubsection And a subsubsection 6.1.1.1. Paragraph This is a lead-in heading (paragraph) Subparagraph This is a lead-in heading (subparagraph) There is also a command \part, but it has not been particularly well designed. The general syntax of these commands should be known to you already. We have made no changes apart from the layout. 7. Lists and displayed text The document class redefines itemize and enumerate so that they take an optional argument that makes some parameterization possible. Also, there are some environments available to do displayed text, for instance, quotations. usrman.tex; 19/08/1999; 12:52; p.11 12 Kluwer Academic Publishers 7.1. ITEMIZE In the case of itemize the optional argument specifies the label that should be used as default. \begin{itemize}[$\bullet$] \item This is an example of a list with an optional argument \item[--] This is the second item \end{itemize} \begin{itemize} \item Ordinary. \end{itemize} Will result in: • This is an example of a list with an optional argument – This is the second item 7.2. ENUMERATE In the case of enumerate the optional argument specifies the width of the left margin (in approximately the same way as for the thebibliography environment). \begin{enumerate}[000000] \item See the wide left margin below?\\ Next line \end{enumerate} \begin{enumerate} \item Normal.\\ Next line \end{enumerate} Will result in: 1. See the wide left margin below? Next line 1. Normal. Next line The default value for the optional argument is 00, which is approximately 1em. usrman.tex; 19/08/1999; 12:52; p.12 User Manual 13 7.3. U SING POETRY, QUOTES , AND QUOTATIONS To do ‘ordinary’ quotes and quotations, there are the environments verse, quote and quotation. Here are some small examples of each:4 Here’s a verse: I think you will like them, when you shall see them on a beautiful quarto page, RICHARD BRINSLEY SHERIDAN , The School for Scandal (1777) A quote: When a proof has been sent me with two or three lines so widely spaced as to make a grey band across the page, I have often rewritten the passage so as to fill up the lines better GEORGE BERNARD SHAW, in The Dolphin (1940) A quotation: There was things which he stretched, but mainly he told the truth. MARK TWAIN, Huckleberry Finn (1884) 7.4. V ITAE FOR AUTHORS Because of the fact that a lot of our articles end with a short vita(e) of the author(s), we have provided a vitae environment. Usage is as follows: \begin{vitae} \Vauthor{Author1} ... \Vauthor{Author2} ... \end{vitae} This environment is smart enough to notice the difference between one author and more than one author, which will be reflected in the generated heading. Authors’ Vitae Hoekwater, T This author spends most of his working life answering questions about TEX and LATEX. Author 2 ... 4 If you do not know how to use these environments, see the examples in this file. usrman.tex; 19/08/1999; 12:52; p.13 14 Kluwer Academic Publishers 7.5. S PECIAL SECTIONS FOR NOTES AND ACKNOWLEDGEMENTS Just as most articles have a bibliography, a lot of articles also contain ‘Notes’ and ‘Acknowledgements’. For this reason, there are respectively the environments notes and acknowledgements. Here are some examples again: \begin{notes} \item Please note that this class file is provided {\it as is}, and is \textcopyright\index{copyright} by Kluwer Academic Publishers. You are free to use this class file as you see fit, provided that you do not make changes to the included macro files. If you do make changes, you are required to rename the changed files.\index{making changes} \end{notes} Notes 1. Please note that this class file is provided as is, and is © by Kluwer Academic Publishers. You are free to use this class file as you see fit, provided that you do not make changes to the included macro files. If you do make changes, you are required to rename the changed files. \begin{acknowledgements} ... \end{acknowledgements} Acknowledgements I would like to thank Donald E. Knuth for the fact that he wrote this brilliant program, thereby indirectly supporting my wife, my cats and myself. 8. Footnotes and endnotes When using the kluwer class file, you can produce endnotes analogous to LATEX footnotes. Instead of the \footnote command you use \endnote. The command \theendnotes should be used to place the endnotes in the text. They will be put in a separate ‘Notes’ section in the \footnotesize font. usrman.tex; 19/08/1999; 12:52; p.14 User Manual 15 For use in locations where \writes fail (tables etc.), there are the companion commands \endnotemark and \endnotetext.1 9. Floats The kluwer class file defines three major kinds of float, and some derivatives like star-ed environments and sub... versions. 9.1. TABLES In general, here is how the table environment is intended to be used: \begin{table}[placement options] ... \caption[optional short version]{Caption text.} \label{unique label} \end{table} For placement options you can use a variable subset of the following characters: t This indicates placement at the top of a page. This may be the current page, but it could also be one of the subsequent ones. b This indicates placement at the bottom of a page. This may be the current page, but it could also be one of the subsequent ones. p This indicates placement on a page that contains floats only, no text. h This should mean ‘here’, but it is not always possible (there may not be enough space left on the page). In that case, LATEX will change this to [ht]. The following option is special: H Also means ‘here’, but in a more rigorous way. If there is not enough space left on the page, the page will be filled up with whitespace and the float will appear at the top of the next page. The difference between h and H is that H never skips over the following text. The table caption is given with the \caption command. This command is required! If you do not have a caption, use \caption{}. As you will see in the examples below, the correct way to tag a table for referencing through \ref is by putting the \label after the caption command. usrman.tex; 19/08/1999; 12:52; p.15 16 Kluwer Academic Publishers Table II. Caption text. Description 1 Description 2 Description Row 1, Col 1 Row 2, Col 1 Row 1, Col 2 Row 2, Col 2 Row 1, Col 3 Row 2, Col 3 9.1.1. Examples Two examples of typical tables follow. Their output can be seen in Tables II and III. We wish to avoid using both vertical rules between columns and horizontal rules between rows. You should, however, always use the following three horizontal rules: a top rule, a middle rule and a bottom rule. As you can see, we have made some adjustments to the line spacing, effectively disabling vertical rules completely because they create gaps. We saved the old environment in TABULAR in case somebody absolutely needs it. \begin{table} \caption{Caption text.}\label{tab1} \begin{tabular}{lll} \hline Description 1 & Description 2 & Description \\ \hline Row 1, Col 1 & Row 1, Col 2 & Row 1, Col 3 \\ Row 2, Col 1 & Row 2, Col 2 & Row 2, Col 3 \\ \hline \end{tabular} \end{table} Note in the following example that we also adjusted tabular*, so that now the columns always fill the total width you specified. The special \maxfloatwidth dimension is the maximum allowed width of the float. This is important because some of our journals have indented floats, so the float is not allowed to be as wide as \textwidth, while rotated tables (see below) have an allowed width of (almost) \textheight. usrman.tex; 19/08/1999; 12:52; p.16 17 User Manual Table III. Caption text. Description 1 Description 2 Description Row 1, Col 1 Row 2, Col 1 Row 1, Col 2 Row 2, Col 2 Row 1, Col 3 Row 2, Col 3 \begin{table} \caption{Caption text.}\label{tab2} \begin{tabular*}{\maxfloatwidth}{lll} \hline Description 1 & Description 2 & Description \\ \hline Row 1, Col 1 & Row 1, Col 2 & Row 1, Col 3 \\ Row 2, Col 1 & Row 2, Col 2 & Row 2, Col 3 \\ \hline \end{tabular*} \end{table} 9.2. A DDITIONAL COMMANDS FOR ‘ TABULAR ’ AND ‘ TABULAR *’ As you saw above, there are some changes to the tabular and tabular* environments. Apart from the extended baseline and the filling out of tabular*, there are also four extra commands to draw partial horizontal lines, these are: \rcline; which leaves some space to the left of the line \lcline; which leaves space to the right of the line \rlcline and \lrcline; these two leave space on both sides.5 These commands are used in the tabular below: Description 1 A B Description 2 Row 1, Col 2 Row 2, Col 2 Description Row 1, Col 3 Row 2, Col 3 \begin{tabular}{lll} \hline Description 1 & Description 2 & Description \\ \lcline{1-1}\rlcline{2-2}\rcline{3-3} A& Row 1, Col 2 & Row 1, Col 3 \\ B& Row 2, Col 2 & Row 2, Col 3 \\ \hline \end{tabular} 5 Both mean the same thing, but the double definition maintains symmetry. usrman.tex; 19/08/1999; 12:52; p.17 18 Kluwer Academic Publishers Figure 3. This is the caption of the figure. This is the tiger from the GhostScript distribution. 9.3. F IGURES For figures, there are the environments figure and figure*. Both of these support the same optional placement specifiers as table; if you want to look into them again, see 15 in section 9.1 A typical figure will look like the following example: \begin{figure} \centerline{\epsfig{file=tiger.eps,width=16pc}} \caption{This is the caption of the figure.} \end{figure} Note that this example needs the line \usepackage{epsfig} in the preamble of your document. Please see the documentation for epsfig (or (Goossens et al., 1994)) about the options you can specify in the \epsfig command. 9.4. F URTHER OPTIONS FOR TABLES AND FIGURES figure and table also allow you to use the environments subtable and subfigure. These two environments are analogous to subequation, that was explained previously in section 4.3. To rotate a table or figure over 90 degrees counterclockwise, enclose the entire table/figure in the kaprotate environment. usrman.tex; 19/08/1999; 12:52; p.18 User Manual 19 \begin{kaprotate} \begin{table} ... \end{table} \end{kaprotate} If you rotate a float, it will always use an entire page. In two-column styles, there is a difference between the starred forms figure* and table* compared to their normal forms. The starred forms of table and figure will be doublecolumn, while the ordinary forms are one column. This distinction also holds for rotated versions. 10. References References are inserted in the thebibliography environment. We distinguish two styles of References lists: alphabetically sorted (explained below in section 10.1) and numbered (explained in section 10.2). You can select one of these styles by including the appropriate document option in the \documentclass command. Please refer to the style of the journal concerned when chosing an option for your references. If no document option is included, the class file will usually presume named references. 10.1. A LPHABETICALLY S ORTED R EFERENCES For alphabetically sorted references one should include the document option namedreferences in the preamble command: \documentclass[namedreferences]{kluwer} Every \bibitem in the thebibliography environment should have a \citeauthoryear command as an option and a key to be referred to. The \citeauthoryear should have two arguments: the author’s name(s) and the year. The \citeauthoryear should be preceded by a \protect and in the case of more than two authors the argument with the author’s name(s) should contain the first author’s name with an et al., e.g.: \bibitem[\protect\citeauthoryear{authorname(s)}{year}]{key} The first part of your References section could look like this: usrman.tex; 19/08/1999; 12:52; p.19 20 Kluwer Academic Publishers \begin{thebibliography}{} % Note the empty pair of curly braces! \bibitem[\protect\citeauthoryear{Smith et al.}{1992}]{Smith92} Smith, I.N., Johnes, R.S. and Hines, W.P.: 1992, ‘Title of the Article’, {\it Journal\/} {\bf Vol.~no.~X}, pp.~00--00 The following \cite commands can now be used in your article: \cite, \shortcite, \citeauthor, \citeyear, \inlinecite and \opencite. For the sample \bibitem above, the four cite commands would generate the following reference in your text: Call: Produces: \cite{Smith92} \citeauthor{Smith92} \citeyear{Smith92} \shortcite{Smith92} \inlinecite{Smith92} \opencite{Smith92} (Smith et al., 1992) Smith et al. 1992 (1992) Smith et al. (1992) Smith et al., 1992 With these commands or combinations of them you can create any reference in your text according to the reference style of the journal in which your article is to be published. If you don’t want to make use of references, but just want to generate a bibliographic list at the end of your article, you can use empty square brackets and braces, like this: \bibitem[]{}. You must do the formatting of the bibitems yourself. For the layout conventions we refer you to the authors instructions of the journal in which your article is to be published. 10.2. N UMBERED R EFERENCES For numbered references one should include the documentclass option numreferences in the preamble command: \documentclass[numreferences]{kluwer} You should start the thebibliography environment with the command: \begin{thebibliography}{99} usrman.tex; 19/08/1999; 12:52; p.20 User Manual 21 The second pair of curly braces should contain a number that corresponds with the widest number in the reference list below (usually 99 is the correct value). You should label every \bibitem by putting a key between the curly braces, e.g.: \bibitem{Smith92} In your article you can refer to this \bibitem with \cite{Smith92}. 10.2.1. Using the optional argument of bibitem Do not use the optional argument to \bibitem in this case, since it will produce unexpected results. The \cite command will produce the number of the reference in brackets, e.g. [2]. The \shortcite, \citeauthor ... commands, as mentioned in Section 10.1, can also be used but they will produce the same output as \cite. You must do the formatting of the bibitems yourself. For the layout conventions we refer you to the authors’ instructions of the journal in which your article is to be published. 10.3. BIBTEX You can of course use BIBTEX, but if you do so, please make sure you send all the necessary files with the LATEX source file, i.e. the bbl file. You could also include the BIBTEX output directly in your article. Please don’t send us .bib files. Kluwer has BIBTEX style files available for the namedreferences and numreferences options. For named references, the file is called klunamed.bst and for numreferences, it is called klunum.bst. Both files are included with the distribution of the class file. We refer you to the LATEX and BIBTEX manuals for further information on using BIBTEX. 11. Special options and extra information 11.1. M Y PAGES COME OUT RAGGEDBOTTOM ! The sectioning commands always try to keep a certain amount of lines with them on the same page. Values may differ, but the typical values are: 3 lines for section and subsection, 2 lines for subsubsection. If you find that your pages come out unbalanced, this could be the problem. The other likely problem is that you used a Here float on the page, and it didn’t fit. usrman.tex; 19/08/1999; 12:52; p.21 22 Kluwer Academic Publishers A. B. Figure 4. A) This is a figure. B) Second subfigure 11.2. AUTHORS ’ INSTRUCTIONS The authors’ instructions for certain journals are not up-to-date. Quite often the instructions indicate that submissions should be made with double line spacing, or that the journal does not accept electronic figures. Both of these statements do not apply to LATEX submissions. You do not have to change the baselines and we are always quite happy with Encapsulated Postscript figures. 11.3. S IDE BY SIDE FIGURES The use of minipages to put two partial floats next to each other, as demonstrated in Goossens et al., 1994, doesn’t work with our class files. This is partially because of the way we have implemented floats, and partially a design decision. If you need two figures next to each other, do something like this: \begin{figure} \centerline{ \epsfig{file=tiger.eps,width=5pc}~A.\qquad \epsfig{file=tiger.eps,width=5pc}~B. } \caption{A) This is a figure. B) Second subfigure} \end{figure} 11.4. D OUBLE ABSTRACTS Sorry, but you cannot have multiple abstracts in one article. If you need one, you have to make a separation in one abstract environment. 11.5. L ETTERSPACED TEXT, PROBLEMS WITH SECTIONS AND CAPTIONS Certain journals require certain headings in a letterspaced font. While the stylefile provides for this, it interferes with writing to auxiliary files like the Table of Contents files. If you encounter incomprehensible error messages, the first thing you should try is to replace the offending \caption{} or usrman.tex; 19/08/1999; 12:52; p.22 User Manual 23 \section{} command by \caption[]{} or \section[]{}. You will sometimes also have to delete the \jobname.aux file. If you tried this, and it didn’t work, you can ask support from [email protected]. Please provide us with a log file that contains the error you received. 11.6. O PTAINING EXTRA FONTS / MACRO PACKAGES You may want to get extra packages and/or fonts (like the wasy symbol font) if those are not provided at your site. All TEX related files on the internet are available for a large central archive called CTAN. Below you will find a list of the main sites and mirrors for CTAN. If you decide to download, please select a site near you (network-wise). CTAN main archives ftp.dante.de (Deutschland) /tex-archive ftp.shsu.edu (Texas, USA) /tex-archive ftp.tex.ac.uk (England) /tex-archive CTAN mirrors dongpo.math.ncu.edu.tw (Taiwan) /tex-archive ftp.center.osaka-u.ac.jp (Japan) /CTAN ftp.ccu.edu.tw (Taiwan) /pub/tex ftp.cs.rmit.edu.au (Australia) /tex-archive ftp.loria.fr (France) /pub/unix/tex/ctan ftp.muni.cz (The Czech Republic) /pub/tex/CTAN ftp.riken.go.jp (Japan) /pub/tex-archive ftp.uni-stuttgart.de (Deutschland) /tex-archive (/pub/tex) kadri.ut.ee (Estonia) /pub/tex src.doc.ic.ac.uk (England) /packages/tex/uk-tex sunsite.unc.edu (North Carolina, USA) /pub/packages/TeX wuarchive.wustl.edu (Missouri, USA) /packages/TeX If you do not have internet access, some of the packages from these sites can also be obtained by request from KAP, using the address at the end of this document. 11.7. S UBMITTING BUG REPORTS AND REQUESTS If you have questions regarding our class file, or if you have discovered a bug, or if you have a request for something you would like to see included in the next version of this class file, send you comments to: [email protected] (e-mail) or to KAP PrePress, Achterom 119, 3311 KB Dordrecht, The Netherlands (regular mail). usrman.tex; 19/08/1999; 12:52; p.23 24 Kluwer Academic Publishers Notes 1 Here is an example of an endnote References Goossens, Michel; Mittelbach, Frank; and Samarin, Alexander: The LATEX Companion. Addison-Wesley, Reading, MA, USA, 1994. Knuth, Donald E: The TEXbook. Addison-Wesley, Reading, MA, USA, 1984. Lamport, Leslie: LATEX – A Document Preparation System – User’s Guide and Reference Manual. Addison-Wesley, Reading, MA, USA, 1985. Smith, I.N., Johnes, R.S. and Hines, W.P.: 1992, ‘Title of the Article’, Journal Title in Italics Vol. no. X, pp. 00–00 Index Symbols \\ . . . . . . . . . . . . . . . . . . . . . 5, 6 A \abbrev . . . . . . . . . . . . . . \abbreviations . . . . . . . abstract environment . . . . . . . acknowledgements environment amssym package . . . . . . . . . . amssymb package . . . . . . . . . ao environment . . . . . . . . . . . article environment . . . . . . . . \author . . . . . . . . . . . . . . authors’ instructions . . . . . . . \bibitem . . . Bibliography . . Bibtex . . . . . . . klunamed.bst klunum.bst . . . . . . B .. .. .. .. .. . . . . . C \caption . . . . . . . \centerline . . . . \cite . . . . . . . . . . \citeauthor . . . . \citeauthoryear . . . . . . . . . . . . . . . . . . . . . . . . . . . . . . 7 7 7 14 3 8 6 6 5 22 \citeyear . . . . . . class option . . . . . . . \classification copyright . . . . . . . . . . . . . . . . . . . . . . . . . . . . . . . . . . . . . . . . . . . . . 20 3 7 14 D \date . . . . . . . . . . . . . . . . . . . 7 \dedication . . . . . . . . . . . . . 6 double line spacing . . . . . . . . . . . 22 E \email . . . . . . . . . \endnote . . . . . . . \endnotemark . . . Endnotes . . . . . . . . . endnotes package . . . . . . . . . 19–21 \endnotetext . . . See References \ensuremath . . . . . . . . . . . . . 21 . . . . . . . . . 21 enumerate environment . . . . . . . . . 21 Environments abstract . . . . . . . acknowledgements ao . . . . . . . . . . . . . . . . . 15, 18 article . . . . . . . . . . . . . . . . . 18 enumerate . . . . . . . . . . . . 20, 21 figure . . . . . . . . . . . . . . . . . . 20 . . . . . . . . . 19 figure* . . . . . . . . . . . . . . . . . . . . . . . . . . . . . . . . . . . . . . . . . . . . . . . . . . . . . . . . . . . . . . . . . . . . . . . . . . . . . . . . . . . . . . . . . . . . . . . . . . . . . . . . . . . . .. 5 . . 14 . . 15 . . 14 .. 3 . . 15 .. 8 11, 12 .. 7 . . 14 .. 6 .. 6 11, 12 . . . 18 . . . 18 usrman.tex; 19/08/1999; 12:52; p.24 25 User Manual itemize . . . . . . kaprotate . . . . motto . . . . . . . notes . . . . . . . opening . . . . . pf . . . . . . . . . pf* . . . . . . . . quotation . . . . quote . . . . . . . subequation . . . subfigure . . . . subtable . . . . . table . . . . . . . tabular . . . . . . TABULAR(*) . tabular* . . . . . thebibliography varequation . . . verse . . . . . . . vitae . . . . . . . \epsfig . . . . . . epsfig package . . . . . . . . . . . . . . . . . . . . . . . . . . . . . . . . . . . . . . . . . . . . . . . F figure environment . . figure* environment . . Figures electronic . . . . . . options . . . . . . . . placement options side by side . . . . . float package . . . . . . floats . . . . . . . . . . . captioning . . . . . . difference between starred forms . maximum width . . placement options referencing . . . . . rotating . . . . . . . subnumbering . . . \footnote . . . . . . Footnotes . . . . . . . . . to author . . . . . . . to title . . . . . . . . . . . . . . . . . . . . . . . . . . . . . . . . . . . . . . . . . . . . . . . . . . . . . . . . . . . . . . . . . . . . . . . . . . . . . . . . . . . . . . . . . . . . . . . . . . . . . . . . . . . . . . . . . . . . . . . . . . . . . . . . . . . . . . . . . . . . 11, 12 . . 18 .. 7 . . 14 .. 3 . . 11 . . 11 . . 13 . . 13 . . 18 . . 18 . . 18 15, 18 . . . 16 . . . 16 . . . 16 19, 20 ... 8 . . . 13 . . . 13 . . . 18 . . . 18 . . . . . . . . . . . . . . . . . . . . 18 . . . . . . . . . 18 . . . . . . . . . 22 . . . . See floats . . . . . . . . . 15 . . . . . . . . . 22 ......... 3 . . . . . . . . . 15 . . . . . . . . . 15 normal and . . . . . . . . . 19 . . . . . . . . . 16 . . . . . . . . . 15 . . . . . . . . . 15 . . . . . . . . . 18 . . . . . . . . . 18 . . . . . . . . . 14 . . . . . . . . . 14 ......... 5 ......... 5 I \inlinecite . . . . . . . . . . . . . 20 \institute . . . . . . . . . . . . . . 5 itemize environment . . . . . . . 11, 12 K kaprotate environment . . . . . . . . . 18 \keywords . . . . . . . . . . . . . . . 7 L \lcline . . . . . . . . . . . . . . . . . 17 \lrcline . . . . . . . . . . . . . . . . 17 M making changes . . . \maxfloatwidth motto environment . multiple abstracts . . . . . . . . . . . . . . . . . . . . . . . . . . . . . . . . . . . . . . . . . . 14 16 7 22 N namedreferences option \newdisplay . . . . . \newproof . . . . . . . \nomen . . . . . . . . . . \nomenclature . . . notes environment . . . . numreferences option . . . . . . . . . . . . . . . . . . . . . . . . . . . . . . . . . . . . . . . . . . 19, 21 . . 10 . . 10 .. 7 .. 7 . . 14 20, 21 O \opencite . . . . . opening environment Options class . . . . . . . . namedreferences numreferences . . Overfull lines . . . . . . . . . . . . . . . 20 .......... 3 . . . . . . . . . . . . . . . . . . . . . . . . . . . . ... 3 19, 21 20, 21 ... 6 . . . . . . . . . . . . . . . . . . . . . . . . . . . . . . . . . . . . . . . . . . . . . . . . . . . . . . . . . . . . . . . . . . . . . . . . . . . . . . . . P Packages amssym . . . amssymb . . endnotes . . . epsfig . . . . . float . . . . . . wasysym . . \paragraph . \part . . . . . . pf environment . pf* environment . . . . . . . . . . . . . . . . . . . . . . . . . . . . . . . . . . . . . . . . . 3 . 8 . 3 . 18 . 3 3, 8 . 11 . 11 . 11 . 11 usrman.tex; 19/08/1999; 12:52; p.25 26 Kluwer Academic Publishers T Preamble . . . . . . . . . . . . . . . . . . 3 \protect . . . . . . . . . . . . . . . . 19 table environment . . . . . . . Tables . . . . . . . . . . . . . . . Q placement options . . . . quotation environment . . . . . . . . . 13 tabular quote environment . . . . . . . . . . . . 13 additional commands in . changes made in . . . . . R lines in . . . . . . . . . . . . \rcline . . . . . . . . . . . . . . . . . 17 tabular environment . . . . . . References . . . . . . . . . . . . . . . . . 19 TABULAR(*) environment . alphabetical . . . . . . . . . . . . . . 19 tabular* environment . . . . . numbered . . . . . . . . . . . . . . . 20 \thanks . . . . . . . . . . . . typesetting a sorted list . . . . . . 20 \thanks (to author) using bibtex . . . . . . . . . . . . . 21 The H option for floats . . . . \rightline . . . . . . . . . . . . . . 8 thebibliography environment \rlcline . . . . . . . . . . . . . . . . 17 \theendnotes . . . . . . . \runningauthor . . . . . . . . . . 6 \title . . . . . . . . . . . . . \runningtitle . . . . . . . . . . . 6 \translation . . . . . . . S \section . . . . . . . . . short pages . . . . . . . . . . \shortcite . . . . . . . subequation environment subfigure environment . . \subparagraph . . . . \subsection . . . . . . \subsubsection . . . subtable environment . . . \subtitle . . . . . . . . \surname . . . . . . . . . . . . . . . . . . . . . . . . . . . . . . . . . . . . . . . . . . . . . . . . . . . . . . . . . . . . . . . . . . . . . . . . . . . . . . . . . . . . . . 11 21 20 18 18 11 11 11 18 4 5 . . 15, 18 . . . . . 15 . . . . . 15 . . . . . . . . . . . . . . . . . . . . . . . . . . . . . . . . . . . . . 17 . . 16 . . 17 . . 16 . . 16 . . 16 .. 5 .. 6 . . 15 19, 20 . . . 14 ... 4 ... 6 U User macros . . . . . . . . . . . . . . . . 3 Using bibtex . . . . . . . . . . . . . . . . 21 V varequation environment \Vauthor . . . . . . . . verse environment . . . . vitae environment . . . . ... .... .... .... . . . . . . . . . . . . . . . . 8 13 13 13 W wasysym package . . . . . . . . . . . 3, 8 Address for Offprints: KLUWER ACADEMIC PUBLISHERS PrePress Department, P.O. Box 17, 3300 AA Dordrecht, The Netherlands e-mail: [email protected] Fax: +31 78 6392500 usrman.tex; 19/08/1999; 12:52; p.26