1
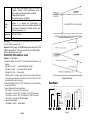
®
LASER DISPLAY SYSTEM
MANUAL
SEVEN STARS
®
Please read the manual carefully before using.
BIG DIPPER LASER SCIENCE & TECHNOLOGY CO., LTD
REV: 3.02
Laser light after service
Product warranty card
Please fill in the following content properly and keep it safe for
future maintenance. Accordingly, for your each purchase of our systems we have
archive Serial number and parameters for future reference.
Testing :
Mode:
Distributor:
warranty:
non-warranty:
Serial No.:
Address:
Tel:
About Product Warranty
1.Where in my company (and an authorized agent) to buy the proper use
of laser devices in the case of products that enable card are entitled to
light a period of mechanical, electronic one-year warranty; if not the
warranty situation, the company can also according to actual situation
provide paid maintenance services.
2.The warranty is no longer valid in the following situations:
* Warranty cards and products have no serial numbers.。
* Product is damaged or show significant signs of self-disassembly.
*Any unauthorized modification (removal or replacement) made to
product or it’s components.
*Improper or excessive use of inappropriate repairs which result in a
repair failure or injury。
* Did not follow instructions or use in an environment not suitable for
product..
*Product damage caused by strong impact
*The warranty cannot be extended if the product as been serviced
* Laser power normal degradation
*Warranty card must be filled out with receipt of purchasing in order for
the warranty to be valid.
*Product is damaged due to abnormal voltage or caused by other
accidents (ex. Natural disasters).
3.The Company reserves the right to interpret the provisions above.
The content of these articles is subject to change without notice!
Laser Display System Manual
Model: B10000+RGB
Notices
1. This is IV laser product. Do not exposure the human eye directly to
the laser light.
2. Please follow the instructions. Do not disassemble this product.
Please contact the professional person if there is a malfunction.
3. Installation should be done by a professional technician.
4. Please place the product far away from strobe lights.
5.The product should be placed in a dry place. Do not use the product
in a wet or dusty environment. Water-proof fittings required if it is
used outdoor.
6. Do not touch the product or pull the power wire by wet hand.
7. The work temperature of laser product is 10-40℃. The product will
not work normally in a low-temperature environment.
8. Do not turn on or off the product frequently. Otherwise, the service
time of lasers will be affected. Besides, keeping working for a long
time should be avoided.
9. Fixed installation to prevent the product from strong vibration or
shock.
10. Prevent foreign objects from entering the product to avoid
malfunction.
11. Keep the distance between the product and the objects in the
lighting 1M at least.
12. Do not connect the power cable or turn on the light before
installation.
13. Make sure the plug has been wired up properly before being
powered on.
13. Make sure the plug has been wired up properly before being
powered on.
14. After running constantly for three hours, turn off the product for 25
minutes at least for cooling to reuse.
Page 1
15. Turn on the product before opening the laser show control
software. Otherwise, the laser show control software need to be
reopened.
16. Use the original shake-proof packing for re-transportation.
(Attention:When in Follow Mode,either can be chosen for the Host.In
asynchronous situation,the Follow one will run after the Host
automatically to reach synchrony).
17.
Clean the lens regularly. Do not use a wet cloth or chemicals, but a
This symbol indicates separate collection of electronics and
Maintenance
electronic equipment
cotton swab with alcohol to clean the lens. The maintenance
Inspection
frequency depends on the usage frequency and surrounding working
conditions of the product. Clearance per 15 days is recommended.
In order to use the product securely and properly, please read the
manual before using and follow the instructions strictly to prevent
personal safety trouble and product damage caused by misuse.
Take care of the product, check the possibility of the product damage
caused by transportation and check all the listed items are present
upon receipt of the product.
1 x LASER display system
1 x User manual
1 x DMX cable
1 x Power cable
1 x DB25 link(optional)
1 x Interlock wire
Installation
1. Make sure there is no flammable or explosive subjects within min
1.5 meter nearby the installation.
2.Before installation, please check and make sure the power supply
voltage meet request of the system.
3. Please check ventilation and fans or exhaust passages are cleared.
4. The equipment should be fixed firmly.
5. For security reasons, the appliance must be earthed.
6. Laser light above MPE should not be accessible to audience, MPE
can’t be exceed in the separation distance, see the illustration:
Besides, dust cover at the product side should be dismantled to clear
regularly because the heat radiation effect will be affected by the dust
for the long-time use.
Warning
Power off before installation or maintenance.
Declare
The product is with good performance and complete package when it
is delivered. The end-user of this product should follow all the above
instructions and warnings. Any damage caused by misuse, malfunction
and problem caused by ignoring the instructions are not included in
the repair guarantees of the manufacturer or dealers.
All products made from Big Dipper Laser Company have anti - fake
identification. please verify the anti-counterfeit label at the bottom
of the case to ensure the interests of consumers.
Instruction of using interlock wire
The machine will work only if plugging in the Interlock wire with
short circuit. It will delay 5-15 seconds to light out.
Page 2
Page 7
Display
effect
3.It can work synchronously under the control of
computer (stander ITDA interface)and work in
DMX ,sound and auto mode without computer.
4.Slow lighting from start
(The speed of scanner is 15KPPS)
Can show animation with blanking , patterns can be
zoomed in or zoomed out synchronously (or
asynchronously) in vertical or horizontal orientation, the
same motion is effected on the offset, rotation, wave,
dot-line ,strobe and so on.
Dimensions
330×370×125mm
NW./ GW.
5.6/7.1KG
Warning:In any installation and maintenance work, please make
sure the system is powered off.
Remark:DMX512 mode,the LASER display system will shut off ,if the
DMX512 signal intermit . Under the sound mode, the LASER display
system will be closed when quiet.
ADDRESS: DMX address setup
Address 1-10 Dip switch:
1. When Dip Switch 10 is set to “On”, the function of Dip code 1-9 as
follows:
Dip Switch 1 is OFF…… Sound Mode(Master LASER)
Dip Switch 1 is ON…… Auto Mode (Master LASER)
Dip Switch 2 is ON……Follow Mode
(Attention :When in Follow Mode ,either can be chosen for the Host.
In asynchronous situation ,the Follow one will run after the Host
automatically to reach synchrony).
2.When Dip Switch 10 is set to “OFF”, the system can be controlled by
12 channels DMX512.
3.Speed adjustment Under sound Mode:
Dip Switch 3, 4 are set to OFF, Auto speed
Dip Switch 3 is set to “ON” , Dip Switch 4 to “OFF” Slow speed
Dip Switch 3 is set to “OFF” , Dip Switch 4 to “ON” Fast speed
Dip Switch 3 ,4 are set to ”ON” Fast speed
4.when in Follow Mode:
Dip Switch 2 is ON...... Follow Mode
Diagram illustration
RearPanel
①②
Page 6
③
④⑤⑥
⑦ ⑧
Page 3
⑨
⑩
⑾
Function setting
① ILDA IN:ILDA Input
② ILDA OUT:ILDA Output
③ INTERLOCK:Remote control connection
④ MIN-MAX: Sound Sensitivity adjustment
⑤ Microphone:Sound signal IN
⑥ Indicator: light on under sound mode
⑦ IN: DMX signal input
⑧ OUT: DMX signal output
⑨ DMX ADDRESS: Binary format switch
⑩ POWER ON/OFF: Power Switch
⑾ F3AL 250V:Three core socket communication
Technical parameters
Model
Laser diode
Laser power
Power Requirement
Scan angle
DMX Channels
B10000+RGB
R/G /B
R: 300mW B:500mW G:200mW
100-240VAC, 50/60HZ
±15°
12 Channels
DMX512 Control Channel Settings
DMX512
Channels
Operating Mode
numerical
0-63
Off
64-127
Auto-Sound Mode
1PLAY MODE 128-191
Auto mode
192-255
Manual
0-82
Static patterns
83-92
Characters, Seven Stars
2-Pattern
93-95
Dancing animation
option
96-98
Love heart animation
99-255
Dynamic patterns
8
levels adjustment(0-255)/30=(0-8)
3- strobe
0-255
0-167
Manual
168-188
Auto
Right/Left
4-Horizontal
move
189-209
Auto Left/Right
210-255
Auto Bounce Right/Left
0-167
Manual
168-188
Auto Down/Up
Page 4
189-209
210-255
0-10
11-109
110-154
155-204
205-255
0
1-150
151-255
0
1-150
151-255
0
1-180
181-217
218-255
0-63
64-127
128-191
192-255
0-10
11-200
201-255
Auto Up/Down
Auto Bounce Up/Down
No zoom
Manual zooming
6-Zoom
Auto zooming out
mode
Auto zooming in
Auto zooming
No stretch
7Horizontal
Manual stretch
tension
Auto stretch
No stretch
8Manual stretch
Perpendicular
drawing
Auto stretch
No rotating
Manual rotation
9- rotating
Auto clockwise rotation
Auto anti-clockwise rotation
Normal display
Dot-line display
10Display mode
Subsection display
Dot display
No wave
11- wave
Frequency low /high
Amplitude low /high
White-red-green-blue-yellow-purpleCyan-Stimulation modulation color
00-251
→Subsection(RGB)→Subsection(PCY)→S
(each five
value one ubsection(RGPYBCW)→
Counterchange(RGB)→
color,47
12- color
color
Counterchange(PCY)→
optional) Counterchange(WRGBPYC)→analogue
modulation color segmentation flow
252-255
Color flow/Sound Mode
Sound control 、 Auto control ,DMX, Follow
Control mode
Mode ,Compatible with PC software
1. Red and Blue can work in analogue modulation ,34
kinds of color can realize 47
changing colors in
Feature
DMX mode
2.Fantastic animation, beam effect
Page 5