1
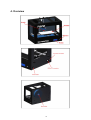
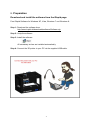
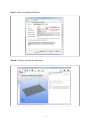
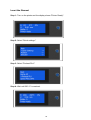
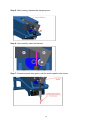
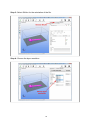
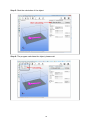
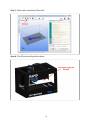
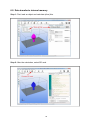
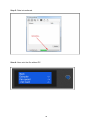
User Manual iRapid Black
Delivery contents:
• iRapid 3D Printer
Accessories:
•
•
•
•
•
•
Spool holder, protective caps
Power supply, USB cable
Oil, allen key
Scraper
Instructions
Overview
Contents
1.
Introduction
Page
3
2.
Safety Instructions
Page
3
3.
Guarantee and Warranty
Page
5
4.
Quick Overview
Page
6
5.
Preparation
Page
7
6.
6.1
6.2
6.3
Printing
Printing with PC
Data Transfer to the Internal Memory
Printing without PC
Page
Page
Page
Page
12
12
16
19
7.
Technical Data of iRapid BLACK
Page 21
8.
8.1
8.2
How to Fix Common Problems
Hardware
Software
Page 22
Page 24
Page 24
9.
Contact Us
Page 24
2
1. Introduction
Thank you for choosing the iRapid 3D printer!
This device has been designed with utmost care in order to satisfy your
requirements. To use your 3D printer immediately, please use the instructions to
setup the printer and read the information in the user manual on performing basic
functions.
Make the most out of your 3D printer by reading read the user manual carefully and
checking the latest updates from our website.
We are always striving to deliver 3D printer performance and value with an
affordable price. Your satisfaction is very important to us. Should you encounter any
problems, our expert support staff are happy to help. We are always open for
suggestions because we want you to be satisfied.
Selecting a location for the printer
When selecting a space to put the printer, you should always make sure that there is
enough space to open the printer trays, covers and doors. The following
requirements must necessarily be met:
•
Make sure that there is sufficient air circulation in the room.
•
The 3D printer must be on a flat, sturdy and stable surface.
•
You should make sure that the 3D printer:
– Is not exposed to a direct airflow through air conditioners, heaters, or
ventilators.
– Is protected from direct sunlight, humidity extremes or temperature
fluctuations.
- Is always clean, dry and free of dust.
2. Safety instructions
CAUTION: Do not leave the printer unattended while it is in use.
Suitable for adults (aged 18 or over).
CAUTION - POTENTIAL INJURY: Please read the safety information before
connecting cables or electrical components.
Connect the power cord to a properly grounded electrical outlet that is near the
product and easily accessible.
This product should not be placed or used near water or in a damp environment.
CAUTION - HOT NOZZLE: The nozzle and the immediate environment can be
3
very hot. Let hot component to cool before touching the surface to avoid injury.
CAUTION - POTENTIAL INJURY: Before moving the 3D printer, follow these
instructions to prevent injury and damage to the 3D printer:
• Turn off the 3D printer and unplug the power cord from the outlet.
• Unplug all cables before moving the 3D printer.
• Use only the power cord provided with this product or an approved by the
manufacturer's authorized replacement.
CAUTION - SHOCK HAZARD: Make sure that all external connections such as
internet and computer system connections are properly installed in their marked
connections. This device and the associated components have been tested
according to the global security requirements. The safety features of some parts may
not be obvious. If parts are used, which are not provided from the manufacturer, so
assumes the manufacturer no responsibility or liability for this product.
CAUTION - SHOCK HAZARD: To avoid the risk of electric shock when cleaning
the 3D printer, unplug the power cord from the outlet and disconnect all cables from
the 3D printer before proceeding.
CAUTION - SHOCK HAZARD: Do not use the 3D printer during a thunderstorm.
Do not install this product or plug any devices or cables such as the USB cable and
power cord during a thunderstorm.
CAUTION - POTENTIAL INJURY: The power cord must not be cut off, bent,
pinched or squashed. Always ensure that the power lead has not been damaged. Do
not place any heavy objects on it. Do not expose the cable no rubs and no otherwise
load. Do not pinch the power cord between objects, for example, furniture and walls.
If one of these is present, dangers of fire and electrical shock hazard. Check the
power cord regularly for these dangers. Unplug the power plug from the socket
before checking the power cord. Have all maintenance and repair work that is not
described in the user documentation by an authorized electrician.
You can download the EU Declaration of conformity hier:
http://www.irapid.de/downloads/zertifikate/ke_black.pdf
WEEE- Waste from Electrical and Electronic Equipment)
The WEEE symbol signifies specific recycling programs and procedures for
electronic products in countries of the European Union. We encourage the recycling
of our products after use. For more information about recycling options, visit the
website at www.irapid.de.
4
Temperature information
Ambient temperature 15C° – 30 C°
Transport and storage temperature 5 C° – 30 C°
3. Guarantee and Warranties
The guarantee and warranty is 24 months after receiving the Rapid 3D printer.
Excluded from this warranty and warranty are wear parts such as nozzle and printing
table. The 3D printer cannot be opened without authorization, or otherwise damaged.
Please retain this documentation and the original package of this printer in case you
need to ship it for repairs or to a new address. 3D printers are inherently sensitive to
bumping or knocking and are best protected in their original box. Returns that are not
properly packaged cannot be repaired under warranty.
• Software changes
Software changes of the device and the use of applications, not provided by iRapid
GmbH, lead to loss of the warranty claim. If the printer has been damaged by the use
of software or applications not provided by iRapid GmbH, you must cover the
shipping and repair costs.
Download software and applications only from our website:
(http://www.irapid.de/downloads/software/Software.zip).
The company iRapid GmbH assumes no liability for any loss of data on any internal
or external storage medium.
The device has been pre-installed with software and works as can be reasonably
expected. It cannot be guaranteed that the software is error-free. As long as it is
possible to use the printer as designed an error in the software does not constitute a
faulty device and hence provides no grounds to a warranty claim. The warranty only
covers faults in the software that would prevent the normal use of the printer.
Limitations of the software caused by hardware faults, the environment the printer is
being used in, operating error or similar reasons are not considered software faults.
5
4. Overview
6
5. Preparation
Download and install the software from the iRapid page:
Free iRapid Software for Windows XP, Vista, Windows 7 und Windows 8:
Step 1: Download the software here:
http://www.irapid.de/downloads/software/Software.zip
Step 2: Unzip the software.
Step 3: Install the software.
All necessary drivers are installed automatically.
Step 4: Connect the 3D printer to your PC via the supplied USB cable.
7
Step 5: Start the software and select "Configuration".
Step 6: Select "Printer Settings".
8
Step 7: Select the highest COM port.
Step 8: Connect now with the 3D printer.
9
Insert the filament
Step 1: Turn on the printer and the display shows "Printer Ready".
Step 2: Select "Quick settings."
Step 3: Select "Preheat PLA."
Step 4: Wait until 200 ° C is reached.
10
Step 5: After heating, depress the clamping lever.
Step 6: Now carefully insert the filament.
Step 7: Press the plastic wire gently until the molten plastic wire comes.
11
6. Printing
6.1 Printing with PC
Step 1: Connect the 3D printer to the PC.
Step 2: Load the object.
12
Step 3: Select Slic3er for the calculation of the file.
Step 4: Choose the layer resolution
13
Step 5: Start the calculation of the object.
Step 6: The program calculates the object, please wait.
..
14
Step 7: Select after calculating "Start Job".
Step 8: The 3D printer will print the object.
15
6.2. Data transfer to internal memory
Step 1: First, load an object and calculate (slice) this.
Step 2: After the calculation, select SD card.
16
Step 3: A new window will open, select here the upload button.
Step: Assign a name
17
Step 5: Data is transferred.
Step 6: Now, print the file without PC
18
6.3. Printing without PC
Step 1: Turn on the printer, the display showing „printer ready“
Step 2: Choose "SD Card"
Step 3: Choose "Print file"
19
Step 4: Choose "Sample or Test "
Step 5: The 3D printer is printing
20
7. Technical data profile of iRapid BLACK
Print Technology:
Max. print dimensions:
Filament diameter:
Fused Filament Fabrication
approx. 250mm width, 150mm depth, 120mm height
1.75mm
Layer Resolution Settings:
50 Micrometer (0,05mm)
100 Micrometer (0,10mm)
200 Micrometer (0,20mm)
250 Micrometer (0,25mm)
300 Micrometer (0,30mm)
For small parts
For small parts
For medium parts
For medium parts
For medium and big parts
Drive system:
Patented rack and pinion drive
Display:
Display size:
Internal memory:
File types:
Printing without computer
75x30mm
4GB
STL for host or gcode for printing without computer
Print bed:
Interior:
Removable magnetic print bed
LED - Illuminated
AC input:
100-240 V, 50-60Hz
Operating systems:
Software:
Ambient operating temperature:
Storage temperature:
Printer dimensions:
Weight:
Windows XP, Vista, Windows7, Windows 8, (Mac OS commig soon)
Repetier
15-30°C
05-30°C
approx. 500mm width, 350mm depth, 400mm height
approx. 9kg
21
8. How to fix common problems
8.1 Hardware
Plastic wire (filament) is not inserted in the nozzle.
If the 3D printer is turned off and is still connected via the USB cable to the PC, the display
remains lit.
For optimal printing results, the printing table must be precisely adjusted to the
nozzle.
Generally the printing table is optimally adjusted. However, due to transportation or after
several uses, the table should be readjusted.
The table can be easily adjusted, using the 5 allen screws under the table. The optimal gap
between the nozzle and the printing table is 0,2mm or two sheets of paper.
If necessary, please check all 5 positions of the table.
22
As a rule:
If the gap is too big, the adhesion is too weak
If the gap is too small, the adhesion is too strong.
23
8.2 Software
•
Use only offered by iRapid software on the website.
•
Is there still a problem with the software please contact our support
team via our website www.iRapid.de.
9. Contact us
iRapid GmbH
Gottfried-Hagen-Straße 60
51105 Cologne
Germany
Tel: +49 221 16 80 49 0
Mail: [email protected]
Web: www.irapid.de
24