1
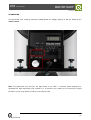
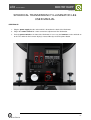
LE6 user manual
www.image-engineering.de
SPHERICAL TRANSPARENCY ILLUMINATOR LE6
USER MANUAL
STARTING UP
1. Plug the power supply into the socket which is located on the back of the illuminator.
2. Plug in the remote control for a more convenient adjustment of the illumination.
3. Push the power switch on the front of the illuminator. If necessary the luxmeter can be switched on
or off. The switch for the luxmeter display is located directly next to the power button.
1/5
LE6 user manual
www.image-engineering.de
ILLUMINATION LEVEL
The unit for the illumination level can be set with the rotary knob. If using a USB interface, set the marked
position to USB.
The other positions are:
B
C
D
E
F
≙
≙
≙
≙
≙
< 20 lx
< 200 lx
< 2 klx
< 20 klx
< 200 klx
The values are shown in the display above the rotary knob. Depending on the setting of the rotary knob
the illumination level is displayed.
2/5
LE6 user manual
www.image-engineering.de
ILLUMINATION
The illumination level varied by turning the crank (below the Voltage display) or with the button on the
remote control.
Note: The photometer that measures the light density in the LE6 is a luxmeter which originally was
developed for light engineering and scientific use. It therefore also enables the measurement of light
intensities in a klx range which can not be reached by the LE6.
3/5
LE6 user manual
www.image-engineering.de
REMOTE CONTROL
The remote control consists of two toggle buttons which are
marked with 70/100 and
.
The button 70/100 button shifts the voltage to 70% or 100%
of the maximum. The 70% setting is only a stand-by mode
when you are not using the illuminator for measurement. The
100% is the mode for measurement. At the 70% mode the
illuminator runs with a color temperatur of app. 2900K. In the
measurement mode (100%) it works with 3200K.
The
button is for the adjustment of the illumination
level. By pressing the toggle button to the left the value
decreases. By pressing the toggle button to the right the
value increases to the maximum. If you double klick the
toggle button to the left the illumination level will be reduced
to the minimum level. By double clicking the toggle button to
the right the illumination level will be raised up to the
maximum.
USB INTERFACE
With the aid of the USB-Interface the
light intensity can be measured and
controlled with a Windows PC. The
rotary knob has to be set to the USB
position.
4/5
LE6 user manual
www.image-engineering.de
REPLACING THE BULB
Attention: Please disconnect the power supply before replacing the bulb.
1. Pull the drawer out a little using the two grips at the front. Please be careful with the cables which
are fixed to the drawer.
2. Release the grounding cable from the drawer (cable color yellow-green).
3. Please pull the bulb out carefully.
4. When replacing the bulb do not touch it directly with your fingers. Otherwise the durability of the bulb
is reduced. We recommend using a tissue.
5. Fix the grounding cable on the drawer. Make sure the luxmeter cable has no contact with the bulb.
Oder Make sure the luxmeter cable is not lying on top of the bulb.
6. Push the drawer back into the regular position. Please make sure tthat there aren’t any cables
jammed between the drawer and the illuminator.
5/5