1
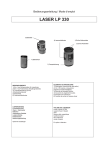
Operators Manual Laser Cross Level L223
1 – Battery compartment cover
2 – ON/OFF-Switch
3 – Thumbwheel
4 – Power indicator lamp
5- Laser emitting window
6- Side calibration hole
7 – 5/8” nut (connection to multifunctional mount)
Use of FL40-Pocket:
- Open the battery compartment cover “1” and put in 3 AA batteries
as per figure (take care of correct polarity).
- Place the unit on a platform or tripod.
- Switch the unit on. A cross line will be projected.
- A visual alarm (blinking lines) indicates that the unit was set up
outside of compensator range. Set it up on a more even surface!
Multi-functional mount:
Remove the laser by moving the thumbwheel “3” counter-clockwise (release).
Unfold hanging board.
Set the unit back to the
Set the unit back to the
multi-functional mount
and move the thumbwheel “3” clockwise
(connect).
b) Fix the mount to a wall by use
of a screw or nail.
b) Attach it to a metal plate by use
of the built-in magnets “9”.
c) Fix it to a pipe by use of the
fixing strap.
12
Multi-functional mount
8 – Elevating screw
9 – Magnets
10 – Elevating thumbwheel
11 – Slot for fixing strap
12 – Hanging board
13 – 5/8” nut for connection to
builders’ tripod
14 – 1/4” nut for con. to camera tripod
Height adjustment:
The unit can be
moved up and down
within a range of
15 mm.
Move elevating
thumbwheel “10”
in direction
“up” or “down”
as indicated on the
mount.
Kit consists of: Instrument, multi-functional mount, 3 x AA battery,
magnetic laser target, fixing strap, bag, operators manual.
Take special care:
1 - DO NOT STARE INTO BEAM.
2 - Don’t knock, drop and heat the unit. Do not use in rain.
3 - Transport only in original bag.
Ensure that the unit is powered off at transport.
4 - Clean instrument with soft cloth.
5 - Recheck instrument at regular intervals and before important measurements.
Horizontal rotation:
L223 can be rotated by 90° to the left and
90° to the right on the mount.
Bedienungsanleitung
Vollautomatischer Linien-Laser L223
1 – Abdeckung Batteriefach
2 – An-/Ausschalter
3 – Einstellrad
4 – Kontrollampe An/Aus
5- Laseraustrittsfenster
6- Öffnung zum Justieren
7 – 5/8”-Gewinde (zum Anschluss an
die multifunktionale Halterung)
Bedienung:
- Abdeckung des Batteriefachs “1” öffnen und 3 AA Batterien einlegen gemäß Zeichnung (korrekte Polarität beachten).
- Gerät aufstellen (Wand, Stativ,…).
- Gerät einschalten. Ein Laserkreuz wird projeziert.
- Ein optischer (blinkende Linien) u. akkustischer Alarm zeigt an,
dass das Gerät ausserhalb des Selbstnivellierbereiches aufgestellt
wurde. In diesem Fall eine waagerechtere Position suchen.
Multifunktionale Halterung:
Einstellrad “3” in Pfeilrichtung “release” drehen. Gerät von der Halterung abnehmen.
Wandhalterung ausklappen.
Gerät wieder auf die
Halterung aufsetzen und
zum Befestigen Einstellrad „3“ in Richtung
„connect“ drehen.
Das Gerät kann auch ohne Stativ
folgendermassen befestigt werden:
a) An einer Wand mit Schraube
oder Nagel.
b) An magnetischen Oberflächen
mit den Magneten “9”.
c) An z.B. einem Rohr mit dem
Befestigungsriemen.
12
Multifunktionale Halterung
8 – 5/8”-Anschluss für Gerät
9 – Magnete
10 – Einstellrad Höhenverstellung
11 – Schlitz für Befestigungsriemen
12 – Wandhalterung
13 – 5/8”-Anschluss für Baustativ
14 – 1/4“-Anschluss für Kamerastativ
Höhenverstellung:
Das Gerät kann innerhalb eines Bereiches
von 15 mm hoch und
runter feineingestellt
werden.
Dazu das Einstellrad „10“
entsprechend in
Pfeilrichtung „up“ (hoch) bzw.
„down“ (runter) drehen.
Lieferumfang: Instrument, multifunktionale Halterung, 3 x AA Batterie,
magnetische Zieltafel, Befestigungsriemen, gepolsterte Tasche, Anleitung
Wartung und Hinweise:
1 – Nicht in den Laserstrahl blicken – Gerät nicht unnötig auf Personen richten.
2 – Gerät nicht im Regen benutzen.
3 - Transport nur in Originaltasche.
Dabei sicherstellen, dass das Gerät ausgeschaltet ist.
4 – Gerät, insbesondere Laseraustrittsfenster mit weichem Tuch reinigen.
5 – Vor wichtigen Messungen u. in bestimmten Zeitabständen Justierung prüfen.
Horizontales Schwenken :
Der L223 kann horizontal auf dem
Halter 90° nach links und 90° nach rechts
geschwenkt werden.