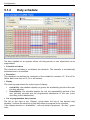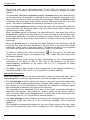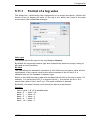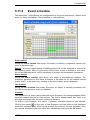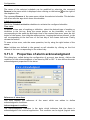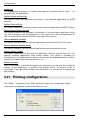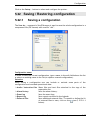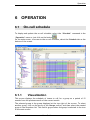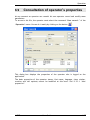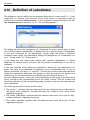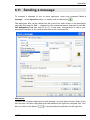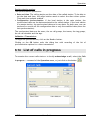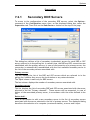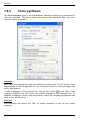
1
User Guide Version 3.6 rev.1 – Mars 2012 Copyright © 1994-2012 Micromedia International MICROMEDIA INTERNATIONAL 11, chemin du Vieux Chêne – INOVALLÉE 4201 F 38942 MEYLAN Cedex +33 (0) 4 76 04 11 00 - Fax +33 (0) 4 76 90 24 76 email :[email protected] web :www.micromedia-int.com Summary SUMMARY 1 INTRODUCTION ......................................... 1-1 1.1 DESCRIPTION ..................................................1-1 1.2 FUNCTIONS ....................................................1-4 1.3 NEWS OF THE VERSION 3.5 ...................................1-9 1.3.1 1.3.2 1.3.3 1.4 1.4.1 Version 3.5 revision 1 ......................................................... 1-9 Version 3.5 revision 2 ....................................................... 1-10 Version 3.5 revision 3 ....................................................... 1-10 NEWS OF THE VERSION 3.6 ................................. 1-12 Version 3.6 revision 1 ....................................................... 1-14 2 FUNCTIONNING ......................................... 2–1 2.1 APPLICATION SUPERVISION ....................................2–1 2.2 USER MANAGEMENT ...........................................2–4 2.3 GROUP AND TEAM ORGANIZATION .............................2–7 2.4 CALL MANAGEMENT ...........................................2–9 2.5 CONTROL OF WORKING FAILURES ........................... 2–10 2.6 REDUNDANT MODE .......................................... 2–11 3 INSTALLATION .........................................3–14 3.1 REQUIRED CONFIGURATION .................................. 3–14 3.2 SOFTWARE INSTALLATION ................................... 3–15 3.2.1 3.2.2 3.3 Standard or Server Station ................................................. 3–15 Client Station ................................................................. 3–15 SOFTWARE REGISTRATION ................................... 3–16 4 USER INTERFACE ....................................... 4–1 4.1 4.1.1 4.1.2 LOGIN .........................................................4–1 Standard or Server Station ................................................... 4–1 Client Station ................................................................... 4–2 4.2 USER INTERFACE ..............................................4–3 4.3 MENUS .........................................................4–4 4.4 TOOLBAR ......................................................4–7 ALERT User Guide i Summary 4.5 STATUS BARS ................................................. 4–8 4.6 MAIN SCREEN ................................................. 4–9 4.6.1 Topographical representation .............................................. 4.6.1.1 Root ..................................................................... 4.6.1.2 Station .................................................................. 4.6.1.3 Supervision ............................................................. 4.6.1.4 Tags ..................................................................... 4.6.1.5 Data servers ............................................................ 4.6.1.6 Tag groups .............................................................. 4.6.1.7 On-call Management .................................................. 4.6.1.8 Users .................................................................... 4.6.1.9 On-call groups ......................................................... 4.6.1.10 Teams ................................................................... 4.7 4–10 4–12 4–13 4–14 4–15 4–17 4–19 4–24 4–24 4–26 4–30 BROWSING BAR .............................................. 4–34 5 CONFIGURATION ....................................... 5-1 5.1 5.1.1 5.1.2 5.1.3 5.1.4 USER LIST .................................................... 5-1 User properties ................................................................. 5-2 Duty schedule .................................................................. 5-6 Dial number definition ........................................................ 5-8 Dial number schedule ....................................................... 5-10 5.2 USER PROFILES .............................................. 5-11 5.3 USER STATUSES.............................................. 5-13 5.4 ON CALL GROUPS ............................................ 5-15 5.4.1 5.5 5.5.1 On-call group properties .................................................... 5-18 ON CALL TEAMS ............................................. 5-21 Team properties ............................................................. 5-22 5.6 ON CALL PROGRAM .......................................... 5-24 5.7 PROGRAMMED CALLS ........................................ 5-26 5.8 PROGRAMMED FILE TRANSFERS .............................. 5-29 5.9 PROGRAMMED STATION SYNCHRONIZATIONS................. 5-31 5.10 SELECTION OF AN EXTERNAL TAG ........................... 5-33 5.10.1 OPC server browsing ......................................................... 5-35 5.11 TAG PROPERTIES ............................................ 5-37 5.11.1 Format of a tag value ....................................................... 5-45 5.11.2 Event schedule ............................................................... 5-47 ii Summary 5.11.3 5.11.4 5.11.5 5.11.6 Properties of alarm acknowledgment ..................................... Properties of alarm masking ............................................... Definition of message format .............................................. Edition of instruction file ................................................... 5-48 5-51 5-53 5-55 5.12 STATION PROPERTIES ........................................ 5-57 5.13 DATA SERVER PROPERTIES ................................... 5-58 5.14 TAG GROUP PROPERTIES .................................... 5-60 5.15 DEFINITION OF ACTIONS ..................................... 5-61 5.15.1 5.15.2 5.15.3 5.15.4 5.15.5 5.15.6 5.15.7 5.15.8 Call group ..................................................................... Message to user .............................................................. Execute script ................................................................ Execute command ........................................................... Stop command ................................................................ Execute application ......................................................... Play Tone...................................................................... Play Vocal Message .......................................................... 5-61 5-63 5-64 5-65 5-66 5-66 5-67 5-68 5.16 COMMANDS .................................................. 5-70 5.16.1 Command list ................................................................. 5-70 5.16.2 Command definition ......................................................... 5-71 5.17 COMMUNICATION PORTS ..................................... 5-74 5.17.1 Selection of a communication port........................................ 5.17.2 Configuration of a modem (TAPI) .......................................... 5.17.3 Configuration of a physical port (COM) ................................... 5.17.3.1 Configuration of modem parameters ............................... 5.17.3.2 Configuration of vocal modem parameters ........................ 5.17.3.3 Configuration of GSM/PCS modem parameters ................... 5.17.4 Configuration of ISDN controller (CAPI) .................................. 5.17.4.1 Advanced properties of an ISDN port ............................... 5-76 5-77 5-78 5-81 5-83 5-85 5-88 5-90 5.18 DIALING PARAMETERS ....................................... 5-91 5.19 COMMUNICATION DRIVERS ................................... 5-93 5.19.1 Adding a driver ............................................................... 5-94 5.20 EXTERNAL APPLICATIONS .................................... 5-95 5.21 PRINTING CONFIGURATION .................................. 5-96 5.22 SAVING / RESTORING CONFIGURATION ...................... 5-97 5.22.1 Saving a configuration ....................................................... 5-97 5.22.1.1 Saving external files .................................................. 5-98 5.22.2 Restoring a configuration ................................................... 5-99 5.22.3 New configuration .......................................................... 5-101 ALERT User Guide iii Summary 6 OPERATION ............................................. 6-1 6.1 6.1.1 6.1.2 6.1.3 6.1.4 6.1.5 6.1.6 6.1.7 6.1.8 6.1.9 6.2 6.2.1 6.2.2 6.2.3 6.2.4 6.2.5 6.2.6 6.2.7 6.2.8 6.3 6.3.1 6.3.2 6.3.3 6.3.4 6.3.5 6.3.6 6.3.7 6.3.8 6.4 6.4.1 6.4.2 6.4.3 6.4.4 6.4.5 6.5 6.5.1 6.5.2 6.5.3 iv ON-CALL SCHEDULE .......................................... 6-1 Visualization .................................................................... 6-1 Active team ..................................................................... 6-2 Definition of holiday days .................................................... 6-3 Copy of the on-call program ................................................. 6-3 Modification of the schedule ................................................. 6-3 Duplication of schedule area ................................................. 6-4 Cancellation of the performed operations ................................. 6-4 Printing the schedule .......................................................... 6-4 Calling the on call team ...................................................... 6-4 ALARM TABLE................................................. 6-5 Selection of displayed alarms ................................................ 6-7 Alarm acknowledgment ....................................................... 6-8 Removing an alarm from the table .......................................... 6-8 Editing a comment about an alarm ......................................... 6-8 Editing a report about an alarm ............................................. 6-8 Group transfer .................................................................. 6-9 Printing .......................................................................... 6-9 Exportation ..................................................................... 6-9 ALARM HISTORY ............................................. 6-10 Choosing period to analyze ................................................. Choosing scope of analysis.................................................. History and statistics presentation ........................................ Global statistics .............................................................. Editing a comment about an alarm ....................................... Editing a report about an alarm ........................................... Printing ........................................................................ Exportation ................................................................... 6-11 6-11 6-12 6-13 6-14 6-15 6-15 6-15 CALL OVERVIEW ............................................. 6-16 Date selection ................................................................ Selection of the alarm list to control ..................................... Selection of the display type ............................................... Overview of the call cycle of an alarm ................................... Printing the call report of an alarm ....................................... 6-17 6-17 6-17 6-17 6-18 EVENT LOG .................................................. 6-19 Visualization .................................................................. 6-19 Printing ........................................................................ 6-21 Exportation ................................................................... 6-21 Summary 6.6 LOGBOOK .................................................... 6-22 6.7 EDITING A REPORT ........................................... 6-23 6.8 ALERT SUPERVISION ......................................... 6-25 6.8.1 6.8.2 6.8.3 6.9 Supervision server ........................................................... 6-25 Synoptic editor ............................................................... 6-26 Web browser plug-in ........................................................ 6-26 CONSULTATION OF OPERATOR’S PROPERTIES ............... 6-27 6.10 DEFINITION OF SUBSTITUTES ................................ 6-28 6.11 SENDING A MESSAGE ......................................... 6-29 6.12 FILE TRANSFER .............................................. 6-32 6.13 STATION SYNCHRONIZATION ................................. 6-34 6.14 LIST OF CALLS IN PROGRESS ................................. 6-35 6.15 TEAM CHANGEOVER ......................................... 6-37 6.16 SCHEDULE DEROGATION / CALL LOCKING ................... 6-38 6.17 MASKED ALARMS ............................................. 6-41 6.17.1 Masking / Unmasking alarms ............................................... 6-43 6.18 GROUP TRANSFER ........................................... 6-44 6.19 CONTROL OF DDE AND OPC LINKS ......................... 6-46 6.20 LINE PRINTER ................................................ 6-47 7 OPTIONS ................................................. 7-1 7.1 7.1.1 7.1.2 7.1.3 7.1.4 7.2 GENERAL OPTIONS .............................................7-1 Advanced parameters ......................................................... 7-4 Alert Viewer Configuration ................................................... 7-5 Web browser page setup ...................................................... 7-6 RSS feed configuration ........................................................ 7-6 SUPERVISION OPTIONS .........................................7-9 7.2.1 Secondary DDE Servers ...................................................... 7-13 7.2.2 Definition of alias names ................................................... 7-14 7.2.2.1 Alias definition......................................................... 7-15 7.3 DISPLAY OPTIONS ............................................ 7-17 7.4 ALARM OPTIONS ............................................. 7-19 7.5 CALL OPTIONS ............................................... 7-22 ALERT User Guide v Summary 7.6 REDUNDANCY OPTIONS ...................................... 7-25 7.7 CLIENT STATION OPTIONS ................................... 7-28 7.8 VOCAL SERVER CONFIGURATION ............................. 7-30 7.8.1 7.8.2 7.8.3 7.8.4 7.9 Vocal Server options ......................................................... Vocal Server messages ...................................................... Voice synthesis ............................................................... Usage of the vocal server ................................................... 7-30 7-33 7-36 7-39 TOOLBAR CUSTOMIZATION................................... 7-40 7.10 COMMUNICATION LOG ....................................... 7-41 8 APPENDIX ............................................... 8-1 8.1 VOCAL SERVER ............................................... 8-1 8.2 TERMINAL / WAP SERVER .................................... 8-5 8.3 EXTERNAL DATABASE EXPORTATION .......................... 8-7 8.3.1 8.3.2 8.3.3 Configuration database ....................................................... 8-7 History database ............................................................. 8-10 Database schemas ........................................................... 8-12 8.4 MULTI-LANGUAGE MANAGEMENT ............................ 8-15 8.5 DYNAMIC IMPORTATION FILTERS .............................. 8-2 8.5.1 8.5.2 Generalities ..................................................................... 8-2 Definition of an expression ................................................... 8-2 8.6 IMPORTATION OF A TEXT FILE ................................ 8-5 8.7 REMOTE CONTROL .......................................... 8-10 8.8 ALERT AS SERVICE ........................................... 8-11 8.9 COMMAND DRIVER ........................................... 8-13 8.10 BEEP DRIVER ................................................. 8-13 8.11 FAX DRIVER .................................................. 8-16 8.12 EMAIL DRIVER ................................................ 8-19 8.13 ALERT DRIVER ............................................... 8-25 8.14 DDE SERVER INTERFACE ..................................... 8-27 8.14.1 General presentation ........................................................ 8.14.2 SYSTEM topic ................................................................. 8.14.2.1 DDE protocol items .................................................... 8.14.2.2 Application control items ............................................ vi 8-27 8-27 8-28 8-28 Summary 8.14.3 USER topic .................................................................... 8.14.3.1 DDE protocol items .................................................... 8.14.3.2 User management items ............................................. 8.14.4 GROUP topic .................................................................. 8.14.4.1 DDE protocol items .................................................... 8.14.4.2 Group management items ............................................ 8.14.5 DATASERVER topic ........................................................... 8.14.5.1 DDE protocol items .................................................... 8.14.5.2 Data server management items ..................................... 8.14.6 TAGGROUP topic ............................................................. 8.14.6.1 DDE protocol items .................................................... 8.14.6.2 Tag group management items ....................................... 8.14.7 ALARM topic .................................................................. 8.14.7.1 DDE protocol items .................................................... 8.14.7.2 Alarm management items ............................................ 8-29 8-30 8-30 8-32 8-32 8-32 8-33 8-33 8-33 8-33 8-34 8-34 8-34 8-34 8-34 8.15 COMMAND INTERFACE (DDE OR COMMAND LINE) ........... 8-37 8.15.1 Presentation .................................................................. 8.15.1.1 DDE command.......................................................... 8.15.1.2 Command by command line ......................................... 8.15.2 CreateAlarm .................................................................. 8.15.3 SetInstructions ............................................................... 8.15.4 SetPriority..................................................................... 8.15.5 SetAlarm ...................................................................... 8.15.6 AckAlarm ...................................................................... 8.15.7 MaskAlarm..................................................................... 8.15.8 AckCall ........................................................................ 8.15.9 CallGroup ..................................................................... 8.15.10 CallUser ....................................................................... 8.15.11 ValidUser ...................................................................... 8.15.12 SendConsole .................................................................. 8.15.13 AckConsole .................................................................... 8.15.14 RestoreLinks .................................................................. 8.15.15 ShowWindow .................................................................. 8.15.16 PlayText ....................................................................... 8.15.17 SendDataToScript ............................................................ 8-37 8-38 8-38 8-38 8-39 8-39 8-39 8-40 8-40 8-40 8-41 8-41 8-42 8-42 8-42 8-43 8-43 8-43 8-44 8.16 MESSAGE PROCESSOR ....................................... 8-45 8.16.1 General presentation ........................................................ 8.16.2 Configuration ................................................................. 8.16.2.1 Definition of a prototype ............................................. 8.16.2.2 Dynamic importation filters ......................................... 8.16.2.3 Lists and translations ................................................. ALERT User Guide 8-45 8-46 8-46 8-47 8-50 vii Introduction 1 INTRODUCTION 1.1 Description Alert is a software package of alarm and on call management that functions under the Windows environment (Windows 98, Windows NT, Windows 2000, and Windows XP) and exploits features of the client-server architecture of this environment. Alert gives a way to all Windows application to trigger calls and send messages to operators using various media’s: telephone (embedded vocal server), beeps, pagers, fax, printer, email, etc. Alert can be used by all Windows applications that support the DDE1 or OPC2 communication protocol. It can be used also through its programming interface (API or Active X) in order to command its main functionalities by simple call of functions and can be solicited through its command line to activate, reset or acknowledge alarms or to order execution of other commands. The possibility of selecting a Mediator3 module to interface the client application and Alert increases ergonomics and possibilities of the software: maximal integration to the supervised application, simplified configuration of the data to supervise, possibility of interfacing with any non Windows application (UNIX, etc.). A specific mediator, the Message Processor allows Alert to be interfaced with any application that is capable of producing information on a serial or TCP/IP link, in a file or a database or by sending short messages (GSM). This information is processed by the message processor to extract alarms and trig consequent actions. 1 DDE ("Dynamic Data Exchange") Windows protocol of communication and data exchange between applications. An application server proposes services to all client applications interested by these services. 2 OPC (“OLE for Process Control”) Universal communication protocol that manages Client/Server communications with industrial devices and that tends to become a standard in Industry. 3 Mediator A module "mediator" is a DLL module that assumes information exchange between ALERT and the supervised application. Its interface with ALERT being normalized, it is developed specially for a type of application and is therefore in measure to process all features of this application. It notably allows the importation of the variables defined in the supervised application, with all their parameters (alarm message, priority, groups ...) and to process directly modifications of these variables (alarm activation or deactivation, acknowledgment from the application or from ALERT). It can also allow realizing specific processing: capture in a text file of contextual information attached to an event, dynamic modification of priority level, etc. ALERT User Guide 1-1 Introduction Alert is at the same time an alarm manager and an on call server that proposes the following basic services: management of users who are called to intervene either locally or at a distance. management of groups, every group possessing its own schedule, detection of alarms and trig of calls to the concerned operators, diffusion of alarm or service messages, either numerical, alphanumeric or vocal, management of call and alarm acknowledgments, management of alarm history including daily, weekly or monthly statistics on failures and interventions, management of an event log and a on line printed report, management of intervention reports. With Alert, the client applications don't have to worry of to choose the operators to call and of the means required to alert them. They can only give the order of triggering a call cycle, explicitly by a control, or implicitly by positioning a variable in an alarm state. The selection of the operators to call and the alarm messages transmitted will effectively depend on the software configuration. Alert can be used according to 3 modes: Client mode: The user application runs according to its own logic, on an independent way. Its only constraint is to deliver information that can be interpreted as events when they are transmitted or indicate a determined change of state. This transmission can be performed through a DDE or OPC server integrated in the supervised application, a file, a serial link (printer output), a data base and many other mechanisms. In this mode, Alert directly assumes the polling of the events declared in the application server. It also can take in charge acknowledgments done either from Alert or from the supervised application. Alert is also able to directly supervise a Programmable Logic Controller by the way of a DDE or OPC communication server. Server mode: The user application integrates the Alert software in its working logic. In this mode, Alert can be considered like an evolved call transmitter that allows a supervision application to be discharged from all aspects of the call management (constitution of groups and teams, schedule management, communication with operators...). In this mode, Alert answers to explicit solicitations of the client application (alarm triggering, messages transmission...). These commands can be transmitted either through its programming interface (API) of DLL type, through its DDE server interface, or through its command line. Integrated mode: Alert uses a mediator module that is especially developed for an application or a type of application. This mediator takes in charge all the problems concerning the interface between Alert and the supervised application: import of variables defined as alarm with all their attributes (messages, priority, group...), detection of the 1-2 Introduction activation and the deactivation of alarms, acknowledgment, specific treatments, etc. management of reciprocal Alert can be perfectly integrated in a network environment. By using the NETDDE protocol (DDE by network) or OPC (via DCOM interface), the application can be distributed on several stations. Alert can support all types of media in order to communicate numerical, alphanumeric or vocal information to an operator. The adaptation to an unsupported media requires only the addition of the suitable DLL module (driver). Alert integrates a vocal server which allows alarm transmission and acknowledgment by using a very common media: the telephone. The vocal alarm messages can be recorded (either locally or by telephone) or, in option, they can be automatically synthesized from the associated alphanumeric messages. With its server version, Alert can manage Alert Client stations. These client stations provide an efficient interface to deal with the software from any network station: schedules, alarms, histories, journal, etc. Associated to the Visual Access software (terminal and WAP server), Alert proposes a remote terminal interface that offers many services to a remote operator (consultation and acknowledgment of alarms, visualization and modification of schedules, call numbers, visualization and downloading of files, remote supervision of the supervised application through synoptic screens and menus. Alert is a complete and secured tool for alarm treatment: Alert is not only able to record and transmit the detected alarms, but it can display some complementary information (instructions, contextual report established automatically at the time of the alarm, dynamic values). Alert guarantees traceability of operations (alarms detected and actions performed to handle them), through the event log and the alarm table that includes for every alarm a memo displaying all the operations relative to the alarm and the alarm history that records all alarms and the associated treatment (date, duration, acknowledgment), integrating some statistical functions about failures and interventions. On option, the alarm and call history can be automatically exported in real time to an external database. Alert is able to perform an active supervision of its environment in order to detect an abnormal working of the supervised application or a dysfunction of the calling system (modems). This "watchdog" function can trigger calls like for events detected in the supervised application. Alert can guarantee a very high level of security while running in redundant mode (double installation). In this mode, stations supervise each other; only one station is in charge for the calls at a specific time. In case of failure of the active station, the other station automatically takes over from the first one, without any loss of information. The configuration of redundant stations is automatically synchronized. Alert can be entirely customized for user's category and to offer a work environment adapted to each operator: displayed menu and toolbar, accessible screens, authorized commands, ALERT User Guide 1-3 Introduction 1.2 Functions Basic functions of Alert are the following: Management of modems (telephone or GSM), ISDN controllers (compatible with the CAPI 2 interface) or specific call systems via the PC communication ports: direct handling of physical ports (COM1 to COM64) or throw the TAPI interface of Windows (modems installed in the Control Panel). Voice Over IP capabilities (integrated SIP protocol) allowing voice communications with operators through the IP network without any modem or telephonic adapter. Management of a user database which can contain until 999 operators: name, first name, identifier, password, language, user class, call numbers, on-duty / off-duty status, substitute, duty schedule, weekly program of call numbers. An operator can be declared as virtual in order to define a media used by several operators (e.g. mobile phone or pager). Management of availability statuses of operators (available, unavailable, meeting…). Management of on call groups, a group defining a list of operators who can be called to intervene on a specific alarm category ("Fire" group for example), with facility of relief group. Capability of command transmission to an external application to signal starting, success, failure or acknowledgment of the call of the group. Capability of transferring alarms to another group in support or substitution. Management of on call teams, a team corresponding to a list of operators who will be called either simultaneously or by rotation (according to option), with possibility of declaring relief operators to call in case of call failure. Management of a schedule table by group, each table defining the team schedule for a group over one year. The time periods can be defined with a resolution of one hour, a half of hour or a quarter of hour. It is possible to define “reduce duty” periods (time during which only important alarms trigger the call of operators). Weekly programs can also be defined (with holiday management) for the preprogramming of on-call teams in the schedule. Possibility of schedule derogation with option to redirect calls to a specific team. Management of team changeover possible (clock in and out) with option of mandatory team changeover for the strict control of the on-call teams. Definition of tags to supervise: type of tag (simple variable, event, alarm or acknowledgment), reference, station (localization), functional group, polling mode (DDE or OPC tags). For event or alarm tags: transitory type or no, alarm condition (numerical or alphanumeric state) or threshold detection (absolute value or variation), weekly schedule for validation, numerical, alphanumeric and vocal messages, list of actions to perform. For alarm tags: priority, possibility to declare a masking alarm, text file containing instructions attached to the alarm. 1) Management of various data servers (alarm generator applications) with possible control of the status of each data server from an external application through the DDE or OPC interface of ALERT. Supervised tags can be organized in a tree structure of functional groups for the synoptic visualization of alarms (physical or functional localization), the statistic treatment of alarms and creation of alarm synthesis (synthesis of all alarms of a group). 1-4 Introduction On alarm or event detection, or on return to a normal state, recording of the event in the event log. On alarm setting, recording of the alarm in the alarm table, with all contextual information associated. On event set or reset, or on alarm acknowledgment, possibility to execute a configurable list of actions : call of on-call groups, call of operators, execution of a sequence of commands, execution of a message processor script, launching of an application, playing of a vocal message on the local station. Triggering of calls using the available resources and the suitable media. For alarm calls, management of resumption procedures and call of relief operators in case of failure or no call acknowledgment. Transmission of alphanumeric, numerical or vocal messages. Possibility of formatting of alphanumeric message with static parameter (group, priority...) or contextual and dynamic information (current state or value of tags of the supervised application). Multilanguage management of messages allowing alarm messages and associated information to be transmitted to recipient operators in their respective language. Call acknowledgment (taking into account of the received call by the operator), either locally or at a distance by telephone (DTMF keys) or from a remote terminal. Alarm acknowledgment (taking into account of the alarm by the operator), either locally or at a distance by telephone (DTMF keys) or from a remote terminal. Possibility to acknowledge alarms either individually, by functional group or globally. Option of automatic alarm acknowledgment on event reset or group warned. On option, automatic synchronization of acknowledgments with the supervised application. Possibility of masking and unmasking of alarms, with date and operator's name recording. An alarm masking can be temporized (limit date and time). A comment can be attached to the masking operation. Possibility of automatic masking of an alarm by another one, in order to limit the avalanche effect following upon certain failures (e.g. power down). Possibility to dispatch service messages to the on call team or to any operator. Messages transmitted to an operator are recorded in its mail box. It is also possible to trigger file transfers to one or several stations as well as station synchronizations. Possibility to program calls of operators, at beginning or end of their on-call period, as well as cyclic calls or periodic calls (at a given time of a week day), with optionally an attached text file. Possibility of embedded dynamic values in the transmitted message or attached text file. Possibility to program cyclical or periodical files transfers or station synchronizations. Active surveillance of the supervised application by controlling the links with this last and possibility to perform a periodic request about specifics tags, in order to detect a no response (e.g. application crash). Possibility to set an alarm on link failure or no answer to a request. Active surveillance of calling systems (modems). Possibility to set an alarm in case of dysfunction of one of these systems. Management of an alarm table containing a time stamped list of actual and past alarms with their acknowledgment state. Every alarm recorded in the table is ALERT User Guide 1-5 Introduction associated to a memo containing the alarm description (parameters and current state), instructions and contextual information (generated at event time), as well as the history of the different operations performed to alert operators (warned operators, call failures, acknowledgments, event reset). Comments and reports can be edited about the alarms present in the alarm table. Management of an alarm history containing the recording of all past alarms and their treatment: date and hour of detection, failure duration, name of the operator who has acknowledged it, its reaction and intervention time. Possibility of consultation or edition of comment or reports about the recorded alarms. The alarm history integrates some daily, weekly and monthly statistical functions on alarms, by group or for a particular alarm: number of failures, total failure duration, mean failure duration. It also integrates some daily, weekly and monthly statistical functions on operator interventions: number of interventions, mean time of reaction, mean time of intervention. 2) Management of a call overview, allowing the call cycles triggered by an alarm to be supervised in real time (to know who is warned) or later controlled (called groups, operators and numbers, call reports). Reports on call cycles can be printed. This new feature, attached to the data base export option, requires that option to be activated. Management of an event log containing a time stamped trace of all the events: user logins, alarms, calls, acknowledgments, etc. This event log can be printed simultaneously. It can be also transmitted by DDE to client applications that requested it or to a designated DDE server application. Management of a logbook containing intervention reports of the operators. These reports can be either written or vocally recorded. They are automatically signed and time stamped, and they can be classified by topic. Reports can be especially attached to one or more alarms. A vocal report can also be done by telephone; a written report can be entered from a remote terminal. 3) Integration of a supervision server to generate and animate HTML synoptic views of the supervised installation, for a better visual control and a graphical localization of alarms detected on the installation. This feature includes the supervision server module (derived from Visual Access) for the animation of synoptic views, the Web browser plug-in to display the synoptic views on the Alert screens (server and clients) and the VAEdit synoptic editor to edit the synoptic views. Automatic deletion of the oldest recording files (event log, history, vocal messages). The storage duration is configurable. Management of client stations (server version) to operate from any network station: schedule (consultation, configuration, derogation), alarms (consultation, acknowledgment, masking), history (consultation, statistics), journal (consultation), logbook (consultation, report edition), users and groups (creation and modification of users, groups and teams), supervision (edition and modification of the supervised variable list), etc. Built-in vocal server, with greeting message and vocal guide, allowing identification of the called or calling operator (by DTMF keys), listening to the alarm or service messages, alarm acknowledgment, recording of a vocal report, switching to remote terminal or callback request (callback forced on option). Operator identification results in the automatic acknowledgment of calls that has been addressed to him. 1-6 Introduction The vocal messages (alarms, greeting...) can be recorded in local (if the P.C. is provided with a sound card and a microphone) or by telephone. Automatic selection of the language and voice used by the vocal server according to the connected operator. Automatic detection of an answering machine, with possibility to record a message and to switch automatically to the following number. Capability of call forwarding (automatic call of an operator followed by the call forwarding to a telephone station in order to establish a direct voice communication). Voice synthesis option (Text To Speech). This option avoids recording of alarm messages (automatic synthesis from the formatted alphanumeric alarm messages) and enhances the capabilities of the vocal server (configurable greeting message, customized welcome of operators, announcement of the alarm number, timestamp of alarms, integration of dynamic and contextual information in the vocal alarm messages). Automatic selection of the Text To Speech voice according to the connected operator. An option allows presynthesis of messages to optimize the response time when a lot of alarms are triggered. The synthesized messages are saved and restored between each launching. Management of client stations (with the server option) to operate from any network station: schedule (consultation, configuration, derogation), alarms (consultation, acknowledgment, masking), history (consultation, statistics), journal (consultation), logbook (consultation, report edition), users and groups (creation and modification of users, groups and teams), supervision (edition and modification of the supervised tag list), etc. Terminal server associated, usable for the incoming calls and, via the vocal server, for the outgoing calls, from a PC (with a terminal emulation). Utilization of separated ports (incoming call only) or common to the terminal server and Alert. Acknowledgment of received calls, consultation of the alarm table with all associated information (instructions or contextual information), with possibility of acknowledgment, mask / unmask of alarms, event log consultation, consultation of the operator schedule and possibility for a sufficient level operator to modify the schedule of every group, consultation and modification of operator call numbers, consultation of service messages sent to the operator, registration of a written report, file reading, with possibility of transmission (download or upload of files), remote supervision of the supervised application through synoptic screens and menus. Integrated management of external applications: manual launching from the menu, automatic launching at the initialization, automatic closure, automatic restart on closure. Management of an external "watch dog" variable allowing the automatic detection of an abnormal functioning of the Alert software. Options to preset the application behavior and customize it: title bar, type of window, locking of Windows tasks, archive duration, DDE and OPC parameters, colors, toolbar... Options to parameter the treatment of alarms and call cycles. Possibility to define a specific work environment by user's category: menu and toolbar displayed, accessible screens, authorized commands. ALERT User Guide 1-7 Introduction The configuration can be saved under a name for a later restoration: environment parameters, list of supervised variables with all their parameters, organization of team and groups with the associated schedule, programmed calls and synchronizations. All the files are saved in a subdirectory labeled with the name of the configuration. The base directory can be selected on a network station. Option for the periodic saving of the configuration, history files and log file. Management of an interfacing module with the supervised application (Mediator module), allowing to optimally integrate the alert management in the application: import of alarm defined in the application with all their attributes (reference, messages, priority, group, etc.), alarm detection, reciprocal acknowledgment management, specific treatments, etc. A specific mediator (message processor) allows the treatment of messages that can be issued from a serial communication line or TCP/IP connection, from a database or a file, or from an email or a GSM transmitter (SMS), to retrieve event information and trig alarms. Management of redundant DDE and OPC servers. When a data server is out, the software is automatically connected on the following server in the list of the redundant servers of the failed server. Management of a redundant mode. In this mode, the software must be installed on 2 stations interconnected by a network. Only one station is active at one time and transmits calls. The two stations mutually supervise themselves. In case of failure of the active station, the secondary station takes automatically the control, without no loss of information (alarms in progress, acknowledgments...). The working and the configuration of the two stations can be automatically synchronized (alarms, acknowledgments, schedules, messages...). With the "Alert" driver, possibility of central management of remote stations equipped with the Alert software from one or several Alert central stations: transmission of alarms to the central stations (including event resets and alarm acknowledgments), cyclical or periodical transmission of files and synchronization of on-call schedules. Built-in management of an external remote control application (pcAnyWhere or Carbon Copy). Automatic launch of the remote control application on telephonic request of an authorized operator (via the Vocal Server), with release of the used communication port (port sharing) and automatic recovery of the port at the end of the remote control session. Option for automatic and real time exportation to an external database of the alarm and call history and report log, with all the associated configuration data. Option for running as Windows service, allowing the software to be automatically launched at the system initialization, before all session opening. Programming interface (API) and ActiveX interface. These interfaces allow any application to interact with the software throw many functions: creation/deletion of objects (alarms, users, groups...), read/write of parameters, set/reset/acknowledgment of alarms, call of group or user... 4) Multilanguage user interface (English, French, German, Spanish, Italian, Dutch and Chinese), dynamically switchable. Multilanguage management of labels and messages. 1-8 Introduction 1.3 News of the version 3.5 The version 3 5 of Alert had introduced a new user interface, offering a structured and synoptic view of the whole supervised application and on-call management organization. 1.3.1 Version 3.5 revision 1 The revision 1 of the version 3.5 of the software, by developing certain aspects of the organization of the data and by correcting some weakness of the original version, still has reinforced the possibilities offered by this interface: Extension of the station concept, allowing the management of virtual stations. The organization of the data in stations meets the need to define specific subsets for the management of operators and data attached to companies or sites. With the concept of virtual stations, this logical organization is now possible independently of the organization of the data acquisition: data can be recovered through a single frontal or database and then redistributed between the various stations according to their origin. Identification of the DDE and OPC data servers. The tags issued from the same data server (local or distant) are gathered in a branch of the tree structure, allowing to visually identify a problem of connection with a server and to perform specific operations on a server (start/stop polling, acknowledgment ...). For each data server, it is possible to define a list of redundant servers, able to ensure the data supply in the event of failure of the main server (or of the previous redundant server in the list). Redefinition of the organization of the functional groups: a group can now contain at the same time groups (old grouping) and tags. This organization makes it possible to define tags in all the levels of a tree structure of groups. Extension of the client OPC interface for a full integration of specificities of the OPC interfaces Data Access V2 and Alarm & Event. New mediator OPC allows the static importation of the data to be supervised, while profiting from the possibilities offered by the OPC Data Access V2 specification of properties attached to a variable to retrieve automatically all information associated with an alarm (message, priority ...). This new mediator allows also the dynamic importation of alarms by the automatic creation of alarms at the time of their activation according to preconfigured filters. Improvement of the management of the operator call numbers: unlimited list of call numbers, customizable recovery options on the level of each number, graphical weekly schedule of the numbers to be used. Possibility of calling several numbers for the same operator (e.g. transmission of SMS + confirmation by phone call), automatic adaptation of the numbers to dial when internal and external telephone line are simultaneously used. Improvement of the graphical interface: optimization of display, customization of the lists, sorting on columns, new columns (call following...). New contextual on-line help. ALERT User Guide 1-9 Introduction The archiving of the configuration data and the data exchanges performed during the synchronizations between the redundant stations and the server and client stations were completely modified. The archived and exchanged data are now structured in accordance with standard XML. This choice reinforces the interoperability of the software and offers a standardized access to all the configuration data of the application. 1.3.2 Version 3.5 revision 2 The revision 2 of the version 3.5 of the software introduced the following new functionalities: Option to run as Windows service. When this option is validated, the software is automatically registered as Windows service. It is then automatically launched at the system initialization and is operational even if no user session is open. (See § 8.8 “Alert as service”) ActiveX interface giving access to all the functions of the programming interface (API) of Alert. Extension of the data server concept to all the tags, other than DDE and OPC tags (mediator and other tags). New option “Explicit call acknowledgment” allowing a call to be explicitly accepted or refused. When a call is refused it is automatically reiterated to a relief operator. New Text To Speech interface allowing the new generation Text To Speech engines to be integrated (SAPI5). New communication drivers to call users throw an IP network (VoIP driver, SIP compatible) and usage of instant messaging (MSN driver). 1.3.3 Version 3.5 revision 3 The revision 3 of the version 3.5 of the software introduced the following new functionalities: Transfer of alarm calls to another group Thanks to this new functionality, an operator dealing with alarms can, to treat some alarms, require the intervention of another operator group, either in support (need for a complementary competence) or in substitution (impossibility of processing the alarm at the level of the group). History of temporary alarms Alarms declared as temporary (created at the alarm time then automatically deleted when the alarm is reset and acknowledged) are now recorded in the alarm history when the “database export” option is activated. This allows history of all alarms, including deleted alarms. Automatic saving of the configuration The functionalities of automatic saving of the configuration have been extended. The saving can contain a list of any external files. It is also possible to keep a 1-10 Introduction configurable number of savings achieved periodically, allowing restoration of a configuration of several days or weeks. Deactivation of automatic synchronization (redundancy) In order to facilitate maintenance operations, it is now possible to suspend the automatic synchronization of redundant stations during a configurable time. Management of operator unavailability An operator can now declare himself unavailable, for example during an intervention or a meeting. In this case, the calls are no longer transmitted to him until he declares himself available again. This status means the operator is on duty, but not available to treat an alarm. Dynamic management of priorities The alarm priority can be automatically incremented when it has been set and a continuous flow of high priority alarms prevents it from being transmitted. This functionality makes the priority of an alarm relative to the time elapsed since its activation. Consultation of instruction file The instruction file attached to an alarm can be directly consulted from the tag views (for tags in alarm state) and alarm table. Data servers The device notion has been introduced at the level of the data servers. A device is defined as an entity capable of grouping several alarms (high threshold, low threshold, sensor failure…, for example). In this version, this notion is only used for license management (device counting instead of tag counting) and display (display of devices in the tree of data servers). An option has also been added allowing a data server to be forced to “error link” status when at least one of its attached tags is invalid. PLUGIN interface The functionalities of the ALERT product can now be extended by integrating additional modules. These modules are automatically loaded by ALERT and integrated to its main screen. They interact with ALERT through a new “Plug-in” type interface. So, the ALERTDATI module has been developed with ASCOM Company to propose a graphic interface for visualization and localization of alarms transmitted from personal security systems. This module allows security alarms to be received and localized on ALERT situation plans. New communication drivers New communication drivers have been developed and are integrated to the new version: OXEPaging driver to transmit alarm messages to DECT through Alcatel 4400 PABX. This driver replaces the old “Alcatel 4400” driver. The Notification Server gateway, which is no longer sold by Alcatel, is henceforth not necessary. SNMPTrap driver to automatically transmit management station on alarm reception. ALERT User Guide SNMP traps to a network 1-11 Introduction 1.4 News of the version 3.6 The 3.6 version of ALERT software, beyond the refreshing of its user interface and some new interesting features, implements important structural evolutions which extends its internationalization capabilities (Unicode, multilingual management) and increase its capacities (number of manageable tags and users). The main new features given by this version are the following: UNICODE management (-> Chinese version) The ALERT software has been entirely revisited to be compatible with the UNICODE standard (character encoding has been encoded from 8 bits to 16 bits). This important evolution allows all existing languages to be supported, for data input and message display, and for the translation of the user interface in idiomatic languages or in non Latin alphabet base languages (Chinese, Russian, Arabic…). Consequently, the user interface of ALERT, already available in English, French, German, Spanish, Italian and Dutch, is now proposed in Chinese (Mandarin). Extension of the multi-language management The multilingual management introduced in 3.5 version of the software has been revisited and extended to be completely operational in this new version. This feature allows: sending messages and alarm consultation in the accurate language of the recipient operators, switching the interface completely to another language, including labels and displayed messages simultaneous utilization of the user interface in different languages from client stations Synoptic visualization of alarms A new alarm supervision feature has been integrated to generate and animate HTML synoptic views of the supervised installation, in order to have a better visual control and a graphical localization of alarms detected on the installation. This feature includes the supervision server module (derived from Visual Access) for the animation of synoptic views, the Web browser plug-in to display the synoptic views on the Alert screens (server and clients) and the VAEdit synoptic editor to edit the synoptic views. This feature is particularly interesting when the installation does not integrate a SCADA application. Call overview A call overview feature has been added, allowing the call cycles triggered by an alarm to be supervised in real time (in order to know who is warned) or later controlled (called groups, operators and numbers, call reports). Reports on call cycles can be printed. This new feature, attached to the database export option, requires this option to be activated. On-call schedule management The scheduling now distinguishes between preprogrammed periods (initialized from the on-call program of the corresponding group) and periods forced by direct 1-12 Introduction assignment of a team at a given date. The preprogrammed periods are displayed in a light color. The modifications of a group program directly affect the preprogrammed periods of the group schedule. The forced periods remain unchanged, except if one forces the reinitialization of the schedule (button « Copy program »). In the same way, the definition of public holidays directly affects the preprogrammed periods for the corresponding days. When a team is forced in the schedule, it can be removed to be replaced either by the preprogrammed team (choice program) for the corresponding range, or by no team (choice no team). User duty schedule For each operator a duty schedule can be defined to program off-duty periods and substitutions, according to the planned unavailability periods of the operator (vacation, training, trip…). This schedule can be defined from a weekly programming (week + public holidays) and calendar (forcing of periods over some calendar days). It can be read either as an on-duty schedule (on duty periods), or as an off-duty schedule (off-duty periods). User availability management Various service statuses can be defined giving in real time the availability status of each operator to be called for alarms. By default, two statuses are predefined: “available” and “unavailable”. Additional statuses can be defined (“Meeting”, “Intervention”…), with the possibility for each status of specifying the precise availability status of the user: available or not to treat the alarms, only available as relief user (called if no other active user of the group can be reached) or for important alarms, available to receive service messages. Control of the connection status of data servers The connection status of each data server can be controlled from an external application by DDE or OPC by reading the "status" variable attached to each server. This variable can be self-monitored by ALERT to automatically trigger an alarm when a data server is disconnected. Alarm synthesis The alarm status of a functional group (presence of an alarm in the group) can be controlled from an external application by DDE or OPC by reading a "status" variable attached to each functional group. This variable can be self-monitored by ALERT to generate an alarm synthesis of the tags assigned to the group. Improved management of service messages The function of message diffusion has been improved: selection of the recipient operators: possibility of filtering by station and by group, possibility of limitation on the on-call and on-duty operators, possibility of specifying the media to use for the message (fax, email, SMS …). Vocal announcement of alarms on client stations Alarms can now be notified vocally on each connected client station (according to a specific option for each client station). Management of RSS feed for alarms A feature of RSS feed management has been introduced to exploit the possibilities offered by this new technology. This feature makes it possible to transmit the current state of alarms present on the installation via FTP protocol to an external Web server ALERT User Guide 1-13 Introduction as a XML file compatible with RSS 2.0. It is then possible to subscribe to the feeds corresponding to the generated XML file from any RSS reader (Google, Yahoo, Internet Explorer 7...), in order to be automatically notified of the present alarm state on the supervised installation. This feature only requires an outgoing Internet access. Extension of the maximum number of tags and users The identifiers of the objects "tags" and "users" have been extended from 15 bits to 24 bits, deferring their theoretical limit to a little more than 16 million. New communication drivers New drivers have been developed and are integrated into version 3.6 of the software, in particular: “Winpager” driver to transmit alarms and messages to a Windows paging emulator. Alarms are displayed on the screen of the receiver and can be acknowledged. They can also be announced vocally, with repeat option. “Extreamer” driver to broadcast vocal messages (alarm and service messages) on a public address system through the TCP/IP network. Each subset of the public address system can be directly addressed to diffuse specific messages by area (place, workshop …). 1.4.1 Version 3.6 revision 1 The revision 1 integrates many software improvements and optimizations, correcting a few defects present in the previous versions: optimization of the display, redundancy, links with data servers … This version also proposes interesting new functionalities: AlertMobile “AlertMobile” functionality enables very simple managing of supervision applications embedded in Windows Mobile compatible mobile phones. Optimizing data exchanges with mobile phones, this option enables use of SMS for transmission of animation dynamic data on screens. This solution consequently offers advantages in terms of simplicity (a simple GSM modem is needed), security (no intrusion), covering and battery life. The mobile phone operator can control his application via different supervision screens described in XML file. Each screen can display the status of a functional sub-system of the application. The screen updating requests are transmitted by SMS, WIFI or 3G to ALERT which transmits back the requested data coming from supervised applications (via DDE, OPC, mediators, message processor, …). In the same way, the operator can trigger commands remotely or adjust parameters. GSM modems management The GSM modems management has been modified. The configuration of the operator supplying the SIM card integrated in the modem is now made at the concerned communication port level. It simplifies the configuration of the calling numbers for sending of SMS (one selects the operator corresponding to the called number and no more to the used modem). Managing of several GSM modems with different subscriptions is now also possible. 1-14 Introduction The functionalities of the GSM driver have been extended: possibility to demand an acknowledgement for the sent SMS (with call acknowledgement option on receipt of acknowledgement of receipt). Operator import The import function has been improved. It is now possible to import variables and operator files. Each imported property can be defined by one or several columns of the import file. The import commands are directly accessible from the supervision and on-call management tree. Dynamic import filters The dynamic import concept enables definition of supervision conditions of the alarms in ALERT: no need to previously define a list of variables to supervise. The configuration of the dynamic import is limited to the definition of the criteria of the dynamic creation of the alarms. These criteria are determined by the configuration of import filters defining the conditions and properties of the alarms created dynamically from expressions defining properties associated with the supervision data (type, category, priority, terms, localization …). This enables, for instance, validation of alarm creation according to its priority and localization. It is thus also possible to define the transmitted message by concatenation of terms associated with this alarm and the group to call according to the localization of the alarm. This functionality has been integrated to several interface modules with supervision data: message processor, OPC AE and certain mediators (Citect, Wizcon). External files saving ALERT enables saving of the whole configuration data, with all the attached configuration and saving files (logs, histories …). The possibility to save additional files external to ALERT proper configuration (files attached to supervision, Jericho or Net’Sentinel configuration …) existed in the previous versions but has been extended in this version. The interface is more ergonomic and it is possible to automatically restore the external files at their original places, without additional copy. Derogation and mask programming It is now possible to program an on-call derogation period in advance (cancel of calls for a group or call forward to a team explicitly designated) or alarm mask by defining a date or beginning and end hour for the derogation or mask period. Manual scripts The message processor scripts can now be manually triggered on request (menu command) to execute certain treatments (alarm test, operator file importation …). Polling option according to the on-call status of the station In normal redundant mode, the two stations permanently supervise their own supervision data (redundant database or even database). In certain case, it is ALERT User Guide 1-15 Introduction useful (or more efficient) to limit the links to the active station. A new option allows supervision links only with the active station. Forcing of variable type A variable type (character or numeric chain) was automatically determined by the type of reference value used to evaluate the event condition. If this value was numeric (beginning by a numeric character), the value was numeric type declared. This automatic designation, which was most of the time useful, was sometime incoherent. To avoid such incoherence, the variable type is now configurable (numeric by default). Client functionalities extension So as to guarantee a better compatibility in service or terminal server mode, the client/server functionalities of the software have been extended. The following functionalities are now accessible from client stations: current call follow-up, call acknowledgement, control of the links with supervision. 1-16 Functionning 2 FUNCTIONNING 2.1 Application supervision Alert manages a list of tags to supervise, each entry of this list containing all necessary information for acquisition of the current state of the associated tag and for the treatments to perform when the tag goes into a specific state. Tags declared in this list can be DDE or OPC items, in that case Alert takes in charge the polling of their current state. Either, they can be considered as simple reference; in that case they should be updated by explicit commands of an external application or through the suitable mediator module. A tag can be handled as: A simple variable: the acquisition of its current value will be the only treatment in order to supply associated alarm with contextual information. An event, that will be recorded in the event log when the tag goes into a state declared as an event state and will optionally trigger a message transmission to the concerned operators. An alarm considered as a particular event that requires a human intervention. An alarm is recorded in the alarm table and must be acknowledged. It is signaled by a red indicator ALARM on the alarm status bar. An alarm can trigger the call of concerned operators, with procedure of resumption and relief in case of failure. An acknowledgment, to transmit an acknowledgment request either from the supervised application or from an external system. Every variable has the following attributes: An identifier This identifier can be a simple name or the reference of the DDE or OPC link with the tag of the supervised application. A DDE reference always contains the name of the server application (service name), the name of the rubric (topic name) which contains the tag and the designation of the tag (item name). The DDE link is therefore defined by a triplet "service-topic-item". An OPC reference contains the name of the OPC server application and the reference of the tag within the server, under the form: "server\variable". The name of the DDE server or DDE topic can be replaced by an alias. This feature allows different tags to be referenced by using the same name (redundant configurations) or the link with a tag to be modified without having to change the Alert database. ALERT User Guide 2–1 Functionning A Station The station attribute defines a subset of the application of on-call management corresponding to a specific entity, geographical (site) or organizational (company, trade ...). The definition of stations allows subsets of tags and operators to be treated separately, with all associated information (on-call schedules, alarm table, alarm history, event log). According to the architecture of the application, one can choose one of the two following modes of management: Alert stations: the definite stations are attached to real remote stations, equipped with the Alert software and dealing autonomously with their data and alarm management, in synchronization with the main station. Virtual stations: the definite stations are virtually attached to specific entities (sites, companies...) but all the treatments (data acquisition, calls) are performed on the same computer. Functional groups The tags can be organized following a hierarchical structure of groups (e.g. countries, cities, buildings, machines, functions, applications, etc.); each group can itself contain a sub-tree structure of groups(buildings in cities in countries for example). This organization allows the synoptic visualization of subsets of the application as well as treatments by group in the working screens (acknowledgment of all alarms of a group, statistics by groups, etc.). A tag can belong to several groups. For each tag, one can select a basic group, who allows specific treatments: vocal message of identification of the group in alarms, grouping of message, etc. A polling mode (DDE or OPC variables only) DDE or OPC variables can be supervised either through a permanent connection, or a periodic reading. DDE variables can be punctually read on detection of an alarm in the group. The periodic reading of a variable allows an active surveillance of the application and the detection of any problem at the level of the connection or of the application itself. A tag defined as event or alarm has in addition the following attributes: An event condition The tag is declared as event when its associated event condition is TRUE. This condition can be the change into a determined state, the threshold overtake (high or low) or a mask on a logical state of the tag (event bit). An event can be defined as transitory (pulsed event). In that case the return to normal state is implicit and not handled. A weekly schedule allows the definition of periods for event invalidation, alarm masking or call inhibition. A multi-format message An event can be associated to a numerical, alphanumeric and vocal message. The numerical message is only used for alarms in order to identify the alarm when calling operators provided with a numeric pager. The alphanumeric message is used to identify the event in the event log. It is also used for variables declared as alarms, to identify them in the alarm table and to inform the operator provided with an alphanumeric pager, a fax, a printer or a remote terminal. This alphanumeric message can be formatted in order to include 2–2 Functionning some complementary static information (group, priority of alarm,) or dynamic data (value of associated tags). The vocal message is used to identify the event locally on the PC (on option), and for tags defined as alarms to identify them by telephone. This message can be recorded, by microphone or by telephone, or synthesized automatically from the formatted alphanumeric message if the "vocal synthesis from the text" option is available. An action list The activation of an event, its reset to normal state or the acknowledgment of an alarm, can trig the execution of a predefined list of actions: call of one or several on-call groups, call of designated operators, execution of a command sequence, execution of a script of the message processor, activation of an application, vocal message on the local station. For an alarm the call of an on-call group results in the trigger of a call cycle to the operators who belong to the group and who are currently on duty according to the group schedule. By default, this call will require a call acknowledgment (in order to suspend the call cycle). If the call does not succeed for certain operators, it can be resumed to relief operators. The call can be delayed in order to filter an event that will be treated as an alarm only if it persists a minimum time (a prolonged power failure for example). A tag defined as alarm furthermore has the following attributes: A priority level The priority level characterizes the alarm importance. It can be set between 0 (the lowest priority by default) and 9999. The priority order can be reversed. The priority level is used to transmit alarm messages by order of decreasing importance (what allows the most important alarm to be transmitted when only one message can be transmitted by call). It also allows the calls concerning the most important alarms to be handled first when several alarms are simultaneously detected. It finally allows alarms to be discriminated in 2 categories: the important alarms requiring to be handled quickly, whatever the time, and the less important alarms that will not require an immediate call during periods defined as reduce duty (the night for example); according to an option, the no important alarms can be preserved in order to be treated at the end of the period of reduce duty. An option to mask alarm by another alarm An alarm can be masked by another one, in order to avoid an avalanche of alarms in certain circumstances (power failure for example). A masked alarm will be treated like a simple event, without triggering of call. An associated text file (option) This text file can contain instructions for the alarm treatment or contextual information acquired automatically at the alarm time. It can be consulted either locally in the alarm table or at a distance from a remote terminal. It can also be transmitted by fax. An acknowledgment condition (option) An acknowledgment condition (indicating that the alarm has been acknowledged) can be defined like an alarm condition. This acknowledgment condition can be relative to the content of the tag itself or to the content of an associated tag. This functionality allows Alert to be informed by the supervised application that the ALERT User Guide 2–3 Functionning alarm has been acknowledged, and the consequent treatments to be performed (recording in event log, abort of the call cycle,). In addition, an option allows the acknowledgment condition to be reciprocally transmitted to the supervised application when the alarm is acknowledged from Alert (locally, by telephone or from a remote terminal). An masking condition (option) On the same way, a masking condition (indicating that the alarm has been masked) can be defined. This masking condition can be relative to the content of the tag itself or to the content of an associated tag. This functionality allows Alert to be informed by the supervised application that the alarm has been masked. In addition, an option allows the masking condition to be reciprocally transmitted to the supervised application when the alarm is masked from Alert. Each time a tag declared as event or alarm changes of state (goes to event or return to normal), this change of state is time stamped and recorded in the event log (with possible copy on a line printer). If it is a change to event state, the local operator can be warned by two audio consecutive messages: For alarms, a specific sound is played depending on the associated on call group (if the alarm option “play group tone” is validated and if a sound file is attached to the group). A vocal message identifying the event (if the option “talk voice message” is validated and if a vocal message is attached to the event). On option, that message can be repeated in a continuous loop until the alarm acknowledgment. If the tag was declared as alarm, the following operations are done: Updating of the alarm table and alarm history. Updating of indicators (ALARM and ACK) on the alarm status bar. 2.2 User management The list of operators who will be called to intervene (either locally or at a distance) is defined in the user file. Every operator is defined by: His name and first name. His usual language. A real or virtual type. A numerical operator identifier (ID), 1 to 4 digits. A numerical access code (password), 0 to 4 digits. His user class. An off-duty option with or without substitute. A list of call numbers. Optionally,, a weekly program defining the automatic assignment of his call numbers. 2–4 Functionning An option to be called on event reset. An option to be called on alarm acknowledgment. The name and first name are used to identify the operator during a local access on the station (login). There are also used for recording in the event log events concerning him (calls, acknowledgments) and for intervention reports. When an operator has to identify himself he can enter his name, his name and his first name, or his name followed by the first letters of his first name. The language of the operator specifies the language to use to transmit him the messages. If a message to transmit is not defined in the user language, it will be searched in the following priority order: in the language of the user interface, if it is defined in this language, in US English, if it is defined in this language, in the first available language for the message. A real operator corresponds to a physical operator that can intervene locally or at a distance on the installation. A virtual operator corresponds to a communication media, used by several operators: shared pager or cellular phone, telephone set in a common local, etc. When a virtual operator is called in vocal, any real operator who belongs to the same on call group can identify himself instead of the virtual operator. On the same way, when the virtual operator is a pager, the real operator having received the message can call back in order to acknowledge the call. This functionality allows the identification of who really took in charge the call transmitted. The operator code (ID), 1 to 4 digits, allows the operator to identify himself during telephonic communications by using the telephonic keyboard (DTMF codes). The access code allows the operator to authenticate himself when he locally logs on to Alert or during the telephonic communications. The user class (or user profile) defines the work environment of the operator. It can be easily configured and defines the menu and toolbar to display, the accessible screens and the authorized commands on each of these screens. Three basic classes are defined, each class being associated with an access level between 0 and 2, characterized by the following features: Operation (level 0) The operator does not have access to the configuration of the application and cannot close the application. Control (level 1) The operator has access to the configuration of most parameters (alarms, schedules,), except the configuration of user parameters (user profiles and user database) and environment parameters. System (level 2) Maximal level, the operator has access to all functions of the application. The off-duty option allows an operator to be temporarily removed from the calling procedure without having to modify the schedule tables. An operator can be set on/off duty selectively for each of the on call groups he is belonging to. That option can be set or reset from an external application.. ALERT User Guide 2–5 Functionning When an operator is set off-duty, another operator can substitute him in each group he his belonging to. The substitute has in charge his duty and those concerning the off-duty operator. A list of call numbers can be configured. Each call number is defined by the type of media to be used (beep, telephone, pager, fax, email…) and by the operator's address, in reference to the selected media (dial number, user identifier in paging system, email address...). A call number belonging to the call number list can be designated as an active number. It is the first number that will be used. A second number can be designated as relief number. This second number will only be used if the call to the active number did not succeed, after a configurable number of attempts. The numbers are called sequentially in the order of the list, the call cycle being ended with the first successful call of a final number. A final number is a number which requires a call acknowledgment, automatic or not. In case a call failure, the call is reiterated a number of times configurable (globally or at the level of a specific number), after a time also configurable. After the configured number of unsuccessful attempts, the call is resumed with the following number of the list. A call acknowledgment can be required (globally or at the level of a specific number). If the call acknowledgment is not automatic, a timeout for waiting the call acknowledgment can be defined with a number of reiterations of the call if no call acknowledgement is performed in the defined time. The list of the numbers to call at a given time can be automatically established from a weekly program of the call numbers. This program defines the assignment of the call numbers for each day of the week and the public holidays, by time sections of 15 minutes. The program can be put in service (automatic change of the list of call numbers at each new period) or out of service (manual operation). Under automatic operation, it is possible to derogate temporarily from the current configuration by modifying it manually. This configuration will remain valid until the next period. Every operator owns his mail box that stores the last 10 service messages that have been transmitted to him. The operator can consult and erase them, either locally, or at a distance by telephone (audio messages) or from a remote terminal. An operator can be declared as console operator. This attribute allows a list of operators to be defined, these operators being able to receive specific messages via the DDE command "SendConsole" or the API function "AlertSendConsole". The messages transmitted by this way will be only sent if the operator is on-call. If the operator is not on-call, the messages will be stored and transmitted at the beginning of his on-call period, unless they have been acknowledged meanwhile (DDE command "AckConsole" or function "AlertAckConsole"). In the case of a multi stations management, the operators can be attached to a specific station or to all the stations. Operators with the same name can be defined on different stations. Some operators can be destined to receive a full traceability of the alarms (activations, acknowledgments, returns to normal state). In that case, the call options on event reset and alarm acknowledgment have to be validated for the operators in question. 2–6 Functionning 2.3 Group and team organization Several on call groups can be defined, each one corresponding to a group of users having the same localization or competence (fire, security...). A group is characterized by: An identifier name for the group. An operator list attached to the group. A specific audio signal (local alarm). Operators belonging to a group must have been previously declared in the user file. An operator can simultaneously belong to several groups. In a group, it is possible to create teams. A team is a set of operators who can be called to intervene simultaneously or by rotation (following option at the group level and at the team level) when an alarm concerning the group is detected. By default, a team is created for every operator belonging to the group. A team is defined by: The name of the team (by default it is the name of the first operator). A color allowing the team to be visually identified in schedule table.. The list of operators making up the team. In a team, some operators can be declared as relief operators. By default, these operators are called only when the main operators cannot be reached. The call order of relief operators is the list order. On option, it is possible to call one relief operator for each main operator not reached, in order to guarantee the intervention of a constant number of operators. A schedule is defined for each group. This one is defined over a year from the previous month of the current month. A team can be programmed by time sections of 15 minutes minimum. A time period can be qualified as a period of reduced duty, indicating that during this time only the important alarms will be immediately treated. A group schedule can be configured very easily with the mouse by positioning teams on the schedule table (by drag and drop operation). The schedule of a group also can be automatically configured from its weekly program. This program defines the assignment of the teams for each day of the week and for the public holidays, by time section of 15 minutes. A team can be programmed in reduce duty or not. This program is applied automatically for every new month. It can be manually forced from the current day and the current hour and for the eleven next months. When a program has been applied in the schedule table, it is still possible to modify it manually. A group can be set in derogation state. In this state, calls concerning this group are redirected to a team of the group designated as a derogation team. If there is no designated team, calls are abandoned or suspended according to option. The derogation of a group can be temporized until a limit time or the next change of oncall team. The change of the on-call team can be done through a declared team changeover. When a team executes a team changeover, it immediately starts its on-call period. On ALERT User Guide 2–7 Functionning option, the team changeover can be mandatory. In this mode, each change of on-call team must be explicitly declared. In case of no changeover in a given time from the scheduled hour, an alarm can be trigged. For a given group, it is possible to designate a relief group. This last will be called on alarm only if there is no active team in the schedule for the corresponding period or in case of failure of the call cycle of the main group. This possibility allows the definition of a secondary on call process for the group, independent of the main on call process of the group. It is possible to cross the relief groups (a group can be designated as relief group of its own relief group). When calling a group, it is possible to transmit commands to supervised application, or any other external application, to signal the starting, the success, the failure or the acknowledgment of the group call. 2–8 Functionning 2.4 Call management When a call is triggered to a group following an alarm, a call request is registered in the list of groups to call, with the cause of call. If the group was already under call (following a previous alarm), the new cause of call is added. For each group added to the list of groups to call, the on-duty team is searched. If for a group, no team is on-duty, the search is resumed cyclically. When a team is found, the call is triggered to this one. Following option, either the next operator to call (turnover option) or the list of active operators (not in relief) is extracted from the team to call. Only on-duty operators are called. Then a call request to these operators is registered in the list of users to call. For each operator of the list of operators to call, the call procedure is triggered to the first valid number of the list of call numbers of the operator. If this call does not succeed, and after a configurable number of attempts, the call is reiterated to the next valid number in the list of call numbers of the operator, and so on. When the call succeeds, a temporization is triggered to wait for the call acknowledgment. At the end of this temporization, the operator call is reiterated, a configurable number of times. The call can be acknowledged either locally (by any operator) or from a distance by telephone or from a remote terminal, by the operator himself or, when the called operator is declared as virtual, by an operator belonging to the same group. If the call number is not declared as final number, no call acknowledgment is required and the call cycle automatically continues with the next number of the list. The call of an operator is considered as failed when: there is no valid call number for the operator. the call did not succeed for any of his numbers, after the configured number of attempts. the call succeeded, but no call acknowledgment intervened in the specified time, after the configured number of reiterations. In this case, according to option, the call cycle of the team can be either abandoned or reiterated after a configurable temporization. A team is considered as warned when, according to the chosen option, either at least one operator of the team has been warned or when the required number of warned operators has been reached. However, if the alarm is not acknowledged in a defined delay, the call of the team (or the following in the schedule) can be reiterated. If the timeout defined to acknowledge an alarm is null, the group is automatically removed from list of groups to call as soon as the on-duty team has been warned. Otherwise, the group remains in the list of groups to call so long that all alarms concerning this group have not been acknowledged. At the time of the acknowledgment of an alarm, if this alarm is the last cause of call of a team, all calls concerning this team are abandoned ALERT User Guide 2–9 Functionning 2.5 Control of working failures In order to be reliable, an alert management system must be able to treat events in all circumstances. To guarantee a high level of security, it must control that the supervised application works correctly, that the link with this one is available and that it will be able to trigger the necessary calls when an alarm will be detected. To insure the security of the whole system, Alert offers control functions on its environment: Control of the application working and of the link with this one Alert can detect a failure of the link with the application. This failure is materialized by the fault indicator of the alarm status bar (“LINK”), the "Supervision" led becoming red and by recording the "LINK FAILURE" in the event log. It also set to "1" the value of the DDEFAIL item of the Alert DDE server. This item can be self-supervised by Alert to produce an alarm. In case of link failure with a DDE or OPC server, the connection can be automatically switched on a secondary DDE or OPC server. Alert also can perform periodical DDE or OPC requests (watchdog) for one or several variable. If there is no answer after the specified delay, a LINK fault is generated, as for a link failure. Besides, the alarm associated to the event is triggered. Control of the working of call systems (modems) Alert is able to detect a working defect of a modem on a communication port and to generate consecutively a communication port failure. This failure is materialized by the fault indicator of the alarm status bar (“MODEM”), the corresponding led becoming red and by recording the COM failure in the event log. It also set to "1" the value of the "PORTFAIL" item of the Alert DDE server. This item can be self-supervised by Alert for producing an alarm. 2–10 Functionning 2.6 Redundant mode To reinforce the security of the whole system, it is possible to use two computers in redundancy. PLC’s PC n°1 PC n°2 SCADA SCADA ALERT ALERT PC’s network To perform a full redundancy, the Alert software and the supervision software (or the communication server with the PLC network) must be installed on each of the two computers, with the same configuration. The two computers supervises a unique database (the PLC network can be doubled) and are interconnected by a computer network. Each of the Alert application supervises its own environment. As the PLC data base is the same, each computer detects the same alarms. In redundant mode, only the active computer transmits calls. Acknowledgements performed on a computer are automatically transmitted to the other one. The determination of the active computer is automatic. The two computers supervise themselves reciprocally through the computer network. A computer considers itself in active state if there is no fault detected (communication with the supervisor OK and at least a communication system in service). If the two computers are active at the same time, the computer not declared as main station changes to the inactive state. The secondary station becomes active only when the main station becomes inactive or if it can not supervise this one normally (main station or network out of order). It is possible to define some supervision tags as specific to one station (declared as "no redundant" tags). This allows the definition of events as specific to an environment or issuing from the other station. An alarm declared as no redundant triggers the call independently of the alert state (active or inactive) of the station. ALERT User Guide 2–11 Functionning The updating of the configuration of the two computers can be automatically synchronized: schedule tables, supervision list (redundant variables), messages, and alarm and call parameters. This synchronization can be configured. To insure an optimal resumption when switching from a station the other, alarms, acknowledgments and call cycles can also be synchronized. It is also possible to perform a reduced redundancy by installing only the Alert software on the secondary computer. This last will have for function to trigger an alarm call if the main computer goes in defect. The main station also can supervise the secondary station of the same way. To trigger a call in case of defect of the main station (station out of order or incapable to call), it is enough to supervise the "REDUNDANCYFAIL" item of the DDE server of Alert, by declaring an alarm on this item (with the event condition "different of 0"). The redundancy can be reinforced by the declaration of redundant data servers. For each data server used (DDE or OPC), it is possible to define one or more redundant servers. In case of failure of a data server, the software automatically restores the connections with the next data server in the list of redundant servers of the failed server. 2–12 Functionning ALERT User Guide 2–13 Installation 3 INSTALLATION 3.1 Required configuration The Alert software requires the Windows 32 bits environment (Window 2000, Windows XP, Vista, Windows 7, Windows 2005 and 2008 Server). ALERT can also be installed under a Windows 64 bits environment. The required hardware configuration is the one recommended for the used environment. If this software is running with other applications and uses a lot of multimedia functionalities, it is worth better to provide with a well-dimensioned hardware configuration: Screen and Super VGA board (800x600), higher resolution advisable (1024x768 or more), 64 MB of memory available for Alert, or more according to the application configuration (number of defined tags…). Hard disk with 500 MB minimum (storage of audio files, boards...), 2 GB with Text To Speech A sound card with loudspeaker and microphone (not necessary but recommended). To call operators, it is necessary to add the appropriate hardware in accordance with the used media's: For the call directed to a local in site paging system, a simple serial link is sufficient, For the call directed to paging servers, Hayes modems mode are needed, For the vocal communications, it is necessary to use vocal modems. The Alert software can also work on a network and communicate with applications located on other stations. In this case a network card has to be plugged. 3–14 Installation Software installation 3.2 3.2.1 Standard or Server Station To install the Alert software, execute the INSTALL.EXE program which is located on the installation CDROM then follow the displayed instructions. A Micromedia group is automatically created and the Alert icon is added to this group. The communication drivers that have been selected during the installation are loaded at the application launching, from the driver list described in the [drivers] entry of the ALERT.INI file, for example: [drivers] Fax=15,Fax.DLL,0,3 Printer=4,Printer.DLL,0,7 Beep=2,Beep.DLL,0,7 Tap=28,Tap.DLL,0,7 Ermes UCP=60,Ermes.DLL,0,7 GSM=1200,GSM.DLL,0,7 … This entry contains the list of drivers that can be used by the application. This list contains for each available driver: the driver name, an identifier numerical code (>0), the name of the file containing the DLL module, a code defining the mode to use for the driver, a management code for the driver (0 = not in any menu, 1 = in help menu, 2 = in configuration menu, 3 = in help and configuration menus). Bit 3 indicates that the driver is unused. Drivers are automatically loaded at application starting. 3.2.2 Client Station To install an Alert client station, one can execute the installation program which is located on the installation CDROM and follow the program instructions (by selecting the application "AlertClient"). It is also possible to install a client station through the network, by launching from the client station, the "AlertClient.exe" program which is located in the "ClientSetup" subdirectory of the Alert installation directory on the server station. The Micromedia group is automatically created and the AlertClient icon is added to this group. ALERT User Guide 3–15 Installation 3.3 Software registration If the Alert software has been provided with a hardware key (dongle), connect this key to a parallel or USB port of the PC (according to the key model). The “parallel port” key can be inserted into an existing printer connection; it also can be used serially with other keys. When launched with a connected key, the software searches in the Windows registry database for a registration entry corresponding to the serial number written in the key. If it doesn’t find a such registration, it searches then for a license file corresponding to the serial number in question (file “ALERT 3.5_XXXXXXXX.LIC, for the serial number “XXXXXXXX”), located in its installation directory (C:\MMI\ALERT by default). This file normally was been copied from the CDROM during the software installation. If this file is found and valid, the software automatically performs its registration in the Windows registry database, with all the options authorized by the license. If there is no key connected, the software executes the same procedure, but by using a serial number corresponding to an environment code computed from specific characteristics of the hardware system on which it is installed. When the software is not registered (no registration in the Windows registry database, no license file matching the serial number written in the connected key or the computed environment code), the software displays the “About” dialog box. 3–16 Installation This dialog box can be called at any moment, by selecting the “About” command from the “?” menu”. It can be used to register the software or modify the options authorized by the license. From this dialog box, it is possible to manually register the software: Either from a license file, by clicking on the “Register” button then selecting in a directory the licence file corresponding to the serial number or the environment code of the system. Or by manually entering the installation code of each option. For each option to register (or modify), you must select it, click ion the “Modify” button, then, on the new displayed dialog box, select the wished value for the option and type the corresponding installation code that has been you given by your provider. By clicking on the “OK” button of the dialog box, without having performed software registration, the application starts in demonstration mode. In this mode, the working time is limited to 60 minutes. After registration of the software, later launchings of the application will no longer display the “About” dialog box, provided the serial number written in the key ever can be accessed (key connected and not defective), or, in case of registration from the environment code of the PC, this environment code has not been modified, following for example a change of master card or network card. ALERT User Guide 3–17 Installation Note : AlertClient software can be freely installed on any station of the network. It requires no registration, under condition a “Client Access” license with at least 2 client accesses has been validated on the server station. 3–18 User Interface 4 USER INTERFACE 4.1 4.1.1 Login Standard or Server Station To have access to services provided by the application, the operator has to log on to Alert. To do so, at the starting of the application, or when the application has been freed by a previous operator, you only have to select the Login command from the File menu, or simply to click on the button: A dialog box requires the operator to identify himself by his name and his access code. This one must enter his name (always forced in capitals) followed by his first name (that can be shorted). The access code of the operator must be supplied, if it exists. When the station management mode is defined as "Virtual stations" (see § 7.1 “General options”) or, in the opposite case ("Alert stations""), if the local station (fist station) is defined as "Main Station", a dropdown list "Station" allows the selection of the station to display. In the case of Alert stations, only the synchronizable stations (stations defined with a user having the name of the station and associated with a communication driver of type ALERT) are proposed in the list. The choice "(all)" gives access to the data of all stations. If a station is selected, the name of the selected station is displayed in the status bar on the bottom of the main window, and only the data of this station will be accessible: configuration data for on-call management and supervision, on-call schedule, alarm table, alarm history and event log. It is possible to change the selected station later in the display options (see § 7.3). If the name and the access code are recognized, the application is opened for the operator in question and offers to him all services authorized for his user profile. Note 1 At the first start of the application, and so long as no operator has been configured, the operator must identify himself with the temporary name "ALERT". This access has the higher level ("system" profile), and allows the configuration of the user file. Note 2 It is possible to authorize a working mode said “without login” (see the login options, § 7.1 “General options”) which allows some limited operations to be enabled without ALERT User Guide 4–1 User Interface having to be logged: call or alarm acknowledgment, alarm masking/unmasking, edition of an alarm comment or report, call transmission… In this mode, every command that requires the designation of the responsible user for the performed action (acknowledgment, masking…) provokes the display of a dialog box to get the name of the user and his/her password. The command will be only accepted if the profile of the designated user authorizes it. 4.1.2 Client Station To have access to services provided by the Alert server application from a client station, the operator has to identify and authenticate himself in the same way as on the server station. But during this operation he will have to designate the server computer onto he wants to connect, either with the station name or directly with its IP address. The server station can be browsed among the network stations (button on the login dialog box). If the IP port number has been modified on the server station (2495 by default, can be modified in the redundancy options), the new port number will also have to be entered. When the connection is successfully completed, all the server connection parameters are saved. On the next connections one only have to select the wanted server station in the dropdown list of the login dialog box. If the Auto connect option is checked, the client station will automatically try to connect again to the selected server in case of failure at the connection time or in case of unwanted disconnection. If several servers have been connected with the Auto connect option, the client station will automatically search for the first active server. 4–2 User Interface 4.2 User interface Once identified (see § 4.1 “Login”), the operator is in front of the following screen (some menus or buttons can be masked according to the user profile and the configuration of this one). This screen includes: A configurable title bar allowing the alert station to be named. A menu bar containing all the commands of the application. A tool bar offering a quick access to the commands. An alarm status bar allowing the visualization of the general working state. A general status bar at the bottom of the screen. The central part of the display constitutes the main screen, made up of threes parts: On the left part, a topographical representation of the application, under the form of a tree of the stations with sub-trees for description of the supervision and on-call management attached to each station. On the top right part, a synoptic view of the entity selected in the tree (station, list of supervised tags, functional group, user list, on-call group, team, …). On the bottom right part, a tabbed application window (on-call schedule, alarm table, alarm history, call overview, event log, logbook, viewer). ALERT User Guide 4–3 User Interface 4.3 Menus The main menu gives access to the main available function of the software. Some commands of the main menu are accessible more quickly from the buttons of the toolbar (see § 4.4 “Toolbar”). In addition, on the tree of the main screen and its associated view, contextual menus give a direct access to commands dedicated to the selected entities (see § 4.6 “Main screen”). Menus depend on the profile of the logged user and on the configuration of this profile. The menus marked (1) below are accessible only to an operator declared with a "control" or "system" profile (in standard configuration), those marked (2) are accessible only to an operator having a "system" profile (in standard configuration). File menu Logout... Operator leaves the application (without closing it) (1) Links Control of DDE and OPC links: closure or restoration of links with the supervised application (2) New Erase the current configuration (2) Open... Open a saved or remote configuration (2) Save As... Save the current configuration (1) Import... Importation of tag or user list from a text file (1) Print... Printing of configuration tables (1) Printer setup... Selection and configuration of the printer (1) Line printer... Selection and configuration of the line printer (trace) (1) Line printer setup... Selection of event types to trace on the line printer (1) Trace... Configuration of options for debug trace (1) Exit Closure of the application 4–4 User Interface Operation menu User record... Consultation of the record of logged user Send a message... Send a message or files to one or several operators Calls in progress... Consultation and acknowledgment of current calls Schedule Display and modification of schedules Alarms Display and acknowledgment of alarms History Display of history and statistics Call overview Display of call overview screen Event log Display of the event log (journal) Logbook Display of logbook and report edition Viewer Display of alarm viewer page 2 1 Team changeover… Team changeover (Begin/End of on-call period) Schedule derogation… Set or reset the derogation state of on call groups Alarm Mask/Unmask… Mask or unmask alarms Stop sound alarm Stop the sound alarm message 3 1 The “Call overview” command is only displayed when the data base export option is activated (see § 7.1 “General options”) 2 The “Viewer” commands is only displayed when the Alert viewer module-in is activated (see § 7.1.2 “Alert Viewer Configuration”). 3 The “Stop sound alarm” command is only displayed when a sound alarm message is repetitively played on the sound output of the local station. ALERT User Guide 4–5 User Interface Configuration menu On-call Management… Configure on call management (operators, groups, teams...) (1) Message processor... Configure the message processor 1 (2) User profiles... Configure the user profiles (1) User statuses... Definition of availability statuses of operators Communication… Configure the communication parameters (2) Vocal server… Configure the vocal server (1) Screen editor… Launch the screen editor (VAEdit) (1) Options… Configure the application options (1) Applications… Configure the list of associated applications (2) Toolbar... Customize the tool bar (1) Record messages by telephone Indicate the messages recorded by telephone are to be keep (alarm messages) 2 Help menu (?) (2) DDE Server... List of available item for the DDE clients Quick start... Display of the quick start guide User guide Display of the application user guide Contextual Help Display of the contextual help screen (1) Drivers help Display of the user guide of drivers Technical Support Display a HTML page which contains information (telephone numbers, hyperlinks) about Technical Support About ALERT... Display miscellaneous information (version, copyright) , registration of options authorized by the license 1 The "Message processor..." command is only displayed when the message processor is activated The “Screen editor” commands is only displayed when the Alert viewer module-in is activated (see § 7.1.2 “Alert Viewer Configuration”). 2 4–6 User Interface Toolbar 4.4 The toolbar can contain the following buttons, subject to the validation of the corresponding menu commands in the profile of the current user: Button or Action User login / logout Consultation of the record of logged user Send a service message to one or several operators Consultation and acknowledgment of calls in progress Display group schedules (consultation and updating) Display alarm tables (consultation and acknowledgment) Display alarm history and statistics Display the call overview 1 Display the event log (journal) Display the logbook (consultation and report edition) Team changeover (Begin/End of on-call period) Set / Reset schedule derogation Mask / Unmask alarms Configure on call management (users, groups, teams) Configure communication parameters Launch/Activate screen editor (VAEdit) 2 Display a contextual help Stop the sound alarm 3 1 This button is only displayed when the data base export option is activated (see § 7.1 “General options”) 2 This button is only displayed when the Alert viewer module is activated (see § 7.1.2 “Alert Viewer Configuration”) 3 This button is only displayed when a sound alarm message is repetitively played on the sound output of the local station ALERT User Guide 4–7 User Interface This toolbar can be customized (see § 7.9 “Toolbar customization”) 4.5 Status bars The application displays two status bars: An alarm status bar Located at the top of the screen, under the toolbar, including 3 (or 4) textual indicators and LED's indicating the status of the connection with the supervised application and of each of the communication ports: ALARM indicator: at least on alarm is active in the alarm table ACQUIT indicator: at least a non acknowledged alarm in the alarm table FAULT indicator: "LINK" Link failure with the supervised application "MODEM" At least one communication port failed "DEROG." At least one on cal group in derogation state "ENREG." The vocal server is preset to record vocal messages by telephone Number of connected clients (server station only) "Supervision" LED: indicates the status of the link with the supervised application: gray yellow green red connection is not established connection is in progress connection is established and is working normally connection is failed "Alert" LED: indicates the working status of the station (calls transmitted or not) green red the station is active, alarms are processed normally the station is inactive (redundant mode) and doesn’t call on alarm "Redundant" LED: indicates the status of the link with the redundant station, displayed only when the redundant mode is selected: gray yellow green red connection with the redundant station is not established connection is in progress connection is established and is working normally connection is failed "COMx" LED’s: indicate the current status of communication port (or connected modem): gray dark gray green 4–8 port is not used port is being initialized port is available for calls User Interface red port failure (cannot be open or out of order) yellow an incoming or outgoing call is in progress orange data connection established (pager, printer, remote terminal) purple vocal connection established dark yellow port is being disconnected A general status bar At the bottom of the screen, including 3 windows and a message zone: 1st window: name of the locally logged operator (with name of its class in brackets) 2nd window: name of the station selected at login time or in the display options. 3rd window: current date and hour right part: zone to display help or service messages 4.6 Main screen The main screen displays a browser like synoptic view of the supervised installation and on-call management. It allows a continuous and optimal control of the application and proposes a lot of tools for operation and analyze. This screen is made up of threes windows and a browsing bar. The left window of the main screen displays a topographical representation of the whole application, under the form of a tree of stations, with for each station, the corresponding sub-tree for the representation of the supervised data (supervision) and the organization of the staff in charge of the surveillance (on-call management). Graphical symbols allow the system state to be showed at one sight (alarms, link failures, unreachable on-call groups, active teams …). The right window located on the top part of the screen displays a synoptic view of the entity selected in the tree (station, list of supervised tags, tag groups, operators, on-call group, team …). According to the views, graphical symbols allow an immediate identification of the active or unacknowledged alarms, off duty or relief users, active or unreachable teams, etc. The graphical representation of each view can be modified (list, small or large icons, …). For each view represented under a list form, it is possible to select the columns to display by clicking with the mouse right button on the header line of the list. The size and the order of the columns can be modified by respectively dragging column separators or column headers. The right window located on the bottom part of the screen displays various application screens that can be selected by tabs (or by the display commands of the main menu or buttons of the toolbar): “Schedule” ALERT On-call schedule of the group selected in the screen (see § 6.1 “Oncall schedule”). User Guide 4–9 User Interface “Alarms” Table of alarms present in the supervised application (see § 6.2 “Alarm table”). “History” History and statistics on the alarms and user interventions (see § 6.3 “Alarm history”). “Calls” Screens for call overview and analysis (see § 6.4 “Call overview”). This tab is only displayed when the data base export option is activated. “Journal” Journal displaying the event log (see § 6.5 “Event log”). “Reports” Logbook containing reports recorded by the users (see § 6.6 “Logbook”). When the alarm viewer module is activated (see Configuration”), a new tab is added: “Viewer” § 7.1.2 “Alert Viewer Graphical supervision of alarms to display synoptics for representation and localization of alarms. A browsing bar located above the synoptic view identifies the selected view and can be used to quickly browse through the various views. It also gives the choice among various graphical representations. The size of each window can be adjusted by moving the mouse cursor on the vertical or horizontal split bar between the windows (cursor or displayed), clicking on the left button of the mouse then dragging the cursor in the wished direction, keeping the mouse button pressed. Note: it is possible to suppress the topographical representation of the application (with the associated synoptic views) to return to a display compatible with the previous versions (before the version 3.5): Either generally for all the users by unselecting the “Mapping display” option in the starting options (see § 7.1.1 “Advanced parameters”). Or for a specific user profile by unselecting the menu entry “Supervision Mapping” of the “Operation” menu for the concerned profile(s). 4.6.1 Topographical representation The displayed tree architecture is as shown on the next page: 4–10 User Interface Root1 (blue) if DDE/OPC connections stopped | (red) if at least one alarm not acknowledged on all the stations | (blue) if alarms acknowledged and active on all the stations |--- Station1 (blue) if polling stopped on the station | | (red) if calls disabled on the station | | (red) if at least one alarm not acknowledged on the station | | (blue) if alarms acknowledged and active on the station | |--Supervision1 (blue) if polling stopped on the station | | | (red) if at least one alarm not acknowledged on the station | | | (blue) if alarms acknowledged and active on the station | | |--Tags1 (blue) if polling stopped on the station | | | | (red) if at least one alarm not acknowledged on the station | | | | (blue) if alarms acknowledged and active on the station | | | |--Data Server1 (blue) if polling stopped on data server 1 | | | |--Data Server (red) if alarm not acknowledged in data server 2 | | | | (blue) if alarms acknowledged/ active in data server | | | |---Data Server1 (red) if link failure with at least one tag of data server | | | | | |---Groups1 (blue) if polling stopped on the station | | | (red) if at least one alarm not acknowledged on the station | | | (blue) if alarms acknowledged and active on the station | | |---Group1 (blue) if polling stopped on the station | | | | (red) if alarm not acknowledged in group or sub-group 2 | | | | (blue) if alarms acknowledged and active in group or sub-group | | | | (red) if link failure with a tag of group or sub-group | | | |---Group1 (blue) if polling stopped on the station 1 | | | |---Group (red) if alarm not acknowledged in the group 2 | | | | (blue) if alarms acknowledged and active in the group | | | |---- Group1 (red) if link failure with a tag of the group | | | | | |---Group1 | |---On-Call Management | |---Users | |---Groups | | | |--Active on-call group (red) if active team not reachable | | |---Team (red) if unreachable team 3 | | |---Active team (red) if unreachable team | | | |---Locked on-call group (no active team) | |---Team |---Station 1 Customizable icon Flashing if call in progress 3 No reachable operator (user off duty or without valid dial number) 2 ALERT User Guide 4–11 User Interface 4.6.1.1 Root The root of the tree provides a synoptic view of the whole stations controlled by the application. Its contextual menu allows the creation of new stations and the configuration of the general options of the application. It also allows the root icon to be modified. Tree menu Acknowledgement Acknowledgment of all alarms of the application (all stations). Polling Stop / Restore the DDE/OPC connections. Add a station Creation of a new station (see § 5.12 “Station properties”). Import Importation of a tag or user list from a text file (see § 8.6 “Importation of a text file”). Paste Add one or more station(s) first copied, with the name "copy<n> of <name of the copied station>". Properties Edition of the properties of the root (icon change). General options Edition of the general options of the applications (see § 7.1 “General options”). Associated view menu Open Opens the station in the tree (see below). Acknowledgement Acknowledgment of all the alarms of the selected stations. Synchronize Synchronization of the selected stations with the local main station (see § 6.13 “Station synchronization”). Copy Copy data of the selected stations to the clipboard for duplication by a later paste on the root of the tree. Delete Deletion of the selected stations. If data are attached to the stations (tags, tag groups, users, on-call groups), a confirmation is required. The local station (first station) cannot be deleted. Rename Change the name of the station. Properties Edition of the properties of the station (see § 5.12 “Station properties”). 4–12 User Interface 4.6.1.2 Station Each station branch displays in its sub-tree the whole information relative to the corresponding station, from 2 main branches: a supervision branch for the data owned by the station and an on-call management branch for the on-call management specific to the station. For each station, it is possible to hide one or the other branch (see § 5.12 “Station properties”). The icon of each station can be customized by using the Properties command of the associated contextual menu. The order of the stations in the tree can be customized. The local station is always displayed on the top of the tree and cannot be moved. To move a station in the tree, click on its icon with the mouse left button, drag the icon (keeping the mouse button pressed) over the station icon AFTER which the dragged station is wished to be moved, then release the mouse button. Tree menu Acknowledgement Acknowledgment of all alarms of the station. Synchronize Synchronization of the station with the local main station (see § 6.13 “Station synchronization”. Polling Stop / Restore the DDE/OPC connections of the station. Import Importation of a tag or user list from a text file (see § 8.6 “Importation of a text file”). Copy Copy data of the selected stations to the clipboard for duplication by a later paste on the root of the tree. Delete Deletion of the station. If data are attached to the station (tags, tag groups, users, on-call groups), a confirmation is required. The local station (first station) cannot be deleted. Rename Change the name of the station. Properties Edition of the properties of the station (see § 5.12 “Station properties”). ALERT User Guide 4–13 User Interface Associated view menu Open Opens the supervision or on-call management sub-tree (according to the selection). Acknowledgement Acknowledgment of all alarms of the selected station. Properties 4.6.1.3 Edition of the properties of the supervision sub-tree (icon change). Supervision The Supervision branch displays in its sub-tree the whole information relative to the supervision of the parent station, from 2 main branches: a Tags branch which contains the whole list of the supervised tags and a Groups branch which displays a topographical functional description of the organization of the supervised tags. Tree menu Acknowledgement Acknowledgment of all alarms of the selected station. Polling Stop / Restore the DDE/OPC connections of the station. Import Importation of the supervision list from an OPC server, a text file or a mediator. The mediator choice (“M_XXXXXX”) is only proposed when a mediator has been selected in the supervision options (see § 7.2 “Supervision options”). Properties Edition of the properties of the supervision sub-tree (icon change). Associated view menu Open Opens the list of tags (or of groups according to the selection) in the tree. Acknowledgement Acknowledgment of all alarms of the selected station. Properties 4–14 Edition of the properties of the list of tags or groups (icon change). User Interface 4.6.1.4 Tags The Tags branch displays in the associated synoptic view the whole supervised tags that are attached to the parent station. It also displays in its sub-tree the list of the data servers (DDE and OPC) referred to in the tag list. The type and the status of a tag are represented by icons. In the report representation, the column (1st column by default) displays the type of the tag and the column (2nd column by default) displays its status. In the other views, each tag is represented by an icon resulting from the juxtaposition of the icons representative of its type and its status. The type of a tag is symbolized by the following icons: Variable Event Alarm Masked alarm The status of a tag is signaled by the following symbols: DDE or OPC tag not polled Invalid tag (server out of order, unreliable value ...) Event active High priority alarm, active not acknowledged Low priority alarm, active not acknowledged Alarm active acknowledged High priority alarm, reset not acknowledged Low priority alarm, reset not acknowledged In the report representation, the current value is displayed and updated in real time. When the value is not valid (link failure or data not yet read), the value is represented by a question mark ( ?). Note: the representation of the displayed value depends on the defined event condition for the tag (of type event or alarm). If the value defined for the comparison is numerical (1st character numeric), the displayed value will be numerical. Particularly, if the value is received as an alphanumeric string, the displayed value will be the result of the numeric conversion of the received string. The tags of type alarm can be directly acknowledged or masked from this view with the capability of multi selection for the acknowledgment or masking of groups of alarms. Comments can be typed about the present alarms or when masking alarms. These comments are displayed in the report representation of the view. The Tags view can be used for the configuration of the list of tags to supervise. New tags can be easily added: By selecting the Add a Tag… command in the contextual menu of the branch or view. A first dialog box is displayed to enter the tag reference or to browse it in an ALERT User Guide 4–15 User Interface external application (see § 5.10 “Selection of an external tag”). When the reference is defined, a new dialog box allows the parameters of the tag to supervise to be configured (see § 5.11 “Tag properties”). The default parameters of the created tag (type, event condition, action list …) are those of the tag which was selected in the view. By selecting the Paste command in the contextual menu of the branch or view, to create a DDE type tag. Before that operation, the pasted tag has to be copied from a DDE server application (“LINK” format). A dialog box allows the parameters of the tag to supervise to be configured (see § 5.11 “Tag properties”). This view also can be used as starting base for assignment of tags to the defined supervision groups: By “drag-and-drop” operation: tags to assign to a group are selected 1 in the view then dragged with the mouse over the tree branch that corresponds to the wanted group. This operation does not remove the selected tags from the tag list, even if the CTRL key is pressed when releasing the mouse button (cursor “+” always displayed during the dragging operation). By “copy / paste” operation: tags to assign to a group are selected 1 in the view then copied in the clipboard using a XML format (“Copy” command of the contextual menu). These tags can after be pasted in various groups. The order of the tags in the list can be modified. To move a tag, click on its line with the mouse left button, drag it, keeping the mouse button pressed, over the tag line AFTER which the dragged tag is wished to be moved, then release the mouse button. Tree menu Acknowledgement Acknowledgment of all alarms of the selected station. Polling Stop / Restore the DDE/OPC connections of the station. Add a tag Creation of a new tag (see § 5.10 “Selection of an external tag” and § 5.11 “Tag properties”). Import Importation of the supervision list from an OPC server, a text file or a mediator. The mediator choice (“M_XXXXXX”) is only proposed when a mediator has been selected in the supervision options (see § 7.2 “Supervision options”). Paste Creation of a new tag using a DDE reference that was prior copied in the clipboard (“LINK” format) from a DDE server application (see § 5.11 “Tag properties”). Properties Edition of the properties of the tag list (icon change). 1 To select a set of contiguous tags, keep the SHIFT key pressed during the selection. To select disjoined sets of tags, keep the CTRL key pressed during the selection. 4–16 User Interface Associated view menu Acknowledgement Acknowledgment of selected alarms1. Comment Add a comment about the selected alarms12. Report Edit a report about the selected alarms. Consultation of the report when a report already exists for only one of the selected alarms12. Alarm masked Masking / Unmasking of selected alarm tags (see § 6.17.1 “Masking / Unmasking alarms”). Group transfer Request for transfer of calls triggered by selected alarms to an additional or substitution on-call group (see § 6.18 “Group transfer”)3. Display instructions Display of the instruction file(s) attached to the selected alarm(s)4. Add a tag Creation of a new tag preset with the parameters of the selected tag (see § 5.10 “Selection of an external tag” and § 5.11 “Tag properties”). Copy Copy the properties of the selected tags to the clipboard (XML format) for later paste in groups. Paste Creation of a new tag using a DDE reference that was prior copied in the clipboard (“LINK” format) from a DDE server application (see § 5.11 “Tag properties”). Delete Deletion of the selected tags. After confirmation, the tags are definitively deleted. Properties Edition of the tag properties (see § 5.11 “Tag properties”). 4.6.1.5 Data servers The Tag branch displays in its sub-tree the list of data servers (DDE and OPC) referred to in the tag list. Each data server is represented in a sub-branch of the Tag branch, by a customizable icon and the name of the data server, with its network path if the server is located on another computer. 1 This command is available only for the tags in alarm. This command is available only when the option Database export is validated (see § 7.1 “General options”). 3 This command is available only for unacknowledged alarms intended to at least one group configured with a list of substitution groups. 4 This command is available only for tags configured with an instruction file. 2 ALERT User Guide 4–17 User Interface The associated view displays all the tags attached to the server under the same format than in the Tag branch. New tags can be easily added to a data server by selecting the Add a Tag… command in the contextual menu of the branch or view. A first dialog box is displayed to enter the tag reference or to browse it in an external application (see § 5.10 “Selection of an external tag”). When the reference is defined, a new dialog box allows the parameters of the tag to supervise to be configured (see § 5.11 “Tag properties”). The default parameters of the created tag (type, event condition, action list …) are those of the tag which was selected in the view. This view also can be used as starting base for assignment of tags to the defined supervision groups: By “drag-and-drop” operation: tags to assign to a group are selected 1 in the view then dragged with the mouse over the tree branch that corresponds to the wanted group. This operation does not remove the selected tags from the tag list, even if the CTRL key is pressed when releasing the mouse button (cursor “+” always displayed during the dragging operation). By “copy / paste” operation: tags to assign to a group are selected 1 in the view then copied in the clipboard using a XML format (“Copy” command of the contextual menu). These tags can after be pasted in various groups. The order of the tags in the list can be modified. To move a tag, click on its line with the mouse left button, drag it, keeping the mouse button pressed, over the tag line AFTER which the dragged tag is wished to be moved, then release the mouse button. The polling of a data server can easily be suspended and reactivated by using the Polling command in the contextual menu of the corresponding branch. The icon of each data server can be customized by using the Properties command of the associated contextual menu. Tree menu Acknowledgement Acknowledgment of all alarms of the selected data server. Polling Stop / Restore the connections with the data server. Add a tag Creation of a new tag attached to the selected data server (see § 5.10 “Selection of an external tag” and § 5.11 “Tag properties”). Import Importation of the supervision list from the OPC mediator, with preset of the selected data server. This command is only available for OPC data servers. Delete Deletion of all tags of the selected data server. Rename Redefines a new name for the data server (usable in DDE or OPC connections). 1 To select a set of contiguous tags, keep the SHIFT key pressed during the selection. To select disjoined sets of tags, keep the CTRL key pressed during the selection. 4–18 User Interface Properties Edition of the properties of the data server (icon change). Associated view menu Acknowledgement Acknowledgment of selected alarms1. Comment Add a comment about the selected alarms 1 2. Report Edit a report about the selected alarms. Consultation of the report when a report already exists for only one of the selected alarms 1 2. Alarm masked Masking / Unmasking of selected alarm tags (see § 6.17.1 “Masking / Unmasking alarms”). Group transfer Request for transfer of calls triggered by selected alarms to an additional or substitution on-call group (see § 6.18 “Group transfer”)3. Display instructions Display of the instruction file(s) attached to the selected alarm(s)4. Add a tag Creation of a new tag attached to the selected data server and preset with the parameters of the selected tag (see § 5.10 “Selection of an external tag” and § 5.11 “Tag properties”). Copy Copy the properties of the selected tags to the clipboard (XML format) for later paste in groups. Delete Deletion of the selected tags. After confirmation, the tags are definitively deleted. Definition Edition of the external reference of the tag (see § 5.10 “Selection of an external tag”). Properties Edition of the tag properties (see § 5.11 “Tag properties”). 4.6.1.6 Tag groups The Groups branch displays a functional topographical description of the organization of the supervised variables. This description is made by the definition of a hierarchical structure of groups (e.g. countries, cities, buildings, devices, functions, 1 This command is available only for the tags in alarm. This command is available only when the option Database export is validated (see § 7.1 “General options”). 3 This command is available only for unacknowledged alarms intended to at least one group configured with a list of substitution groups. 4 This command is available only for tags configured with an instruction file. 2 ALERT User Guide 4–19 User Interface applications, etc.). A group can contain a sub-tree of groups (e.g. buildings in cities in countries). Each group branch displays in its associated view a set of the tags attached to the group (in black) or to one of the groups of its sub-tree (in yellow-green). This organization allows the synoptic visualization of application subsets as well as treatments by group in the application screens (acknowledgment of the whole alarms of a group, statistics by group, etc.). A tag can belong to several groups. For each tag, a basic group can be selected, which offers the following specificities: It is possible to incorporate the name of the basic group in the alarm message of the tag by inserting the string "&G" in the associated message format. It is possible to define a vocal message for each basic group. This message, when defined, will be played before the audio message associated with the event. It even can replace it if this last is not defined. It is possible to perform only one call for all the alarms of the basic group when this option is validated at the level of the used communication driver. All the alarms of a basic group can be simultaneously acknowledged by a communication driver (vocal ...) The basic group of a tag is designated in the Group field of the tag properties dialog box (see § 5.11 “Tag properties”). The icon of each group can be customized by using the Properties command of the associated contextual menu. The order of the groups in the tree and their overlapping can be customized: To modify the order of groups of same level (belonging to the same parent group), click with the mouse left button on the icon of the grouping to move, drag the icon (keeping the mouse button pressed) over the icon of the same level group AFTER which the group is wished to be moved, then release the mouse button. To move a group to the first position, drag its icon over the icon of its parent group. To attach a group and its whole sub-tree to a group of different level (but not belonging to its own sub-tree), click with the mouse left button on the icon of the group to move, drag the icon (keeping the mouse button pressed) over the icon of the group in which the group is wished to be incorporated, then release the mouse button. To attach a group to a group of same level, first move it immediately after the group to which it is wished to be attached (see above), then drag it over this same group: the moved group (and its whole sub-tree) is positioned on the top of the list of groups attached to the targeted group. To extract a group from its parent group, move it to the top of the list of same level group (see above), then drag it over its parent group: the moved group (and its whole sub-tree) is positioned at the level of its parent group, immediately after. To assign tags to a group, various methods can be used: Directly create a new tag in the group by selection of the Add a tag command in the contextual menu associated with the branch or the view. A first dialog box is displayed to enter the tag reference or to browse it in an external application (see § 5.10 “Selection of an external tag”). When the reference is defined, a new dialog box allows the parameters of the tag to be configured (see § 5.11 “Tag 4–20 User Interface properties”). The default parameters of the created tag (type, event condition, action list …) are those of the tag which was selected in the view. Use the Paste command in the contextual menu, to create in the group a new DDE tag. Before that operation, the pasted tag has to be copied from a DDE server application (“LINK” format). A dialog box allows the parameters of the tag to be configured (see § 5.11 “Tag properties”). Use the same Paste command in the contextual menu, to insert in the group a list of tags that were prior copied in the clipboard (XML format) from the tag view, a data server or another group. The copied tags are just assigned to the group. They are not removed from the tag list or from the origin group. Perform a “drag-and-drop” operation: the tags are first selected in the view associated with the Tags branch, a data server branch or any other group branch, then dragged with the mouse over the icon of the target group. The tags dragged and dropped are just assigned to the group. They are not removed from the tag list. If they are issued from another group, they are automatically detached from this group, except if the CTRL key is keeping pressed at the dropping time (cursor “+” displayed to signal a copy operation). The synoptic view associated with a group displays either the list of its child groups (belonging to the first level of its sub-tree) or the list of the whole tags attached to the group and all the groups belonging to its sub-tree. The choice of the displayed list is done by clicking on the button of the browsing bar. The synoptic view associated with a group displays the status and the value of the variables assigned to the group (see above). The "Tags" selection displays the status and the value of the tags under the same form as in the Tags branch (see above). This view can be used as staring base for the assignment of the tags to the others defined groups, by “drag-and-drop” or “copypaste” operations. The order of the tags in the list can be modified. To move a tag, click on its line with the mouse left button, drag it, keeping the mouse button pressed, over the tag line AFTER which the dragged tag is wished to be moved, then release the mouse button. ALERT User Guide 4–21 User Interface Tree menu Acknowledgement Acknowledgment of all alarms attached to the selected group and to the groups of its sub-tree. Mask Masking of all alarms attached to the selected group and to the groups of its sub-tree. Unmask Unmasking of all alarms attached to the selected group and to the groups of its sub-tree. Add a tag Creation of a new tag attached to the selected group (see § 5.10 “Selection of an external tag” and § 5.11 “Tag properties”). Add a group Creation of a new group in the selected group (see § 5.14 “Tag group properties”). Copy Copy the properties of the tags of the group to the clipboard (XML format) for later paste in other groups. Paste Creation in the group of a new tag using a DDE reference that was prior copied in the clipboard (“LINK” format) from a DDE server application or assignment to the group of a list of tags prior copied in the clipboard (XML format) from the tag view, a data server or another group. Delete Deletion of the selected group. After confirmation, a message proposes to delete the tags contained in the group. Rename Change the name of the group. Properties Edition of the group properties (see § 5.14 “Tag group properties”). Group view menu choice Open Open the selected group under the form of a list of groups if child groups are defined or a list of tags in the opposite case. Acknowledgment Acknowledgment of all alarms attached to the selected group and to the groups of its sub-tree. Mask 4–22 Masking of all alarms attached to the selected group and to the groups of its User Interface sub-tree. Unmask Unmasking of all alarms attached to the selected group and to the groups of its sub-tree. Delete Deletion of the selected group. After confirmation, a message proposes to delete the tags contained in the group. Rename Change the name of the group. Properties Edition of the group properties (see § 5.14 “Tag group properties”). Tag view menu choice Acknowledgment Acknowledgment of selected alarms 1. Comment Add a comment about the selected alarms 1 2. Report Edit a report about the selected alarms. Consultation of the report when a report already exists for only one of the selected alarms 1 2. Alarm masked Masking / Unmasking of selected alarm tags (see § 6.17.1 “Masking / Unmasking alarms”). Group transfer Request for transfer of calls triggered by selected alarms to an additional or substitution on-call group (see § 6.18 “Group transfer”)3. Display instructions Display of the instruction file(s) attached to the selected alarm(s)4. Add a tag Creation of a new tag attached to the selected group (see § 5.10 “Selection of an external tag” and § 5.11 “Tag properties”). Copy Copy the properties of the selected tags to the clipboard (XML format) for later paste in other groups. Paste Creation in the group of a new tag using a DDE reference that was prior copied in the clipboard (“LINK” format) from a DDE server application or assignment to the group of a list of tags 1 This command is available only for the tags in alarm. This command is available only when the option Database export is validated (see § 7.1 “General options”). 3 This command is available only for unacknowledged alarms intended to at least one group configured with a list of substitution groups. 4 This command is available only for tags configured with an instruction file. 2 ALERT User Guide 4–23 User Interface prior copied in the clipboard (XML format) from the tag view, a data server or another group. Delete Deletion of the selected tags. A message proposes the deletion of the tags from the tag list. Definition Edition of the external reference of the tag (see § 5.10 “Selection of an external tag”). Properties Edition of the tag properties (see § 5.11 “Tag properties”). 4.6.1.7 On-call Management The “On-Call Management” branch presents in its sub-tree all the information relative to the on-call management of the parent station, with 2 main branches: a Users branch which contains the list of all the users attached to the station and a Groups branch which contains the list of the defined on-call groups with their teams. Tree menu Import Importation of a tag list from a text file (see § 8.6 “Importation of a text file”). Configuration Configuration of the on-call management (see § 5.4 “On call groups” ) Open According to the selected icon, open the list of the users or of the on-call groups. Configuration According to the selected icon, configuration of the user list (see § 5.1 “User list”) or of the on call groups (see § 5.4 “On call groups”) Associated view menu 4.6.1.8 Users The Users branch displays in its associated synoptic view the whole users assigned to the parent station. In this view, each user is represented by an icon. The off-duty users are signaled by the overlapped symbol . The duty status of a user or of a group of users can be switched by using the Off duty command in the contextual menu. One or more users can be set off-duty and substituted by using the Substituted by… command in the contextual menu to designate a substitute for the selected users in each of their groups. 4–24 User Interface On-duty operators can be signaled momentarily unavailable (during their intervention to deal with an alarm for example), meaning they can’t be called to intervene. This status is indicated by the overlapped symbol . In the report view, the “Called numbers” column displays the numbers that will be used when the user will be called (in the call order). The comment column provides possible additional indications (substitute name if the user if off duty). The User view can be used for the configuration of the user list by using the Add a user command from the contextual menu attached to the branch or the view. A dialog box allows the user parameters to be configured (see § 5.1.1 “User properties”). This view also can be used as a starting base when assigning users to the on-call groups and teams: By “drag-and-drop” operation: users to assign to a group or a team are selected1 in the view then dragged with the mouse over the tree branch that corresponds to the wanted group or team. This operation does not remove the selected users from the user list, even if the CTRL key is pressed when releasing the mouse button (cursor “+” always displayed during the dragging operation). By “copy / paste” operation: users to assign to a group are selected1 in the view then copied in the clipboard using a XML format (“Copy” command of the contextual menu). These users can after be pasted in various groups and teams. The order of the users in the list can be modified. To move a user, click with the mouse left button on its icon or on its line in the list, drag it, keeping the mouse button pressed, over the user line AFTER which the dragged user is wished to be moved, then release the mouse button. Tree menu Configuration Add a user Creation of a new operator (see § 5.1.1 “User properties”). Import Importation of a tag list from a text file (see § 8.6 “Importation of a text file”). Paste Add an operator or a group of operators prior copied in the clipboard (XML format) from the user list of the station or another station. Configuration of the user list (see § 5.1 “User list”). 1 To select a set of contiguous users, keep the SHIFT key pressed during the selection. To select disjoined sets of users, keep the CTRL key pressed during the selection. ALERT User Guide 4–25 User Interface Associated view menu Send a message… Send a message to the selected operators (see § 6.11 “Sending a message”). Availability Selection availability status (Available / Unavailable / …) of the selected operators (see § 5.3 “User statuses”). Off duty Switch the selected operators to “Offduty” / “On-duty”. Substituted by Switch the selected operators to “Offduty” with designation of a substitute (see § 6.10 “Definition of substitutes”). Add a user Creation of a new operator (see § 5.1.1 “User properties”). Copy Copy the properties of the selected operators to the clipboard (XML format) for later paste in groups and teams. Paste Add an operator or a group of operators prior copied in the clipboard (XML format) from the user list of the station or another station. Delete Deletion of the selected operators. After confirmation, the operators are definitively deleted. Properties Edition of the properties of the selected operator (see § 5.1.1 “User properties”). 4.6.1.9 On-call groups The Groups branch displays in its associated view the list of the defined groups. The groups represented with the icon are the groups in which there is no active team (no team scheduled, team changeover not performed or group in derogation state without redirection of the calls). The groups represented with the overlapped symbol are those in which the active team is not reachable (all operators off duty or with invalid dial numbers). The order of the groups can be customized in the tree and in the report view associated with the Groups branch. To move a group, click on its icon with the mouse left button, drag the icon (keeping the mouse button pressed) over the icon of the group AFTER which the group is wished to be moved, and then release the mouse button. To move a group to the first position, drag its icon over the Groups icon. The list of groups allows some actions to be performed on the selected groups: The call of one or several groups simultaneously, meaning the call of the active teams of each of the selected groups. 4–26 User Interface The locking of the calls for one or more groups, meaning the forcing to the derogation state of the selected groups, without redirection of the calls to a team. Tree menu Program Configuration of the weekly on-call programs (see § 5.6 “On call program”). Add a group Creation of a new on-call group (see § 5.4.1 “On-call group properties”). Configuration Configuration of the group list (see § 5.4 “On call groups”). Open Open the list of the teams or of the operators of the selected group. Associated view menu Send a message… Send a message to the operators of the active team of every selected group (see § 6.11 “Sending a message”). Call locked Locking / Unlocking of the calls of the group (see § 6.16 “Schedule derogation / Call locking”). Program Configuration of the weekly on-call program of the selected group (see § 5.6 “On call program”). Rename Change the name of the group. Delete Deletion of the selected groups. After confirmation, the selected groups and their teams are definitively deleted. The operators assigned to the deleted group are not deleted. Properties Edition of the properties of the selected group (see § 5.4.1 “On-call group properties”). The synoptic view associated with each group branch displays either the list of teams of the group or the list of all the operators assigned to the group. The choice of the displayed list is done by clicking on the button of the browsing bar. To assign users to a group, various methods can be used: Directly create a new operator in the group by selection of the Add a user command in the contextual menu associated with the Users view. A dialog box allows the parameters of the user to be configured (see § 5.1.1 “User properties”). Use the Paste command of the contextual menu, to insert in the group a list of operators who were prior copied in the clipboard (XML format) from the user list, another group or a team. The copied operators are just assigned to the group. They are not removed from the user list or from the origin group or team. Perform a “drag-and-drop” operation: the operators are first selected in the view associated with the Users branch, or any group or team branch, then dragged with the mouse over the icon of the target group. The operators dragged and dropped ALERT User Guide 4–27 User Interface are just assigned to the group. They are not removed from the user list. If they are issued from another group or team, they are automatically detached from it, except if the CTRL key is keeping pressed at the dropping time (cursor “+” displayed to signal a copy operation). When the option Create a team for each user added to a group is validated in the dialog box of group configuration (see § 5.4 “On call groups”), a team is automatically created each time an operator is added to a group, giving it the name of the added operator. It is also possible to directly create a team in a group by using the Add a team command from the contextual menu associated with the group. The synoptic view which presents the list of the group users displays the duty, availability and relief status of the users in the group: The duty status of the operators is signaled by the overlapped symbol for the offduty operators. The duty status of one or more operators can be switched by using the Off duty command of the contextual menu. The status of operators declared as unavailable (during an intervention for example) is indicated by the overlapped symbol . The availability status of one or more operators can be selected by using the Availabilty command of the contextual menu. The relief status of the operators in the group is signaled by the overlapped symbol 2 on the icon of the relief operators. The relief status of one or more operators can be switched by using the Relief user command of the contextual menu. One or more operators can be set off-duty and substituted by using the Substituted by… command in the contextual menu to designate a substitute in the group for the selected users. The list of the numbers to call for each operator is displayed in the in the report view of the operators of the group. This view can be used as starting base for the assignment of the operators to the other defined groups or teams of the group, by “drag-and-drop” or “copy-paste” operations. The order of the operators in the group can be modified. To move an operator, click with the mouse left button on its icon or on its line in the list, drag it, keeping the mouse button pressed, over the operator line AFTER which the dragged operator is wished to be moved, then release the mouse button. Tree menu Send a message… Send a message to the operators of the active team of the group (see § 6.11 “Sending a message”). 4–28 Call locked Locking / Unlocking of the calls of the group (see § 6.16 “Schedule derogation / Call locking”). Program Configuration of the weekly on-call program of the group (see § 5.6 “On call program”). Add a user Creation of a new operator assigned to the group (see § 5.1.1 “User User Interface properties”). Add a team Creation of a new team in the group (see § 5.5.1 “Team properties”). Paste Assignment to the group of a list of operators prior copied in the clipboard (XML format) from the user list, another group or a team. Delete Deletion of the group. After confirmation, the group and its teams are definitively deleted. The operators assigned to the group are not deleted. Rename Change the name of the group. Properties Edition of the properties of the group (see § 5.4.1 “On-call group properties”). Team view menu choice Open Open the list of the operators of the selected team. Send a message… Send a message to the active (not relief) operators of the selected teams (see § 6.11 “Sending a message”). On-call (forced) Begin / End of the redirection of calls (derogation) to the forced team (see § 6.16 “Schedule derogation / Call locking”). Team changeover Start of on-call time (clock in). The name of the operator performing the team changeover is asked for confirmation (see § 6.15 “Team changeover”). This command is only proposed for the teams that are scheduled on the next period. End on-call End of the on-call period (only for active team). The name of the operator declaring the end of the on-call time (clock out) is asked for confirmation (see § 6.15 “Team changeover”). Delete Deletion of the selected teams. After confirmation, the selected teams are definitively deleted. The operators assigned to the deleted teams are not deleted. Rename Change the name of the team. Properties Edition of the properties of the team (see § 5.5.1 “Team properties”). ALERT User Guide 4–29 User Interface User view menu choice Send a message… Send a message to the selected operators (see § 6.11 “Sending a message”). Availability Selection availability status (Available / Unavailable / …) of the selected operators (see § 5.3 “User statuses”). Off duty Switch the selected operators to “Offduty” / “On-duty”. Substituted by Switch the selected operators to “Offduty” with designation of a substitute for the group (see § 6.10 “Definition of substitutes”). Relief user Switch the selected operators to the “Relief” / “Active” status in the group. Add a user Creation of a new operator assigned to the group (see § 5.1.1 “User properties”). Copy Copy the properties of the selected operators to the clipboard (XML format) for later paste in groups and teams. Paste Assignment to the group of a list of operators prior copied in the clipboard (XML format) from the user list, another group or a team. Delete Deletion of the selected operators. The operators are only removed from the group. They remain defined in the user list. Properties Edition of the properties of the selected operator (see § 5.1.1 “User properties”). 4.6.1.10 Teams Each team branch displays in its associated view the ordered list of the users of team. The team represented with the icon is the active team of the parent group (team called in case of alarm concerning the group). The teams represented with the overlapped symbol are those that are not reachable (all operators off duty or no valid dial numbers defined). The order of the teams in a group can be customized in the tree. To move a team, click on its icon with the mouse left button, drag the icon (keeping the mouse button pressed) over the icon of the team AFTER which the team is wished to be moved, and then release the mouse button. To move a team to the first position in the group, drag its icon over the icon of its parent group. To assign users to a team, various methods can be used: 4–30 User Interface Directly create a new operator in the team by selection of the Add a user command in the contextual menu associated with the “User” view. A dialog box allows the parameters of the user to be configured (see § 5.1.1 “User properties”). Use the Paste command of the contextual menu, to insert in the team a list of operators who were prior copied in the clipboard (XML format) from the user list, a group or another team. The copied operators are just assigned to the team. They are not removed from the user list, nor from the origin group or team. Perform a “drag-and-drop” operation: the operators are first selected in the view associated with the Users branch, or any group or team branch, then dragged with the mouse over the icon of the target team. The operators dragged and dropped are just assigned to the team. They are not removed from the user list. If they are issued from another group or team, they are automatically detached from it, except if the CTRL key is keeping pressed at the dropping time (cursor “+” displayed to signal a copy operation). The operators added to a team are automatically added to the parent group. The following actions can be performed on the team selected in the tree: Call of the team, resulting in the automatic selection of the active (not relief) operators of the team for a message transmission. Perform a team changeover to signal that the team that was scheduled begins it on-call period. After declaration of the operator who clock in, the team becomes active (icon ). End of on-call period (only for the scheduled active team), meaning that the team as ended its on-call time. After identification of the operator who clock out, the team becomes inactive (icon ). Forcing of the active team, corresponding to a derogation of the group with redirection of the calls to the forced team, without time limitation (see § 6.16 “Schedule derogation / Call locking”). The forced team becomes active (icon ), the possible old active team being automatically deactivated. The same command on a forced team (command On-call (forced) checked in the contextual menu) ends the forcing. Tree menu Send a message… Send a message to the active (not relief) operators of the team (see § 6.11 “Sending a message”). On-call (forced) Begin / End of the redirection of calls (derogation) to the forced team (see § 6.16 “Schedule derogation / Call locking”). Team changeover Start of on-call time (clock in). The name of the operator performing the team changeover is asked for confirmation (see § 6.15 “Team changeover”). This command is only proposed for the teams that are scheduled on the next period. ALERT User Guide 4–31 User Interface End on-call End of the on-call period (only for active team). The name of the operator declaring the end of the on-call time (clock out) is asked for confirmation (see § 6.15 “Team changeover”). Add a user Creation of a new operator assigned to the team (see § 5.1.1 “User properties”). The created operator is automatically added to the parent group. Paste Assignment to the team of the operators prior copied in the clipboard (XML format) from the user list, a group or another team. Delete Deletion of the selected teams. After confirmation, the teams are definitively deleted. The operators of the teams are not deleted. Rename Change the name of the team. Properties Edition of the team properties (see § 5.5.1 “Team properties”). The synoptic view of the team displays the duty, availability and relief status of the operators in the team: The duty status of the operators is signaled by the overlapped symbol for the offduty operators. The duty status of one or more operators can be switched by using the Off duty command of the contextual menu. The status of operators declared as unavailable (during an intervention for example) is indicated by the overlapped symbol . The availability status of one or more operators can be selected by using the Availabilty command of the contextual menu. The relief status of the operators in the team is signaled by the overlapped symbol 2 on the icon of the relief operators. The relief status of one or more operators can be switched by using the Relief user command of the contextual menu. One or more operators can be set off-duty and substituted by using the Substituted by… command in the contextual menu to designate a substitute in the parent group of the team for the selected operators. The list of the numbers to call for each operator is displayed in the in the report view of the operators of the team. This view can be used as starting base for the assignment of the operators to the other teams of the group or other groups, by “drag-and-drop” or “copy-paste” operations. The order of the operators in the team can be modified. To move an operator, click with the mouse left button on its icon or on its line in the list, drag it, keeping the mouse button pressed, over the user line AFTER which the dragged operators is wished to be moved, then release the mouse button. 4–32 User Interface Associated view menu Send a message… Send a message to the selected operators (see § 6.11 “Sending a message”). Availability Selection availability status (Available / Unavailable / …) of the selected operators (see § 5.3 “User statuses”). Off duty Switch the selected operators to “Offduty” / “On-duty”. Substituted by Switch the selected operators to “Offduty” with designation of a substitute for the parent group of the team (see § 6.10 “Definition of substitutes”). Relief user Switch the selected operators to the “Relief” / “Active” status in the team. Add a user Creation of a new operator assigned to the team (see § 5.1.1 “User properties”). The created operator is automatically added to the parent group. Copy Copy the properties of the selected operators to the clipboard (XML format) for later paste in groups and teams. Paste Assignment to the team of the operators prior copied in the clipboard (XML format) from the user list, a group or another team. The assigned operators are automatically added to the parent group. Delete Deletion of the selected operators. The operators are only removed from the team. They remain defined in the user list and assigned to the parent group. Properties Edition of the properties of the selected operator (see § 5.1.1 “User properties”). ALERT User Guide 4–33 User Interface 4.7 Browsing bar The browsing bar, located above the synoptic view of the topographical screen, allows the customization of the display and a quick browsing through the various views. This bar contains the following buttons: Button Action Display / Hide the tree window on the left of the screen. Display / Hide the tabbed application window. Display / Hide the right top part window (list or synoptic view). Return to the previous views (go back). Return on the return to the previous views (go forward). Go to the upper level in the tree. Display selection for the synoptic view, according to the selected view in the tree. For all views Large icons Small icons List view Report view Selection of a synoptic view as a map of icons format 32x32 pixels. Selection of a synoptic view as a map of icons format 16x16 pixels. Selection of a synoptic view as a list of icons format 16x16 pixels. Selection of a synoptic view as an item list on several columns. For “tag group” views Tags Groups Displays the list of variables which belong to the selected group and to the groups of its sub-tree. Displays the list of groups contained in the selected group (at the 1st level). For “on-call group” views Users Teams 4–34 Displays the list of users attached to the group. Displays the list of the teams of the group. User Interface ALERT User Guide 4–35 Configuration 5 CONFIGURATION 5.1 User list To define the list of operators who will be called to intervene on the Alert system (locally or at a distance), select the “On call management…” command in the “Configuration” menu, or click on the button dialog box, click on the “Users” tab. , then on the displayed tabbed The dialog box of operator configuration also can be called from the contextual menu associated with the “Users” branch in the tree of the main screen (see § 4.6.1.8 “Users”). This dialog box displays the list of operators and the total number of declared operators. The name of the station (if it is not the local station) with which the operator is associated is displayed in brackets. ALERT User Guide 5-1 Configuration If the operator belongs to a class for which the configuration of operators is allowed (only the class "System" by default), he will be able to perform the following operations: Create a new operator by clicking on the “New…” button. This choice lead to the edition of a new user record (see below). Modify the record of an existing operator, by selecting the operator in the list then by clicking on the “Edit…” button (or directly by double-clicking the operator in the list). This choice leads to the edition of the operator's record selected (see below). Remove an operator of the list, by selecting it in the list then clicking on the “Delete” button. A message box asks for a confirmation of the command. 5.1.1 User properties The “User record" dialog box defines the properties of an operator. This dialog box is called from the dialog box of operator configuration. It also can be called from the contextual menu associated with the branch “Users” in the tree of the main screen (see § 4.6.1.8 “Users”). The configurable user properties are: Identification Name User name (1 to 20 characters). This field can only be modified by an authorized user (user configuration authorized in the profile, access level higher or equal). 5-2 Configuration First Name User first name (optional, 0 to 20 characters). This field can only be modified by an authorized user (user configuration authorized in the profile, access level higher or equal). Language Usual language of the operator. Messages addressed to the user will be transmitted in this language when the message does exist in the language in question. If the message to transmit is not defined in the user language, it will be searched in the following order: in the generic user language (regardless of the country), if it is defined in this language, in the language defined as basic language, if it is defined in this language, in the first available language for the message. The proposed languages are those which are already used (user interface language, language of defined users). To add a language to the proposed list, click on the button on the right of the field then select the wished language in the displayed list. To remove one of the proposed languages, click on the same button, select the language to remove then click on the “Mask” button. Class Class assigned to the operator. A class defines operator's profile by assigning to all operators of the same class a specific work space: customized menu and toolbar, displayable screens, authorized commands (see § 5.2 “User profiles”). The class of the first defined operator ("ALERT" by default) cannot be modified. This operator must always belong to the basic system class. Virtual user A virtual operator represents a communication media that can be affected to different operators: pager or cellular telephone used by several operators, fax, etc. When a virtual operator is called in vocal mode, any real operator belonging to one of the on-call groups of the called virtual operator can identify himself in place of the virtual operator. In the same way, when the virtual operator is a message receiver (SMS …), the real operator having received the message can call back by telephone to acknowledge the call. This functionality allows the identification of the real operator that acknowledged the call sent to an anonymous pager or telephone. ID User ID code, 1 to 4 digits according to the option “Waited length for identifier” of the vocal server dialog box (see § 7.8.1 “Vocal Server options”). This code is used to identify the correspondent during a voice communication. It is automatically assigned at the time of the user creation. It can be changed later (by the user himself or another having the required rights), under condition to be unique in the user database (if the new code already exists, it is denied). Code Secret access code (password) of the user: optional, 0 to 4 digits. This code is used to authenticate the user during a local or remote access. ALERT User Guide 5-3 Configuration Duty status An operator can be temporarily forced off duty (holiday, sick…). In that case, he will not be called to process the alarms attached to the groups he belongs, even if he belongs to the active team at this time and some is his programmed duty status. This option can be used for a user temporarily absent, without to have to modify the schedule table. When a user is "off-duty", a substitute can be designated for each of his groups by clicking on the button on the right of the substitute display field. See § 6.10 “Definition of substitutes”. Every time a user is set "off-duty", with or without substitute, it is recorded in the event log. The “Schedule” button of the “Duty status” group gives access to the duty schedule of the user (see § 5.1.2 “Duty schedule”). The duty schedule of a user defines periods during which the concerned user will be programmed off duty or substituted (holiday, trip…). When a duty schedule is defined and activated, the button led is displayed in green. Dial numbers List of the available numbers that can be used to reach the operator. Number identifier associated with a color. The check box validates or not the number in the call sequence. A stared Id (*) indicates that the number is not a final number and that consequently the call must continue using the following number. Column Type Type of the media to use (communication driver). Column Number Number or address of the operator in accordance with the selected media. Column Calls Number of tries in case of unsuccessful call of the number, time between each try (in brackets, in seconds). Column Ack Number of tries in case of no call acknowledgement, time waited for receiving the call acknowledgment (in brackets, in minutes), or “Auto” if the call is automatically acknowledged, or “-“ if call acknowledgment is not required (no final number). Column Id The numbers are called sequentially following the order defined in the list, ignoring the unchecked numbers. The following number will be called only in case of unsuccessful call of the current number, after the defined number of tries, or immediately after if the current number is not a final number (stared Id, “-“ in the Ack column). The call sequence ends when a final number is successfully called. To add a dial number to the list, click on the Add... button (see § 5.1.3 “Dial number definition”). To modify a dial number, select it in the list then click on the Edit... button (see § 5.1.3 “Dial number definition”). To delete a dial number, select it in the list then click on the Delete button. Use the buttons the list. 5-4 and on the right of the list to modify the order of the numbers in Configuration Button Schedule Click on this button to display or mask the dial number schedule of the operator (see § 5.1.4 “Dial number schedule”). When the schedule is active, a green led is displayed on the button. Button Messages.... Click on this button to consult the messages destined to the user. It is only validated when the list of messages is not empty. Button Advanced... Click on this button to have access to the advanced parameters of the user: Station Selection of the station to which the operator is normally attached. This information is used only as discriminator to offer the possibility of the same operators name and first name on different sites. By default, the name of the local station is proposed. User call Call on alarm reset. If the call on event reset is validated, the user will be called for all resets of events for which the call on reset was validated. Call on alarm acknowledgment. If the call on alarm acknowledgment is validated, the user will be called for all acknowledgments of alarms for which the call on acknowledgment was validated. Console This option, when checked, defines the operator is designated as "console" operator. The operators designated as "console" receive the messages transmitted by client applications via the DDE command "SendConsole" or the API function "AlertSendConsole". ALERT User Guide 5-5 Configuration 5.1.2 Duty schedule The duty schedule of an operator allows off-duty periods or user substitution to be programmed. Schedule activation This check box validates or invalidates the schedule. The schedule is automatically activated when it is modified. Resolution This dropdown list defines the resolution of the schedule in minutes: 15, 30 or 60 to define basic time slots of 15, 30 or 60 minutes. Display This control group selects the wished type of display: Availability: the schedule displays (in green) the availability periods of the user (on-duty periods). Unavailability: the schedule displays (in red) the unavailability periods of the user (off-duty periods) and the programmed substitution of the user (color according to the substitution). List of programmable duty statuses The list on the right of the “Display” group shows the key of the defined duty schedule. It allows the selection of the duty status to program in the schedule. If the display selection is “Availability”, only one status is proposed: “On duty”, green color. 5-6 Configuration If the display selection is “Unavailability”, the status “Off duty” is proposed by default (red color). Click on the Add button to create a new substitution status that defines a substitution user of the operator for each of his on-call groups. If a group is specified without a substitution name, the operator will be considered as offduty in this group. See § 6.10 “Definition of substitutes” for the procedure of substitute selection. Click on the Edit button to modify the substitution selected in the list. Click on the Remove button to delete the substitution selected in the list. Schedule The duty schedule of the user is displayed below the tabs “Daily schedule” and “Weekly schedule”. The weekly schedule (“Weekly schedule” tab) defines the duty status of the user (onduty, off-duty, substitution) on time periods for each day of the week and days defined as holidays 1. The periods are defined with the time slot resolution selected in the list “Resolution”. The duty status programmed on a time slot is showed by a color. The daily schedule (“Daily schedule” tab) defines the duty status of the user on time periods for every calendar days, from the current day. On this schedule, the current time is showed by a vertical red mark (|). This schedule is initialized from the performed weekly program, this program being showed on the schedule with a light color. The weekly preselection can be overwritten for some days of the year on given time periods (holidays, trips…). This forced selection is showed with a dark color. Drawing of time slots (weekly or daily) is performed with the mouse. First select the wished duty status in the list above the schedule. Draw the wished time area on the grid of the schedule by clicking with the left button of the mouse on the start position then move the mouse cursor to the end of the wished period, keeping the left button pressed. Release the mouse button on the end position. On the daily schedule, the performed selection overwrites the weekly preselection. The last position can be on another line than the start position, defining then a rectangular area. On the daily schedule, it is possible to draw a continue selection on several days (from 15th April, 8h00 to 20th April, 13h00 for example).To perform this selection, do as for a rectangular area, but keeping the “ALT” key pressed during all the operation. To erase a selection, perform the same operation than to draw a selection, but by using the right button of the mouse. When an area of the daily schedule is erased, the weekly program is restored on the corresponding area. To force the weekly preselection to be erased on a given calendar area, do as for erasing, but keeping the SHIFT key pressed during all the operation. The areas forced as erased are showed with hatched lines. 1 Holidays are defined in the general on-call schedule by clicking on the first column of the row corresponding to the wished day. ALERT User Guide 5-7 Configuration 5.1.3 Dial number definition Number type Selection of the media to use to call the user. The list of proposed media in the dropdown list depends on the installed drivers. To add a media to the list, open the dialog box of communication configuration, select the Driver tab then click on the Add button (see § 5.19 “Communication drivers”). Number / Address Depending on the selected media: telephone dial number (beeper call, voice call, Alert modem) or address (pager, email, Alert socket …). A telephone dial number can contain from 1 to 24 alphanumeric characters (modem codes for pause or tone waiting accepted). An internal number and an external number can be defined in the same field with the character '/' between the both numbers (e.g.: 93/0476041093). At the time of the call, the number to dial will be automatically selected according to the used telephone line (internal or external). For a pager address, its length and allowed characters depend on the selected media. Consult the on line help specific to each installed drivers for more information. When the "Email" media is selected, this field contains the email address of the receiver. If the final receiver is a pager or a mobile-phone (SMS sent by email), the email address will have to be preceded by one of the following strings: "\\" if the information that designates the end-receiver is contained in the email address, "<mobile number>" if the end-receiver has to be designated in the email subject, with <mobile number> designating the mobile address (or pager address) such as it has to be specified in the email subject. 5-8 Configuration When the “Command” driver is selected, the address field designates the command to transmit. This command can be directly selected by clicking on the button , on the right of the address edit field. When the "Alert Socket" media is selected, this field contains the IP address of the remote station, followed by a comma and the number of the used IP port: example "192.168.0.15,20". Attempt number if call fails Maximum number of call attempts to the number when the call failed (no answer, busy, ...). This number can be between 1 and 9. If the Default option is checked, the value selected (indicated in grayed in the field) is that which was defined at the level of the communication driver (when this last proposes a value) or at the level of the general call options (see § 7.5 “Call options”). The time waited to try a new call depends on the type of failure. In case of no answer or busy failure, this time is that indicated by the parameter below ("timeout before new attempt"). It is reduced to 1 second if the modem does not detect the dial tone. Timeout before new attempt Time delay waited after a call failure (no answer or busy) to try a new attempt, in seconds. If the Default option is checked, the value selected (indicated in grayed in the field) is that which was defined in the general call options (see § 7.5 “Call options”). User call validated on successful call This option, validated by default, indicates that when the call of this number succeeds, the call of the operator is validated and that consequently the following numbers of the call sequence will not be called (relief numbers). If this option is not validated, the call of the number is considered as simply informative and does not require a call acknowledgment (SMS transmission followed by a vocal call of the operator for example). For the vocal calls, this option is always validated and is not modifiable (grayed option). Automatic call acknowledgment This option indicates, when it is validated, that the call of the operator will be automatically acknowledged when it succeeds and will thus not require a later call back for acknowledgment. If the Default option is checked, the option value selected (indicated in grayed by the radio buttons Yes and No) is that which was defined in the general alarm options (see § 7.4 “Alarm options”). For the vocal calls, this option is always validated and is not modifiable (grayed option). Attempt number if call not acknowledged Maximum number of calls of the number when the call succeeded but the operator did not acknowledge the call within the defined delay. This number can be between 1 and 9. The call can be acknowledged locally or remote by telephone, by SMS or from a client station. If the Default option is checked, the value selected (indicated in grayed in the field) is that which was defined in the general call options (see § 7.5 “Call options”). ALERT User Guide 5-9 Configuration For the vocal calls, this option is always validated and is not modifiable (grayed option). Timeout for call acknowledgment Time delay waited for call acknowledgment when the called operator has been reached, but without certainty (SMS, beeper, pager). This delay can be between 0 and 99 minutes, the value 0 canceling any delay (the call then always is considered as acknowledged). If the Default option is checked, the value selected (indicated in grayed in the field) is that which was defined in the general call options (see § 7.5 “Call options”). This parameter is not significant if the automatic call acknowledgment option is selected (grayed fields). 5.1.4 Dial number schedule On the user dialog box, click on the “Schedule” button to display the defined schedule of call numbers. This schedule defines under a graphical form the weekly assignment of the dial number to use to reach the operator. The dial numbers programmed for every day of the week are represented as a line drawn with the color of the number. On a same daily period, several numbers can be stacked, defining a sequence of numbers to call following the displayed order of the stack (from top to bottom). Of course, the call sequence will end after the first successful call of a final number. To put a number in the schedule, select it in the number list, then draw with the mouse on the weekly schedule the rectangle area corresponding to the wished period (on one or several day ranges). Note: holidays are defined in the general on-call schedule by clicking on the first column of the row corresponding to the wished day. 5-10 Configuration Activation Select this option to activate the displayed dial number schedule. This option is automatically selected as soon the schedule is modified. Uncheck this option to disable the schedule. Resolution This dropdown list defines the schedule resolution in minutes (minimum time slot). Max numbers This dropdown list defines the maximum size of the number sequence displayable in the schedule (number of stackable lines by day row). 5.2 User profiles To define and configure usable user profiles, select the “User profiles…” command in the “Configuration” menu. In initial configuration, this command is only accessible for operators of “System” class (Level 2). Class Name By default, 3 basic classes are defined, each associated with an access level. Operation (level 0): the operator has access only to operation of the application (no configuration). He cannot close the application. ALERT User Guide 5-11 Configuration Control (level 1): the operator has access to the configuration of exploitation (alarms, on-call schedule,...), but he can't configure the user file nor parameter the basic environment (options, vocal server, ports, drivers,...). System (level 2): maximal level, access to all functions of the application. The class "(without user)" corresponds to the configuration of the application when there is no logged operator. It authorizes or not the visualization of certain operating screens. In this configuration, no command is authorized, nor can be authorized. Access Level The access level associated with a user profile allows to assure compatibility with the old versions, by associating automatically with the defined level the corresponding basic class. It also allows to keep a permanent link between an operator and a basic class in the case where the defined class for the operator would be deleted. It can finally be used by the external applications to globally determine the rights of an operator (terminal server for example). The access level of a class is not modifiable for the 3 basic classes. Option Access to all stations When this option is checked (state by default), the user attached to the defined class has access to the data of all stations (schedule, alarm table, alarm history ...). When this option is not checked, the user has only access to its station, excepted if he is declared as attached to all stations (see advanced parameters of the user properties). Option Access to all groups When this option is checked (state by default), the user attached to the defined class has access to all the on-call groups, even those to which he does not belong (schedule, alarm table, alarm history ...). If this option is not checked, the user has only access to the on-call groups to which he does belong. Main Menu Selection of authorized commands of the main menu that will be displayed for an operator having the selected profile. Validate or invalidate a menu by clicking on the corresponding checkbox. To select the authorized commands for a particular menu, click on the line of the menu in question: commands of the menu selected are presented in the "Menu entries" list. Remarks: The "File" menu cannot be disabled ("Login/Logout" command is mandatory). The "Configuration" menu cannot be suppress for the basic class of level 2 ("System" by default). Menu entries Selection of authorized commands in the menu selected into the "Main Menu" list. Validate or invalidate a menu by clicking on the corresponding checkbox. Remarks: The "Login" and "Logout" commands of the "File" menu are not displayed, in the measure where they cannot be disabled. 5-12 Configuration The "User profiles..." command of the "Configuration" menu cannot be disabled for the basic class of level 2 ("System"). Screens This list displays the different screens that can be customized. To select the authorized commands in a particular screen, click on the line of the screen in question: the possible commands for this screen are presented in the Authorized functions list. Authorized functions This list defines the display options and the authorized functions on the screen selected in the Screens list. To Validate or invalidate a function, click on the corresponding checkbox. This list is disabled for the definition of the profile "without user" (no authorized command). Button Default Click on this button to reinitialize the selected profile with the default configuration associated with its access level. Modification of the profile name To modify the name of the selected profile, directly type its new name in the Class Name field, then validate by clicking on the OK button. Creation of a new profile To create a new profile, select the profile to be derived, enter a new name then click on the Add button. Deletion of a profile To delete a profile, select the profile in question then click on the Delete button 5.3 User statuses To define and configure the different used availability status of operators, select the "User statuses..." command in the "Configuration" menu. ALERT User Guide 5-13 Configuration The list presents the defined user statuses. The two first statuses (“Available” and “Unavailable”) are automatically created and cannot be deleted. The columns A, P, R and M define the status characteristics in accordance with the corresponding check boxes below the list. To create a new status, type its name in the “Name” field then define its characteristics: Receive alarms (A): when this option is not checked, the operators defined with this status will not be called to process the alarms, some is their on-call state. In this case, the two next options are grayed. Only priority alarms (P): when this option is checked, the operators defined with this status will only be called for priority alarms. Call as relief user (R): when this option is checked, the operators defined with this status will only be called as relief operators to process the alarms that concern them. Receive messages (M): when this option is not checked, the operators defined with this status will not be proposed to receive service messages. To validate the entry and create the new status, click on the “Add” button. To modify an existing status, select it in the list, modify its name or its characteritics in the corresponding fields then validate the entry by clicking on the “Apply” button. To delete an existing status, select it in the list then click on the “Delete” button. This action is not enabled for the two first statuses of the list. 5-14 Configuration 5.4 On call groups To define and configure the on call groups and teams, select the “On call management…” command in the “Configuration” menu, or click on the button . This dialog box also can be called from the contextual menu associated with the “Oncall Management” in branch the tree of the main screen (see § On-call groups “Oncall groups”). On the displayed dialog box, select the “Groups” tab. This dialog box displays the list of operators attached to the group selected in the “Group” drop down list. Group Name of the selected group. If the group is attached to a station different from the local station, the name of this station is displayed in brackets. Click on the arrow of the drop-down list to select another group in the list of the existing groups. User List List of all the defined operators (user file). To add an operator to the current group, you can: ALERT User Guide 5-15 Configuration either select its name in the list then click the Add button. or click on its name in the list then drag it into the list of the operators of the group by keeping the mouse button pressed (release the button on the destination). A click on the button Information... or a double click in this list causes the form of the operator selected in the list to be displayed. Group Operators List of operators belonging to the selected group. The operators in brackets are the relief operators 1 of the group. To set an operator as relief operator (or set him back as main operator), you can: either select his name in the list then click on the Relief button, or double-click on this operator in the list. To remove an operator of this list, you can: either select its name in the list then to click the Remove button, or click on his name in the list then drag it to the "exit" icon by keeping the mouse button pressed (release the button on the destination). Button New... Click on this button to create a new group. A dialog box is displayed for the configuration of the properties of the new group (see § 5.4.1 “On-call group properties”). Button Modify... Click on this button to open the property dialog box of the selected group (see § 5.4.1 “On-call group properties”). Button Delete This button allows the current group to be deleted. A message asking for confirmation is displayed when this choice is performed. Button Teams... This button gives access to the configuration of the teams of the group (see § 5.5 “On call teams”). Team changeover management Team changeover mandatory This option defines the default management mode of the team changeover. It predefines the team changeover mode for each new created group. It does not modify the team changeover mode for the existing groups, except when clicking on the Apply button. When this option is checked, the on-call users have to clock in and out (see § 6.15 “Team changeover”). One of the users of the new on-call team has to clock in at the scheduled changeover time within a configurable deadline. If the team changeover has not been performed when the deadline is reached, a team changeover fault is signaled with possibility of trigging an alarm. Similarly at the end of the on-call period, if no other team is planned, one of the users of the on1 A relief operator is called on alarm only when no one of main operators has been option) at least one of the main operators has not been joined. 5-16 joined, or (in Configuration call team has to clock out. Failing which the team will remain on-call beyond the planned period. Maximum delay for team changeover This option defines the default value of the maximum accepted delay to clock in from the planned beginning time of the on-call period. This option predefines the default delay for each new created group. It does not modify the default delay for the existing groups, except when clicking on the Apply button. When clocking in, this delay is proposed by default for waiting the next team changeover. The proposed time can be modified. Button Apply Click on this button to reinitialize the team changeover options (team changeover mandatory and maximum authorized delay) for all the existing groups with the values defined in this dialog box. A message is displayed for confirmation. Option Create a team for each user added to a group This option validates the automatic creation of a new team every time an operator is added to a group. At beginning, the created team contains only one operator, the operator added to the group, and is designated by the name of this operator. This option avoids the team configuration when the on-call organization does not require several operators to be called at a time. This option, validated by default, is general and concerns all groups. ALERT User Guide 5-17 Configuration 5.4.1 On-call group properties This dialog box defines the properties of an on-call group. It can be called by clicking on the "New..." button or on the "Modify..." button of the dialog box of on-call group configuration (see above). It also can be calledfrom the main screen by selecting the Properties or Add a group entry in the contextual menu associated with the displayed list (group list) or with the branch selected in the "On-Call Management" sub-tree of the main screen (see § 4.6.1.9 “On-call groups”). The following properties can be configured: Group name The group name must be defined: 1 to 20 alphanumeric characters. Relief group A group can be designated as relief group. The group selected as relief group will be only called when there is no planned team to call in the schedule of the main group or when the call cycle of the main group failed. If the choice “(none)” is selected, there is no group designated as relief for the actual group. Alarm tone The displayed file name, when it is not empty, designates a sound file which contains the alarm tone to play when an alarm is detected that concerns the group. 5-18 Configuration That tone will be played only if the option “play group tone” is checked in the alarm options (see § 7.4 “Alarm options”) or for alarms having an associated “Play tone” action without sound file specified (see § 5.15.7 “Play Tone”). Button Browse... Click on this button to browse files for a sound file containing an alarm sound to assign to the group. Button Listen Click on this button to listen to the alarm sound selected for the group. Call cycle This group defines the default options for the management of the teams of the group: Selection of the team management mode: Call one user for each alarm, different for every alarm (operator turnover) Call all active users of the team (call broadcasting), with management of relief operators according to options below. Definition of the call conditions for relief operators (only for call broadcasting): Call relief if not one of user is advised: a relief operator is called when none of the main operators of the team has been successfully reached (assures that at less one operator is warned). Call relief for each unadvised user: a relief operator is called every time a team's operator cannot be reached (assures that a constant number of operators are warned). Button Default This button reinitializes the management options for the teams of the group from the default options defined in the general call options. Team changeover management Team changeover mandatory This option defines the default management mode of the team changeover. When this option is checked, the on-call users off the group have to clock in and out. One of the users of the new on-call team has to clock in at the scheduled changeover time within a configurable deadline. If the team changeover has not been performed when the deadline is reached, a team changeover fault is signaled with possibility of trigging an alarm. Similarly at the end of the on-call period, if no other team is planned, one of the users of the on-call team has to clock out. Failing which the team will remain on-call beyond the planned period. Maximum delay for team changeover This option defines for the group the default value of the maximum accepted delay to clock in from the planned beginning time of the on-call period. When clocking in, this delay is proposed by default for waiting the next team changeover. The proposed time can still be modified at this time. Button Advanced... This button gives access to the advanced parameters of the group. ALERT User Guide 5-19 Configuration Station This drop-down list selects the station to which the group is attached. This information is only used to discriminate groups with same name on different sites. By default, the name of the local station is proposed. Resolution Display resolution for the group schedule (minimum time slots). Associated commands This option group defines the commands that can been transmitted to an external application when the group changes of state: Group to call: command to transmit when the group goes to call state (at least one not acknowledged alarm). Group advised: command to transmit when the group is considered as warned (successful call). Group call failed: command to transmit when the call of the group is considered as failed. Group acknowledged: command to transmit when all the alarms attached to the group have been acknowledged (the group is not any more to call). Type the command in the edit field or click on the button to select an existing command or to define a new command (see § 8.9 “Command driver”). Group transfer This control group defines the list of groups that can be proposed to transfer the alarm calls directed to the group (see § 6.18 “Group transfer”). 5-20 Configuration The list On-call groups displays the list of on-call groups defined for the attached station. The list Substitution groups displays the list of groups which will be proposed to transfer the calls provoked by the alarms directed to the current group. Click on the button to add the group(s) selected in the list of on-call groups (left list) to the list of substitution groups (right list). Click on the button to remove the group(s) selected in the right list from the list of substitution groups. 5.5 On call teams This dialog box shows the list of operators attached to the team selected in the Team drop down list, for the group designated in the field Group. It is called from the configuration of on call groups (see above), by clicking on the "Teams..." button. Group Name of the group to which the team is attached (group selected). Group Operators User list of the group to which the team is attached. To add a user to the current team, you can: select his name in the list then click on the button Add, click on his name in the list then drag it into the list of the team operators by keeping the mouse button pressed (release the button on the destination). A click on the Info… button or a double click in the list displays the form of the user selected in the list. ALERT User Guide 5-21 Configuration Team Name of the selected team. Click on the arrow of the drop-down list to select another team in the list of the teams attached to the current group. Team Operators List of the operators belonging to the current team. The marked in brackets operators are the relief operators. To change an operator to relief (or the opposite), you can: either select his name in the list then click on the button Relief, or double-click on this operator in the list. To modify the team's order (order of call), you can: either select an operator in the list then click on one of the buttons or click on an operator in the list then drag it to the wanted position. or , To remove an operator from this list, you can: either select his name in the list then click on the Remove button, or click on his name in the list then drag him to the "exit" icon by keeping the mouse button pressed (release the button on the destination) Button New team... Click on this button to create a new team. A dialog box is displayed to define the properties of the new team (see § 5.5.1 “Team properties”). Button Modify... Click on this button to edit the parameters of the team. A dialog box is displayed to edit and modify the properties of the team (see§ 5.5.1 “Team properties”). Button Delete team Click on this button to delete the current team. A message asking for confirmation is displayed before deleting the team. 5.5.1 Team properties This dialog box defines the properties of an on-call team. It can be called by clicking on the New Team... button or on the Modify... button of the configuration dialog box of the on-call teams (see above). It also can be called from the main screen by selecting the Properties or Add a team entry of the contextual menu associated with the displayed list (list of teams of a group) or with the branch selected in the tree (branch <group name> or <team name>). See § 4.6.1.10 “Teams”. One also can have access to this dialog box from the schedule screen by doubleclicking on the desired team in the team list. 5-22 Configuration Team Name The name of the team can be explicitly defined by a name from 1 to 20 alphanumeric characters. By default, when the option First operator name is checked, the name of the team is the name of the operator placed at the head of the list of the operators of the team. Color Displays the color selected for the team. This color allows the team to be visually identified in the schedules. When clicking on the Choose... button, a color palette is displayed to select a new color for the team. Call cycle Selection of the team management mode: Call one user for each alarm, different for every alarm (operator turnover) Call all active users of the team (call broadcasting), with management of relief operators according to options below. Definition of the call conditions for relief operators (only for call broadcasting): Call relief if not one of user is advised: a relief operator is called when none of the main operators of the team has been successfully reached (assures that at less one operator is warned). Call relief for each unadvised user: A relief operator is called every time a team's operator cannot be reached (assures that a constant number of operators are warned). Button Default This button reinitializes the team management options from the default options defined at the group level. ALERT User Guide 5-23 Configuration 5.6 On call program To configure the weekly on call program of each defined group, select the “On call management…” command in the “Configuration” menu, or click on the button On the displayed dialog box, select the “Program” tab. . This dialog box also can be directly called from the contextual menu displayed when clicking with the mouse right button on the icon of an on-call group in the tree of the main screen then selecting the command "Program" (see § 4.6.1.9 “On-call groups”). This dialog box displays the weekly on call program defined for the group selected in the “Group” drop down list. Group Select in this drop-down list the on-call group which one wants to visualize and configure. The selection of a group validates the modifications which were possibly made on the group selected beforehand. Teams List of teams attached to the group selected in the drop-down list Group. Each team is represented by its color and its name. 5-24 Configuration To assign a team to the on call program of the group, select it in this list, then, using the mouse, trace on the weekly schedule the rectangular area corresponding to the wished on call period (over one or more days). The corresponding rectangle is filled with the color of the team. Option Reduced duty When this option is checked, the periods traced on schedule are qualified as on call period in reduced duty (call only for priority alarms). These periods are traced on the low part of the day rows. Resolution Resolution of the displayed schedule, in minutes (minimum time slots). Schedule On call program of the group. This schedule defines in graphic form the weekly assignment of the teams of the selected group. The teams programmed for each day of the week are represented by lines of the color of the team, on the high part of the day rows for the teams in normal duty (unconditional call), on the low part of the day tows for the teams in reduced duty (call only for priority alarms). To assign a team to the on call program of the group, select it in the team list, then, using the mouse, trace on the weekly schedule the rectangular area corresponding to the wished on call period (over one or more days). Note: the public holidays are defined in the general on call schedule by clicking in the schedule on the first column of the line corresponding to the desired day. ALERT User Guide 5-25 Configuration 5.7 Programmed Calls To configure the programmed calls, select the “On call management…” command in the “Configuration” menu, or click on the button select the “Programmed calls” tab. . On the displayed dialog box, The list on the top of the page displays the programmed calls for the user selected in the Users dropdown list. If the selection is "(all)", the list displays the programmed calls for all the users. In this case, it is not possible to create a new programmed call (Add button grayed). A programmed call is defined by a line containing: the call type: (1) for a call at beginning of on-call period, (2) for a call at end of on-call period, (3) for cyclic call, (4) for periodic call. the name of the user to call, possibly followed by the identifier in the dial number directory of the user of the specific number to call (under the form <Id>), the period of the cyclic call or the day and time of the periodic call. To add a new programmed call 1) Select the concerned operator in the drop down list. 5-26 Configuration 2) Select the programmed call type: call at the beginning of on-call period, call at the end of on-call period, cyclic call or periodic call. 3) In case of a cyclic call, define the call cycle. In case of a periodic call, select in the Every drop-down list the day of the call (a specific week day or every days), then define the call time for the selected day. 4) Type the text message to send (see below). 5) Finally click on the Apply button. If one wishes to designate a specific dial number for a programmed call, select the call in question in the list of programmed calls, click on the Number... button, then, in the displayed dialog box, choose the option "selected number" and select the number to call. The default option "programmed number" will use the active dial number for the user at the time of the call. For a given user, only one cyclic call can be defined. But it is possible to define several periodic calls for the same operator. To remove a programmed call Select it in the programmed calls list then click on the Remove button. To modify a programmed call Select it in the programmed calls list, modify the wanted parameters then click on the Apply button. Remark: if the call type or the period of a periodic call is changed, a new programmed call is created. Option Call always This option indicates, when checked, that the cyclic or periodic calls will be performed whatever is the on-call status of the concerned user. If it is not checked, the call will be performed only during the on call periods of the user. Message Text message to send during the programmed call (0 to 512 characters). The number of characters is displayed above the edit field. Tag value The message can contain variable fields. To incorporate in the message a tag value of the supervision list, click on the button . In the displayed dialog box, select the wished tag then validate. The numerical identifier of the tag is inserted in the edit field at the current cursor position, under the form: &(tag id). Vocal Message Name of the vocal file that will be transmitted to the operator called by telephone. The vocal message can be recorded (Record... button) or selected it among the prerecorded messages (Browse... button). If the Text To Speech option has been installed, and if this filed is empty, the vocal message will be automatically generated from the text message defined above. Associated Text File Name of the text file associated with the message. This file is used to transmit some further information by fax or email. It can be defined as “contextual” and incorporate the value of tags of the supervision list. ALERT User Guide 5-27 Configuration Click on the Edit button to directly type the text to transmit or on the Browse... button to browse and select an existing text file on the disk. The information to transmit (text message, vocal message, text file) can be defined in various languages, the information really transmitted being automatically selected according to the language of the recipient operator. The list of tabs displayed above the message edit field, allows the selection of the typing language. The proposed languages are those which are already used (user interface language, language of defined operators). To add a language to the proposed list, click on the button on the right of the field then select the wished language in the displayed list. To remove one of the proposed languages, click on the same button, select the language to remove then click on the “Mask” button. 5-28 Configuration 5.8 Programmed file transfers To configure the programmed files transfers, select the “On call management…” command in the “Configuration” menu, or click on the button dialog box, select the “Programmed Transfers” tab. . On the displayed The list on the left top of the dialog box displays the programmed file transfers for the user selected in the Users dropdown list. If the selection is "(all)", this list displays all the programmed file transfers. In this case, it is not possible to create a new programmed file transfer (Add button is grayed). The users proposed are those who have been configured with a number associated with a driver allowing the file transfer (Email, Alert Modem, Alert Socket, Alert Direct). A programmed file transfer is defined by a line containing: the name of the user to call, the call type : (3) for cyclic call, (4) for periodic call. the period of the cyclic call or the day and time of the periodic call. The files to upload are designated in the transfer list at the bottom of the dialog box. The right column describes the full path of the files on the local station. ALERT User Guide 5-29 Configuration The left column gives the name and the path that will have the files on the target station. For a transfer by email, the files are attached files. Changes of name and path are ignored. For a transfer performed by a synchronization driver (Alert Modem, Alert Socket, Alert Direct), the files will be copied in the download directory of the target station. This directory is defined on the target station in the parameters of the corresponding synchronization driver. To create a new programmed file transfer 1) Select the concerned operator in the dropdown list. 2) Select the call type: cyclic call or periodic call. 3) In case of a cyclic call, define the call cycle. In case of a periodic call, select the day of the call (a specific week day or every days) in the dropdown list Every, then define the call time for the selected day. 4) Define the transfer direction: Send: the files are sent to the remote station (upload) Receive: the files are received from the remote station (download) 5) Select the files to send by clicking on the Add Files button. This action displays a dialog box to browse and select the files to add to the file list. To remove files from the list, select them in the file list the click on the Remove Files button. 6) Finally click on the Add button located below the user list. For a given operator, only one cyclic file transfer can be defined. But it is possible to define several periodic file transfers for the same operator. To delete a programmed file transfer Select it in the programmed file transfer list then click on the Remove button. To modify a programmed file transfer Select it in the programmed file transfer list, modify the wanted parameters then click on the Add button. Remark: if the call type or the period of a periodic call is changed, a new programmed file transfer is created. 5-30 Configuration 5.9 Programmed station synchronizations To configure the programmed station synchronizations, select the "On-call management" command from the "Configuration" menu, or click on the button On the tabbed dialog box displayed, select the "Stations synchro" tab. . To be able to synchronize remote stations, it is necessary first to define for every remote station a (virtual) operator having a call number attached to a synchronization driver (Alert Modem, Alert Socket, Alert Direct). The list on the left top of the dialog box displays the programmed synchronizations for the station selected in the Stations dropdown list. If the selection is "(all)", this list displays all the programmed synchronizations. In this case, it is not possible to create a new programmed synchronization (Add button is grayed). The station list displays the list of operators configured with a dial number attached to a driver allowing station synchronization (Alert Modem, Alert Socket, Alert Direct) and who have the same name as one of the defined station. A programmed synchronization is defined by a line containing: the name of the station to call, the call type : (3) for cyclic call, ALERT User Guide 5-31 Configuration (4) for periodic call. the period of the cyclic call or the day and time of the periodic call. To create a new programmed synchronization 1) Select the concerned station in the dropdown list. 2) Select the call type: cyclic call or periodic call. 3) In case of a cyclic call, define the call cycle. In case of a periodic call, select the day of the call (a specific week day or every days) in the drop down list Every, then define the call time for the selected day. 4) Define the synchronization options: The synchronization options are: Date and time. The calling station set the date of the called station. To be able to set the date and time, the called station needs the Alert driver option "Date and time updates enabled" to be selected. Configuration synchronization. If the local station is the main station, the synchronized data are the data associated to the called station. If the local station is a remote station, the synchronized data are its own data. For both case, we can send and/or receive all the configuration data or only the modified data (since the last synchronization). The synchronized data are the users, the call groups, the teams, the alarm groups, the on-call schedule and the tags. 5) Finally click on the Add button located below the station list. For a given station, only one programmed synchronization can be defined. But it is possible to define several periodic programmed synchronizations for the same station. To delete a programmed synchronization Select it in the programmed synchronizations list then click on the Remove button. To modify a programmed synchronization Select it in the programmed synchronizations list, modify the wanted parameters then click on the Add button. Remark: if the call type or the period of a periodic call is changed, a new programmed synchronization is created. 5-32 Configuration 5.10 Selection of an external tag This dialog box is used to browse and select an external tag to supervise. It can be called to define an external reference of tag, by selecting the command “Add a tag” in the contextual menus attached to the “Tags” tree of the main screen or its associated views. It also can be called to modify an external reference, by selecting the command “Definition” in the contextual menu attached to the tag views. Type Type of the server containing the tag to supervise: DDE : tag issued from a DDE server application OPC : tag issued from an OPC server application External : tag issued from a communication driver (logical or analogical I/O) Other other tag, updated by an external application (or by a specific mediator) ALERT : User Guide 5-33 Configuration Computer Name of the computer where is located the server which contains the tag. If the server is located on the local station, this field must be empty. Enter the name of the computer (or its IP address) or click on the button right of the field to select a computer of the network. on the This field is only displayed when the type of the server is DDE or OPC. It is not modifiable if the dialog box is called from a <data server name> view of the main screen. Driver Selection of the acquisition driver. Only the installed communication drivers which have capabilities of input acquisition (Advantech, ...) are proposed in the list. This field is only displayed when the type of the server is External. Server Designation / Selection of the DDE or OPC server. DDE Server: Enter the name of the DDE server or select it in the dropdown list. Only the active DDE servers are proposed in the list (if they properly answer to the requests for DDE server enumeration) or those which have been prior registered for NETDDE sharing. OPC Server: Enter the name of the OPC server or click on the button on the right of the filed to select one of the OPC server registered on the computer designated in the field Computer. This field is only displayed when the type of the server is DDE or OPC. It is not modifiable if the dialog box is called from a <data server name> view of the main screen. Topic Designation / Selection of the DDE topic or external module. DDE Server: Driver: Enter the name of the DDE topic or select it in the dropdown list if the DDE server designated in the field Server proposes a list of topics. Select in the dropdown list one of the subsets (card, module) proposed by the driver designated in the field Driver. This field is only displayed when the type of the server is DDE or External. It is not modifiable if the dialog box is called from a <data server name> view of the main screen. Item Designation / Selection of the tag. DDE Server: Enter the name of the DDE tag or select it in the dropdown list if the DDE server designated in the field Server proposes a list of tags for the topic designated in the field Topic. OPC Server: Enter the name of the OPC tag or click on the button on the right of the field to browse the server designated in the filed Server and running on the computer designated in the field Computer then select a tag. 5-34 Configuration Driver: Other: 5.10.1 Select in the dropdown list one of the tags proposed by the driver designated in the field Driver, for the subset designated in the field Topic. Enter the name of the tag, as it will be referred to by the external application (or the mediator) in the alarm commands. OPC server browsing To define an OPC tag, one can directly browse the database of the OPC server which contains the variable. This feature is only available with OPC servers that implement this service (IOPCBrowseServerAddressSpace interface). The left list displays a tree view of the variables proposed by the selected OPC server. To open a branch and browse its sub tree, click on the symbol displayed on the left of the branch name. The right list displays the variables contained in the branch selected in the tree. The dropdown list Property displays the properties defined for the variable selected in the list. By default, the Value property is selected (value of the variable). When a variable is selected in the right list, the selected property is automatically read from the OPC server. The read result is displayed below the list: Value of the property Type of the property (I1 ,UI1 ,I2 ,UI2 ,I4 ,UI4 ,R4 ,R8 ,CY ,DATE ,BSTR ,BOOL …) Authorized access (R, W, RW) Quality of the variable reading (Good, Bad, Not connected …). The controls displayed on the top of the dialog box allow the list of the proposed branches or variables to be limited according with the defined filters (and filtering performed by the OPC server): ALERT User Guide 5-35 Configuration Branch filter: restricts the branches displayed in the left list to those whose name corresponds to the typed string (can include the generic characters ‘*, ‘?’). Click on the adjacent Apply button to refresh the tree in accordance with the defined filter. Item filter: restricts the variables displayed in the right list to those whose name corresponds to the typed string (can include the generic characters ‘*, ‘?’). Click on the adjacent Apply button to refresh the list in accordance with the defined filter. Type: restricts the variables displayed in the right list to those whose type corresponds with the selected type. Click on the adjacent Apply button to refresh the list in accordance with the selected type. Access: restricts the variables displayed in the right list to those whose access mode corresponds with the selected access mode. Click on the adjacent Apply button to refresh the list in accordance with the selected access mode. 5-36 Configuration 5.11 Tag properties This dialog box defines the main properties of the supervised tags. It can be called from the configuration of supervision list, by clicking on the "Add..." button or the “Modify…” button in the dialog box displaying the variable list (see § Erreur ! Source du renvoi introuvable. “Erreur ! Source du renvoi introuvable.”). It also can be called from the contextual menu associated with the branch "Variables" in the screen of the main screen (see § 4.6.1.4 “Tags”). The external reference of the concerned tag is displayed in the title bar: DDE reference (under the form "server"|"topic"!"item"), OPC reference (under the form "server\tag") or simple name. ALERT User Guide 5-37 Configuration Type The type of tag defines the usage of the tag in the application. Variable Simple tag only declared to be able to get its value and that can be referenced in an alarm message (see Message format) or a contextual instruction file to display its current value. Event Variable associated with an event condition for recording of the changes of state of the event in the event log. A list of actions to execute (calls of groups or operators, commands …) can be associated with each change of state of the event (set, reset). An event is processed like an alarm if the "alarm enabled" option is checked. Acknowledg. Variable associated to an event condition, but used to bring up an acknowledgment request for the associated alarm group from a supervised device (acknowledgment hard button) or through a communication driver. If there is no alarm group designated for the variable, the field message must contain a valid operator name. This name will be used to search for and to acknowledge the oldest group in alarm for which a call has been transmitted to the operator in question. See note on the bottom of the page*. Option Not redundant A tag can be defined of non redundant type to specify, in the case of an installation of 2 stations in redundancy, that this tag is specific to the local station and that the automatic procedure of synchronization of the redundant stations should not recopy it on the distant station. Moreover, for the tag of the event type associated with a call group action, the activation of the non redundant event will always trig the call of the group, whatever is the activation status of the station. Name Alphanumeric identifier of the tag. By default, it is the external reference of the tag, displayed in the title bar of the dialog box (DDE or OPC reference or simple name). This name is this one which will be used to reference the corresponding tag from a client application of the OPC server of ALERT. Station The station defines a subset of the application corresponding to a specific entity, geographical (site) or organizational (company, trade ...). The definition of a station * Usage of an acknowledgment type tag When the tag is type acknowledgment, the change of state of the tag to the event state provokes the acknowledgment of all alarms belonging to the basic functional group associated with the tag. If there is no functional group associated with the tag, the field "Message" must contain the name of a valid operator in order to be able to search for the oldest alarm group transmitted to this operator and acknowledge alarms of this group (with the name of the operator in question). If a Call group action is defined, a call is triggered to the operators concerned by the acknowledgment of the associated alarm group, with transmission of the formatted message of the tag. Example 5-38 message format: message: associated group: message transmitted: "Acknowledgment of &G alarms by &M" "Peter HENRY" "Boiler room" "Acknowledgment of Boiler room alarms by Peter HENRY" Configuration makes it possible to separately treat subsets of tags and operators, with all associated information (on call schedule, alarm table, alarm history, event log). By default the tags are attached to the local station (first station displayed in the main screen). Group The group referred in this dialog box is the basic functional group to which the variable is attached. A functional group allows tags concerning a specific entity (machine, room, category ...) to be grouped. It makes it possible to organize and visualize alarms by groups (alarm table, alarm history) and to be able to execute certain treatments on the level of the groups (acknowledgment, masking, statistics ...). A tag can belong to several groups. The basic functional group, selected in this field, present some additional functionalities: Possibility of integrating the name of the basic group in the alarm message by inserting the string "&G" in the associated message format (see § 5.11.5 “Definition of message format”). Possibility of playing the audio message of the basic group before the audio alarm message, or in substitution if the alarm message is empty. Possibility of performing only one call for all alarms of the group when this option is enabled on the level of the call driver. Possibility of acknowledgment of the basic group of an alarm ordered from a driver (vocal ...). If this field is empty, the tag is attached to no basic group. The button on the right of the field gives access to the configuration of the properties of the selected group (see § 5.14 “Tag group properties”). Button Value... Click on this button to define the display format of the value of the tag and associated treatments. See § 5.11.1 “Format of a tag value”. DDE / OPC Polling If the reference of the tag is a DDE or OPC reference, the polling mode of the tag must be defined: Advise: When this option is checked, the tag will be put in permanent polling, by the means of a DDE or OPC ADVISE request near the concerned server. The supervised tag then will be automatically transmitted by the server to each change of its value, without any other request being necessary. Periodic Request: When this option is checked, the concerned tag will be the subject of explicit and periodic DDE or OPC requests. These requests make it possible to control that the supervised application is always active (watchdog). The polling period and the response timeout can be adjusted in the supervision options (see § 7.2 “Supervision options”). This option should be validated only for a restricted number of tags, insofar as the active polling is consuming resources and as it is not useful to test several variables to check that the supervised application is always active. On Group Alarm: When this option is checked, the concerned tag will make the object of DDE requests every time an alarm of the same functional group will change of state (activation or deactivation of alarm). ALERT User Guide 5-39 Configuration This option reduces the number of DDE transactions (economy of resources system), by regrouping alarms of the same group on one alarm ("OR" alarms) set in DDE advise. The real source of the alarm is provided by reading at this moment all tags of the group having option "On group alarm". Event The event condition defines the state in which the tag must be considered as an event. This condition can be logical (logical state represented by a name, mask of a logical state of the tag) or analogical (comparison with a value, in equality or going beyond of high or low threshold). To define an event condition, in reference to a value "X" of reference, the following operators are proposed: No event condition, event will be trigged from an external NONE application DIFFERENT Event if value is not equal to X EQUAL Event if value is equal to X HIGHER Event if value is higher than X LOWER Event if value is lower than X HIGHER SAME Event if value is higher than or equal to X LOWER SAME Event if value is lower than or equal to X AND Event if a bit defined as 11 into X is 1 into the value NOT AND Event if a bit defined as 1 into X is 0 into the value SUPVAR Event if the variable variation during a time of T seconds is higher than the value V. V and T are defined by the value X = “V;T” INFVAR Event if the variable variation during a time of T seconds is lower than the value V. V and T are defined by the value X = “V;T” (*) The state of a bit is defined by the corresponding bit in the value "X" converted in hexadecimal. Example: for the bit mask 00010000, translate in hexadecimal (10h), then type the value converted in decimal (16). The value "X" entered in edit field can be numeric (positive or negative, integer or float) or alphanumeric. A value is defined as numeric if it begins by one of the following characters: '+','-','0','1','2','3','4','5','6','7','8','9', or '.' If the value entered is alphanumeric, only the operators NOT EQUAL and EQUAL are available, the other operators being accepted but treated as EQUAL (HIGHER OR SAME, LOWER OR SAME) or NOT EQUAL (all the others). Warning: the definition of an alphanumeric value is only authorized when the tag has been defined with the “String” type (see § 5.11.1 “Format of a tag value”) Examples Event upon change to high state (non null): 1 The state of a bit is defined by the corresponding bit in the value "X" converted in hexadecimal. Example: for the bit mask 00010000, translate in hexadecimal (10h), then type the value converted in decimal (16). 5-40 Configuration (Condition proposed by default) Detection of crossing high threshold: The value to not to go across is 117,4. Remark: It is possible to supervise a high threshold and a low threshold for the same variable by defining 2 events with the same reference. An event will be associated to the high threshold crossing (as above) with the adequate messages. The other will be associated to the low threshold crossing (LOWER or INF EGAL) with correspondent messages. Supervision of a “watchdog” variable : If the variable does not change (at least 1 unit) during 3 seconds, the event is activated. The Transitory option indicates the transitory (or pulsed) state of an event. A transitory event (passage of door...) is only logged when changing to event state (not when returning to the normal state, this last being implicit). The Reactivable option indicates that the event can be reactivated without passing by a return to the normal state. A reactivable event is consigned to each change of state corresponding to an event condition. This option is necessary for example when the tag receives messages and must start a treatment each time it receives a message. The Schedule... button opens a dialog box to define time areas for event invalidation, alarm masking or call inhibition. See § 5.11.2 “Event schedule”. When the event invalidation, alarm masking and call inhibition schedule is active, a green led is displayed on the button. Alarm The Alarm enabled option indicates that the event will be processed as an alarm: recording in the alarm table and alarm history, acknowledgment required, possibility of masking. The Priority parameter defines the priority level of the alarm. The priority level determines the order of alarms in the alarm table (and therefore the transmission order of messages), the most important alarms being at the head, as well as the order of the calls when several alarms are detected simultaneously. The priority level also conditions the call processing. If the priority level is lower than the minimal level defined in the alarm options (see § 7.4 “Alarm options”) for "reduced duty" period, and if the attached on-call group is in a "reduced duty" period when the event is detected, the call will be delayed until the end of this period (unless alarm is acknowledged meanwhile). ALERT User Guide 5-41 Configuration The priority level can be defined between "0" and "9999". By default, "0" is the lowest priority. However, the priority order can be reversed in the general alarm options. The parameter Period for automatic priority increment allows the alarm priority to be dynamically incremented by defining a cycle of automatic increment of the alarm priority when the alarm is waiting for transmission. When the Default option is selected, the cycle value is that which has been defined at the level of the data server. The value 0 invalidates the automatic increment of the priority. The field Alarm masked by defines an alarm tag which will automatically mask the alarm defined in the dialog box when it will be in alarm state ("alarm" option) or in normal state ("normal" option). When the Alarm option is checked, the alarm defined in the dialog box will be automatically masked if the tag referenced in the edit field is in alarm state. This avoid alarm avalanche in certain circumstances (power failure for example). The alarm masked by an active alarm is processed as a simple event (only recorded in event log). When the Normal option is checked, the alarm defined in the dialog box will be activated only when the tag referenced in the edit field is in alarm state (alarm masked by normal state of the other alarm). This allows an alarm to be activated only when two alarms are simultaneously active (AND of two alarms). To define a masking tag, click on the button on the right of the field and choose the wanted tag in the displayed list. The "mask" tag must have been beforehand defined. The Ack... button gives access to the configuration of the acknowledgment conditions of the alarm by DDE or OPC and to the definition of the autoacknowledgment properties of the alarm. See § 5.11.3 “Properties of alarm acknowledgment”. The Mask... button gives access to the configuration of the masking conditions of the alarm by DDE or OPC. See § 5.11.4 “Properties of alarm masking”. Associated information With each change of state of the event (activation, return to the normal state, alarm acknowledgment), numerical, alphanumeric and vocal messages can be associated. The long message is used to identify the event in the event log and the alarm table and for all media accepting alphanumeric messages (SMS, paging systems, fax...). It can contain up to 512 alphanumeric characters, the number of characters typed being displayed in bracket on the right of the field title. This message can be formatted at the time of the event to include information associated with (group, code, reference, priority, value) or the current value of other variables. Click on the Format button to define the format associated with the message (see § 5.11.5 “Definition of message format”). The short message is used to identify the alarm in the messages which can only be transmitted under the form of a few characters message, often numerical (beeper…). This message is automatically assigned at the time of the creation of the tag, under the form of a numerical code. It can be modified (1 to 32 characters), no numerical 5-42 Configuration characters being accepted, however being careful that these characters are allowed by the transmission system used for the messages. Call forward: the short message also can be used to define a telephone number or an operator name to call back. In this case, the code (or operator name) must be preceded by the character "!". After the called operator, following the activation of the corresponding alarm or event, has listened to the associated audio message, the number specified in this field is automatically called back, followed by the call forward. A vocal message can be associated with the variable to identify the event during telephonic communications. It can also be played locally at the time of the event if the PC is provided with a sound card and if the option “play vocal message” is validated in alarm options (see § 7.4 “Alarm options”). Click on the Browse... button to browse files for a sound file containing a prerecorded audio message. It can be a message recorded by telephone and stored in the “MESSAGE” subdirectory, with a name under form “MTxxxx.WAV”, “xxxx” being between “0000” and “9999”. Click on the Record… button to directly record an audio message. The name of the created sound file is automatically generated under the form “MAxxxx.WAV”, “xxxx” being a numeric code between “0000” and “9999”. This button can be used also to modify an audio message already recorded (silence truncation at end of the message for example). Click on the Listen button to play on the sound card of the PC (if it exists) the audio message associated with the event. Remark: When the “Text To Speech” option is validated, the vocal message can be synthesized directly from the formatted alphanumeric message. This synthesis is performed every time the tag goes to the event state, what makes possible to vocally time stamp the event (on option) and to include dynamic information in the vocal message (value of the tag or other tags). To test the voice synthesis of the typed message (with the current formatting parameters) click on the Listen button. A text file can be associated with the event when it is defined as an alarm. This file allows instructions or contextual information concerning the event to be transmitted with the alarm message. It is used to display information (instructions) in the alarm table and to transmit these information by fax or by email. Click on the Edit… button to directly enter the text to transmit. This text is recorded in the MESSAGE subdirectory, under the form of a text file whose name is affected automatically with the “INSTxxx.TXT” format, “xxxx” being a numeric code between “0000” and “9999”. See § 5.11.6 “Edition of instruction file”. Click on the Browse… button to browse files for an existing text file on the disk. Language Transmitted information (long and short messages, message format, vocal message, text file) can be defined in various languages, the information really transmitted being automatically selected according to the language of the addressed operator. The list of tabs displayed above the edit field “Long message” allows the selection of the typing language. The proposed languages are those which are already used (user interface language, language of defined operators). ALERT User Guide 5-43 Configuration To add a language to the proposed list, click on the button on the right of the language tabs then select the wished language in the displayed list. To suppress a language, click on the same button, select the language to suppress then click on the “Mask” button. Actions For each change of state of the event (event activation, event reset, alarm acknowledgment), a list of actions can be defined. The possible actions are: Call group call the group designated in the 2nd column with option of inhibition (1), delayed call (indicated in the 3rd column) or relief call (signaled in the 3rd column). Call user call the user (2) designated in the 2nd column with option of forcing the called number (indicated in the 3rd column). Execute script execute the message processor script (3) designated in the 2nd column. Execute command execute the command designated in the 2nd column with option of forcing the written value (indicated in the 3rd column). Stop command stop the execution of the command designated in the 2nd column. Execute application launch the application designated in the 2nd column. Play tone play the sound file attached to the called group or designated in the 2nd column. Play vocal message play the vocal message attached to the alarm or designated in the 2nd column (wave file or text to synthesize). (1) The action "Call group" attaches the tag to the designated group and consecutively authorizes the users of the group in question to have access to that tag (for status consultation and acknowledgment). If the tag must be accessible to a group that we do not want to call, a call group action with call inhibition must nevertheless be defined. (2) The action "Call user" produces a type "service message" call but does not attach the tag to the called user. If the user does not belong to any of the groups to call, he will not have access to the tag (status consultation, acknowledgment). (3) A script can be used to parse the event and consecutively activate alarms or to trig actions in response to the event. Only the Message Processor scripts that are defined with the "Alarm" interface can be executed. These scripts are started at the software launching time and have to block themselves for waiting the event (instruction RECEIVEALARM). Click on the Add… button to add an action to the action list. Click on the Edit… button to modify the action selected in the action list. Click on the Delete button to remove the action selected from the action list. Use the buttons and in order to respectively move up or down the action selected in the action list. The actions are simultaneously executed regardless of the others, but the execution order is the list order. 5-44 Configuration 5.11.1 Format of a tag value This dialog box, called during the configuration of an event (see above), defines the format to use to display the value of the tag in the tables and views of the main screen and in the transmitted messages. Value type This option defines the type of the tag: String or Numeric. By default the tag as the numeric type and consecutively does not accept a string to be typed as event condition. Bit mask This field allows the automatic extraction of a bit field from the source value and the replacement of the original value by the value contained in the bit field. It is validated only for the variables of numeric type. Define in this field the binary mask that localizes the bit field in the source value. For example, 1 to extract the bit 0, 2 to extract the bit 1, 4 to extract the bit 2, 6 to extract the value of bits 1 and 2, etc. The mask is defined in decimal. By default, the value 0 means no bit extraction has to be performed. Example: Source value = 18 (16 in hexadecimal) Mask = 0 -> Value = 18 Mask = 1 -> Value = 0 Mask = 2 -> Value = 1 Mask = 6 -> Value = 3 Mask = 16 -> Value = 1 ALERT User Guide 5-45 Configuration Display format This format (type Excel) can contain any alphanumeric character with the following specific treatments: # display only significant digits (non significant zeros are not displayed). 0 (zero) display non significant zeros if a number has less of digits than there is zeros in the format If the format string begins with the following characters, a conversion is first performed on the original value: \H conversion to hexadecimal format, using the characters A-F (30 -> 1E). \h conversion to hexadecimal format, using the characters a-f (30 -> 1e). \B conversion to binary format (31 -> 11110). \b idem \B. Examples: # ###,# #,000 0,# #,0# #,0 °C \H# \H000# \B# \B0000000# 1234,56 8,9 631 12 1234,568 25 25,678 displayed displayed displayed displayed displayed displayed displayed under under under under under under under the the the the the the the form form form form form form form 1 234,6 8,900 0,6 12,0 1234,57 25,0 °C 25,7 °C 47 47 47 47 displayed displayed displayed displayed under under under under the the the the form form form form 2F 002F 101111 00101111 This format can be entered or selected in the dropdown list among the existing formats (already defined). Invalid value treatment Check the Invalid value displayed as option to display a specific label for the tags whose value is invalid or uncertain (disconnected tag or defect sensor). The label to display is defined in the field below. This label can be entered or selected in the dropdown list among the existing labels (already defined). When the Link failure if invalid tag value option is activated, a link failure is set on tags with invalid values despite a successful connection, following for example a bad quality in OPC. If the Default choice is selected, the option is set from the data server property. 5-46 Configuration 5.11.2 Event schedule This dialog box, called during the configuration of an event (see above), defines time areas for event invalidation, alarm masking or call inhibition. Event masked During the Event masked time areas, the event (or alarm) is completely ignored (no trace in the event log). Remark: An event trigged during a masking period will not be detected at the end of the masking period, even it is yet active at this time. A new activation of the event, out of the masking period, will be necessary to provoke the consequent treatments. Alarm masked During the Alarm masked time areas, the alarm is automatically masked. The treatment performed on the alarm activation is the same as for the masked alarms (trace "event" in the event log, masking in the alarm table, actions disabled). Call disabled During the Call disabled time areas, the event (or alarm) is normally processed, but the call actions (group or user) are disabled. Schedule The schedule of an event can be selected in the dropdown list among schedules which were beforehand defined for other events. The choice (none) means that there is no schedule associated with the event (choice by default). To define a new schedule, first select, if possible, schedule closest to that desired. Click on the button on the right of the dropdown list then select in the displayed menu the command New. After having entered the name of the new schedule, draw the desired schedule in the time table then validate by clicking on the OK button. ALERT User Guide 5-47 Configuration The name of the selected schedule can be modified by selecting the command Rename in the menu which is displayed when clicking on the button on the right of the dropdown list. The command Remove of the same menu delete the selected schedule. This deletion will affect alls the tags which share this schedule. Schedule activation Check the Schedule activation checkbox to activate the configured schedule. Time table To define a time area of masking or inhibition, select the desired type of masking or inhibition in the list top. Bring the mouse pointer on the timetable, on the cell corresponding to the week day and begin time of the wanted time area, press the left button of the mouse, then drag the mouse pointer, keeping the button pressed, to the cell corresponding to the last hour of the last day of the chosen time area. Finally release the button. To erase a time area, redo the same operation, but by using the right button of the mouse. Note: holidays are defined in the general on-call schedule by clicking on the first column of the row corresponding to the wished day. 5.11.3 Properties of alarm acknowledgment This dialog box, called during the configuration of an event (see above), defines the conditions of the acknowledgment of an alarm by DDE or OPC. It also defines the auto acknowledgment properties of the alarm. Reference of alarm item This field displays the reference of the event which one wishes to define acknowledgment conditions. Acknowledgment condition The acknowledgment condition is the state which indicates that the alarm is acknowledged in the external application. This condition can be logical (logical state 5-48 Configuration represented by a name, mask of a logical state of the tag) or analogical (comparison with a value, in equality, threshold condition). To define an acknowledgment condition, in reference to a “X” value, the following operators can be used: NONE No acknowledgement condition is defined (by default) NOT EQUAL Acknowledgement if value is not equal to X EQUAL Acknowledgement if value is equal to X HIGHER Acknowledgement if value is higher than X LOWER Acknowledgement if value is lower than X HIGHER SAME Acknowledgement if value is higher than or equal to X LOWER SAME Acknowledgement if value is lower than or equal to X AND Acknowledgement if a bit defined as 11 into X is 1 into the value NOT AND Acknowledgement if a bit defined as 1 into X is 0 into the value (*)The state of a bit is defined by the corresponding bit in the value "X" converted in hexadecimal. Example: for the bit mask 00010000, translate in hexadecimal (10h), then type the value converted in decimal (16). The reference value "X" can be numeric (positive or negative, integer or float) or alphanumeric. A value is defined as numeric if it begins by one of the following characters: '+', '-', '0', '1', '2', '3', '4', '5', '6', '7', '8', '9' or '.' If the reference value is alphanumeric, only the operators NOT EQUAL and EQUAL are available, the other operators being accepted but treated as EQUAL (HIGHER OR SAME, LOWER OR SAME) or NOT EQUAL (all the others). The tested variable is that defined by the selection Reference of acknowledgment item. This item can be different or identical to the item referenced to define the event. Example of utilization of the simultaneous transmission in the same variable of an alarm condition and an acknowledgment condition: This example corresponds to the following table: 0 No alarm 1 Acknowledged alarm 2 Alarm reset but not acknowledged 3 Alarm not acknowledged 1 The state of a bit is defined by the corresponding bit in the value "X" converted in hexadecimal. Example: for the bit mask 00010000, translate in hexadecimal (10h), then type the value converted in decimal (16). ALERT User Guide 5-49 Configuration Send acknowledgments This option enables, when checked, the transmission to the supervised application of the acknowledgments performed through ALERT, locally, by telephone or from a remote terminal. This transmission corresponds to a DDE or OPC write command of the value defined as acknowledgment condition. That supposes that the supervised application is able to interpret the write of value in the item in question like an acknowledgment command. If the definite value is not numeric, the acknowledgement is required, for acknowledgment conditions EQUAL, HIGHER SAME, LOWER SAME, by transmission of the associated string, and for the other conditions, by transmission of an empty string. If the definite value is numeric, the following treatment will be made, in function of the acknowledgment condition: EQUAL, HIGHER SAME or LOWER SAME Transmission of the associated value. NOT EQUAL or HIGHER Transmission of the value + 1. LOWER Transmission of the value – 1. AND Transmission of the result of LOGICAL OR between the current value of the variable and the mask defined by the associated value. NOT AND Transmission of the result of LOGICAL AND between the current value of the variable and the inverse of mask defined by the associated value. Reference of acknowledgment item This group defines the item of the supervised application which contains the acknowledgment information in reading and, if the option Send acknowledgments... is validated, the control of acknowledgments in writing. By default the reference of the event tag is proposed. Alarm acknowledgment on alarm reset When this option is selected (choice Yes), the alarm will be automatically acknowledged when the alarm condition disappears (event reset). The choice Default means that the option value is defined by the general option for automatic acknowledgment on event reset defined in alarm options (see § 7.4 “Alarm options”). Alarm acknowledgment on group warned When this option is selected (choice Yes), the alarm will be automatically acknowledged when the associated on call group (or the first group if several groups are called) was informed successfully. The choice Default means that the option value is defined by the general option for automatic acknowledgment on group warned defined in alarm options (see§ 7.4 “Alarm options”). 5-50 Configuration 5.11.4 Properties of alarm masking This dialog box, called during the configuration of an event (see above), defines the conditions of the masking of an alarm by DDE or OPC. Reference of alarm item This field displays the reference of the event which one wishes to define masking conditions. Masking condition The masking condition is the state which indicates that the alarm is masked in the external application. This condition can be logical (logical state represented by a name, mask of a logical state of the tag) or analogical (comparison with a value, in equality, threshold condition). To define a masking condition, in reference to a “X” value, the following operators can be used: NONE No masking condition is defined (by default) NOT EQUAL Masked if value is not equal to X EQUAL Masked if value is equal to X HIGHER Masked if value is higher than X LOWER Masked if value is lower than X HIGHER SAME Masked if value is higher than or equal to X LOWER SAME Masked if value is lower than or equal to X AND Masked if a bit defined as 11 into X is 1 into the value NOT AND Masked if a bit defined as 1 into X is 0 into the value (*)The state of a bit is defined by the corresponding bit in the value "X" converted in hexadecimal. Example: for the bit mask 00010000, translate in hexadecimal (10h), then type the value converted in decimal (16). 1 The state of a bit is defined by the corresponding bit in the value "X" converted in hexadecimal. Example: for the bit mask 00010000, translate in hexadecimal (10h), then type the value converted in decimal (16). ALERT User Guide 5-51 Configuration The reference value "X" can be numeric (positive or negative, integer or float) or alphanumeric. A value is defined as numeric if it begins by one of the following characters: '+', '-', '0', '1', '2', '3', '4', '5', '6', '7', '8', '9' or '.' If the reference value is alphanumeric, only the operators NOT EQUAL and EQUAL are available, the other operators being accepted but treated as EQUAL (HIGHER OR SAME, LOWER OR SAME) or NOT EQUAL (all the others). The tested variable is that defined by the selection Reference of masking item. This item can be different or identical to the item referenced to define the event. Transmits masking actions to the server This option enables, when checked, the transmission to the supervised application of the masking actions performed through ALERT, locally, by telephone or from a remote terminal. This transmission corresponds to a DDE or OPC write command of the value defined as masking condition. That supposes that the supervised application is able to interpret the write of value in the item in question like a masking command. If the definite value is not numeric, the mask activation is required, for masking conditions EQUAL, HIGHER SAME, LOWER SAME, by transmission of the associated string, and for the other conditions, by transmission of an empty string. If the definite value is numeric, the following treatment will be made, in function of the masking condition: EQUAL, HIGHER SAME or LOWER SAME Transmission of the associated value. NOT EQUAL or HIGHER Transmission of the value + 1. LOWER Transmission of the value – 1. AND Transmission of the result of LOGICAL OR between the current value of the variable and the mask defined by the associated value. NOT AND Transmission of the result of LOGICAL AND between the current value of the variable and the inverse of mask defined by the associated value. Reference of masking item This group defines the item of the supervised application which contains the masking information in reading and, if the option Transmits masking... is validated, the control of masking actions in writing. By default the reference of the event tag is proposed. 5-52 Configuration 5.11.5 Definition of message format This dialog box, called during the configuration of an event (see above), defines a character string which will be used to format the alarm message (or reset or acknowledgement message) of a specific tag. If the format string is empty (default value), the used format will be the default format, defined in the alarm options (see § 7.4 “Alarm options”). Item reference This field displays the reference of the tag of which one wishes to define the message format. Message format The message format defines a composite message that will be created at the time of the alarm (or reset or acknowledgment). This format can be selected in the dropdown list among the already defined formats or directly entered in the edit field. Syntax The format can contain some invariant parts, reproduced as they are, and some variable parts, that make reference to parameters of the alarm, by using the following syntax: &M This field will be replaced by the alphanumeric message (long message) defined for the tag. &R This field will be replaced by the external reference of the tag (DDE/OPC reference or other). ALERT User Guide 5-53 Configuration &O This field will be replaced by the unique numeric ident²ifier of the tag (OID). &N This field will be replaced by the name of the tag. &J This field will be replaced by the name of the data server of the tag. &C This field will be replaced by the alarm code (short message) defined for the tag. &S This field will be replaced by the current value of the station name. &P This field will be replaced by the value of the alarm priority. &G This field will be replaced by the name of the alarm group associated with the tag. &A This field will be replaced by the name of the call group associated with the tag. &V This field will be replaced by the value of the tag at the event time. &V* This field will be replaced by the current value of the tag. &L This field will be replaced by the current value of the station name, only if the station is not the local station. &U This field will be replaced by the name of the user who acknowledged the alarm. &D This field will be replaced by the date and time of the alarm with the format "MM/DD/YY HH:MM/SS". &[ref] This field will be replaced by the value of the tag referenced by "ref" (reference in the supervision list), at the event time. &(id) This field will be replaced by the value of the tag identified by "id" (identifier in the supervision list), at the event time. &(id)* This field will be replaced by the current value of the tag identified by "id" (identifier in the supervision list), at the time of the message transmission. The buttons allow the value of a contextual variable to be inserted (current value or value at the alarm time) more easily than by entering the syntax “&[ref]” or “&(id)” as described above. After clicking on this button, select in the displayed list the wanted variable, then validate. The selected variable will be inserted automatically in the text, with the syntactic form “&(id)”, at the end of the text already entered in the format edit field. Note: the fields &V, &V*, &(id), &(id)*, &[ref] can be followed up by a display format in square brackets. The display format defined here is the same as this defined for the display format of a tag (see § 5.11.1 “Format of a tag value”). If a display format is defined at the level of the inserted value, it is replaced by the format defined here. Example: &V[#.0] The value 12 will be replaced by 12.0 Button Preview Click on this button to have a preview of the message generated with the definite format. The displayed parameter values are the current values. The item reference is the reference of the variable of which one wishes to define the message format. 5-54 Configuration 5.11.6 Edition of instruction file This dialog box allows the edition of the instruction file that will be transmitted on alarm or user message sending (manual or programmed call). It can be called from the dialog boxes of definition of the tag properties (see § 5.11 “Tag properties”), of configuration of the programmed calls (see § 5.7 “Programmed Calls”) or of message transmission (see § 6.11 “Sending a message”). Event This field displays the reference of the alarm of which one wishes to edit the instruction file. If the file is attached to a service message, this reference is replaced by "Service Message ". The associated alphanumeric message, previously defined for the alarm variable or for the message to send, is displayed in the first edit field. This message is not modifiable here. Contextual File This option indicates that the edited file can include some contextual information (prefixed by “&”), and that these information should be automatically updated at the time of the associated alarm (or at call time if the file is associated with a service message or a programmed call). File content The multi-lines edit field allows the wanted text to be entered. This text can include tabulations and carriage returns. If the Contextual File option is checked, the text can contain fields of type “&[ref]” or “&(id)”, “ref” designating the alphanumeric reference of the tag, “id” its numeric identifier. ALERT User Guide 5-55 Configuration By clicking on the button , then by selecting the wanted tag in the displayed list, one can create automatically a field of type “&(id)”. These fields will be replaced at the alarm time by the current value of the tag designated by its reference “ref” or its identifier “id”. The referenced tags must have been previously defined in the list of tags to supervise. NOTE When the file is intended for transmission to a fax, it is possible to incorporate one or several bitmaps in the instruction file by inserting to the wanted line for each bitmap a line with the following format: &F<FILE>[,<H>[,<P>]] with: <FILE> <H> (optional) <P> (optional) Example: &FTest.BMP &FTest.BMP, 20, R &FC:\Test2.BMP, 0, L Name of the bitmap file (relative name or full path). Height of the bitmap in mm, 0 by default to use the originated dimension of the bitmap. When the bitmap is resized in height, its width is proportionally adapted. Position of the bitmap on the line : L for left alignment, R for right alignment, centered by default. File "Test.BMP" (in Alert directory) centered on the line with originated size File "Test.BMP" (in Alert directory) right aligned and resized for height of 20 mm File " C:\Test2.BMP" left aligned with originated size This bitmap file can be dynamically created by the curve mediator (M_CURVE.DLL) to draw a curve from a set of values contained in a text file of same name and located in the same directory but with an extension ".txt". The text file contains a line by point of the curve with the format : <TIME><SEP><VALUE> with: <TIME> <SEP> <VALUE> recording time of the value (format HH:MM) separator (tabulation) point value Example: 00:19 56.5 The curve format is configurable in the curve mediator. 5-56 Configuration 5.12 Station properties This dialog box defines the properties of a station. It is called from the tree of the main screen (see § 4.6.1.2 “Station”). Name Name of the station. This name must be unique in the list of stations. Numeric identifier The numeric identifier is the code to enter, at the beginning of a telephonic communication, just before the ID code of the operator to identify the station to which the calling or called operator is attached. This code is only needed on main stations which have set a non null length for the station identifier in the vocal server dialog box (see § 7.8.1 “Vocal Server options”). In the opposite case, this field is grayed. Tag number The field Current displays the number of tags that are declared in the station. The field Maximum displays the maximum number of tags authorized for the station. For the basic station (1st station in the tree), it’s the maximum number of tags authorized by the license. This number cannot be modified (grayed field). For other stations, another value can be selected in the dropdown list. The proposed values depend on the software license. Call disabled When this option is checked, alarm calls issued from the station are disabled (ca call performed). This state is signalled by a red crossbar on the station icon ( ). Main station Type of the station. A main station receives the configurations of the remote stations. During the synchronizations, the exchanged data are the data attached to the remote stations. ALERT User Guide 5-57 Configuration This option is displayed only when the Alert stations option is checked in the general options (see § 7.1 “General options”) and only for the local station (first station of the tree in the main screen). Display Display options for the remote station in the tree of the main screen. The "Display supervision" option validates the display of the "Supervision" branch in the sub-tree attached to the station. The "Display on-call" option validates the display of the "On-call Management" branch in the sub-tree attached to the station. This choice is only possible on the station of type "Alert station". Icon Representation of the station in the supervision tree. Click on the Modify... button to select another representation (small and large icon). 5.13 Data server properties This dialog box defines the properties of a data server. It is called from the tree of the main screen (see § 4.6.1.5 “Data servers”). Identification The field Identifier defines the external reference of the data server ((<Server>|<Topic> for the DDE servers, <Server> for the OPC servers, simple name in other cases). This field is not modifiable. 5-58 Configuration The field Name defines the name that will be used to designate the data server on the display of the user interface or to reference it through the OPC server of ALERT. By default, it contains the same label than the identifier field. However it can be modified to define an alias to the identifier, particularly if the data server has to be referenced through the OPC server of ALERT that generally does not authorize the original name (name of DDE or OPC server). The OPC reference of the data server notably allows its status to be controlled (connected, failure…) from an external OPC client application. Polling of server data This option defines the polling mode of the data server. If the option Always is selected, the data server always establishes links with its data source, any is the active status of the station. If the option Only active station is selected, the data server establishes links with its data source only when the station is active (“Alert” led in green). When the Default option is selected, the polling mode of the data server is that which has been defined by default in the supervision options. Link failure if invalid tag value This option defines the default treatment for invalid value of the tags of the data server. It only concerns the tags of the data server for which the treatment of invalid values has not been specifically redefined. If this option is active, a link failure is automatically set when the value of a tag of the data server is declared invalid, despite a successful connection, following for example a bad quality indication from OPC server. If the Default choice is selected, it’s the general supervision option which defines the behaviour in case of invalid value. Dynamic priority management This parameter allows the alarm priority to be dynamically incremented by defining a cycle of automatic increment of the alarm priority when the alarm is waiting for transmission. The value 0 invalidates the automatic increment of the priority. This option only concerns the tags of the data server for which this parameter has not been specifically redefined. When the Default option is selected, the cycle value is that which has been defined at the level of the general alarm options. Icon Representation of the data server in the supervision tree. Click on the Modify... button to select another representation (small and large icon). ALERT User Guide 5-59 Configuration 5.14 Tag group properties This dialog box defines the properties of a functional group. It can be called either from the « Groups » branch of the supervision tree of the main screen or from any other defined group branch (see § 4.6.1.6 “Tag groups”), or from the property dialog box of a tag (see § 5.11 “Tag properties”). Group Name This name identifies the group. It must be unique among the groups of same level (groups having the same parent). Station This field displays the name of the station to which it is attached. Display Graphical representation of the group in the supervision tree (small and large icon). Click on the Modify... button to select another icon. Associated vocal message This field defines the name of an audio file containing the voice message associated with the group. If the typed text is not ended by ".WAV", the text will be automatically synthesized (if the Text To Speech option is active) in order to produce the voice message associated with the group. The sound file can be selected among the existing files by clicking on the Browse... button or directly recorded by clicking on the Record... button. Click on the Listen button to listen to the selected vocal message. 5-60 Configuration Note: The vocal message associated with the group is used to designate the basic group of an alarm in the vocal alarm messages. It is played before the vocal message associated with the tag in alarm. If there is no vocal message associated with the tag, the identification message of the group is played alone. Language The vocal message associated with a group can be defined in various languages, the message really transmitted being automatically selected according to the language of the recipient operator. The proposed languages are those which are already used (user interface language, language of defined operators). To add a language to the proposed list, click on the button on the right of the language tabs then select the wished language in the displayed list. To suppress a language, click on the same button, select the language to suppress then click on the “Mask” button. 5.15 Definition of actions 5.15.1 Call group The Call group action causes the call of the group selected in the Group to call dropdown list with option of inhibition or delay. Note: this action implicitly authorizes the users of the designated group to have access to the tag (consultation, acknowledgment). It is the only way of associating a tag with a group. To authorize a group which should not be called, to have access to the tag, a call action for the group in question must be defined with invalidation of the call. Group to call This dropdown list designates the on call group to call. Select this group in the list of the defined groups by clicking on the arrow of the dropdown list. ALERT User Guide 5-61 Configuration If the desired group does not exist, type its name in the edit field. An empty group is automatically created. It will be necessary to return later to the group configuration to assign users and organize the teams. Call enabled When this option is checked, the group will only be called in case of call failure of a previous group in the action list. When starting the call cycle, all the actions described in the action list (scenario) are triggered simultaneously. If a group is specified as to be called as relief group, this action and the next actions of the list are not triggered. They will only be triggered if a call from a preceding group in the list fails. In this case the execution of the scenario continues from the suspended group call until the end of the list, or a new group designated as relief. This feature allows you to define several relief groups for an alarm, with different reliefs for the same group according to the alarm. Example: Alarm 1: call group G1, if call failed call group G2, if call failed call group G3 Alarm 2: call group G1, if call failed call group G3. Call enabled This option can be used to validate or invalidate the call. The "Default" choice is only enabled for calls on reset or acknowledgment. When this choice is done, the call option is given by the corresponding option in the general alarm options. For the calls on event activation, the call invalidation allows a group to be attached to a tag (for consultation and acknowledgment by the users of the designated group) without having to call the group in question. Call delayed This option allows the call to be delayed during the time indicated in the adjacent edit field. It is only available for the events defined as alarms. If this option is validated, the detected alarm will be processed as others (event log, alarm table…), but the call will be triggered at the end of the time specified in the adjacent field, and only if the alarm is still active at the end of this time. If the alarm is reset before the end of the specified timeout, then it is automatically acknowledged and no call is triggered. This option allows the filtering of events that are not important when they are temporary (short power fail on an installation protected by a UPS for example). A) Call on event activation If the tag is defined as alarm, the alarm detection triggers the call of users of the designated group for transmission of the information associated with the alarm (numeric, alphanumeric or vocal message, text file). The call will be reiterated so long that the group will not be considered as warned (messages transmitted and call acknowledged). If the variable is not defined as alarm (simple event), the detection of the event triggers the call of the main users (not relief users) of the active team of the designated group for transmission of the information associated with the event (numeric, alphanumeric or vocal message, text file) under the form of a service message (no call of relief users if failed, no call acknowledgment). 5-62 Configuration If the variable is defined as acknowledgment, the event triggers a call of the users concerned by the acknowledgment of the associated basic alarm group, with transmission of the associated formatted message, independently of the designated on-call group. Example format message: message: associated group: message transmitted: "Acknowledgment of &G alarms by &M" "Peter HENRY" "Boiler room" "Acknowledgment of Boiler room alarms by Peter HENRY" B) Call on event reset If the call on reset is validated for an event, only users of the selected on call group having their "call on reset" option validated will be effectively called. The reset of the event triggers the call of the main users (not relief users) of the active team of the designated group for transmission of the information associated with the event reset (numeric, alphanumeric or vocal message, text file) under the form of a service message (no call of relief users if failed, no call acknowledgment). If the variable is defined as alarm, the call on reset is done only if at least one call has been triggered after the alarm detection. C) Call on alarm acknowledgment If the call on acknowledgment is validated for an event, only users of the selected on call group having their "call on acknowledgment" option validated will be effectively called. The acknowledgment of the alarm triggers the call of the main users (not relief users) of the active team of the designated group for transmission of the information associated with the alarm acknowledgment (numeric, alphanumeric or vocal message, text file) under the form of a service message (no call of relief users if failed, no call acknowledgment). The call on acknowledgment is done only if at least one call has been triggered after the alarm detection. 5.15.2 Message to user The Call User action provokes the call of the user selected in the User to call dropdown list with option of forcing the called number. ALERT User Guide 5-63 Configuration Note: so that the user can consult the tag or acknowledge the alarm, the tag has to be attached to one of the on call groups which the user belongs, by defining an a "call group" action for the group in question. If the operator does not belong to any the groups to be called, he will not have access to the tag. User to call This dropdown list designates the user to call. Select this user in the list of the defined users by clicking on the arrow of the dropdown list. On event activation (or reset or acknowledgment following the selected tab), the designated user will receive a call of type "service message" with the formatted message which corresponds to the selected tab. Programmed number When this option is checked, the call of the user is processed by using the number that is active at the call time, with possible call of the relief number in case of failure. Designated number When this option is checked, the call of the user is processed by using the number which is explicitly designated in the list below. In case of failure, there is no possible call of the relief number. 5.15.3 Execute script The Execute script action executes the message processor script selected in the Script to execute dropdown list. Script to execute This dropdown list designates the treatment of the Message Processor that will be triggered every time the event is set (or reset or acknowledged following the selected tab). This treatment can be used to parse the event and consecutively activate alarms or to trig actions in response to the event. Only the Message Processor prototypes that are defined with the "Alarm" interface are proposed in the list. The associated scripts are started at the software launching time and have to block themselves for waiting the event (instruction RECEIVEALARM). 5-64 Configuration 5.15.4 Execute command The Execute command action executes the command selected in the Command to execute dropdown list with option of forcing the written value. Command to execute This dropdown list designates the command to execute. Select this command in the list of defined commands, by clicking on the arrow of the dropdown list. Button Add... If the wished command does not exist in the list, click on this button to create a new command and add it to the list (see § 5.16.2 “Command definition”). Button Edit... To modify the parameters of the selected command, click on this button (see § 5.16.2 “Command definition”). Button Delete Click on this button to delete the selected command. Button Test Click on this button to test the selected command. Value (default) The value defined in this field is the value which will be transmitted in all the requests of writing which make the command and for which no value is not explicitly defined. This option makes it possible to use generic commands for definition of outputs to control and to parameterize the transmitted value at the time of the action. The forced value can contain variable fields that will be updated at the time of event activation (or reset or acknowledgment following the selected tab). Click on the button to integrate the value of a supervised tag in the default value transmitted by the command. In the displayed dialog box, select the wished tag then validate. The numerical identifier of the tag is inserted in the edit field at the current cursor position, under the form: &(tag id). ALERT User Guide 5-65 Configuration 5.15.5 Stop command The Stop command action stops the execution of the command selected in the Command to stop dropdown list. Command to stop This dropdown list designates the command to stop. Select this command in the list of defined commands, by clicking on the arrow of the dropdown list. This action can be use, for example, to abort on event reset or alarm acknowledgment a temporized command that was activated on alarm detection. 5.15.6 Execute application The Execute application action launches the application or URL designated in the Open application or document dropdown list. The defined command line will be executed on activation of the event (or reset or alarm acknowledgment according to the selected tab). It can be executed for test by clicking on the "Test" button. Open application or document This dropdown list designates the application to execute or the document to open. Type in this field a command line which designates an application (with its possible 5-66 Configuration parameters) or a document. The application or document must be typed with their full path. The command lines that have been already defined are registered and can be directly selected by clicking on the arrow of the dropdown list. This field also can define a web page by its URL (http://...). This web page will be automatically displayed when executing the action, in an independent browser window or in the supervision plug-in of Alert, according with the option below. When an URL is defined as action for the associated tag, the corresponding web page can also be directly displayed from the user interface of Alert by clicking in the list with the right button of the mouse on the tag in question then selecting the command “Display the attached web page…” in the contextual menu. Button Browse... The application or the document can be searched and selected by clicking on this button. Show URL in plug-in “Supervision” This option is only validated (not grayed) when the application defined in the edit field above is an URL (name beginning with “http://”). When this option is checked, the URL will be displayed in the supervision plug-in. In the opposite case, it will be displayed in an independent browser. Button Test The defined command line can be executed for test by clicking on this button. 5.15.7 Play Tone The Play Tone action plays the sound file attached to the called group or designated in the Sound file dropdown list. Note: The option Play group tone defined on the Alarms page of the general options forces the execution of the sound file associated to the on-call group attached to the alarm (or to first of the attached groups) for all the defined alarms, regardless of the Play Tone actions possibly defined. ALERT User Guide 5-67 Configuration Sound file This dropdown list designates the sound file to play. Click on the "Browse…" button to search and select a sound file or directly type the name of the wanted file with its full path. The sound file already selected in actions or associated with the on call groups attached to the tag (groups to be called) can be directly selected by clicking on the arrow of the dropdown list. Sound board activation Check this box if you want to force the alarm sound to be played on the station, even if the sound has been turned off. In that case, the volume is forced at 75% of the maximum volume. Button Test The selected sound file can be played for test by clicking on this button. The "Play Tone" action plays the sound file attached to the called group or designated in the “Sound file” dropdown list. 5.15.8 Play Vocal Message The Play Vocal Message action plays the vocal message attached to the alarm or designated in the Sound file or message to synthesize dropdown list. Note: The option Play vocal message defined on the Alarms page of the general options forces the alarm vocal message to be played on the local station for all the defined alarms, regardless of the Play vocal message actions possibly defined. Sound file or message to synthesize This dropdown list designates the audio file which contains the recorded vocal message (*.WAV format) or, if the typed text is not ended by ".WAV", the text to synthesize to produce the vocal message to play on the local station. If the field is empty, the played message will be the vocal message defined for the activation, reset or acknowledgment, according to the selected tab. 5-68 Configuration Repeated message When this option is checked, the vocal message is repeated until the alarm acknowledgment. This selection is only possible for activation of events defined as alarms. Sound board activation Check this box if you want to force the vocal message to be played on the station, even if the sound has been turned off. In that case, the volume is forced at 75% of the maximum volume. Button Browse... Click on this button to browse file and select the desired audio file. Button Record... Click on this button to record the audio file. Button Test The selected audio file or the synthesized message can be played for test by clicking on this button. ALERT User Guide 5-69 Configuration 5.16 Commands The Alert software is capable of initiating commands to write external variables or outputs, in reaction to an event activation or reset or an alarm acknowledgment. A command can be used, for example, to activate a siren or a flashing light, or, during a call cycle, to signal the call procedure failure or to command an external relief call system. Each command is designated by a name and is made up of a sequence of basic writing commands of external variables (by DDE or OPC) or outputs (through a communication driver), with timer capability. The controlled variables and outputs are designated in the sequence. The value written on each variable or output can be predefined in the sequence and can include the content of supervised tags. A default value can also be redefined when referring to the command in the action list attached to an event. This default value will be applied to every variables and outputs that are not defined in the sequence. It allows the same command to be used to write various values in function of the command origin. The commands can be defined when configuring an action of type “Execute command” (see § 5.15.4 “Execute command”), an on-call group (see § 5.4.1 “On-call group properties”) or a user call number of type “Command” (see § 5.1.3 “Dial number definition”). It also can be defined when configuring the “Command” driver (see § 8.9 “Command driver”). 5.16.1 Command list Command List Display the list of defined commands. 5-70 Configuration Command description Sequence of writing commands to external variables or outputs which corresponds to the command selected in the command list. Button Test Click on this button to execute for test the command selected in the list. Button Add... Click on this button to create a new command (see below. Button Edit... Click on this button to modify the parameters of the command selected in the list (see below). Button Delete Click on this button to delete the command selected in the list. 5.16.2 Command definition A command is made up of a sequence of basic writing commands of external variables (by DDE or OPC) or outputs (through a communication driver), with timer capability. The controlled variables and outputs are designated in the sequence. The value written on each variable or output can be predefined in the sequence and can include the content of supervised tags. A default value can also be redefined when referring to the command in the action list attached to an event. This default value will be applied to every variables and outputs that are not defined in the sequence. It allows the same command to be used to write various values in function of the command origin. ALERT User Guide 5-71 Configuration Name This field designates the command by an explicit name. This name must be unique in the command list. Trace commands... When this option is checked, the command execution will be traced in the event log. Sequence This list displays the ordered sequence of variables and outputs that will be written during the execution of the command. Each variable or output is designated by an external reference under the form : "server|topic!item" (DDE reference), "server\item" (OPC reference) or "driver##block##output" (driver reference). The value to write can be set when defining the command (Value column). That value can also be defined later, every time the command is used. The defined sequence can include timers ("Wait"), with time counted in seconds. Use the buttons and to modify the execution order of the sequence by moving respectively up and down the external reference or the timer selected in the list. Button Write... Click on this button to add a new variable or output reference to the sequence (see § 5.10 “Selection of an external tag”). In the displayed dialog box, select the desired type (DDE, OPC or external) and reference. Button Wait Click on this button to insert a timer in the sequence. Define the value of the wished time to wait in the field Associated value (time in seconds) then validate the typed value by clicking on the Apply button. Button Edit... Click on this button to modify the external reference selected in the list. This action displays the dialog box of selection of an external variable (see § 5.10 “Selection of an external tag”). Button Remove Click on this button to remove from the sequence the external reference or timer selected in the list. Associated value When an external reference is selected in the list, this field defines the value to write in the variable or output designated by the selected external reference. This value can be any numerical or alphanumeric string. It can include tab chars, but they have to be coded under the form "&T". If this field is empty, the written value will be the default value which is defined when selecting the command in an action of type "Execute Command". The value to write must be validated by clicking on the Apply button. The value to write can contain variable fields that will be updated at the time of the command execution. To integrate the content of a supervised tag, click on the button 5-72 Configuration . In the displayed dialog box, select the desired tag then validate. The numerical identifier of the tag is inserted in the edit field at the current cursor position, under the form: &(tag id). ALERT User Guide 5-73 Configuration 5.17 Communication ports To configure the communication ports, select the "Communication..." command in the "Configuration" menu or click on the button . On the displayed dialog box, select the “Port” tab. The list displays the communication ports used by the application. This list can reference physical COM ports (COM1, COM2, ...), ISDN ports (CAPI1, CAPI2 ...) or modems that have been installed before through the Windows Control Panel. TCP/IP ports (SOCKET1, ...) also can be automatically created by the communication drivers. To add a physical port, an ISDN port or a modem to the list, click on the Add button. The status displayed for each port is updated in real time. It can be: Not used The port is not used by application Out of order The port is used but doesn't function correctly Initialization... The modem is initializing Modem ready The modem is ready for incoming or outgoing calls Ring... The modem processes an incoming call Call in progress... The modem processes an outgoing call Connected The connection is established in "data" mode Disconnect... The connection is breaking Fax transmission… The modem is transmitting a fax Voice communication... The connection is established in "voice" mode The possible actions on this dialog box are the following: 5-74 Configuration Button Add... Click on the Add button to create a new communication port and add it to the list. This port can be a physical COM port, an ISDN port or a TAPI modem. See § 5.17.1 “Selection of a communication port”. Button Properties... Click on the Properties button to configure the parameters of the selected port (physical COM port, ISDN port or modem). See § 5.17.2 “Configuration of a modem (TAPI)”, 5.17.3 “Configuration of a physical port (COM)” or 5.17.4 “Configuration of ISDN controller (CAPI)”. Button Remove Click on the Remove button to delete the port selected in the list. Button Initialize Click on the Initialize button to reinitialize the port selected in the list. The current status of the port is updated in real time in the list. Button Monitor... Click on the Monitor button to display the line monitor screen for controlling data exchanged on the port selected in the list. See § 7.10 “Communication log”. Communication log option This option validates the recording of transmitted and received data on the communication port. See § 7.10 “Communication log”. ALERT User Guide 5-75 Configuration 5.17.1 Selection of a communication port The Communication ports dialog box allows the selection of a communication port to add it to the application. Modems (TAPI) This list contains the list of modems that have been installed on the PC and that are available. To add a modem to this list, use the "Modem" icon of the Windows Control Panel. Note : for a better control of the modem, especially in vocal mode, it is often more advisable to not use the TAPI interface and rather to configure the physical COM port it is connected to with the type "modem" (list "Physical Ports"). Physical ports (COM) This list contains the list of physical ports of the PC. If the check box “display only available COM ports” is not checked, this list contains the ports COM1 to COM64, except those that are already used by the application. If the check box “display only available COM ports” is checked, this list only contains the available ports (hardware detected and not in use). Option "Display only available COM ports" When this box is checked, the physical Port list only contains the available ports (hardware detected on the PC and not used by another application). The polling of available ports being capable to disturb communications already established by other applications (using drivers no compatible Windows), this choice must be done on good grounds. 5-76 Configuration ISDN Ports (CAPI) This list displays the ISDN controllers installed on the PC and compatible with the CAPI 2 interface. 5.17.2 Configuration of a modem (TAPI) This dialog box defines the working parameters of the selected TAPI modem. The following parameters can be configured: On incoming call This drop down list selects the treatment to perform on reception of an incoming call: No response no answer to the call. Voice response voice answer (utilization of the voice driver), validated only when the modem driver accepts voice commands. Telematic server answer to a remote terminal, by using the Visual Access application (terminal server). When the message processor is active, the treatments that have been defined for a serial link can also be selected. Option Incoming call only When this option is checked, the modem is exclusively reserved for incoming calls and cannot be used for outgoing calls. Prefix to dial Prefix to dial to have access to the public telephone network on the line connected to the controller. The "-" prefix indicates that the line is exclusively reserved for internal calls (no access to the public telephone network). Max. communication time This time defines the maximum duration of a communication in seconds. After this time, the modem is automatically disconnected. If this time is set to 0, there is no limit for the communication time. Voice modem When this option is checked, the modem can be used for vocal communications. This option depends on the installed driver at the level of the Windows Control Panel. ALERT User Guide 5-77 Configuration Relief When this option is checked, the modem will be only used in relief mode, when none of the main communication ports (not defined as relief) can be used (ports in failure). This option allows a relief calling device to be used in case of problem with the usual calling systems. Button Setup... Click on this button to configure the general parameters of the modem. 5.17.3 Configuration of a physical port (COM) This dialog box defines the working parameters of the selected communication port when it is connected to a modem or to an external system. Port defined as modem connection: 5-78 Configuration Port defined as direct connection (with an external system): The following parameters can be configured: Type Type of the connection on the port: Direct Direct connection with an external call system Hayes Modem Connection through a Hayes modem Relief When this option is checked, the modem will be only used in relief mode, when none of the main communication ports (not defined as relief) can be used (ports in failure). This option allows a relief calling device to be used in case of problem with the usual calling systems. Baud Default baud rate. This value can be automatically changed by the driver using the port during an outgoing call. Bits Number of bits by transmitted character. This value can be automatically changed by the driver using the port during an outgoing call. Stops Number of stop bits transmitted at the end of each character. This value can be automatically changed by the driver using the port during an outgoing call. Parity Type of parity. ALERT User Guide 5-79 Configuration This value can be automatically changed by the driver using the port during an outgoing call. Flow control Type of flow control. The Hardware choice corresponds to a flow control by the RTS/CTS signals of the V24 junction. The Xon/Xoff choice corresponds to a software flow control by sending the Xoff code (13h) to request the emitter to suspend the data transmission, and the Xon code (11h) to request for the resumption. This value can be automatically changed by the driver using the port during an outgoing call. Incoming call management This drop down list selects the treatment to perform on reception of an incoming call: No response no answer to the call. Voice response voice answer (utilization of the voice driver), validated only when the modem driver accepts voice commands. Telematic server answer to a remote terminal, by using the Visual Access application (terminal server). When the message processor is active, the treatments that have been defined for a serial link can also be selected. Option Incoming call only When this option is checked, the modem is exclusively reserved for incoming calls and cannot be used for outgoing calls. Prefix to dial Prefix to dial to have access to the public telephone network on the line connected to the modem. The "-" prefix indicates that the line is exclusively reserved for internal calls (no access to the public telephone network). Voice modem When this option is checked, the modem can be used for vocal communications. A button is then displayed on the right to give access to the configuration of specific parameters of the voice modem (see § 5.17.3.2 “Configuration of vocal modem parameters”). Fax modem When this option is checked, the modem can be used to transmit faxes. GSM / PCS modem Check this option when the connected modem is a GSM or PCS modem. A button is then displayed on the right to give access to the configuration of specific parameters of the GSM/PCS modem (see § 5.17.3.3 “Configuration of GSM/PCS modem parameters”). 5-80 Configuration Carrier detect (DCD) Validation of the processing of the carrier detection signal (DCD) of the V24 junction to automatically release the line when this signal falls down. Button Modem parameters... Click on this button to have access to the configuration of specific parameters of the modem (see § 5.17.3.1 “Configuration of modem parameters”). Maximum communication time This time defines the maximum duration of a communication in seconds. After this time, the modem is automatically disconnected. If this time is set to 0, there is no limit for the communication time. Connect detect (DSR) Validation of the processing of the DSR signal of the V24 junction as an active connection indicator of an external messaging system. Communication driver Selection of the communication driver used on the connection. This drop down list selects the communication driver that will process the data exchanges on the concerned port.. When the message processor is active, the treatments that have been defined for a serial link can also be selected. 5.17.3.1 Configuration of modem parameters This dialog box defines the specific properties of the connected modem. The following parameters can be configured: Init string String transmitted to the modem when the interface is initialized or reinitialized (switch of vocal mode to terminal mode). ALERT User Guide 5-81 Configuration Dial Prefix: Suffix: Hang-up Prefix: Suffix: sent before the call number sent after the call number attention sequence to signal a modem command during a communication disconnection command Originate connection Connection command sent to the modem during a manual call. Answer connection Connection command sent to the modem during a manual answer. Ring number to wait Number of rings waited before answering to an incoming call. The type of answer depends on the selection On incoming call done in the dialog box of port configuration. Caller ID This selection allows a protocol to be validated for identifying the caller dial number during incoming calls. The following protocols can be selected: Formatted ID analog voice modem with caller identification Unformatted ID analog voice modem with caller identification Register S190 ISDN modem, caller id stored in the modem register S190 Hang-up by DTR Validation of the treatment of the DTR signal of the V24 junction as a hang up modem command. Periodic line test Validation of the periodic test of the telephonic line. Validation of the treatment of the DTR signal of the V24 junction as a hang up modem command. This test is periodically performed in accordance with the cycle defined in the general dialing parameters. This test is performed by using the Hayes command "ATD;". It should be noted that this command is not available with all modems. Default button This button restores the initial standard parameters. 5-82 Configuration 5.17.3.2 Configuration of vocal modem parameters This dialog box defines the specific properties of the voice modem used. The following parameters can be configured: Modem This list selects the type of vocal modem being used. The proposed modems are those that are designed in the file "modem.lst". Transmission format Selection of the transmission format to use to play or record the voice messages. The proposed formats are those that are described in the file "modem.lst" for the selected voice modem. Silence Detection Period Maximum elapsed time without receiving any ADPCM data in voice receive mode. Silence Sensitivity Tuner Selects the silence sensitivity tuner in voice receive mode. DTMF tone detection Validation of detection of DTMF tone: ALERT User Guide 5-83 Configuration Transmission Reception Command mode during voice message transmission during voice message recording in command mode (neither transmission, neither reception). Ringback goes away timer Time between the moment where the ringback cadence stops once detected and the moment where the modem assumes that the remote station has gone off-hook. By default this time is 7 seconds (70). It is possible to reduce it in order to minimize the time waited for the greeting message when an operator is called, but with the risk to detect false line pick-ups. Ringback never appeared timer Time the modem will spend looking for an initial ringback. If ringback is not detected within this interval, the modem will assume that the remote station has gone offhook. By default this time is 10 seconds (100). It is possible to reduce it in order to minimize the time waited for the greeting message when an operator is called, but with the risk to detect false line pick-ups. Deadman Timer Period of time (in seconds) which if expired causes the modem to hang up the telephone line if no data has passed during the period. Voice Gain Transmit Gain to apply during the transmission of a voice message. The value 255 corresponds to the maximum gain. This parameter is only valid for some voice modems. Baud Baud rate used with the modem during voice communications. Flow control Flow control used on the modem connection. None flow control is not used. Hardware flow control by RTS/CTS. Xon/Xoff flow control by characters DC1 (11h) et DC3 (13h). Begin Voice Communication String of characters transmitted to the modem before the establishment of a voice communication. End Voice Communication String of characters transmitted to the modem at end of voice communication. Default button Click on this button to reinitialize the default values for the selected voice modem. 5-84 Configuration 5.17.3.3 Configuration of GSM/PCS modem parameters This dialog box defines the specific properties of the GSM modem used as well as its operating mode. The following parameters can be configured: GSM Service Provider This group defines the GSM operator who has provided the SIM card for the modem connected to the port. You must first select the country of the provider in the first dropdown list, then the wished provider in the dropdown list below. If the checkbox “Provider forced” is checked, the selected operator will be forced in the modem. This option avoids inopportune operator changes when the signal is low. If the checkbox is not checked, the modem is configured for automatic selection of the operator. ALERT User Guide 5-85 Configuration The dial number used to call the Short Message Service Center (SMSC) of the selected operator is automatically displayed in the edit field “SMSC number”. If this number is not correct, it can be modified. The new number will be saved. If this number is empty, the SMSC number defined in the modem will be used. If the checkbox “Write number to SIM card” is checked and the defined number doesn’t match the number set in the modem, it is automatically written in the modem. Note: if no country is selected (choice “none”), the name “Generic GSM-SMS” is proposed as operator with an empty SMSC. In this case, the configuration defined by the SIM card will be used. PIN Number Personal Identification Number that authorizes access to the functions of the connected GSM modem. SMS format Select here the format to use in the commands to transmit or read short messages (SMS). The "Auto" selection allows the actual format configured in the modem to be used. Incoming call identification When this option is validated, the incoming calls on the GSM modems are identified. Processing of received messages When this option is validated, the messages received by the GSM modem can be processed as: a call acknowledgment or call denial (following the messages respectively defined in the fields "Call acknowledged" and "Call denied"), a team changeover command (begin or end of on-call period, following the messages defined in the field "Team changeover"). alarm or acknowledgment messages that will be treated by the message processor according with the treatment selected in the "Message processor" list. Received messages can be automatically transmitted by the GSM modem. However, some modems only transmit received messages on request. For these modems, it will be necessary to define a polling period in the field cycle. The value 0 disables the polling cycle of the modem. Call acknowledged Short message text that will be interpreted as an acknowledgment of the calls that was destined to the operator who has transmitted the short message. If the modem is used with “AlertMobile” mobiles, you must use the same syntax that has been defined in the mobiles (“ACKC” by default). Call denied Short message text that will be interpreted as a denial of the calls that was destined to the operator who has transmitted the short message, leading to the immediate transfer of the calls to relief operators. If the modem is used with “AlertMobile” mobiles, you must use the same syntax that has been defined in the mobiles (“NAKC” by default). 5-86 Configuration Team changeover Short message text that will be interpreted as the beginning (first field) or the end (second field) of the on-call period of the operator who has transmitted the short message. Message processor Select here the treatment to perform on the messages received by the GSM modem. The treatments that can be selected in the list are those that have been defined in the message processor with the type "Short Messages (SMS)". This selection is only enabled when the option "reception of SMS messages" has been validated at the software installation. Operator When the GSM modem is properly initialized, this field indicates the name of the operator which is selected by the device. Signal Indicator of the level of the signal received from the selected GSM operator. This level can vary between 0 and 31. Min value Minimum threshold of the signal reception level. When the reception level is lower or same than this threshold, the modem is declared in “line” failure (idem no dial tone on a telephone line). Init string Initialization string sent to the GSM modem at initialization time. ALERT User Guide 5-87 Configuration 5.17.4 Configuration of ISDN controller (CAPI) This dialog box defines the working parameters of the selected ISDN controller. The following parameters can be configured: Max. communication time This time defines the maximum duration of a communication in seconds. After this time, the modem is automatically disconnected. If this time is set to 0, there is no limit for the communication time. Prefix to dial Prefix to dial to have access to the public telephone network on the line connected to the controller. The "-" prefix indicates that the line is exclusively reserved for internal calls (no access to the public telephone network). Periodic line test Validation of the periodic test of the telephonic line. This test is periodically performed in accordance with the cycle defined in the general dialing parameters. Relief When this option is checked, the modem will be only used in relief mode, when none of the main communication ports (not defined as relief) can be used (ports in failure). 5-88 Configuration This option allows a relief calling device to be used in case of problem with the usual calling systems. Controller configuration for outgoing calls When the Vocal option is checked, the controller can be used to transmit vocal calls. The associated Advanced... button allows advanced parameters to be defined for the vocal communications. When the Fax option is checked, the controller can be used to transmit fax calls. The associated Advanced... button allows advanced parameters to be defined for the fax communications. When the Modem option is checked, the controller can be used to transmit calls to destination of analog modems. When the Data option is checked, the controller can be used to transmit calls in data mode to destination of ISDN controllers. The calling number associated with each selection is the dial number that will be transmitted as calling number to the receiver. With some installations that number must be specified in order to have the call accepted. Controller configuration for incoming calls When the Vocal option is checked, the controller can be used to receive vocal calls. When the Modem option is checked, the controller can be used to receive calls from analog modems. When the Data option is checked, the controller can be used to receive calls in data mode from ISDN controllers. The treatment to perform on reception of a call of type modem or data must be selected in the dropdown list associated with each type. The proposed treatments are: Telematic server answer to a remote terminal, by using the Visual Access application (terminal server). Alert modem answer performed by the Alert modem driver for data exchange with a remote station. When the message processor is active, the treatments that have been defined for a serial link can also be selected. Called number List of the numbers accepted by the controller on reception of an incoming call. It is possible to define several numbers by designating for each number the required response mode (vocal, modem or data). To add a number to the list, type the number in the edit field, select the wanted response mode then click on the Add button. To modify the response mode that is associated with a number, select it in the dropdown list, define the wanted response mode then click on the Add button. To remove a number from the list, select it in the dropdown list then click on the Remove button. ALERT User Guide 5-89 Configuration 5.17.4.1 Advanced properties of an ISDN port This dialog box defines the Compatibility Information Profile (CIP) for vocal and fax ISDN communications and the parameters for detections of DTMF tones. The selected profile predefines some standard parameters (bearer capability, low layer compatibility, high layer compatibility). The profile to select depends on the used ISDN connection. Vocal communications Telephony (default profile): CIP code = 16 (coding CCITT, speech transfer mode, circuit mode, 64kbits/s, G.711 protocol, high layer compatibility CCITT with identification of type telephony) Vocal: CIP code = 1 (coding CCITT, speech transfer mode, circuit mode, 64kbits/s, G.711 protocol) Audio 3.1 kHz: CIP code = 4 (coding CCITT, transfer mode 3.1 kHz audio, circuit mode, 64kbits/s, G.711 protocol) Fax communications ISDN Fax (default profile): CIP code = 17 (coding CCITT, transfer mode 3.1 kHz audio, circuit mode, 64kbits/s, G.711 protocol, high layer compatibility CCITT with identification of type Group 2/3 facsimile) Analog fax: CIP code = 4 (coding CCITT, transfer mode 3.1 kHz audio, circuit mode, 64kbits/s, G.711 protocol) DTMF detection Duration: minimal duration of a DTMF tone (default = 100 ms). Gap: minimal time between 2 DTMF tones (default = 40 ms). 5-90 Configuration 5.18 Dialing parameters To configure the dialing parameters, select the "Communication..." command in the "Configuration" menu or click on the button . On the displayed dialog box, select the “Dialing” tab. The configurable dialing parameters are: Max length on internal dial number When a dial prefix is defined for a communication port, this prefix will be automatically added at head of the dial numbers having a length greater than the size defined here. Character to suppress the dialing prefix The character defined here can be added at head of a dial number to notify that this number is an internal dial number and the dial prefix defined for the used line have not to be added. This character will be never dialed. Character to force the dialing prefix The character defined here can be added at head of a dial number to notify that this number is an external dial number and the dial prefix defined for the used line have to be added. This character will be never dialed. International prefix The international prefix of the country where is installed the software can be defined in this field. It authorizes the definition of the telephonic numbers used by the application with the following format: +<international prefix>(<telephone provider prefix>)<number> ALERT User Guide 5-91 Configuration That numbers can be exchanged between stations located in different countries. The international prefix of the station that dials the number is compared with the number international prefix to determine the format of the number that is really dialed. For example, if the number to dial is defined by +33(0)476041100, the dialed number will be 0476041100 if the defined international prefix is 33, or +33476041100 if the defined international prefix is not 33. Automatic selection of internal/external line When this option is checked, the port to use to transmit a call will be select according to the internal / external type of the dial number, in accordance with the defined dialling rulers (max length of internal number, forcing or suppression of prefix). If the number to call is an internal number, only the lines defined as internal (dial prefix defined for the associated communication port) will be used. If the number to call is an external number, all the lines can be used, except those that have been specified as exclusively internal (dial prefix "-"). Max time to wait to answer Maximal time to wait for answer after dialing. After this time without answer, the call is considered as failed (no answer). Test cycle for port opening When this value is non null, the ports that cannot be open by the software (used by another application, remote control application for example) are periodically checked following the defined cycle. Telephone line test cycle When this value is non null, the modems for which the line test has been validated are periodically checked for line test following the defined cycle. Failed modem test cycle When this value is non null, the modems considered as in fail state are periodically checked following the defined cycle. 5-92 Configuration 5.19 Communication drivers To configure the communication drivers, select the "Communication..." command in the "Configuration" menu or click on the button . On the displayed dialog box, select the “Driver” tab. The displayed list defines the list of communication drivers that will be proposed when defining a dial number. The possible actions on this dialog box are: Button Add... Click on this button to add one or several new driver(s) to the list of used drivers. Button Properties... Click on this button to configure the communication driver selected in the list. Button Remove Click on this button to remove the driver(s) selected in the list. These drivers will no more be proposed when defining a dial number. This dialog box displays the list of installed communication drivers. ALERT User Guide 5-93 Configuration 5.19.1 Adding a driver This dialog box allows the selection of one or several communication drivers to add them to the list of used drivers. The list displays the drivers that have been installed but that are not used. Select in this list the driver(s) that you wish to add then click on the OK button. The following options allow the list of proposed drivers to be reduced: Country When the (all) entry is selected, all the unused installed drivers are displayed in the list. When a specific country is selected, only the drivers concerning that country and those that do not depend on a country are displayed. With GSM modem When this option is selected, the drivers that use a GSM modem are included in the list. The "Command" driver is a generic driver which allows commands to be transmitted to an external application during a call cycle. See § 8.9 “Command driver”. Consult the corresponding rubrics for the drivers "Email" (§ 8.12), "Beep" (§ 8.10), "Fax" (§ 8.11) and "Alert" (§ 8.13). For the other drivers (SMS, public paging systems, in site paging systems, teleprinter, etc) consult the on line help associated with the driver for more information. 5-94 Configuration 5.20 External applications The "Applications" command of the "Configuration" menu allows to define the list of external applications associated with Alert. These applications can be launched directly from the “Operation” menu of Alert or automatically at initialization. They can be applications to supervise or complementary applications. List of defined applications The list on the top left of the dialog box displays the list of external applications associated with ALERT. Click on the Add button to add an application to the list by browsing files for the wanted application. Click on the Delete button to remove an application from the list. Option Menu Text This option validates the insertion of the selected application in the Operation menu. The text that is displayed in the menu is the one entered in the associated edit field. When this option is validated, the selection of the corresponding menu command will activate the application or place it to the foreground if it was already active. Command Line This is the command line that will be used to launch the application. This line must contain the full path of the application if its directory is not in the default path. Initial Directory The initial directory is that to use by the selected application. ALERT User Guide 5-95 Configuration Arguments The arguments are optional: it could be the name of a document (Excel sheet ...) to be opened by the application. Option Launch at Start Up This option causes the automatic activation of the selected application at ALERT start-up. Option Close on Exit This option causes the automatic closure of the selected application at ALERT closure. Option Reactivate on closure This option provokes the automatic reactivation of the associated application when this last is stopped, with reinitialization of the connections with this application at the end of the initial timeout defined in the supervision options. Option Maximize window This option indicates that the selected application must be launched in full screen. Option Minimize window (icon) This option indicates that the selected application must be launched as icon. Option Always visible This option indicates that the selected application must be placed above all nontopmost windows (application stays always visible). This option is validated (or invalidated) for the application in question as soon as the Activate button is clicked, whether this application is already active or not. Button Activate Click on this button to activate the application selected in the list with the configured options. If the application in question was already active, its window is set to foreground. If the application window was minimized, it is restored to its original size and position. 5.21 Printing configuration The “Print...” command of the “File” allows printing of the configuration tables. A dialog box is displayed to select the tables to print 5-96 Configuration Click on the Setup... button to select and configure the printer. 5.22 Saving / Restoring configuration 5.22.1 Saving a configuration The Save As... command of the File menu is used to save the whole configuration in a compressed file (ZIP format) with a suffix ".abf”. Configuration name In order to save the current configuration, type a name in the edit field above the list or select an existing name in the list (to replace a saved configuration). Selection When saving a configuration one can include or exclude some parts of the configuration and recorded operational data: Audio / instruction files Wave files and text files attached to the tags of the supervision list. Alarm history Save the alarm history. Event log Save the event logs. Report log Save reports recorded in the logbook. External files Save additional external files. To consult or define the lit of external files to save, click on the (see $ 5.22.1.1 below). ALERT User Guide 5-97 Configuration Main path Name of the basic directory in which the configuration files will be saved. By default, it is the basic directory of the Alert application. This directory can be chosen on a computer of the network. Click on the Browse... button to select another basic directory. 5.22.1.1 Saving external files The list of external files to save when requiring a specific backup (command “Save As...” from the menu “File”) or defining a periodic backup (see $ 7.1 “General options”) is defined by the following dialog box: The field “Name of the saving file” defines the name of the text file that will contain the list of files to save. For specific backup, the name is “ExtFiles.lst” and cannot be changed (edit field grayed). For periodic backup, the default name is “ExtFiles_Backup.lst” and it can be changed. Click on the “Add files…” button to select one or several files to add to the list. Click on the “Add a directory…” to select a directory to add to the list. Click on the “Remove” button to remove the selected files and/or directories selected in the list. Note: The files and directories located in the parent path of the application (“C:\MMI” by default) will be recorded as relative path to the parent directory, allowing them to be restored in another path if the application is moved. The files and directories located outside the parent path of the application are recorded with their absolute path. They will be restored in the same place, even if the application has been moved. 5-98 Configuration 5.22.2 Restoring a configuration The Open... command of the File menu restores a configuration. Configuration to restore One can restore: The actual configuration, to reinitialize for example the list of the supervised tags when the configuration file of the supervision (taglist.xml) has been modified by an external application, The remote configuration (only in redundant mode) to reinitialize the configuration from the redundant station, Select the option Synchronization on the most recent configuration to only retrieve the data that are more recent on the redundant station. In the opposite case, the whole of the selected parameters will be copied from the redundant station. A saved configuration, by selecting the configuration to restore in the list below. It is possible to restore a saved configuration from a directory different from the Alert directory by changing the basic directory. Selection The restoration can be partial by selecting some of the following subsets: Parameters Parameters of the application. The environment parameters and the configuration files (“.ini”) of the ALERT User Guide 5-99 Configuration Supervision Groups & Teams Programmed calls Telematic server Alarm history Event log Report log Icons External files: selected mediator and used communication drivers are restored only when the option load environment parameters... is selected. Configuration files of the supervision (taglist.xml, taggrouplist.xml) and the text and audio messages associated with. Configuration file of the on call management (userlist.xml, grouplist.xml, teamlist.xml, holiday.xml), group schedules (groupschedxxx.xml). Option forced with the "Supervision" option. Configuration file of programmed calls and synchronization calls with the remote stations (progcalllist.xml). Configuration file of the server application (Alertpro.ini). Restore all the alarm history. Restore the event logs. Reports recorded in the logbook. Icons defined in the tree of the main screen. Additional files (see $ 5.22.1.1 above). Load environment parameters This option allows the restoration of the application parameters to be limited to the parameters independent of the environment. When this option is not checked, the following parameters are not restored: selection and configuration of communication ports. communication drivers Windows control (general options) redundancy parameters (general options) selected mediator (general options) DDE trace (DDE options) external applications activation of voice synthesis Load message processor configuration Check this option to load the configuration of the message processor of the redundant station (parameters and scripts). This option is displayed only for the restoration of a remote configuration. Main path Name of the basic directory in which the configuration files are saved. By default, it is the basic directory of the Alert application. This directory can be chosen on a computer of the network. Click on the Browse... button to select another basic directory. 5-100 Configuration 5.22.3 New configuration The New... command of the File menu reinitializes the current configuration (configuration files of supervision and on call management are cleared), the current environment parameters being unchanged. Reset of Select the options corresponding to the subsets to reinitialize: Supervision Erase the list of supervised tags. Groups & Teams Reset the on-call organization (users, groups and teams) Programmed calls Reinitialize the configuration of programmed calls and synchronization calls with the remote stations. Alarm history Erase all the alarm history. Event log Erase the event logs. Report log Remove the reports recorded in the logbook. Parameters Reinitialize the general parameters of the application. Communication ports Reset the configuration of used communication ports. The unselected subsets will remain in the state of the current configuration. ALERT User Guide 5-101 Configuration 5-102 Operation 6 OPERATION 6.1 On-call schedule To display and update the on call schedule, select the “Schedule” command in the “Operation” menu or just click on the button . On the main screen, to access to the on-call schedule, select the Schedule tab on the bottom of the screen. 6.1.1 Visualization This screen displays the schedule of teams to call for a group on a period of 12 months from the previous month of the current month. The selected group is the group displayed at the top right of the screen. To select another group, click on the arrow of the Groups control, and then select the wanted group in the dropdown list. This field is grayed when the group is selected in the tree of the main screen. ALERT User Guide 6-1 Operation Teams to call are represented by color strips. To identify the represented teams, use the “color legend” represented by the team list of the selected group, on the right of the screen. One can also visualize and modify the content of a team by doubleclicking in the list on the team in question. When the team planed on a period cannot be reached (operators off-duty or without valid dial number), the corresponding strips are displayed with a “?“. By default, the on-call schedule displays the weekly program of the selected group, applied to the visualized calendar period. This programming is represented by light color strips (color of the associated team lighted). The periods programmed as reduced duty periods are represented by half strips. The weekly programming can be overwritten by forcing a team on specific calendar periods, symbolized by dark color strips (darkly color of the associated team). The visible part of the timetable corresponds to days displayed on the left of the screen, for the month selected in the panel of buttons located below. The selected month always corresponds to the 1st day displayed in the schedule. Days of the week are represented with a white ground color lightly grayed. Days of the weekend (Saturday and Sunday) are represented with a light gray ground color. The holiday days are represented with a gray ground color. The holiday days marked with a cross in the column on the left are fixed holiday days, independent of the year. Months are separated by a red line. The schedule table can be scrolled from the 1st day of the month preceding the current month to the last day of the 10th month following the current month by using the scroll bar on the right of the table: day by day by clicking on the up or down arrows, week by week by clicking above or below the scroll bar button, or by block by dragging this button. By clicking on a “month” button, one directly reaches the schedule for the month in question, from the 1st day of the selected month. 6.1.2 Active team The field Active team displays the name of the team which is actually on duty (team called in case of alarm concerning the group). This team can be the scheduled team, a forced team (group in derogation), or a team having processed to a team changeover in advance. If this field is marked "No team", there is no active team for the group. Following the status of the team changeover, a further indication can be displayed below this field: Changeover done The scheduled team has changed over (team in advance). Changeover waited (n) Waiting for team changeover (the team is late or duty ended in mandatory team changeover mode). The value that can be displayed in brackets (n) indicates the remaining time (in minutes) before timeout expired. Changeover timeout The timeout for waiting the team changeover is expired. Duty ended The duty is ended (before the programmed time, except in mandatory team changeover mode). 6-2 Operation 6.1.3 Definition of holiday days The left column of the table allows the public holidays of the current year to be defined. To define a day of the displayed schedule table like holiday, click once in the first column of the wanted day. The day is refreshed with a beige ground color. This day is defined like holiday for the current year. It will be automatically redefined like normal day for the following year. A second click in this column on the same line displays a cross (X). It means that the day is defined like holiday independent of the year (December 25 for example). This day will remain registered like holiday for the following years. A new click in this column suppresses the definition of holiday for the day in question (white or yellow ground color). Note: the public holidays defined in the schedule table of a group apply to all groups. 6.1.4 Copy of the on-call program To reinitialize the schedule table from the weekly on-call program which is defined for the selected group, click on the Copy Program button. This action results in the deletion of all the forced area, from the current day and hour for the next eleven months. The Copy Program button is validated only when a program is defined for the selected group. 6.1.5 Modification of the schedule To force an on-call team on the timetable: a) Select a team in the list of teams of the group with one of the mouse buttons. The color of team selected for the mouse button in question appears in one of the 3 representative windows of mouse buttons, located under the list of teams. The choice “(Program)” means one wishes restore the programmed team (in the weekly program of the group) on the drawn area (programming restoration). The choice “(No team)” means one wished no team on the drawn area (schedule erasure). b) If one wishes to define a reduced duty period for the selected team, check the Reduced duty option. During reduced duty periods, the team is only called for the alarms having a priority level higher than or equal to the minimal level defined in alarm options (see § 7.4 “Alarm options”). c) Bring the mouse pointer on the timetable, on the cell corresponding at the 1st hour of the 1st day of wanted time area, then press the button corresponding to the team in question. Drag the mouse pointer, keeping the button pressed, to the cell corresponding to the last hour of the last day of the chosen time area. So release the button. The defined time area becomes colored with the color of the selected team. If the Reduced duty option was selected, the strips corresponding to the selected time area are represented by half strips. Note 1: it is not possible to modify the schedule for a past period; if the defined time area overlaps an area belonging to the past, just the part corresponding to the future (from the current hour) will be taken into account. ALERT User Guide 6-3 Operation Note 2: if the time area to define is not rectangular, you should proceed in many times, for each of the rectangular part of the area. 6.1.6 Duplication of schedule area To duplicate groups of days of the schedule table (weeks, fortnight...): a) Select first the area to copy. To do that, click in the day column of the table, on the 1st wished day and drag the mouse cursor until the last day of the wanted selection, keeping the button pressed. The selection is displayed in reverse video. The Copy button (on bottom right of the screen) is validated. b) Click on the Copy button. The Paste button becomes valid. c) Select, in the day column of the table, the 1st day of the recipient area by clicking over. The selected day is displayed in reverse video. d) Click on the Paste button. The previously copied selection is reproduced. The operations c) and d) can then be reproduced again, the copied selection being always valid. Note: it is not possible to modify the schedule for a past period; if the selected period overlaps an area belonging to the past, just the part corresponding to the future (from the current hour) will be modified. 6.1.7 Cancellation of the performed operations Click on the button to undo the operations performed on the schedule table (team assignment or deletion, duplication, program copy). Each time this button is clicked, the preceding operation is canceled. It is possible to undo up to the 10 last performed operations. This button is validated only if there is at least one operation to undo. Click on the button to come back on the cancellation done. It is validated only if at least one undo operation has been performed. 6.1.8 Printing the schedule To print the monthly schedule table of the selected group, choose the desired month and click on the button , at the bottom right of the windows. The printer which will be used is the printer selected by the Print setup... command of the File menu. If no setup has been performed, it is the default printer. 6.1.9 Calling the on call team Click on the button to directly call the operators of the team which is currently on duty and to transmit them a service message. This action displays the call dialog box (see § 6.11 “Sending a message”), with a list of addressees preset with the operators of the current team. 6-4 Operation 6.2 Alarm table To display the alarm table, select the “Alarms” command in the “Operation” menu or just click on the button . On the main screen, to access to the alarm table, select the Alarms tab on the bottom of the screen. The alarm table displays the time stamped list of all alarms that have been detected, that they are active or inactive, acknowledged or not. An alarm remains in the alarm table as long as it is not removed by an operator's explicit command, or, if the option Automatic deletion of inactive and acknowledged alarms is validated in alarm options(see § 7.4 “Alarm options”), until it is simultaneously inactive and acknowledged. The displayed list represents the content of the alarm table, according to the station/group selection and the selected filter of alarm status. By default, the masked alarms are not displayed in the table. This list contains 8 columns by default: P Priority level of the alarm. Date Alarm time. Station Name of the station attached to the alarm. Alarm Group Basic tag group of the alarm. Alarm Formatted message defined for the alarm. ALERT User Guide 6-5 Operation Value Acknowledged By Current value of the alarm variable (updated according to the selected option in alarm options). Alarm acknowledgment time ("-" if the alarm is not acknowledged). Name of the operator who has acknowledged the alarm ("-" indicate, when the alarm is acknowledged, an acknowledgment performed automatically or from the supervised application). This list can be customized and sorted1. One can notably suppress some columns or add some of others: Code Numerical code associated with the alarm tag. Reference Reference of the alarm tag. On-call Group Name of the on-call group associated with the alarm. C Comment indicator (*). R Report indicator (*). Reset Date of alarm reset (come back to normal state). Initial value Value of the alarm variable at alarm time. Comment Comment about the alarm. The current state of an alarm is represented by a configurable specific color (see § 7.3 “Display options”): Default color Red Mauve Black Gray Blue Status Alarm active and not acknowledged Alarm inactive and not acknowledged Alarm active and acknowledged Alarm inactive and acknowledged Alarm masked When an alarm has been acknowledged, the name of the operator who has proceeded to the operation appears on the line of the alarm in question, with the date and the hour of the acknowledgement. When an alarm is selected in the list, the descriptive alarm record is displayed in the detail window located under the list. This record contains 3 parts, each part being 1 This list can be entirely customized (selection of columns to display, order, width and title of columns, alignment of the title or the column content). To perform this customization, position the mouse cursor on the column of which one wants to modify the presentation and click on the right button of the mouse. Select then the adequate command in the displayed contextual menu. The new configuration is automatically saved to be restored for the next sessions. The contextual menu also allows to configure the printing format of the list and to export the list to the clipboard or a file, with a configurable format. The width of each column can be visually adjusted by positioning the mouse cursor on the concerned size bar of the title line, then clicking and dragging the bar to get the wanted size. This list can also be sorted according to the increasing or decreasing order of each of its columns. To do this, click on the title of the wanted column: an arrow will indicate the increasing sense of the sorting. Click again on the title of the column to reverse the sort order (reversed arrow). To perform a fast research for a value in the list, select the research column by clicking on its title, then scroll the list with the scroll bar: a "bubble" displays the content of the selected column for the 1st line of the list corresponding to the scroll bar position. 6-6 Operation optionally displayed according to the respective check boxes Details, Instructions and Processing: *** DETAILS *** Descriptive and current state of the alarm, under the form: "Alarm message" (formatted) STATION Name of the station attached to the alarm GROUP Functional group of the alarm REFERENCE Reference of the alarm variable CONDITION Event condition PRIORITY Alarm priority ON CALL Name of the on-call group associated with the alarm ACTIVATION VALUE RESET ACKNOWLEDGMT BY COMMENT Alarm time Value of the variable at alarm time Date of alarm reset Date of alarm acknowledgment Name of operator who has acknowledged the alarm Comment text about the alarm *** INSTRUCTIONS *** Content of the instruction file (if it is defined) with the contextual information acquired at the alarm time. *** PROCESSING *** Time stamped list of actions performed to process the alarm (warned operators, call failures, acknowledgment, alarm reset). A size bar allows the respective heights of the alarm table and detail window to be modified, by clicking over with the left button of the mouse and dragging the mouse cursor in the wanted direction, keeping the button pressed. When the mouse button is released, the bar is automatically located to the selected position. 6.2.1 Selection of displayed alarms The Station dropdown list selects the alarms attached to a specific station. The choice "-" selects all alarms. The On Call dropdown list selects the alarms which concern a specific on call group. The choice "-" selects all alarms. The Group dropdown list selects the alarms attached a specific tag group. The choice "-" selects all alarms. The No Ack, Active and Unmasked check boxes select the type of alarms to display in the list. The Listen checkbox validates, when checked, the automatic listening of associated vocal messages (alarm message and possible vocal instructions) on selection of an alarm in the list. ALERT User Guide 6-7 Operation 6.2.2 Alarm acknowledgment Select in the list a no acknowledged alarm, and click on the Ack button (or directly double-click on the representative line of the alarm). This button is not validated (grayed button), when there is no selected alarm or when the selected alarm is already acknowledged. If calls are in progress for the alarm in question, the call cycle concerning this alarm is aborted. An acknowledged alarm change of color and the operator's name having proceeded to the discharge is displayed in the list, with the date and the hour of the acknowledgment. To acknowledge all alarms of a functional group or of an on call group, select the wanted group, and then click on the Ack All button. If no group is selected (Station, On call or Group), all alarms of the table are acknowledged. 6.2.3 Removing an alarm from the table Select in the list an inactive and acknowledged alarm, and click on the Delete button. This button is not validated (grayed button), when there is no selected alarm or when the selected alarm is not acknowledged. 6.2.4 Editing a comment about an alarm Note: this function is only available when the database export option is validated by the software license and activated (see § 7.1 “General options”). Select an alarm in the list then click on the Comment… button. In the displayed dialog box, type the text of the wanted comment. When a comment is attached to an alarm, it can be read in the descriptive record of the selected alarm. It can also be read (and possibly modified) by clicking on the Comment… button. The alarm comment can be read later from the alarm history, even after the alarm has been removed from the alarm table. When a comment exists for an alarm, it is indicated by an asterisk (*) displayed in the C column. This column is not visible by default. It can be added by clicking in the list with the right button of the mouse then selecting the Display command. The comment can also be directly displayed in the Comment column (not visible by default). 6.2.5 Editing a report about an alarm Note: this function is only available when the database export option is validated by the software license and activated (see § 7.1 “General options”). Select an alarm in the list, or select an alarm subset (by using the selections Station, On Call and Group), then click on the Create… button. Select the wished option: creation of report for the selected alarm or for all the following alarms in the displayed list. Finally type the report text in the report edition dialog box. A topic can be selected or defined. A voice report can be recorded. One or several files can be attached to the report. 6-8 Operation The report attached to an alarm can be read (and possibly modified) by clicking on the Edit… button. If several reports are attached to the alarm, use the buttons “” and “” of the report dialog box to browse the different reports. The reports about an alarm can be read later from the alarm history or the logbook. In the logbook, the alarm reports are indicated by a red "!" in the header bar of the report. When a report exists for an alarm, it is indicated by an asterisk (*) displayed in the R column. This column is not visible by default. It can be added by clicking in the list with the right button of the mouse then selecting the Display command. 6.2.6 Group transfer An operator dealing with alarms can require, to treat some alarms, the intervention of another operator group, either in support (need for a complementary competence) or in substitution (impossibility of processing the alarm at the level of the group). To require the intervention of an additional group or a substitution group to treat some alarms, select the alarms in question in the list, then click on the Group transfer… button. A dialog box is displayed for the selection of new recipient groups for the selected alarms (see § 6.18 “Group transfer”). 6.2.7 Printing To print the displayed alarm list (according to the current selection) click on the Print button. If no alarm is selected, the entire list of displayed alarms is printed. If an alarm is selected, only its descriptive alarm record is printed, as displayed on the screen. The printer which will be used is the printer selected by the Print setup... command of the File menu. If no setup has been performed, it is the default printer. To define the printing format of the list, click with the right button of the mouse in the list of alarms, then select the Printing... command in the displayed contextual menu. 6.2.8 Exportation The current alarm table can be exported in a file or in the clipboard (for copy it in a spreadsheet for example). To perform this operation, click in the list with the right button of the mouse, then select the Export... command in the displayed contextual menu. In the displayed dialog box, choose columns to export, the export format (header, separator) and the destination (file or clipboard). ALERT User Guide 6-9 Operation 6.3 Alarm history To display the alarm history or consult the statistics about alarms or interventions, select the command "History" of the menu "Operation", or just click on the button . On the main screen, to access to the alarm history, select the History tab on the bottom of the screen. This screen presents alternately: The alarm history The alarm statistics The intervention statistics Select the wanted presentation in the dropdown list on the top right of the screen. Whatever the chosen presentation, the history and statistic screen always contains three parts: The high part of the screen displays the different selectors that can be used to select the wanted history or statistic, as well as editing (comments and reports), printing and export commands. The median part of the screen contains the list that displays the history or statistics, according to the done selection. The low part of the screen contains global statistical counters concerning the done selection. 6-10 Operation 6.3.1 Choosing period to analyze History and statistics can be done over 3 periods: Daily Weekly Monthly Click on the corresponding radio button (day, week or month) to select the wanted period. Choose then in the dropdown list below the calendar period to analyze. This period is displayed in calendar days, in calendar week (beginning day - end day) or in calendar month according to the selected type of period. 6.3.2 Choosing scope of analysis History and statistics can concern subsets of alarms or operators, according to a combination of possible selection: Selection of a station If a station is selected, the alarm history and statistics will only concern alarms attached to this station. For intervention statistics, only interventions concerning alarms attached to this station will be taken in account. Selection of a tag group If a group is selected, the alarm history and statistics will only concern alarms belonging to this group. For intervention statistics, only interventions concerning alarms of this group will be taken in account. Selection of an on-call group If an on-call group is selected, only the alarms concerning this group will be taken in account in the alarm history and statistics. Concerning intervention statistics, only interventions of operators belonging to this group will be taken in account. Selection of an operator If an operator is selected, only alarms acknowledged by this operator will be taken in account in the alarm history and statistics. Concerning intervention statistics, only interventions of the operator in question will be taken in account. Selection of an alarm If an alarm is selected, the alarm history and statistics will only concern this alarm. For intervention statistics, only interventions concerning this alarm will be taken in account. To select an alarm, click on the button , on the right of the Alarm field and choose the wanted alarm in the displayed list. To suppress the selected alarm, perform the same operation, but in displayed dialog box, click on the line selected in the list for unselect it, then validate by OK. Restriction of the statistic display (choice All / No null) When the statistic display (alarms or interventions) is selected, the content of the list can be restricted to the items (alarms or operators) that have been counted at least one time by selecting the No null option. ALERT User Guide 6-11 Operation 6.3.3 History and statistics presentation The list displayed in the median part of the screen depends on the type of selected history or statistics. Alarm history The list presents the whole of alarms that occurred on the selected period, in the chronological order of their appearance and in accordance with the filter done by the selection. Every line represents an alarm on 9 columns: Date Alarm time. Station Station attached to the alarm. Group Tag group of the alarm. Alarm Formatted message defined for the alarm. P Priority level of the alarm. Acknowledged by Name of the operator who has acknowledged the alarm (if the alarm is acknowledged). Fail duration Time during which the alarm was active (if the alarm is returned to the normal state), in seconds. Reaction Time between the alarm activation and its acknowledgment (if the alarm is acknowledged), in seconds. Intervention Time between the alarm acknowledgment and its return to normal state, in seconds. If the alarm is reset before its acknowledgment, the intervention time is not taken in account and is represented "-". This list can be customized and sorted1. The following columns can be added: Code Numerical code associated with the alarm tag. Reference Reference of the alarm tag. On-call Group Name of the on-call group associated with the alarm. Value Value of the alarm tag at alarm time. C Comment indicator (*) 1 This list can be entirely customized (selection of columns to display, order, width and title of columns, alignment of the title or the column content). To perform this customization, position the mouse cursor on the column of which one wants to modify the presentation and click on the right button of the mouse. Select then the adequate command in the displayed contextual menu. The new configuration is automatically saved to be restored for the next sessions. The contextual menu also allows to configure the printing format of the list and to export the list to the clipboard or a file, with a configurable format. The width of each column can be visually adjusted by positioning the mouse cursor on the concerned size bar of the title line, then clicking and dragging the bar to get the wanted size. This list can also be sorted according to the increasing or decreasing order of each of its columns. To do this, click on the title of the wanted column: an arrow will indicate the increasing sense of the sorting. Click again on the title of the column to reverse the sort order (reversed arrow). To perform a fast research for a value in the list, select the research column by clicking on its title, then scroll the list with the scroll bar: a "bubble" displays the content of the selected column for the 1st line of the list corresponding to the scroll bar position. 6-12 Operation R Reset Acknowledged Comment Report indicator (*) Date and time of the alarm reset Date and time of the alarm acknowledgment. Comment about the alarm. Alarm statistics The list presents statistics for the tags declared as alarm and corresponding to the done selection. In the displayed statistics, only are counted alarms that have been seen by Alert coming back to normal state. Every alarm tag is represented by a line, on 7 columns: Station Station attached to the alarm. Group Tag group of the alarm. Alarm Formatted message defined for the alarm. P Priority level of the alarm. Fail number Number of time that the alarm triggered during the selected period. Only are taken in account alarms that came back in normal state. Total time Addition of time during which the variable was active, during the selected period, in seconds. Mean time Average time on the selected period, of the time during which the variable remained to the state of alarm, in seconds. This list can be customized and sorted1. The following column can be added: Code Numerical code associated with the alarm tag. Reference Reference of the alarm tag. On-call Group Name of the on-call group associated with the alarm. Intervention statistics The list presents the whole of operators concerned by the selection, every line representing an operator on 4 columns: Operator Name of the operator. Interventions Number of time that the operator intervened during the selected period. Mean reaction time Average reaction time of the operator, in seconds. The reaction time is the time measured between the alarm activation and its acknowledgment. Mean intervention time Average intervention time of the operator, in seconds. The intervention time is the time measured between the alarm acknowledgement and its return to normal state. 6.3.4 Global statistics The low part of the screen contains some global statistics concerning the done selection. ALERT User Guide 6-13 Operation Alarm statistics Fail number Total number of failures (alarms) on the selected period and for the done selection. On the alarm history screen, all alarms are counted, that the alarm is reset or no. On the alarm or intervention statistic screen, only reset alarms are counted. Total failure time Addition of all failure times (time during which an alarm was active), on the selected period and for the done selection, in seconds. The calculation takes in account only alarms that are reset. Mean failure time Average of all failure times (time during which an alarm was active), on the selected period and for the done selection, in seconds. The calculation takes in account only alarms that are reset. Intervention statistics Intervention number Mean reaction time Number of interventions done by selected operators on the selected period and for alarms corresponding to the done selection. Average reaction time of selected operators, on the selected period and for alarms corresponding to the done selection, in seconds. The reaction time is the time measured between the alarm activation and its acknowledgment. Mean intervention time Average intervention time of selected operators, on the selected period and for alarms corresponding to the done selection, in seconds. The intervention time is the time measured between the alarm acknowledgement and its return to normal state. 6.3.5 Editing a comment about an alarm Note: this function is only available when the database export option is validated by the software license and activated (see § 7.1 “General options”). Select an alarm in the list then click on the Comment… button. In the displayed dialog box, type the text of the wanted comment. The same command allows an alarm comment to be read (and possibly modified). When a comment exists for an alarm, it is indicated by an asterisk (*) displayed in the C column. This column is not visible by default. It can be added by clicking in the list with the right button of the mouse then selecting the Display command. The comment can also be directly displayed in the Comment column (not visible by default). 6-14 Operation 6.3.6 Editing a report about an alarm Note: this function is only available when the database export option is validated by the software license and activated (see § 7.1 “General options”). Select an alarm in the list, or select an alarm subset (by using the selections Station, On Call, Group, User and Alarm), then click on the Create… button. Select the wished option: creation of report for the selected alarm or for all the alarms of the displayed list. Finally type the report text in the report edition dialog box. A topic can be selected or defined. A voice report can be recorded. One or several files can be attached to the report. The report attached to an alarm can be read (and possibly modified) by clicking on the Edit… button. If several reports are attached to the alarm, use the buttons “” and “” of the report dialog box to browse the different reports. The reports about an alarm can be read later from the alarm history or the logbook. In the logbook, the alarm reports are indicated by a red "!" in the header bar of the report. When a report exists for an alarm, it is indicated by an asterisk (*) displayed in the R column. This column is not visible by default. It can be added by clicking in the list with the right button of the mouse then selecting the Display command. 6.3.7 Printing To print the displayed list (alarm history, alarm statistics or intervention statistics), according to the current selection and chosen period, click on the Print button. The printer which will be used is the printer selected by the Print setup... command of the File menu. If no setup has been performed, it is the default printer. To define the printing format of the list, click with the right button of the mouse in the list of alarms, then select the Printing... command in the displayed contextual menu. 6.3.8 Exportation The content of the selected screen (alarm history, alarm statistics or intervention statistics) can be exported in a file or in the clipboard (to copy it in a spreadsheet for example). To perform this operation, either click on the Export… button or click with the right button of the mouse in the list, then select the Export... command in the displayed contextual menu. In the displayed dialog box, choose columns to export, the export format (header, separator) and the destination (file or clipboard). Remark: following the choused installation option, the alarm history can also be automatically exported in real time to an external database (see § 8.3 “External database”). ALERT User Guide 6-15 Operation 6.4 Call overview To display the call overview screen, select the Call overview... command in the Operation menu, or just click on the button . One can also display the call overview page by directly selecting the Calls tab on the bottom of the main screen. Note: the “Call Overview” feature is only available when the database export option is validated by the software license and activated (see § 7.1”General options”). This screen allows the visualization and control, in real time or differed time, the progression of calls triggered by the recorded alarms. It includes the following parts: (1) The upper part of the screen allows the selection of the alarms one wishes control the associated call cycle. (2) The first list below displays the alarm list corresponding to the criteria selected in the upper part. (3) The second list, on the left lower part of the screen, displays the list of on-call groups called for the alarm selected in the list above. (4) The third list, on, the right lower part of the screen, displays the list of the calls performed for the on-call groups selected in the adjacent list. 6-16 Operation 6.4.1 Date selection Select in the dropdown list Date the day one wishes control the treatment of detected alarms. By default, the current day is selected and the alarms of the current day are displayed in the alarm list, according to the selected criteria. If another day is selected and a new alarm appears, the current day is automatically selected to visualize the new alarm. To inhibit this automatic switching, when analyzing a call cycle of a previous day for example, check the box Alarm list locked. 6.4.2 Selection of the alarm list to control The list of alarm to control can be reduced according to some criteria: Selection of a station If a station is selected in the dropdown list Station, the alarm list will only contain the alarms attached to this station. Selection of a tag group If a tag group is selected in the dropdown list Group, the alarm list will only contain the alarms belonging to this group. Selection of an on-call group If an on-call group is selected in the dropdown list On Call, the alarm list will only contain the alarms attached to this group. Selection of an operator If an operator is selected in the dropdown list User, only the alarms acknowledged by this operator are displayed in the list. 6.4.3 Selection of the display type Select in the group Display the wished type of display for the list of performed calls: Call log: all the performed calls are displayed in the call list (detailed analyze of the execution of a call cycle). User call status: only the last performed call for each operator is displayed (visualization of warned operators). 6.4.4 Overview of the call cycle of an alarm The alarm list presents all the alarms of the select day, according to the selected criteria. The alarms currently processed (active or not acknowledged alarms) are displayed in black. The alarms completely processed (inactive and acknowledged, or prior recorded) are displayed in grey. The call status of an alarm is only displayed for the alarms currently processed. ALERT User Guide 6-17 Operation Select in the alarm list the alarm to control. The groups called for this alarm are displayed in the group list (on the left lower part) and are automatically selected to directly visualize in the call list (on the right) all the calls performed for this alarm. The calls completed and acknowledged are displayed in blue, the failed calls are displayed in red, and all others call status being displayed in black. The width of columns of each list can be visually adjusted by positioning the mouse cursor on the concerned size bar of the title line, then clicking and dragging the bar to get the wanted size. The displayed columns can be choose by clicking with the right button of the mouse on the title bar of the concerned list then selecting in the displayed contextual menu the wished columns. The column order can be modified by simple drag and drop operation. When a new alarm appears, it is automatically added the actual alarm list and directly selected to visualize the calls performed for the new alarm. To inhibit this automatic selection, when analyzing a call cycle for example, check the box Alarm list locked. To acknowledge an alarm currently processed, click with the right button of the mouse in the alarm list on the alarm in question, then select the command Alarm acknowledgment in the displayed contextual menu. To acknowledge a call currently processed, or to abort it, click with the right button of the mouse in the call list on the concerned call, then select the command Call acknowledgment, or Call cancellation, in the displayed contextual menu. 6.4.5 Printing the call report of an alarm To print the report of the calls performed for the selected alarm, in accordance with the selected display configuration (list, order and width of displayed columns, selection of call log or call status), click on the Print button. The print report includes the following information: selected alarm (as displayed in the alarm list), list of called groups (as displayed in the group list), and list of performed calls (as displayed in the call list). The first time a print command is done on this screen, a dialog box is displayed to select the printer to use and define some printing parameters (portrait or landscape). For the next printing commands, this dialog box is no more displayed. If needed, use the Print setup... command of the File menu to modify the printing parameters. 6-18 Operation 6.5 Event log To display the journal which contains the event log, select the command "Event log" of the menu "Operation", or just click on the button . On the main screen, to access to the event log, select the Journal tab on the bottom of the screen. The event log contains the history of all significant actions that intervened at the level of the alarm supervision station and each of the remote stations: operator login, alarms, calls, acknowledgements... This event log is recorded in files (one file per day), located in the "TRACE" subdirectory of the application directory. The date corresponding to a file is coded in its name under the form: TYYMMDD.LOG 6.5.1 with YY = year, MM = month, DD = day Visualization Every event is represented in the event log under the form of a time stamped line. The events that can be recorded in the event log are defined in the table of the following page. ALERT User Guide 6-19 Operation Events Parameters Meaning INIT EXIT LOGIN LOGOUT MESSAGE CALL ALARM CALL ADVISED UNADVISED CALL FAIL ALARM ALARM ACK NORMAL CALL ACK EVENT CALL RECEIVED WARNED GROUP UNWARNED GROUP DEROGATION END DEROGATION TIME CHANGED REMOTE LOGIN CONNECT DISCONNECT PORT FAILURE LINK FAILURE INFO OFF DUTY SUBSTITUTION ALARM MASKED ALARM UNMASKED DISACTIVATION ACTIVATION REMOTE LOGOUT ERROR ON DUTY CALL DENIED <operator> <operator> <operator> (<port>:<driver>) <operator> (<port>:<driver>) <operator> <operator> <operator>: <cause> <alarm message> <alarm message> / <operator> <alarm message> <operator> / <operator> <alarm message> <operator> (<port>) <on-call group> <on-call group> <on-call group> (-> <team>) <on-call group> <operator> (<port>) <port> <port> <port> <reference of server or item> <information> <operator> <operator> / <substitute> <alarm reference> / <operator <alarm reference> / <operator <operator> <error description> <operator> <operator> / <operator> TEAM CHANGEOVER Group <G>, team changeover <A> -> <B> / <operator>, max delay <n> minutes Group <G>, team changeover <A> -> <B> Application initialization Application closure User login User logout Outgoing call for message Outgoing call for alarm Advised operator Unadvised operator Call failure Alarm Alarm acknowledgment 1 Alarm reset Call acknowledgment 2 Simple event Incoming call Group call succeeded Group call failed Schedule derogation3 End of schedule derogation System date modified Login from a remote terminal Connection established on a port End of communication on a port Port failure (modem) Link failure Information message Operator set off duty Operator substituted Set of alarm mask Reset of alarm mask Alert management deactivation4 Alert management reactivation 4 End of remote session Error Operator set on duty Call denied (negative call acknowledg.) 2 Team changeover team A to team B in group G 5 CHANGEOVER FAILED END ON-CALL USER STATUS Group <G>, team <E> / <operator> <operator> -> <status> Team changeover failed team A to team B in group G (timeout expired) 5 End on-call time group G team E Change of user status (availability) List of journal events 1 If the acknowledgement is issued from an external application, without identification of operator, the part "/ operator name" is suppressed. 2 If the call is acknowledged by the called operator himself, the part "/ operator name" is suppressed. 3 If no team is defined in derogation, the part "(-> team)” is suppressed. 4 In redundant mode. 5 If 1st changeover, the part "<A>" is suppressed, if default delay, the part ", max delay…" is suppressed. 6-20 Operation When the event log is displayed, the following actions can be performed: Selection of the station to control in the Station list. Selection of the day to visualize by clicking on the wanted date in the Date list. Selection of the type of events to visualize, by clicking the corresponding checkboxes. To consult past events, check the List locked option to disable the automatic scrolling of the list to the arrival of a new event. When this option is not checked, every new event provokes the automatic display of the event log of the current day in last position (to visualize the new event). 6.5.2 Printing To print the displayed event log, according to the actual date and event type selection, click on the Print button. The printer which will be used is the printer selected by the Print setup... command of the File menu. If no setup has been performed, it is the default printer. To define the printing format of the list, click with the right button of the mouse in the list of alarms, then select the Printing... command in the displayed contextual menu. 6.5.3 Exportation The displayed event log can be exported in a file or in the clipboard (to copy it in a spreadsheet for example). To perform this operation, click in the list with the right button of the mouse, then select the Export... command in the displayed contextual menu. In the displayed dialog box, choose columns to export, the export format (header, separator) and the destination (file or clipboard). ALERT User Guide 6-21 Operation 6.6 Logbook To display the logbook to consult or edit user reports, select the command "Logbook" of the menu "Operation", or just click on the button . On the main screen, to access to the logbook, select the Reports tab on the bottom of the screen. The logbook contains the written or oral reports which have been recorded by the operators, either locally (see § 6.7 “Editing a report”) or by telephone (see § 8.1 “Vocal server”). This logbook is recorded in files (one file per day). These files are located in the “REPORT” subdirectory of the application directory. The date corresponding to a file is coded in its name under the form: RYYMMDD.LOG with YY = year, MM = month, DD = day Each report is represented by a heading line followed by the contents of a written report. The report heading line contains: The name of the operator who has written the report in question. The edition date of the report. The topic matter of the report. This topic is a label which allows sorting of the reports. The topic is optional ("-" if there is no topic). An indicator of alarm report ( ) if the rapport has been edited from the alarm table or alarm history. An indicator of attached files ( ) if one or several files are attached to the report. To open the files attached to a report, click with the right button of the mouse on the symbol , then select the wanted file in the displayed contextual menu. A button if an audio message is associated with the report. Press this button to listen the message. Keep it pressed during the time you are listening the voice message. When the logbook is displayed, the following actions can be performed: Select the day to visualize by clicking on the desired day in the Date list. Select the type of reports to be displayed, by performing a sort by author (User dropdown list) and/or topic (Topic dropdown list). Click on the New button to create a new report (see § 6.7 “Editing a report”). 6-22 Operation Click on the Edit button to edit the report selected in the list of reports (see § 6.7 “Editing a report”). Only the author of a report can edit it to change or complete it, on the condition that the right “report edition/modification” of the logbook is validated in his user profile. Click on the Delete button to delete a report selected from the list of reports. When a report is deleted, the associated audio report, if it exists, is also deleted. Click on the Print button to print the logbook corresponding to the date and to the selection author/topic done. The printer which will be used is the printer selected by the Print setup... command in the File menu. If no setup has been performed, it is the default printer. 6.7 Editing a report To edit a report, select the display of the logbook, then click on the New button to create a new report, or Edit to modify or complete an existing report (after having selected it from the list of reports). If the "database export" option is validated by the software license, a report can be attached to one or more alarms. An alarm report can be edited (creation, consultation, modification) from the alarm table (see § 6.2.5), from the alarm history ALERT User Guide 6-23 Operation (see § 6.3.6), or from any view of the main screen displaying tags in alarm, by using the associated contextual menu (Report command). Header When creating a new report, this last is automatically time stamped and signed with the name of the user who creates it. This information (date, time and author) can be modified. Only the author of a report can then re-edit it for modification, on the condition that the right “report edition/modification” of the logbook is validated for his user profile. The buttons and are only displayed for reports attached to an alarm and when several reports are attached to the same alarm. They allow the reports attached to a same alarm to be browsed. One can attach the report (at its creation or at a following re-edition) to a topic, this last becoming a search criteria for consultation of the logbook. The label of the topic can be selected from the list of existing topics or directly entered into the edit field (the new name is automatically added to the list). Report The written report is edited under the form of a note. The passage to the next line is automatic. It can be forced manually by pressing the "Enter" key. A vocal message can be associated with a report. By clicking on the Browse... button one can browse files for a "sound" file containing a pre-recorded audio message. By clicking on the Record... button, one directly records the audio message. The file name is automatically created, under the form "Myymmxxx.WAV", "yy" representing the year, "mm" the number of the month and "xxx" being a numerical code from "000" to "999". Click on the Listen button to listen to the audio message. Attached files One or several files can be attached to the report. The Attached files dropdown list contains the list of files attached to the report. Click on the Add... button to add a file to the list of attached files. Click on the Remove button to remove the selected file from the list of attached files. Click on the Open button to open the file selected in the list of attached files. The "Open" action is defined by the association that has been done for the type of the selected file (following the file extension). 6-24 Operation 6.8 Alert supervision To display the Alert supervision screen, select the Supervision... command in the Operation menu. One can also display the supervision page by directly selecting the Supervision tab on the bottom of the main screen. Note Alarm supervision feature is only available when the Supervision Plugin is validated (with the authorized max number of supervision tags) and the supervision server is activated (see Alert viewer configuration). This screen displays synoptic views of the supervised installation, in order to have a visual control of statuses and measures or to localize alarms on a site map. 6.8.1 Supervision server The supervision server module is a DLL module derived from the Visual Access software. It can manage a set of HTML pages and interact with Java applets embedded in these pages in order to visualize and animate synoptic views on client stations simply equipped with a web browser. The Java applets can integrate animated images (gif) and various dynamic graphic elements, allowing site maps, buttons, animated objects (lights, bar graphs, bowls, gates…) and curves to be displayed. ALERT User Guide 6-25 Operation Animation data are provided by the VADB module, data server capable of centralizing and recording data from various sources through its integrated communication drivers (DDE, OPC, Modbus…). 6.8.2 Synoptic editor The content of the visualized pages can be edited by using the associated synoptic editor VAEdit, by selecting the Screen Editor… command in the Configuration menu or clicking on the toolbar button . The synoptic editor is only accessible when the Screen editor licence has been validated. 6.8.3 Web browser plug-in The pages provided by the supervision can be directly visualized on the Alert user interface (Server or Client stations) through this supervision screen, a real web browser integrated in the software as a plug-in. The navigation bar displayed on the top of the supervision window contains the main navigation commands of a web browser: Previous page Next page Home page Refreshing of the displayed page The home page is defined in the Web browser page setup dialog box. 6-26 Operation 6.9 Consultation of operator’s properties At any moment an operator can consult his own operator record and modify some parameters. To access to his file, the operator must select the command “User record…” of the “Operation” menu. He can do it easily by clicking on the button . This dialog box displays the properties of the operator who is logged on the application. The basic properties of the operator (name, first name, language, class, station, creation and call options) cannot be modified at this level. See § 5.1.1 “User properties”. ALERT User Guide 6-27 Operation 6.10 Definition of substitutes This dialog box can be called from the property dialog box of a user (see § 5.1.1 “User properties”) or directly from the tree of the main screen or associated views by selecting the command Substituted by… in the contextual menus attached to the Oncall management sub-tree (see § 4.6.1.7 “On-call Management”). This dialog box allows the designation of a substitute for one or several users in each one of their groups of membership. It displays the list of all the groups of membership of the user concerned by the substitution, except when the group is implicitly indicated when calling the substitution dialog box (designation of a substitute in a view "<Group name>" or "<Team name>"). If the dialog box was called with several users selected (designation o a same substitute for several users), the list of all the groups of membership of the user is displayed. If the user selected when calling the substitution dialog box was substituted in a group, the name of its substitute is displayed on the corresponding line. If not, its status is indicated "(Off duty)" or "(Active)". If there were several users selected when calling the substitution dialog box, the groups for which the status is not defined in a uniform way for the selected users are marked with an indefinite status ("-"). For each displayed group, select the wished substitute for the group in the drop-down list by clicking on the corresponding line of the "Users" column. This list contains the list of the operators of the corresponding group, except for the users already selected to be substituted. The following particular choices will be noted: The choice "-" indicates that the status and the user substitute are not affected for this group. After validation, the selected users will remain in their initial status regarding this group. The choice "(Off duty)" indicates that the selected users must all be put off duty, without substitute, regarding this group. The choice "(Active)" indicates that the selected users must all be put on duty regarding this group. 6-28 Operation 6.11 Sending a message To transmit a message to one or more operators, select the command Send a message... in the Operation menu, or simply click on the button . This dialog box also can be called from the tree of the main screen or the associated views by selecting the Call... command in the contextual menus attached to the OnCall Management sub-tree (see § 4.6.1.7). In this case, the operators to call or preselected in function of the current selection in the concerned list. Addressees To select the recipient operators for the message, you only have to select them in the left list (user list) then drag them with the mouse to the right list (recipient list). One also can click on the button to copy the selected operators to the right list. ALERT User Guide 6-29 Operation The list of operators proposed as candidate to be recipient of the message (left list) can be restricted by the followings filters: Station: if a station is selected in this list, only the operators attached to this station are proposed. Group: if an on-call group is selected in this list, only the operators belonging to this group are proposed. On-call operators only: if this box is checked, only the operators belonging to an active team (current on-call team of each group) and active in this team (not relief operators) are proposed. If an on-call group is selected, only the operators of the active team of this group are proposed. On-duty operators only: if this box is checked, only the operators who are on duty and available to be called for service messages are proposed. If the list of proposed users matches the list of wished recipients for the message, one can click on the button to copy the entire list to the recipient list (right list). In case of error in the selection of recipients, select in the right list the operators to remove from the selection, then drag them to the “Exit” icon or click on the button . The button reinitializes the recipient list. The dropdown list Media can be used to specify the media one whishes to use to transmit the message. By default, the choice “Programmed media” is proposed, meaning the message will be transmitted by using the currently active number of each operator to call (through the attached media). If a type of media is specified (Email, Fax, Pager, SMS or Vocal), the message will only be transmitted to the recipients through the specified media. If an operator owns several numbers attached to the specified media (several fax numbers for example), the first active number with the specified type will be selected. If no number with the specified type is active, the first number with that type will be selected. The recipient operators who do not own a media of the specified type cannot receive the message. They are grayed in the recipient list. The dial number to use to reach a user can be specifically designated. This number will be called regardless of the current active dial number of the user. To designate a specific dial number for the user selected in the receiver list, click on the Number… button. In the displayed dialog box, select the wished number. When a dial number is specified, its identifier in the dial number directory of the user is written after the user name in the receiver list under the form <Id>. To suppress the selection of the number to use to call an operator, select the operator in question in the recipient list (right list), click on the Number button then select the option Programmed number. Message According to the media used to reach each of recipient operators, the message can be transmitted under various forms: 6-30 Operation Long message: message up to 512 characters, destined to operators equipped with an alphanumeric receiver device capable of displaying a relatively long text message (email, fax, SMS…). The number of entered characters is displayed on the right of the edit field. The character set is free. The characters not allowed by a type of receiver will be filtered out at the transmission time. The long message can contain variable fields. To incorporate in the message the value of a tag of the supervision list, click on the button . In the displayed dialog box, select the wished tag then validate. The numerical identifier of the tag is inserted in the edit field at the current cursor position, under the form: &(tag id). Short message: message up to 32 characters, destined to operators equipped with a receiver having a small display capacity (pager, beep…). The number of entered characters is displayed on the right of the edit field. The character set is free. The characters not allowed by a type of receiver will be filtered out at the transmission time. Vocal message: vocal message destined to operators to reach by telephone. To define vocal message, click on the Browse... button to browse files for a sound file containing a pre-recorded audio message or click on the Record... button, to directly record the audio message. The audio file is automatically created with the format name "MCxxxx.WAV", "xxxx" being a numerical code between “0000” and “9999”. The file is recorded in the sub-directory "MESSAGE". Click on the Listen button to listen to the selected audio message. Remark: If the "Text To Speech" option is available, the vocal message can be directly synthesized from the long message entered. To request for the synthesis of the text message, check the Vocal message option. To test the voice synthesis of the entered message, click on the Listen button. When checked, the Beeper call enabled option validates the call of operators configured with a beeper number. A text file can be associated with the message. This file is used to transmit some further information by fax or email. It can be defined as “contextual” and incorporate the value of tags of the supervision list. Click on the Edit button to directly type the text to transmit. This text is recorded in a text file, in the "MESSAGE" sub-directory, with a name under the format "MCxxxx.TXT", "xxxx" being a numerical code between “0000” and “9999”. Click on the Browse button to search and select an existing text file Language Transmitted information (long and short messages, vocal message, text file) can be defined in various languages, the information really transmitted being automatically selected according to the language of the recipient operator. The list of tabs displayed above the edit field “Long message” allows the selection of the typing language. The proposed languages are those which are already used (user interface language, language of defined operators). To add a language to the proposed list, click on the button on the right of the language tabs then select the wished language in the displayed list. To suppress a language, click on the same button, select the language to suppress then click on the “Mask” button. ALERT User Guide 6-31 Operation Validation / Transmission By clicking on the OK button, one leaves the dialog box with recording of the message in the mailbox of each of the operators selected as addressee. By clicking on the Send >> button, one leaves the dialog box with starting the immediate transmission of the message to the operators selected as addressee. 6.12 File transfer To transmit files to one or more operators, select the Send a message... command from the Operation menu, or just click on the button Transfer: 6-32 , then select the tab File Operation Addressees The list on the left top of the dialog box displays the users configured with a number associated with driver allowing the file transfer (Email, Alert Modem, Alert Socket, Alert Direct). To select a user to reach, you can: either select his name in the list then click on the Add button, or click on his name in the list then drag it over the list of addressees. A double-click in this list displays the properties of the selected user In case of error, to remove a user from the list, you can: either select his name in the list then click on the Remove button, or click on his name in the list then drag and drop it over the "exit" icon. File selection The files to upload are designated in the transfer list. The right column describes the full path of the files on the local station. The left column gives the name and the path that will have the files on the target station. For a transfer by email, the files are attached files. Changes of name and path are ignored. For a transfer made by a synchronization driver (Alert Modem, Alert Socket, Alert Direct), the files will be copied in the download directory of the target station. This directory is defined on the target station in the parameters of the corresponding synchronization driver. Select the files to send by clicking on the Add Files button. This action displays a dialog box to browse and select the files to add to the file list. To remove files from the list, select them in the file list the click on the Remove Files button. Validation / Transmission Select the transfer direction: Send: the files are sent to the remote station (upload) Receive: the files are received from the remote station (download) Clicking on the Send >> button exits the dialog box with immediate transfer of the chosen files to the users selected as addressees. Clicking on the OK button exits the dialog box with recording of the list of files to transfer with their destination directory for a later transmission. ALERT User Guide 6-33 Operation 6.13 Station synchronization To synchronize the configuration of one or several remote stations, select the Send a message... command from the Operation menu, or just click on the button select the tab Stations. , the To be able to synchronize remote stations, it is necessary first to define for every remote station a (virtual) operator having a call number attached to a synchronization driver (Alert Modem, Alert Socket, Alert Direct). Station The station list displays the list of users configured with a driver having synchronization capabilities and who have the same name as one of the defined stations. Select in this list the station to synchronize. 6-34 Operation Synchronization options The synchronization options are: Date and time. The calling station set the date of the called station. To be able to set the date and time, the called station needs to select the Alert driver option: "Date and time updates enabled". Configuration synchronization. If the local station is the main station, the synchronized data are the data associated to the called station. If the local station is a remote station, the synchronized data are its own data. For both case, one can send and/or receive all the configuration data or only the modified data (since the last synchronization). The synchronized data are the users, the on call groups, the teams, the tag groups, the on-call schedule and the tags. Validation / Transmission To begin the synchronization, click on the Send>> button. Clicking on the OK button exits the dialog box with recording of the list of synchronization options for a later transmission. 6.14 List of calls in progress To examine the current calls state or to locally acknowledge a call, select the Calls in progress... command of the Operation menu, or just click on the button ALERT User Guide . 6-35 Operation This dialog box is modeless (this means that the user can continue to use the others functions of the application) and is updated in real-time. Groups to Call List of all the on call groups for which at least a call was required: 1st column: name of the group. 2nd column: number of alarm call requests, followed by the priority level of the most important active alarm. 3rd column: “T1/Tm A1/Am” T1 = number of performed call attempts (current call included) Tm = max number of call attempts A1 = current iteration of call acknowledgment waiting Am = max number of iterations of call acknowledgment waiting Active Calles List of the calls in progress. 1st column: name of the called user. 2nd column: port - driver name (used for the call). 3rd column: “T1/Tm A1/Am” T1 = number of performed call attempts Tm = max number of call attempts A1 = current iteration of call acknowledgment waiting Am = max number of iterations of call acknowledgment waiting Pending Calls List of the suspended or waiting calls. 1st column: name of the user to call 2nd column: cause of suspension or waiting Button Call Acknowledgment Click on this button to acknowledge the call for the user who is selected either in the list of calls in progress, or in the list of pending calls. When a call is acknowledged by an operator, the reference of the call disappears from the list (of calls in progress or pending calls). If the call was in progress, it is aborted. Button Cancel Call Click on this button to abort the call (without acknowledgment) for the user who is selected either in the list of calls in progress, or in the list of pending calls. 6-36 Operation 6.15 Team changeover To declare the beginning or the end of his on-call period (clock in or out), an operator can select the Team changeover... command in the Operation menu, or simply click on the button . Remark: A team changeover also can be directly ordered from the contextual menu displayed when clicking with the mouse right button on the icon of the team to change in the tree of the main then selecting the command Team changeover or End on-call (see § 4.6.1.10 “Teams”). According to the selected management mode of the team changeover (see § 5.4.1 “On-call group properties”), this operation can be required or not: If the Team changeover mandatory option is not checked (default mode), the team changeover is performed automatically according to the planned on-call schedule. A team changeover operation can be forced, but only in the case of a changeover made in advance (before the end of the planned period) or an early end of the on-call period. If the Team changeover mandatory option is checked, the team changeover operation has to be performed by one of the users of the new on-call team, at the time scheduled for the team changeover, within a configurable deadline. If the team changeover has not been performed when the deadline is reached, a team changeover fault is signaled with possibility of alarm trigging. Similarly at the end of the on-call period, if no other team is planned, one of the users of the on-call team has to clock out. Failing which the team will remain on-call beyond the planned period. Team changeover The Team changeover selection designates a clock-in operation: the operator clocks in to begin its on-call period. After validation, the user (and its team) will be on-call for all the selected groups. ALERT User Guide 6-37 Operation End on-call The End on-call selection designates a clock-out operation. The operator clocks out to signal that he leaves (with its team) and its on-call time is over. After validation, nobody is on-call for the selected groups. Note: The "End on-call" operation is not required when a team replaces an other. The changeover of a team A to a team B ends the on-call time of the team A. If the “Team changeover mandatory” mode is selected, The "End on-call" operation provokes the transition to the "Waiting for team changeover" state with a timeout initialized to the default value configured as “Maximum delay for team changeover” for the group. If the scheduled team (if it is defined) has not clocked before the end of this timeout, the "ChangeoverStatus" variable of the concerned group changes to the state 3 ("Timeout for team changeover expired"), with possibility of trigging an alarm. List of groups This list displays the groups for which the identified operator (designated in the title bar) can perform a team changeover, begin or end of on call period according to the selection "Team changeover " / "End on-call". Team changeover The list displays all the candidate groups for which the user designated in the title bar can clock in, with the proposed team in brackets. The proposed team is either the scheduled on-call team if it is not yet active or the next scheduled on-call team if the active team is this one that was planned. Only the groups having a team to propose and for which the user belongs to the proposed team are displayed. End on-call The list displays all the candidate groups for which the user designated in the title bar can clock out, with the concerned team in brackets. Only the groups for which the user belongs to the active team are displayed. Click on the All button to select all the groups proposed for the team changeover. Click on the None button to unselect all the groups proposed for the team changeover. Maximum delay for next team changeover This option defines the maximum authorized time to perform the next team changeover. The default option selects the default value of the group (see § 5.4.1 “On-call group properties”). At the end of the on-call period of every selected group, if no team changeover has been performed, this time is counted. When the defined time is expired without team changeover, the "ChangeoverStatus" variable of the concerned group changes to the state 3 ("Timeout for team changeover expired"). This variable, which can be consulted by DDE or API, can be used to trig an alarm. 6.16 Schedule derogation / Call locking If necessary (during an intervention on site for example), it is possible to temporarily depart from the on-call schedule of a group by forcing this group in derogation state. 6-38 Operation When a group is in derogation state, its on-call schedule is ignored and all the alarm calls for the group either are redirected to a team which was predefined at the derogation time, or they are discarded or suspended1 (calls locked) if no team has been designated for the call redirection. To lock the calls for a given group, select the Calls locked command in the contextual menu displayed when clicking with the mouse right button on the icon of the group in the on-call management tree (see § 4.6.1.9 “On-call groups”). The icon of the locked group signals that the group cannot be called: . To unlock the calls for a given group, select the same command in the contextual menu displayed when clicking with the mouse right button on the icon of the group (command checked to signal locked status of the group). If a team is planned in the schedule, it automatically becomes on-call and the icon of the group signals that the group can be called again: . To redirect the calls addressed to a group to a team of the group, select the On-call (forced) command in the contextual menu displayed when clicking with the mouse right button on the icon of the team in the on-call management tree (see § 4.6.1.10 “Teams”). The icon of the forced team signals that the team is active: . To end the redirection of the calls to a team, select the same command in the contextual menu displayed when clicking with the mouse right button on the icon of the team (command checked to signal forced status of the team). The team which is planned in the schedule then automatically becomes active. To force one or more groups in derogation state, or consult the list of groups in derogation state, select the Schedule Derogation... command in the Operation menu or click on the button . This command displays the following dialog box: 1 Following the call option "Discard call if no team to call when alarm is activated ". ALERT User Guide 6-39 Operation Schedule derogation... The list displays the whole of groups with their current derogation state. Groups in derogation state are checked. When a group is in derogation state, all calls that concern it are redirected to the derogation team (indicated in brackets on the right of the group name). If there is no derogation team designated, calls are discarded or suspended according to the call option Discard call if no team to call... (see § 7.5 “Call options”). Click on the checkbox of a group to change it in derogation (box checked) or in normal on-call state (box not checked). Click on the All button to change all groups to derogation state. Click on the None button to change all groups to normal on-call state. Redirect calls to team When a group is selected in the list, one can select the associated derogation team in the list Redirect calls to team. This team will be the one to which will be redirected all the calls intended to the group in question when this last is forced in derogation state (checked in the group list). The dropdown list displays the list of all defined teams for the selected group. The choice "(none)" means that there is no derogation team for the selected group. Begin date & time This group defines the begin time for the derogation of the selected groups: If the Now option is checked (default option), the selected groups are immediately set in derogation state, after validation by clicking on the OK button. If the Next duty change option is checked, the selected groups are set in derogation state at the next team changeover. If the Begin date & time option is checked, the selected groups are set in derogation state at the date and time defined in the adjacent field. Limit date & time This group defines the limit time for the derogation of the selected groups: If the No limit option is checked (default option), the selected groups remain indefinitely in derogation state, until an explicit command to end the derogation. If the Next duty change option is checked, the selected groups remain in derogation state until the next team changeover. If the Limit date & time option is checked, the selected groups remain in derogation state until the date and time defined in the adjacent field. When at least a group is in derogation state, the “DEROG.” indication is displayed in the fault indicator of the alarm status bar. The changes of derogation state are recorded in the event log. 6-40 Operation 6.17 Masked alarms To mask or unmask alarms or to visualize the list of masked alarms, select the Alarm Mask/Unmask... command of the Operation menu, or click on the button . Note : an alarm or a group of alarms also can be masked and unmasked from any of the tag views associated with the branches of the supervision tree in the main screen (see § 4.6.1.4 “Tags”). This dialog box contains the list of alarms that are currently masked. List of masked alarms Each line of the list displays a masked alarm on 5 columns (by default): Group Functional group of the alarm. Message Alarm message associated with the event. Locked by Name of the operator who masked the alarm ("-" indicates a mask command performed by the supervised application). Date Date and time of the mask command. Limit date Limit date and time of the mask ("-" indicates an unlimited mask). This list can be customized and sorted1. It is possible to add other columns: 1 This list can be entirely customized (selection of columns to display, order, width and title of columns, alignment of the title or the column content). To perform this customization, position the mouse cursor on the column of which one wants to modify the presentation and click on the right button of the mouse. Select then the adequate command in the displayed contextual menu. The new configuration is automatically saved to be restored for the next sessions. The contextual menu also allows to configure the printing format of the list and to export the list to the clipboard or a file, with a configurable format. ALERT User Guide 6-41 Operation Station Code Reference On-call group C Comment Name of the station attached to the alarm. Numeric code of the tag. Reference of the tag. Name of the on-call group attached to the alarm. Indicates that a comment exists (*) about the masking action (click on the Edit button or double-click on the line to read the comment). Comment about the masking action. Treatment of masked alarms The masked alarms do not trig calls and are not logged in the alarm history. If a masked alarm is activated, it results in a simple message of type “EVENT” in the event log. The masked alarms normally do not appear in the alarm table. To display in the alarm table the masked alarms that are active or not acknowledged, uncheck the Unmasked filter in the status bar of this table. A limit date and time can be defined when masking an alarm. In this case the alarm is automatically unmasked at the end of the defined time. Masking an alarm or a group of alarms To mask an alarm or a group of alarms, click on the Mask… button. This action displays the list of no masked alarms. To mask an alarm or a group of alarms, select the desired alarm or the whole subset defined by the filter options Station (to select a station), On Call (to select an on-call group) or Group (to select a tag group), check the Selected list option then validate by the OK button.. After the selection of an alarm or a group of alarms, a dialog box is displayed to define the limit date and time of the mask and possibly type a comment (see § 6.17.1 “Masking / Unmasking alarms” below). The mask command will be taken in account only when exiting of the Masked Alarms dialog box by clicking on OK. Unmasking an alarm To unmask an alarm, first select it in the list (by clicking on the corresponding line), then click on the Unmask button. This button is validated only when an alarm is selected in the list. Lookup, edition of the comment, modification of the limit time To consult the masking comment of an alarm or modify it or to change the limit time of an alarm mask, select the alarm in the list (by clicking on the corresponding line), then click on the Edit… button (see § 6.17.1 “Masking / Unmasking alarms” below). This button is validated only when an alarm is selected in the list. The width of each column can be visually adjusted by positioning the mouse cursor on the concerned size bar of the title line, then clicking and dragging the bar to get the wanted size. This list can also be sorted according to the increasing or decreasing order of each of its columns. To do this, click on the title of the wanted column: an arrow will indicate the increasing sense of the sorting. Click again on the title of the column to reverse the sort order (reversed arrow). To perform a fast research for a value in the list, select the research column by clicking on its title, then scroll the list with the scroll bar: a "bubble" displays the content of the selected column for the 1st line of the list corresponding to the scroll bar position. 6-42 Operation Printing To print the list of masked alarms, click on the Print button. The printer which will be used is the printer selected by the Print setup... command of the File menu. If no setup has been performed, it is the default printer. To define the printing format of the list, click with the right button of the mouse in the list of alarms, then select the Printing... command in the displayed contextual menu. Exportation The list of masked alarms can be exported in a file or in the clipboard. To perform this operation, click in the list with the right button of the mouse, then select the Export... command in the displayed contextual menu. In the displayed dialog box, choose columns to export, the export format (header, separator) and the destination (file or clipboard). 6.17.1 Masking / Unmasking alarms Masking and Unmasking of alarms can be performed by using the command Alarm masked in the contextual menu associated with the tag views of the main screen (see § 4.6.1.4 “Tags”). The list of masked alarms can be displayed by selecting the Alarm Mask/Unmask... command of the Operation menu, or clicking on the button . See above. Begin date & time Define here the begin date and time of the mask. At this time the alarm will be automatically masked. The choice Now indicates that the alarm is immediately masked, after validation by clicking on the OK button. ALERT User Guide 6-43 Operation End limit date & time Define here the end limit date and time of the mask. At the end of this time the alarm will be automatically unmasked. The choice No limit indicates that the alarm is masked without time limit. It will be masked until a user comes to explicitly unmask it. Comment Write in this field the comment about the masking action of the alarm (or any other information concerning the masking action). 6.18 Group transfer Alarm calls intended to a group can be transferred to another operator group, either in support (need for a complementary competence) or in substitution (impossibility of processing the alarm at the level of the group). A request for group transfer can be performed either from the alarm table by selecting the alarms to transfer in the list then clicking on the Group transfer… button, or from the tag list displayed in a view of the main screen by selecting the alarms to transfer in the displayed list then selecting the Group transfer… command in the contextual menu associated to the view. The displayed dialog box allows a new recipient group to be selected for each group attached to the selected alarms (group called or call in progress), with substitution option (current group call aborted) or not. On-call Group List of on-call groups that have been called or are currently called for the selected alarm(s). Substit. Selection of "substitution" or not. If the box is checked, the call of the group designated in the 1st column is aborted. New recipient group Selection of the recipient group. Only groups defined as substitution groups for the group designated in the 1st column are proposed (see § 5.4.1 “On-call group properties”). The choice "-" indicates that no recipient group is selected. 6-44 Operation For each group displayed in the 1st column, select the wished recipient group in the dropdown list displayed by clicking on the corresponding line of the 3 rd column. Check the box of the 2nd column if you want the current group call to be aborted. ALERT User Guide 6-45 Operation 6.19 Control of DDE and OPC links To control the state of the connections established with the DDE or OPC server applications, select the Links... command from the File menu. The link list contains a list of all the items currently polled by DDE or OPC, for which the connection with the DDE or OPC server has been established, and a response to a first request has been received: Server Name of the server application Group Name of the variable group (DDE topic for DDE variables) Item Name of the item Value Current value of the item This list can be customized1. Connections The number of established connections is indicated above of the list under the form: Number of response received / Number of connections established / Number of connections to establish 1 This list can be entirely customized (selection of columns to display, order, width and title of columns, alignment of the title or the column content). To perform this customization, position the mouse cursor on the column of which one wants to modify the presentation and click on the right button of the mouse. Select then the adequate command in the displayed contextual menu. The new configuration is automatically saved to be restored for the next sessions. The width of each column can be visually adjusted by positioning the mouse cursor on the concerned size bar of the title line, then clicking and dragging the bar to get the wanted size. This list can also be sorted according to the increasing or decreasing order of each of its columns. To do this, click on the title of the wanted column: an arrow will indicate the increasing sense of the sorting. Click again on the title of the column to reverse the sort order (reversed arrow). To perform a fast research for a value in the list, select the research column by clicking on its title, then scroll the list with the scroll bar: a "bubble" displays the content of the selected column for the 1st line of the list corresponding to the scroll bar position. 6-46 Operation Option Display all items When this option is checked, the value of all the tags of the supervision list are displayed in the list, including those which are not polled (no DDE or OPC tags). Button Start connections This button allows the establishment (or re-establishment) of the connections of the tags designated as polled tags in the supervision list. Note: The establishment of the links is automatically performed at start-up of the application. However, if some links couldn't have been started (closed application) or have been broken since, this command gives the possibility of manual restoration. Button Close connections Click on this button to close all current connections (stop all polling). 6.20 Line printer The event log can be sent in real time onto a printer. To select and configure this printer, click on the Line printer... command from the File menu. Select the desired printer from this dialog box, or choose the Not used option if no line printer is being used. The line printer can be connected to a local port or the port of another PC connected on a network. This must be a "line" type printer (dot matrix), and not a "page" type printer (laser). Click on the Options button to configure the printer. ALERT User Guide 6-47 Operation 6-48 Options 7 OPTIONS 7.1 General options To access the configuration of the general options, select the Options… command of the Configuration menu. This dialog box also can be called from the contextual menu associated with the root of the tree in the main screen. ALERT User Guide 7-1 Options Advanced... Click on this button to define the advanced parameters of the software (starting page, user interface, running as service, basic language). See § 7.1.1Advanced parameters”. Title Bar This field defines the content of the title bar of the application (maximum 40 characters). The default title is "ALERT". Stations Mode of management of the stations: The Alert stations option indicates that the stations defined in the application are real stations equipped with the Alert software for the alarm centralization and capable of managing a local on call organization in synchronization with the centralization station. The Virtual stations option indicates that the stations defined in the application are virtual stations, created to segment the data and/or the on-call management in meaning entities (representation of remote sites, companies, trades...). Database export This group allows the real time export to an external database (see § 8.3 “External database”) to be configured and activated or deactivated. The commands of this group are only enabled when the "database export" option is validated by the software license. Check the option Database export activation to activate the database export functionality. Uncheck this option to stop the database export. Click on the Data links... button to select the files that define the link with the external database: AlertDB_AlarmDef.udl (configuration database) AlertDB_AlarmLog.udl (history database) By default, these files are installed in the application subdirectory "Bases". The link parameters with the wished database must be prior configured and tested by opening each of these files (by double click). Remote control This group defines the management parameters of external remote control software (see § 8.7 “Remote Control”). The Used port dropdown list designates the communication port to be shared with the remote control software. This port will be automatically assigned to the remote control software, either at the software launching if the remote control software is running at this time and is using the port, or on explicit requirement of a remote user (command "99" of the vocal server). The Waiting call edit field defines the maximum time waited for the remote control callback. This time is counted from the line hang-up. After this delay, the remote control software is breakdown and the communication port is retrieved by Alert. In order to give time to the remote control application to be launched, it is preferable do not enter a value below 30 seconds. When the Priority to alarms option is checked, all call requested during a remote control session and that will need the port used by the remote control software, 7-2 Options will cause a warning message to be displayed to inform the operator that the remote control session will be aborted in the delay that has been defined in the adjacent field. The Time before hang-up edit field defines the time waited before aborting the remote control session when Alert needs the port used by the remote control application to make a call. This delay is taken in account only when the option “priority to alarms” is checked. Archive duration This group defines the duration of storage of recorded data. Any data recorded before the specified archival duration for the concerned data category is automatically destroyed at the start-up of the Alert application and at every change of day. The archived data are: Alarm History: daily files of type "HYYMMDD.LOG" located in the "HISTO" subdirectory (100 days by default). Event Log: daily files of type "TYYMMDD.LOG" located in the "TRACE" subdirectory (100 days by default). Logbook: daily files of type "RYYMMDD.LOG" located in the "REPORT" subdirectory, as well as the associated audio files of the "MYYXXXXX.WAV" type (100 days by default). Transmitted vocal messages: audio files of type "MCXXXX.WAV" in the "MESSAGE" subdirectory (7 days by default). Automatic configuration backup This group defines a periodic backup of the configuration in a designated directory. To program a backup, select a period (date and time), a backup directory (application directory by default) and the prefix of the name of the backup file ("Backup" by default). The choice of day "---" invalidates the automatic backup. The generated backup files are compressed files (ZIP format), recorded under a name of type: "PPPP_YYYY-MM-DD.abf" With: PPPP = prefix ("Backup" by default). YYYY = year, MM = month, DD = day The parameter "Maximum number of files in the backup directory" defines the maximum number of automatic backup files that will be kept in the backup directory. Beyond this number, the older backup files are automatically deleted. Alarm supervision This group allows the activation and configuration of the Alert viewer module, as well as setup of RSS functionality for automatic notification of alarms by RSS feed. Check the box Alert Viewer activation to activate the Alert viewer module allowing pages to be displayed by the integrated Web server for a graphical visualization of alarms and supervised data (synoptic view, location map …). Click on the Configuration… button to configure the parameters of the Alert viewer module (see § 7.1.2 “Alert Viewer Configuration”). Click on the RSS… button to define the RSS feed of alarm notification (see 7.1.4 “RSS feed configuration”) ALERT User Guide 7-3 Options Login / Logout The option Enable commands out of login allows some operations to be authorized without having to be logged on the application: call or alarm acknowledgment, alarm masking/unmasking, edition of an alarm comment or report , call transmission, … When this option is validated, every commands that require the designation of the accountable user for the performed action (acknowledgment, masking …) provoke the display of a dialog box to get the name of the user and his password. The command is only accepted if the profile of the designated user authorizes it. The parameter Automatic logout timeout defines the time after which the application will be automatically logged out if there was no user action in the middle time (mouse or keyboard action). The value 0 corresponds to an infinite time (no automatic logout). 7.1.1 Advanced parameters The Advanced parameters dialog box defines the advanced parameters of the software (starting page, user interface, running as service, basic language). Starting page The displayed page at the start time of the software can be defined by selecting one of the options of this group. When the "none" option is selected, the starting screen does not display any window. Service Select this option to declare the software as Windows service. 7-4 Options When this option is checked, the software is automatically registered as a Windows service. It will be then automatically launched as service at the next system restarts and will be operational even if there is no open session. To unregister the software as Windows service, you have just to uncheck this option. (See § 8.8 “Alert as service”). Basic language Selection of the basic language, used to identify the data servers and tags in the external references of the DDE and OPC server of ALERT. It is also the reference language used for the messages and labels when they are not defined in a language. See § 8.4 “Multi-language management”. 7.1.2 Alert Viewer Configuration The dialog box Alert Viewer Configuration defines the parameters of the Alert viewer module allowing pages to be displayed by the integrated Web server for a graphical visualization of alarms and supervised data (synoptic view, location map …). Web Server This group defines the parameters of the embedded web server. The edit field Server root directory defines the basic directory of the Web server from which the displayed HTML pages are referenced. By default, it is the installation directory of the software. The edit field HTTP port defines the IP port used by the http protocol of the Web server (8080 by default). The edit field Java port defines the communication IP port used by the Java applets embedded in the displayed HTML pages (6700 by default). ALERT User Guide 7-5 Options Screen editor directory This group designates the screen editor to use to create and modify the HTML pages to display and defines the project file that contains these pages. The edit field Screen editor directory defines the directory where is located the program to use to edit the synoptic views (VAEdit.exe). Click on the adjacent button to browse and select this directory. The edit field Project path defines the full path of the project file to use by the screen editor. Click on the adjacent button to browse and select this file. Web Browser Plug-in This group allows the activation and configuration of the Web browser plug-in. Check the box Display the Web browser plug-in to add a Web browser tab to the work space allowing the visualization of the synoptic pages generated by the Alert viewer module. Click on the Configuration… button to configure the parameters of the Web browser tab (Welcome page to display and tab label). See below. 7.1.3 Web browser page setup The dialog box Web browser setup defines the HTML page to display in the screen attached to the Web browser tab. Enter in the field Main URL the reference to the hyperlink with the wished welcome page. Example: “http://localhost:8080\Supervision\Default.htm” This dialog box also allows the Web browser tab label to be modified (“Viewer” by default). 7.1.4 RSS feed configuration The dialog box RSS feed configuration defines the functionality of automatic notification of alarms by RSS feed. The RSS feed functionality (Really Simple Syndication) allows dynamic information to be automatically received from a WEB server (news, alerts …) by the mean of 7-6 Options subscription of client applications (feed readers). Information to transmit is written in a normalized XML file stored on a public WEB server. When the RSS functionality of ALERT is activated, every time the alarm status is changed (set, reset or acknowledgment of alarms), an XML file is automatically generated in format RSS 2.0 from the current alarm table then uploaded by FTP to a public WEB server. The XML file is regenerated and periodically transmitted, every time the alarm status has been modified (set, reset, acknowledgment). The option RSS feed activation validates/invalidates the functionality of alarm notification by RSS feed. The configuration of the RSS feed working includes the configuration of the FTP access to a public WEB server (accessible from any feed reader) and the definition of some parameters of the RSS feed. FTP access The field FTP server URL defines the URL label of the FTP server that will receive the XML file of the RSS feed. The field Port defines the port number used by the server for the FTP access (port 21 by default). Specify, if needed, in the field Server directory, the full path of the directory where the XML file has to be stored, relatively to the root of the FTP server. Define the authentication parameters of the FTP access, specifying, for Normal type access, an identifier (User field) and a password. RSS feed parameters The field Name of RSS file defines the name of the XML file that will be generated to record the list of current alarms (Alarm_RSS.xml by default) ALERT User Guide 7-7 Options The field Period for RSS feed refreshing defines the maximum time the XML file must be polled by the feed reader (in minutes). 7-8 Options 7.2 Supervision options To configure the supervision options, select the Options… command of the Configuration menu, then, on the displayed dialog box, select the Supervision tab. Button Data Servers... This button gives access to the list of the DDE and OPC servers that are referred to in the polling list. It allows a list of secondary (redundant) servers to be defined for each referred server (see § 7.2.1 “Secondary DDE Servers”). Button Alias... This button gives access to the definition of alias names for the DDE server and topic names The alias names allow a same name to be used to refer to different servers or topics in redundant configurations (see §7.2.1 “Secondary DDE Servers”). Button OPC Setup... This button gives access to the configuration of the Client and Server OPC interface. ALERT User Guide 7-9 Options Mediator This group allows the selection of the mediator1 module which will be in charge of the interface with the supervised application. Select in the drop down list the name of the "Mediator" module. By default, there is no mediator selected (choice "-"). To add a mediator to the list, one only have to copy the DDL file of the mediator in the directory of the Alert application, the file name being required to have the format: "M_XXXXXX.DLL, with "XXXXXX" a string identifying the mediator. The Setup button gives access to a dialog box to configure the selected mediator. It is grayed if there is no mediator selected or if the selected mediator does not propose a setup service. The Initialize button commands the reinitialization of the mediator module. It is grayed if there is no mediator selected. The Message processor activation option activates, when checked, a mediator for message processing (message processor). If the message processor is not installed, this option is grayed. When the message processor is active, it can be configured by the command Message processor... in the Configuration menu. Polling parameters The Timeout before start polling value defines the timeout between start-up of the application (with launching of external applications) and the establishment of the connections with the supervised applications. This timeout allows the completed initialization of external applications to be awaited before soliciting them. The Timeout to restart polling value defines the timeout initialized when the connection with an external application is broken before trying to automatically restore it. This timeout will be retriggered until the reestablishment of the connections. If this value is null, there is no automatic reestablishment of the connections. The Timeout on request response value defines the maximum delay for waiting for a response to explicit DDE or OPC requests. These requests are transmitted to all the events to watch, first at the establishment of the connection, then periodically for the events defined with the "periodic request" option. If this timeout is null, requests are done in synchronous mode (blockage while waiting answer). The Polling cycle (Periodic Request) value defines the polling period to read the events set with the "periodic request" option. At the end of this period, all the events defined with this option are submitted to an explicit DDE or OPC request, to control that the supervised application is still responding. The choice Polling: Always / Only active station defines the default polling mode of the station. If the option “Always” is selected, the data servers always establish links with their respective data sources, any is the active status of the station. If the option “Only active station” is selected, the links are only established when the station is active (“Alert” led in green). 1 A mediator module is a DLL module which takes charge of the data exchanges between the ALERT software and the supervised application. 7-10 Options The Initial DDE Request on Advise option forces at the connection time an initial request for the DDE type tags declared in polling to recover their current value. This option must be validated if the DDE server of the supervised application does not provide an initial value in return of advise command (the server transmits the value only to the next change). It must be invalidated if the DDE server of the supervised application returns incoherent values on an explicit request after starting ADVISE transaction, while the tag value has not been acquired by the server. When the Initial DDE request... option is validated, the Request before Advise option specifies that the DDE request must be performed before the DDE advise. When the Link failure on invalid tag value option is activated, a link failure is set on tags with invalid values despite a successful connection, a bad quality in OPC for example. This parameter can be redefined at the level of each data server and each tag. Server item receiving the event log This option designates an item in an external DDE or OPC server application that will receive the trace of the events logged by ALERT (user login, alarms, acknowledgments ...). This reference can be directly typed or browsed by clicking on the button on the right of the edit field. To disable the event transmission to an external variable, you just have to erase the reference of the defined variable. The events logged by Alert are transmitted to the selected DDE variable under the form: "Event code" <Tab> "Parameters" (See the Event coding table on the following page). Watch Dog item This option defines an item in an external DDE or OPC server application which will be then cyclically written with the value of a counter incremented at each cycle. This item could be tested by the external application to check that its contents changes according to the parameterized cycle, and so control that the alarm manager is still running. This reference can be directly typed or browsed by clicking on the button on the right of the edit field. The Cycle parameter defines the period of the writing cycle of the designated item, in seconds. A null value disables the watch dog processing. The Modulo parameter defines the maximal value of the transmitted counter. When this value is reached, the counter is reset to zero. The Format parameter defines the value which will be written in the designated "watch dog" item. By default the write format contains only the counter value, coded under the form "&C". The format string can include any other numerical or alphanumeric string, and also tab characters that must be coded under the form "&T". To disable the watch dog processing, you just have to erase the reference of the defined "watch dog" item or to set the write cycle to zero. ALERT User Guide 7-11 Options Code 0 1 2 3 4 5 6 7 8 9 10 11 12 13 14 15 16 17 18 19 20 21 22 23 24 25 26 27 28 29 30 31 32 33 34 35 36 37 38 39 1 Parameters Meaning <operator> <operator> <operator> (<port>:<driver>) <operator> (<port>:<driver>) <operator> <operator> <operator>: <cause> <alarm message> <alarm message> / <operator> <alarm message> <operator> / <operator> <alarm message> <operator> (<port>) <on-call group> <on-call group> <on-call group> (-> <team>) <on-call group> <operator> (<port>) <port> <port> <reference of server or item> <information> <operator> <operator> / <substitute> <alarm reference > / <operator> <alarm reference> / <operator> <port> - Application initialization Application closure User login User logout Outgoing call for message Outgoing call for alarm Advised operator Unadvised operator Call failure Alarm Alarm acknowledgment 1 Alarm reset Call acknowledgment 2 Simple event Incoming call Group call succeeded Group call failed Schedule derogation3 End of schedule derogation System date modified Login from a remote terminal End of communication on a port Port failure (modem) Link failure Information message Operator set off duty Operator substituted Set of alarm mask Reset of alarm mask Connection established on a port Alert management deactivation in redundant mode 4 Alert management reactivation in redundant mode 4 <operator> End of remote session <error description> Error <operator> Operator set on duty <operator> / <operator> Call denied (negative call acknowledgment) 2 Group <G>, team changeover <A> -> Team changeover team A to team B in group G <B> / <operator>, max delay <n> 5 minutes Group <G>, team changeover <A> -> Team changeover failed team A to team B in group G (timeout expired) 5 <B> Group <G>, team <E> / <operator> End on-call time group G team E <operator> -> <status> Change of operator status (availability) If the acknowledgement is issued from an external application, without identification of operator, the part "/ operator" is omitted. 2 If the call is acknowledged by the called operator himself, the part "/ operator" is omitted. 3 If no team is defined in derogation, the part "(-> team)” is omitted. 4 In redundant mode. 5 If 1st changeover, the part "<A>" is suppressed, if default delay, the part ", max delay…" is suppressed. 7-12 Options Event coding 7.2.1 Secondary DDE Servers To access to the configuration of the secondary DDE servers, select the Options… command of the Configuration menu, then, on the displayed dialog box, select the Supervision tab. Then click on the Data Servers… button on the top of the page. This dialog box defines a list of secondary (redundant) servers for each DDE or OPC server referred to in the polling list. In normal time, the DDE and OPC connections are established with the primary servers. In case of disconnection of a primary server, the connection is automatically reestablished with the first available secondary server in the list of the secondary servers associated with. Primary servers This list displays the list of the DDE and OPC servers which are referred to in the polling list, whether they are on the local station or any network station. The Topic column is used only for DDE servers. The last column displays the number of secondary servers associated with. Secondary servers This list displays the list of secondary DDE and OPC servers associated with the server selected in the list "Primary channels". These servers will be requested, in case of failure of the associated primary server, in accordance with the order defined in the list. Button Add... Click on this button to add a new secondary server in the list of secondary servers associated with the server selected in the list of primary servers. The displayed dialog box allows the selection of a computer (a network station), a server and a topic. ALERT User Guide 7-13 Options Button Edit... Click on this button to modify the definition of the secondary server selected in the list of secondary servers. The displayed dialog box allows the modification of the computer (the network station), the server and the topic. Button Delete Click on this button to remove the selected secondary server from the list of secondary servers. Buttons and Use these buttons to respectively move up and down the secondary server selected in the list of secondary servers. The secondary servers are used in accordance with the order defined in the list. 7.2.2 Definition of alias names To access to the configuration of the supervision options of the application, select the Options… command of the Configuration menu, then, on the displayed dialog box, select the Supervision tab. Then click on the Alias… button on the top of the page. DDE alias names can be used to replace the server or topic names in a DDE reference name. This allows the same name to be used to reference different servers or topics in redundant configurations. Server Alias List This list contains the alias names defined for the DDE servers, under the form: <alias name> -> <DDE server> (list of topics attached to the server) Topic Alias List This list contains the alias names defined for the DDE topics, under the form: <alias name> -> <DDE topic> Button Add... Click on this button to create a new server or topic alias (see below). 7-14 Options Button Edit... Click on this button to edit the properties of the alias selected in the server alias list or the topic alias list (see below). Button Delete Click on this button to delete the alias selected in the server alias list or the topic alias list. 7.2.2.1 Alias definition Option Server Alias Association of an alias name with a DDE server name and definition of a list of attached topics. Option Topic Alias Association of an alias name with a DDE topic name. Alias This field contains the name of the defined alias. Server/Topic This field contains the name of the DDE server or DDE topic (according to the above selection) referenced by the alias name. Defined Topics This list displays the topic aliases that have been defined. Attached Topics This list displays the topic alias attached to the defined server alias name. This list is only valid when the defined alias is a server alias. The list of topic alias attached to a server allows the topic list to be predefined when the server alias is selected during the definition of a DDE reference. ALERT User Guide 7-15 Options Button + This button adds the topic alias defined in the Alias field to the Topic list. Button >> This button adds the topic selected in the Topic list to the Attached Topic list. Button << This button deletes the topic selected in the Attached Topic list. 7-16 Options 7.3 Display options To configure the display options, select the Options… command of the Configuration menu, then, on the displayed dialog box, select the Display tab. Language Selection of the language of the user interface (menus, dialogs, messages, help, etc). This is also the language used to display and define the multilanguage labels (See § 8.4 “Multi-language management”). The defined language will be taken into account from validation by clicking the OK button. Click on the Font… button to select the font to use in the user interface of the application (font, style and size). Windows Control The System menu box option validates the display of the "system menu" box on the left of the title bar of the main window. This option will have effect only after restarting the application. ALERT User Guide 7-17 Options The Window sizing option validates the display of the sizing controls of the main window (buttons to minimize and maximize windows, sizing frame). If this option is not selected, the window is full screen and can be neither adjusted nor moved. This option will have only after restarting the application. The Lock ALT and CTL/ESC option validates the locking of the Windows commands to switch the tasks (ALT/TAB, CTRL/ESC). This option forbids any user to switch to another Windows application. Schedule Selection of the resolution used in the on call schedule. When the resolution is decreased (1/4h -> 1/2 h -> 1 hour), a confirmation message is displayed to warn the operator that the schedule is likely to be modified (extension of time periods not aligned for the new resolution). Colors Customization of colors representing the types of events in the event log and the state of alarms in the alarm table. Select an alarm state from the Alarm log list or a type of event from the Event log list then click on the Choose... button. Select the desired color in the displayed palette. The Default button restores the default configuration of the colors associated to alarm states and events. Displayed station configuration filter Selection of the station to view. This selection is only enabled when the local station (first station) is defined as a "Centralization station". Only the "ALERT" stations (stations defined with a user having the station name and associated with an ALERT communication driver) are proposed in the list. The choice "(all)" gives access to the data of all stations. If a station is selected, the name of the selected station will be displayed in the status bar on the bottom of the main window, and only the data of this station will be accessible: configuration data for on-call management and supervision, on-call schedule, alarm table, alarm history and event log. 7-18 Options 7.4 Alarm options To configure the alarm management options, select the Options… command of the Configuration menu, then, on the displayed dialog box, select the Alarms tab. Acknowledgment This group defines the options associated with alarm acknowledgment: Automatic alarm acknowledgment an alarm reset. This option enables the automatic acknowledgment of an alarm by solving the problem which produced the alarm. This option can be redefined at the level of each alarm. Automatic alarm acknowledgment on group warned. This option enables the automatic acknowledgment of an alarm when the concerned group is warned. This option can be redefined at the level of each alarm. Anonymous acknowledgments dedicated to local user. This option allows anonymous acknowledgments (transmitted by a SCADA for example) to be identified by attributing them to the user who is locally logged. ALERT User Guide 7-19 Options Timeout before restarting the call cycle when an alarm is not acknowledged. This parameter defines the maximum time to acknowledge an alarm. This number can be between 0 and 999 minutes, the value 0 canceling all delay (no obligation to acknowledge the alarm). When this time expired (if the alarm has not been acknowledged meanwhile), the call cycle is restarted towards the team which is on duty at that moment. Priority This group defines the priority management: Reverse priority order. This option defines the priority order. When this option is not checked, the 0 priority is the lower priority. When this option is checked, the 0 priority is the higher priority. Period for automatic priority increment. Default cycle time for automatic increment of the priority of an alarm when it is waiting to be transmitted. This functionality allows the priority of a waiting alarm to be promoted according to the elapsed time. The value 0 (default value) invalidates the automatic increment of waiting alarms. This parameter can be redefined at the level of each data server and each alarm. Alarm Table This group defines the options associated with the alarm table: Automatic deletion of inactive and acknowledged alarms. When this option is checked, alarms are automatically removed from the alarm table when they are both acknowledged and not active. Local Alarm This group defines the local sound treatment of the alarms: Play group tone. This option validates the local emission of the characteristic sound message of the concerned on call group when an alarm is detected. If several groups are attached to an alarm, the played file will be the file of the first group defined in the list of the attached groups. Note: This option is validated for all the defined alarms attached to an on-call group having a sound file configured. It is also possible to play a sound file for a specific alarm by defining a "Play Tone" action for this alarm. Play vocal message. This option validates the local emission of the audio message attached to an alarm when an alarm is detected. This emission will follow the emission of the group sound message, if this emission is validated. If the (Repeated) box is checked, the message will be played in a continuous loop until the alarm acknowledgment. Note: This option is validated for all the defined alarms in the polling list. It is also possible to play the alarm message on the local station for a specific alarm by defining a "Play vocal message" action for this alarm. Default format of alarm messages This group defines the default format to use for the alarm messages (and reset or acknowledgment messages) that do not have specific format associated with. The message format defines a composite message that will be created at the event time of the concerned alarm, reset or acknowledgment. It can contain some invariant parts, reproduced as they are, and some variable parts, that make reference to alarm parameters, by using the following syntax: 7-20 Options &M &R &O &N &J &C &S &P &G &A &V &V* &L &U &D This field will be replaced by the alphanumeric message (long message) defined for the tag This field will be replaced by the external tag reference (DDE/OPC reference or other) This field will be replaced by the tag object identifier (OID) This field will be replaced by the name of the tag. This field will be replaced by the name of the data server of the tag. This field will be replaced by the alarm code (short message) defined for the tag This field will be replaced by the name of the station attached to the tag. This field will be replaced by the value of the priority of the tag This field will be replaced by the name of the basic alarm group associated with the tag This field will be replaced by the name of the call group associated with the tag This field will be replaced by the value of the tag at the alarm time. This field will be replaced by the current value of the tag. This field will be replaced by the name of the station attached to the tag, if the station is not the local station. This field will be replaced by the name of the user who acknowledges the alarm. This field will be replaced by the date and time of the alarm with the format "MM/DD/YY HH:MM/SS" If no default format is defined, the equivalent format will be "&M" to display the alarm message, if this last is defined, or "&R" to display the tag reference if the alarm message is not defined. Default Ack and Reset call This group defines the default call options on event reset and alarm acknowledgment. These options can be redefined at the level of each tag. Call option on alarm reset. If this option is checked, the reset of alarms for those the call option on event reset has not been specifically redefined will trigger a call to the attached group. Call on alarm acknowledgment. If this option is checked, the acknowledgment of alarms for those the call option on alarm acknowledgment has not been specifically redefined will trigger a call to the attached group. In the both case, only operators having the corresponding call option will be called. ALERT User Guide 7-21 Options 7.5 Call options To configure the call management options, select the Options… command of the Configuration menu, then, on the displayed dialog box, select the Calls tab. Call trigging This group defines the options attached to the call trigging conditions: Discard call if no team to call when alarm is activated. This option defines the behavior of the Alert manager when an alarm is triggered during a period where there is no team to call (no active team in the schedule or group in derogation state without derogation team). If this option is validated, the alarm is recorded in the alarm table, but the call is discarded. To the next valid on-call time period (or when exiting derogation state), there will be no call for alarms already registered, that they are acknowledged or no. If this option is not validated, the alarm is recorded in the alarm table with the corresponding call request. To the next valid on-call time period (or when exiting 7-22 Options derogation state), the call will be automatically triggered, except if the alarm in question were acknowledged meanwhile. New call if unacknowledged alarm is reactivated. This option allows a new call to be retriggered when an unacknowledged alarm is reactivated. If this option is not selected, an unacknowledged alarm will not provoke a new call if it is reactivated after a return to the normal state. This option is checked by default. Reactivation of call cycle if new alarm. When this option is checked, the apparition of a new alarm reinitialize the call cycle of the concerned group. This option ensures that all new alarm will be signaled to operators even if they have been already called. This option is checked by default. Abort call cycle on derogation. When this option is checked, the derogation command for a group immediately aborts the current call cycle of the group. By default, this option is not checked. Calls in progress fail if no more on-call team. When this option is checked (default option), the end of the on-call period (no more team in schedule) stops the current call cycle, with fail of the group call if the successful call conditions are not fulfilled. Trace if call failed caused by off-duty user. This option validates or not the trace in the event log of the call fails that are consecutive to the call of an off-duty operator. When the on-call management is controlled from the supervised application by the modification of the on-duty status of operators, it is preferable to uncheck this option to avoid useless information in the event log. High priority vocal alarm management. When this option is checked, all alarms having a priority level higher or equal to the level defined below will provoke priority calls. When a priority alarm requires a vocal call and no vocal line is available (vocal calls in progress), one of these vocal calls is aborted (after sending a warning message) to allow the priority call to be performed. The aborted call will be resumed as soon as possible (available vocal line). A vocal alarm can stop the current call when its priority is higher or equal to… This value defines the minimal priority level of alarms requiring priority calls (suspension of calls in progress). This option is only available (not grayed) when the option of management of priority alarms is validated (see above). Delay before trigging call. This parameter defines the waited timeout (in seconds) before trigging a call when an alarm is detected. This timeout allows the alarm to be immediately treated by a local operator before starting of the call cycle. By default, this time is 0 (no delay to trigger the call). During a reduced duty period, trig the call if the alarm priority is at least. This value defines the minimum level of alarm priority to start a call during a "reduced duty" period. When an alarm has a priority level lower than this value, its activation during a "reduced duty" period for the concerned group will not induce an immediate call. This call will be delayed until the end of the reduced duty period, except if the alarm has been acknowledged meanwhile. Timeout before restarting a new cycle after fail. This parameter defines the waited timeout (in minutes) at the end of a call cycle when this cycle did not succeed (including the call of relief operators) to restart the cycle. If meanwhile the on-call team changed, the call will be performed to the new team. ALERT User Guide 7-23 Options By default, this time is 5 minutes. If this time is null, there is not resumption of the cycle in case of failure (except at the end of the acknowledgment timeout if it is not null). Team Management This group defines the default options for the management of the teams: Selection of the team management mode: Call one user for each alarm, different for every alarm (operator turnover) Call all active users of the team (call broadcasting), with management of relief operators according to options below. Definition of the call conditions for relief operators (only for call broadcasting): Call relief if not one of user is advised: a relief operator is called when none of the main operators of the team has been successfully reached (assures that at less one operator is warned). Call relief for each unadvised user: a relief operator is called every time a team's operator cannot be reached (assures that a constant number of operators are warned). Call Management This group defines the default treatment options for call failures: Attempt number if call fails: maximum number of call attempts to the number when the call failed (no answer, busy ...). This number can be between 1 and 9. The time waited to try a new call depends on the type of failure. In case of no answer or busy failure, this time is that indicated by the parameter below ("timeout before new attempt"). It is reduced to 1 second if the modem does not detect the dial tone. Timeout before new attempt: time delay waited after a call failure (no answer or busy) to try a new attempt, in seconds. By default, this time is 60 seconds. Attempt number if call not acknowledged: maximum number of calls of a number when the call succeeded but the operator did not acknowledge the call within the defined delay. This number can be between 1 and 9. The call can be acknowledged locally or remote by telephone, by SMS or from a client station. Timeout for call acknowledgment: time delay waited for call acknowledgment when the called operator has been reached, but without certainty (SMS, beeper, pager). This delay can be between 0 and 99 minutes, the value 0 canceling any delay (the call then always is considered as acknowledged). 7-24 Options 7.6 Redundancy options To configure the redundancy options, select the Options… command of the Configuration menu, then, on the displayed dialog box, select the Redundancy tab. Activation This group defines the functioning of the application in redundant mode. The Active with the station option validates, when checked, the redundant mode with the station defined in the adjacent field (name of a computer on the network functioning in redundancy with the local station). This name can be directly entered in the field or selected among the active computers of the network by clicking on the adjacent button . The redundant station also can be designated by its IP address. The Main Station option defines the operating mode of the 2 redundant stations. The main station is the station that will be active when the 2 stations will normally function. So that the redundant mode functions correctly, it is necessary to define ALERT User Guide 7-25 Options one of the 2 stations like main station (checked option) and the other station like secondary station (option not checked). When the Automatic Switch option is checked (default option), the switching between the 2 stations is automatic when the active station goes to failure. Uncheck this option if you wish to control this switching from the external application. When the Distributed calls option is checked, the calls are distributed between the 2 stations. If the main station does not have any available port for the type of call to perform, it automatically delegates the call to the other station. When this operating mode is chosen, switching between the stations is not necessary (Automatic Switch option not checked). The TCP/IP Port field defines the number of the port used for the TCP/IP exchanges between the redundant stations. This number has to be modified only when the default proposed port (2495) is already used by another application on one of the redundant stations The selected TCP/IP port is this that will be used for the exchanges with the client stations. The Trace option, when checked, displays a trace window to visualize the TCP/IP exchanges. Remote station supervision This group defines the parameters of the polling cycle of the remote station: The network polling cycle defines the polling period of the remote station. A TCP/IP link control is performed at each period expiry. The timeout on response parameter defines the general timeout for waiting answer to each protocol request. Automatic synchronization This group defines the synchronization options of redundant stations and enables or not the synchronization of alarms, acknowledgments and configuration between the 2 stations: Synchronization at launching: when this option is checked, the configuration of the remote station (declared in redundancy) is automatically retrieved when the application is launched. Synchronization on the most recent configuration: when this option is validated, the dates of modification of the synchronized data between the redundant stations are compared to determine the values to keep for the synchronization. That option is especially useful during the automatic synchronization at launching when the configuration of each station has been modified on the both stations. Alarm synchronization: alarms detected on a station are automatically reported to the other station. When the supervised application is redundant, this option is not necessary insofar as alarms are signaled on each station by their respective instance of the redundant application. However, that option can increase the efficiency of the redundancy insofar as it gives the possibility to continue to call for alarms from the other station in case of simultaneous failure of links on a station and communication ports on the other station. 7-26 Options Acknowledgment synchronization: the call and alarm acknowledgments performed on a station are automatically transmitted to the other station. When this option is checked, the alarm masking and unmasking are also synchronized. Call synchronization: the call progression status on the active station is automatically transmitted to the other station. Schedule synchronization: any modification of the schedule table of a group is automatically transmitted to the other station. On call management synchronization: any modification of the on-call organization (operators, groups, teams, derogation...) is automatically transmitted to the other station. Supervision synchronization: every modification of the tag list to supervise is automatically transmitted to the other station. The tags declared as no redundant are not transmitted. Programmed call synchronization: any modification of the programmed calls and calls for synchronization with the remote stations is automatically transmitted to the other station. Parameter synchronization: any modification of working parameters is automatically transmitted to the other station: alarm parameters, call parameters, working of the vocal server (messages and parameters). Report synchronization: any modification of the logbook is automatically transmitted to the other station. Stop synchronization: select this option to suspend the automatic synchronization of stations (during a maintenance operation for example). To automatically reactivate the synchronization after a given time, enter in the adjacent field the wished time value for the synchronization suspension. Manual synchronization The following synchronizations are only performed on request, from the local station, by clicking on the Synchronize button. Icon synchronization: selection of the synchronization of icons defined in the tree of the main screen. Script synchronization: selection of the synchronization of scripts and parameters of the message processor. ALERT User Guide 7-27 Options 7.7 Client station options To configure the specific options of the client station, select the "Client Options…" command of the "Configuration" menu. This command in only available on the client station, after a session has been opened with the ALERT server station. The parameters defined in this dialog box are locally saved on the client station. Advanced... button Click on this button to define the working mode of the client station at launching time (see § 7.1.1 “Advanced parameters”). Title bar This field defines the content of the title bar of the application (maximum 40 characters). The origin default title is “ALERT”. Language Selection of the language of the user interface (menus, dialogs, messages, help, etc). This language can be different of that selected on the server station. 7-28 Options The defined language will be taken into account from validation by clicking the OK button. Click on the Font… button to select the character font to use in the user interface of the client station (font, style and size). Windows restoration Option of automatic activation of the client window. The activation of the client window results in the setting on foreground of the client window. If the latter were in icon, it is restored full screen. Choice on alarm: the client window is automatically reactivated on reception of an alarm. Choice on event log: the client window is automatically reactivated every time an event is logged in the journal (login, alarm, acknowledgment...). Local alarm This group defines the local sound treatment of the alarms on the client station: Play group tone. This option validates the emission on the client station of the characteristic sound message of the concerned on call group when an alarm is detected. If several groups are attached to an alarm, the played file will be the file of the first group defined in the list of the attached groups. Play vocal message. This option validates the emission on the client station of the audio message attached to an alarm when an alarm is detected. This emission will follow the emission of the group sound message, if this emission is validated. If the (Repeated) box is checked, the message will be played in a continuous loop until the alarm acknowledgment. Colors Customization of colors representing the types of events in the event log and the state of alarms in the alarm table. Select an alarm state from the Alarm log list or a type of event from the Event log list then click on the Choose... button. Select the desired color in the displayed palette. The Default button restores the default configuration of the colors associated to alarm states and events. Login/Logout Define here the time after which the client station will be automatically disconnected if there was no user action in the middle time (mouse or keyboard action). The value 0 corresponds to an infinite time (no automatic logout). Supervision Check the box “Supervision plugin activation” to add an additional tab on the screen of the client station, displaying a WEB page for a graphical representation of alarms (alarm viewer synoptic, localization map…). Define in the field “Tag values polling period” the polling period of the client station to automatically refresh the value of the displayed tags. The value 0 invalidates the automatic refreshment of the value of the displayed tags. ALERT User Guide 7-29 Options 7.8 Vocal server configuration To configure the working of the built-in vocal server of Alert for telephonic vocal communications, select the Vocal Server… command of the Configuration menu. The displayed dialog box contains 4 tabs: Options: configuration of the general options of the vocal server. Messages: definition of messages used by the vocal server and vocal messages attached to the tag groups. Voice synthesis: configuration of the voice synthesis (this tab is only displayed when the voice synthesis option is installed). Usage: selection of the telephonic keys used by the vocal server. 7.8.1 Vocal Server options The Options page of the Vocal Server dialog box displays the general options of the vocal server. 7-30 Options Voice The vocal server can be configured for each language used in the application (user interface language, language of defined operators). To define the voice of the vocal server to use for a given language, select the language in the dropdown list Language, then select the wished voice in the dropdown list below. To add a language to the proposed list, click on the button on the right of the language dropdown list then select the wished language in the displayed list. To suppress a language, click on the same button, select the language to suppress then click on the “Mask” button. Identification These parameters define options for the identification of the called or calling operator. Identification before playing messages When this option is checked, the called or calling operator must identify himself with his identification code (ID of the user file) to be able to listen to messages which are intended to him. This option is validated by default. If this option is not checked, all the alarm messages (unacknowledged or active alarms) are transmitted after the greeting message. The operator has the choice to identify himself to acknowledge the call. If the operator does not enter his ID code, the call is considered as failed. Substituted by a unique code for outgoing call If a numeric code of one or several digits is defined in this field, this code will be to used as identifier for all called operators. This option allows a standard procedure to be defined for answering to Alert calls, independently of the called operators, these one being implicitly identified by the identifier of the called operator. This code is only valid for outgoing calls. When an operator calls for Alert, he must identify himself with his personal code. Correspondent authentication This authentication means the user access code (0 to 4 digits) is required during voice communications after user identification. Explicit call acknowledgment When this option is checked, the call has to be explicitly acknowledged or refused by the called operator (or calling operator for received messages to acknowledge): - Key 3: to accept the call (call acknowledgment) - Key 9: to refuse the call and ask for its reiteration to a relief operator. Number of identification attempts (3 by default) This number defines the maximum number of attempts authorized for the entry of the identifier code (ID) code or the password when accessing by telephone. When the called or calling user exhausted his number of attempts without having entered a valid code, the telephone line is automatically hang up. If this value is null, the number of attempts is unlimited. Identifier waited length ALERT User Guide 7-31 Options This value defines the number of digits waited to identify the operator (0 to 4, 3 by default). If this value is null, the identification procedure is suppressed. The operator immediately has access to all commands of the vocal server. Station identifier waited length This value defines the number of digits waited to identify the station (0 to 4, 0 by default). If this value is null, the station identification procedure is suppressed. This identification is needed only on the centralization stations. The operator must enter the identifier of the station followed by his own identifier. Time-out for identifier entry This time can be between 10 and 180 seconds. When this timeout expires without having received a valid user identifier, the telephone line is automatically hang up. Time between message repetitions If the option "identification before playing messages" is validated, the greeting message is cyclically repeated with a pause between each transmission that corresponds to the value specified here. If the option "identification before playing messages" is not validated, the alarm messages are cyclically repeated with a pause between each transmission that corresponds to the value specified here. The value 0 invalidates the repetition process. Other options Limited access on incoming call (force call-back) When this option is checked, it is impossible to connect from a remote terminal or to acknowledge alarms by telephone during an incoming call. It is obligatorily necessary to be called following an alarm or a callback request (by key "6"), to be able to use the terminal server or the acknowledgment command by telephone. Acknowledgment of alarms by telephone When this option is checked, the operator can listen to alarms one by one (key "7") and acknowledge the last listened alarm by pressing the key "8". Answering machine management (key *) This option validates the automatic recording of messages on a vocal answering machine (answering machine or GSM mail service). When this option is checked, the software will interpret the receipt of the DTMF code of the key "*" (before all other code) like a request to abort the identification procedure. In this case, alarm messages are transmitted at the end of the defined timeout then the line is disconnected. The following call number is then directly called. If the timeout value is null, messages are not transmitted and the following number is called immediately. This function can be used to automatically detect that the call reached an answering machine. To do that, one only has to insert the DTMF code of the key "*" at the end of the announcement message of the answering machine (by pressing the key "*"). Maximum communication time (without action) This value defines the maximum duration of a telephone communication without any action of the operator (key stroke). 7-32 Options After this time, the communication is automatically aborted. The timeout avoids an unlimited communication in case of deficiency of the modem watchdog or if the busy tone cannot be detected. The value 0 suppresses all limitation. Maximum record duration This value defines the maximum duration of a telephone recording. After this time, the recording is automatically stopped. The value 0 suppresses all limitation. 7.8.2 Vocal Server messages The Message page of the Vocal Server dialog box defines the messages used by the vocal server and the vocal messages associated with tag groups. Language First select the language for which one wishes to configure the messages of the vocal server. The voice used for this language is that which was associated to it on the 1st page of the dialog box ("Options" tab). ALERT User Guide 7-33 Options To add a language to the proposed list, click on the button on the right of the language dropdown list then select the wished language in the displayed list. To suppress a language, click on the same button, select the language to suppress then click on the “Mask” button. Greeting message The greeting message is played at the beginning of a telephone communication to invite the operator to identify him. A different greeting message can be played for outgoing calls and incoming calls. For outgoing calls, the message will be played in the language of the called operator. If no outgoing greeting message is defined in this language, the message will be played in the language selected for the user interface. For incoming calls, the language to use being undefined at the playing time (operator not yet identified), the selected message will be that definite in the user interface language. If no greeting message for incoming call is defined in this language, the correspondent greeting message for outgoing call will be selected. When the voice synthesis option is installed, the greeting message (for outgoing or incoming call) can be either recorded or synthesized from a text message (Text To Speech), according to the choused option: Sound File: the greeting message is recorded (files "greeting.wav" and "greetingin.wav"). Voice Synthesis: the greeting message is synthesized from the text defined in the "Voice synthesis" page. Click on the Listen button to listen to the selected greeting message. Click on the Browse... button to browse files for a sound file containing a prerecorded greeting message. When a sound file is selected, its content is copied in the place of the current greeting message. Click on the Record... button to record a new greeting message or edit the current greeting message. Vocal Guide The vocal guide explains the usage of the vocal server. It can be automatically played after the alarm and service messages (if the option "Automatic play of vocal guide after messages" is validated) or on explicit demand of the user (key "*"). The option Automatic play of vocal guide after messages validates the automatic play of the vocal guide after the initial transmission of the alarm and service messages. Click on the Listen button to listen to the selected vocal guide. Click on the Browse... button to browse files for a sound file containing a prerecorded vocal guide. When a sound file is selected, its content is copied in the place of the current vocal guide. Click on the Record... button to record a new vocal guide or edit the current vocal guide. 7-34 Options Default Alarm Message The default alarm message is played during telephone communications to signal alarms that do not have any defined vocal message (neither alarm message nor group message). Click on the Listen button to listen to the selected default alarm message. Click on the Browse... button to browse files for a sound file containing a prerecorded default alarm message. When a sound file is selected, its content is copied in the place of the current message. Click on the Record... button to record a new default alarm message or edit the current message. Other Messages All the messages used by the vocal server can be defined. First select the message in the dropdown list to define the corresponding vocal message. Click on the Listen button to listen to the selected message. Click on the Browse... button to browse files for a sound file containing a prerecorded message. When a sound file is selected, its content is copied in the place of the current selected message. Click on the Record... button to record a new message or edit the current selected message. Alarm Group Messages The vocal message associated with a tag group is used to designate the group in the vocal alarm messages. This message is played before the vocal message associated with the tag in alarm. If there is not vocal message associated with the tag, only the group message is played. First select a group in the dropdown list to define the vocal message which will be associated with. Click on the Delete button to delete the vocal message associated with the group selected in the list. Click on the Listen button to listen to the message associated with the selected group. Click on the Browse... button to browse files for a sound file containing a prerecorded audio message. Click on the Record... button to record a new message or edit the message associated with the selected group. The recorded sound file is stored in the subdirectory MESSAGE, under the form of a "wave" file whose name is affected automatically with the "MGxxxx.WAV" format, "xxxx" being a numeric code between “0000” and “9999”. ALERT User Guide 7-35 Options 7.8.3 Voice synthesis The Voice synthesis page of the Vocal Server dialog box defines the parameters of the voice synthesis. The tab to select this page is only displayed when the voice synthesis option is installed. Language First select the language for which one wishes to configure the Text To Speech. Each language has its own configuration of Text To Speech: interface, selected engine and voice, adjustments. To add a language to the proposed list, click on the button on the right of the language dropdown list then select the wished language in the displayed list. To suppress a language, click on the same button, select the language to suppress then click on the “Mask” button. Interface This dropdown list selects the Text To Speech interface to use for the chosen language. 7-36 Options When a TTS interface is selected, it is immediately initialized and the list of the voices that are available in the selected language and with the voice engines using this interface is updated. When the choice (none) is performed, no voice engine is used for the selected language. Button About... This button opens a dialog box giving information about the TTS engine attached to the selected voice. This button is grayed when there is no interface selected or if the engine attached to the selected voice does not provide this service. Greeting Message The greeting message can be synthesized at each vocal communication from the text entered in this field. One can define a different greeting message for outgoing calls and incoming calls. For outgoing calls, the message will be played in the language of the called operator. If no outgoing greeting message is defined in this language, the message will be played in the language selected for the user interface. For incoming calls, the language to use being undefined at the playing time (operator not yet identified), the selected message will be that definite in the user interface language. The text of the greeting message, particularly for the outgoing call message, can be multilingual. By default, the used synthesis language is that selected in the dropdown list Language. To define a sequence of text in another language, introduce into the text a language commutation tag under the form: &<langid> with langid = language identifier (see table § 8.4 “Multi-language management”). Example: &<fr-fr> to switch in French of France. The text of the greeting message also can include sound files (that will be directly played) and values of tags of the supervision list. To insert a sound file, click on the button &{...} = sound file, select the wanted file then validate. The name of the file is inserted in the edit field, to the current position of the cursor, under the form: & {name of file}. To insert a tag value, click on the button &(n) = variable value, select the wanted tag then validate. The numeric identifier of the tag is inserted in the edit field, to the current position of the cursor, under the form: &(variable id). To listen to the text typed in the field (with interpretation of the fields "file" and "variable") click on the Listen button. Options Message presynthesization. When this option is validated, all the messages likely to be synthesized following an alarm (alarm messages, timestamp, number of alarms) are presynthesized at launching time. Customized user welcome after identification. When this option is validated, the operator is welcomed verbally after having identified ("Hello Peter Henry!"). ALERT User Guide 7-37 Options Alarm number notification. When this option is validated, the total number of alarms concerning the called or calling operator is vocalized before playing the alarm messages (after the connection or on operator request by the key "0"). Vocal time stamping of alarm message. When this option is validated, the alarm message is synthesized with the hour of alarm detection vocalized before ("At 8h30..."). Voice synthesis parameters The "Voice" dropdown list selects the voice to use. The list of proposed voices depends on the selected language and TTS interface. The voice list can also be limited by the software license (number of authorized voices for a given speech engine). When the voice is modified, the voice synthesis engine is immediately reset with the new voice. The cursors can be used to adjust the voice synthesis: Rate defines the elocution speed of the synthesis. Pitch defines the tonality of the voice generated, low (high value) or high (low value). Volume defines the sound level of the message generated. The “Dictionary” field designates the dictionary file to use for the selected voice. It is a file with an extension “bcd”, located by default in the directory: “C:\MMI\Tts\Scansoft\RealSpeakSolov4\speech\components\dictionary” Click on the adjacent button to select this file. If this field is empty, no dictionary is used. A dictionary allows the pronunciation of some words or acronyms to be explicitly defined. To edit this dictionary, use the editor “Rsude.exe” located by default in the directory: “C:\MMI\Tts\Scansoft\RealSpeakSolov4\speech\components\common” The "Advanced..." button gives access to the configuration of the advanced parameters of the TTS engine attached to the selected voice. This button is grayed when there is no interface selected or if the engine attached to the selected voice does not provide this service. 7-38 Options 7.8.4 Usage of the vocal server The Usage page of the Vocal Server dialog box defines the keys telephonic keyboard that will be used by the vocal server. When the box associated with a key is not checked, the key in question is not interpreted by the vocal server. The interpretation of this key, when the box is checked, is defined by the associated text. When the option Acknowledgment of an alarm by typing its ID code is checked, the alarm acknowledgment by telephone is performed by typing the key 8 followed by the identifier code of the alarm to acknowledge (code displayed in the title bar of the configuration dialog box of the alarm in question). When the option Only announce unacknowledged alarms is checked, only the not acknowledged alarms are enounced by the vocal server. This option avoids the alarms already acknowledged during a previous call to be again announced. ALERT User Guide 7-39 Options 7.9 Toolbar customization The tool bar supporting the command buttons can be customized by the addition or removal of buttons. To access to the configuration of the toolbar, select the Toolbar… command of the Configuration menu. The list Toolbar contents shows the buttons displayed in the current toolbar, with the associated menu command (eg: File:Logout = "Logout" command from the "File" menu). The "[Separator]" lines correspond to a half-button space on the tool bar. 1) To remove a button Select the desired button in the list Toolbar contents, then click on the Remove button. 2) To modify a button Select the desired buttons in the list Toolbar contents, then choose the new button from the list Buttons (it can be the same one) and the command associated with it from the list Commands. Click on the Modify button. 3) To insert a new button Select in the list Toolbar contents the button before which one wants to insert the new button. Then choose the new button from the list Buttons and the command to be associated with it from the list Commands. Click on the Insert button. The Default button restores the standard configuration of the application. 7-40 Options 7.10 Communication log By clicking on the Monitor button of the Communication dialog box, one can control in real time the data exchanged on a specific communication port on a line monitor screen. On the monitor line screen, the transmitted frames are displayed in red, the received frames are displayed in green. The frames can be displayed in ASCII or hexadecimal. The time between 2 consecutive frames is displayed on the left, in milliseconds. The Communication log option of the Communication dialog box enables to record in a file the data transmitted and received on a port during a communication. The name of the record file has the form "PORTx.LOG", x being the number of the concerned port. This file is recorded in the directory of the application and reset for each communication. When a call doesn't succeed, the record file is saved with a name of the form "PORTx_n.LOG", x being the number of port concerned and n a number of 0 to 9 automatically incremented for each new file. When there are more 10 files of fail recording, oldest is replaced by the new. The recording format is: "S:xxxxx<CR><LF>" for the character strings "xxxxx" transmitted "R:xxxxx<CR><LF>" for the character strings "xxxxx" received The non displayable characters are represented by their mnemonic code between characters "< >" (< CR >, < LF >,...) for codes between 00h and 1Fh and by their hexadecimal code between "< >" for codes between 80h and FFhs. ALERT User Guide 7-41 Options When transmitting audio data blocks (vocal communication) or fax data blocks (fax communication), data of each transmitted block are symbolized by the label < DATA >. This option is useful only for diagnostic if a problem appears with the use of a particular communication driver. In normal situations it should not be activated. 7-42 Appendix 8 APPENDIX 8.1 Vocal server When a vocal telephonic communication is established, following an incoming or outgoing call, Alert first transmits a greeting message. This message can be used to identify the site for the correspondent and to invite him to identify himself. It can be cyclically repeated until the identification of the correspondent. If there is no greeting message defined, a greeting beep is transmitted. The greeting message can be recorded (in local or by telephone) or, if the voice synthesis option is installed, synthesized from a text. If that case, the text can include some pre-recorded vocal messages and tags of the supervision list (see § 7.8.2 “Vocal Server messages”). In standard working, Alert waits for the 3 or 4 digits1 operator's code or for the command to switch in terminal mode (key "#"). The operator code is the one that is displayed in the "ID" field of the property dialog box of the operator. In case of error, press on the key "*" of the telephonic keyboard to cancel the entry, and then enter the code again. As soon as a key is pressed, Alert stops the emission of the greeting message, what authorizes an experienced operator to immediately identify himself without having to wait for the complete transmission of the message. When the code is entered and recognized, a 3 tones acknowledgment beep is transmitted. Otherwise, a message "invalid code" invites the operator to enter his code again. If the "authentication" option is validated, Alert waits then for the access code of the operator (4 digits). Procedures of canceling and acknowledgment are the same. At the end of the identification phase2 (with possible authentication), and if there are messages pending for the operator or alarms not acknowledged or active concerning him, the corresponding messages are transmitted. Otherwise a message informs the operator that there are no alarms. 1 The waited operator identifier can be shorted to 1 or 2 digits. It can even be suppressed (null length), in which case Alert doesn't manage any more identification procedure (vocal server opened to all public). 2 By default (option “explicit call acknowledgment” not checked), the call acknowledgment which indicates that the operator was properly warned is implicit (automatic acknowledgment from the operator identification). When the option “explicit call acknowledgment” is checked (see § 7.8.1 “Vocal Server options”), the call has to be explicitly acknowledged, either by pressing the key "3", that indicates a call acceptance, or by pressing the key "9", that indicates the call is refused and a reiteration of the call to a relief operator is required. If none of these actions was performed during the communication, the call in not acknowledged and therefore will be reiterated to the operator. ALERT User Guide 8-1 Appendix If there are more 10 pending alarms for the connected operator, only the 10 first messages (by decreasing priority order then reverse chronological order) are played. The maximum number of announced alarms (10 by default) is defined by the “maxalarm” parameter in the “vocal” section of Alert.ini file. When all messages have been transmitted, a vocal guide can be transmitted automatically, to inform the operator on the possible actions. The automatic transmission of this vocal guide is optional. The operator has then access to the commands defined in the table of the following page. Recording of a message or a report by telephone: The built-in vocal server allows vocal messages and oral reports to be recorded by telephone. In normal operating phase, the recording procedure produces oral reports that can be consulted from the logbook and that are automatically deleted at the end of a configurable time. To record the vocal messages by telephone (alarms, greeting, guide), it is previously necessary to set the software in record mode, by selecting the Record messages by telephone entry in the Configuration menu: the “RECORD” indication is displayed in the fault indicator of the alarm status bar. After having recorded messages, the same command must be selected again to come back in normal operating mode. To record a message (or a report) by telephone, once the telephonic connection established (after identification and listen to eventual messages): Press the key "1" and wait for the beep that signals that the application is ready to record. Enunciate the message, avoiding dead times. The record stops automatically as soon as a silence longer than the time defined in the configuration of the vocal driver (2 seconds by default) is detected. A new beep signals that the record is completed. This beep can be transmitted beyond operator's control if the record is aborted (receipt overflow). Press the key "2" to listen to the recorded message. If the quality of the message does not agree restart the recording by pressing again the key "1". Press the key "3" to validate the recorded message. The message is saved then under the MTxxxx.WAV name, in the "MESSAGE" subdirectory of the application, "xxxx" being a sequence number automatically incremented to each new message. In the case of recording of a report, the storage is done automatically in the "REPORT" subdirectory, at the end of the telephonic communication. It is not necessary to press the key "3". Note: To erase the silence at the end of a message, just assign the message to the wanted variable (or to the greeting or guide message), then click on the Record... button of the corresponding file group. In the recording dialog box, click on the button to listen to the message. At the end of the message, stop monitoring at the beginning of the silence time (button ), then click on the button Cut>> to cut the end of the message. Listen again to the message, then validate by OK if the result agrees. If the operation degraded the message, cancel the operation by clicking on Cancel, then retry again. 8-2 Appendix ALERT User Guide 8-3 Appendix KEY FUNCTION 0 Listen to the 101 first no acknowledged or active alarms that concern the operator, in the decreasing order of priorities and reverse chronological order, the acknowledged active alarms at the end. 1 Record a message or a vocal report. 2 Listen to recorded message or vocal report. 3 When the message recording is active, save the recorded message. "MTXXXX.WAV in the "MESSAGE" subdirectory) When the option “explicit call acknowledgment” is checked (see § 7.8.1 “Vocal Server options”), the call is accepted (call acknowledgment). 4 Listen to the service message that concerns the operator (mailbox). 5 Delete the messages in the operator's mailbox. 6 Callback request, only valid for incoming call. The demand is acknowledged by a message, then the call is triggered as soon as the operator has released the line. 7 Listen to no acknowledged alarms that concern the operator, one by one, in the decreasing order of priorities and reverse chronological order. Each time “7” is keyed, the following alarm is transmitted. A message signals the end of list. The next “7” command returns in beginning of list. 8 Acknowledgement of the last alarm that was transmitted following a “7” command. The acknowledgement is signaled by a message. If there was no alarm to acknowledge, or if the "acknowledgment of alarms by telephone" option was not validated (see § 7.8.1 “Vocal Server options”), or if the callback option was forced and the actual communication is an incoming call, a message is transmitted, indicating that the acknowledgment has been denied. A second pressure on this key provokes the acknowledgment of all alarms of the group of the selected alarm by the preceding “7” command. On option, the alarm acknowledgment can be directly commanded by pressing the key 8 then typing the identifier code of the alarm to acknowledge (see § 7.8.4 “Usage of the vocal server”). 9 Command to release the line (no obligatory, hang up being automatically detected, but more slowly). When the option “explicit call acknowledgment” is checked (see § 7.8.1 “Vocal Server options”), the call is refused and a new call is immediately reiterated to a relief operator. If the “9” key is pressed consecutively two times (in a short time), the remote control procedure will be started (see § 8.7 “Remote Control”). * First command following connection: identification of answering machine2 Following commands: listen to the vocal guide. # Switch to terminal mode. If the terminal server Visual Access is not activated, this command is denied (message "terminal server out of order"). Available commands from the telephonic keypad 1 This number is defined by the “maxalarm” parameter in the ‘vocal’ section of Alert.ini file. If the option management of answering machine is validated in the vocal server options (see § 7.8.1 “Vocal Server options”). 2 8-4 Appendix 8.2 Terminal / WAP server Alert can be used in connection with the terminal server Visual Access. To launch (and to close) automatically this application at the same time as Alert, it is necessary to define Visual Access like an external application (see § 5.20 “External applications”), with positioning options of automatic opening and closing. This configuration is done automatically at the installation time when one chosen to install Alert and Visual Access together. Visual Access responds to calls of remote terminals (PC with terminal emulation, videotext terminal…), through its own communication ports or through ports shared with Alert (if the response mode is defined as "Terminal server" in the modem parameters). It can also be activated at the time of a vocal communication (on incoming or outgoing call) by pressing the key “#” of the telephonic keypad (see § 8.1 “Vocal server”). Visual Access interacts with Alert to offer the following services: Call acknowledgment (automatically after identification and authentication of the operator on the welcome page). Consultation of alarms and instructions associated with, acknowledgment and mask/unmask of alarms. Consultation of the event log. Consultation of service messages sent to the operator. Consultation of the file of the calling operator, with possible modification of call numbers and selection of the active and relief numbers. Consultation of the operator's schedule, from the current week until the last week of the 11th month. Recording of a write report to the logbook. Edition of the on call schedule (only by an operator belonging to a class of level 2). Visual Access also allows a direct interaction with the supervised application through a configurable tree of screens: Menu screens, to browse through the tree. ALERT User Guide 8-5 Appendix Synoptic screens, to visualize and control some variables of the application. Screens to display text files. Visual Access offers at last the possibility of downloading files (to collect history for example) and uploading files (updating of software modules for example). 8-6 Appendix External database exportation 8.3 In order to extend the capabilities of the statistical treatment of alarms and calls, the application configuration and the alarm history, the call history (group and user calls) and the report log can be automatically exported to an external database. To set this functionality operational, the database export option has to be authorized by the software license and the Database export activation option must be checked in the general option dialog box (see § 7.1 “General options”). When the database export option is activated, some additional features are available: Enhanced history information (transmitted message) Capability of comment attachment to alarms Generation of report attached to alarms Real time and differed time call overview The exported data can be dispatched into 2 distinct databases, one for the storage of the ALERT configuration and one for the history storage. The link with these databases is defined by the data link files “AlertDB_AlarmDef.udl” (configuration database) and “AlertDB_AlarmLog.udl” (history database). A unique database can also be used to store the whole configuration and history data. To modify a link with a database, open the concerned file with the data source editor (by double-clicking on the file name) then modify the wished parameters. The tables in the databases are automatically created at the application launching. 8.3.1 Configuration database The configuration database contains al the configuration data that are useful for the utilization of history data. It is automatically updated after each modification of the corresponding configuration data. By default, it is a database in the Microsoft Access format located in the "Bases" subdirectory: "AlarmDef.mdb". The configuration database includes the following tables: STATIONS: list of stations Field name Type Description StationId Numeric Station identifier StationName Text Station name GROUPS: list of functional groups Field name Type Description GroupId Numeric Group identifier GroupName Text Group ame CALLGROUPS: list of on-call groups ALERT User Guide 8-7 Appendix Field name Type Description CallGroupId Numeric Group identifier GroupName Text Group name StationId Numeric Identifier of the attached station TEAMS: list of on-call teams Field name Type Description TeamId Numeric Team identifier TeamName Text Team name CallGroupId Numeric Identifier of the attached on-call group TAGS: list of supervised tags Field name Type Description TagId Numeric Tag identifier StationId Numeric Identifier of the attached station Label Text Alphanumeric identifier of the tag GroupId Numeric Identifier of the attached functional group CallGroupId Numeric Identifier of the attached on-call group Message Memo Associated text message Priority Numeric Tag priority USERPROFILES: list of user profiles Field name Type Description ProfileId Numérique Profile identifier ProfileName Text Profile name ProfileLevel Numérique Basic access level of the profile USERS: list of operators Field name 8-8 Type Description UserId Numeric User identifier UserName Text User name UserFirstName Text User first name (can be NULL) StationId Numeric Identifier of the attached station Appendix UserNumericId Numeric Telephonic identifier o the user ProfileId Numeric Identifier of the attached profile LanguageId Numeric Code of the user language UserType Numeric User type (1=virtual, 2=console, …) DRIVERS: list of installed communication drivers Field name Type Description DriverId Numeric Driver identifier DriverName Text Driver name DriverType Numeric Driver type (vocal, fax, SMS, …) CountryCode Text Country code (2 characters, NULL is not localized) CALLNUMBERS: list of call numbers Field name Type Description NumberId NumAuto Call number identifier UserId Numeric Identifier of the attached user EntryNumber Numeric Entry number in he user directory DriverId Numeric Identifier of the communication driver to use Address Text Call number or address CALLGROUPS_USERS: table for assignment of users to on-call groups Field name Type Description CallGroupUserId Numeric Link identifier CallGroupId Numeric Identifier of the attached on-call group UserId Numeric Identifier of the attached user Relief Boolean Relief indicator for operator in the group TEAMS_USERS: table for assignment of users to on-call teams Field name Type Description TeamUserId Numeric Link identifier TeamId Numeric Identifier of the attached on-call team UserId Numeric Identifier of the attached user UserIndex Numeric Position of the user in the team Relief Boolean Relief indicator for operator in the team ALERT User Guide 8-9 Appendix 8.3.2 History database The history database contains all the dynamic data recorded by the software: alarms, calls, reports. By default, it is a database in the Microsoft Access format located in the "Bases" subdirectory: "AlarmLog.mdb". The history database includes the following tables: ALARMLOG: history of alarms Field name Type Description AlarmLogId NumAuto Identifier of the alarm event TagId Numeric Identifier of the tag in alarm (cf. TAGS) AlarmTime Date/Time Timestamp of the alarm activation Message Memo Formatted alarm message ResetTime Date/Time Timestamp of the alarm reset UserId Numeric Identifier of the user who acknowledged the alarm (cf. USERS) AckTime Date/Time Time stamp of the alarm acknowledgment AlarmValue Text Tag value at the alarm time CommentText Mémo Comment associated with the alarm The alarm history table is updated in real time for every alarm event (activation, reset, acknowledgment). CALLGROUPLOG: history of group calls Field name Type Description CallGroupLogId NumAuto Identifier of the group call CallGroupId Numeric Identifier of the on-call group (cf. CALLGROUPS) BeginTime Date/Time Timestamp of the begin of the call cycle EndTime Date/Time Timestamp of the end of the call cycle Status Numeric 0 = no call performed 1 = call aborted before the end of call cycle 2 = call transmitted (wait for call acknowledgment) 3 = unwarned group (call cycle failed) 4 = warned group (calls acknowledged) The call group table is updated at the beginning of the call cycle (EndTime and Status fields set to NULL) and at the end of the call cycle. 8-10 Appendix CALLLOG: history of user calls Field name Type Description CallLogId NumAuto Identifier of the user call UserId Numeric Identifier of the called user (cf. USERS) DriverId Numeric Identifier of the used communication driver (cf. DRIVERS) CallNumber Memo Called number BeginTime Date/Time Timestamp of the begin of the call EndTime Date/Time Timestamp of the end of the call Status Numeric 0 = no call performed 1 = call aborted 2 = call suspended 3 = call transmitted (wait for call acknowledgment) 4 = call failed 5 = call acknowledged 6 = call not acknowledged (failed) FailReport Text Detailed error report The call table is updated at the beginning of the call (EndTime and Status fields set to NULL) and at the end of the call. REPORTLOG: report log Field name Type Description ReportLogId NumAuto Identifier of the report ReportDate Date/Time Time stamp of the first report edition UserId Numeric Identifier of the report author (cf. USERS) TopicId Numeric Identifier of the report topic (cf. TOPICS) ReportText Memo Report content AudioFile Text Name of the attached audio file AtachedFile Memo List of attached files AlarmReport Boolean Indicator for alarm report The report log is updated after each report edition (creation or modification). REPORTTOPIC: list of report topics Field name Type Description TopicId NumAuto Identifier TopicTexte Text Topic label ALERT User Guide 8-11 Appendix The following tables contain the list of crossed references between the alarms and the consecutive group calls (ALRMTOCALLGROUP), between the group calls and the associated user calls (CALLTOCALLGROUP), and the alarms and the associated reports (ALARMTOREPORT). ALARMTOCALLGROUP: links alarms / group calls Field name Type Description AlarmToCallGroupId NumAuto Identifier AlarmId Numeric Identifier of the alarm event (cf. ALARMLOG) CallGroupId Numeric Identifier of the group call (cf. CALLGROUPLOG) CALLTOCALLGROUP: links user calls / group calls Field name Type Description CallToCallGroupId NumAuto Identifier CallId Numeric Identifier the user call (cf. CALLOG) CallGroupId Numeric Identifier of the group call (cf. CALLGROULOG) ALARMTOREPORT: links alarms / reports Field name Type Description AlarmToReportId NumAuto Identifier AlarmId Numeric Identifier of the alarm event (cf. ALARMLOG) ReportId Numeric Identifier of the report (cf. REPORTLOG) 8.3.3 Database schemas The relations between the different tables of the databases “AlarmLog” and “AlarmDef” are described by the following schemas: 8-12 Appendix Relational schema of the configuration database ALERT User Guide 8-13 Appendix Relational schema of the history database 8-14 Appendix 8.4 Multi-language management The visual user interface of the software (menus, dialogs, messages, help, etc) can be dynamically switched between 7 languages: English, French, German, Spanish, Italian, Dutch and Chinese. See § 7.3 “Display options”. The labels defined in the application (names of stations, groups, operators …) can be typed in the different languages of the interface. They are displayed in the langue selected for the interface, when they are defined for that language, or in the language defined as basic language and at last in the first available language. The messages associated with the supervised alarms, as well as the service messages transmitted to the operators, can be defined in different languages, to be displayed in the various languages used for the user interface (as for the labels) but above all to be able to be transmitted in every languages used by the different operators. The choice of the language is free. The messages are displayed in the langue selected for the interface, when they are defined for that language, or in the language defined as basic language and at last in the first available language. The vocal interface of the software is dynamically switched by the automatic selection of the vocal server voice and the synthesis voice to use according to the connected operator (see § 8.1 “Vocal server”). If no voice has been defined for the language of the connected operator, it is the voice associated with the language defined as basic language or at last, the first available voice. It is the same for the synthesis voice to use. The messages transmitted to an operator are automatically selected in the usual language that has been assigned to him. If the message to transmit is not defined in the user language, it will be searched in the following order: 1) in the generic user language (regardless of the country), if it is defined in this language, 2) in the language defined as basic language, if it is defined in this language, 3) in the first available language for the message. To edit the labels in a language, select the wished language as interface language (see § 7.3 “Display options”), then proceed to the edition of the labels to translate: Name of stations (see § 5.12 “Station properties”). Name (alias) of data servers (see § 5.13 “Data server properties”). Name of tag groups and associated vocal message (see § 5.14 “Tag group properties”). Name of on-call groups and name of the sound file containing the associated alarm tone (see § 5.4.1 “On-call group properties”). Name of on-call teams (see § 5.5.1 “Team properties”). Name and first name of operators (see § 5.1.1 “User properties”). Name of the different user statuses (see § 5.3 “User statuses”). Identifier (name) of tags (see § 5.11 “Tag properties”). The messages attached to the supervised alarms and all the associated parameters (long message, short message, audio file, text file, format of long message) can be directly edited in any language by selecting the corresponding language tab in the tag properties dialog box (see § 5.11 “Tag properties”). ALERT User Guide 8-15 Appendix When a label or a message is not defined in the selected language (interface language for the labels, language of the selected tab for the messages), it is displayed as grayed in the language defined as basic language (or by default in the first available language). When editing a label or a message, the deletion of the defined string for the selected language causes the string defined in the default language to be displayed (basic language or first available language). To delete this default string, if an empty string is enabled for the concerned parameter, clear again the displayed string. To restore the default string when it has been erased, press again the “Del” key. The strings defined in the different languages for the labels and messages are recorded in the XML file attached to the associated entities under the form of “langstring” records with the “langid” attribute identifying the language in accordance with the following table: 8-16 Appendix 1078 1025 2049 3073 4097 6145 7169 8193 9217 10241 11265 12289 13313 14337 15361 16385 1068 2092 1059 1093 1026 1028 2052 3076 4100 5124 1050 1029 1030 1043 2067 1033 2057 4105 5129 6153 7177 8201 10249 11273 12297 13321 1061 1035 1036 2060 3084 4108 5132 6156 1079 1031 2055 3079 4103 5127 1032 1037 ALERT Afrikaans Arabic (Saudi Arabia) Arabic (Iraq) Arabic (Egypt) Arabic (Libya) Arabic (Morocco) Arabic (Tunisia) Arabic (Oman) Arabic (Yemen) Arabic (Syria) Arabic (Jordan) Arabic (Lebanon) Arabic (Kuwait) Arabic (U.A.E.) Arabic (Bahrain) Arabic (Qatar) Azeri (Latin) Azeri (Cyrillic) Belarussian Bengali Bulgarian Chinese (Taiwan Region) Chinese (PRC) Chinese (Hong Kong) Chinese (Singapore) Chinese (Macau) Croatian Czech Danish Dutch (Netherlands) Dutch (Belgium) English (United States) English (United Kingdom) English (Canadian) English (New Zealand) English (Ireland) English (South Africa) English (Jamaica) English (Belize) English (Trinidad) English (Zimbabwe) English (Philippines) Estonian Finnish French (Standard) French (Belgian) French (Canadian) French (Switzerland) French (Luxembourg) French (Monaco) Georgian German (Standard) German (Switzerland) German (Austria) German (Luxembourg) German (Liechtenstein) Greek Hebrew 1081 1038 1039 1057 1040 2064 1041 2144 1087 1042 1062 1063 2087 1071 1086 2110 2145 1044 2068 1045 1046 2070 1094 1048 1049 3098 2074 1051 1060 1034 2058 3082 4106 5130 6154 7178 8202 9226 10250 12298 13322 14346 15370 16394 17418 18442 19466 1089 1053 2077 1054 1055 1058 1056 2080 1091 2115 1066 User Guide Hindi Hungarian Icelandic Indonesian Italian (Standard) Italian (Switzerland) Japanese Kashmiri (India) Kazakh Korean Latvian Lithuanian Lithuanian (Classic) Macedonian Malay (Malaysia) Malay (Brunei Darussalam) Nepali (India) Norwegian (Bokmal) Norwegian (Nynorsk) Polish Portuguese (Brazil) Portuguese (Standard) Punjabi Romanian Russian Serbian (Cyrillic) Serbian (Latin) Slovak Slovenian Spanish (Traditional Sort) Spanish (Mexican) Spanish (Modern Sort) Spanish (Guatemala) Spanish (Costa Rica) Spanish (Panama) Spanish (Dominican Republic) Spanish (Venezuela) Spanish (Colombia) Spanish (Peru) Spanish (Ecuador) Spanish (Chile) Spanish (Uruguay) Spanish (Paraguay) Spanish (Bolivia) Spanish (El Salvador) Spanish (Honduras) Spanish (Nicaragua) Swahili (Kenya) Swedish Swedish (Finland) Thai Turkish Ukrainian Urdu (Pakistan) Urdu (India) Uzbek (Latin) Uzbek (Cyrillic) Vietnamese 8-17 Appendix Language coding table 8-18 Appendix Code ar-sa ar-iq ar-eg ar-lt ar-dz ar-ma ar-tn ar-om ar-ye ar-sy ar-jo ar-lb ar-kw ar-ae ar-bh ar-qa bg-bg ca-es zh-tw zh-cn zh-sg cs-cz da-dk de-de de-ch de-at de-lu de-li el-gr en-us en-gb en-au en-ca en-nz en-ie en-za en-jm en-cb en-bz en-tt en-zw en-ph es-es es-mx es-gt es-cr es-pa es-do es-ve es-co es-pe es-ar es-ec es-cl es-uy es-py es-bo es-sv es-hn es-ni es-pr fi-fi fr-fr ALERT Language Arabic Arabic Arabic Arabic Arabic Arabic Arabic Arabic Arabic Arabic Arabic Arabic Arabic Arabic Arabic Arabic Bulgarian Catalan Chinese Chinese Chinese Czech Danish German German German German German Greek English English English English English English English English English English English English English Spanish Spanish Spanish Spanish Spanish Spanish Spanish Spanish Spanish Spanish Spanish Spanish Spanish Spanish Spanish Spanish Spanish Spanish Spanish Finnish French Country Saudi Arabia Iraq Egypt Libya Algeria Morocco Tunisia Oman Yemen Syria Jordan Lebanon Kuwait U.A.E. Bahrain Qatar Bulgaria Spain Taiwan PRC Singapore Czech Republic Denmark Germany Switzerland Austria Luxembourg Liechtenstein Greece United States United Kingdom Australia Canada New Zealand Ireland South Africa Jamaica Caribbean Belize Trinidad Zimbabwe Philippines Spain Mexico Guatemala Costa Rica Panama Dominican Republic Venezuela Colombia Peru Argentina Ecuador Chile Uruguay Paraguay Bolivia El Salvador Honduras Nicaragua Puerto Rico Finland France Code fr-be fr-ca fr-ch fr-lu fr-mc he-il hu-hu is-is it-it it-ch ja-jp ko-kr nl-nl nl-be no-no pl-pl pt-br pt-pt ro-ro ru-ru hr-hr hr-hr sk-sk sq-al sv-se sv-fi th-th tr-tr ur-pk id-id uk-ua be-by sl-si et-ee lv-lv lt-lt fa-ir vi-vn hy-am az-az eu-es mk-mk af-za ka-ge fo-fo hi-in ms-my ms-bn kk-kz sw-ke uz-uz tt-ru bn-bd pa-in gu-in or-in ta-in te-in kn-in ml-in as-in mr-in sa-in User Guide Language French French French French French Hebrew Hungarian Icelandic Italian Italian Japanese Korean Dutch Dutch Norwegian Polish Portuguese Portuguese Romanian Russian Croatian Croatian Slovak Albanian Swedish Swedish Thai Turkish Urdu Indonesian Ukrainian Belarusian Slovenian Estonian Latvian Lithuanian Farsi/Persian Vietnamese Armenian Azeri Basque Macedonian Afrikaans Georgian Faroese Hindi Malay Malay Kazakh Swahili Uzbek Tatar Bengali Punjabi Gujarati Oriya Tamil Telugu Kannada Malayalam Assamese Marathi Sanskrit Country Belgium Canada Switzerland Luxembourg Monaco Israe Hungary Iceland Italy Switzerland Japan Korea Netherlands Belgium Norway Poland Brazil Portugal Romania Russia Croatia Croatia Slovakia Albania Sweden Finland Thailand Turkey Pakistan Indonesia Ukraine Belarus Slovenia Estonia Latvia Lithuania Iran Vietnam Armenia Azerbaijan Spain Macedonia South Africa Georgia Faeroe Islands India Malaysia Brunei Darussalam Kazakhstan Kenya Uzbekistan Tatarstan India India India India India India India India India India India 8-1 Appendix Alphanumeric language coding 8.5 8.5.1 Dynamic importation filters Generalities The dynamic importation filters allow alarm supervision conditions to be defined in Alert without having prior to define a list of variables to supervise. This feature considerably reduces the work required to configure the software and also authorizes a dynamic self-configuration of the supervision when the supervised system evolves. The configuration of the dynamic importation consists to define a list of importation filters, each filter defining criterions to dynamically create a specific category of alarms. The main task to realize is a preliminary work to specify importation criterions of every alarm to process in order to define the properties of these alarms (identifier, messages, group classification, priority, groups to call …) in function of basic properties attached to data to supervise (type, category, labels, priority, localization …). The basic properties attached to supervision data depends on the importation context : In the case of Message Processor, they are variables defined as “filter” variables that will be updated by the script before calling the filter processing function (PROCESSEVENT). In the case of OPC AE, they are properties transmitted with the event notifications. In the case of mediators, they are properties that are specific to the supervision environment processed by the mediator. The properties of created alarms as well as possible associated conditions are defined by arithmetic and logical expressions of basic properties of supervised data. To make expressions more clear and optimize the filter evaluation, macroexpressions can be defined. These macro expressions can be used in every filter and are computed only one time just before each processing of the list of filters. For an usage example of filters, see the configuration of Message Processor (§ 8.16.2.2 “Dynamic importation filters”). 8.5.2 Definition of an expression The properties and conditions designated in a filter are defined by an arithmetic or logical expression that is evaluated when processing the filter. This expression can be directly typed in the edit field of the property or condition. One can also use the expression editor by clicking on the adjacent button ( ). 8-2 Appendix The field “Expression” displays the defined expression. The wished expression can be directly typed in this field or built by using the tools proposed by the expression editor to insert variables, constants, operators and functions (see below). The expression displayed in the field “Expression” can be syntactically tested by clicking on the button “Test”. If a syntax error is detected (unknown variable, parenthesis …), the error is signaled by selecting the part considered as incorrect in the expression. If the expression is correct, a message “OK” is displayed. The same test is performed when exiting of the dialog box by clicking on the button “OK”. 1) Variables The variables are designated by a name (key word). Only the names that are displayed in the list “Variables” can be used as variables To add a variable to the expression, one can directly type its name or select this name in the list then click on the adjacent button Add, or double-click on the name of the variable in the list. 2) Constants Constants are numerical or alphanumerical values used as it is. The constants must be directly typed in the expression field. Alphanumeric values must be written with quotation marks (ʺ). Some variables, when selected in the variable list, can propose a list of predefined values in the dropdown list “Value”. So one can select the wished value in the list then click on the adjacent button Add to insert the constant in the expression. 3) Operators The operators proposed in the group “Operators” can be used in the defined expression. ALERT User Guide 8-3 Appendix To add an operator to the expression, type it directly or click on the button corresponding to the wished operator. Remark: The comparison operators (‘=’, ‘<>’, ‘<’, <=’, ‘>=’, ‘>’) compare either two numeric values, or two alphanumeric values. If a value is numerical and the other no, the non numeric value is converted to a numeric value. The result is always a boolean. The operator ‘+’ adds either two numeric values, or two alphanumeric values (string concatenation). If the first value is alphanumerical and the other no, the second value is converted to an alphanumeric value. If the first value is numerical and the other no, the second value is converted to a numeric value. The operators ‘-‘, ‘*’, ‘/’, ‘%’ (modulo) and ‘ˆ’ (exponentiation) only accept numerical values. The logical operators ‘AND’ and ‘OR’ can be used with two boolean values (logical ‘AND’ or ‘OR’, Boolean result) or numeric values (bitwise ‘AND’ or ‘OR’, unsigned integer result) The operator XOR can only be used with numeric values, unsigned integer result. The parenthesis ‘(‘ and ‘)’ can be used to force the operator priorities. 4) Functions The functions proposed in the dropdown list “Function” can be used in the defined expression. The following functions can be used: a) Mathematical functions: NOT(x): returns the complement value of the boolean or numeric value x. ABS(x): returns the absolute value of the value x. EXP(x): returns the square of the value x. SQRT(x): returns the square root of the value x. LOG(x): returns the decimal logarithm (log base 10) of the value x. LN(x): returns the natural logarithm (log base e) of the value x. ROUND(x): returns the rounded value to the closest integer value of the value x. CEIL(x): returns the rounded value to the closest higher integer value of the value x. FLOOR(x): returns the rounded value to the closest lower integer value of the value x. b) Trigonometric functions: SIN(x): returns the sinus of the value x. COS(x): returns the cosine of the value x. TAN(x): returns the tangent of the value x. ASIN(x): returns the arc sinus of the value x. 8-4 Appendix ACOS(x): returns the arc cosine of the value x. ATAN(x): returns the arc tangent of the value x. c) Conversion functions: STR(x): converts the numeric value x to a character string. VAL(x): converts the character string x to a numeric value. BCDTODEC(x): converts the value x from BCD to decimal. DECTOBCD(x): converts the value x from decimal to BCD. BOOL(x, mask, valtrue): returns a boolean to TRUE if the bitwise AND of the value x with the value mask is either non null if the optional parameter <valtrue> is omitted, or equal to the value of <valtrue> if this parameter is specified. d) String processing functions: LEN(x): returns the length of the character string x. MID(string, start, length): extracts the character substring of <length> characters beginning to the <start> position from the string <string>; the positions start from 0; if the optional parameter <length> is omitted, the end of the string <string> from the position <start> is returned. INSTR(start, str1, str2): searches for the first occurrence of the string <str2> in the string <str1> from the <start> position and returns the position of this string in <strs1> if it is found, else the value -1; the positions start from 0; the parameter <start> is optional (0 by default). Remark: this function can be used to check if a string str2 belongs to a list of strings written as a string list in str1 (strings separated by a comma for example). INFILE(file, str): searches for the first occurrence of the string <str> in the file <file> and returns the position of this string in the file if it is found, else the value -1. Remark: this function can be used to check if a string belongs to a list of strings written as a list in a file. e) Miscellaneous functions: RAND: returns a numeric random value. 8.6 Importation of a text file The importation function of a text file allows a list of variables to supervise or operators to call to be imported in Alert from a text file provided by an external application or a database. The format of the text file is free, provided that data to import can be identified in the file under the form of columns separated by a specific separator (tabulation, comma, semicolon …). The correspondence between information contained in the file and the properties of variables or operators to import is described by a mapping table fully configurable in the importation dialog box. ALERT User Guide 8-5 Appendix The importation command can be performed from the main menu (File/Import…) or from the root of the tree view or a station node (Import…) for the variable or user files, from a node of the “Variables” branch (Import > text file) for the variables files or from a node of the “On-Call Management” branch (Import…) for the user files. The dropdown list Profile specifies the type of importation to perform (“Tag List Configuration” or “User List Configuration”). According with the origin of the command, this selection can be modified or not. The field “File to import” designates the name of the text file to import. Click on the button on the right of this field to browse and select the wished file. The number of lines contained in the file is displayed on the right. The group “Basic separator” defines the column separator used in the selected text file. Select a standard separator (tabulation, semicolon, comma or space) or define in 8-6 Appendix the field “Other” the used separator character. The result of the file parsing in function of the selected separator is immediately displayed in the list below. The group “Secondary separator” defines an additional parsing level in some columns. Select the concerned column in the dropdown list “Column”, and then select the wished separator. By default there is no secondary parsing (choice “None”). The first list displays the content of the selected file with the column parsing corresponding to the selected separators. Select in this list the lines one wishes to import then click on the button “Import” to launch the importation of selected lines. The button “All select” allows the entire file to be selected, with the exception of the lines above the importation line defined in the field “Start importation from line”. The line “1” corresponds to the first line of the file. The importation is performed in function of the mapping defined in the second list. The first column of this list contains the list of tag or user properties that will be affected by the importation. The second column displays the mapping that is defined for the corresponding property under the form of an arithmetic expression of variables (column identifiers: C1, C2 …) and of numeric or alphanumeric constants (character strings in quotation marks). To create a new mapping for a property, select the wished property in the dropdown list “Property” then define the mapping expression in the adjacent field, by using one of the following methods: Typing the expression in the edit field, Selection among the proposed values in the dropdown list (following the property), Selection of a column in the importation list, by clicking on the header of the wished column, Calling of the expression editor (see remark 1) or specific editor of the property (see remark 2) by clicking on the button on the right of the field. Do not forget to valid the defined expression by clicking on the button “Apply”. This action results in the updating of the mapping list. To modify the mapping of a property, select the corresponding line in the mapping list. The associated property is automatically selected in the dropdown list “Property” and the defined mapping expression is displayed in the adjacent edit field. Modify the mapping expression by using one of the methods indicated above then validate by clicking on the button “Apply”. Remark 1: the expression editor is the same one used in the definition of dynamic (see § 8.5.2 “Definition of an expression”). The variables proposed for the edition of the expression are the columns of importation list under the form C1, C2 … Remark 2: when configuring the mapping for user importation, the property “Dial number” can be defined several times to define each number of an operator. The format of the expression is specific, under the form of 4 fields separated by a semicolon: <number ID> ; <dial number> ; <number type> ; <number validation> The filed <number ID > defines the number identifier (non null integer) ALERT User Guide 8-7 Appendix The field <dial number> defines the dial number by the reference to the column containing the wished number (C1, C2 …) The field <number type> designates the driver selected for the number (ʺVocalʺ, ʺFaxʺ, ʺEmailʺ …) The field <number validation> defines the validation status of the number (0 or 1). Use the dial number editor (by clicking on the button define the mapping expression of the dial number. on the right of the field) to The button Options is only validated for the tag configuration. It gives access to the configuration of some importation options. The configurable properties are defined by the following tables. Tag list configuration Station Identifier OPC (0/1) Type Pulsed (0/1) Long message Short message On-call group Alarm group Priority Condition Condition value Instruction file Ack identifier Ack condition Ack value Reset long message Reset short message Reset on-call group Reset instruction file Ack long message Ack short message Ack on-call group Ack instruction file Station of the tag (1) External reference of the alarm tag OPC tag, boolean value (0 or 1) Tag type (2) Transitory variable, boolean value (0 or 1) Long alarm message Short alarm message Group to call on alarm (3) Tag group (4) Alarm priority Event condition (5) Reference value for the defined condition Name of the attached instruction file External reference of the acknowledgment tag Acknowledgment condition (5) Reference value for the acknowledgment condition Long reset message Short reset message Group to call on reset (3) Name of the attached instruction file for reset Long acknowledgment message Short acknowledgment message Group to call on acknowledgment (3) Name of the attached instruction file acknowledgment for (1) The station can be selected among the existing stations. If the defined or referred (column) name of station is empty, the station is the local station. 2 ( ) The tag type is a numerical code that can be selected in the dropdown list: 0 = variable, 1 = event, 2 = alarm. 3 ( ) The on-call group can be selected among the existing groups. If the defined group did not exist, it is created or not according to the chosen option (Options button). A list of groups to call can be defined by using the separator defined in option between each name of group (‘/’ by default). 8-8 Appendix (4) The tag group can be selected among the existing groups. If the specified group does not exist, it is automatically created. 2 ( ) The event condition is a numeric code that can be selected in the dropdown list. User list configuration Station User name User first name Virtual operator Identification code (ID) User password User profile User language User access level Dial number Station of the user (1) Name of the operator First name of the operator Virtual operator, boolean value (0 or 1) Numeric identifier code of the operator Password of the operator User profile attached to the operator (2) Language of the operator (3) Access level of the operator (1, 2 or 3) Dial number to call the operator (see remark 2 above) (1) The station can be selected among the existing stations. The choice “(all)” means the user is attached to all stations. If the defined or referred (column) name of station is empty, the station is the local station. 2 ( ) The user profile can be selected among the existing profiles. (3) The user language can be selected among the languages proposed in the list. ALERT User Guide 8-9 Appendix 8.7 Remote Control To avoid having to use 2 different modems for the remote surveillance and maintenance of a supervision station, Alert gives the possibility to share a communication port with remote control software (pcAnyWhere32 versions 7.5 and subsequent, Carbon Copy). The port shared with the remote control software must be declared in Alert (see § 7.1”General options”). This port will be automatically transferred to the remote control software, either at the software launching if the remote control software is already launched at that moment and have reserved the port, or on an explicit demand of a remote operator. If the remote control software is not active, it is possible to automatically start a remote control session from a remote station. The procedure to apply is the following: 1) Call Alert from a telephonic handset. After having entered your ID, you will have to type 2 times on the key "9" of the telephonic keypad. If the command is accepted (authorized user), an acknowledgment message is emitted. If the command is denied, a message as "command denied" is emitted. Hang up! When the line is available, Alert releases the communication port that was used then launches the remote control software. This last have before to be setup to run as "Host PC" on a modem connection using the modem in question. 2) Wait some seconds, then, from the remote control software of the remote PC, call Alert at the same dial number. The remote control session start normally. 3) At the end of the session, close the remote control software on the remote. Alert automatically detects the end of session, closes the remote control software on the host PC, then retrieves the communication port. If an alarm is detected during a remote control session that requires the usage of the communication port affected to the remote control, the remote operator is warned by a screen message. If the option "Priority to alarms" is validated (see § 7.1”General options”), the message displays the delay remaining before closure of the session. If after this delay, the session is not closed by the user himself, Alert automatically closes the session to retrieve the port and trig the required call. During a remote control session, it is possible to close Alert (from the remote PC), then to launch it again before closing the remote control session (after uploading a new version for example). At the end of the session, Alert automatically closes the remote control software then it retrieves its communication port, as the same manner as it has not been closed. 8-10 Appendix 8.8 Alert as service Alert can be run as a Windows service. Although this option offers new functionalities, its setup must be done carefully. Service installation To activate this functionality, check the box “Application running as Windows service”, in the Alert starting parameters. (See § 7.1.1 “Advanced parameters”) Choose the executing user As Alert can be run without Windows login, you need to set the Alert executing user. To do this, use the Dcomcnfg tool. (Windows “Start” menu, command “Run”, enter “Dcomcnfg” then validate). In the displayed window, open the DCOM applications list. (Example with Windows XP) Click with the mouse right button on the “Alert” icon, the select the “Property” command in the contextual menu. On the displayed dialog box, select the “Identity” tab. ALERT User Guide 8-11 Appendix Enter the name and password of the Alert executing user (In the previous example, it is the Administrator). CAUTION: The choice of the user restricts the OPC server use. As a matter of fact, in normal mode (not as service) the Alert OPC server can only be used by the Alert running user. In such a case you can always use the OPC client if the OPC server is deactivated. (See § 7.2 “Supervision options”, button OPC setup: uncheck the box OPC server activated). When running as service, the OPC server is fully operating! Before starting service: Alert configuration When Alert is started as service, its user graphic interface is not visible. You can only use the AlertClient interface to connect to Alert. As Alertclient does not offer a full configuration interface (you can setup on-call management and supervision, but neither the communication ports, nor the vocal server, nor general options …), you should do your Alert configuration before starting it as a service. 8-12 Appendix 8.9 Command driver This driver, built-in with the basic Alert software, allows writing commands to an external application or outputs to be initiated during a call cycle, to signal, for example, the call procedure failure or to request for a relief external call system. The list of available commands can be configured either by accessing to the Command driver setup (see § 5.19 “Communication drivers”), or directly when invoking the Command driver in a user or group property sheet, by clicking on the button on the right of the corresponding Number or Command field. The displayed dialog box shows the list of the defined commands (see § 5.16.1 “Command list”). 8.10 Beep driver This driver is a generic driver which is used to call a beeper, receiver system that is only capable of alerting an operator by emitting a beep or a vibration, with optional display of a numeric message. What is characteristic of this type of paging system is the possibility to use a simple telephonic keyboard to "beep" an operator and to transmit him a numeric message. The interface with the beep manager system is a DTMF interface, with or without vocal server, that interprets DTMF codes sent by the telephonic keyboard to identify the recipient operator (operator address) and to get the numeric message to transmit. The Beep driver simulates this behavior by using a modem to call the Beep service (if necessary) and to transmit him the call beep request (operator address, numeric message) using DTMF dialing. The modem to use can be a simple dialer modem capable of transmitting DTMF codes without connection (treatment of the character ";" at number end to come back in command mode after dialing). However, if the beep system requires the call of a vocal server, and therefore the remote pick-up detection, it is preferable to use a voice modem. Otherwise, if remote pick-up can't be recognized, one will suppose that the vocal server answers in a given time (temporization). To configure a driver based on the generic Beep driver, select the driver in question in the "Communication" dialog box ("Drivers" tab), then click on the "Properties…" button. ALERT User Guide 8-13 Appendix The displayed dialog box allows the working parameters of the selected driver to be configured: The dial number is only used when the beep system requires the call of a particular service (dial number of the vocal server or prefix of the built-in beep service of the PABX). If there is not a specific number for the beep service, this field must be empty, all the necessary information being in the call number of the concerned operator. When the Remote pick up detection option is validated, the remote pick-up is waited after dialing to continue the beep call procedure. This option has to be validated only when the remote pick-up really exists and if the used modem is able to detect this remote pick-up (voice modem). When this option is not validated and however the remote pickup has to be waited, the time to wait for pick-up which is indicated (in seconds) is waited before continuing the beep call procedure. The No message or message header only option message must be validated only to call simple beepers (beepers incapable to receive a numeric message) or to transmit always the same message (entered in the "Message header" field) independent of the call reason (alarm or service message). The One call by message option proposes choice between triggering a beep call for each message to transmit (option checked) or triggering only a beep call for all the messages to transmit, the transmitted code being the code of the alarm which have the higher priority (option not checked). 8-14 Appendix The temporizing before sending address parameter allows waiting the called service being ready to receive the recipient's address (end of transmission of the greeting message for example). The end address DTMF code is to configure only for servers that ask for a delimiter code at the end of address sequence. The temporizing before sending message parameter allows waiting, after the transmission of the address, the called service being ready to receive the message to transmit. The message header field allows the transmission of a constant string at the head of all messages (identification of the station for example). This string must only contain characters 0 to 9, A to D, # or *. The end message DTMF code is to configure only for servers that ask for a delimiter code at the end of message sequence. The temporizing for validation parameter allows waiting, after the transmission of the message the called service being ready to receive the validation code for message acceptance (if necessary). The validation DTMF code is to configure only for servers that ask for confirmation to send the message. Using the Beep driver to call a telephone number with automatic call forward The Beep driver can be used to call a telephonic number with automatic call forward after pick-up to a given number (call an operator to establish a voice communication with the central station for example). The recommended configuration of the Beep driver is the following: Remote pick-up detection validated End address DTMF code: "!" Time before sending message: 2 seconds Message header: number to call back (central station …) ALERT User Guide 8-15 Appendix 8.11 Fax driver This driver is used to drive the modem during a fax transmission and to format the transmitted message. To configure the parameters of this driver, select the line "Fax" in the Communication dialog box (on Drivers tab), then click on the Properties… button. The displayed dialog box allows the configuration of the following parameters: The Automatic call acknowledgment option, when checked, avoids having to call back Alert to confirm the fax reception. The Send all alarms in one report option allows, when checked, the transmission of all the alarms on the same fax. When this option is not checked, a fax is transmitted for each alarm. The fax identifier (maximum 20 characters). This identifier is used by the protocol to identify the calling fax on the display of the receiving fax and for the statistical reports of this last. For compatibility with some fax, it is better to only use numeric characters (generally the phone number of the calling fax). The header to write on the top of each page (for the first page and the following pages). 8-16 Appendix The fax header is formatted following the specified model file and size. The model file is created in RTF format and contains references to variables that will be dynamically replaced during the fax transmission. These references are: &TO& Report receiver &SUBJECT& Report subject &STATION& Emitting station name &DATE& Current date at the fax transmission &TIME& Current time in format "HH:MM:SS" &PAGES& Number of page in the report These references can be used several times. The font and position of the values will be those of their references. The page foot to write on the first page and/or the other pages. As for the header, the foot page is build following a model RTF file and a size of page foot. If the size of the formatted file exceeds the size of the foot (idem for the header), the display is truncated. The header and the page foot of the first page can be different of the headers and foot pages of the other pages. The body of the fax. The body is also build from a model RTF file, but it is never truncated (the report stretches over several pages if necessary). The references used for the header and foot page are always valid. For the body, it is possible to define a structure with reference on the alarms. This structure is repeated for each alarm. The added references are the following: &BODY& Begin of the structure to repeat for each alarm &ALDATE& Date of the alarm &ALTIME& Time of the alarm in format "HH:MM:SS" &ALMESS& Alarm message &ALINSTRUC& Instruction file that will be inserted in the fax &ENDBODY& End of the structure to repeat for each alarm All the references between &BODY& and &ENDBODY& will be replaced for each alarm by the corresponding values. The fax transmission parameters: The Class 2 option forces the fax modem in class 2, without prior test in class 1. The vertical resolution to use. The "high resolution" choice corresponds to a vertical resolution of 196 points per inch. if this option is not selected, the normal resolution is used (98 points per inch). The selection of the bit rate used by the modem. This bit rate depends on the modulation supported by the fax modem used: 2400 bits/s V27 ter 4800 bits/s V27 ter 9600 bits/s V29 or V17 14400 bits/s V33 or V17 The More… button gives access to the configuration of communication parameters (baud rate, format, parity…) that will be used to call a fax. For more information, consult the online help of the corresponding dialog box. ALERT User Guide 8-17 Appendix 8-18 Appendix 8.12 Email driver This driver can be used either to send common emails or to transmit messages to pagers or mobile phones (smart messages) via an email server. It can also be used to create Alert reports. The email report sender must be one of the Alert operators with his email address as his active call number. In the case of a common email, the receiver address is specified in the "number" field associated with the "Email" driver in the form of the concerned user. The message body that will be transmitted will contain the alarm or service message followed by the contents of the text file eventually attached. Depending on the message type (alarm or service), the associated subject and sender will be: Alarm message: the sender contains the title of the Alert windows (ALERT by default); the subject can be formatted with fields which are dynamically replaced by their value. Service message: the sender is the name of the logged operator; the subject contains a configurable text. In the case of an email destined to a pager or mobile phone, the receiver address specified in the number field associated with the "Email" driver in the form of the concerned user must contain as header one of the following strings: "\\" if the information that designates the end-receiver is contained in the email address, "<mobile number>" if the end-receiver has to be designated in the email subject, with <mobile number> designating the mobile address (or pager address) such as it has to be specified in the email subject. In this case, only the alarm or service message is transmitted (no text file). In the number field associated with the "Email" driver in the form of the concerned user, it is possible to precise email CC recipients. The format is the following: main_recipient(copy_recipient1,copy_recipient2,…) The email driver can be configured with several Providers. Each connection that can be used on the system can be managed by a sub-driver of the email driver. To configure the parameters of the "Email" driver, select in the Communication dialog box (on "Drivers" tab) the line Generic Email or directly choose the sub-driver of the wished connection, then click on the Properties… button. In the case of the generic driver "Generic email", it is possible to add a new sub-driver or to delete a defined sub-driver. To create a new driver, click on the Add button. To delete a sub-driver, select it in the installed drivers list then click on the Remove button. After having created a new sub-driver, define its properties then validate by clicking on the OK button. In the case of sub-drivers, it is only possible to modify the parameters of the selected driver. ALERT User Guide 8-19 Appendix Global This control group defines the following parameters: The Full Name field gives the name of the sub-driver that will appear in the driver list. The Short Name field gives the name of the driver in the configuration file (after creation, it can’t be modified). The Trace option allows the recording in the event log of the messages sent to the email server. The Automatic call acknowledgment option, when checked, avoids having to call back Alert to confirm the email reception. If this option is not checked, the mail is sent with a request for a receipt notification. The call is acknowledged when the receipt is received by Alert or if the user call back Alert. The value of the Call attempt number field indicates the number of call attempts for the driver in case of failure. If the value is 0, le number of attempt will be the one defined in Alert call options. Format This control group defines the email format options. The two first check boxes validate or not the indication of the friendly name of the sender and recipient in their address. 8-20 Appendix The tabs below designate the type of concerned message (Alarm, Reset Acknowledgment or User message) to modify the parameters that are specific to each type of message: The Mail subject field contains the subject of the email to use when sending the message (according to the selected tab). The subject can contain tags that will be dynamically replaced at sending time. These tags are the following: &T message type (alarm, reset or acknowledgement) &D alarm date and time &M alarm message &R alarm name &C numeric code &P alarm priority &G alarm group &V alarm value &S station where the alarm occurred &A alarm call group &J list of attached files The Priority selection defines the priority level of the message (according to the selected tab). The MIME Format check box validates or not the MIME format coding of the message. When this box is checked, the following options are available: The option Attach a RTF file allows a formatted file for alarm description to be attached to the mail. The attached file is formatted following a model file defined in the edit field. To choose the file, click on the Browse button. The model file is created in RTF format and contains references to variables that will be dynamically replaced during the mail transmission. These references are: &TO& Report receiver &SUBJECT& Report subject &STATION& Emitting station name &DATE& Current date at the fax transmission &TIME& Current time in format "HH:MM:SS" &PAGES& Number of page in the report These references can be used several times. The font and position of the values will be those of their references. Other references can be used in the file body: &BODY& Begin of the structure to repeat for each alarm &ALDATE& Date of the alarm &ALTIME& Time of the alarm in format "HH:MM:SS" &ALMESS& Alarm message &ALINSTRUC& Instruction file that will be inserted in the fax &ENDBODY& End of the structure to repeat for each alarm Inside the body, the references can be repeated as often as wished. ALERT User Guide 8-21 Appendix The option Put the instruction file as an attachment gives the possibility of attachment of the instruction file to the message rather than inserting its content in the message body. SMTP server The SMPTP server... button gives access to the parameter box of the SMPTP server of Alert to directly receive the messages without having to use a mail account. The Enable SMTP server Option allows the activation of the SMTP server for the reception of email by Alert. The Report subject field defines the subject of the mail that will be processed as reports. All the mails received with the subject defined in the Alarm object field will set, reset or acknowledge alarms in Alert. (See below for the syntax to use). The Message processor dropdown list selects a message processor script that will be in charge of processing the received mails. Only the type “API” scripts are proposed. Connection parameters The Connection button gives access to the dialog box of configuration of the connection parameters. 8-22 Appendix That dialog box allows the connection parameters to the mail servers to be modified. The group Connection type defines the type of connection to use and the attached parameters to connect to the mail server. The LAN / Modem radio buttons specify the access mode to the mail server: local network (LAN) or Dial-Up networking (modem). The Connection name dropdown list selects, in case of a modem connection, the "Dial-Up networking connection" to use to reach the mail server. In that case, the user account and password that have been assigned by the Internet provider have to be defined in the fields Login and Password. The group Outgoing mail defines the parameters attached to the mails to send. The SMTP server address field provides the network address of the mail server (machine name such as "mail.compuserve.com", or a dotted number such as "128.56.22.8"). The field Your email address must contain the e-mail address of the sender (used for receipt acknowledgment and reports). If the SMTP server requires an authentication, check the box The SMTP server needs authentication then define the associated identifier and password in the fields below. The group Incoming mail defines the parameters attached to the emails reception. The Receive incoming mail check box validates or not the email reception. When this box is checked the following controls are enabled. The POP3 server connection period defines the polling period of the POP3 server (in minutes) to retrieve the received mails. ALERT User Guide 8-23 Appendix The POP3 server address field provides the network address of the pop3 server used to get the received mails. The fields Mail user name and Mail password define the login information required by the POP3 server. The radio buttons delete messages fromPOP3 server after reading define the archive mode of received mails on the POP3 server The Report subject field is a filter for selecting the emails which will create Alert reports (these mails can contain attached files). All the emails received with the subject given in Alarm subject will set, reset or acknowledge an alarm in Alert. The mail body should describe the alarm. To do this, the sender can use the following syntax: Type1:Value1; Type2:Value2; … The defined types are: IDENT STATE PRIORITY ALPHAMESSAGE ALPHAMESSAGERST ALPHAMESSAGEACK NUMMESSAGE NUMMESSAGERST NUMMESSAGEACK CALLGROUP CALLGROUPRST CALLGROUPACK ALARMGROUP alarm identifier alarm state (0: reset, 1: set, 2: acknowledgement) alarm priority (0 to 999) alphanumeric alarm message alphanumeric message for alarm reset alphanumeric message for alarm acknowledgment numeric alarm message numeric message for alarm reset numeric message for alarm acknowledgment alarm call-group (created if not exist) reset call-group (created if not exist) acknowledgment call-group (created if not exist) alarm alarm-group (created if not exist) Only the IDENT field is mandatory. The driver can manage only one alarm per mail. The Message processor dropdown list selects a message processor script that will be in charge of processing the received mails. Only the type “API” scripts are proposed. The group Mail answer management defines the treatment to perform on reception of emails in response to the transmitted emails. The Identified by subject header field defines the header identifying the answers in the subject of received mails (“RE” by default). The radio buttons below define the treatment that will be done on reception of answer emails identified as response to alarm emails: None, Alarm acknowledgment or Call acknowledgment. By default, the reading confirmation of an alarm email, automatically transmitted when opening the concerned email, is processed as a call acknowledgment. If the mail answer management option Call acknowledgment is selected, the call acknowledgment will require sending an explicit answer. 8-24 Appendix 8.13 Alert driver This driver is used for the centralized management of alarms. It allows the synchronization of remote Alert stations with one or several central Alert stations. The Connection group defines the parameters of the connection taken in charge by the driver. The Link type field defines the type of the link. The content of this field cannot be edited and depends on the selected driver: Alert Direct direct connection Alert Modem modem connection Alert Socket TCP/IP connection. The extra parameters depend on the type of connection. In the case of a direct link, there are no extra parameters. For a modem connection, a button gives access to the modem parameters. For a TCP/IP connection, a field defines the IP port that will be used by the driver. When the Automatic call acknowledgment option is checked, it is not necessary to call back Alert to confirm the reception. The Trace in Alert option activates the trace of the driver work in the event log. ALERT User Guide 8-25 Appendix When the option Date and time updates enabled is checked, a synchronization call can modify the system date and time. The station synchronization call can be described in a file called “StationName.log” if the Synchronization log file option is selected. The value given in Call attempt number is the call attempt number, in case of call failure, specific to this driver. If null, the number of attempt is the default one defined in Alert options. The Download path field defines the path of the directory in which the files downloaded by Alert will be copied. If the user specifies a path in the file transfer dialog box, this path will be added to the path defined here. 8-26 Appendix 8.14 DDE server interface 8.14.1 General presentation The DDE server interface gives a standard access to the internal database of Alert (using the service name "ALERT") to control alarm and call processing. This interface includes the following DDE topics: The SYSTEM topic contains general information about the DDE protocol and control items of the application,, The USER topic contains information about operators, The GROUP topic contains information about the on call management, The DATASERVER topic contains information about the on data servers, The TAGGROUP topic contains information about the on tag groups, The ALARM topic contains information about alarms. To reach the server DDE of Alert through a network, from a remote computer, it will be necessary to use the DDE share names that are recorded automatically by the server application: ALERT_SYSTEM$ for "SYSTEM" topic ALERT_USER$ for "USER" topic ALERT_GROUP$ for "GROUP" topic ALERT_DATASERVER$ for "DATASERVER" topic ALERT_TAGGROUP$ for "TAGGROUP" topic ALERT_ALARM$ for "ALARM" topic The items belonging to each of these topics can be read by a simple request (REQUEST transaction) or by a request for advise (ADVISE transaction). Some topics can also be written (POKE transaction). The most usual format is the TEXT format. When an item contains a list of values, the values are separated by tabulations. Alert can also process transactions using specific block formats ("XLTABLE", "INTOUCH BLOCKED DDE V2" …) The DDE interface of the ALERT server also accepts EXECUTE transaction on the SYSTEM topic. See § 8.15 “Command interface (DDE or Command line)” for the syntax of these commands. Note: the list of topics and items processed by the DDE interface of Alert is presented in the dialog box displayed by selecting the DDE server command of the "?" menu. 8.14.2 SYSTEM topic The SYSTEM topic contains general items concerning the DDE protocol and items to control the Alert application. ALERT User Guide 8-27 Appendix 8.14.2.1 DDE protocol items TOPICS List of topics supported by the DDE server SYSITEMS List of items supported under the SYSTEM topic STATUS Current status of the application: INIT processing initialization READY in normal operational mode DEMO in demonstration mode FORMATS List of supported formats CONVCOUNT Current number of DDE conversations established with the SYSTEM topic ADVISECOUNT Current number of advise transactions with items of the SYSTEM topic 8.14.2.2 Application control items SHOW Command to display the Alert window: "0" Hide the Alert window "1" Display of the Alert window with normal size "2" Display of the Alert window as icon "3" Display of the Alert window as maximized (full screen) "4" Alert window always visible (topmost window) CLOSE Command to close the Alert application: "1" Close if no other DDE conversation is established "2" Unconditional closure ALERTLOCK On-call status of the station (calls transmitted or not): "0" The station is active ("Alert" led is green), calls are normally transmitted "1" The station is inactive ("Alert" led is red), only calls concerning no redundant events are processed. This status can be controlled by a client application to force the working status of the station (redundancy controlled by a supervisor for example). REMOTEALERTLOCK On-call status of the redundant station: "0" The redundant station is active ("Alert" led is green) "1" The redundant station is inactive ("Alert" led is red). VALPORT Number of valid communication ports (configured and available to transmit calls) LINKSTATUS Status of the link with supervised application "0" Link not established "1" Connection in progress "2" Link established "3" Link failure REDUNDANCYSTATUS Status of redundancy 8-28 Appendix "0" "1" "2" "3" Redundancy not initialized Redundancy test in progress Redundancy OK Redundancy failure COMi / MODEMi / CAPIi / SOCKETi Status of the communication port i "0" Port closed "1" Port in failure "2" Initialization in progress "3" Modem ready or communication established (direct link) "4" Call in progress (incoming or outgoing call) "5" Connected in data mode (Terminal) "6" Connected in fax or voice mode "7" Disconnection in progress COMi.Fail / MODEMi.Fail / CAPIi.Fail / SOCKETi.Fail Failure on the communication port i (0 = OK). WATCHDOGCOUNTER Actual value of the "watch dog" counter. This value is incremented every second and varies between 0 and the maximum value which is defined in the watch dog parameters (see § 7.2 “Supervision options”). DBSTATUS Status of the database "0" Database connection not initialized "1" Database connection in progress "2" Database connection OK "3" Database connection failed DONGLEREMOVED Dongle read failure counter. Elapsed time in minutes since the dongle disconnection. COMMAND Command for execution of procedures by "poke" (See § 8.15 “Command interface (DDE or Command line) REPORT Report for command interpretation (See § 8.15 “Command interface (DDE or Command line) TRACE Trace of events (logins, calls, acknowledgments, ...), under the form: "Event code" <Tab> "Parameters" (See table at § 7.2 “Supervision options” for the event coding) 8.14.3 USER topic The USER topic contains, in addition to the DDE protocol items, some items concerning operators. ALERT User Guide 8-29 Appendix 8.14.3.1 DDE protocol items TOPICITEMLIST List of items supported under the USER topic CONVCOUNT Current number of DDE conversations established with the USER topic ADVISECOUNT Current number of advise transactions with items of the USER topic 8.14.3.2 User management items DRIVERLIST List of installed communication drivers USERCOUNT Number of defined operators USERLIST List of operators, each operator in the list being represented by his name followed by his first name USERACCES Operator login request through DDE by poke of the string: "user name" <Tab> "access code" If the name (followed or not by first name) and the associated code are valid, the poke command is accepted. If a call was pending for the operator in question, it is automatically acknowledged. The USER topic also includes for each operator: a <USER> item that contains the record of the user designated by <USER>, operator's name followed or not by his first name (or an abbreviation of the first name). See the record description below. a <USER>.ONDUTY item allowing the on-duty status of the user to be read and write: 0 = user off-duty 1 = user on-duty a <USER>.CALLSTATUS item for reading of the call cycle status of the user: 0 = on call cycle for the user 1 = call in progress 2 = call suspended 3 = call succeeded (wait for call acknowledgment) 4 = call failed 5 = call acknowledged 6 = call not acknowledged (failed) a <USER>.SCHEDULE.N item that contains the on call schedule of the operator designated by <USER> for the N'th week starting from the current week (N = 0 to 51). By default N is set to 0 (schedule for the current week). a <USER>.MESSAGE.N item that contains the N'th message (by default N=0) in the mailbox of operator designated by <USER>. a <USER>.REPORT item that contains the report transmitted by operator designated by <USER>. 8-30 Appendix The user record item contains a line of 17 fields separated by tabulation characters (TAB) and ended by a carriage return (CR): Field Field Field Field Field Field Field Field Field Field Field Field Field Field Field Field Field 1 2 3 4 5 6 7 8 9 10 11 12 13 14 15 16 17 User ID code (numerical identification number) User name User first name Access level (0, 1 or 2) 1st call number Driver code for 1st call number Validation of 1st call number (0/1) 2nd call number Driver code for 2nd call number Validation of 2nd call number (0/1) 3rd call number Driver code for 3rd call number Validation of 3rd call number (0/1) Index of active number (0 = none, 1, 2 or 3) Index of relief number (0 = none, 1, 2 or 3) 0 = operator off-duty, 1 = operator on-duty Name of substitute operator (when field 16 = 0) In writing (poke), the whole file is transmitted, but only fields 5 to 17 are taken into account. The schedule item is represented for reading by a line of 7 identical fields separated by tabulations and ended by a carriage return (CR). Each field contains the on call schedule for one day of the week, the 1st field representing the schedule for Monday. Each field of the schedule has the following format: "DD-MM:XXXXXX", with: JJ = day of month (01 to 31) MM = month (01 to 12) XXXXXX = 6 hexadecimal digits representing the daily schedule in the form of a bit field, a bit being set if the operator is on call, the 1 st bit (MSB) corresponding to 0h. Example: 03FFF8 corresponds to the daily schedule: 0 - 1 - 2 - 3 - 4 - 5 - 6 - 7 X 8 X 9 10 11 12 13 14 15 16 17 18 19 20 21 22 23 X X X X X X X X X X X X - - - This item cannot be written (poke denied). The message item is shown for reading by a line of 4 fields separated by tabulations and ended by a carriage return (CR): Field Field Field Field 1 2 3 4 Index of the message (starting from 1) Date/time of deposit of message (format "DD-MM HH:MM:SS") Name / first name of user who sent the message Message content In writing, only the value "0" is allowed, which provokes the deletion of all the messages sent to the operator. ALERT User Guide 8-31 Appendix 8.14.4 GROUP topic The GROUP topic contains, in addition to the DDE protocol items, some items concerning on-call groups. 8.14.4.1 DDE protocol items TOPICITEMLIST List of items supported under the GROUP topic CONVCOUNT Current number of DDE conversations established with the GROUP topic ADVISECOUNT Current number of advise transactions with items of the GROUP topic 8.14.4.2 Group management items GROUPCOUNT Number of defined on-call groups GROUPLIST List of on call groups The GROUP topic also includes for each group: a <GROUP>.STATUS item that indicates the on-call status of the group designated by <GROUP>: 0 = there is no on-call team defined at the current time, 1 = the current on-call team is defined in reduced duty (only called for important alarms), 2 = the current on-call team is defined in normal duty (called for all alarms), 3 = no valid user in the current on-call team. This item is read only. a <GROUP>.TEAM item that returns the name of the current team to call for the group designated by <GROUP>. This item is read only. a <GROUP>.DEROGTEAM read/write item that designates the team selected to be called when the group designated by <GROUP> is in derogation state. a <GROUP>.DEROGATION read/write item that specifies the current derogation status of the group designated by <GROUP>: 0 = group in normal on-call state (teams called according to the defined schedule), 1 = group in derogation state. The called team is the one that is preset as derogation team. If there is not a preset team, calls concerning the group are locked. a <GROUP>.CALLSTATUS item that indicates the current status of the call cycle for the group designated by <GROUP>: 0 = no current call cycle for the group, 1 = call cycle in progress, 2 = call transmitted (wait for call acknowledgment), 3 = group unwarned (call failed), 4 = warned group (calls acknowledged). This item is read only. 8-32 Appendix a <GROUP>.CALLSTATUS item that indicates the team changeover status of the group designated by <GROUP>: 0 = programmed schedule or forced team, 1 = team changeover done (before the scheduled time), 2 = waiting for team changeover (after the scheduled time or on-call ended in the “team changeover mandatory” mode), 3 = timeout for team changeover expired, 4 = on-call ended (before the scheduled time, except in the “team changeover mandatory” mode). This item is read only. 8.14.5 DATASERVER topic The DATASERVER topic contains, in addition to the DDE protocol items, some items concerning the data servers. 8.14.5.1 DDE protocol items TOPICITEMLIST List of the items supported under the DATASERVER topic CONVCOUNT Current number of DDE conversations established with the DATASERVER topic ADVISECOUNT Current number of advise transactions with items of the DATASERVER topic 8.14.5.2 Data server management items DATASERVERCOUNT Number of defined data servers DATASERVERLIST List of data servers The DATASERVER topic also includes for each data server: A <SERVER>.STATUS item that indicates the current status of the data server designated by <SERVER>: 0 = Data server connected, no alarm, 1 = Active alarms on the data server, all acknowledged, 2 = All alarms inactive on the data server, but at least one to acknowledge, 3 = Active and unacknowledged alarms on the data server, 4 = Link failure with the data server, 8 = Data server polling stopped. This item is read only. 8.14.6 TAGGROUP topic The TAGGROUP topic contains, in addition to the DDE protocol items, some items concerning the tag groups. ALERT User Guide 8-33 Appendix 8.14.6.1 DDE protocol items TOPICITEMLIST List of the items supported under the TAGGROUP topic CONVCOUNT Current number of DDE conversations established with the TAGGROUP topic ADVISECOUNT number of advise transactions with items of the TAGGROUP topic 8.14.6.2 Tag group management items GROUPCOUNT Number of defined tag groups GROUPLIST List of tag groups The TAGGROUP topic also includes for each group: A <GROUP>.STATUS item that indicates the current status of the group designated by <GROUP>: 0 = No alarm in the group, 1 = Active alarms in the group, all acknowledged, 2 = All alarms inactive in the group, but at least one to acknowledge, 3 = Active and unacknowledged alarms in the group, 4 = Link failure with at least one tag of the group, 8 = Polling stopped for all tags of the group. This item is read only. 8.14.7 ALARM topic The ALARM topic contains, in addition to the DDE protocol items, some items concerning alarms. 8.14.7.1 DDE protocol items TOPICITEMLIST List of items supported under the ALARM topic CONVCOUNT Current number of DDE conversations established with the ALARM topic ADVISECOUNT Current number of advise transactions with items of the ALARM topic 8.14.7.2 Alarm management items PORTFAIL Communication port failure (modem) 0 = all ports ok 1 = at least one port is failed 2 = all ports are failed REMOTEPORTFAIL Communication port failure (modem) on redundant station 0 = all ports ok 8-34 Appendix 1 = at least one port is failed 2 = all ports are failed DDEFAIL Not zero if the DDE conversation with the supervised application is broken or faulty REMOTEDDETFAIL Application link failure (DDE or OPC) on redundant station REDUNDANCYFAIL Redundancy failure 0 = redundant station ok 1 = link or port failure on redundant station 2 = link failure with redundant station ALARMLOCK 0 if no on-call group is in derogation state, 1 if at least one on-call group is in derogation state. In writing, the value 1 forces all groups in derogation state GROUPCOUNT Number of defined functional groups GROUPLIST List of functional groups ALARMACK Command to acknowledge an alarm, under the form: "AlarmRef <Tab> User" AlarmRef is the identifier of the alarm to acknowledge. User is the name of the operator who acknowledge the alarm. The part "<Tab> User" can be omitted, in which case the alarm is acknowledgement anonymously. ALARMCOUNT Number of alarms in the alarm table ALARMLIST Alarm table (read only) This table is represented bar a list of lines having the format defined below for the items ALARM.N. The ALARM topic also contains an item for each alarm of the alarm table. This item is identified by the name ALARM.N, the value N representing the index of the alarm in the table starting from 0, the maximum value being equal to the value of ALARMCOUNT item minus one. For read operations, an alarm item is represented by a line of 10 fields separated by tabulations and ended by carriage return (CR): ALERT User Guide 8-35 Appendix Field Field Field Field Field 1 2 3 4 5 Field Field Field Field 6 7 8 9 Field 10 "-" if inactive alarm, "*" if active alarm Date/Time of alarm (format "DD/MM HH:MM:SS") Alarm identifier Alarm message Date/Time of acknowledgment ("DD/MM HH:MM") "-" if not acknowledged alarm Name of acknowledging operator, "-" if not acknowledged alarm. Alarm priority Value of the variable associated with the alarm Name of file containing the instructions Empty field if no instructions Name of functional group of the alarm In writing, this item allows the acknowledgment of an alarm, by specifying in the data field the name of the operator who acknowledges the alarm. 8-36 Appendix 8.15 Command interface (DDE or Command line) 8.15.1 Presentation Some functions can be commanded by writing a command string in the COMMAND item of the SYSTEM topic or transmitting the same string through an EXECUTE transaction or through the “ALERT” command line. The DDE commands can be sent from a remote station connected by network (NETDDE). The available commands are:: ALERT_SZCREATEALARM "CreateAlarm" ALERT_SZSETINSTRUCTIONS "SetInstructions" Attach an instruction file ALERT_SZSETPRIORITY "SetPriority" Modify the alarm priority ALERT_SZSETALARM "SetAlarm" Activate / deactivate an alarm ALERT_SZACKALARM "AckAlarm" Alarm acknowledgment ALERT_SZMASKALARM "MaskAlarm" Mask / unmask alarm ALERT_SZACKCALL "AckCall" Call acknowledgment ALERT_SZCALLGROUP "CallGroup" Group call ALERT_SZCALLUSER "CallUser" Call for service message ALERT_SZVALIDUSER "ValidUser" Validate / invalidate an operator ALERT_SZSENDCONSOLE "SendConsole" Send a message to the remote console ALERT_SZACKCONSOLE "AckConsole" Acknowledge a console message ALERT_SZRESTORELINKS "RestoreLinks" Reinitialize the connections ALERT_SHOWWINDOW "ShowWindow" Selects the window ALERT_PLAYTEXT "PlayText" Synthesizes and plays a message on the local station ALERT User Guide Creation of an alarm DDE display and of OPC ALERT 8-37 Appendix 8.15.1.1 DDE command If the command is denied, the POKE or EXECUTE command returns an error. The error cause can be read in the REPORT item of the SYSTEM topic. The REPORT item can be read by a simple request (REQUEST) or by a demand for advise (ADVISE). It returns the report value of the last executed command: ALERT_ERR_NOERROR 00 Command accepted ALERT_ERR_INVALIDCOMMAND 02 Invalid function ALERT_ERR_SYNTAXERROR 03 Syntax error ALERT_ERR_LOWMEMORY 04 Memory overflow ALERT_ERR_INVALIDGROUP 05 Invalid group name ALERT_ERR_INVALIDALARM 06 Invalid alarm identifier ALERT_ERR_ACKNOWLEDGED 07 Alarm already acknowledged. ALERT_ERR_INVALIDUSER 08 Invalid user name ALERT_ERR_NOCONSOLE 09 No console defined The report for execution of a command that needs a delay to be completed (call command) should be interpreted by analysis of the events sent back in the TRACE item of the SYSTEM topic (see § 8.14.2). The commands are transmitted under the form of character strings (upper or lower case) including a command label, followed by a parameter list, each parameter being separated from the previous by a tab character. 8.15.1.2 Command by command line The commands are transmitted under the form of character strings (upper or lower case) including the name of the ALERT application (with full path), a command label followed by a parameter list, each parameter being separated from the previous by a tab or a space character. If a parameter includes spaces or tabulations, it must be transformed in a quoted string (“). 8.15.2 Object: CreateAlarm Creation of an entry in the event list Parameters: 1st parameter 2nd parameter 3rd parameter 4th parameter 5th parameter Example: 8-38 alarm identifier attached on call group associated alphanumeric alarm message associated numerical alarm message (optional) name of audio file containing the associated vocal message (optional) Appendix DDE command: CreateAlarm <Tab> Pressure <Tab> Technical <Tab> Boiler overpressure <Tab> 00835 <Tab> C:\Message\Pressure.wav Command line: ALERT CreateAlarm Pressure Technical “Boiler overpressure” “C:\Message\Pressure.wav” 8.15.3 Object: 00835 SetInstructions Attach an instruction file to an alarm Parameters: 1st parameter 2nd parameter 3rd parameter alarm identifier Nom of text file containing the instructions 1 = demand to delete the file upon deletion of alarm (by default: 0 = file never deleted) Example: DDE command: SetInstructions <Tab> Pressure<Tab> c:\inst\pressure.txt Command line: ALERT SetInstructions Pressure "c:\inst\pressure.txt" (Attach the file "c:\inst\pressure.txt" to the alarm "Pressure") 8.15.4 Object: SetPriority Modify the priority of an alarm Parameters: 1st parameter 2nd parameter alarm identifier Priority level (0 to 99) Example: DDE command: SetPriority <Tab> Pressure<Tab> 3 Command line: ALERT SetPriority Pressure 3 (set the priority level of alarm "Pressure" to 3) 8.15.5 Object: SetAlarm Activate/deactivate an alarm Parameters: 1st parameter ALERT alarm identifier User Guide 8-39 Appendix 2nd parameter 3rd parameter "1" to activate, "0" to deactivate (optional, 1 by default) alarm value (optional) Example: DDE command: SetAlarm <Tab> Pressure<Tab> 1 Command line: ALERT SetAlarm Pressure 1 (activate "Pressure" alarm, and start a call to the "Technical" group, following the configuration set by CreateAlarm) 8.15.6 Object: AckAlarm Acknowledgment of an alarm (suspend pending calls for this alarm) Parameters: 1st parameter 2nd parameter alarm identifier name of user who acknowledges the alarm (optional) Example: DDE command: AckAlarm <Tab> Pressure Command line: ALERT AckAlarm Pressure 8.15.7 MaskAlarm Object: Masks or unmasks an alarm Parameters: 1st parameter 2nd parameter 3rd parameter alarm identifier "1" to mask, "0" to unmask (optional, 1 by default) name of user who masks the alarm (optional) Example: DDE command: MaskAlarm <Tab> Pressure Command line: ALERT MaskAlarm Pressure 8.15.8 Object: AckCall Acknowledgment of a call Parameters: 1st parameter 8-40 name of called user Appendix 2nd parameter 3rd parameter name of user who acknowledges the call (optional) "1" to require disconnection , "0" else (optional, 0 by default) Example: DDE command: AckCall <Tab> Bob Command line: ALERT AckCall Bob 8.15.9 CallGroup Object: Creation of a temporary alarm, alarm activation and calling the associated group. This alarm will be deleted after acknowledgment. Parameters: 1st parameter 2nd parameter 3rd parameter 4th parameter 5th parameter destination of on-call group alarm identifier associated alphanumeric alarm message associated numerical alarm message(optional) name of audio file containing the associated vocal message (optional) Example: DDE command: CallGroup <Tab> Technical <Tab> Pressure <Tab> Boiler overheating <Tab> 00835 <Tab> C:\Message\Pressure.wav Command line: ALERT CallGroup Technical “C:\Message\Pressure.wav” Pressure “Boiler overheating” 00835 8.15.10 CallUser Object: Call a user for transmission of a message Parameters: 1st parameter 2nd parameter 3rd parameter 4th parameter 5th parameter name of user alphanumerical message to transmit numerical message to transmit(optional) name of SOUND file containing the associated vocal message (optional) name of associated TEXT file (optional) Example: DDE command: CallUser <Tab> Bob <Tab> Call Alert station Command line: ALERT User Guide 8-41 Appendix ALERT CallUser Bob “Call Alert station” 8.15.11 ValidUser Object: Set an user on-duty or off-duty Parameters: 1st parameter 2nd parameter name of user "0" = off-duty, "1" = on-duty (optional, 1 by default) Example: DDE command: ValidUser <Tab> Bob <Tab> 0 Command line: ALERT ValidUser Bob 0 8.15.12 SendConsole Object: Send a message to the operators defined with the console attribute (see § 5.1 “User ”). Parameters: 1st parameter 2nd parameter alphanumerical message to transmit message identifier (optional) The message identifier is used to identify the message upon acknowledgment (AckConsole). If this identifier is defined, the message will only be transmitted during the on call period of the remote console, this message being hold until that period. If the identifier is not defined (no 2nd parameter), the message is systematically transmitted, whether or not the remote console is on call. Example: DDE command: SendConsole <Tab> Battery fault(message forced) SendConsole <Tab> Battery fault <Tab> A001 (message transmit if on call) Command line: ALERT SendConsole “Battery fault” (message forced) ALERT SendConsole “Battery fault” A001 (message transmit if on call) 8.15.13 AckConsole Object: Acknowledgment of a console message Parameters: 1st parameter identifier of message to acknowledge Example: DDE command: AckConsole <Tab> A001 8-42 Appendix Command line: ALERT AckConsole A001 8.15.14 RestoreLinks Object: Reinitialize the DDE and OPC links Parameters: none Example: DDE command: RestoreLinks Command line: ALERT RestoreLinks 8.15.15 ShowWindow Object: Acknowledgment of a console message Parameters: 1st parameter display mode "0" Hide the Alert window "1" Display of the Alert window with normal size "2" Display of the Alert window as icon "3" Display of the Alert window as maximized (full screen) "4" Alert window always visible (topmost window) Example: DDE command: ShowWindow <Tab> 2 Command line: ALERT ShowWindow 2 (set the ALERT window as icon) 8.15.16 PlayText Object: Synthesizes and plays a message on the local station (require TTS option) Parameters: 1st parameter message to synthesize Example: DDE command: PlayText <Tab> Full alert Command line: ALERT PlayText “Full alert” ALERT User Guide 8-43 Appendix 8.15.17 SendDataToScript Object: Transmits a string command to the Message Processor Parameters: 1st parameter message to process Example: DDE command: SendDataToScript <Tab> AAAA XXX ZZZZ Command line: ALERT SendDataToScript “AAAA XXX ZZZZ” 8-44 Appendix 8.16 Message Processor 8.16.1 General presentation The message processor is a specific mediator module of Alert. Its function is to deal with messages for alarm information extraction and triggering of consequent treatments (alarm set/reset, acknowledgment). Messages are any character strings, alphanumerical or binary, that can be issued from different sources: 1) Serial link Messages are issued from an external system through a serial link (printer output of an external system for example). Messages can be either asynchronously received or required by the message processor (polling sequence). Acknowledgment can be transmitted. 2) TCP/IP Messages are issued from an external system through a TCP/IP network, in connected mode (TCP) or as datagram (UDP). Messages can be either asynchronously received or required by the message processor (polling sequence). Acknowledgment can be transmitted. 3) Alarm Messages are transmitted in the content of a string variable declared as event in Alert (DDE or OPC tag or tag written by a mediator). 4) Short Messages (SMS) Messages are received from remote GSM modems under the form of short messages (SMS). Short messages can also be sent back for acknowledgment. 5) API / Command line Messages are transmitted through the programming interface (API) of the software (function <AlertSendDataToScript> or <AlertSendMessageToScript>) or by a command line (command <SendDataToScript>, see § 8.15.17). 6) Other Messages are cyclically extracted from a file, a data base, or a mail box (email). The message processor is able to simultaneously process messages from different origin. Each treatment is described by a prototype which include a set of parameters that are saved in an initialization file (file <prototype>.ini) associated with a script (file <prototype>.prg). The script is a Basic type program which is executed by the message processor and which is designed to extract significant information from the messages and to trig the consequent Alert treatments. The script functioning can take in account external setup data (lists and translations) that are specific to the installation and saved in a text file (<prototype>.csv). These ALERT User Guide 8-45 Appendix external configuration data define the associations to perform between information extracted from the received messages and the parameters of alarms to trig (group to call, message to send, priority ...). If information contained in the messages are rich enough, the script can dynamically create the alarms from reported information and defined translations then set (or reset) them. In this case, it will not be necessary to declare alarms in Alert, excepted if complementary information is needed (recorded voice message or text file). If information that is contained in messages is not sufficient (transmission of just an event identifier for example), alarms to treat will have to be prior declared in Alert. The script just will have to set and reset the declared alarms following received messages. From the version 3/6 revision 1, a new feature of dynamic importation filters allows a great simplification and standardization of script writing by externalizing the model of dynamic creation of alarms under the form of filters that can be configured at the application level. The script only has to update some environment variables (“filter” variables) in function of received information then to call the function “ProcessEvent” that will process the defined filters to automatically import the alarms notified in the received information. 8.16.2 Configuration By default the message processor is not activated. To activate message processor, open the "Options" dialog box (menu Configuration, command Options...) then on the "General" page, select the check box "Message processor activation" (on the bottom of the page), then validate by OK. When the message processor is activated, an entry in the Configuration menu gives access to its configuration (command Message processor...). 8.16.2.1 Definition of a prototype The dialog box for configuration of the message processor allows the definition of prototypes to activate and the configuration of each of these prototypes. To edit, add, import or remove a prototype, click on the button ”>" on the right of the drop-down list Prototype, then, in the displayed contextual menu, select the corresponding command (respectively Edit..., Add..., Import... or Remove). The importation of a prototype consists in selection of the initialization file of the wanted prototype (<prototype>.pro). If this file is not located in the current application directory, it is automatically recopied with all associated files (<prototype>.prg and <prototype>.csv). During the creation of a prototype, the following parameters have to be defined: an identifier : short name used as radical for the configuration files (initialization, script and application data). a name : explicit name for designation of the prototype. the interface type used by the prototype : serial link, TCP/IP, short message, API or other (file, data base, email, …). 8-46 Appendix It will be next possible to define variables that will be referenced by the script to parameter its working (initial parameters) or to store the value of the fields extracted from the received messages (“filter” variables). The creation and activation of alarms are performed in the script by calling methods of the “Alert” object (defined in the script). These methods use parameters that must be initialized by the script. 8.16.2.2 Dynamic importation filters A) General presentation The dynamic importation filters allow alarm supervision conditions to be defined in Alert without having prior to define a list of variables to supervise. This feature considerably reduces the work required to configure the software and also authorizes a dynamic self-configuration of the supervision when the supervised system evolves. The configuration of the dynamic importation consists to define a list of importation filters, each filter defining criterions to dynamically create a specific category of alarms. The main task to realize is a preliminary work to specify importation criterions of every alarm to process in order to define the properties of these alarms (identifier, messages, group classification, priority, groups to call …) in function of basic ALERT User Guide 8-47 Appendix properties attached to data to supervise (type, category, labels, priority, localization …). The basic properties attached to supervision are variables defined as “filter” variables that will be updated by the script before calling the filter processing function (PROCESSEVENT). The properties of created alarms and possible associated conditions are defined by arithmetic and logical expressions of basic properties of supervised data. To make expressions more clear and optimize the filter evaluation, macroexpressions can be defined. These macro expressions can be used in every filter and are computed only one time just before each processing of the list of filters. B) Definition of a filter A filter is designated by a unique name. 8-48 Appendix If the “Filter enabled” checkbox is not checked, the filter will not be processed. If a condition is defined in the adjacent field, the filter will be processed only if this condition is true. By default, the filter is enabled without condition when created. The field “Creation condition” defines the condition to create the alarm concerned by the filter. The filter will be evaluated only when this condition is true. Remark: when several filters are defined (list of filters), the filters are processed in the list order and each filter is evaluated regardless of other filters. If one wants filter only deals with a specific category of alarms, it is necessary to define an exclusive creation condition, i.e. that condition defines the alarms concerned by the filter with the exception of all other alarms. The field “identifier” designates the created alarm by an identifier. The identifier resulting of the expression written in this field must absolutely be unique. The group “Event and alarm definition” defines some properties of the processed event: Transitory event: if this checkbox is checked, the event will be created with the type transitory (no event reset waited). If a condition is defined in the adjacent field, the event will be declared as transitory only if this condition is true. Reactivable: if this checkbox is checked, the event will be considered as reactivable (event trigged at every change, any is its previous state). Alarm enabled: if this checkbox is checked, the event will be processed as an alarm. If a condition is defined in the adjacent field, the event will be processed as alarm only if this condition is true. The group “Properties” defines the general properties of the processed event. Select the property to configure in the dropdown list. The field “Value” defines the value to assign to the selected property under the form of an expression. This value will be taken into account only if the field “Condition” is empty or if the result of the expression defined in this field is true. The properties not defined or not validated by a defined condition are assigned with their default value. The group “Groups” allows the created event or alarm to be classified in a tree of functional groups. A branch of groups is defined by a list of group names (or expressions resulting in a group name) separated by the character “/”. The specified groups are automatically created if they not already exist. For each group of the list, it is possible to define a membership condition for created alarms. The designated group will be created and the alarm attached to this group only if the condition is true. A special condition (<DEFAULT>) defines a condition that will be true only if none of the previous conditions of the list is true. The tabs “Alarm Processing”, “Reset Processing” and “Acknowledgment Processing” define the actions to perform when an alarm is set (respectively reset or acknowledged) and the information to transmit (long and short message, instruction file). For each alarm, one can define a list of actions as “Call Group”, “User Message” or “Script Execution”. Each action of the list can depend on a condition. The action will be added to the list only if the condition is true. A special condition (<DEFAULT>) defines a condition that will be true only if none of the previous conditions of the list is true. The designated group (user or script) can be selected among the existing groups (user or script) or explicitly defined by an expression. ALERT User Guide 8-49 Appendix For the group call, the group will be created only if the option “Group creation” is checked. The call can be disabled (to attach the alarm to a group without having to call it) or conditionally enabled by defining a call condition. A call delay can also be defined. 8.16.2.3 Lists and translations Some variables can be defined as list variables. The list variables allow both the definition of a set of accepted value for a message field and the conversion of a value to another value: for example, conversion of a message id to explicit message, or association of a machine id to an area number. A list variable is defined in connection with an other variable. Its value depends on the value of the associated variable. The associations between the value of a list variable and the values of its associated variable are defined in the page "Lists" of the configuration dialog box of the message processor. The value of a list variable is set by calling the function SETFROMLIST in the script. This function will get from the list the value that corresponds with the actual value of the associated variable. The creation and set/reset of alarms is performed in the script by the mean of methods of the Alert object (defined in the script). These methods use parameters that have to be initialized by the script. This initialization can be automatically performed by calling the function RESOLVEALERTPARAM which will update the 8-50 Appendix parameters of the Alert interface following the type of translation defined for each parameter and the content of the associated variables: translation by value : the parameter is the value of a variable, translation by expression : a text including the value of one or several variables is recopied in the parameter, translation by function : the parameter is a function of a set of 1 to 3 primary parameters. The translations by function are defined in the page "Translations" of the configuration dialog box of the message processor. ALERT User Guide 8-51