1
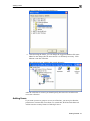
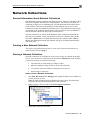
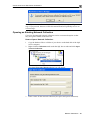
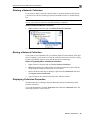
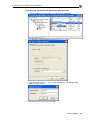
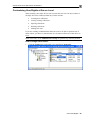
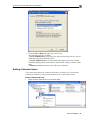
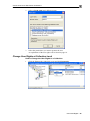
Web Research Network Add-on User Guide For Version 2.7 Copyright © macropool GmbH 2001-2007 General Information Table of Contents Table of Contents i Introduction 3 General Information System Requirements Microsoft SQL Server / Express Edition Web Research Network Add-on Web Research Installation Installing Microsoft SQL Server 2005 Express Edition Installing the Web Research Network Add-on Firewall Configuration Getting Started Starting Web Research Server Manager: Connecting to SQL Servers Creating a New Network Collection Adding Users Opening a Network Collection in Web Research Network Collections General Information about Network Collections Creating a New Network Collection Closing a Network Collection Opening an Existing Network Collection Renaming a Network Collection Deleting a Network Collection Moving a Network Collection Displaying Collection Properties Shrinking the Log File Changing the Database Owner Importing Local Collection files (.csa) Enable Full-Text Indexing Users and Rights General Information Server-based Security Access Protection at Database Level Adding a New SQL Server User Account Changing the Password Adding Collection Users Change User Rights at Collection Level SQL Server Changing the Authentication Mode with SQL Server 2000 Remote Internet Access 1. Enabling SQL Server Authentication 2. Configuring Firewall and Proxy-Server 3. Configuring SQL Server for TCP/IP Protocol 3 3 3 3 3 4 4 4 4 5 5 5 7 8 11 12 12 12 12 13 14 15 15 15 16 16 17 17 18 18 18 18 18 18 21 22 24 24 25 25 25 25 Table of Contents - i Table of Contents 4. Enable PING Troubleshooting Cannot Connect to SQL Server Collections 1. MS SQL Server Service must be available 2. Wrong autentication mode 3. Check access rights 25 26 26 26 26 26 Contact Addresses 27 Index 28 Table of Contents - ii General Information Introduction This chapter is an introduction to the Web Research Network Add-on. General Information The Web Research Network Add-on is a management tool to create and administer Web Research network collections in a network. You can store gathered information in a central database, to be used by whole work groups like firms, editorial and research departments, and many more. Many Web Research users can share, save, find, and use documents stored in Network collections. The technical base for this is Microsoft SQL Server, the professional database system from Microsoft, or its free light version Microsoft SQL Server Express Edition. MS SQL Server is a client-/server database system, which manages concurrent multi-user access within the network and provides security features. In addition, it also lets you handle databases with large amounts of data. Web Research users can use local collection files (*.csa) and SQL Server based network collections simultaneously. Documents and folders can be copied and moved between them. Web Research network collections are created and administered with Web Research Server Manager. System Requirements The following information will give you an overview of requirements for using the Web Research Network Add-on. Microsoft SQL Server / Express Edition To use the Web Research Network Add-on, you need MS SQL Server installed on one of your PC workstations or servers on your network. There are various versions of SQL Server available and there is probably already one installed on your company network. Web Research requires at least version 2000. If you do not yet have a MS SQL Server, you can use the free Microsoft SQL Server 2005 Express Edition. You find an explanation how to obtain and install it on page 4. Web Research Network Add-on The Web Research Server Manager is the main administration tool for network collections. With this software, you are able to create network collections on one or more SQL Servers and manage the users‟ access to these collections. This tool can be installed on any workstation on the network so that you are able to administer the network collections remotely from any workstation on your network. The Web Research Server Manager can be installed on any computer where Web Research Professional can be installed. Web Research To be able to work with network collections, every user needs Web Research Professional or its predecessor ContentSaver 2.x. Web Research network collections are fully compatible with ContentSaver „server archives‟. Introduction - 3 Installing Microsoft SQL Server 2005 Express Edition Installation Installing Microsoft SQL Server 2005 Express Edition As described earlier, the Web Research Network Add-on requires Microsoft SQL Server. If you are working in small work groups or you only want to evaluate Web Research Network Add-on on a network, you can use the free Microsoft SQL Server 2005 Express Edition. You can also use SQL Server 2000 Desktop Engine (MSDE). Choose a Windows computer with enough performance; this workstation should be ready for permanent operation, so that users can reliably use the network collections. SQL Server 2005 Express can run under Windows 2000, XP, Server 2003, or Vista. Note: Administrator rights are required for the installation. How to Install Microsoft SQL Server 2005 Express Edition: 1 Before you install any member of the SQL Server 2005 Express Edition family, you must download and install the Microsoft .NET Framework 2.0 if it is not yet installed. 2 Afterward, download SQL Server 2005 Express Edition with Advanced Services and run the file sql2005express_en.exe. 3 Microsoft SQL Server 2005 will be installed with best configuration settings for using Web Research. Installing the Web Research Network Add-on You can install the Web Research Network Add-on on any Windows computer of your choice. It is not required to run the actual SQL Server on the same machine. How to Install the Web Research Network Add-on: 1 If not yet done, download the Web Research Network Add-on. 2 Run the file wr_network_setup.exe. Firewall Configuration The Windows Firewall closes ports such as 445 that are used for file and printer sharing to prevent Internet computers from connecting to file and print shares on your computer or to other resources. When SQL Server is configured to listen for incoming client connections by using named pipes over a NetBIOS session, SQL Server communicates over TCP ports and these ports must be open. SQL Server clients that are trying to connect to SQL Server will be not be able to connect until SQL Server is set as an exception in Windows Firewall. To set SQL Server as an exception in Windows Firewall, use the steps that are listed below: How to configure the Windows XP or Vista Firewall: 1 Click Start, Control Panel (Classic View), Windows Firewall. 2 On the Exceptions tab, select File and Printer Sharing. 3 Click Add Port to open TCP Port 1433 4 Click Add Port to open UDP Port 1434 Installation - 4 Starting Web Research Server Manager: Getting Started This chapter describes the most important steps to create and access Web Research network collections. Starting Web Research Server Manager: After successful installation, you will find Web Research Network Add-on in the program groups in the Start menu. Click the icon Web Research Server Manager. The Web Research Server Manager will be loaded in the Microsoft Management Console. At first, no SQL Server will be displayed. Connecting to SQL Servers In the next steps, you make a connection to a SQL Server so that you can create network collections and administer users. Note: You must have the permission to log on to the SQL Server. How to Add a New SQL Server Registration: 1. Right-click the Database/Server node and click New SQL Server Registration. Getting Started - 5 Connecting to SQL Servers The Connect to SQL Server dialog box appears: 2. If you are working on a Windows network with a domain, please choose this domain or enter a new one. 3. Enter the name or the IP address of the computer where MS SQL Server is installed and ready to use. 4. Click Test Connection. If the connection is successfully established, click OK. Otherwise, note the given message and check the following potential problems: Error 1: SQL Server doesn’t exist or access denied. Answer: The SQL Server is not available because the service has to be started or it is not installed on that computer. There can also be problems with firewalls and the network configuration. Error 2: The user name is not available or the passwords incorrect. Other possibility: The access is explicitly denied. Solution: Let the SQL Server administrator grant you access. Getting Started - 6 Creating a New Network Collection Error 3: Login failed for user “User name” Cause: Not associated with a trusted SQL Server connection. Solution: Change the authentication mode. If necessary, create a SQL Server user account with a user name and password. Creating a New Network Collection After you have added a SQL Server registration, you can create your first network collection on the SQL Server. How to Create a Network Collection: 1. Right-click the Collection node and click Create New Network Collection. 2. The Create Collection Wizard appears. Click Next to type a name for the network collection and click Next. 3. Click Search to choose a folder on the SQL Server computer where the collection should be stored. Note: Only the folders of the SQL Server computer are shown, not those of your local workstation on which you are using the Server Manager. You can only Getting Started - 7 Adding Users choose folders from fixed hard disk drives. 4. After choosing the folder, you can change the suggested database file name. Note: Do not change this file name unless it is absolutely necessary. Click Next to create the collection. The collection is now added to the console hierarchy: After the collection is created, you should specify the users who are allowed to access the collection. Adding Users If you want a person or group to use server collections, you must give them the permission to connect and access them. To control this, Web Research Network Add-on uses the security features of MS SQL Server. Getting Started - 8 Adding Users A special role is given to the Windows user group „Administrators“. All members of this group have - by default - full rights and are allowed to perform all activities on the SQL Server and its databases. All further users must be explicitly granted access. Click the Logins node to see all users who can already connect to the SQL Server. If you want to allow further users to access SQL Server, proceed as follows: How to Add a New Login: 1 Right-click the Logins node and click New Login. The Add Login Wizard appears. 2 Click Next and choose the authentication method. Depending on how your SQL Server is configured, you can choose between two methods: a) Windows Authentication: The user does not need extra identification; he automatically gets verified with his Login on the Windows network or on the workstation. b) SQL Server Authentication: If the SQL Server is configured this way, the SQL Server Authentication is also available. 3 a) If you chose Windows Authentication, click Select to choose a user or a user group. Do only select one name and click OK. Getting Started - 9 Adding Users b) If you chose the SQL Server Authentication, type the user name and the password and click Next. 4 In the following step, you must specify which collections the user can use (if there are already collections present) 5 Click Next to finish the wizard. You will find more details about user rights later in this part the user guide. Note: If a user appears under Logins, he already has access to the SQL Server. Getting Started - 10 Opening a Network Collection in Web Research Opening a Network Collection in Web Research After creating the collection with Web Research Server Manager, you are now able to use it with Web Research Professional. How to Open a Network Collection in Web Research: 1 Start Web Research Professional. 2 On the File menu, point to Open and click Network Collection. 3 Click Next and specify a SQL Server. 4 Click Next and choose the authentication method according to the configuration of the SQL Server and the user type. 5 Choose a collection on the SQL Server and click Next. 6 Type a display name, which will be used to display that network collection in the user‟s Web Research Folder List. Getting Started - 11 General Information about Network Collections Network Collections General Information about Network Collections Web Research network collections are MS SQL Server databases, which have Web Research compatible data structures and procedures. You can use more than one collection per SQL Server simultaneously. All Web Research Professional clients create a direct connection to the databases on the MS SQL Server. Access and transaction security are handled by MS SQL Server. The performance and capacity are defined by the technical characteristics of the SQL Server, the used hardware, and the network connection and grade of concurrent use. Network collections are stored on the hard disk of the workstation on which the SQL Server is installed. A network collection consists of a database file with the file suffix *.mdf and the associated transaction log file with the suffix *.ldf. By adding and deleting documents, the database files grow and shrink automatically after some time. Creating a New Network Collection The step-by-step instructions on how to create a new network collection are explained in the section on page 7. Closing a Network Collection Network collections are available for users as long as they are opened on the SQL Server. You can remove a collection from the network without physically deleting it. Reasons for doing so would be following: The collection is (temporarily) no longer needed All users should no longer be able to access the collection You want to Store the collection somewhere else (move it) Data backup or protection How to Close a Network Collection: 1 Start Web Research Server Manager and expand the SQL Server and the collection you want to close. Note: In order to find the physical database file more easily, first check and remember the file path in the properties of the collection. 2 Right-click the collection and click Close Network Collection 3 Click Yes to close the collection. Contact Addresses - 27 Cannot Connect to SQL Server Collections Note: If you close a collection that is still in use by other users, you will get a message. If you proceed, the users will be disconnected and will probably receive an error message. Opening an Existing Network Collection Closed or disconnected network collections can be reconnected anytime so that they are again available on the network. How to Open a Network Collection: 1 Copy the database files to a folder of your choice on the hard disk of the SQL Server computer. 2 Right-click the Collections node under the SQL Server node and click Open Network Collection. The Open Network Collection dialog box will appear: 3 Enter a name for the network collection (No spaces and special characters). Network Collections - 13 Cannot Connect to SQL Server Collections 4 Click the ellipsis button (…) to choose the database file from the server. Please note that only files with an *.mdf suffix can be selected. 5 Choose the associated transaction log file *.LDF. Note: These files usually reside in the same folder and have the same file name as the .mdf file but ending with _log.MDF. 6 Click OK. Renaming a Network Collection If necessary, you can rename a network collection. Note: By changing the name of the collection, the physical file name of the database file does not change. Clients that opened the collection under the old name have to reopen the collection because they can no longer connect under the old name. How to Change a Collection Name: 1 Click the collection that you want to rename and click the node a second time so that the name becomes editable. Alternatively, choose the Rename command from the shortcut menu. 2 Change the name and press ENTER. Network Collections - 14 Cannot Connect to SQL Server Collections Deleting a Network Collection If you want to delete a network collection that is currently opened in SQL Server, you need to use the Server Manager because the database files are locked during use. Note: If a network collection is already closed (disconnected) from the SQL Server, you are able to delete the data file manually in Explorer. How to Delete a Network Collection: 1 Right-click the collection and click Delete Network Collection. 2 Click Yes to confirm. Moving a Network Collection If you want to store a database file in a different folder on the hard disk of the SQL Server computer, you first have to close the collection, then move the file by using Explorer and finally reopen it using Web Research Server Manager. How to Physically Move a Network Collection: 1 Right-click the collection and click Close Network Collection. 2 Move the database file (mdf) and the associated transaction log file (LDF) by using Windows Explorer to the folder of your choice. 3 Back in Web Research Server Manager, right-click the Collections node and click Open Network Collection. 4 Type a name for the collection and select the .mdf and .ldf file. Displaying Collection Properties Web Research Server Manager displays additional technical information about network collections. To see the information, click the Properties node under the Collection node. The following properties will be shown: Network Collections - 15 Cannot Connect to SQL Server Collections Shrinking the Log File Microsoft SQL Server has a system inherent characteristic to log database transactions. Thus, log files of a database are growing continuously until you manually shrink the log file. How to Shrink the Log File of a Network Collection: 1 Right-click the collection and click Shrink Log file. 2 Click Yes. Changing the Database Owner Every collection has its owner (dbo), which is displayed in the collection properties. In most cases, this is the user who originally created the collection. The database owner has the rights to perform any activities in that database. How to Change the Owner of a Network Collection: 1 Right-click the collection and click Change Owner. Network Collections - 16 Cannot Connect to SQL Server Collections Importing Local Collection files (.csa) Users can open local collections (*.csa) und network collections at the same time in Web Research und copy documents / folders between the two collections by using a drop and drop operation. To copy all data from a local collection to a server collection, we recommend using our migration tool WRCopy.exe, which is installed in the program directory of the Web Research Server Manager. It runs in a separate process, and you can continue working with Web Research in the meantime. Another advantage is that this tool does not create duplicates in the case that you have to interrupt the copy process. Enable Full-Text Indexing Search queries in Web Research network collections can be sped up significantly if you enable full-text indexing in SQL Server. In addition, full-text search for Microsoft Office documents stored in the network collection will be enabled. Note: Not every SQL Server edition supports full-text indexing. How to Create a Full-Text Index: 1 Right-click the node Full-Text Index and click Create Full-Text Index. 2 Click Yes to confirm. 3 The indexing state will now be displayed. Note: Creating a full-text index can take some time. You should not interrupt this process. The index can be deleted anytime later. Network Collections - 17 Cannot Connect to SQL Server Collections Users and Rights General Information Access protection is provided by the security features of the SQL Server. The architecture of this security system is based on users and groups. The permissions are assigned to local or global Windows security accounts or alternatively to SQL Server security accounts, which can be administered independently from Windows NT 4.0, 2000, and Server 2003. Server-based Security At the server level, you can administer the following rights: Standard User: Is able to connect to the SQL Server and use collections. System Administrator (sysadmin): Has the permission to perform all actions on SQL Server and access any databases. Security Administrator (securityadmin): Is able to add and administer SQL Server users and change their passwords. Database Creator (dbcreator): Is able to create and delete collections / databases, e.g. for Web Research. Access Protection at Database Level In addition, every collection itself has access protection features and user roles. The access protection cannot be applied on a single folder and documents. The permission is always applied to the entire collection. You can use several collections and set the access protection to your needs. The following collection roles are available: Reader (cs_reader): Can read and search all documents. Writer (cs_writer): Can save and work with documents in the collection. Structurer (cs_structurer): Is allowed to create folders and categories. Security Administrator (db_securityadmin): Can set the rights of the users within a certain collection. Access Administrator (db_accessadmin): Can only add or delete a collection user within the actual collection. Database Owner (db_owner): Has all rights within a collection. Adding a New SQL Server User Account Please see the Adding Users section on page 8. Changing the Password If have a login name with SQL server authentication, you can change the password. Note: It is not possible to change Windows NT user account passwords. Users and Rights - 18 Cannot Connect to SQL Server Collections Changing the Password of a SQL Server User Account: 1 Click the Logins node, right-click a user and choose Properties. 2 The SQL Server Registration Properties dialog box appears. 3 Click the ellipsis button (…) next to the Password box. The Change Password dialog box appears. 4 Enter the password twice and click OK. Users and Rights - 19 Cannot Connect to SQL Server Collections Customizing User Rights at Server Level When creating a new SQL Server user account, this new user can only connect to the SQL Server but cannot perform any of these actions: Creating new collections Closing existing collections Opening collections Deleting collections Adding new users If you are working as administrator and want a user to be able to perform one of these actions, you have to customize the user account to allow one of the above actions. Note: Users who are in Administrator Group can perform any action by default. How to Assign Server Roles: 1 Click the Logins node, right-click a user and choose Properties. Users and Rights - 20 Cannot Connect to SQL Server Collections The SQL Server Registration Properties dialog box appears. 2 Click the Server Roles tab and select a server role. The following roles are available: - System Administrator can perform any activity on the SQL Server. This includes the rights of the following roles: - Security Administrator can create and manage SQL Server user accounts including changing there passwords but cannot create, change, or delete collections. - Database Creator can create, alter, and resize collections. Adding Collection Users To let users open and access a network collection, you need to give at least read permissions. Otherwise, only System administrators are allowed to access. How to Add a New User: 1 Right-click the Users node and click New User. Users and Rights - 21 Cannot Connect to SQL Server Collections 2 Select a Login name and a DB user name. 3 Select the permissions you want to grant to the user. An explanation of the user rights can be found on page 18. Change User Rights at Collection Level How to Change the User Rights in a Collection: 1 Click the Users node, right-click a user and click Properties. Users and Rights - 22 Cannot Connect to SQL Server Collections 2 Change the permissions according to your needs and click OK. Users and Rights - 23 Cannot Connect to SQL Server Collections SQL Server The following chapter describes some advanced settings for the older SQL Server 2000. If you are using SQL Server 2005 Express this is not applicable. Changing the Authentication Mode with SQL Server 2000 By default, SQL Server 2000 is configured to support only Windows authentication. SQL Server authentication with username and password–independent from Windows accounts–is not possible by default. Changing the Authentication Mode: 1 Stop SQL Server and all related services from the Services applet in Control Panel. 2 Click Start, click Run, type regedit.exe, and then click OK. 3 Go to the following registry key for the default instance: HKEY_LOCAL_MACHINE\SOFTWARE\Microsoft\MSSQLServer\MSSQLServer 4 On the right-hand pane, locate the value LoginMode, right-click it and click Modify. 5 In the dialog box that appears, set the value to 2. 6 Click OK and restart the SQL Server service. SQL Server - 24 Cannot Connect to SQL Server Collections Remote Internet Access If the SQL Server is installed on a workstation with direct Internet connection, it would be possible to access the network collection over the Internet. You can then use the network collection in the same way as on your local network. To connect to an external SQL Server, follow these steps: 1. Enabling SQL Server Authentication If you do not log on to your domain remotely, you need to configure SQL Server for SQL Server authentication. Please see page 24. 2. Configuring Firewall and Proxy-Server If you are using a firewall or a proxy server, you have to configure them in that way that a connection to Port 1433 is allowed. To do so, create a new IP package filter with the following settings: IP protocol: TCP Direction: Both Local Port: Fixed Port Port number: 1433 (fixed) Remote-Port: all Ports Port number: - Depending on the firewall software, you can also set which IP address or which address area is able to connect. 3. Configuring SQL Server for TCP/IP Protocol Depending on the version and service pack, the SQL Server is configured to communicate with the connected clients either via TCP/IP-protocol or Named Pipes - or both. For remote access, TCP/IP has to be enabled. How to Enable the TCP/IP Protocol: 1. Start the SQL Server Network Configuration: a) If you are using the licensed SQL Server Version, you will find a shortcut in the SQL Server program group. b) If you are using MSDE 2000, start the program SVRNETCN.exe in this folder: C:\Program Files\Microsoft SQL Server\80\Tools\Binn\ 2. Verify that the TCP/IP protocol is activated on Port 1433. 3. Click OK. 4. Enable PING Web Research pings a SQL Server computer before connecting. Check if ping is possible. Type the command ping [server.com] at the command line. It should return a reasonable result. SQL Server - 25 Cannot Connect to SQL Server Collections Troubleshooting Cannot Connect to SQL Server Collections If you cannot connect to a SQL Server or network collection, don‟t only rely on the error message you get. Check the following causes: 1. MS SQL Server Service must be available If you get the error message: “SQL Server does not exist or access denied.” a) Verify the server name or IP address and ping the server computer with the Ping command form the command line. b) Check if the SQL Server service is running. c) Check firewall settings and network settings. Maybe they are too restrictive. See page 25 for more details. d) Check if the TCP/IP NetBIOS Helper system service is running on the SQL Server machine. 2. Wrong autentication mode If you get the error message: “Login failed for user “User name” Cause: Not associated with a trusted SQL Server connection.” You try to connect to an SQL Server with username and password, but this SQL Server is not configured for SQL Server authentication. You need to change the authentication mode. See pages 8 and 24. 3. Check access rights Start Web Research Server Manager and check if the user account you are trying to connect is listed under Logins. If the user is listed there, right-click it and click Properties. Afterward, click the Collections tab and check if at least one collection is checked. Troubleshooting - 26 Contact Addresses The Web Research team would be glad to here from you: Ask us questions, share your experiences, report problems, or make suggestions. Send an e-mail message to: [email protected] Fax: Fax: +49 9602 615411 Postal address: macropool GmbH Postfach 1052 D-92661 Altenstadt GERMANY Contact Addresses - 27 Index Note: The page number used refers to the page number in this User Manual. When opening the Manual with Adobe Reader, the page number will not be identical to this Index. C Contact addresses 27 G Getting Started Adding Users 8 Connecting to SQL Servers 5 Creating a New Server Collection 7 Opening a Server Collection in Web Research 11 Getting Started 5 Starting Web Research Server Manager 5 I Installation 4 Firewall Confiiguration 4 Microsoft SQL Server 2005 Express Edition 4 Web Research Network Add-on 4 Introduction 3 General Information 3 System Requirements 3 P Password 18 S Closing a Server Collection 12 Creating a New Server Collection 12 Delete 15 Displaying Properties 15 Enable Full-Text Indexing 17 General Information 12 Importing Local Collection files (.csa) 17 Move 15 Opening an Existing Server Collection 13 Rename 14 Shrinking the Log File 16 SQL Server 24 Change Authentication Mode 24 Remote Access 25 T Troubleshooting 26 U Users and Rights 18 Access Protection at Database Level 18 Add 8 Add a new SQL Server User Account 18 Adding Collection Users 21 Change at Collection Level 22 Change the Password 18 Customizing at Server Level 20 General Information 18 Server-based Access Security 18 Server Collections 12 Change Database Owner 16 Index - 28