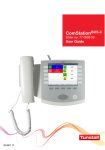
1
Verlassen des Raumes: Anwesenheitstaste (grün: Personal 1, gelb: Personal 2) an der ComSta‐ tionCT oder an abgesetztem Anwesenheitstaster ausschalten. ü Die Erinnerungslichter von allen Anwesenheitstasten dieser Personal‐ gruppe im Raum sind dunkel. ComStationCT Flamenco Order No. 77 0606 00 User Guide All the reassurance you need Order No. 00 8811 73 Table of contents For safety . . . . . . . . . . . . . . . . . . . . . . . . . . . . . . . . . . . . . . . . . . . . . . 3 General safety rules . . . . . . . . . . . . . . . . . . . . . . . . . . . . . . . . . . . . . . . . . . . . . When a fault is displayed . . . . . . . . . . . . . . . . . . . . . . . . . . . . . . . . . . . . . . . . . 3 4 Basic knowledge . . . . . . . . . . . . . . . . . . . . . . . . . . . . . . . . . . . . . . . 6 Flamenco® nurse call system . . . . . . . . . . . . . . . . . . . . . . . . . . . . . . . . . . . . . Call types and categories . . . . . . . . . . . . . . . . . . . . . . . . . . . . . . . . . . . . . . . . . What else you need to know . . . . . . . . . . . . . . . . . . . . . . . . . . . . . . . . . . . . . . 6 7 8 ComStationCT . . . . . . . . . . . . . . . . . . . . . . . . . . . . . . . . . . . . . . . . . . 9 To log as present . . . . . . . . . . . . . . . . . . . . . . . . . . . . . . . . . . . . . . . 10 Call handling . . . . . . . . . . . . . . . . . . . . . . . . . . . . . . . . . . . . . . . . . . . 11 How calls are displayed . . . . . . . . . . . . . . . . . . . . . . . . . . . . . . . . . . . . . . . . . . Answer a call with speech possibility . . . . . . . . . . . . . . . . . . . . . . . . . . . . . . . Acknowledge a call with speech possibility . . . . . . . . . . . . . . . . . . . . . . . . . . Providing help for the caller . . . . . . . . . . . . . . . . . . . . . . . . . . . . . . . . . . . . . . . 11 12 13 14 Calling for assistance . . . . . . . . . . . . . . . . . . . . . . . . . . . . . . . . . . . 15 Raising a call . . . . . . . . . . . . . . . . . . . . . . . . . . . . . . . . . . . . . . . . . . . . . . . . . . . Raising an alarm call (if alarm button is available) . . . . . . . . . . . . . . . . . . . . 15 15 Ward coupling . . . . . . . . . . . . . . . . . . . . . . . . . . . . . . . . . . . . . . . . . . 16 Enable / Disable ward coupling programme . . . . . . . . . . . . . . . . . . . . . . . . . 17 Shifts . . . . . . . . . . . . . . . . . . . . . . . . . . . . . . . . . . . . . . . . . . . . . . . . . . 19 Enable / disable a shift . . . . . . . . . . . . . . . . . . . . . . . . . . . . . . . . . . . . . . . . . . . 20 Privacy feature . . . . . . . . . . . . . . . . . . . . . . . . . . . . . . . . . . . . . . . . . 22 Cleaning ComStationCT . . . . . . . . . . . . . . . . . . . . . . . . . . . . . . . . . 23 Rear casing and desktop mount . . . . . . . . . . . . . . . . . . . . . . . . . . . . . . . . . . . Front panel . . . . . . . . . . . . . . . . . . . . . . . . . . . . . . . . . . . . . . . . . . . . . . . . . . . . . 23 23 All rights to this documentation are reserved, in particular copyright and distribution rights. No part of this docu‐ mentation may be reproduced in any form or processed, copied or distributed using electronic systems without the prior written consent by Tunstall GmbH. We reserve the right for implementing technical changes. © Tunstall GmbH ComStation CT - User Guide, 00 8811 73, 06/2010 (Rev. 1.0) For safety For safety General safety rules WARNING! The following points are for the safety of staff and pa‐ tients. ð This user guide requires you to be familiar with the procedures of hospital care service. ð You must have gained, via appropriate measures such as training, sufficient knowledge about the operation and use of the call system. These measures have to be repeated if necessary. This user guide requires such knowledge. ð Report all irregularities of functions, all failures and faults immediately to a technician. ð Ensure that the connection of the ComStationCT is always plugged in to the socket. ð Never open the housing of the ComStationCT. In case of a fault, return the device to the supplier. ð Bright sunlight can impair the readability of the display. Place the ComSta‐ tionCT in a non-reflective location. ð Do not relocate the ComStationCT, i.e. do not connect it in another room. The ComStationCT was programmed exactly for the original room. To use it at an‐ other location, it has to be reprogrammed. 3 For safety When a fault is displayed Icon means: Press key: If the fault icon ately. There is a fault! Open the fault list. appears in the display, you must inform a technician immedi‐ There is (at least) one fault in the call system. This means that perhaps you can no longer be called from every room. Additionally your are informed acous‐ tically about the fault by a signal tone. How to display the faults for your ward: l Press the function key. ¢ The fault list is displayed. All rooms with faults are listed. Press key: l To close the fault list press the Close fault list. function key. ¢ The fault is still displayed but with another symbol. The signal tone for the fault is turned off. Icon means: Press key: Fault has not yet been cleared. Fault list has already been opened. Open fault list. ¢ The fault display disappears after the fault has been cleared. 4 For safety Several faults If there are more than 3 faults scroll through the list using the tion keys. Press key: Scroll up Press key: Scroll down and func‐ A maximum of 8 faults can be displayed. If there are more than 8 faults in the ward, the icon is displayed at the end of the list. Press key: Scroll up Icon means: There are more than 8 faults 5 Basic knowledge Basic knowledge Flamenco® nurse call system Flamenco® systems are nurse call systems for hospitals and similar establish‐ ments. A substantial prerequisite for the correct operation of the system is the staff presence message. When staff is entering the room he or she activates the staff presence button. When staff is leaving the room he or she de-activates the staff presence button. If a patient needs help, he/she presses the call button on his/her patient hand‐ set. This call will be displayed on all ComStationCT units and all ComTerminals in the ward where staff presence is activated. The call will then be taken e.g. by the staff at the ComStationCT. That means the call will be acknowledged or answered. Answering means to establish a speech connection to the calling location. The staff at the ComStationCT will ask the patient about the nature of the call and decide on appropriate action. If there is no speech possibility to the calling location, the call will only be ac‐ knowledged. That means the staff member acknowledges that he or she has registered the call. The staff goes to the calling location and provides the required help to the call‐ ing person. After help is provided, the call is cancelled when presence switch is de-activated upon leaving the room. All signals displaying the call will now be reset. 6 Basic knowledge Call types and categories The kind of assistance a patient requires can vary greatly. Thus, we differenti‐ ate various call types. It is important that you know these types of calls as they will give you a hint towards the kind of assistance the patient requires. The call types are divided into three categories: Calls, emergency calls and alarms. The call categories are distinguished by their level of urgency. Emergency calls are more urgent than calls; alarms are more urgent than emergency calls. Call category Call type Calls (low priority) Call A patient has raised a call or the plug has been disconnected from the connection socket. WC Call A call was raised in a WC room. Door Call Somebody raised a call at the entrance door. Telephone Call The telephone in the duty room is ringing. Emergency calls Emergency 1 *) Staff 1 have raised a call with their presence logged. (medium priority) Emergency 2 *) Staff 2 have raised a call with their presence logged. Emergency WC Staff have raised a WC call with their presence logged. Diagnostic Call A medical monitoring device has raised a call. That can be, e.g., a monitor that has automatically raised a call when values have exceeded specified parameters. Alarm / Code blue Alarm (high priority) A call is raised via a specific alarm button. Special staff (e.g. resuscitation team) are required. *) Exception: Calls from rooms with ComStationCT and from other duty rooms are not signalled as emergency calls but only as calls (low priority). 7 Basic knowledge What else you need to know Staff groups The medical staff can be divided into two groups (e.g. nurses and doctors). We have staff group 1 and staff group 2. Each staff group has its own presence button in the room (Staff 1 = green, Staff 2 = yellow). You have to ask your sys‐ tem administrator which type of staff is allocated to the respective group. Privacy Although it is possible to converse with rooms from the ComStationCT, it is not possible to listen in on the rooms without this being noticed. The reason is, every room has a privacy function, a technical device which makes listening in impossible. This will be cancelled, if a call is raised from the room or if staff are logged as present in the room. It is also possible to manually activate the pri‐ vacy function. Ward coupling During periods of low activity, two or more wards can be organisationally coupled. This means that within the coupled wards, all calls from the coupled wards will be displayed and answered. Zones and shifts (zone nursing) Wards can be organisationally divided into smaller entities (zones). Then the calls within one zone are only displayed and answered within that zone. The division into zones can be changed during the course of the day (shift opera‐ tion). 8 ComStationCT ComStationCT 1 2 3 1 7 4 5 6 8 1 2 3 4 Loudspeakers Display Four function keys: Alarm button (blue): (if available) Function refers to the associated icon in the display Faintly illuminated for finding the button in the dark when presence is activated. Flashing brightly when an alarm was raised at the ComStationCT. 5 Call button (red): Faintly illuminated for finding the button in the dark. Flashing brightly when a call was raised at the ComSta‐ tionCT. 6 Presence button 1 (green): Illuminates when presence for staff 1 is activated. 7 Presence button 2 (yellow): Illuminates when presence for staff 2 is activated. 8 Microphone 9 To log as present To log as present Before you can use the ComStationCT you have to log as present. When entering the room l Activate the green presence button (Staff 1) or yellow presence button (Staff 2) at the ComStationCT or at a remote presence switch in the room. ¢ The reminder lights of all presence buttons in the room for this staff group come on. When leaving the room l De-activate the green presence button (Staff 1) or yellow presence button (Staff 2) at the ComStationCT or at a remote presence switch in the room. ¢ The reminder lights of all presence buttons in the room for this staff group go out. Activated presence buttons n prepare the reception of calls at the ComStationCT, n indicate the presence of staff in this room, n acknowledge a fresh call in this room, n deactivate the privacy feature for the ComStationCT. 10 Call handling Call handling How calls are displayed WARNING! You must have activated staff presence at the ComSta‐ tionCT, see page 10. Otherwise no calls will be displayed. Calls are presented in the display of the ComStationCT and an acoustic signal will sound: Call tone Call category Tone sequence Call: Short tone, long pause, short tone, ... Emergency call: Tone, pause, tone, ... Alarm: Long tone, short pause, long tone, ... Call with speech possibility to the call location Emergency 1 Room: 203 Call type Calling location Icon means: Press key: Call with speech possibility Answer call Call without speech possibility to the calling location Diagnostic Call Room: 207 Call type Calling location Icon means: Press key: Call without speech possibility Acknowledge call 11 Call handling Answer a call with speech possibility l Answer the call by pressing the function key. ¢ A speech connection to the call location will be established. The display still shows the call. Call type Calling location Emergency 1 Room: 203 Icon means: Press key: l Speech possibility Close speech connection and hold the call Close the speech connection and hold the call by pressing the key. 1) 2) function ¢ The speech connection is closed. l When leaving the room de-activate staff presence, refer to page 10. Go to the calling location. Provide the required help to the calling person, refer to page 14. 1) Cancel call type “Call” For the call type “Call” - i.e. for the call from a patient - you have the possibility to directly cancel the call This is useful, if you have been able to help the pati‐ ent when talking to him/her and if there is no need to go to the room itself: Call Room: 203 l 12 Instead of pressing the Call type Calling location Press key: Cancel call Icon means: Press key: Speech possibility Close speech connection and hold the call function key press the function key. Call handling ¢ The speech connection is closed. The call is cancelled. Call handling is completed. 2) Special case: Door call When handling a door call you can activate the door opening mechanism to let the person at the door in. Door Call Room: 201 Call type Calling location Press key: Icon means: Press key: Open the door Speech possibility Close speech connection and hold the call l To activate the door opening mechanism press the l To close the speech connection to the door panel press the function key. function key. ¢ The speech connection to the door panel is closed. The door call is can‐ celled. Acknowledge a call with speech possibility l Acknowledge the call by pressing the function key. ¢ The call is acknowledged. The display still shows the call. Diagnostic Call Room: 207 Call type Calling location Icon means: Press key: l After you have read the text press the play. No speech possibility Close call display function key to close the call dis‐ 13 Call handling NOTE! If you don't close the call display within a programmed time frame (e.g. 60 seconds), the call display will be closed automatically. l When leaving the room de-activate staff presence, refer to page 10. Go to the calling location. Provide the required help to the calling person, refer to page 14. NOTE! If an acknowledged call is not cancelled within the programmed time frame (e.g. 3 minutes), it will be re-activated automatically. Providing help for the caller Your help is required in another room: l Log-out from the current room: De-activate the presence button. l Go to the calling location. l Log-in at the call location: Activate the presence button. l Provide the required help to the calling person. l l 14 Cancelling the call: Automatic cancelling of calls after de-activating the presence button (except calls from WC). For calls from WC: Press grey cancel button in the WC area or - if function key available - press the function key at the ComTerminal. De-activate the presence button. Calling for assistance Calling for assistance Raising a call You need assistance: l Press the red call button at the ComStationCT or another call switch in the room. ¢ The light for the call button is brightly illuminated or is flashing brightly (ComStationCT). Raising an alarm call (if alarm button is available) You need top priority assistance (e.g. cardiac team): l Press the blue alarm button at the ComStationCT or another alarm switch in the room. ¢ The light for the alarm button is brightly illuminated or is flashing brightly (ComStationCT). NOTE! To prevent false use of the alarm button, the alarm button in the ComStationCT is operational only while the presence button is activated. 15 Ward coupling Ward coupling At your ComStationCT, you normally monitor only the rooms in your ward. When needed - e.g. during times with low work frequency - several wards can be coupled. All calls of the coupled wards are displayed and answered throughout the coupled wards. Ward coupling can be enabled by yourself or from another ComStation. NOTE! Automatic ward coupling can be initiated when a specific call category - e.g. Alarm (code blue) - , is raised. Ask your system adminis‐ trator whether this variant has been set up for your system. Your system administrator will have set up to 8 ward coupling programmes (WCP) for you to select from. Each ward coupling programme stands for the coupling of specific wards. Ask your system administrator which wards are coupled by which ward coupling programme. You can enable and disable these programmes. There may be other active ward coupling programmes which you cannot disable. When a ward coupling programme is active, the corresponding wards are coupled. While one (or more) ward coupling programmes or a shift is enabled, which you can disable, the plus icon in the display is presented inverse: Icon means: Press key: 16 Ward coupling programme(s) or shift enabled Enable or disable a ward coupling programme or a shift Ward coupling Enable / Disable a ward coupling programme NOTE! As soon as ward coupling is enabled, the shifts in the wards in‐ volved are disabled (refer to page 19). While ward coupling is active, no shift can be enabled in the wards involved. How to enable or disable a ward coupling programme: Press key: l Press the or the Enable or disable a ward coupling programme or a sh function key. ¢ The following menu is displayed: *Ward Coupling Shifts Press key: Close operation Press key: Press key: Select menu item Scroll down If a ward coupling programme is currently enabled, which you can disable, the term „Ward Coupling“ is marked with a star. l Press the function key. ¢ All ward coupling programmes you can enable or disable are displayed. Enabled programmes are marked with a star. *WCP1 WCP2 Press key: Close operation Press key: Press key: Switch coupling programme Scroll down 17 Ward coupling l l Mark the ward coupling programme you want to enable or disable by press‐ or function key. ing the Press the function key. ¢ The marked ward coupling programme will be switched, i.e. an enabled pro‐ gramme will be disabled, a disabled programme will be enabled. WCP1 WCP2 l 18 Press key: Close operation Press key: Press key: Switch coupling programme Scroll down To close the operation press the function key twice. Shifts Shifts To support zone nursing Tunstall has developed the concept of zones and shifts: Zone A zone is a part of a ward within which calls are displayed and answered at ComStationCT units and ComTerminals, with activated staff presence. Calls which are raised within the zone are not displayed in rooms of the ward which lie outside the zone. Usually, certain care staff are responsible for one zone. Shift The zones of a ward are not set for the long-term. The zone organisation can change. Each division of the ward into zones is classed as a “Shift“. A shift refers to the division of a ward into a maximum of 8 zones. Thus, the zones may overlap each other, i.e. certain rooms can belong to several zones. A maximum of 8 different shifts is assigned to each ward. Using the ComSta‐ tionCT you choose which shift should be active. While a shift or one (or more) ward coupling programmes are enabled, which you can disable, the plus icon in the display is presented inverse: Icon means: Press key: Ward coupling programme(s) or shift enabled Enable or disable a ward coupling programme or a shift 19 Shifts Enable / disable a shift NOTE! While a ward coupling programme is enabled no shift can be enabled. The ward coupling programme has to be disabled before en‐ abling the shift, refer to page 17. How to enable or disable a shift: Press key: l Press the or the Enable or disable a ward coupling programme or a sh function key. ¢ The following menu is displayed: Ward Coupling Shifts Press key: Close operation Press key: Press key: Select menu item Scroll down If a shift is currently enabled, which you can disable, the term „Shifts“ is marked with a star. l Press the l Press the function key to mark “Shifts“. function key. ¢ All shifts you can enable or disable are displayed. An enabled shift would be marked with a star. 20 Shifts Day Shift *Night Shift l l Press key: Close operation Press key: Press key: Switch the marked shift Scroll down Mark the shift you want to enable or disable by pressing the tion key. Press the or func‐ function key. ¢ The marked shift will be switched, i.e. an enabled shift will be disabled, a disabled shift will be enabled. Note: If you enable a shift while another shift is enabled, the other shift will automatically be disabled. *Day Shift Night Shift l Press key: Close operation Press key: Press key: Switch the marked shift Scroll down To close the operation press the function key twice. 21 Privacy feature Privacy feature If you do not want that other persons can listen into this room via the ComSta‐ tionCT although staff presence is activated, you may manually activate the pri‐ vacy feature: Icon means: Press key: l Press the Privacy is de-activated. Activate privacy. function key. ¢ The display will show . (“receiver on-hook”). Privacy is activated. Icon means: Press key: l For de-activating the privacy feature press the ¢ The display will show: Privacy is de-activated. 22 Privacy is activated. De-activate privacy. (“receiver off-hook”). function key. Cleaning ComStationCT Cleaning ComStationCT Basically, ComStationCT can be cleaned with a moist tissue using diluted and residue-free household cleaners or detergents. The front panel is made of glass and therefore it is absolutely waterproof. The front panel is suitable for a simple and effective wipe disinfection. Consider the following notes: Rear casing and desktop mount The rear casing is made of a user-friendly plastic, but there are small openings (for cable entry, microphone, loudspeakers ...) through which water can in‐ gress. This must not happen! The desktop mount is made from plexiglass. Front panel Before you can clean the front panel you have to put the buttons out of opera‐ tion to prevent faulty activations. l Put the buttons out of operation by pressing the Clean function key. ¢ For at least 10 seconds (adjustable) the buttons are out of operation. l Wipe the front panel. ¢ The buttons will automatically return to operation. 23 All the reassurance you need Tunstall GmbH, Orkotten 66, D-48291 Telgte, Germany, Telephone: +49 25 04 / 7 01-0 Fax: +49 25204 / 7 01-499, www.tunstall.de, e‐mail: [email protected] 00 8801 xx, 06/10 (Rev. 1.0)