1
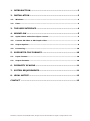
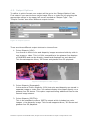
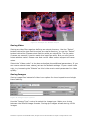
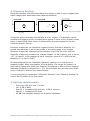
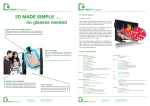
25.10.2013
DECS
MEDIA
GMBH
OCU.DFS 1.0.1 USER GUIDE
User Guide for OCU Depth from Stereo | Ingo Schiller
1. INTRODUCTION ........................................................................ 3
2. INSTALLATION ......................................................................... 3
2.1.
Windows ................................................................................................... 3
2.2.
Linux ......................................................................................................... 3
3. THE USER INTERFACE ............................................................... 4
4. WORKFLOW .............................................................................. 5
4.1.
Open Videos and select clip to convert ...................................................... 5
4.2.
Convert 3D video to 3D+Depth video ........................................................ 6
4.3.
Output Options .......................................................................................... 8
4.4.
Processing ............................................................................................... 10
5. SUPPORTED FILE FORMATS .................................................... 10
5.1.
Input formats .......................................................................................... 10
5.2.
Output Formats ....................................................................................... 10
6. DISPARITY SCALING .............................................................. 11
7. SYSTEM REQUIREMENTS ......................................................... 11
8. LEGAL NOTICE ........................................................................ 12
CONTACT ..................................................................................... 12
OCU.DFS is a product of DeCS Media GmbH, all rights reserved. All information is subject to change without notice.
1. Introduction
OCU.DFS (Depth from Stereo) is a software for the automatic conversion of
Stereo 3D footage into a 3D+Depth format which is suitable for glasses-free
multi-view 3D playback. Its intended usage is to convert 3D movies to multi-view
3D movies for glasses-free 3D playback on glasses-free displays but the
computed depth information is also helpful for various other applications such as
color grading or focus adjustments. It reads in the most common 3D formats and
video codecs and offers several output options and 3D+Depth formats such as
WOW (LDV) and 3DZTile.
2. Installation
2.1. Windows
-
-
Download OCU.DFS from the product page (www.decsmedia.de).
Launch OCU.DFS setup. Double-click on DeCSMedia-OCU.DFS.x.x.x-x64.exe.
OCU.DFS setup window will appear. Read the recommendations and
warnings. Click “Next”.
The license agreement will appear. Read the agreement and if you accept the
terms click “I Agree”.
Select the option “Do not add OCU.DFS to the system PATH”. Choose whether
to create a desktop symbol. Click “Next”.
Select the installation folder for the application. Click “Next”.
Select the start menu shortcut. Click “Install”.
When setup is finished, and all the necessary files are installed on your
computer, OCU.DFS has been successfully installed dialog will appear, and the
program is ready to be run. You do not need to reboot your computer.
2.2. Linux
OCU.DFS is available for Debian linux as a Debian package. To install the
package follow these steps:
-
Download OCU.DFS from the product's page (www.decsmedia.de) or its
mirrors.
Reach superuser rights by typing “su” + ENTER in a console. Switch to the
directory where you downloaded the installation package to.
Install the package by typing
“dpkg –i DeCSMedia-OCU.DFS.x.x.x_x64.deb” + ENTER.
Loose superuser rights by typing “exit” + ENTER.
The installation is done and you can start the program from the start menu or
by typing OCU.DFS in the console.
To install OCU.DFS on other distributions you can use package conversion tools
such as “alien” to convert the debian package to a rpm package for example.
OCU.DFS is a product of DeCS Media GmbH, all rights reserved. All information is subject to change without notice.
3. The User Interface
The user interface, shown in figure 1, consists of a picture area used to display
input pictures and the conversion result and the tool area used to set options
and to control the conversion process.
Figure 1: User Interface
The tool area has three tabs which group the options in logical blocks. The first
tab is used to select input videos or images. The second tab allows to make
options for depth computation and filtering and the third tab is used to set the
output parameters for video or image saving.
OCU.DFS is a product of DeCS Media GmbH, all rights reserved. All information is subject to change without notice.
4. Workflow
The workflow of OCU.DFS consists of three basic steps.
1. Select your input footage you wish to convert
2. Set your parameters for depth computation and output
3. Process the video
4.1. Open Videos and select clip to convert
To open a video you wish to convert select the “Input Options” tab in the Tool
Area. Select the 3D picture format of your source footage by clicking on the
“Input Format” box and select the appropriate entry.
Figure 2: Selecting the input format
Here you also have the option to select “Separate Videos” which allows selecting
two separate video files for entry. Note that these videos need to be
synchronized (See figure 3).
Figure 3: Separate input videos
OCU.DFS is a product of DeCS Media GmbH, all rights reserved. All information is subject to change without notice.
If the pictures are interchanged in your source material, e.g. the picture from the
right camera is on the left in your side-by-side movie check the “Switch leftright” checkbox next to the Input Format box. This will swap the images before
computation.
To open a video file click on the “Select” button and select the file with the
shown file browser. Do this also for the second video in case you are using
separate input videos.
Select the start and the end point if you wish to convert only a part of the video.
You may alter the position in the video by typing in a number, by using the up
and down arrow buttons, or by using the up and down and page-up and pagedown keys on your keyboard. Note that the position in the video is displayed as
timecode values which follow the format hh:mm:ss.ff with hh=hours,
mm=minuts, ss=seconds and ff=image number. Changing the start or end
position is supported by a video preview in the picture area.
You also have the option to use images as input. This is useful if you are working
with raw footage such as dpx or other images. All major formats of images are
supported, please see chapter 5 for a list of supported formats.
To use images as input they have to be in a list file in which every image is
listed. Creating list files is easy; every image has to be in a new line. To create a
list file in the software use the “Create Imagelist” menu entry in the “File” menu.
You will be prompted with two file dialogs, the first lets you select the files which
shall be in the list, the second dialog asks for a place and name to store the file.
After clicking the select button on the “Input Options” tab, select “Image Lists” in
the lower right corner and all list files will be presented. Note that the entries in
the list files have to be absolute, e.g. in Windows they usually start with your
drive number such as d:\myimages\stereo\image001.png. Please also note that
the files need to have the same dimensions, i.e. width and height have to be
equal for all files.
4.2. Convert 3D video to 3D+Depth video
The second step is to set up the parameters for conversion. This allows
controlling the quality of the conversion process. To set your options go to the
“Disparity Options” tab which is shown in figure 4.
OCU.DFS is a product of DeCS Media GmbH, all rights reserved. All information is subject to change without notice.
Figure 4: Disparity Options
A very important setting on this tab is the “Maximum Disparity” value. The
horizontal offset between the same object in the left and right image is called
horizontal disparity or parallax. Here you may define the maximum value that
you expect is included in your footage. This value is given in pixel. This has great
influence on the values in your results as the resulting values are scaled after
computation using this “Maximum Disparity” value. If you are unsure what to set
just use the default setting which will do for most scenarios. The “Disparity
Scaling” control allows scaling the disparity after computation. This can be used
to strengthen or to weaken the resulting 3D effect. The value is given in percent,
so a setting of 100% leaves the result untouched. For further information on
disparity scaling and output refer to section 6.
The “Disparity Options” tab offers three different filters which can be used to
filter the resulting depth or disparity image.
1. The “Smoothing filter” can be used to smooth the resulting image to get
rid of errors.
2. The “Diffusion Filter” is a border preserving filter which enhances the
resulting depth image at object borders.
3. The “Color Aware Filter” is also a border preserving filter which respects
color borders in the input images while strengthening the object borders in
the depth map.
It is recommended to turn on smoothing and diffusion filters. To enhance the
results you can also try to turn off the diffusion filter and use the color aware
filter instead.
The “Quality” slider offers three predefined quality levels. “Low” is only
recommended for previews as the results will be poor but the computation is
fast. The recommended setting is “Medium” as this produces good results with
good computation times. The “High” setting will further improve the quality of
the results but with significantly higher computation times.
Check the “Advanced Settings” checkbox to alter the predefined values. There
are three parameters you can change. The more “Iterations” you allow the better
the results will be. The number of “Warps” influences the maximum distance on
the image which is taken into account for computation. The higher the more
accurate the result will be. The “Smoothness” also influences the quality,
increase it for better results.
OCU.DFS is a product of DeCS Media GmbH, all rights reserved. All information is subject to change without notice.
4.3. Output Options
To define in which format your output will be go to the “Output Options” tab.
First select if you want to save single image files or a video file by selecting the
appropriate option in the upper left corner marked as “Output Type”. The
“Output Format” box offers different output choices.
Figure 5: Output Options
There are three different output choices to choose from:
1. Color+Disparty (LDV):
Is a format in which color and disparity images are stored side-by-side in
one image or video. This is 100% compatible to the glasses-free displays
of DIMENCO and can be directly viewed and displayed on such devices.
This format supports Mono, 3D Stereo and glasses-free 3D playback.
Figure 6: Example for LDV output
2. Color+Disparty (Separated):
Is the same as Color+Disparity (LDV) but color and disparity are stored in
separate image or video files. You cannot display this output directly on a
glasses-free 3D device. This option requires storing additional files for the
second image stream.
3. Color+Disparty (3DZTile):
This is the standard-conform 3DZTile output which includes two color
images + the disparity image. This format supports Mono, 3D Stereo and
glasses-free 3D playback.
OCU.DFS is a product of DeCS Media GmbH, all rights reserved. All information is subject to change without notice.
Figure 7: Example for 3DZTile output
Saving Video
Saving as video files requires defining an output directory. Use the “Select”
button behind the text field to select an output directory, or use the “Select”
button behind the Filename text field to select an output file. The fps value
(frames per second) is set to match the input fps value. But you are free to
select another value. Please note that not all video codecs support all framerates.
Select the “Video codec” in the box and adjust the additional parameters. If you
are unsure about those values just use the default settings. If your result looks
ugly, try increasing the “Bitrate” as this is the most crucial parameter for video
quality.
Saving Images
Saving image files instead of video is an option for close inspection and single
frame editing.
Figure 8: Image output options
Use the “Image Type” control to select the image type. Make your choice
between the offered image formats. Saving dpx images allows storing 12 Bit
images.
OCU.DFS is a product of DeCS Media GmbH, all rights reserved. All information is subject to change without notice.
The selection of the output directory is as described for the video output. The
naming of the image files will use the given “Image Prefixes” and add a five digit
increasing number followed by the selected image postfix. In the example above
the image files will be stored in c:\tmp\dfs\movieXXXXX.png and
c:\tmp\dfs\movie-dispXXXXX.png, with XXXXX an increasing number.
4.4. Processing
After all the parameters have been defined click on the “Process”-button in the
lower left corner. The processing will start and a preview of the processing result
is shown in the picture area. You can stop the processing by clicking on the
“Process”-button again which now shows “Stop”. You can click “Stop” at any
time, already processed frames are stored and videos are finalized after pressing
“Stop”.
5. Supported file formats
5.1. Input formats
Image Formats: Jpg, png, bmp, pnm, dpx and various other formats.
Video formats: Mpeg1, mpeg2, mpeg4, DIVX, XVID, H264, avi, mov, mts.
5.2. Output Formats
Image Formats: PNG, JPEG, DPX, TIFF
Video formats: H264, MSMPEG4, MSMPEG4V2 (Linux also supports MPEG1,
MPEG2 and FFV1)
OCU.DFS is a product of DeCS Media GmbH, all rights reserved. All information is subject to change without notice.
6. Disparity Scaling
Disparity describes the horizontal offset of an object in two or more images when
these images have been taken from different positions.
d
Left image
Right image with positive disparity
d
Right image with negative disparity
The figure above illustrates the disparity d of an “object”. The disparity can be
positive and negative which corresponds to objects in front of the (virtual) screen
plane or behind this plane which is influenced by the convergence of the two
cameras used for filming.
Normally images can not represent negative values; therefor a disparity of 0
(called zero-parallax) is set to the middle of the value range of the images.
Normally images can represent values between 0 and 254 per color channel.
Disparity images are normally one channel images. So the disparity of 0 is set to
127. (In case of 12 Bit images the value range per channel is 0-4095 and the
disparity of 0 is set to 2048.)
As mentioned earlier the “Maximum Disparity” setting is a crucial point for
disparity output. After computation of the disparity, the values are scaled in a
way that all values with Maximum Disparity correspond to 254 and with negative
Maximum Disparity correspond to 0. (For 12 bit images they correspond to 4095
and 0.) Values in between are scaled linearly.
You can use the two parameters “Maximum Disparity” and “Disparity Scaling” to
control the 3D effect of the final result.
7. System requirements
-
Dual Core CPU with min. 2.0 GHz
Min. 4 GB of RAM
OpenCL 1.1 capable GPU with min. 1 GB of memory
OpenCL 1.1 capable GPU driver
20 MB free harddisk capacity for program installation
OCU.DFS is a product of DeCS Media GmbH, all rights reserved. All information is subject to change without notice.
8. Legal Notice
© 2013 DeCS Media GmbH. All rights reserved.
No part of this document may be reproduced, whatever the form of exploitation,
without the prior permission of DeCS Media GmbH. Remember that the contents
of this document are protected by intellectual property laws.
The contents of this document are for informational purposes only, are subject to
change without notice and should not be construed as a commitment by DeCS
Media GmbH. DeCS Media GmbH assumes no responsibility for any errors or
inaccuracies that may appear in this document.
Remember that the images that appear in this document may be protected under
existing intellectual property laws. The unauthorized incorporation of such
material into a new work may constitute a violation of the intellectual property
rights of the owner. Be sure to obtain the necessary permits from the copyright
owner.
DeCS Media GmbH registered in the Handelsregister Kiel Nr. 14376 KI
Contact
In case of questions or problems or for feature requests please contact
[email protected].
DeCS Media GmbH
Schauenburger Str. 116
24118 Kiel / GERMANY
OCU.DFS is a product of DeCS Media GmbH, all rights reserved. All information is subject to change without notice.