1
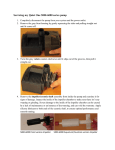
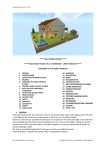
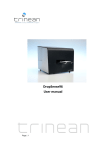
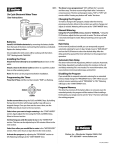
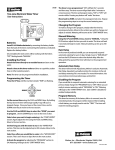
USER GUIDE
saving fish from
all seneye monitor
Temperature in °C & °F
Water Level
NH3 Free Ammonia *
pH *
Light Level %
actual size
roken Heaters & Chillers
B
Filter Crashes
New Tank Syndrome
Sudden pH Changes
Tank or Pond Leaks
Failing or Incorrect Lights
1500 rea
d
for each ings
of
5 param the
te
every m rs
onth
REEF ADDS
Light Spectrum Analyzer
PAR, LUX & Kelvin Light Levels
Also Ideal For Planted Tanks
*requires seneye+ slide
aquatic alert system
your seneye
Seneye+ slide pack
Suction cup
Reading indicator
Power on
indicator
Temperature alert
Drip protector
Free ammonia alert
pH alert
2 .5m marine quality
USB cable
Replace slide alert
Light Sensor
Seneye+ slide
back
le
b
a
v
o
m
Re
Product ID label
(do not remove)
what you need
To start using your seneye device you will need:
PC with a wired or wireless network and TCP/IP protocol,
Windows XP, Vista 32-/64-bit, Windows 7 32-/64bit, & Windows 8 32-/64bit.
Full speed USB 1.0 port
Minimum 1Ghz processor and 128mb RAM
Internet browser: Internet Explorer 8.0+, Firefox 4.0+, Safari 4.0+ & Chrome.
Internet connection (for setup and online use)
2
what’s included with your seneye
seneye device
seneye+ slide ph and NH3 (1 month)
suction cup
float (seneye Pond only)
seneye connect application (SCA) on free download
seneye.me online dashboard
m.seneye.me mobile website
free seneye apps for Windows, Android and iPhone
alerts via email
alerts via SMS with an active seneye slide
connecting seneye
The seneye device can be used in the following ways. Online will give you constant
uploads to seneye.me with alerts. Offline will allow the device to work as a data
logger and upload readings when the device is next connected to a PC using SCA.
PC online
Connect your seneye directly to the PC. If your computer or laptop isn’t close enough you can extend
the cable length by 2.5m using the seneye USB extension. For those who require even more range, the
seneye active USB extension cable allows the cable length of the seneye device to be increased by an
additional 15m. The seneye device can also be connected to a wireless USB bridge giving increased
flexibility over Wi-Fi. You will however still need a PC running the SCA.
Seneye Web Server (SWS) online - Coming soon
The SWS removes the need for any PC in the house and will connect your seneye to your internet
router. It will then send results directly to the seneye cloud website. Visit seneye.com/coming-soon for
more information. With the SWS you can use a seneye device and an apple computer.
Power Adaptor offline
After initial set up, your seneye can be connected to a seneye USB power adapter. This option is great
if you don’t wish to have your seneye device constantly connected to a PC. When powered by the USB
Power Adaptor, readings are stored on the internal memory ever hour. Warning lights are displayed on
the on the seneye device if the water parameters are bad. You will not receive alerts via SMS or Email.
3
Contents
Page 5. Quick start guide
Page 6. Soaking your seneye slide
Page 7. Registering online and using the seneye connect application
Page 8. Syncing your seneye device
Page 9. Registering your seneye slide
Page 10. Installing your seneye slide
Page 11. Placing your seneye device
Page 12. Aquarium use
Page 13. Pond use
Page 14. Seneye Connect Application SCA
Page 15. Viewing your current readings
Page 16. Replace Slide
Page 17. Salt water use
Page 18. Seneye reef light meter
Page 19. Server connection
Page 20. Settings
Page 21. Seneye.me
Page 22. Help and seneye answers
Page 23. Accessoires
Page 24. Environmental and Safty
4
Quick start up steps
The following instructions are for the seneye home, pond and reef.
Step 1. Soak your seneye+ ph & NH3 slide
Step 2. Register an account - www.seneye.me
Step 3. Download the seneye connect application - www.seneye.com/download
Step 4. Plug your seneye device into a USB port and name the seneye
Step 5. E
nter your seneye+ slide number on the software
Step 6. Install the slide
Step 7. Placing your seneye device in the aquarium
If you see a camera icon on a page click it to link to an online video.
If you need any help on any subject then try typing it in the search box at:
http://answers.seneye.com
Or feel free to contact us at [email protected]
5
STEP 1. Soak your seneye slide
keep this code safe to
activate your slide
seneye+
slide soaker
Or
ot
n
o
d
e
mag ye+ pads
a
d
d
i
o
to av h the sene
touc
Your slide is delivered dry. Soak in your aquarium/pond for a minimum of 24 hours
(48 hours for marine) before use.
if you do not soak your slide
the pH will read low
If you do not have a slide soaker they are available from the seneye store.
Alternatively the slide can be soaked in a cup of aquarium water.
6
step 2: register online
1. Visit the www.seneye.me/register website
2. Click the ‘sign up’ button and use your preferred email address to receive alerts
3. Enter the details of the aquarium that you are going to place the seneye device
in
4. After completing the information click the submit button. Your account has
been created ready for use
5. We will send you a welcome email
step 3: seneye connect application (SCA)
1. After completing the registration you will be presented with the option to
download the SCA
2. C
lick the download button and save the file to your computer
3. After the download has completed double click the downloaded file
4. Follow on the on screen instructions to install the software
Tip: You may need to disable your virus checker to allow the download and install.
Make sure you add give ‘c:/seneye’ and ‘seneye.exe’ an exception.
More advice can be seen here: answers.seneye.com
7
step 4: sync device
Once installed, your SCA can be opened using the icon on your desktop or in the
start menu.
1. Double click the seneye icon to start
2. S
elect your chosen language.
3. Enter your e-mail address when prompted; use the same
email address that you registered with on seneye.me.
4. Connect the USB lead from the seneye device to your Windows
computer.
5. After a short while the SCA will prompt you to enter the
name your seneye device. (for example: John’s seneye)
WAIT! Your seneye will be configuring in the background. Please leave connected
to your PC (and running) for 1 hour to ensure the internal clock has been powered
fully and syncing has completed. Once fully synced the SCA will show all the device
info.
8
step 5: register your slide
Each seneye slide has a unique activation code which you must register to your
seneye device. This allows us to ensure your device uses the correct ,maths for
the slide type and batch.
Locally
1. Make sure the seneye connect has been running for 1 hour with the seneye
device connected
2. Click on the ‘Replace Slide’ tab
3. Click the ‘Activate Slide’ button and enter the 11 digit activation code from the
front of your seneye slide packaging.
Online
Register the unique serial number online in your seneye.me page.
Use the ‘replace slide’ widget on the second tab on your seneye.me account.
9
step 6: installing the slide
1. Remove the black plastic back cover from the seneye device
2. Take your pre-soaked slide and insert it into the device, taking care to hold
it on the sides so the sensor areas are not touched. Ensure no air is trapped
between the slide and device. This process is best carried out with the device
under water.
back cover
If you have not soaked your slide its pH will read low while it wets up.
3. Replace the back cover on the seneye device
To ensure continuous and accurate readings for pH and ammonia, you
should simply replace your seneye slide each month.
10
step 7: placing your seneye device
Ensure that the drip protector is located on the end closest to your USB
connector. The drip protector should be located at the lowest point on the cable.
.
Drip protector
Your seneye device is designed to remain submerged. The seneye slide should not
be allowed to dry out after intial soaking as this may give inaccurate readings.
If your seneye slide does become damaged, please replace with a new one or
contact [email protected] for more information.
11
aquarium use
In an aquarium your seneye device should be attached using the supplied suction
cup. Position the seneye device close to the filter or in an area of high flow to ensure
sufficient water flow through the device.
If the device is mounted to the back of the aquarium with the white face looking in, it could
read out of water. Make sure the back of the device looks into the aquarium.
http://
answers.seneye.
If you are using the light meter, then
we recommend
that you attach the seneye device to
the front of your aquarium. If you wish to take more precise light meter readings, you can
use the optional seneye float so that the light meter is suspended just below the water
level pointing directly towards your aquarium lighting.
seneye
float
find out
more
seneye a
nswers
http://answers.seneye. com
12
pond use
You can place your seneye device inside your pond filter or float it on the surface of your
pond. If you are using your seneye device in the filter, then we would recommend that you
position it so if you have a leak the seneye device will not remain submerged. If your seneye
device is connected to an internet enabled PC, you can choose to receive an alert if this
happens.
filter box
You can leave the seneye device floating in your pond. However if you would like to know if
your pond has a leak, we suggest you teather the cable to the side of the pond so if the
water level does drop the device is held out of water.
attachere
me h
Make sure no air is not trapped under the device otherwise it will indicate that it’s out of
water. For this reason we recommend a postion with good flow but little aeration
13
seneye connect application (SCA) overview
If your SCA is not running please launch it now.
When the seneye device is connected to your computer and the SCA is launched, any stored
readings will be automatically uploaded. During this process egg timers may be shown,and
live readings will not show until this process has finished. Do not unplug the device.
If you wish to use the device offline, please disconnect the device only when the SCA has
finished uploading readings. Graphs for these readings will be produced once they have
been received and analysed. Depending on the number of uploads this process can take a
few minutes.
The following pages will explain a little about how to use the seneye connect application.
More detailed information visit answers.seneye.com
If mutiple devices are run from the same SCA, the instructions below will apply to the
selected device shown in bold green.
14
current readings
Once the SCA is running you will see that that ‘Current Readings’ page is displayed.
Your ammonia (NH3), pH, and temperature are displayed in the boxes. If one of these
parameters is outside of your warning levels then the box will turn red alerting you.
The box on the right shows if the seneye device is submerged or disconnected
from the computer.
The seneye device takes reading every 30 minutes when connected to a PC.
The information at the bottom of the page shows when the last reading was
completed. This reading will be sent when the seneye server can be reached.
You can edit the alert levels for your seneye on your www.seneye.me account.
find out
more
seneye a
nswers
http://answers.seneye. com
15
replace slide
When your slide is due for replacement, you will receive an email and the “replace
slide” light will start to flash. To replace your slide simply follow these steps:
1. Soak your slide as explained in step 1 (page 6)
2. Activate your slide as explianed in step 5 (page 9)
3. Install your slide as explained in step 6 (page 10)
The SCA shows how many days are remaining on your slide in the box on the left.
ils
a
t
e
d
slide
To view a ‘how to’ demo click the camera incon shown on this page.
16
seneye saltwater use
All seneye devices can be used in both freshwater and saltwater. However if
you are using your seneye device in saltwater, then we recommend that you tick
the marine check box, which is found on the SCA, by clicking the padlock icon.
Once selected, it will use a different set of maths for the pH calculation
in saltwater. Remember to relock the padlock icon to save the change.
With the padlock icon slected open you will also notice there are a few other
features. Click on the following blue text and you will also find out about these
advanced features here such as trim and the ability to turn off alert lights.
17
seneye reef light meter
The seneye light meter is designed to be used submerged, giving PAR, LUX,
spectra and Kelvin readings. To view light readings click on the tab marked
‘light meter’.
As the light meter has specially designed optics for underwater use, if used out
of water the results may not be correct.
Hold the seneye device white face downwards and move the device underwater
to view the different levels of light inside your aquarium. You may find that the
light is stronger in some areas of the aquarium and lower in others. You can use
this information to select your coral placements.
The light meter has been designed for directional use; it cuts out stray ambient
light so the readings are mainly from your aquarium lighting.
PAR charts for plants and coral can be found at answers.seneye.com
find out
more
seneye a
nswers
http://answers.seneye. com
18
seneye server connection
The SCA will show if it is able to make a connection to the seneye server and
upload your readings.
iconStatus
not connected
connection icon
connected
If the seneye software fails to make a connection the readings will be stored
locally and automatically uploaded when a connection is made. Each seneye device
can store 30 days worth of readings. Offline readings are logged internally every
hour on the hour.
You should check your internet connection if the icon shows that it is unable to
connect to the seneye server.
TIP: If you are never able to connect to the seneye server but you can browse
the internet please check to ensure your anti-virus software is not blocking the
SCA. Please consult the makers of your anti-virus software for information on
how to unblock programs.
find out
more
seneye a
nswers
http://answers.seneye. com
19
settings
The ‘settings’ panel in the SCA shows the current settings, including the minimum
and maximum ranges of water parameters which are suitable for your aquarium.
By visiting your seneye.me dashboard you can alter these ranges.
Any changes made via your seneye.me dashboard will be automatically sent to the
SCA within 30 minutes. However if you prefer to re-sync your settings before
this time you can click the ‘resync’ button.
20
seneye.me
The data received from your seneye device will be automatically uploaded by the
SCA.
Data from your seneye device will be uploaded very 30 minutes when connected
to your PC. These readings will be automatically graphed so you can easily see
how your aquarium / pond is performing.
If there is a problem we will automatically send you an email and text message.
From your seneye dashbaord you can also search answers.seneye.com to get
advice on what action your should take to improve the water quality for your fish.
The seneye website uses the latest in HTML5 web technology to offer the most
rich experience. We therefore recommend that you use the latest version of
your choosen internet browser.
21
help and seneye answers
Got a problem with your seneye or just want to find out more about fish keeping?
Then try searching seneye answers. We are adding more content routinely.
Visit answers.seneye.com
Or email technical Support on:
[email protected]
Please ensure you use or give us your seneye.me email address as used to register.
If you have a specific issue with the SCA or browser, please include a screen shot
when possible.
Help is also available direct from your seneye account via the information widget.
type your re
e
question h
22
accessory
USB adaptor
Compatibility
seneye Home, seneye Pond, seneye Reef, compatible with other
USB devices
What’s in the Box?
seneye USB Power Adapter
Product Description
Use the seneye device without a PC. This convenient USB Adaptor
powers the seneye device allowing it too internally store readings
every hour. Any readings stored on the seneye device are
automatically uploaded to the customers personal seneye.me
website whenever it is reconnected to a PC which has the seneye
connect application installed.
USB extension 2.5m
Compatibility
seneye Home, seneye Pond, seneye Reef, compatible with other
USB devices
What’s in the Box?
2.5m black USB extension cable
Product Description
This seneye USB extension cable allows the cable length of the
seneye device to be increased by an additional 2.5m, totalling 5m
Seneye+ slide soaker
Float
Compatibility
seneye Home, seneye Pond, seneye Reef
What’s in the Box?
seneye Float
Product Description
This convenient Float is designed for use in pond, aquariums and sumps. The
product can allow for easy floating of the seneye device in a pond. When the
seneye device is placed in the Float with the light sensor facing upwards
constant direct light measurements can be taken.
USB active extender 15m
Compatibility
seneye Home, seneye Pond, seneye Reef
What’s in the Box?
15m Extension cable, Outer weatherproof cover, Electronic Active Relay
Product Description
This seneye USB extension cable allows the cable length of the seneye
device to be increased by an additional 15m, totalling 17.5m. The outer
weatherproof protective cover ensures that the connections remain dry
and can remain outside.
Seneye+ Slides
Compatibility
seneye Home, seneye Pond, seneye Reef
Compatibility
seneye Home, seneye Pond, seneye Reef
What’s in the Box?
seneye+ slide soaker
What’s in the Box?
3x seneye+ slides
Product Description
The slide soaker makes wetting your new seneye + slide even easier
and quicker. It’s simple to use just place a new seneye slide into the
soaker and clip it up. Fix the suction cup and stick it the inside of
your tank just below the water level. For ponds you can just float it
on the surface or in a filter box. There is also an eyelet if you wish
to put a leash on it. Having your new slide in the aquarium water will
help it wet faster and more accurately.
Product Description
The seneye+ includes the disposable seneye slide, e-mail alerts, automatic
online graphing, and personalised advice. Activating your seneye+ is really
easy and the disposable slide removes the need for recalibration (and the
cost of recalibration fluids/buffers etc) and better still it improves accuracy.
23
seneye and the environment
seneye is committed to reducing its impact on the environment by producing high quality and
robust products that last for many years.
PACKAGING
When disposing of this product’s packaging, please ensure that it’s recycled.
SENEYE DEVICE RECYCLING
Do not dispose of your seneye product with your domestic rubbish at the end of its useful life.
The seneye device contains a battery which must be disposed of in the correct manner. This
product contains materials which, when processed correctly, can be recovered and recycled.
You can take this product to your local recycling centre. Your local municipal authority can
advise you of the collection facilities available for electronic waste products in your area.
Alternatively you may return your seneye device to seneye ltd for safe disposal.
safety
WARNINGS AND CONDITIONS
Do not attempt to repair your seneye device. Please contact [email protected]
Make sure that all electrical connections are properly made.
Do not connect your seneye device to the USB Power Adaptor accessory (optional) until you have
properly connected any other leads.
Your seneye device is intended for underwater use. Do not leave your seneye device connected to
a power supply and left for long periods out of water. Doing so may result in damage to the slide.
o not place your seneye device on, or directly next to, your aquarium heater. This placement will
D
give incorrect readings and may cause damage.
The maximum water temperature should not exceed 50oC.
Ensure that the drip protector is located at the lowest point on the cable.
If the USB connector becomes wet do not insert into your PC USB port until completely dry.
Do not look directly as the sensor readers underneath the back cover. LED’s are very bright.
24