1
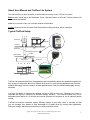
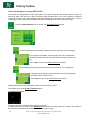
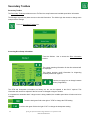
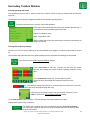
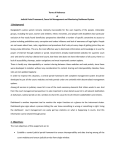
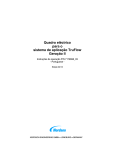
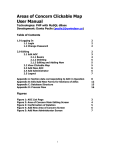
TruFlow Lite
Single Kitchen
User Manual
___________________________
Spring Air Systems Inc., Oakville, Ontario
Phone (866) 874-4505, Fax (905) 338-0179, [email protected]
www.springairsystems.com
September 2014
TABLE OF CONTENTS
Title
Page
Manual Overview and Components
…………………..………...1-2
Log In / Log Out ……………………………………………………..3
Dashboard Window
………………………………………………..4
Kitchen Setup...……………………………………………………….5
Operation Status Window ……………………….………………..6-7
Acknowledging and Clearing Messages…………………………….……6
Thermal Start, example messages …………………………………..…. 7
Primary Toolbox Window………………………………………….8-12
Changing the Time………………………………………………………….8
Changing the Time to Dashboard…………………………………………8
Changing the Maintenance Tracking Reminder ……………………… . 9
Changing Language to French…………………………………………….9
Energy Reduction Goal Setup………………….………………………..10
Automatic Start/Stop Setup………………………………………………11
Water Wash Timer Setup
……………………………………………..12
Secondary Toolbox Window ..………………………………………13-14
Accessing Drive Setup Information……………………………………..13
Viewing Operating mA Values………………………………………......14
Viewing VFD Frequency Settings ……………………………………...14
About User Manual and TruFlow Lite System
This manual will cover basic operation as well as advanced setup of your TruFlow Lite system.
Main windows, which include the Dashboard, Power, Operation Status, and Primary Toolbox windows, will
be underlined and bolded.
Icons to be touched to take you to another window will be bolded.
Auxiliary windows, like the Automatic Start/Stop Schedule setting windows, will be underlined.
Typical TruFlow Setup:
Makeup Air Unit
Exhaust Fan
FRESH AIR
Roof Deck
Exhaust Duct
Variable Frequency Drive
J-COUPLE
Finished Ceiling
Exhaust Hood
Touchscreen
Finished Floor
Appliance Lineup
TruFlow Lite measures heat from the appliances and automatically adjusts fan speeds throughout the
day, giving you the precise amount of exhaust at all times. As more cooking appliances are used the
exhaust and supply volume increase; as fewer appliances are used, the exhaust and supply volume
decrease.
You have the ability to increase the exhaust volume to 100% at any time. Because you control it,
overrides are kept to a minimum to maximize energy efficiency. The override system runs for an
adjustable timed period of 15 minutes and can be activated on the panel or via as optional remote
control.
TruFlow Lite monitors ventilation system efficiency relative to your utility costs, in real-time, so that
you can manage your kitchen to take advantage of off peak times by turning down appliances.
Setting an energy reduction goal reduces your utility costs even more!
Spring Air Systems TruFlow Lite User Manual September 2014
“SEE YOUR SAVINGS”
1
Main System Components
This is your TruFlow Lite Touchscreen panel.
The panel can be mounted on a wall or on of the hoods and puts
operation of your kitchen exhaust equipment at your fingertips.
Additionally, the TruFlow can be set up to control up to seven
cooking appliances, seven external lighting zones, and two extra
exhaust hoods connected to motor starters.
J-Couple
TruFlow measures the temperature in each exhaust duct
collar for each hood connected to an exhaust fan that will be
sped up or slowed down using a j-couple.
Variable Frequency Drive (VFD)
Each exhaust fan has its own variable frequency drive. The
TruFlow sends a signal to the drive telling it to slow down or
speed up the fan.
Some makeup air units will also have a VFD.
2
Spring Air Systems TruFlow Single Kitchen User Manual September 2014
“SEE YOUR SAVINGS”
Log In / Log Out
In order to make any changes to the settings on your TruFlow Lite system, you will need to log in.
Touch the Primary Toolbox icon.
Touch the Login icon.
Touch the white field beside Name.
Type your login name using the pop-up
keyboard.
Touch Enter key.
The login window will return.
The login name is case sensitive. The CAPS key is on automatically. If you do not know your login
name and password call Spring Air Systems.
Touch the white field beside Password
Type your password using the pop-up
keyboard.
Touch Enter key.
The login window will return.
The password is also case sensitive.
Touch the UNLOCK icon.
Touch the word Close to close the login box.
You are now logged in.
Logout
TruFlow will automatically log you out after a set amount of time
Touch the Primary Toolbox window icon.
Touch the lock.
Touch the lock again.
You are now logged out.
Spring Air Systems TruFlow Single Kitchen User Manual September 2014
“SEE YOUR SAVINGS”
3
Dashboard Window
The Main Dashboard is the heart of the TruFlow
system. It provides current exhaust operating data and a
visual representation to the kitchen staff whether or not they
are meeting your Energy Reduction Goal.
This is the Dashboard Window for Kitchen1. The Dashboard displays
the Kitchen1 operational parameters. The Kitchen1 name can be
changed through the setup screen with a password.
The exhaust fan volume is 1950CFM.
The Target indicates the kitchen operation is Green and 150% of target. Kitchen1 exceeding the
Energy Savings Goal by 50% and is saving energy!
The canopy lights are off. When the canopy
lights are on the Lights icon is yellow.
Status Bar
This bar is a visual representation of the operating efficiency and updates continuously. When the staff is
meeting or exceeding your Energy Reduction Goal, this graph will be on target (shown above) and the efficiency
icon will show the percentage the Energy Reduction Goal is being exceeded. When the Energy Reduction Goal
is not been achieved, the graph will show a red hunting target (shown left), and the Efficiency icon will show the
percentage of the Energy Reduction Goal that is being reached.
Override
To override the TruFlow, touch the override bar and hold for 3 seconds. Operation will drive
to 100% for a pre-set length of time and the Efficiency icon will be zero out. The override
time is adjustable through the Power window.
Touch to open the Power window
Touch to open the Message screen window
Touch to open the Primary Toolbox window.
This window is accessible only with a password.
The Time can be changed in the Primary Toolbox window with a password.
Multiple Kitchen display:
The DASHBOARD for a multiple kitchen Truflow Lite displays the Kitchen Name
and Status Bar.
When the kitchens are exceeding the set Energy Savings Goals, the Status Bar
will be in the green.
The Status bar for kitchens not meeting the Energy Savings Goal will be red
4
Spring Air Systems TruFlow Single Kitchen User Manual September 2014
“SEE YOUR SAVINGS”
Power Window
The Power Window provides access to all of the exhaust components controlled by the TruFlow. These include
canopy lights, fan on/off, summer/winter and override settings.
Touch the icon for the Power window.
Canopy Lights.
Touch icon to turn on/off lights. When canopy lights are on, icon has a white border.
Summer/Winter.
Touch icon to switch between summer and winter mode.
When in winter mode, makeup air burner will activate as
required to maintain makeup air temperature.
Override Timer
Touch icon to access Override Timer window to adjust the length
of Override time.
Touch the dark green field next
minutes.
to
Type the time, in
using the pop-up
minutes, the Override should run for
keyboard.
Touch OK to return to Power window.
Manual System Operation.
Touch ‘ON’ button to operate exhaust system manually.
When manual operation is engaged, there will be a green line
above. Automatic start/stop times can be setup in the Primary
Toolbox. See page 11 for instructions on how to set.
Multiple Kitchen Display:
5
Spring Air Systems TruFlow Single Kitchen User September 2014
“SEE YOUR SAVINGS”
Operation Message Window
The Operation Message window provides a list of current and previous messages that have been recorded by
the TruFlow. You will need to go to this screen to clear messages. Current messages will show in red on the list;
acknowledged messages will be yellow and cleared messages will be green.
From the Dashboard touch the Message
Status Window button.
Acknowledge All Messages icon
Touch this icon to acknowledge
all active messages.
Acknowledge Message icon
Touch this icon to acknowledge only
the highlighted active message.
Scroll Up one line
Touch this icon to scroll
the page up by one line.
Scroll Down one line
Touch this icon to scroll the page
down by one line.
Scroll Up one page
Touch this icon to scroll
the page up by one page.
Scroll Down one page
Touch this icon to scroll the page
down by one line.
Clear errors on VFD.
Touching this icon to clear the drive errors.
Messages (errors) will also be recorded on the VFD. Some messages also require the VFD to be restarted. For
a list of errors that require the VFD to be restarted prior to touching clear error on drive, see maintenance
manual.
The exception to this is Thermal Start messages and J-Couple Trouble messages. These messages will not be
recorded on the VFD.
Unless directed to do by an authorized service agent, or Spring Air Systems, do not turn off power to the
TruFlow Lite Touchscreen. Turning off the power to the TruFlow Lite Touchscreen will cause all recorded
messages to be deleted.
6
Spring Air Systems TruFlow Single Kitchen User September 2014
“SEE YOUR SAVINGS”
Operation Message Window
Messages
When a message that requires immediate attention or action occurs,
the screen will change to red with a yellow exclamation mark. These
types of messages include certain drive errors where the VFD cannot
reset automatically, and catastrophic equipment failures (exhaust fan or
makeup air unit not running).
Touching the screen anywhere and opens the Operation Status
window. The current message including the date, time, state and
whether the message has been acknowledged. There will also be an
explanation of the cause of the message.
Once the cause of the message has been corrected, it can be acknowledged by touching the Acknowledge
Message icon and then the Clear Error On Drive icon to resume normal operation. .
Current messages will be highlighted in red. Messages that have been acknowledged but not cleared will be
highlighted yellow. Messages that have been both acknowledged and cleared will be highlighted in green.
Thermal Start
The TruFlow Lite will automatically turn on the exhaust and supply fans
when a threshold temperature under the hood is reached.
When this occurs, the window shown left will popup.
Touch ok to exit the thermal start warning window.
Touch the Clear Error on Drive icon.
Be sure to turn the fans on manually, or switch operation to schedule for continual operation. If you do not, the
thermal start will turn the system off after four hours, and this process will begin again.
J-Couple Cable Trouble
J-Couple Cable Trouble errors occur when the J-couple cable has been unplugged. This message will cause the
TruFlow Lite to operate on high (100%) until the cable is plugged back in.
Example Message Popups
Typical message displayed on Operation Status window
MODbus, Comm Port or Comm issue.
7
Typical message displayed on Dashboard after
surface fire suppression activates.
Spring Air Systems TruFlow Single Kitchen User September 2014
“SEE YOUR SAVINGS”
Primary Toolbox
When logged in with the Manager’s permissions, you will be able to adjust the user settings and view drive
information.
When logged in with authorized service technician permissions, you will also be able to adjust user settings and
view drive information. Additionally, you will have access to system setup items.
Updating the Time
Touch the dark green field with the time.
Touch the dark green field next to Hour or Minute
Type the new time using the pop-up
keyboard.
Touch enter to return to Set Date window.
Touch OK to save changes or Cancel to delete and return to the Primary Toolbox window. TruFlow Lite does
not automatically update for daylight savings.
Updating Time to Dashboard
The default window on TruFlow Lite is the Dashboard window. After a set number of seconds of inactivity, the
TruFlow Lite will return to the Dashboard.
To change the length of time before TruFlow Lite returns to the Dashboard, touch the Time to
Dash icon.
In the pop-up window, touch the dark green field to the left of
Seconds.
Type the new time using the pop-up keyboard.
Touch enter to return to Time to Dashbaord
window.
Touch OK to save changes or Cancel to delete and return to the Primary Toolbox window.
8
Spring Air Systems TruFlow Single Kitchen User September 2014
“SEE YOUR SAVINGS”
Primary Toolbox
Maintenance Tracking
TruFlow Lite can provide pop-up reminders for scheduling service of the kitchen exhaust system, depending on
the kitchen usage.
Touch the Cooking Behavior icon. This will open a pop-up window with several selfexplanatory options
Each option of cooking behavior has its own
maintenance schedule. Kitchens serving solid fuel
appliances will have a more frequent maintenance
schedule (thus more frequent pop-up reminders)
than kitchens service low-volume operations.
If no maintenance reminder is required, touch the
“No Inspection” bar.
The selected maintenance level will be colored pink.
The start date of the maintenance reminders can also be updated.
Touch the checkbox below Maintenance Start Date.
Touch the dark green field next to Month, Day or Year.
.
Type the new information in the pop-up keyboard.
Touch enter to return to Set Date window.
Touch OK to save changes or Cancel to delete them.
Changing Language to French:
Touch the dark green box besides French to switch to the French language.
9
Spring Air Systems TruFlow Single Kitchen User September 2014
“SEE YOUR SAVINGS”
Primary Toolbox
Energy Reduction Goal
As its name indicates, the Energy Reduction Goal is the percentage of energy the operator would like to save by
turning down or off unused appliances. Once these appliances are turned off, the temperature in the hood will
drop, allowing TruFlow Lite to slow down the exhaust fan(s) and makeup air.
When the kitchen staff is meeting or exceeding the Energy Reduction Goal, the bar will be green.
If the kitchen staff is not meeting the Energy Reduction Goal, the bar will be red.
The Energy Reduction Goal is initially factory set to 20%, however this number can be adjusted as needed to
encourage staff to be more energy efficient.
Setting up the Energy Reduction Goal and setting guidelines for staff to turn down or off appliances is key to
getting the most savings.
Adjusting the Energy Reduction Goal
Touch the Energy Reduction Goal Setup icon to access the Energy Reduction Goal Setup window.
In the Energy Reduction Goal Setup window, touch the
dark green field beside “Reduction Goal (%).
Type the reduction goal percentage in the pop-up keyboard.
Touch Enter to return to Energy Goal Setup window.
Touch OK to return to the Primary Toolbox window.
10
Spring Air Systems TruFlow Single Kitchen User September 2014
“SEE YOUR SAVINGS”
Primary Toolbox
Automatic Start/Stop Schedule
The automatic schedule is useful when the exhaust system is required to turn on and off at a set time each day.
A different automatic start and stop time can be set for each day of the week. An automatic start/stop time will
need to be set for every day of the week you will not be operating the exhaust system in manual (HAND) mode.
From the Primary Toolbox window, Touch Automatic Schedule icon.
Touch the name icon for the date you
would like to set up.
Touch the AM/PM icon to change.
Touch the number of the time you would like to update,
and using the pop-up keyboard change the number.
If the hood need to stay turned off on a particular day, set the on and off times to the same.
For example, if the kitchen does not operate on Sundays, set Sunday’s opening and closing time to 12:00 a.m.
11
Spring Air Systems TruFlow Single Kitchen User September 2014
“SEE YOUR SAVINGS”
Primary Toolbox
Water Wash Sequence(s) setup (OPTIONAL)
If the hoods are equipped with a water wash system, the length of time after the exhaust system is turned off
before the wash cycle will turn on and how long the wash sequence will run for can be adjusted. A different
setting can be set for up to three different water wash systems as long as they are connected to the TruFlow
control panel. These settings can be adjusted using with the Manager’s or service technician’s login.
Touch the water wash timer icon to access the Water Wash Timer window.
Touch the dark green field beneath the delay time for the sequence you are setting up.
Using the pop-up keyboard, type the length of time (in seconds) after
the exhaust system has been turned off before the wash sequence will
run.
Press enter to return to the Water Wash Timer window.
Press the dark green field under the wash time for the sequence you are setting up.
Using the pop-up keyboard, type the length of time (in seconds) after
the wash sequence should run for.
Press enter to return to the Water Wash Timer window.
Repeat these steps for each water wash system connected to the TruFlow.
Press OK to return to the Primary Toolbox window.
Activating the Wash
The wash cycle will run when the exhaust fan is turned OFF.
A blinking water drop will show on the Dashboard window when the wash sequence is running. The number in
the water drop indicates which number sequence is currently running.
12
Spring Air Systems TruFlow Single Kitchen User September 2014
“SEE YOUR SAVINGS”
Secondary Toolbox
Secondary Toolbox
The Secondary Toolbox provides access to TruFlow Lite setup features and variable speed drive information.
The Manager login will only have access to view this information. The Admin login has access to change some
setup and drive settings.
Touch the Secondary Toolbox icon.
Accessing Drive Setup Information
Touch the Kitchen 1 bar to access the Drive Information
window.
The current operating information for the drive selected will
be displayed.
This display provides useful information for diagnosing
possible problems at a glance.
Use the next page icon to change between
drives (if applicable).
The CFM and horsepower information are factory set, but can be adjusted in the field if required. This
information will need to be adjusted if the fan’s motor is changed to larger or smaller.
It is important to remember that if a larger motor is being installed, the variable speed drive will also need to be
changed.
Touch the dark green field to the right of “CFM” to change the CFM setting.
Touch the dark green field to the right of “HP” to change the horsepower setting.
13
Spring Air Systems TruFlow Single Kitchen User September 2014
“SEE YOUR SAVINGS”
Secondary Toolbox Window
Viewing Operating mA Values
The operating mA values can be viewed at any time, however values will only be present when the fans are
turned on.
These values can be viewed to diagnose possible CAT5 cabling or signal problems.
Touch the mA Values icon to view the current data available.
PXR1 Input is the value being received from the variable speed drives – it
represents the current operating speed of the fans.
Outside Temperature value
Inside Temperature value
Damper Output value is the mA value being received from the makeup air
damper (if present).
Viewing VFD Frequency Settings
Access to the VFD Frequency Settings will only be available when logged in as Admin and the fans are turned
off.
The minimum and maximum frequency (speed) settings can be both viewed and changed in this window.
Touch the icon for the VFD Frequency Settings window.
Touch read speed for Min freq. The field will turn pink for several
seconds, then display the current minimum operating frequency on the
drive.
Touch read speed for Max freq. The field will turn pink for
several seconds, then display the maximum frequency on the
drive.
If it is necessary to change the minimum or maximum frequency of the VFD, Touch the
field to the left of Write Speed under Min. freq.
Using the pop-up keyboard, type in the new minimum frequency. Touch
enter to return to the VFD Frequency Settings window.
Touch write speed for Min. Frequency. The new setting is now saved (written) to the drive.
Repeat these steps for Max. Frequency.
The rotation of the exhaust drive can be changed by touching the Reverse Exhaust
icon. This option should be used as a test only; the exhaust fan must be properly wired
for the correct rotation.
Spring Air Systems TruFlow Single Kitchen User Manual September 2014
“SEE YOUR SAVINGS”
14